
🌟 Hello,我是蒋星熠Jaxonic!
🌈 在浩瀚无垠的技术宇宙中,我是一名执着的星际旅人,用代码绘制探索的轨迹。
🚀 每一个算法都是我点燃的推进器,每一行代码都是我航行的星图。
🔭 每一次性能优化都是我的天文望远镜,每一次架构设计都是我的引力弹弓。
🎻 在数字世界的协奏曲中,我既是作曲家也是首席乐手。让我们携手,在二进制星河中谱写属于极客的壮丽诗篇!
摘要
在这个云原生时代,传统的单体应用已经无法满足快速迭代、高并发、高可用的业务需求,而微服务架构恰恰为我们提供了完美的解决方案。
Spring Boot 3.x作为Spring生态系统的最新力作,不仅延续了其简化开发的核心理念,更在性能、安全性、云原生支持等方面实现了质的飞跃。基于Java 17的长期支持版本,Spring Boot 3.x引入了诸多令人兴奋的新特性 :原生镜像支持、响应式编程增强、可观测性提升、以及更加完善的微服务治理能力。
在我的实际项目经验中,我见证了从单体应用向微服务架构转型的整个过程。那些曾经让开发团队头疼的问题------服务拆分的粒度把控、分布式事务处理、服务间通信的可靠性、配置管理的复杂性------在Spring Boot 3.x的加持下都得到了优雅的解决。特别是Spring Cloud 2022.x版本与Spring Boot 3.x的完美融合,为我们构建生产级微服务系统提供了坚实的技术底座。
本文将从实战角度出发,深入探讨Spring Boot 3.x微服务架构的设计理念、核心组件、最佳实践以及性能优化策略。我将结合真实的业务场景,通过丰富的代码示例和架构图表,为大家呈现一个完整的微服务解决方案。无论你是微服务架构的初学者,还是希望升级现有系统的资深开发者,这篇文章都将为你的技术成长之路点亮明灯。
1. Spring Boot 3.x 核心特性解析
1.1 Java 17 长期支持与性能提升
Spring Boot 3.x要求最低Java 17版本,这一决策为框架带来了显著的性能提升和开发体验改善。
java
// Spring Boot 3.x 应用启动类示例
@SpringBootApplication
@EnableEurekaClient
@EnableCircuitBreaker
public class UserServiceApplication {

    public static void main(String[] args) {
        // 利用Java 17的文本块特性优化配置
        System.setProperty("spring.application.name", """
            user-service
            """.trim());

        SpringApplication.run(UserServiceApplication.class, args);
    }

    // 使用Java 17的记录类简化数据传输对象
    public record UserDTO(
        Long id,
        String username,
        String email,
        LocalDateTime createdAt
    ) {}
}
1.2 原生镜像支持与GraalVM集成
Spring Boot 3.x对GraalVM原生镜像的支持是其最亮眼的特性之一,能够显著减少应用启动时间和内存占用。
java
// 原生镜像优化配置
@Configuration
@RegisterReflectionForBinding({UserEntity.class, OrderEntity.class})
public class NativeImageConfiguration {

    @Bean
    @ConditionalOnProperty(name = "spring.aot.enabled", havingValue = "true")
    public RuntimeHintsRegistrar customRuntimeHints() {
        return hints -> {
            // 为反射访问注册类型提示
            hints.reflection()
                .registerType(UserService.class, MemberCategory.INVOKE_DECLARED_METHODS)
                .registerType(OrderService.class, MemberCategory.INVOKE_DECLARED_CONSTRUCTORS);

            // 为资源访问注册提示
            hints.resources()
                .registerPattern("static/**")
                .registerPattern("templates/**");
        };
    }
}
2. 微服务架构设计原则
2.1 服务拆分策略
微服务的拆分是架构设计的核心,需要遵循单一职责原则和业务边界清晰的原则。
单体应用 业务域分析 用户服务 订单服务 商品服务 支付服务 用户注册 用户认证 用户信息管理 订单创建 订单状态管理 订单查询 商品目录 库存管理 价格管理 支付处理 退款处理 账单管理
图1:微服务拆分策略流程图
2.2 服务间通信模式
java
// 同步通信 - 使用OpenFeign
@FeignClient(name = "order-service", fallback = OrderServiceFallback.class)
public interface OrderServiceClient {

    @GetMapping("/api/orders/{userId}")
    ResponseEntity<List<OrderDTO>> getUserOrders(@PathVariable Long userId);

    @PostMapping("/api/orders")
    ResponseEntity<OrderDTO> createOrder(@RequestBody CreateOrderRequest request);
}

// 异步通信 - 使用Spring Cloud Stream
@Component
public class OrderEventHandler {

    private final Logger logger = LoggerFactory.getLogger(OrderEventHandler.class);

    @EventListener
    @Async("taskExecutor")
    public void handleOrderCreated(OrderCreatedEvent event) {
        logger.info("处理订单创建事件: {}", event.getOrderId());

        // 异步处理订单相关业务逻辑
        processOrderInventory(event);
        sendOrderNotification(event);
        updateUserStatistics(event);
    }

    private void processOrderInventory(OrderCreatedEvent event) {
        // 库存扣减逻辑
        event.getOrderItems().forEach(item -> {
            inventoryService.decreaseStock(item.getProductId(), item.getQuantity());
        });
    }

    private void sendOrderNotification(OrderCreatedEvent event) {
        // 发送订单通知
        NotificationMessage message = NotificationMessage.builder()
            .userId(event.getUserId())
            .type(NotificationType.ORDER_CREATED)
            .content("您的订单已创建成功,订单号:" + event.getOrderId())
            .build();

        notificationService.sendNotification(message);
    }
}
3. 服务注册与发现
3.1 Eureka服务注册中心配置
java
// Eureka Server配置
@SpringBootApplication
@EnableEurekaServer
public class EurekaServerApplication {

    public static void main(String[] args) {
        SpringApplication.run(EurekaServerApplication.class, args);
    }
}
yaml
# Eureka Server配置文件
server:
  port: 8761

eureka:
  instance:
    hostname: localhost
    prefer-ip-address: true
  client:
    register-with-eureka: false
    fetch-registry: false
    service-url:
      defaultZone: http://${eureka.instance.hostname}:${server.port}/eureka/
  server:
    enable-self-preservation: false
    eviction-interval-timer-in-ms: 5000
3.2 服务消费者配置
java
// 服务消费者配置
@RestController
@RequestMapping("/api/users")
public class UserController {

    private final UserService userService;
    private final OrderServiceClient orderServiceClient;

    public UserController(UserService userService, OrderServiceClient orderServiceClient) {
        this.userService = userService;
        this.orderServiceClient = orderServiceClient;
    }

    @GetMapping("/{userId}/orders")
    public ResponseEntity<UserOrdersResponse> getUserWithOrders(@PathVariable Long userId) {
        // 获取用户信息
        UserDTO user = userService.getUserById(userId);

        // 调用订单服务获取用户订单
        List<OrderDTO> orders = orderServiceClient.getUserOrders(userId).getBody();

        UserOrdersResponse response = UserOrdersResponse.builder()
            .user(user)
            .orders(orders)
            .totalOrders(orders.size())
            .build();

        return ResponseEntity.ok(response);
    }
}
4. 配置管理与服务治理
4.1 Spring Cloud Config配置中心
Config Client Config Server Git Repository Application 配置获取流程 1. 请求配置信息 2. 从Git仓库拉取配置 3. 返回配置文件 4. 返回配置信息 5. 应用配置启动服务 配置刷新流程 6. 配置变更通知 7. 刷新应用配置 8. 确认配置更新 Config Client Config Server Git Repository Application
图2:Spring Cloud Config配置管理时序图
java
// Config Server配置
@SpringBootApplication
@EnableConfigServer
public class ConfigServerApplication {

    public static void main(String[] args) {
        SpringApplication.run(ConfigServerApplication.class, args);
    }
}
yaml
# Config Server配置
server:
  port: 8888

spring:
  cloud:
    config:
      server:
        git:
          uri: https://github.com/your-org/config-repo
          search-paths: '{application}'
          default-label: main
          clone-on-start: true
        health:
          repositories:
            config-repo:
              label: main
              name: config-repo
              profiles: default
4.2 动态配置刷新
java
// 支持配置刷新的服务类
@Component
@RefreshScope
@ConfigurationProperties(prefix = "business")
public class BusinessProperties {

    private String apiUrl;
    private Integer timeout;
    private Boolean enableCache;
    private Map<String, String> features = new HashMap<>();

    // 配置变更监听
    @EventListener
    public void handleRefreshEvent(RefreshRemoteApplicationEvent event) {
        log.info("配置刷新事件: {}", event.getDestinationService());
        // 执行配置刷新后的业务逻辑
        refreshBusinessLogic();
    }

    private void refreshBusinessLogic() {
        // 重新初始化缓存
        if (enableCache) {
            cacheManager.clear();
        }

        // 更新API客户端配置
        apiClient.updateConfiguration(apiUrl, timeout);

        // 重新加载特性开关
        featureToggleService.reloadFeatures(features);
    }

    // Getters and Setters
    public String getApiUrl() { return apiUrl; }
    public void setApiUrl(String apiUrl) { this.apiUrl = apiUrl; }

    public Integer getTimeout() { return timeout; }
    public void setTimeout(Integer timeout) { this.timeout = timeout; }

    public Boolean getEnableCache() { return enableCache; }
    public void setEnableCache(Boolean enableCache) { this.enableCache = enableCache; }

    public Map<String, String> getFeatures() { return features; }
    public void setFeatures(Map<String, String> features) { this.features = features; }
}
5. 服务容错与熔断
5.1 Circuit Breaker模式实现
java
// 使用Resilience4j实现熔断器
@Service
public class OrderService {

    private final OrderRepository orderRepository;
    private final PaymentServiceClient paymentServiceClient;
    private final CircuitBreaker circuitBreaker;

    public OrderService(OrderRepository orderRepository,
                       PaymentServiceClient paymentServiceClient,
                       CircuitBreakerRegistry circuitBreakerRegistry) {
        this.orderRepository = orderRepository;
        this.paymentServiceClient = paymentServiceClient;
        this.circuitBreaker = circuitBreakerRegistry.circuitBreaker("payment-service");
    }

    @CircuitBreaker(name = "payment-service", fallbackMethod = "fallbackCreateOrder")
    @TimeLimiter(name = "payment-service")
    @Retry(name = "payment-service")
    public CompletableFuture<OrderDTO> createOrderAsync(CreateOrderRequest request) {
        return CompletableFuture.supplyAsync(() -> {
            // 创建订单
            Order order = Order.builder()
                .userId(request.getUserId())
                .items(request.getItems())
                .totalAmount(calculateTotalAmount(request.getItems()))
                .status(OrderStatus.PENDING)
                .createdAt(LocalDateTime.now())
                .build();

            Order savedOrder = orderRepository.save(order);

            // 调用支付服务
            PaymentRequest paymentRequest = PaymentRequest.builder()
                .orderId(savedOrder.getId())
                .amount(savedOrder.getTotalAmount())
                .userId(savedOrder.getUserId())
                .build();

            PaymentResponse paymentResponse = paymentServiceClient.processPayment(paymentRequest);

            // 更新订单状态
            if (paymentResponse.isSuccess()) {
                savedOrder.setStatus(OrderStatus.PAID);
                savedOrder.setPaymentId(paymentResponse.getPaymentId());
            } else {
                savedOrder.setStatus(OrderStatus.PAYMENT_FAILED);
            }

            return OrderDTO.from(orderRepository.save(savedOrder));
        });
    }

    // 熔断降级方法
    public CompletableFuture<OrderDTO> fallbackCreateOrder(CreateOrderRequest request, Exception ex) {
        log.warn("支付服务不可用,使用降级策略创建订单: {}", ex.getMessage());

        // 创建待支付订单
        Order order = Order.builder()
            .userId(request.getUserId())
            .items(request.getItems())
            .totalAmount(calculateTotalAmount(request.getItems()))
            .status(OrderStatus.PENDING_PAYMENT)
            .createdAt(LocalDateTime.now())
            .build();

        Order savedOrder = orderRepository.save(order);

        // 发送异步消息,稍后处理支付
        orderEventPublisher.publishOrderCreated(savedOrder);

        return CompletableFuture.completedFuture(OrderDTO.from(savedOrder));
    }
}
5.2 熔断器配置与监控
yaml
# Resilience4j配置
resilience4j:
  circuitbreaker:
    instances:
      payment-service:
        register-health-indicator: true
        sliding-window-size: 10
        minimum-number-of-calls: 5
        permitted-number-of-calls-in-half-open-state: 3
        automatic-transition-from-open-to-half-open-enabled: true
        wait-duration-in-open-state: 5s
        failure-rate-threshold: 50
        event-consumer-buffer-size: 10
        record-exceptions:
          - java.io.IOException
          - java.util.concurrent.TimeoutException
        ignore-exceptions:
          - java.lang.IllegalArgumentException

  retry:
    instances:
      payment-service:
        max-attempts: 3
        wait-duration: 1s
        enable-exponential-backoff: true
        exponential-backoff-multiplier: 2
        retry-exceptions:
          - java.io.IOException
          - java.util.concurrent.TimeoutException

  timelimiter:
    instances:
      payment-service:
        timeout-duration: 3s
        cancel-running-future: true
6. 分布式链路追踪
6.1 Spring Cloud Sleuth集成
java
// 链路追踪配置
@Configuration
public class TracingConfiguration {

    @Bean
    public Sender sender() {
        return OkHttpSender.create("http://zipkin-server:9411/api/v2/spans");
    }

    @Bean
    public AsyncReporter<Span> spanReporter() {
        return AsyncReporter.create(sender());
    }

    @Bean
    public Tracing tracing() {
        return Tracing.newBuilder()
            .localServiceName("user-service")
            .spanReporter(spanReporter())
            .sampler(Sampler.create(1.0f)) // 100%采样率,生产环境建议调低
            .build();
    }

    // 自定义Span标签
    @NewSpan("user-operation")
    @GetMapping("/api/users/{userId}")
    public ResponseEntity<UserDTO> getUser(@PathVariable @SpanTag("userId") Long userId) {
        Span span = tracer.nextSpan().name("get-user-details");

        try (Tracer.SpanInScope ws = tracer.withSpanInScope(span)) {
            span.tag("user.id", String.valueOf(userId));
            span.annotate("开始获取用户信息");

            UserDTO user = userService.getUserById(userId);

            span.tag("user.found", String.valueOf(user != null));
            span.annotate("用户信息获取完成");

            return ResponseEntity.ok(user);
        } finally {
            span.end();
        }
    }
}
7. 微服务架构图

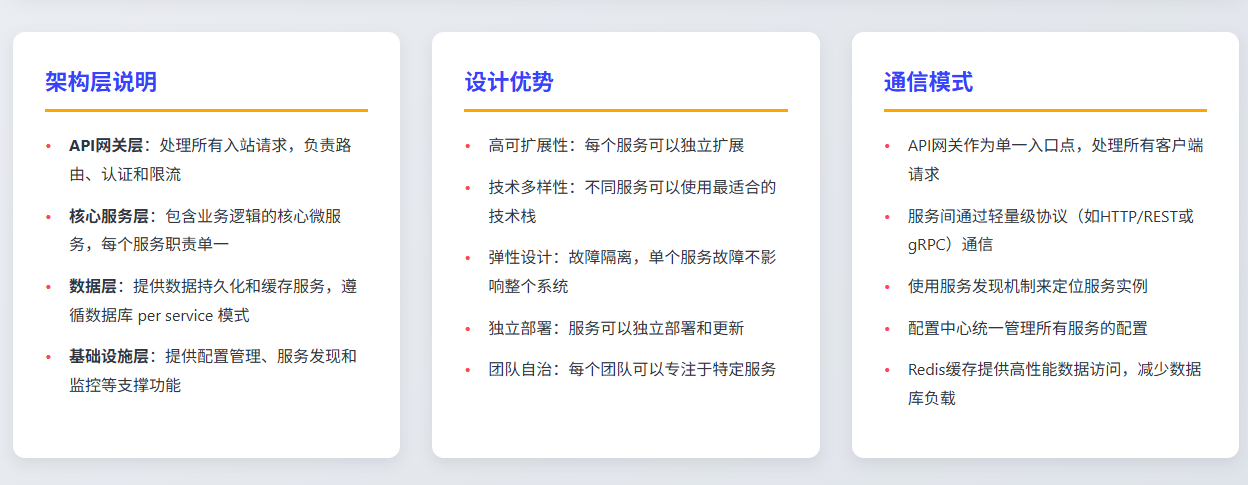
图3:Spring Boot 3.x微服务架构图
8. 性能优化策略
8.1 JVM调优参数
| 参数类别 | 参数名称 | 推荐值 | 说明 |
|---|---|---|---|
| 堆内存 | -Xms | 2g | 初始堆大小 |
| 堆内存 | -Xmx | 4g | 最大堆大小 |
| 垃圾回收 | -XX:+UseG1GC | 启用 | 使用G1垃圾收集器 |
| 垃圾回收 | -XX:MaxGCPauseMillis | 200 | 最大GC暂停时间 |
| 元空间 | -XX:MetaspaceSize | 256m | 元空间初始大小 |
| 元空间 | -XX:MaxMetaspaceSize | 512m | 元空间最大大小 |
| 直接内存 | -XX:MaxDirectMemorySize | 1g | 最大直接内存 |
| JIT编译 | -XX:+TieredCompilation | 启用 | 分层编译 |
8.2 连接池优化配置
java
// HikariCP连接池优化配置
@Configuration
public class DatabaseConfiguration {

    @Bean
    @Primary
    @ConfigurationProperties("spring.datasource.hikari")
    public HikariDataSource dataSource() {
        HikariConfig config = new HikariConfig();

        // 连接池基本配置
        config.setMaximumPoolSize(20);
        config.setMinimumIdle(5);
        config.setConnectionTimeout(30000);
        config.setIdleTimeout(600000);
        config.setMaxLifetime(1800000);

        // 性能优化配置
        config.setLeakDetectionThreshold(60000);
        config.setConnectionTestQuery("SELECT 1");
        config.setValidationTimeout(5000);

        // 连接池监控
        config.setRegisterMbeans(true);
        config.setPoolName("HikariPool-UserService");

        return new HikariDataSource(config);
    }

    // 读写分离配置
    @Bean
    @Qualifier("readOnlyDataSource")
    public DataSource readOnlyDataSource() {
        HikariConfig config = new HikariConfig();
        config.setJdbcUrl("jdbc:mysql://read-replica:3306/userdb");
        config.setUsername("readonly_user");
        config.setPassword("readonly_password");
        config.setMaximumPoolSize(10);
        config.setReadOnly(true);

        return new HikariDataSource(config);
    }
}
9. 监控与可观测性
9.1 Micrometer指标收集
java
// 自定义业务指标
@Component
public class BusinessMetrics {

    private final Counter orderCreatedCounter;
    private final Timer orderProcessingTimer;
    private final Gauge activeUsersGauge;
    private final DistributionSummary orderAmountSummary;

    public BusinessMetrics(MeterRegistry meterRegistry) {
        this.orderCreatedCounter = Counter.builder("orders.created")
            .description("订单创建总数")
            .tag("service", "order-service")
            .register(meterRegistry);

        this.orderProcessingTimer = Timer.builder("orders.processing.time")
            .description("订单处理时间")
            .register(meterRegistry);

        this.activeUsersGauge = Gauge.builder("users.active")
            .description("活跃用户数")
            .register(meterRegistry, this, BusinessMetrics::getActiveUserCount);

        this.orderAmountSummary = DistributionSummary.builder("orders.amount")
            .description("订单金额分布")
            .baseUnit("yuan")
            .register(meterRegistry);
    }

    public void recordOrderCreated(OrderDTO order) {
        orderCreatedCounter.increment(
            Tags.of(
                "status", order.getStatus().name(),
                "user_type", order.getUserType().name()
            )
        );

        orderAmountSummary.record(order.getTotalAmount().doubleValue());
    }

    public void recordOrderProcessingTime(Duration duration) {
        orderProcessingTimer.record(duration);
    }

    private double getActiveUserCount() {
        // 实际业务逻辑获取活跃用户数
        return userService.getActiveUserCount();
    }
}
9.2 健康检查配置
java
// 自定义健康检查
@Component
public class CustomHealthIndicator implements HealthIndicator {

    private final PaymentServiceClient paymentServiceClient;
    private final RedisTemplate<String, Object> redisTemplate;

    @Override
    public Health health() {
        Health.Builder builder = new Health.Builder();

        try {
            // 检查外部服务连通性
            checkPaymentService(builder);
            checkRedisConnection(builder);
            checkDatabaseConnection(builder);

            return builder.up().build();
        } catch (Exception e) {
            return builder.down()
                .withDetail("error", e.getMessage())
                .build();
        }
    }

    private void checkPaymentService(Health.Builder builder) {
        try {
            ResponseEntity<String> response = paymentServiceClient.healthCheck();
            if (response.getStatusCode().is2xxSuccessful()) {
                builder.withDetail("payment-service", "UP");
            } else {
                builder.withDetail("payment-service", "DOWN");
            }
        } catch (Exception e) {
            builder.withDetail("payment-service", "DOWN - " + e.getMessage());
        }
    }

    private void checkRedisConnection(Health.Builder builder) {
        try {
            String pong = redisTemplate.getConnectionFactory()
                .getConnection()
                .ping();
            builder.withDetail("redis", "UP - " + pong);
        } catch (Exception e) {
            builder.withDetail("redis", "DOWN - " + e.getMessage());
        }
    }

    private void checkDatabaseConnection(Health.Builder builder) {
        // 数据库连接检查逻辑
        builder.withDetail("database", "UP");
    }
}
10. 微服务性能对比分析
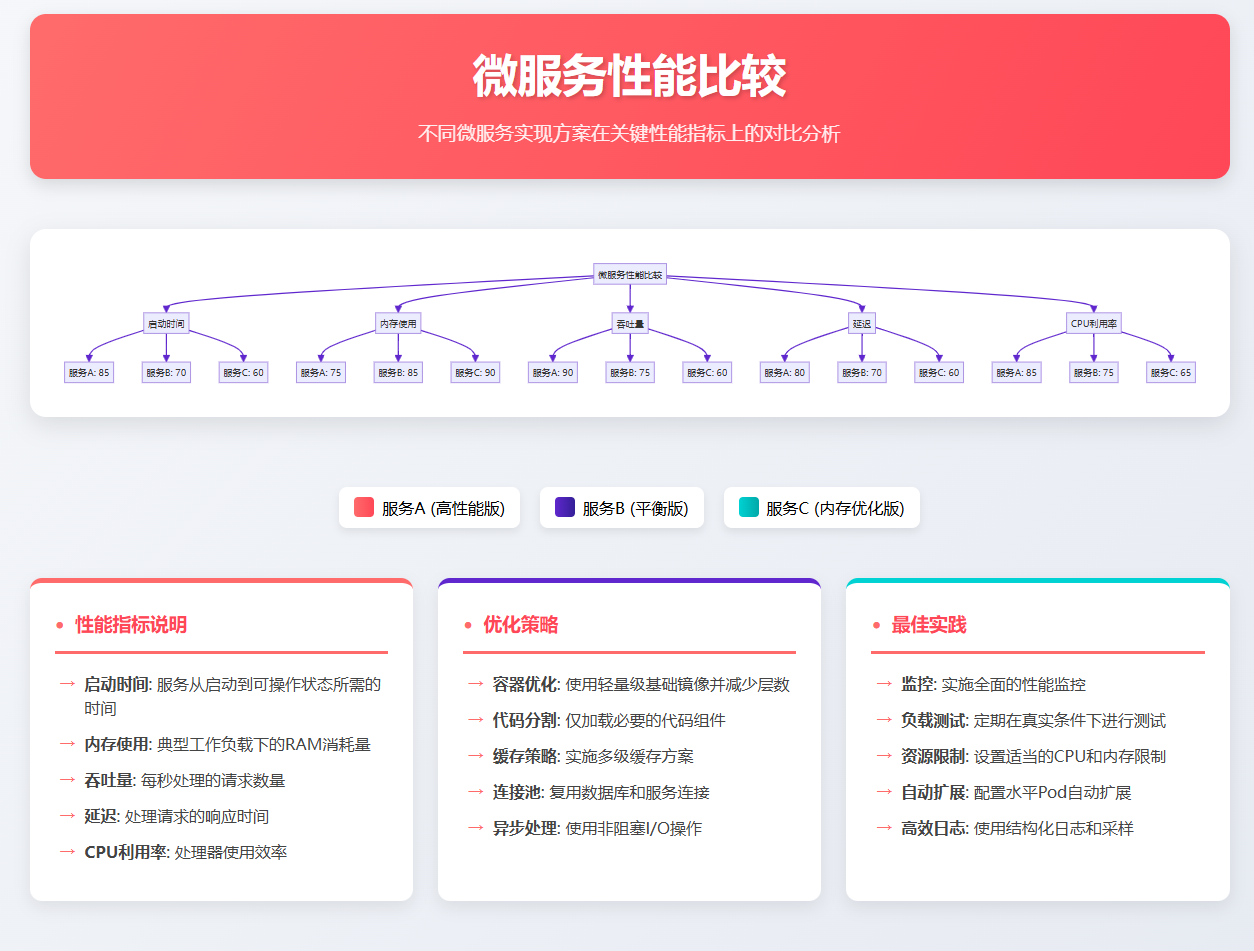
图4:微服务性能对比图表
11. 部署与运维最佳实践
11.1 Docker容器化配置
dockerfile
# 多阶段构建Dockerfile
FROM openjdk:17-jdk-slim as builder

WORKDIR /app
COPY pom.xml .
COPY src ./src

# 构建应用
RUN ./mvnw clean package -DskipTests

# 运行时镜像
FROM openjdk:17-jre-slim

# 创建非root用户
RUN groupadd -r spring && useradd -r -g spring spring

# 安装必要工具
RUN apt-get update && apt-get install -y \
    curl \
    jq \
    && rm -rf /var/lib/apt/lists/*

WORKDIR /app

# 复制构建产物
COPY --from=builder /app/target/*.jar app.jar

# 设置JVM参数
ENV JAVA_OPTS="-Xms512m -Xmx1g -XX:+UseG1GC -XX:MaxGCPauseMillis=200"

# 健康检查
HEALTHCHECK --interval=30s --timeout=3s --start-period=60s --retries=3 \
    CMD curl -f http://localhost:8080/actuator/health || exit 1

# 切换到非root用户
USER spring:spring

EXPOSE 8080

ENTRYPOINT ["sh", "-c", "java $JAVA_OPTS -jar app.jar"]
11.2 Kubernetes部署配置
yaml
# Kubernetes Deployment配置
apiVersion: apps/v1
kind: Deployment
metadata:
  name: user-service
  labels:
    app: user-service
    version: v1
spec:
  replicas: 3
  selector:
    matchLabels:
      app: user-service
  template:
    metadata:
      labels:
        app: user-service
        version: v1
    spec:
      containers:
      - name: user-service
        image: your-registry/user-service:latest
        ports:
        - containerPort: 8080
        env:
        - name: SPRING_PROFILES_ACTIVE
          value: "k8s"
        - name: SPRING_CLOUD_CONFIG_URI
          value: "http://config-server:8888"
        resources:
          requests:
            memory: "512Mi"
            cpu: "250m"
          limits:
            memory: "1Gi"
            cpu: "500m"
        livenessProbe:
          httpGet:
            path: /actuator/health/liveness
            port: 8080
          initialDelaySeconds: 60
          periodSeconds: 30
        readinessProbe:
          httpGet:
            path: /actuator/health/readiness
            port: 8080
          initialDelaySeconds: 30
          periodSeconds: 10
        volumeMounts:
        - name: config-volume
          mountPath: /app/config
      volumes:
      - name: config-volume
        configMap:
          name: user-service-config
---
apiVersion: v1
kind: Service
metadata:
  name: user-service
spec:
  selector:
    app: user-service
  ports:
  - port: 80
    targetPort: 8080
  type: ClusterIP
12. 安全最佳实践
"在微服务架构中,安全不是一个功能,而是一种架构原则。每个服务都应该假设网络是不可信的,每个请求都需要验证和授权。" ------ 微服务安全设计原则
12.1 JWT令牌认证
java
// JWT安全配置
@Configuration
@EnableWebSecurity
@EnableGlobalMethodSecurity(prePostEnabled = true)
public class SecurityConfiguration {

    private final JwtAuthenticationEntryPoint jwtAuthenticationEntryPoint;
    private final JwtRequestFilter jwtRequestFilter;

    @Bean
    public PasswordEncoder passwordEncoder() {
        return new BCryptPasswordEncoder(12);
    }

    @Bean
    public AuthenticationManager authenticationManager(
            AuthenticationConfiguration config) throws Exception {
        return config.getAuthenticationManager();
    }

    @Bean
    public SecurityFilterChain filterChain(HttpSecurity http) throws Exception {
        http.csrf().disable()
            .authorizeHttpRequests(authz -> authz
                .requestMatchers("/api/auth/**").permitAll()
                .requestMatchers("/actuator/health/**").permitAll()
                .requestMatchers(HttpMethod.GET, "/api/products/**").permitAll()
                .requestMatchers("/api/admin/**").hasRole("ADMIN")
                .anyRequest().authenticated()
            )
            .exceptionHandling()
                .authenticationEntryPoint(jwtAuthenticationEntryPoint)
            .and()
            .sessionManagement()
                .sessionCreationPolicy(SessionCreationPolicy.STATELESS);

        http.addFilterBefore(jwtRequestFilter, UsernamePasswordAuthenticationFilter.class);

        return http.build();
    }
}
总结
作为一名在微服务架构领域深耕多年的技术实践者,我深深感受到Spring Boot 3.x为现代企业级应用开发带来的革命性变化。通过本文的深入探讨,我们从多个维度全面解析了Spring Boot 3.x微服务架构的核心要素和最佳实践。
首先,Spring Boot 3.x基于Java 17长期支持版本的技术底座,为我们提供了更强的性能表现和更丰富的语言特性。原生镜像支持和GraalVM集成让微服务应用在云原生环境中展现出惊人的启动速度和资源效率,这对于需要快速扩缩容的现代应用场景具有重要意义。
在架构设计层面,我们深入讨论了服务拆分策略、通信模式选择、以及服务治理的核心原则。通过丰富的代码示例,我们看到了如何在实际项目中应用这些理论知识,特别是在服务间通信、配置管理、容错处理等关键环节的具体实现方案。
服务注册与发现作为微服务架构的基础设施,Eureka与Spring Boot 3.x的完美集成为我们提供了稳定可靠的服务治理能力。配合Spring Cloud Config的动态配置管理,我们能够实现真正意义上的配置与代码分离,大大提升了系统的可维护性和灵活性。
在容错与熔断方面,Resilience4j与Spring Boot 3.x的深度整合为我们构建了强大的服务韧性保障。通过合理的熔断策略、重试机制和降级方案,我们的微服务系统能够在面对各种异常情况时保持优雅的服务降级,确保核心业务功能的持续可用。
性能优化是微服务架构成功的关键因素之一。从JVM调优到连接池配置,从缓存策略到数据库优化,每一个细节都可能成为系统性能的瓶颈。通过系统性的性能调优方法论,我们能够让Spring Boot 3.x微服务应用在高并发场景下依然保持出色的响应性能。
监控与可观测性在微服务架构中的重要性不言而喻。Micrometer指标收集、分布式链路追踪、健康检查机制的完善实施,为我们提供了全方位的系统运行状态洞察能力。这些监控数据不仅帮助我们及时发现和解决问题,更为系统的持续优化提供了数据支撑。
安全性作为企业级应用的生命线,在微服务架构中面临着更大的挑战。通过JWT令牌认证、服务间通信加密、API网关安全策略等多层防护措施,我们构建了一个相对完善的安全防护体系。
展望未来,随着云原生技术的不断发展,Spring Boot 3.x微服务架构将在更多场景中发挥重要作用。无论是传统企业的数字化转型,还是互联网公司的业务创新,掌握这些核心技术和最佳实践都将为我们的技术成长之路增添强大动力。
■ 我是蒋星熠Jaxonic!如果这篇文章在你的技术成长路上留下了印记
■ 👁 【关注】与我一起探索技术的无限可能,见证每一次突破
■ 👍 【点赞】为优质技术内容点亮明灯,传递知识的力量
■ 🔖 【收藏】将精华内容珍藏,随时回顾技术要点
■ 💬 【评论】分享你的独特见解,让思维碰撞出智慧火花
■ 🗳 【投票】用你的选择为技术社区贡献一份力量
■ 技术路漫漫,让我们携手前行,在代码的世界里摘取属于程序员的那片星辰大海!