概述
YOLO(You-Only-Look-Once)目标检测框架是一种卷积神经网络(CNN)模型,能够通过单次图像处理提取多类物体的所有边界框。2015年发表的论文《You Only Look Once: Unified, Real-Time Object Detection》在计算机视觉领域产生了深远影响,其相较于先前的检测框架,可提供更精准且高效的检测推理性能。在YOLO出现之前,主流的检测框架为基于区域的CNN(R-CNN),该框架需为单张图像提取多个候选区域,并对每个区域执行前向传播。与之不同,YOLO作为一种统一框架,仅通过一次前向传播即可输出所有检测结果。
另一方面,目标跟踪作为一项独立的下游任务,可利用YOLO的检测输出及连续帧间的关联关系,为每个检测目标在跨帧过程中赋予唯一且一致的标签。其中,DeepSORT框架具有较高的知名度,该框架于2017年在论文《基于深度关联度量的简单在线实时跟踪》中被提出,其通过卡尔曼滤波器和检测目标的外观嵌入特征,建立连续帧间的关联。
本文旨在从零开始实现目标检测(基于YOLO框架)与目标跟踪(基于自定义框架),并详细阐述模型的代码与架构。为简化概念验证过程,目标检测与跟踪模型所使用的数据将通过OpenCV模拟为晃动的多色粒子。
1. YOLO目标检测简介
在YOLO出现之前,除R-CNN外,另一种较为直接的检测框架是在整个输入帧上采用滑动窗口策略,将每个滑动窗口依次送入单个CNN进行处理。这种方法虽易于实现,但计算量极大,难以满足实时目标检测的需求。
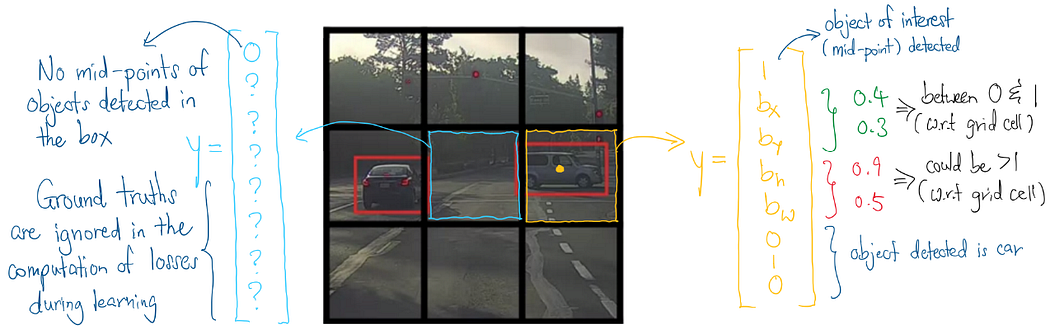
YOLO模型突破了滑动窗口框架的局限,其将整个输入帧送入单个CNN,输出一个三维数值张量,其中每个横截面对应原始输入帧的细分网格。该三维张量的通道包含以下信息:是否检测到目标、目标类别以及网格单元中目标的尺寸信息。
YOLO的工作原理可通过图示说明。假设有一张道路车辆图像,将其划分为3×3的网格框,此时构建的CNN输出维度为3×3×通道数,每个通道包含如下向量:
检测到目标中心点的概率,X中心点坐标,Y中心点坐标,目标相对于网格框的高度,目标相对于网格框的宽度,A类别,B类别,C类别
需要注意的是,上述向量仅包含网格单元中单个对象的信息。若要使一个网格单元容纳多个对象,可通过扩展向量以包含更多对象的相关信息来实现。

接下来,需要创建包含上述输出张量及相关信息的数据集。为此,将继续使用OpenCV模拟生成YOLO数据集。
2. 粒子模拟与YOLO数据收集
本研究的数据集基于OpenCV模拟生成,模拟多色粒子在黑色画布上从不同方向抖动移动。为简化YOLO检测任务,通过强制统一粒子半径,使标记的宽度和高度保持一致。
模拟初始阶段,粒子从各个方向出现,并以0至180度之间的角度移动,直至沿画布边缘消失。在模拟过程中,收集每一帧图像及其相关的边界框信息。
采用模拟方式可避免手动标注边界框,同时加快YOLO模型的测试进程。生成代码如下:
python
import random
import time
import cv2
import numpy as np

frame_height, frame_width = 600, 600

fourcc = cv2.VideoWriter_fourcc(*'XVID')
out = cv2.VideoWriter('simulation_detection.mp4', fourcc, 50.0, (frame_width, frame_height))

def create_particle():
    color = (random.randint(0, 255), random.randint(0, 255), random.randint(0, 255))
    radius = 10  # Radius of the particle
    uniform_random = np.random.uniform()

    if uniform_random <= 0.25:
        # Start from bottom
        position = (random.randint(radius, frame_width - radius), radius)
        angle = random.randint(0, 180)
        start_pos = "bottom"
    elif uniform_random <= 0.5:
        # Start from top
        position = (random.randint(radius, frame_width - radius), frame_height - radius)
        angle = random.randint(180, 360)
        start_pos = "top"
    elif uniform_random <= 0.75:
        # Start from left
        position = (radius, random.randint(radius, frame_height - radius))
        angle = random.randint(-90, 90)
        start_pos = "left"
    else:
        # Start from right
        position = (frame_width - radius, random.randint(radius, frame_height - radius))
        angle = random.randint(90, 270)
        start_pos = "right"

    return {'position': position, 'color': color, 'radius': radius, 'angle': angle, 'start_pos': start_pos}


def move_particle(particle):

    if particle['start_pos']=='bottom':
        angle = random.randint(0, 180)
    elif particle['start_pos']=='top':
        angle = random.randint(180, 360)
    elif particle['start_pos']=='left':
        angle = random.randint(-90, 90)
    elif particle['start_pos']=='right':
        angle = random.randint(90, 270)

    angle_rad = np.deg2rad(angle)
    dx = int(particle['radius'] * np.cos(angle_rad))
    dy = int(particle['radius'] * np.sin(angle_rad))
    x, y = particle['position']
    particle['position'] = (x + dx, y + dy)

def is_off_screen(particle):
    x, y = particle['position']
    return x < 1 or x > frame_width-1 or y < 1 or y > frame_height-1

def draw_frame(particles):
    frame = np.zeros((frame_height, frame_width, 3), dtype=np.uint8)
    bounding_boxes = []
    for particle in particles:
        cv2.circle(frame, particle['position'], particle['radius'], particle['color'], -1)
        x, y = particle['position']
        # cv2.rectangle(frame, (x - 2* particle['radius'], y - 2 * particle['radius']), (x + 2 * particle['radius'], y + 2 * particle['radius']), (0, 255, 0), 1)
        bounding_boxes.append({'x_center': x, 'y_center': y, 'width': particle['radius'], 'height': particle['radius']})

    return frame, bounding_boxes


def simulate_particles(total_data):
    particles = []
    max_particles = 50
    total_particles_created = 0
    timer = 0

    while len(particles) > 0 or total_particles_created < max_particles:
        if total_particles_created < max_particles and timer % 5 == 0:
            total_particles_created += 1
            particles.append(create_particle())

        for particle in particles[:]:
            move_particle(particle)
            if is_off_screen(particle):
                particles.remove(particle)

        frame, bounding_boxes = draw_frame(particles)
        total_data.append({'frame': frame, 'boundary_boxes': bounding_boxes})
        out.write(frame)
        cv2.imshow('Frame', frame)
        if cv2.waitKey(1) & 0xFF == ord('q'):
            break
        timer += 1

    out.release()
    cv2.destroyAllWindows()

    return total_data


total_data = []

for i in range(12):
    total_data = simulate_particles(total_data)
收集原始帧及其关联边界框后,将这些数据排列成30×30的网格张量(含9个输出通道),每个网格单元最多可容纳3个粒子。由于粒子的宽度和高度固定,且只需检测单一类型的物体,问题大为简化。因此,对于每个网格单元中的每个粒子,仅考虑以下向量:
检测到物体中点的概率 , X 中点坐标 , Y 中点坐标 检测到物体中点的概率, X中点坐标, Y中点坐标 检测到物体中点的概率,X中点坐标,Y中点坐标
每个30×30的网格张量将作为y_true列表的单个数据点。同时将每个600×600的帧调整为240×240的数据点,用于X_true列表。
python
def convert_data(total_data):

    grid_size = 30
    cell_size = 600 // grid_size  # 每个单元为20×20像素

    X_true = np.array([data['frame'] for data in total_data])
    y_true = np.zeros((len(total_data), grid_size, grid_size, 9))

    for i, data in enumerate(total_data):
        frame = data['frame']
        boxes = data['boundary_boxes']
        for box in boxes:
            x_center = box['x_center']
            y_center = box['y_center']
            width = box['width']
            height = box['height']

            # 确定网格单元索引
            grid_x = int(x_center / cell_size)
            grid_y = int(y_center / cell_size)

            if y_true[i, grid_y, grid_x, 0] == 0:  # 检查第一个位置是否可用
                y_true[i, grid_y, grid_x, 0] = 1  # 粒子存在标记
                y_true[i, grid_y, grid_x, 1] = (x_center % cell_size) / cell_size   # 局部x中心坐标
                y_true[i, grid_y, grid_x, 2] = (y_center % cell_size) / cell_size   # 局部y中心坐标

            elif y_true[i, grid_y, grid_x, 3] == 0:  # 检查第二个位置是否可用
                y_true[i, grid_y, grid_x, 3] = 1  # 粒子存在标记
                y_true[i, grid_y, grid_x, 4] = (x_center % cell_size) / cell_size   # 局部x中心坐标
                y_true[i, grid_y, grid_x, 5] = (y_center % cell_size) / cell_size   # 局部y中心坐标

            elif y_true[i, grid_y, grid_x, 6] == 0: # 检查第三个位置是否可用
                y_true[i, grid_y, grid_x, 6] = 1  # 粒子存在标记
                y_true[i, grid_y, grid_x, 7] = (x_center % cell_size) / cell_size   # 局部x中心坐标
                y_true[i, grid_y, grid_x, 8] = (y_center % cell_size) / cell_size   # 局部y中心坐标

    return X_true, y_true

X_true, y_true = convert_data(total_data)
python
from sklearn.model_selection import train_test_split

resized_images = np.zeros((len(X_true), 240, 240, 3))

for i in range(X_true.shape[0]):
    resized_images[i] = cv2.resize(X_true[i], (240, 240))

resized_images = resized_images / 255.0
X_true = resized_images

X_train, X_test, y_train, y_test = train_test_split(
    X_true,
    y_true,
    test_size=0.03,
    random_state=42
)
3. 训练YOLO模型
接下来,准备实例化YOLO模型,该过程可通过TensorFlow Keras框架实现。除卷积层外,应用三个2×2最大池化层,将240×240的输入缩减为30×30的输出。
损失函数的设计是关键部分,包含对象的网格单元的损失值相比没有对象的网格单元会被放大,使模型优先"寻找"包含对象的网格。相应地,忽略没有对象的网格单元对应的小数坐标的损失值。
python
import tensorflow as tf
from tensorflow.keras.models import Sequential
from tensorflow.keras.optimizers import RMSprop, Adam
from tensorflow.keras.layers import Conv2D, MaxPooling2D, Dense, Flatten, Reshape, Resizing

model = Sequential([
    Conv2D(32, (3, 3), padding='same', activation='relu'),  # input is (240,240,3)
    MaxPooling2D(2, 2),
    Conv2D(64, (3, 3), padding='same', activation='relu'),
    MaxPooling2D(2, 2),
    Conv2D(128, (3, 3), padding='same', activation='relu'),
    MaxPooling2D(2, 2),
    Conv2D(128, (3, 3), padding='same', activation='relu'),
    Conv2D(256, (3, 3), padding='same', activation='relu'),
    Conv2D(9, (1, 1), padding='same', activation='sigmoid'),  # output is (30, 30, 9)
])

def yolo_loss(y_true, y_pred):
    # Presence mask (1 where there is an object)
    object_mask = y_true[:,:,:, 0]
    object_mask_2 = y_true[:,:,:, 3]
    object_mask_3 = y_true[:,:,:, 6]

    # Absence mask (1 where there is no object)
    no_object_mask = 1 - object_mask
    no_object_mask_2 = 1 - object_mask_2
    no_object_mask_3 = 1 - object_mask_3

    # Object loss for confidence (binary crossentropy for cells with objects)
    object_loss_1 = tf.keras.losses.binary_crossentropy(tf.expand_dims(y_true[:,:,:, 0], -1), tf.expand_dims(y_pred[:,:,:, 0], -1))
    object_loss_2 = tf.keras.losses.binary_crossentropy(tf.expand_dims(y_true[:,:,:, 3], -1), tf.expand_dims(y_pred[:,:,:, 3], -1))
    object_loss_3 = tf.keras.losses.binary_crossentropy(tf.expand_dims(y_true[:,:,:, 6], -1), tf.expand_dims(y_pred[:,:,:, 6], -1))
    object_loss = tf.reduce_sum(object_loss_1 * object_mask) + tf.reduce_sum(object_loss_2 * object_mask_2) + tf.reduce_sum(object_loss_3 * object_mask_3)
    object_loss *= 10

    # No-object loss for confidence (binary crossentropy for cells without objects)
    no_object_loss_1 = tf.keras.losses.binary_crossentropy(tf.expand_dims(y_true[:,:,:, 0], -1), tf.expand_dims(y_pred[:,:,:, 0], -1))
    no_object_loss_2 = tf.keras.losses.binary_crossentropy(tf.expand_dims(y_true[:,:,:, 3], -1), tf.expand_dims(y_pred[:,:,:, 3], -1))
    no_object_loss_3 = tf.keras.losses.binary_crossentropy(tf.expand_dims(y_true[:,:,:, 6], -1), tf.expand_dims(y_pred[:,:,:, 6], -1))
    no_object_loss = tf.reduce_sum(no_object_loss_1 * no_object_mask) + tf.reduce_sum(no_object_loss_2 * no_object_mask_2) + tf.reduce_sum(no_object_loss_3 * no_object_mask_3)

    # Bounding box loss (only for cells with objects)
    bbox_loss = tf.reduce_sum(tf.square(y_true[:,:,:, 1:3] - y_pred[:,:,:, 1:3]) * tf.expand_dims(object_mask, -1))
    bbox_loss += tf.reduce_sum(tf.square(y_true[:,:,:, 4:6] - y_pred[:,:,:, 4:6]) * tf.expand_dims(object_mask_2, -1))
    bbox_loss += tf.reduce_sum(tf.square(y_true[:,:,:, 7:9] - y_pred[:,:,:, 7:9]) * tf.expand_dims(object_mask_3, -1))

    # Total loss includes both object and no-object losses
    total_loss = object_loss + no_object_loss + bbox_loss

    return total_loss

model.compile(
    optimizer=RMSprop(learning_rate=1e-3),
    loss=yolo_loss
)
python
model.fit(
    X_train,
    y_train,
    epochs=300,
    batch_size=8,
    validation_data=[X_test,y_test],
    verbose = 1,
    callbacks=callbacks
)
4. 使用YOLO模型进行推理
当使用YOLO模型进行推理时,有时需要实现非极大值抑制来过滤掉指向同一对象的多个边界框。算法如下:
- 按照检测到的目标置信度降序排列边界框。
- 从置信度最高的边界框开始,计算其区域与其他每个边界框的交并比(IOU),若IOU超过特定阈值则移除该特定边界框检测结果。
若每个网格单元可包含多个物体,则需对不同网格单元中检测到的物体分别进行非极大值抑制计算。
尽管如此,当目标物体尺寸相较于网格单元较大时,单物体对应多边界框的问题会更加突出。在本案例中,粒子宽度几乎与网格单元尺寸相同,因此可在推理过程中安全地省略非极大值抑制步骤。
实现代码如下:
python
model = tf.keras.models.load_model("YOLO_particle_detector", custom_objects={'yolo_loss': yolo_loss})
python
frame_height, frame_width = 600, 600

fourcc = cv2.VideoWriter_fourcc(*'XVID')  # or 'DIVX'
out = cv2.VideoWriter('inference_detections.mp4', fourcc, 50.0, (frame_width, frame_height))


def convert_to_absolute_coordinates(predictions, cell_size=20):

    absolute_predictions = []

    for y_index, y_grid in enumerate(predictions[0]):

        for x_index, x_grid in enumerate(y_grid):
            if x_grid[0] > 0.5:
                x_center = x_grid[1] * cell_size + (x_index * cell_size)
                y_center = x_grid[2] * cell_size + (y_index * cell_size)
                width = 40
                height = 40
                absolute_predictions.append({'x_center': x_center, 'y_center': y_center, 'width': width, 'height': height, 'confidence': x_grid[0], 'grid': (y_index,x_index)})

            if x_grid[3] > 0.5:
                x_center = x_grid[4] * cell_size + (x_index * cell_size)
                y_center = x_grid[5] * cell_size + (y_index * cell_size)
                width = 40
                height = 40
                absolute_predictions.append({'x_center': x_center, 'y_center': y_center, 'width': width, 'height': height, 'confidence': x_grid[5], 'grid': (y_index,x_index)})

            if x_grid[6] > 0.5:
                x_center = x_grid[7] * cell_size + (x_index * cell_size)
                y_center = x_grid[8] * cell_size + (y_index * cell_size)
                width = 40
                height = 40
                absolute_predictions.append({'x_center': x_center, 'y_center': y_center, 'width': width, 'height': height, 'confidence': x_grid[5], 'grid': (y_index,x_index)})

    return absolute_predictions


def detect(frame):

    frame_resized = cv2.resize(frame,(240,240))
    frame_normalized = frame_resized / 255

    detections = model(np.expand_dims(frame_normalized,axis=0))
    predictions = convert_to_absolute_coordinates(np.array(detections))

    for prediction in predictions:
        x = int(prediction['x_center'])
        y = int(prediction['y_center'])
        cv2.rectangle(frame, (x - 20, y - 20), (x + 20, y + 20), (0, 255, 0), 1)

    return frame

def draw_particles(particles):
    frame = np.zeros((frame_height, frame_width, 3), dtype=np.uint8)
    bounding_boxes = []
    for particle in particles:
        cv2.circle(frame, particle['position'], particle['radius'], particle['color'], -1)

    return frame

def test_particles():
    particles = []
    max_particles = 50
    total_particles_created = 0
    timer = 0

    while len(particles) > 0 or total_particles_created < max_particles:
        if total_particles_created < max_particles and timer % 5 == 0:
            total_particles_created += 1
            particles.append(create_particle())

        for particle in particles[:]:
            move_particle(particle)
            if is_off_screen(particle):
                particles.remove(particle)

        frame = draw_particles(particles)
        frame = detect(frame)

        out.write(frame)
        cv2.imshow('Frame', frame)
        if cv2.waitKey(1) & 0xFF == ord('q'):
            break
        timer += 1

    out.release()
    cv2.destroyAllWindows()
5. 目标跟踪简介
现有用于目标检测的YOLO模型,可利用其进行下游任务------目标跟踪。本文从零开始构建一个自定义的目标跟踪模型,无需任何现有参考。
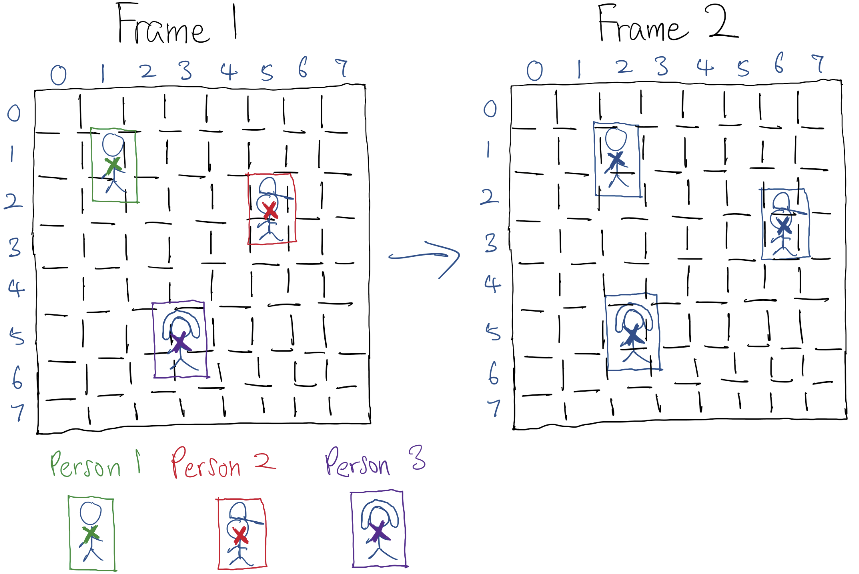
目标跟踪模型将对连续两帧及其边界框检测结果进行联合推理。当新的未标记物体进入检测范围时,模型会在后一帧中为其分配一个任意(或递增)标签。第二步中,该帧将作为带有所有已标记检测结果的前一帧。新的后一帧将通过其关联的已标记检测结果与前一帧建立关联,模型将基于此对后一帧中未分配标签的检测结果进行标签推断。如此循环往复,带有对应标签的唯一物体便在画布上持续传播。
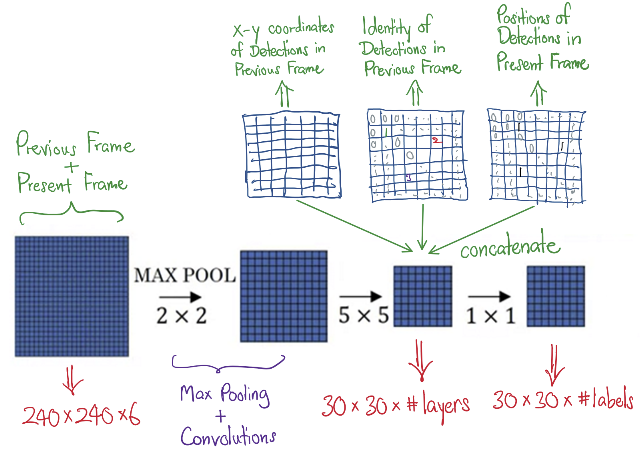
设计了一个多输入CNN架构,该架构同时接收连续帧、YOLO检测输出以及带有已分配检测标签(前一帧的)的张量,经过训练后生成预测输出(后一帧)检测标签的结果。
下方示意图简要展示了该架构。
需要注意的是,输入(前一帧)和输出(后一帧)中检测目标的身份必须进行独热编码,这也意味着需要设定每帧可容纳的最大物体标签数量。
6. 粒子模拟与目标跟踪数据收集
与YOLO目标检测相比,目标跟踪的数据收集过程非常相似,但需要额外模拟粒子标签。在本模型中,假定首个出现的粒子从索引1开始,随后新粒子出现时索引逐次递增。当粒子从视野中消失时,其标签将被回收并进入队列。当新粒子出现时,将立即重用队列中的标签,而非应用新的递增标签。
代码如下所示:
python
frame_height, frame_width = 600, 600

fourcc = cv2.VideoWriter_fourcc(*'XVID')
out = cv2.VideoWriter('simulation_tracking.mp4', fourcc, 40.0, (frame_width, frame_height))
particles_disappeared = []
particles_appeared = []
particle_max_index = 0

def create_particle_tracking():

    global particles_disappeared, particles_appeared, particle_max_index

    color = (random.randint(0, 255), random.randint(0, 255), random.randint(0, 255))
    radius = 10  # Radius of the particle
    uniform_random = np.random.uniform()

    if not particles_disappeared:
        particle_max_index += 1
        particle_index = particle_max_index
        particles_appeared.append(particle_index)
    else:
        particle_index = particles_disappeared[0]
        particles_disappeared = particles_disappeared[1:]
        particles_appeared.append(particle_index)


    if uniform_random <= 0.25:
        # Start from bottom
        position = (random.randint(radius, frame_width - radius), radius)
        angle = random.randint(0, 180)
        start_pos = "bottom"
    elif uniform_random <= 0.5:
        # Start from top
        position = (random.randint(radius, frame_width - radius), frame_height - radius)
        angle = random.randint(180, 360)
        start_pos = "top"
    elif uniform_random <= 0.75:
        # Start from left
        position = (radius, random.randint(radius, frame_height - radius))
        angle = random.randint(-90, 90)
        start_pos = "left"
    else:
        # Start from right
        position = (frame_width - radius, random.randint(radius, frame_height - radius))
        angle = random.randint(90, 270)
        start_pos = "right"

    return {'position': position, 'color': color, 'radius': radius, 'angle': angle, 'start_pos': start_pos, 'particle_index': particle_index}


def draw_frame_tracking(particles):
    frame = np.zeros((frame_height, frame_width, 3), dtype=np.uint8)
    bounding_boxes = []
    for particle in particles:
        cv2.circle(frame, particle['position'], particle['radius'], particle['color'], -1)
        # Draw bounding box
        x, y = particle['position']
        cv2.rectangle(frame, (x - 2* particle['radius'], y - 2 * particle['radius']), (x + 2 * particle['radius'], y + 2 * particle['radius']), (0, 255, 0), 1)
        cv2.putText(frame,f"#{particle['particle_index']}", (x - particle['radius'] - 10,y - particle['radius'] - 15), cv2.FONT_HERSHEY_SIMPLEX, 0.7, (255, 255, 255),1)
        confidence = np.random.uniform(0.99,0.9999999)

        bounding_boxes.append({'x_center': x, 'y_center': y, 'width': particle['radius']*4, 'height': particle['radius']*4, 'index': particle['particle_index'], 'confidence': confidence})

    return frame, bounding_boxes

total_data = []

def simulate_particles_tracking():
    particles = []
    max_particles = 50
    total_particles_created = 0
    timer = 0

    while len(particles) > 0 or total_particles_created < max_particles:
        if total_particles_created < max_particles and timer % 5 == 0:
            total_particles_created += 1
            particles.append(create_particle_tracking())

        for particle in particles[:]:
            move_particle(particle)
            if is_off_screen(particle):
                particles_appeared.remove(particle['particle_index'])
                particles_disappeared.append(particle['particle_index'])
                particles.remove(particle)

        frame, bounding_boxes = draw_frame_tracking(particles)
        total_data.append({'frame': frame, 'boundary_boxes': bounding_boxes})
        out.write(frame)
        cv2.imshow('Frame', frame)
        if cv2.waitKey(1) & 0xFF == ord('q'):
            break
        timer += 1

    out.release()
    cv2.destroyAllWindows()

    return total_data


for i in range(80):
    total_data = simulate_particles_tracking()
在收集完原始数据后,需要进一步处理才能将其转换为目标跟踪CNN架构所需的格式。值得注意的是,该模型需要多个输入数组,下面的代码基于收集的原始Python字典,能清晰地提取并捕获这些数组。
将格式化数据分割为训练集和测试集时,选择按时间顺序而非随机顺序分割,这样测试数据与训练数据完全无关,因为它们是按顺序收集的。
此外,为了训练大量模拟数据,还将训练集和测试集转换为生成器,以便在有限的GPU内存资源上进行训练。
python
def resize(X_true):

    resized_images = np.zeros((len(X_true), 240, 240, 3))
    for i in range(X_true.shape[0]):
        resized_images[i] = cv2.resize(X_true[i], (240, 240))

    resized_images = resized_images / 255.0
    return resized_images

def convert_data_tracking(total_data):

    grid_size = 30
    cell_size = 600 // grid_size  # Each cell is 20x20 pixels

    # Initialize the arrays
    first_frames = resize(np.array([data['frame'] for data in total_data[:-1]]))
    second_frames = resize(np.array([data['frame'] for data in total_data[1:]]))

    X_true_frames = np.concatenate([first_frames, second_frames],axis=-1)

    del first_frames
    del second_frames

    X_true_detection = np.zeros((len(total_data), grid_size, grid_size, 12))  # 12 outputs per cell
    y_true = np.zeros((len(total_data)-1, grid_size, grid_size, 24))
    X_true_first_indices = np.zeros((len(total_data)-1, grid_size, grid_size, 24))


    for i, data in tqdm.tqdm(enumerate(total_data)):

        boxes = data['boundary_boxes']
        for box in boxes:
            x_center = box['x_center']
            y_center = box['y_center']
            confidence = box['confidence']
            particle_index = box['index']

            # Determine the grid cell indices
            grid_x = int(x_center / cell_size)
            grid_y = int(y_center / cell_size)

            if X_true_detection[i, grid_y, grid_x, 0] == 0:  # Check if the first slot is available
                X_true_detection[i, grid_y, grid_x, 0] = confidence  # Particle presence
                X_true_detection[i, grid_y, grid_x, 1] = (x_center % cell_size) / cell_size   # Local x_center
                X_true_detection[i, grid_y, grid_x, 2] = (y_center % cell_size) / cell_size   # Local y_center
                X_true_detection[i, grid_y, grid_x, 9] = particle_index

            elif X_true_detection[i, grid_y, grid_x, 3] == 0:  # Check if the second slot is available
                X_true_detection[i, grid_y, grid_x, 3] = confidence  # Particle presence
                X_true_detection[i, grid_y, grid_x, 4] = (x_center % cell_size) / cell_size   # Local x_center
                X_true_detection[i, grid_y, grid_x, 5] = (y_center % cell_size) / cell_size   # Local y_center
                X_true_detection[i, grid_y, grid_x, 10] = particle_index

            elif X_true_detection[i, grid_y, grid_x, 6] == 0:   # Check if the third slot is available
                X_true_detection[i, grid_y, grid_x, 6] = confidence  # Particle presence
                X_true_detection[i, grid_y, grid_x, 7] = (x_center % cell_size) / cell_size   # Local x_center
                X_true_detection[i, grid_y, grid_x, 8] = (y_center % cell_size) / cell_size   # Local y_center
                X_true_detection[i, grid_y, grid_x, 11] = particle_index


    for i, data in enumerate(X_true_detection[1:,:,:,9:]):
        for j, y_index in enumerate(data):
            for k, x_index in enumerate(y_index):
                for particle in x_index:
                    if particle > 0:
                        y_true[i, j, k, int(particle)-1] = 1

    for i, data in enumerate(X_true_detection[:-1,:,:,9:]):
        for j, y_index in enumerate(data):
            for k, x_index in enumerate(y_index):
                for particle in x_index:
                    if particle > 0:
                        X_true_first_indices[i, j, k, int(particle)-1] = 1

    X_true_first_detection = X_true_detection[:-1,:,:,:9]
    X_true_second_detection = X_true_detection[1:,:,:,:9]

    del X_true_detection

    X_true_both_detection = np.concatenate([X_true_first_detection, X_true_first_indices],axis=-1)
    X_true_both_detection = np.concatenate([X_true_both_detection, X_true_second_detection],axis=-1)

    X_true = [X_true_frames, X_true_both_detection]

    return X_true, y_true

X_true, y_true = convert_data_tracking(total_data)
[X_true_frames, X_true_both_detection] =  X_true

split_index = int(len(X_true_frames) * 0.97)

X_frames_train = X_true_frames[:split_index]
X_frames_test = X_true_frames[split_index:]

X_detections_train = X_true_both_detection[:split_index]
X_detections_test = X_true_both_detection[split_index:]

y_train = y_true[:split_index]
y_test = y_true[split_index:]
python
def train_generator():
    for i in range(len(X_frames_train)):
        yield ((X_frames_train[i], X_detections_train[i]), y_train[i])

def test_generator():
    for i in range(len(X_frames_test)):
        yield ((X_frames_test[i], X_detections_test[i]), y_test[i])


train_dataset = tf.data.Dataset.from_generator(
    train_generator,
    output_types=((tf.float32,tf.float32), np.float32),
    output_shapes=(((None,None,None), (None,None,None)), (None,None,None))  # Adjust these shapes based on actual data shapes
)

# Create the testing dataset
test_dataset = tf.data.Dataset.from_generator(
    test_generator,
    output_types=((tf.float32,tf.float32), np.float32),
    output_shapes=(((None, None, None), (None,None,None)), (None,None,None))  # Adjust these shapes based on actual data shapes
)

# Define batch sizes and prefetch
train_dataset = train_dataset.batch(32).prefetch(tf.data.AUTOTUNE)
test_dataset = test_dataset.batch(32).prefetch(tf.data.AUTOTUNE)
7. 训练目标跟踪模型
利用函数式API,目标跟踪模型的训练可通过TensorFlow Keras框架完成,如下述简单架构所示。输出类似于具有30x30网格的YOLO模型,不同之处在于输出张量有24个通道,表示画布最多可以容纳24个粒子。
此外,未对输出使用softmax激活函数,而是应用了sigmoid激活函数,因为每个网格单元最多可以容纳3个粒子。例如,如果一个网格单元在所有通道上都是0,除了索引5和12接近1,这意味着标签为5和12的粒子存在于该网格单元中。
在该框架中,输出张量将是稀疏的,在推理过程中,只检查YOLO模型检测到物体的网格框。因此设计了一个自定义跟踪损失函数,该函数仅考虑至少包含一个检测到的物体的网格单元中的损失值,然后对存在物体标签的通道的损失值进行放大。
python
from tensorflow.keras.optimizers import RMSprop, Adam
from tensorflow.keras.layers import Conv2D, MaxPooling2D, Dense, Flatten, Reshape, Resizing, concatenate

input_frames = tf.keras.Input(shape=X_frames_train.shape[1:])
input_detections = tf.keras.Input(shape=X_detections_train.shape[1:])

x = Conv2D(32, (3, 3), padding='same', activation='relu')(input_frames)   # input is (240,240,3)
x = MaxPooling2D(2, 2)(x)
x = Conv2D(64, (3, 3), padding='same', activation='relu')(x)
x = MaxPooling2D(2, 2)(x)
x = Conv2D(128, (3, 3), padding='same', activation='relu')(x)
x = MaxPooling2D(2, 2)(x)

x = concatenate([x, input_detections])
x = Conv2D(256, (3, 3), padding='same', activation='relu')(x)

x = Conv2D(256, (1, 1), padding='same', activation='relu')(x)
x = Conv2D(128, (1, 1), padding='same', activation='relu')(x)
output = Conv2D(24, (1, 1), padding='same', activation='sigmoid')(x)    # output is (30, 30, 24)

model = tf.keras.Model(inputs=[input_frames, input_detections], outputs=output)


def tracking_loss(y_true, y_pred):
    # Presence mask (1 where there is an object)
    object_mask = y_true

    # Absence mask (1 where there is no object)
    no_object_mask = 1 - y_true

    mask = tf.reduce_max(y_true, axis=-1, keepdims=True)
    mask = tf.cast(mask, dtype=tf.float32)
    expanded_mask = tf.repeat(mask, repeats=24, axis=-1)

    # Object loss (binary crossentropy for cells with objects)
    object_loss = tf.keras.losses.binary_crossentropy(y_true, y_pred)
    object_loss = tf.reduce_sum(tf.expand_dims(object_loss,-1) * object_mask)
    object_loss *= 5

    # No-object loss (binary crossentropy for cells without objects for grid with objects)
    no_object_loss = tf.keras.losses.binary_crossentropy(y_true, y_pred)
    no_object_loss = tf.reduce_sum(tf.expand_dims(no_object_loss,-1) * expanded_mask)

    total_loss = object_loss + no_object_loss
    return total_loss

def thresholded_accuracy(y_true, y_pred):

    threshold = 0.5
    y_pred_thresholded = tf.cast(y_pred > threshold, tf.float32)
    return tf.keras.metrics.binary_accuracy(y_true, y_pred_thresholded)

model.compile(
    optimizer=RMSprop(learning_rate=1e-3),
    loss=tracking_loss,
    metrics=thresholded_accuracy
)


model.fit(
    train_dataset,
    epochs=300,
    validation_data=test_dataset,
    verbose = 1,
    callbacks=callbacks
)
8. 使用目标追踪模型进行推理
在拥有训练好的YOLO和追踪器模型后,进入项目的核心部分,这也是编码中最棘手的环节。在处理好确保多模态系统输入输出就位的代码逻辑后,最困难的部分在于确保粒子标签在单个画布上以递增方式初始化且不重复。
虽然追踪模型已经训练得很好,能够在连续帧之间传播标签,但在推理过程中仍需手动硬编码解决两个问题:
- 在粒子出现时强制实施标签的增量扩展。如果有旧粒子离开视野,则将回收的排队标签应用于新粒子。在没有任何干预的情况下应用追踪模型时,标签分配几乎是随机的。
- 当新粒子出现时会发生标签重复。此时必须重新引导追踪模型,按照期望的框架来标记新粒子。
在应用以下详细代码后,最终实现了模型的预期行为:
python
detection_model =  tf.keras.models.load_model("YOLO_particle_detector", custom_objects={'yolo_loss': yolo_loss})
tracking_model = tf.keras.models.load_model("YOLO_particle_tracker", custom_objects={'tracking_loss': tracking_loss})
python
frame_height, frame_width = 600, 600

fourcc = cv2.VideoWriter_fourcc(*'XVID')
out = cv2.VideoWriter('inference_tracking.mp4', fourcc, 40.0, (frame_width, frame_height))
particles_disappeared = []
particles_appeared = []
particles_appeared_pos = []
particle_max_index = 0
consecutive_frames = deque(maxlen=2)
indices_matrix = []


def convert_to_absolute_coordinates(predictions, cell_size=20):

    absolute_predictions = []

    for y_index, y_grid in enumerate(predictions[0]):

        for x_index, x_grid in enumerate(y_grid):
            if x_grid[0] > 0.5:
                x_center = x_grid[1] * cell_size + (x_index * cell_size)
                y_center = x_grid[2] * cell_size + (y_index * cell_size)
                width = 40
                height = 40
                absolute_predictions.append({'x_center': x_center, 'y_center': y_center, 'width': width, 'height': height, 'confidence': x_grid[0], 'grid': (y_index,x_index)})

            if x_grid[3] > 0.5:
                x_center = x_grid[4] * cell_size + (x_index * cell_size)
                y_center = x_grid[5] * cell_size + (y_index * cell_size)
``````python
                width = 40
                height = 40
                absolute_predictions.append({'x_center': x_center, 'y_center': y_center, 'width': width, 'height': height, 'confidence': x_grid[3], 'grid': (y_index,x_index)})

            if x_grid[6] > 0.5:
                x_center = x_grid[7] * cell_size + (x_index * cell_size)
                y_center = x_grid[8] * cell_size + (y_index * cell_size)
                width = 40
                height = 40
                absolute_predictions.append({'x_center': x_center, 'y_center': y_center, 'width': width, 'height': height, 'confidence': x_grid[6], 'grid': (y_index,x_index)})

    return absolute_predictions


def detect_tracking(frame):

    frame_resized = cv2.resize(frame,(240,240))
    frame_normalized = frame_resized / 255

    detections = detection_model(np.expand_dims(frame_normalized,axis=0))
    predictions = convert_to_absolute_coordinates(np.array(detections))

    return predictions


def create_X_true_both_detection(first_indices, first_detection, second_detection):

    grid_size = 30
    X_true_both_detection = np.zeros((1, grid_size, grid_size, 9 + 24 +9))

    # Fill first detection (9 channels)
    X_true_both_detection[0,:,:,:9] = first_detection

    # Fill first indices (24 channels)
    X_true_both_detection[0,:,:,9:9+24] = first_indices

    # Fill second detection (9 channels)
    X_true_both_detection[0,:,:,9+24:9+24+9] = second_detection

    return X_true_both_detection


def process_tracking():
    global particles_disappeared, particles_appeared, particles_appeared_pos, particle_max_index, consecutive_frames, indices_matrix

    particles = []
    max_particles = 50
    total_particles_created = 0
    timer = 0
    prev_indices = np.zeros((30,30,24))
    prev_detection = np.zeros((30,30,9))

    while len(particles) > 0 or total_particles_created < max_particles:
        if total_particles_created < max_particles and timer % 5 == 0:
            total_particles_created += 1
            particles.append(create_particle_tracking())

        for particle in particles[:]:
            move_particle(particle)
            if is_off_screen(particle):
                particles_appeared.remove(particle['particle_index'])
                particles_appeared_pos.remove(particle['position'])
                particles_disappeared.append(particle['particle_index'])
                particles.remove(particle)

        frame = draw_particles(particles)
        current_detections = detect_tracking(frame)

        # Prepare current detection tensor (30x30x9)
        current_detection = np.zeros((30,30,9))
        cell_size = 20
        for det in current_detections:
            x_center = det['x_center']
            y_center = det['y_center']
            grid_x = int(x_center / cell_size)
            grid_y = int(y_center / cell_size)
            grid_x = np.clip(grid_x, 0, 29)
            grid_y = np.clip(grid_y, 0, 29)

            if current_detection[grid_y, grid_x, 0] == 0:
                current_detection[grid_y, grid_x, 0] = det['confidence']
                current_detection[grid_y, grid_x, 1] = (x_center % cell_size) / cell_size
                current_detection[grid_y, grid_x, 2] = (y_center % cell_size) / cell_size
            elif current_detection[grid_y, grid_x, 3] == 0:
                current_detection[grid_y, grid_x, 3] = det['confidence']
                current_detection[grid_y, grid_x, 4] = (x_center % cell_size) / cell_size
                current_detection[grid_y, grid_x, 5] = (y_center % cell_size) / cell_size
            elif current_detection[grid_y, grid_x, 6] == 0:
                current_detection[grid_y, grid_x, 6] = det['confidence']
                current_detection[grid_y, grid_x, 7] = (x_center % cell_size) / cell_size
                current_detection[grid_y, grid_x, 8] = (y_center % cell_size) / cell_size

        # Prepare frame input (240x240x6: concatenated previous and current frame)
        frame_resized = cv2.resize(frame, (240,240)) / 255.0
        consecutive_frames.append(frame_resized)

        if len(consecutive_frames) == 2:
            frames_input = np.concatenate(consecutive_frames, axis=-1)
            frames_input = np.expand_dims(frames_input, axis=0)

            # Create detection input
            detection_input = create_X_true_both_detection(prev_indices, prev_detection, current_detection)

            # Predict tracking
            tracking_pred = tracking_model.predict([frames_input, detection_input], verbose=0)[0]

            # Process predictions
            current_indices = np.zeros((30,30,24))
            for y in range(30):
                for x in range(30):
                    # Check if there's a detection in this grid cell
                    if np.any(current_detection[y,x,:3] > 0.5) or np.any(current_detection[y,x,3:6] > 0.5) or np.any(current_detection[y,x,6:9] > 0.5):
                        # Get top 3 predictions
                        top_indices = np.argsort(tracking_pred[y,x,:])[::-1][:3]
                        for idx in top_indices[:3]:
                            if tracking_pred[y,x,idx] > 0.5:
                                current_indices[y,x,idx] = 1

            # Handle new particles and label assignment
            detected_positions = [(det['x_center'], det['y_center']) for det in current_detections]
            new_particles = []

            for pos in detected_positions:
                if not any(np.linalg.norm(np.array(pos) - np.array(p)) < 20 for p in particles_appeared_pos):
                    new_particles.append(pos)

            for pos in new_particles:
                if particles_disappeared:
                    new_idx = particles_disappeared.pop(0)
                else:
                    particle_max_index += 1
                    new_idx = particle_max_index
                particles_appeared.append(new_idx)
                particles_appeared_pos.append(pos)

                # Find corresponding grid cell
                x_center, y_center = pos
                grid_x = int(x_center / cell_size)
                grid_y = int(y_center / cell_size)
                grid_x = np.clip(grid_x, 0, 29)
                grid_y = np.clip(grid_y, 0, 29)

                # Assign new index to this grid cell
                current_indices[grid_y, grid_x, :] = 0
                current_indices[grid_y, grid_x, new_idx-1] = 1

            # Draw labels
            for det in current_detections:
                x_center = det['x_center']
                y_center = det['y_center']
                grid_x = int(x_center / cell_size)
                grid_y = int(y_center / cell_size)
                grid_x = np.clip(grid_x, 0, 29)
                grid_y = np.clip(grid_y, 0, 29)

                # Find assigned index
                idx = np.argmax(current_indices[grid_y, grid_x, :]) + 1
                if current_indices[grid_y, grid_x, idx-1] > 0.5:
                    cv2.rectangle(frame, (int(x_center)-20, int(y_center)-20), (int(x_center)+20, int(y_center)+20), (0,255,0), 1)
                    cv2.putText(frame, f"#{idx}", (int(x_center)-20, int(y_center)-25), cv2.FONT_HERSHEY_SIMPLEX, 0.5, (255,255,255), 1)

            # Update previous variables for next iteration
            prev_indices = current_indices
            prev_detection = current_detection

        out.write(frame)
        cv2.imshow('Tracking', frame)
        if cv2.waitKey(1) & 0xFF == ord('q'):
            break
        timer += 1

    out.release()
    cv2.destroyAllWindows()

process_tracking()
以上代码完成了目标跟踪的推理过程,主要包含以下关键步骤:
- 检测结果转换:将YOLO模型输出的网格坐标转换为绝对坐标,便于后续处理。
- 输入数据构建:按照跟踪模型要求的格式,将连续两帧图像、前一帧的检测结果和标签信息、当前帧的检测结果组合成模型输入。
- 跟踪预测:使用训练好的跟踪模型对当前帧的目标标签进行预测。
- 标签管理:处理新出现的粒子,分配新标签或重用已回收的标签,确保标签的唯一性和连续性。
- 结果可视化:在图像上绘制边界框和对应的跟踪标签,生成最终的跟踪结果视频。
通过上述步骤,实现了从目标检测到目标跟踪的完整流程,能够在模拟的粒子场景中稳定地对多个移动目标进行连续跟踪。
备注:
原文地址:https://pub.towardsai.net/lightweight-yolo-detection-with-object-tracking-from-scratch-4fd6787a6a24