ELK1------elasticsearch
一、认识ELK
ELK是一套开源的日志分析系统,由elasticsearch+logstash+Kibana组成。
官网说明:https://www.elastic.co/cn/products,elk下载地址:https://www.elastic.co/cn/downloads
首先: 先一句话简单了解E,L,K这三个软件
elasticsearch : 分布式搜索引擎
logstash : 日志收集与过滤,输出给elasticsearch
Kibana: 图形化展示
运维人员需要对系统和业务日志进行精准把控,便于分析系统和业务状态。日志分布在不同的服务器上,传统的使用传统的方法依次登录每台服务器查看日志,既繁琐又效率低下。所以我们需要集中化 的日志管理工具将位于不同服务器上的日志收集到一起, 然后进行分析、展示。
前面我们学习过rsyslog,它就可以实现集中化的日志管理,可是rsyslog集中后的日志实现统计与检索又成了一个问题。使用wc, grep, awk等相关命令可以实现统计与检索,但如果要求更高的场景,这些命令也会力不从心。所以我们需要一套专业的日志收集分析展示系统。

二、部署elasticsearch(单节点+集群)
1、elasticsearch简介
Elasticsearch(简称ES)是一个开源的分布式搜索引擎,Elasticsearch还是一个分布式文档数据库。所以它提供了大量数据的存储功能,快速的搜索与分析功能。
提到搜索,大家肯定就想到了百度,谷歌,必应等。当然也有如下的搜索场景
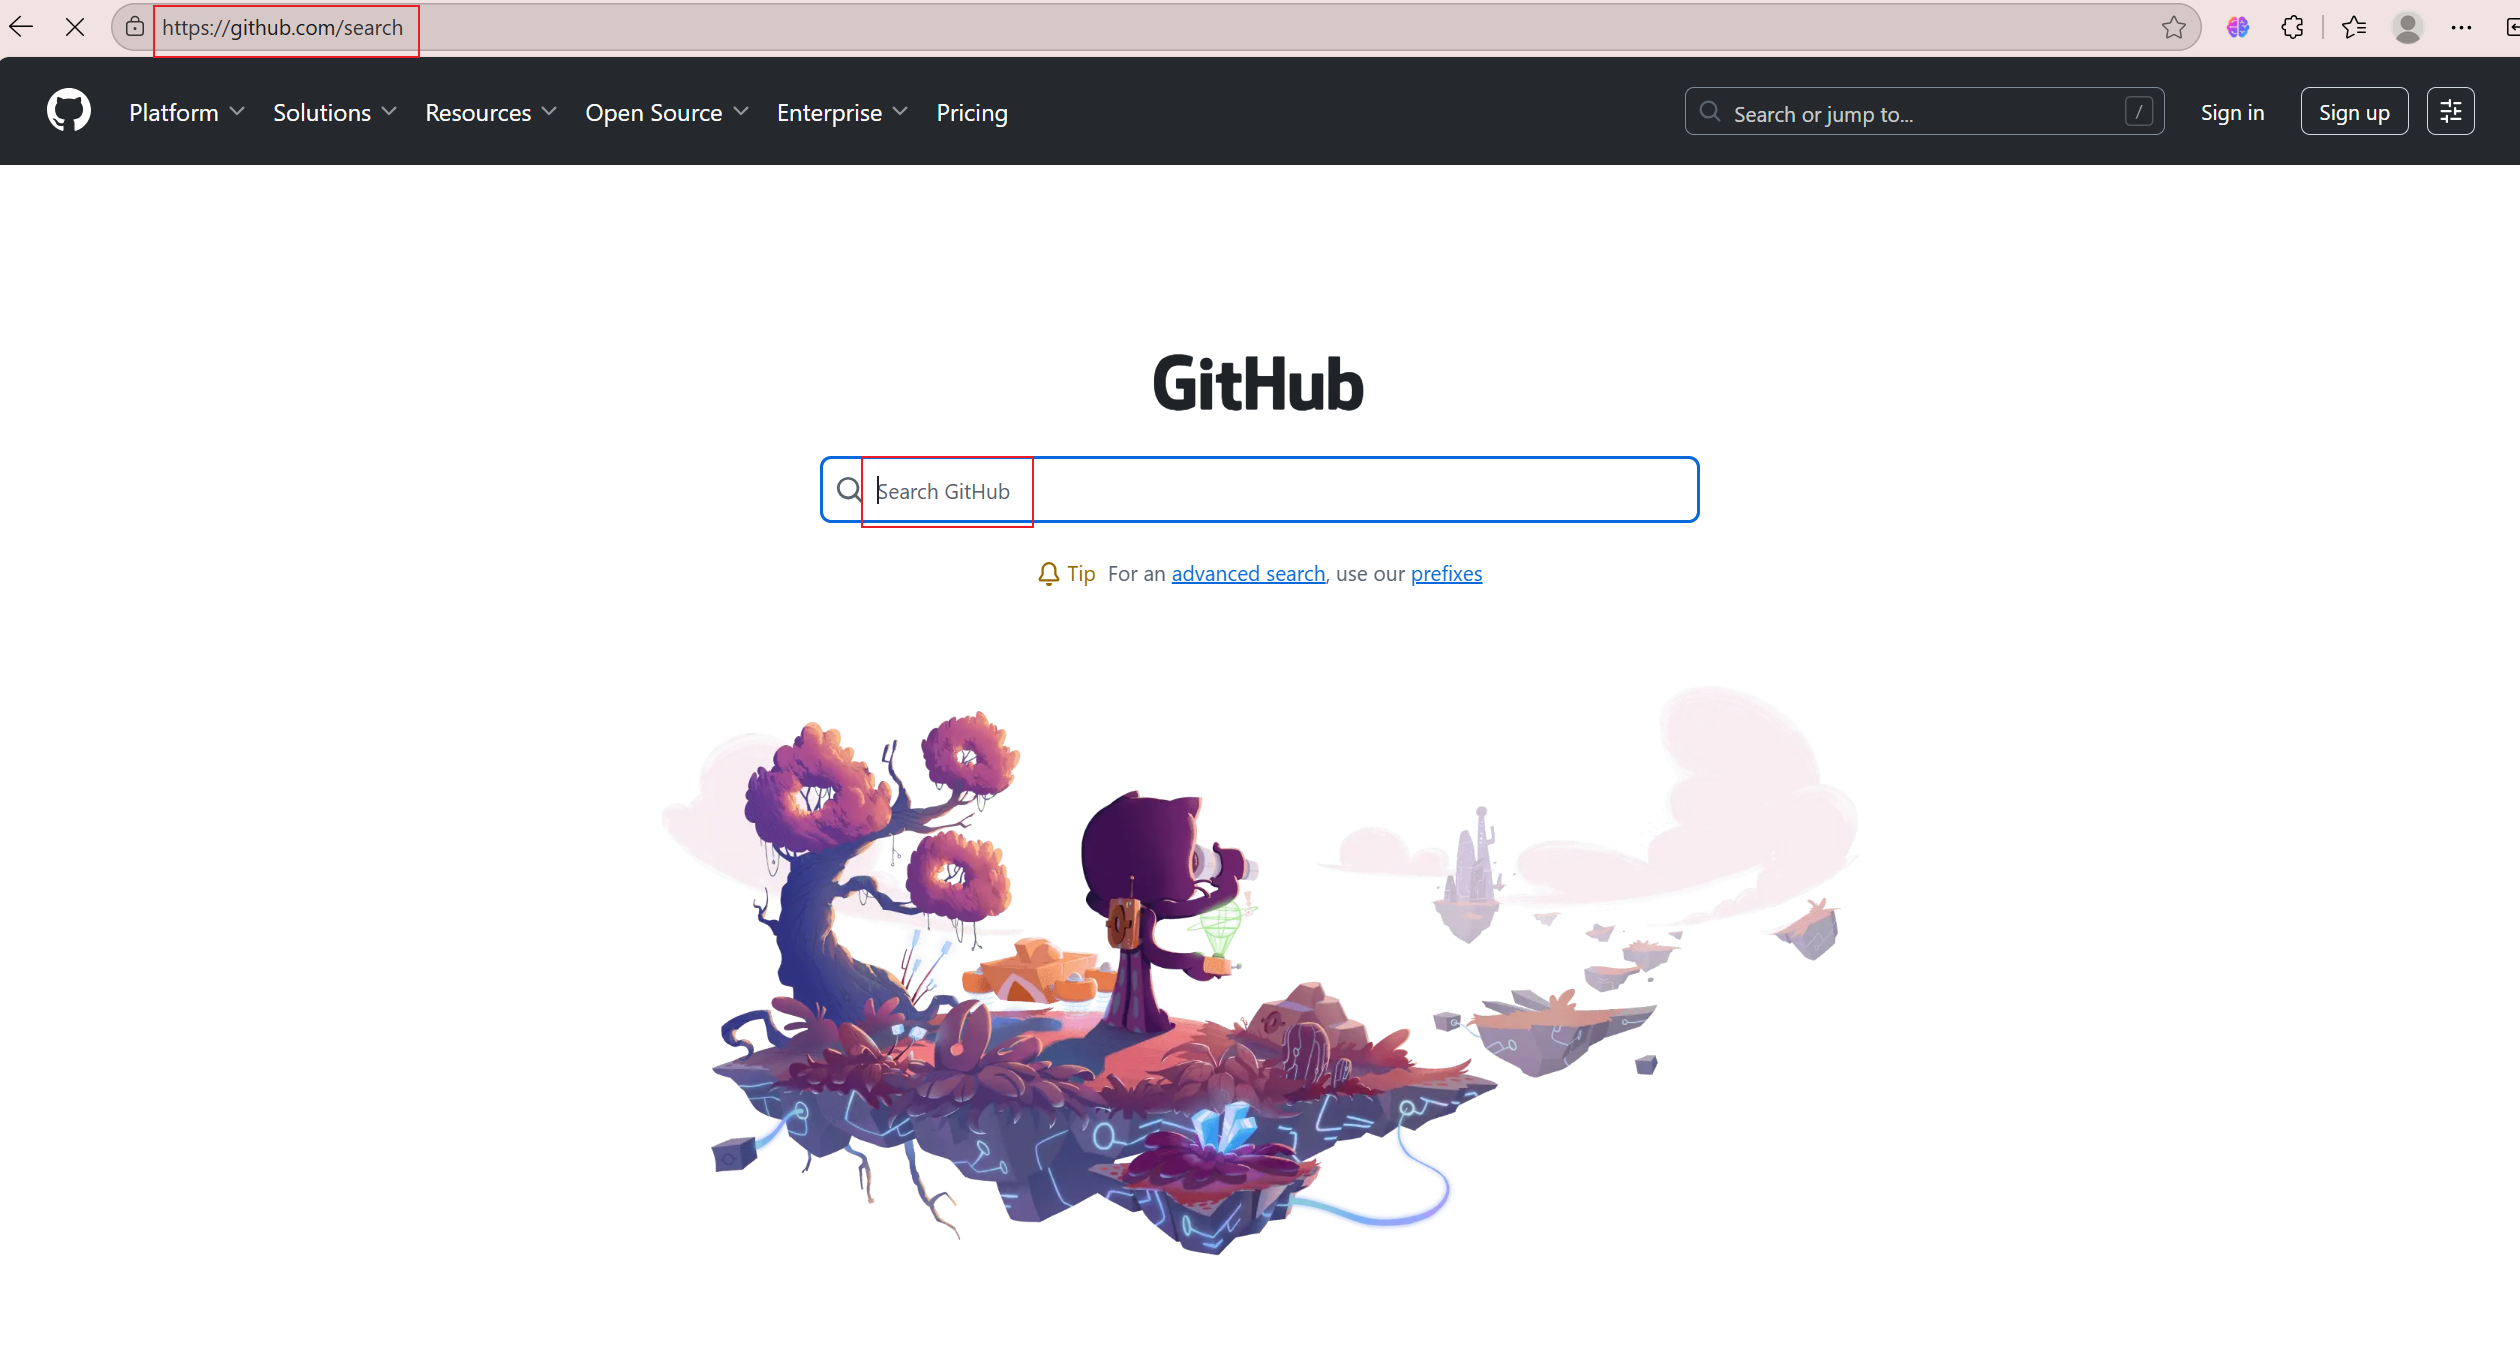
浏览器搜索:https://github.com/search
2、elasticsearch部署
两台虚拟机
192.168.100.10 es1.example.com elasticsearch-slave
192.168.100.20 es2.example.com elasticsearch-master
elasticsearch单节点部署
(1)检查防火墙selinux
powershell
[root@stw ~]# hostnamectl set-hostname es1.example.com
[root@stw ~]# bash
[root@es1 ~]# systemctl status firewalld.service
● firewalld.service - firewalld - dynamic firewall daemon
   Loaded: loaded (/usr/lib/systemd/system/firewalld.service; disabled; vendor preset: enabled)
   Active: inactive (dead)
     Docs: man:firewalld(1)
[root@es1 ~]# getenforce
Disabled
(2)时钟同步
powershell
[root@es1 ~]# systemctl restart chronyd
[root@es1 ~]# systemctl enable chronyd
Created symlink from /etc/systemd/system/multi-user.target.wants/chronyd.service to /usr/lib/systemd/system/chronyd.service.
[root@es1 ~]# hwclock -w
(3)确认jdk版本(使用系统自带的openjdk就可以)
powershell
[root@es1 ~]# rpm -qa | grep openjdk
java-1.8.0-openjdk-1.8.0.181-7.b13.el7.x86_64
java-1.8.0-openjdk-headless-1.8.0.181-7.b13.el7.x86_64
[root@es1 ~]# java -version
openjdk version "1.8.0_181"
OpenJDK Runtime Environment (build 1.8.0_181-b13)
OpenJDK 64-Bit Server VM (build 25.181-b13, mixed mode)
(4)安装、配置、启动elasticsearch
powershell
[root@es1 ~]# rz -E
rz waiting to receive.
[root@es1 ~]# ls
anaconda-ks.cfg  Documents  elasticsearch-6.5.2.rpm  Music     Public     Videos
Desktop          Downloads  initial-setup-ks.cfg     Pictures  Templates
[root@es1 ~]# rpm -ivh elasticsearch-6.5.2.rpm
warning: elasticsearch-6.5.2.rpm: Header V4 RSA/SHA512 Signature, key ID d88e42b4: NOKEY
Preparing...                          ################################# [100%]
Creating elasticsearch group... OK
Creating elasticsearch user... OK
Updating / installing...
   1:elasticsearch-0:6.5.2-1          ################################# [100%]
### NOT starting on installation, please execute the following statements to configure elasticsearch service to start automatically using systemd
 sudo systemctl daemon-reload
 sudo systemctl enable elasticsearch.service
### You can start elasticsearch service by executing
 sudo systemctl start elasticsearch.service
Created elasticsearch keystore in /etc/elasticsearch
[root@es1 ~]# vim /etc/elasticsearch/elasticsearch.yml
[root@es1 ~]# cat /etc/elasticsearch/elasticsearch.yml | grep -v "#"
cluster.name: elk-cluster          //可以自定义一个集群名称,不配置的话默认会取名为elasticsearch
path.data: /var/lib/elasticsearch
path.logs: /var/log/elasticsearch
network.host: 0.0.0.0                 //打开注释,并修改为监听所有
http.port: 9200                       //打开注释,监听端口9200
[root@es1 ~]# systemctl daemon-reload
[root@es1 ~]# systemctl restart elasticsearch.service
[root@es1 ~]# systemctl enable elasticsearch.service
Created symlink from /etc/systemd/system/multi-user.target.wants/elasticsearch.service to /usr/lib/systemd/system/elasticsearch.service.
[root@es1 ~]# netstat -ntlup | grep java
tcp6       0      0 :::9200                 :::*                    LISTEN      10497/java
tcp6       0      0 :::9300                 :::*                    LISTEN      10497/java
(5)查看状态
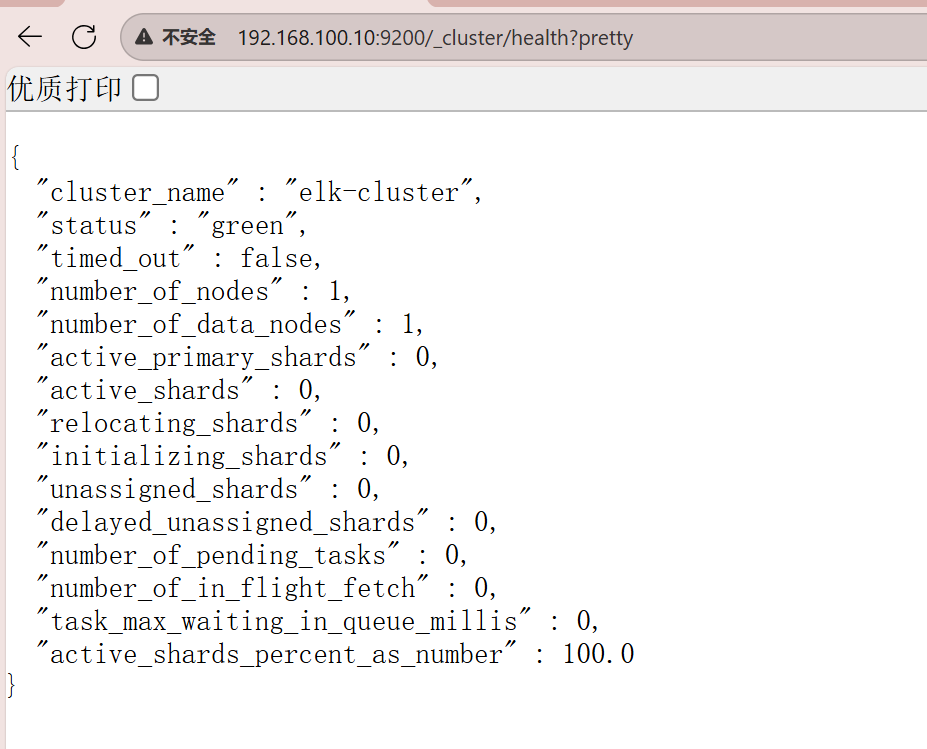
使用curl命令或浏览器访问http://192.168.100.10:9200/_cluster/health?pretty地址(IP为ES服务器IP)
powershell
[root@es1 ~]# curl http://192.168.100.10:9200/_cluster/health?pretty
{
  "cluster_name" : "elk-cluster",
  "status" : "green",
  "timed_out" : false,
  "number_of_nodes" : 1,
  "number_of_data_nodes" : 1,
  "active_primary_shards" : 0,
  "active_shards" : 0,
  "relocating_shards" : 0,
  "initializing_shards" : 0,
  "unassigned_shards" : 0,
  "delayed_unassigned_shards" : 0,
  "number_of_pending_tasks" : 0,
  "number_of_in_flight_fetch" : 0,
  "task_max_waiting_in_queue_millis" : 0,
  "active_shards_percent_as_number" : 100.0
}
elasticsearch集群部署
第二台配置步骤相同
(1)检查防火墙selinux
(2)时钟同步
(3)确认jdk版本(使用系统自带的openjdk就可以)
(4)更改两台主机的/etc/hosts 文件
powershell
[root@es2 ~]# vim /etc/hosts
[root@es2 ~]# cat /etc/hosts
127.0.0.1   localhost localhost.localdomain localhost4 localhost4.localdomain4
::1         localhost localhost.localdomain localhost6 localhost6.localdomain6
192.168.100.10 es1.example.com es1
192.168.100.20 es2.example.com es2
(5)安装elasticsearch
powershell
[root@es2 ~]# rz -E
rz waiting to receive.
[root@es2 ~]# ls
anaconda-ks.cfg  Documents  elasticsearch-6.5.2.rpm  Music     Public     Videos
Desktop          Downloads  initial-setup-ks.cfg     Pictures  Templates
[root@es2 ~]# rpm -ivh elasticsearch-6.5.2.rpm
warning: elasticsearch-6.5.2.rpm: Header V4 RSA/SHA512 Signature, key ID d88e42b4: NOKEY
Preparing...                          ################################# [100%]
Creating elasticsearch group... OK
Creating elasticsearch user... OK
Updating / installing...
   1:elasticsearch-0:6.5.2-1          ################################# [100%]
### NOT starting on installation, please execute the following statements to configure elasticsearch service to start automatically using systemd
 sudo systemctl daemon-reload
 sudo systemctl enable elasticsearch.service
### You can start elasticsearch service by executing
 sudo systemctl start elasticsearch.service
Created elasticsearch keystore in /etc/elasticsearch
(6)更改两台主机的配置文件,定义主节点和从节点
es1:
powershell
[root@es1 ~]# vim /etc/elasticsearch/elasticsearch.yml
[root@es1 ~]# cat /etc/elasticsearch/elasticsearch.yml | grep -v "#"
cluster.name: elk-cluster
node.name: 192.168.100.10
node.master: false
path.data: /var/lib/elasticsearch
path.logs: /var/log/elasticsearch
network.host: 0.0.0.0
http.port: 9200
discovery.zen.ping.unicast.hosts: ["192.168.100.10", "192.168.100.20"]
es2:
powershell
[root@es2 ~]# vim /etc/elasticsearch/elasticsearch.yml
[root@es2 ~]# cat /etc/elasticsearch/elasticsearch.yml | grep -v "#"
cluster.name: elk-cluster
node.name: 192.168.100.20
node.master: true
path.data: /var/lib/elasticsearch
path.logs: /var/log/elasticsearch
network.host: 0.0.0.0
http.port: 9200
discovery.zen.ping.unicast.hosts: ["192.168.100.10", "192.168.100.20"]
(7)起服务,查看端口(9200、9300)
es1:
powershell
[root@es1 ~]# systemctl restart elasticsearch.service
[root@es1 ~]# ss -anlt
State       Recv-Q Send-Q Local Address:Port               Peer Address:Port
LISTEN      0      128              *:111                          *:*
LISTEN      0      128              *:6000                         *:*
LISTEN      0      5      192.168.122.1:53                           *:*
LISTEN      0      128              *:22                           *:*
LISTEN      0      128      127.0.0.1:631                          *:*
LISTEN      0      100      127.0.0.1:25                           *:*
LISTEN      0      128      127.0.0.1:6010                         *:*
LISTEN      0      128             :::111                         :::*
LISTEN      0      128             :::9200                        :::*
LISTEN      0      128             :::6000                        :::*
LISTEN      0      128             :::9300                        :::*
LISTEN      0      128             :::22                          :::*
LISTEN      0      128            ::1:631                         :::*
LISTEN      0      100            ::1:25                          :::*
LISTEN      0      128            ::1:6010                        :::*
es2:
powershell
[root@es2 ~]# systemctl daemon-reload
[root@es2 ~]# systemctl restart elasticsearch.service
[root@es2 ~]# systemctl enable elasticsearch.service
Created symlink from /etc/systemd/system/multi-user.target.wants/elasticsearch.service to /usr/lib/systemd/system/elasticsearch.service.
[root@es2 ~]# ss -anlt
State       Recv-Q Send-Q Local Address:Port               Peer Address:Port
LISTEN      0      128              *:111                          *:*
LISTEN      0      128              *:6000                         *:*
LISTEN      0      5      192.168.122.1:53                           *:*
LISTEN      0      128              *:22                           *:*
LISTEN      0      128      127.0.0.1:631                          *:*
LISTEN      0      100      127.0.0.1:25                           *:*
LISTEN      0      128      127.0.0.1:6010                         *:*
LISTEN      0      128             :::111                         :::*
LISTEN      0      128             :::9200                        :::*
LISTEN      0      128             :::6000                        :::*
LISTEN      0      128             :::9300                        :::*
LISTEN      0      128             :::22                          :::*
LISTEN      0      128            ::1:631                         :::*
LISTEN      0      100            ::1:25                          :::*
LISTEN      0      128            ::1:6010                        :::*
(8)查看状态------访问es集群中任意一个节点ip都可以
powershell
[root@es1 ~]# curl http://192.168.100.10:9200/_cluster/health?pretty
{
  "cluster_name" : "elk-cluster",
  "status" : "green",
  "timed_out" : false,
  "number_of_nodes" : 2,
  "number_of_data_nodes" : 2,
  "active_primary_shards" : 0,
  "active_shards" : 0,
  "relocating_shards" : 0,
  "initializing_shards" : 0,
  "unassigned_shards" : 0,
  "delayed_unassigned_shards" : 0,
  "number_of_pending_tasks" : 0,
  "number_of_in_flight_fetch" : 0,
  "task_max_waiting_in_queue_millis" : 0,
  "active_shards_percent_as_number" : 100.0
}
[root@es1 ~]# curl http://192.168.100.20:9200/_cluster/health?pretty
{
  "cluster_name" : "elk-cluster",
  "status" : "green",
  "timed_out" : false,
  "number_of_nodes" : 2,
  "number_of_data_nodes" : 2,
  "active_primary_shards" : 0,
  "active_shards" : 0,
  "relocating_shards" : 0,
  "initializing_shards" : 0,
  "unassigned_shards" : 0,
  "delayed_unassigned_shards" : 0,
  "number_of_pending_tasks" : 0,
  "number_of_in_flight_fetch" : 0,
  "task_max_waiting_in_queue_millis" : 0,
  "active_shards_percent_as_number" : 100.0
}
三、elasticsearch基础概念
主要的基础概念有:Node, Index,Type,Document,Field,shard和replicas。
Node(节点):运行单个ES实例的服务器
Cluster(集群):一个或多个节点构成集群
Index(索引):索引是多个文档的集合
Type(类型):一个Index可以定义一种或多种类型,将Document逻辑分组
Document(文档):Index里每条记录称为Document,若干文档构建一个Index
Field(字段):ES存储的最小单元
Shards(分片):ES将Index分为若干份,每一份就是一个分片
Replicas(副本):Index的一份或多份副本
为了便于理解,我们和mysql这种关系型数据库做一个对比:
| 关系型数据库(如mysql, oracle等) | elasticsearch |
|---|---|
| database或schema | index |
| table | type |
| row | document |
| column或field | field |
ES是分布式搜索引擎,每个索引有一个或多个分片(shard),索引的数据被分配到各个分片上。你可以看作是一份数据分成了多份给不同的节点。
当ES集群增加或删除节点时,shard会在多个节点中均衡分配。默认是5个primary shard(主分片)和1个replica shard(副本,用于容错)。
四、elasticsearch基础API操作
前面我们通过http://10.1.1.12:9200/_cluster/health?pretty查看ES集群状态,其实就是它的一种API操作。
1、什么是API:
API( application programming interface )应用程序编程接口,就是无需访问程序源码或理解内部工作机制就能实现一些相关功能的接口
2、RestFul API 格式
powershell
curl -X<verb> '<protocol>://<host>:<port>/<path>?<query_string>'-d '<body>'| 参数 | 描述 |
|---|---|
| verb | HTTP方法,比如GET、POST、PUT、HEAD、DELETE |
| host | ES集群中的任意节点主机名 |
| port | ES HTTP服务端口,默认9200 |
| path | 索引路径 |
| query_string | 可选的查询请求参数。例如?pretty参数将返回JSON格式数据 |
| -d | 里面放一个GET的JSON格式请求主体 |
| body | 自己写的JSON格式的请求主体 |
elasticseearch的API很多, 我们运维人员主要用到以下几个要介绍的较简单的API,更多API参考: https://www.elastic.co/guide/en/elasticsearch/reference/6.2/index.html
3、查看节点信息
(1)通过curl或浏览器访问http://192.168.100.10:9200/_cat/nodes?v(ip为ES节点IP,如果有ES集群,则为ES任意节点IP)
powershell
[root@es1 ~]# curl http://192.168.100.10:9200/_cat/nodes?v
ip             heap.percent ram.percent cpu load_1m load_5m load_15m node.role master name
192.168.100.10           31          69   0    0.07    0.04     0.05 di        -      192.168.100.10
192.168.100.20           29          69   1    0.01    0.05     0.05 mdi       *      192.168.100.20
4、查看索引信息
(1)通过curl或浏览器访问http://192.168.100.10:9200/_cat/indices?v
powershell
[root@es1 ~]# curl http://192.168.100.10:9200/_cat/indices?v
health status index uuid pri rep docs.count docs.deleted store.size pri.store.size
//默认现在没有任何索引
5、新增索引
powershell
[root@es1 ~]# curl -X PUT http://192.168.100.10:9200/nginx_access_log
{"acknowledged":true,"shards_acknowledged":true,"index":"nginx_access_log"}

[root@es1 ~]# curl http://192.168.100.10:9200/_cat/indices?v
health status index            uuid                   pri rep docs.count docs.deleted store.size pri.store.size
green  open   nginx_access_log 1NTiCpliQA2ZqVXU3rJ8Yw   5   1          0            0      2.2kb          1.1kb
green :所有的主分片和副本分片都已分配。你的集群是100%可用的。
yellow :所有的主分片已经分片了,但至少还有一个副本是缺失的。不会有数据丢失,所以搜索结果依然是完整的。不过,你的高可用性在某种程度上被弱化。如果 更多的 分片消失,你就会丢数据了。把yellow 想象成一个需要及时调查的警告。
red:至少一个主分片(以及它的全部副本)都在缺失中。这意味着你在缺少数据:搜索只能返回部分数据,而分配到这个分片上的写入请求会返回一个异常。
6、删除索引
powershell
[root@es1 ~]# curl -X DELETE http://192.168.100.10:9200/nginx_access_log
{"acknowledged":true}

[root@es1 ~]# curl http://192.168.100.10:9200/_cat/indices?v
health status index uuid pri rep docs.count docs.deleted store.size pri.store.size
五、ES查询语句
ES提供一种可用于执行查询JSON式的语言,被称为Query DSL。
针对elasticsearch的操作,可以分为增、删、改、查四个动作
1、查询匹配条件:
match_all
from , size
match
bool
range
2、查询应用案例:
导入数据源
使用官方提供的示例数据:
(1)将accounts.json文件下载并导入进elasticsearch
powershell
[root@es2 ~]# curl -H "Content-Type: application/json" -XPOST "192.168.100.20:9200/bank/_doc/_bulk?pretty&refresh" --data-binary "@accounts.json"
[root@es2 ~]# curl "192.168.100.20:9200/_cat/indices?v"
health status index uuid                   pri rep docs.count docs.deleted store.size pri.store.size
green  open   bank  US7YE3hlQN-rJY_8Z1X7Nw   5   1       1000            0   1013.4kb        506.5kb
(2)查询bank索引的数据(使用查询字符串进行查询)
powershell
[root@es2 ~]# curl -X GET "192.168.100.20:9200/bank/_search?q=*&sort=account_number:asc&pretty"
{
  "took" : 491,
  "timed_out" : false,
  "_shards" : {
    "total" : 5,
    "successful" : 5,
    "skipped" : 0,
    "failed" : 0
  },
  "hits" : {
    "total" : 1000,
    "max_score" : null,
    "hits" : [
      {
        "_index" : "bank",
        "_type" : "_doc",
        "_id" : "0",
        "_score" : null,
        "_source" : {
          "account_number" : 0,
          "balance" : 16623,
          "firstname" : "Bradshaw",
          "lastname" : "Mckenzie",
          "age" : 29,
          "gender" : "F",
          "address" : "244 Columbus Place",
          "employer" : "Euron",
          "email" : "bradshawmckenzie@euron.com",
          "city" : "Hobucken",
          "state" : "CO"
        },
        "sort" : [
          0
        ]
      },
      {
......
......
说明:
默认结果为10条
_search  属于一类API,用于执行查询操作
q=* ES批量索引中的所有文档
sort=account_number:asc 表示根据account_number按升序对结果排序
pretty调整显示格式
(3)查询bank索引的数据 (使用json格式进行查询)
powershell
[root@es2 ~]# curl -X GET "192.168.100.20:9200/bank/_search" -H 'Content-Type: application/json' -d'
> {
> "query": { "match_all": {} },
> "sort": [
> { "account_number": "asc" }
> ]
> }
> '
注意: 最后为单引号
{"took":48,"timed_out":false,"_shards":{"total":5,"successful":5,"skipped":0,"failed":0},"hits":{"total":1000,"max_score":null,"hits":[{"_index":"bank","_type":"_doc","_id":"0","_score":null,"_source":{"account_number":0,"balance":16623,"firstname":"Bradshaw","lastname":"Mckenzie","age":29,"gender":"F","address":"244 Columbus Place","employer":"Euron","email":"bradshawmckenzie@euron.com","city":"Hobucken","state":"CO"},"sort":[0]},{"_index":"bank","_type":"_doc","_id":"1",
......
......
3、查询匹配动作及案例:
(1)match_all
匹配所有文档,默认查询
示例:查询所有,默认返回10个文档
powershell
[root@es2 ~]# curl -X GET "192.168.100.20:9200/bank/_search?pretty" -H 'Content-Type: application/json' -d'
> {
> "query": {"match_all": {} }
> }
> '
{
  "took" : 38,
  "timed_out" : false,
  "_shards" : {
    "total" : 5,
    "successful" : 5,
    "skipped" : 0,
    "failed" : 0
  },
  "hits" : {
    "total" : 1000,
    "max_score" : 1.0,
    "hits" : [
      {
        "_index" : "bank",
        "_type" : "_doc",
        "_id" : "25",
        "_score" : 1.0,
        "_source" : {
          "account_number" : 25,
          "balance" : 40540,
          "firstname" : "Virginia",
          "lastname" : "Ayala",
          "age" : 39,
          "gender" : "F",
          "address" : "171 Putnam Avenue",
          "employer" : "Filodyne",
          "email" : "virginiaayala@filodyne.com",
          "city" : "Nicholson",
          "state" : "PA"
        }
      },
//默认查询十条
# query告诉我们查询什么
# match_all是我们查询的类型
# match_all查询仅仅在指定的索引的所有文件进行搜索
(2)from , size
除了query参数外,还可以传递其它参数影响查询结果,比如前面提到的sort,接下来使用的size
powershell
[root@es2 ~]# curl -X GET "192.168.100.20:9200/bank/_search?pretty" -H 'Content-Type: application/json' -d'
{
"query": { "match_all": {} },
"size": 1
}
'
{
  "took" : 13,
  "timed_out" : false,
  "_shards" : {
    "total" : 5,
    "successful" : 5,
    "skipped" : 0,
    "failed" : 0
  },
  "hits" : {
    "total" : 1000,
    "max_score" : 1.0,
    "hits" : [
      {
        "_index" : "bank",
        "_type" : "_doc",
        "_id" : "25",
        "_score" : 1.0,
        "_source" : {
          "account_number" : 25,
          "balance" : 40540,
          "firstname" : "Virginia",
          "lastname" : "Ayala",
          "age" : 39,
          "gender" : "F",
          "address" : "171 Putnam Avenue",
          "employer" : "Filodyne",
          "email" : "virginiaayala@filodyne.com",
          "city" : "Nicholson",
          "state" : "PA"
        }
      }
    ]
  }
}
指定位置与查询条数
powershell
[root@es2 ~]# curl -X GET "192.168.100.20:9200/bank/_search?pretty" -H 'Content-Type: application/json' -d'
{
"query": { "match_all": {} },
"from":0,
> "size": 2
> }
> '
{
  "took" : 8,
  "timed_out" : false,
  "_shards" : {
    "total" : 5,
    "successful" : 5,
    "skipped" : 0,
    "failed" : 0
  },
  "hits" : {
    "total" : 1000,
    "max_score" : 1.0,
    "hits" : [
      {
        "_index" : "bank",
        "_type" : "_doc",
        "_id" : "25",
        "_score" : 1.0,
        "_source" : {
          "account_number" : 25,
          "balance" : 40540,
          "firstname" : "Virginia",
          "lastname" : "Ayala",
          "age" : 39,
          "gender" : "F",
          "address" : "171 Putnam Avenue",
          "employer" : "Filodyne",
          "email" : "virginiaayala@filodyne.com",
          "city" : "Nicholson",
          "state" : "PA"
        }
      },
      {
        "_index" : "bank",
        "_type" : "_doc",
        "_id" : "44",
        "_score" : 1.0,
        "_source" : {
          "account_number" : 44,
          "balance" : 34487,
          "firstname" : "Aurelia",
          "lastname" : "Harding",
          "age" : 37,
          "gender" : "M",
          "address" : "502 Baycliff Terrace",
          "employer" : "Orbalix",
          "email" : "aureliaharding@orbalix.com",
          "city" : "Yardville",
          "state" : "DE"
        }
      }
    ]
  }
}
查询account_number从第501条到510条的数据
powershell
[root@es2 ~]# curl -X GET "192.168.100.20:9200/bank/_search?pretty" -H 'Content-Type: application/json' -d'
{
"query": { "match_all": {} },
"from":500,
"size": 10
}
'
匹配查询字段
返回_source字段中的片段字段
powershell
[root@es2 ~]# curl -X GET "192.168.100.20:9200/bank/_search?pretty" -H 'Content-Type: application/json' -d'
{
"query": { "match_all": {} },
"_source": ["accout_number", "balance"]
}
'
{
  "took" : 16,
  "timed_out" : false,
  "_shards" : {
    "total" : 5,
    "successful" : 5,
    "skipped" : 0,
    "failed" : 0
  },
  "hits" : {
    "total" : 1000,
    "max_score" : 1.0,
    "hits" : [
      {
        "_index" : "bank",
        "_type" : "_doc",
        "_id" : "25",
        "_score" : 1.0,
        "_source" : {
          "balance" : 40540
        }
      },
      {
        "_index" : "bank",
        "_type" : "_doc",
        "_id" : "44",
        "_score" : 1.0,
        "_source" : {
          "balance" : 34487
        }
      },
      {
        "_index" : "bank",
        "_type" : "_doc",
        "_id" : "99",
        "_score" : 1.0,
        "_source" : {
          "balance" : 47159
        }
      },
      {
        "_index" : "bank",
        "_type" : "_doc",
        "_id" : "119",
        "_score" : 1.0,
        "_source" : {
          "balance" : 49222
        }
      },
      {
        "_index" : "bank",
        "_type" : "_doc",
        "_id" : "126",
        "_score" : 1.0,
        "_source" : {
          "balance" : 3607
        }
      },
      {
        "_index" : "bank",
        "_type" : "_doc",
        "_id" : "145",
        "_score" : 1.0,
        "_source" : {
          "balance" : 47406
        }
      },
      {
        "_index" : "bank",
        "_type" : "_doc",
        "_id" : "183",
        "_score" : 1.0,
        "_source" : {
          "balance" : 14223
        }
      },
      {
        "_index" : "bank",
        "_type" : "_doc",
        "_id" : "190",
        "_score" : 1.0,
        "_source" : {
          "balance" : 3150
        }
      },
      {
        "_index" : "bank",
        "_type" : "_doc",
        "_id" : "208",
        "_score" : 1.0,
        "_source" : {
          "balance" : 40760
        }
      },
      {
        "_index" : "bank",
        "_type" : "_doc",
        "_id" : "222",
        "_score" : 1.0,
        "_source" : {
          "balance" : 14764
        }
      }
    ]
  }
}
(3)match
基本搜索查询,针对特定字段或字段集合进行搜索
查询编号为20的账户
powershell
[root@es2 ~]# curl -X GET "192.168.100.20:9200/bank/_search?pretty" -H 'Content-Type: application/json' -d'
{
"query": { "match": { "account_number": 20 } }
}
'
{
"took" : 32,
"timed_out" : false,
"_shards" : {
"total" : 5,
"successful" : 5,
"skipped" : 0,
"failed" : 0
},
"hits" : {
"total" : 1,
"max_score" : 1.0,
"hits" : [
{
"_index" : "bank",
"_type" : "_doc",
"_id" : "20",
"_score" : 1.0,
"_source" : {
"account_number" : 20,
"balance" : 16418,
"firstname" : "Elinor",
"lastname" : "Ratliff",
"age" : 36,
"gender" : "M",
"address" : "282 Kings Place",
"employer" : "Scentric",
"email" : "elinorratliff@scentric.com",
"city" : "Ribera",
"state" : "WA"
}
}
]
}
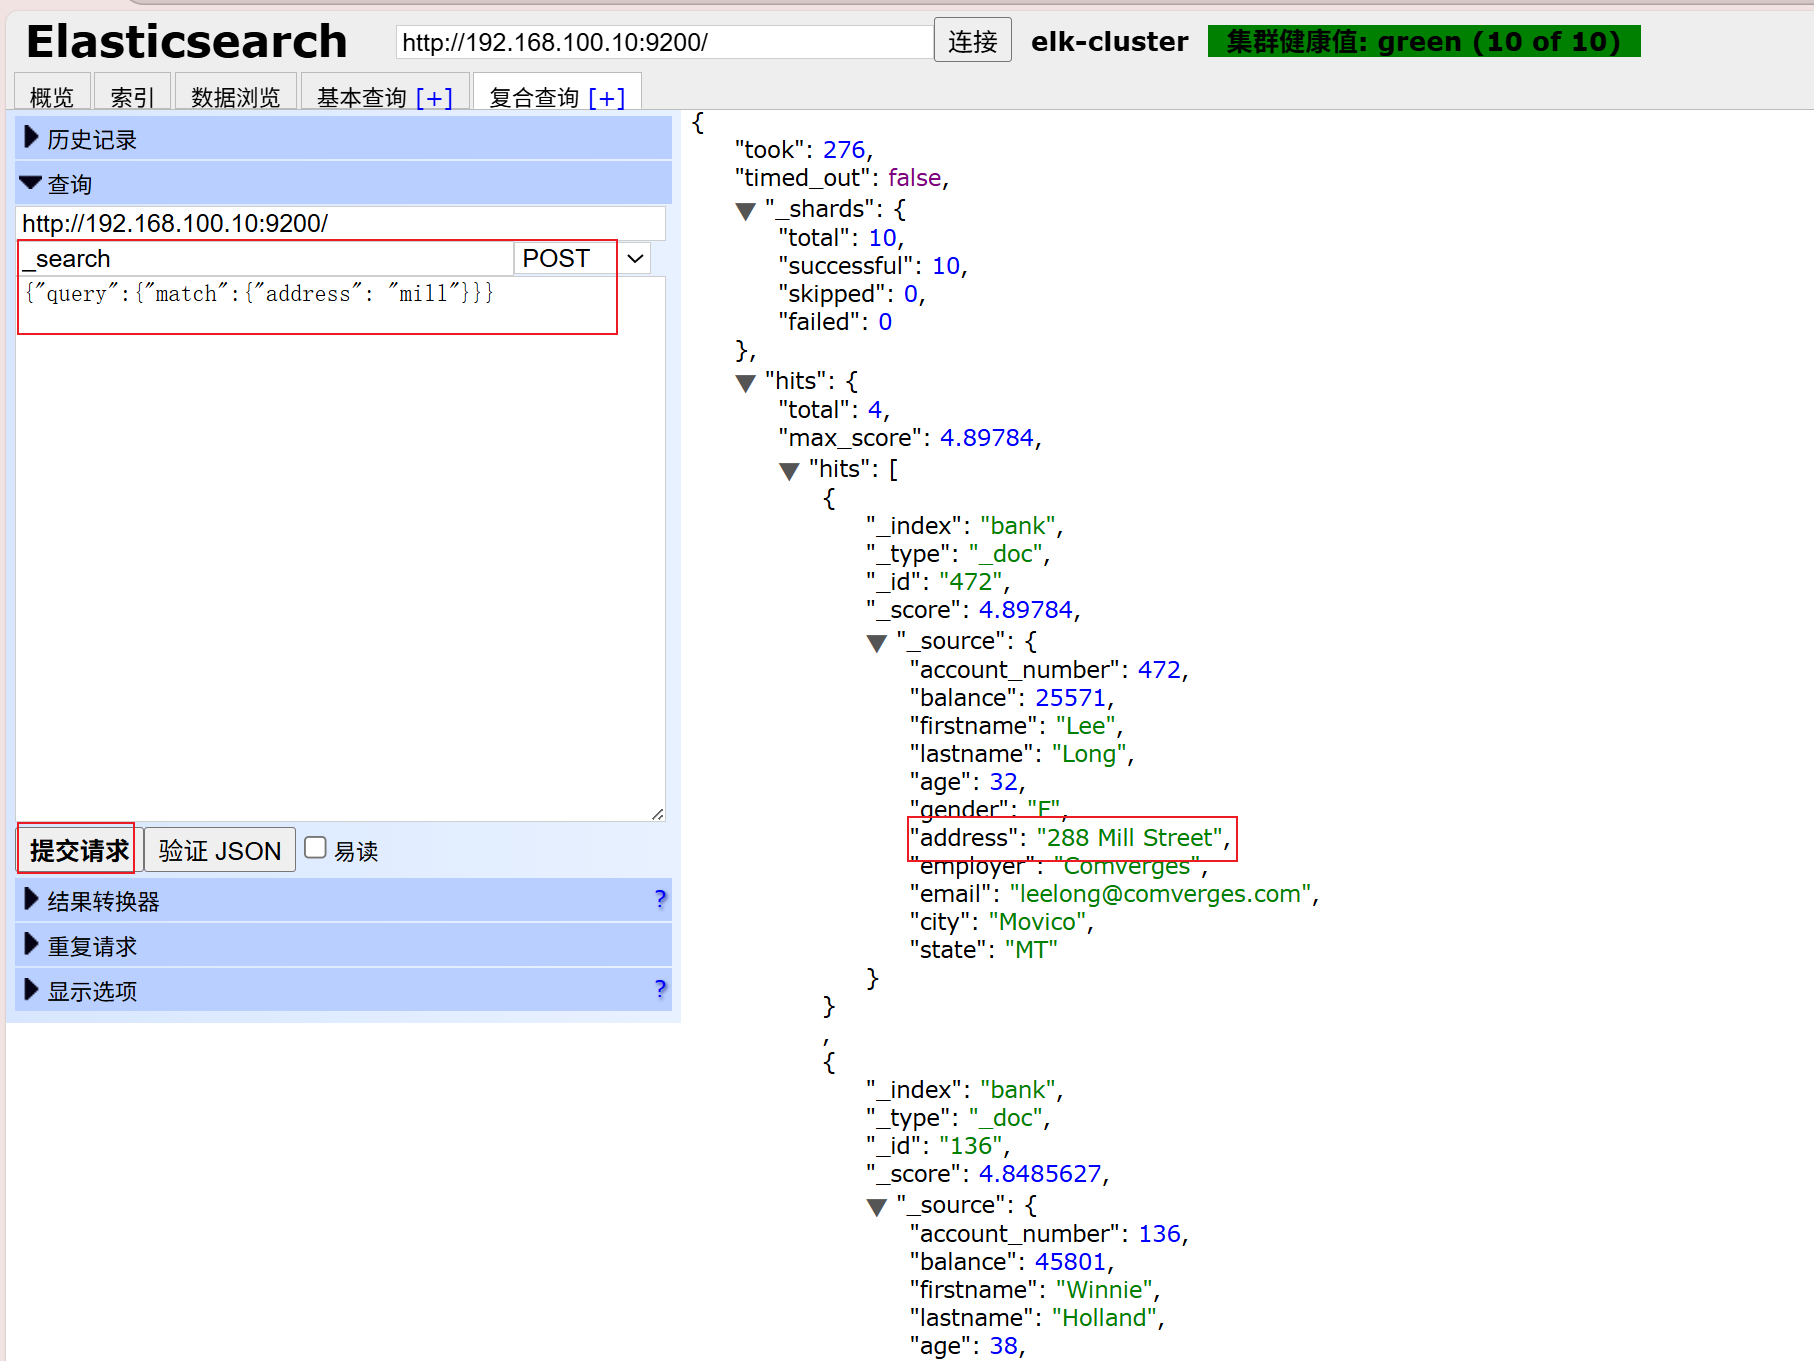
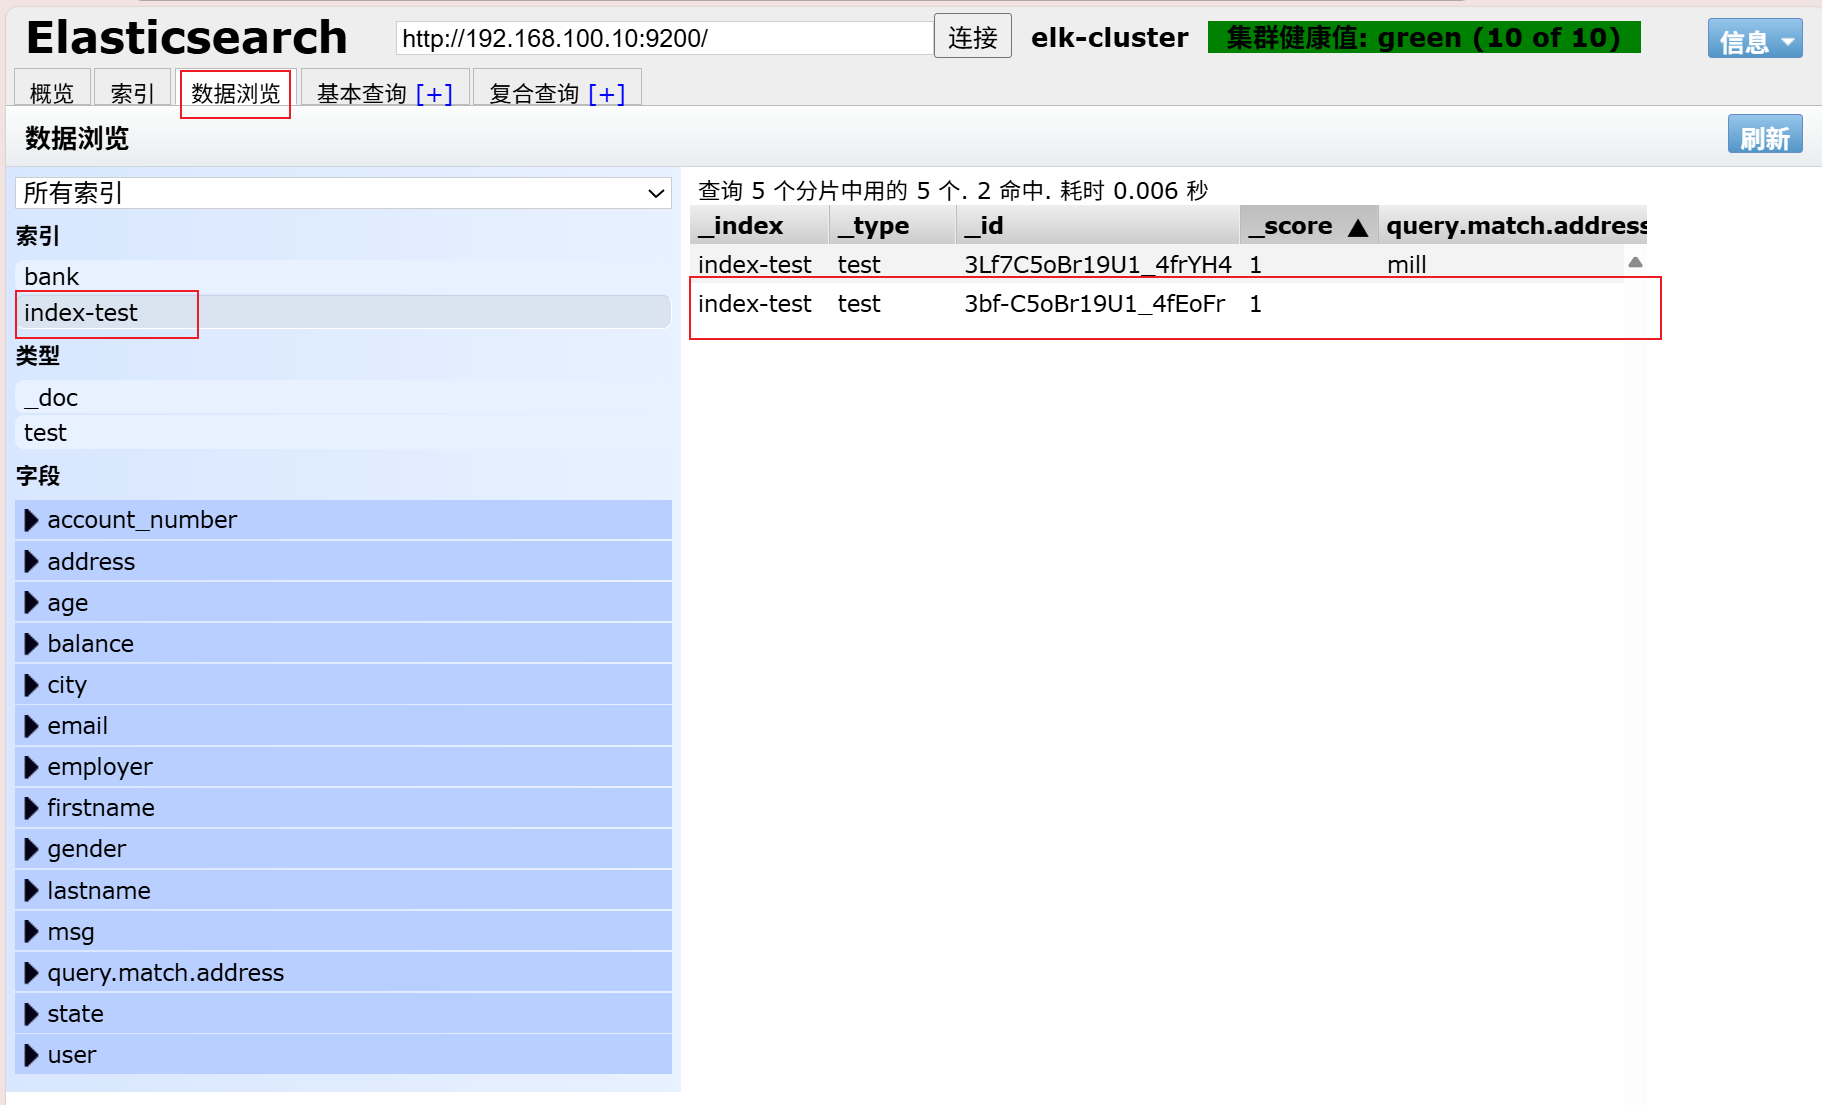
}返回地址中包含mill的账户
powershell
[root@es2 ~]# curl -X GET "192.168.100.20:9200/bank/_search?pretty" -H 'Content-Type: application/json' -d'
{
"query": { "match": { "address": "mill" } }
> }
> '
{
  "took" : 69,
  "timed_out" : false,
  "_shards" : {
    "total" : 5,
    "successful" : 5,
    "skipped" : 0,
    "failed" : 0
  },
  "hits" : {
    "total" : 4,
    "max_score" : 4.89784,
    "hits" : [
      {
        "_index" : "bank",
        "_type" : "_doc",
        "_id" : "472",
        "_score" : 4.89784,
        "_source" : {
          "account_number" : 472,
          "balance" : 25571,
          "firstname" : "Lee",
          "lastname" : "Long",
          "age" : 32,
          "gender" : "F",
          "address" : "288 Mill Street",
          "employer" : "Comverges",
          "email" : "leelong@comverges.com",
          "city" : "Movico",
          "state" : "MT"
        }
      },
      {
        "_index" : "bank",
        "_type" : "_doc",
        "_id" : "136",
        "_score" : 4.8485627,
        "_source" : {
          "account_number" : 136,
          "balance" : 45801,
          "firstname" : "Winnie",
          "lastname" : "Holland",
          "age" : 38,
          "gender" : "M",
          "address" : "198 Mill Lane",
          "employer" : "Neteria",
          "email" : "winnieholland@neteria.com",
          "city" : "Urie",
          "state" : "IL"
        }
      },
      {
        "_index" : "bank",
        "_type" : "_doc",
        "_id" : "970",
        "_score" : 4.388994,
        "_source" : {
          "account_number" : 970,
          "balance" : 19648,
          "firstname" : "Forbes",
          "lastname" : "Wallace",
          "age" : 28,
          "gender" : "M",
          "address" : "990 Mill Road",
          "employer" : "Pheast",
          "email" : "forbeswallace@pheast.com",
          "city" : "Lopezo",
          "state" : "AK"
        }
      },
      {
        "_index" : "bank",
        "_type" : "_doc",
        "_id" : "345",
        "_score" : 4.388994,
        "_source" : {
          "account_number" : 345,
          "balance" : 9812,
          "firstname" : "Parker",
          "lastname" : "Hines",
          "age" : 38,
          "gender" : "M",
          "address" : "715 Mill Avenue",
          "employer" : "Baluba",
          "email" : "parkerhines@baluba.com",
          "city" : "Blackgum",
          "state" : "KY"
        }
      }
    ]
  }
}
返回地址有包含mill或lane的所有账户
powershell
[root@es2 ~]# curl -X GET "192.168.100.20:9200/bank/_search?pretty" -H 'Content-Type: application/json' -d'
{
"query": { "match": { "address": "mill lane" } }
}
'
# 空格就是或的关系
(4)bool
bool must 查询的字段必须同时存在
查询包含mill和lane的所有账户
powershell
[root@es2 ~]# curl -X GET "192.168.100.20:9200/bank/_search?pretty" -H 'Content-Type: application/json' -d'
{
"query": {
> "bool": {
> "must": [
> { "match": { "address": "mill" } },
> { "match": { "address": "lane" } }
> ]
> }
> }
> }
> '
{
  "took" : 44,
  "timed_out" : false,
  "_shards" : {
    "total" : 5,
    "successful" : 5,
    "skipped" : 0,
    "failed" : 0
  },
  "hits" : {
    "total" : 1,
    "max_score" : 8.398771,
    "hits" : [
      {
        "_index" : "bank",
        "_type" : "_doc",
        "_id" : "136",
        "_score" : 8.398771,
        "_source" : {
          "account_number" : 136,
          "balance" : 45801,
          "firstname" : "Winnie",
          "lastname" : "Holland",
          "age" : 38,
          "gender" : "M",
          "address" : "198 Mill Lane",
          "employer" : "Neteria",
          "email" : "winnieholland@neteria.com",
          "city" : "Urie",
          "state" : "IL"
        }
      }
    ]
  }
}
bool should 查询的字段仅存在一即可
查询包含mill或lane的所有账户
powershell
[root@es2 ~]# curl -X GET "192.168.100.20:9200/bank/_search?pretty" -H 'Content-Type: application/json' -d'
{
"query": {
"bool": {
"should": [
{ "match": { "address": "mill" } },
{ "match": { "address": "lane" } }
]
}
}
}
'
(5)range
指定区间内的数字或者时间
操作符:gt大于,gte大于等于,lt小于,lte小于等于
查询余额大于或等于20000且小于等于30000的账户
powershell
[root@es2 ~]# curl -X GET "192.168.100.20:9200/bank/_search?pretty" -H 'Content-Type: application/json' -d'
{
"query": {
"bool": {
"must": { "match_all": {} },
> "filter": {
> "range": {
> "balance": {
> "gte": 20000,
> "lte": 30000
> }
> }
> }
> }
> }
> }
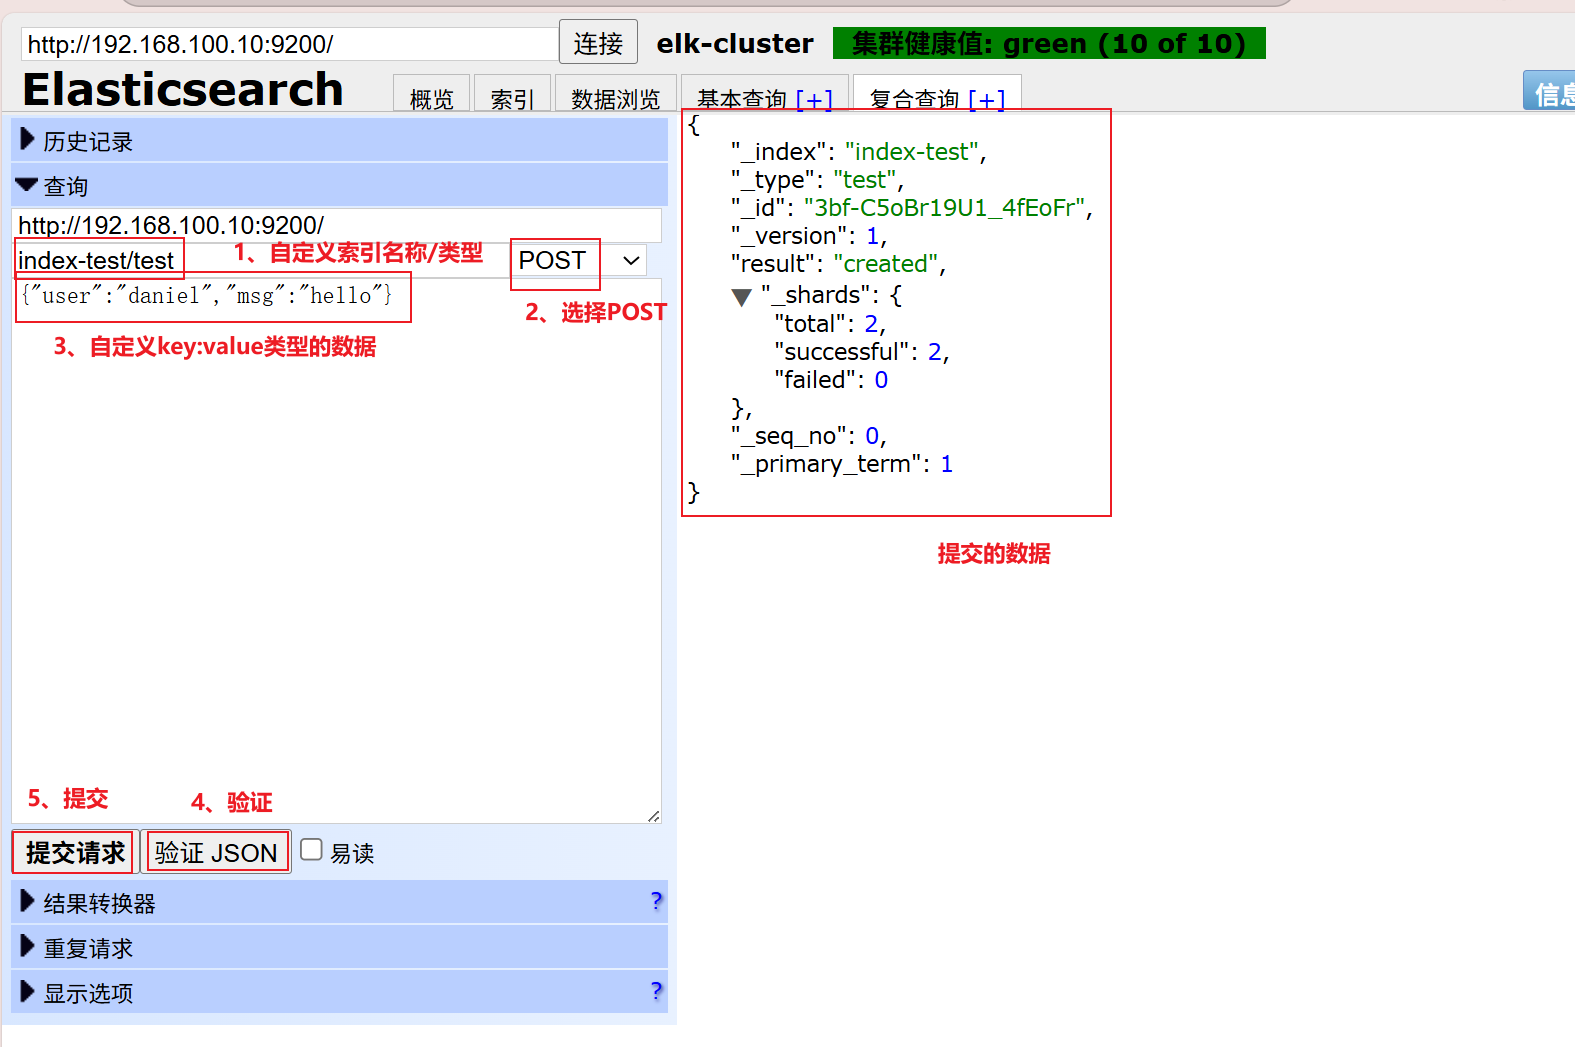
> '六、elasticsearch-head
elasticsearch-head是集群管理、数据可视化、增删改查、查询语句可视化工具 。从ES5版本后安装方式和ES2以上的版本有很大的不同,在ES2中可以直接在bin目录下执行plugin install xxxx 来进行安装,但是在ES5中这种安装方式变了,要想在ES5中安装Elasticsearch Head必须要安装NodeJs,然后通过NodeJS来启动Head。
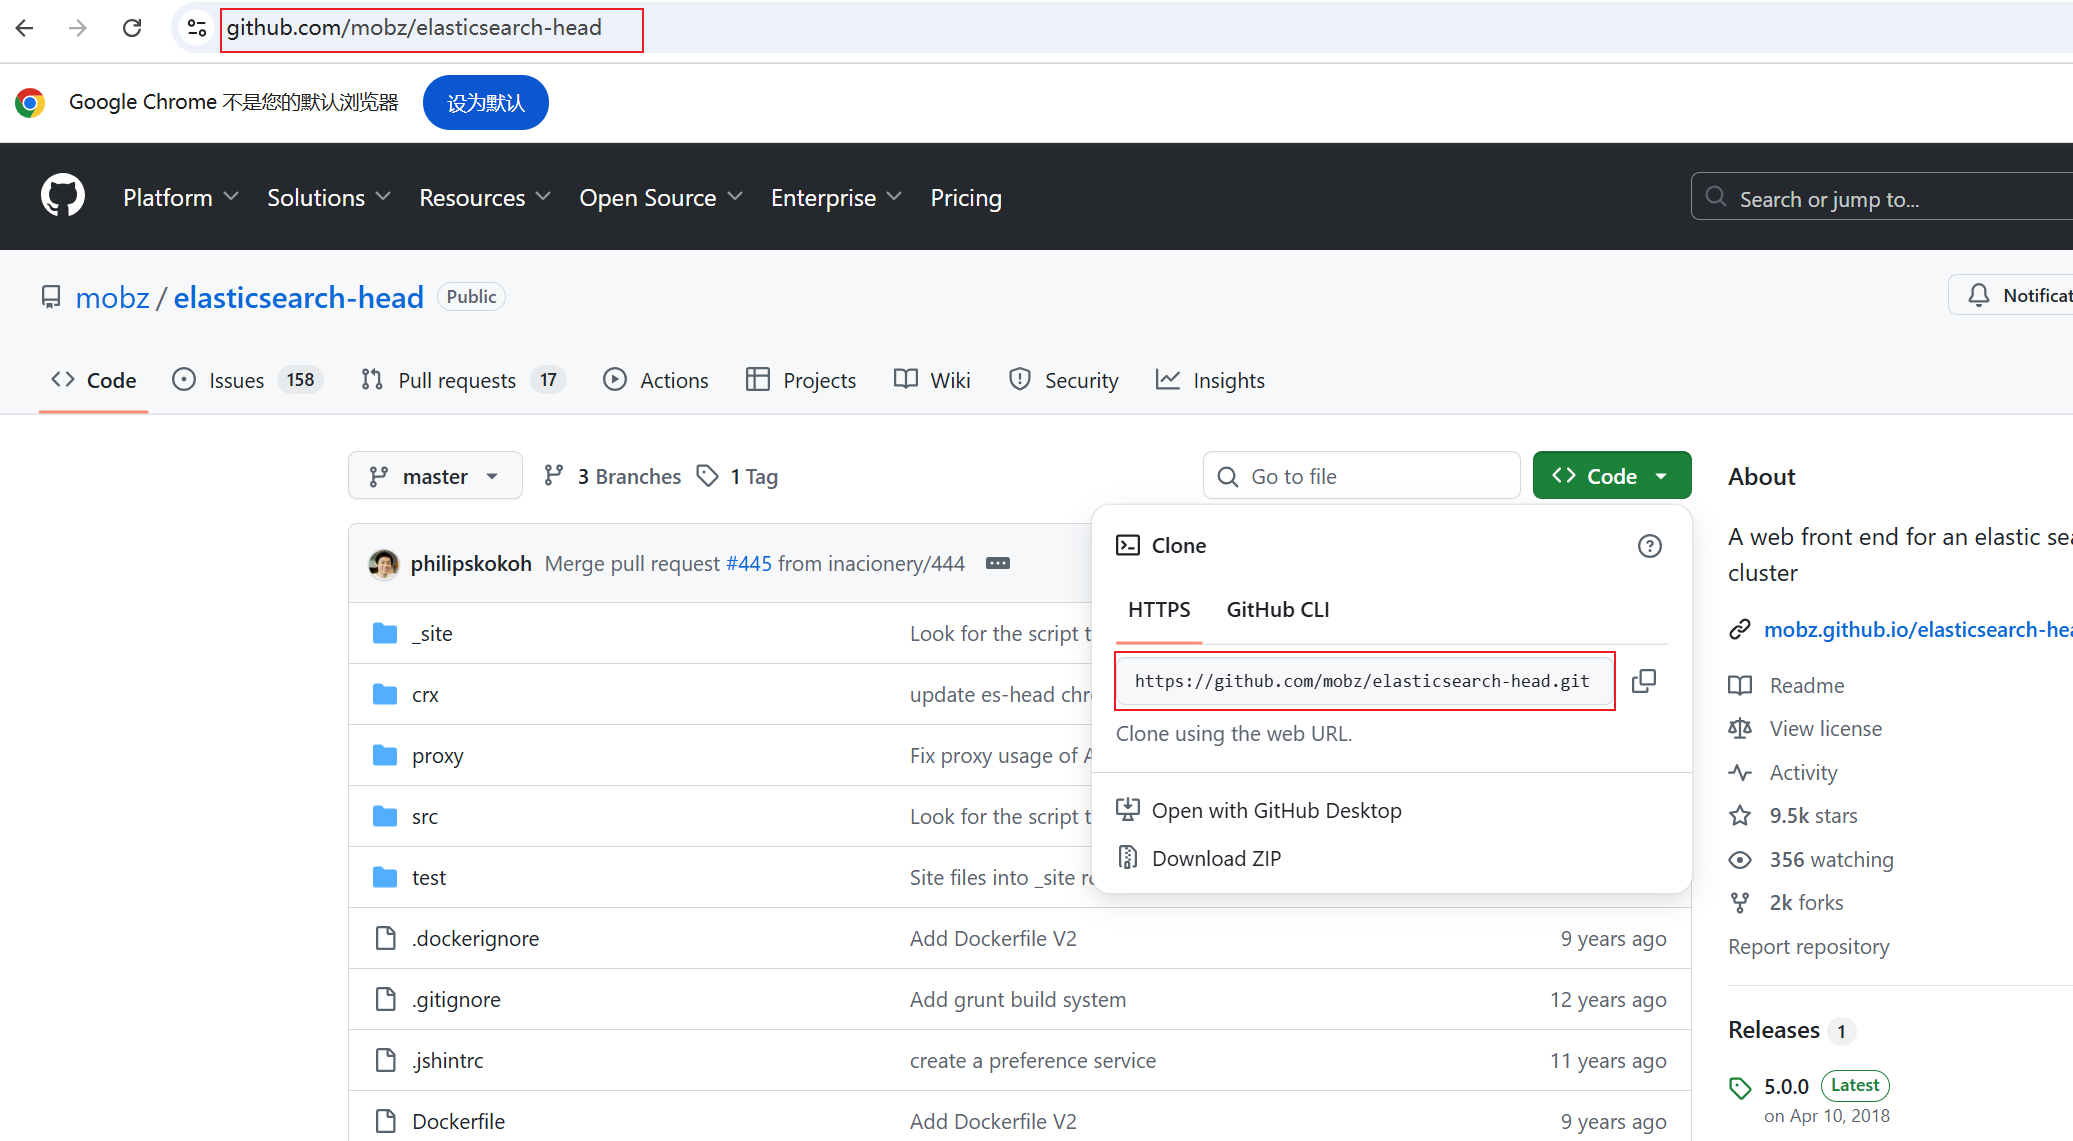
官网地址:https://github.com/mobz/elasticsearch-head
1、配置elasticsearch-head
(1)安装nodejs
powershell
[root@es2 ~]# rz -E
rz waiting to receive.
[root@es2 ~]# ls
accounts.json    Downloads                node-v10.24.1-linux-x64.tar.xz  Videos
anaconda-ks.cfg  elasticsearch-6.5.2.rpm  Pictures
Desktop          initial-setup-ks.cfg     Public
Documents        Music                    Templates
[root@es2 ~]# tar -xf node-v10.24.1-linux-x64.tar.xz -C /usr/local
[root@es2 ~]# cd /usr/local/
[root@es2 local]# ls
bin  etc  games  include  lib  lib64  libexec  node-v10.24.1-linux-x64  sbin  share  src
[root@es2 local]# mv node-v10.24.1-linux-x64/ nodejs
[root@es2 local]# ls
bin  etc  games  include  lib  lib64  libexec  nodejs  sbin  share  src
[root@es2 local]# cd /usr/local/nodejs/
[root@es2 nodejs]# ls
bin  CHANGELOG.md  include  lib  LICENSE  README.md  share
[root@es2 nodejs]# cd bin/
[root@es2 bin]# ls
node  npm  npx
[root@es2 bin]# ln -s /usr/local/nodejs/bin/npm /bin/npm
[root@es2 bin]# ln -s /usr/local/nodejs/bin/node /bin/node
2、安装git
powershell
[root@es2 ~]# cd /etc/yum.repos.d/
[root@es2 yum.repos.d]# ls
CentOS-Base.repo  CentOS-Debuginfo.repo  CentOS-Media.repo    CentOS-Vault.repo
CentOS-CR.repo    CentOS-fasttrack.repo  CentOS-Sources.repo
[root@es2 yum.repos.d]# rm -rf *
[root@es2 yum.repos.d]# wget -O /etc/yum.repos.d/CentOS-Base.repo https://mirrors.aliyun.com/repo/Centos-7.repo
--2025-10-22 20:03:12--  https://mirrors.aliyun.com/repo/Centos-7.repo
Resolving mirrors.aliyun.com (mirrors.aliyun.com)... 111.173.81.22, 111.173.81.20, 111.173.81.21
Connecting to mirrors.aliyun.com (mirrors.aliyun.com)|111.173.81.22|:443... connected.
HTTP request sent, awaiting response... 200 OK
Length: 2523 (2.5K) [application/octet-stream]
Saving to: '/etc/yum.repos.d/CentOS-Base.repo'

100%[===============================================>] 2,523       --.-K/s   in 0s

2025-10-22 20:03:12 (250 MB/s) - '/etc/yum.repos.d/CentOS-Base.repo' saved [2523/2523]

[root@es2 yum.repos.d]# yum -y install git
3、安装es-head(安装时间较久)
powershell
[root@es2 ~]# git clone https://github.com/mobz/elasticsearch-head.git
Cloning into 'elasticsearch-head'...
remote: Enumerating objects: 4377, done.
remote: Counting objects: 100% (40/40), done.
remote: Compressing objects: 100% (27/27), done.
remote: Total 4377 (delta 12), reused 34 (delta 12), pack-reused 4337 (from 1)
Receiving objects: 100% (4377/4377), 2.54 MiB | 38.00 KiB/s, done.
Resolving deltas: 100% (2429/2429), done.
[root@es2 ~]# ls
accounts.json    Downloads                Music                           Templates
anaconda-ks.cfg  elasticsearch-6.5.2.rpm  node-v10.24.1-linux-x64.tar.xz  Videos
Desktop          elasticsearch-head       Pictures
Documents        initial-setup-ks.cfg     Public
[root@es2 ~]# cd elasticsearch-head/
[root@es2 elasticsearch-head]# ls
crx                                 grunt_fileSets.js             proxy
Dockerfile                          index.html                    README.textile
Dockerfile-alpine                   LICENCE                       _site
elasticsearch-head.sublime-project  package.json                  src
Gruntfile.js                        plugin-descriptor.properties  test
[root@es2 elasticsearch-head]# npm install -g grunt-cli
/usr/local/nodejs/bin/grunt -> /usr/local/nodejs/lib/node_modules/grunt-cli/bin/grunt
+ grunt-cli@1.5.0
added 56 packages from 68 contributors in 33.971s
[root@es2 elasticsearch-head]# npm install
安装可能有很多错误,我这里出现了下面的错误(重点是注意红色的ERR!,黄色的WARN不用管)
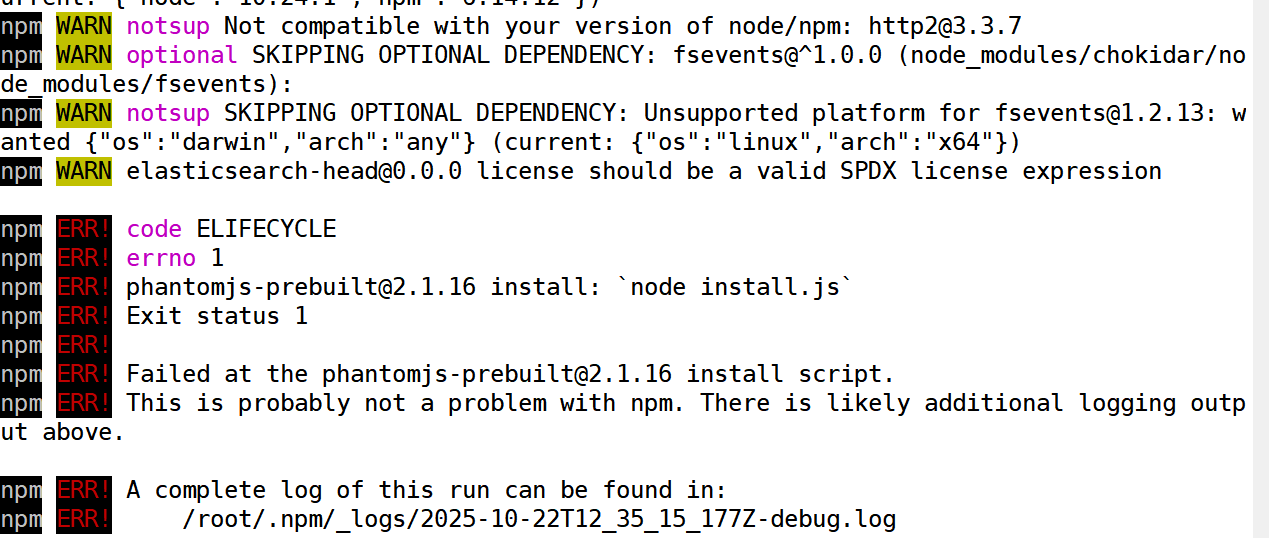
解决方法
powershell
[root@es2 elasticsearch-head]# npm install phantomjs-prebuilt@2.1.16 --ignore-script
npm WARN deprecated phantomjs-prebuilt@2.1.16: this package is now deprecated
npm WARN deprecated request@2.88.2: request has been deprecated, see https://github.com/request/request/issues/3142
npm WARN deprecated uuid@3.4.0: Please upgrade to version 7 or higher. Older versions may use Math.random() in certain circumstances, which is known to be problematic. See https://v8.dev/blog/math-random for details.
npm WARN deprecated har-validator@5.1.5: this library is no longer supported
npm WARN deprecated fsevents@1.2.13: Upgrade to fsevents v2 to mitigate potential security issues
npm notice created a lockfile as package-lock.json. You should commit this file.
npm WARN optional SKIPPING OPTIONAL DEPENDENCY: fsevents@^1.0.0 (node_modules/chokidar/node_modules/fsevents):
npm WARN notsup SKIPPING OPTIONAL DEPENDENCY: Unsupported platform for fsevents@1.2.13: wanted {"os":"darwin","arch":"any"} (current: {"os":"linux","arch":"x64"})
npm WARN elasticsearch-head@0.0.0 license should be a valid SPDX license expression
+ phantomjs-prebuilt@2.1.16
added 62 packages from 65 contributors, removed 4 packages and audited 516 packages in 15.959s
20 packages are looking for funding
run `npm fund` for details
found 122 vulnerabilities (17 low, 37 moderate, 54 high, 14 critical)
run `npm audit fix` to fix them, or `npm audit` for details
[root@es2 elasticsearch-head]# nohup npm run start &
[1] 60394
[root@es2 elasticsearch-head]# nohup: ignoring input and appending output to 'nohup.out'
[root@es2 elasticsearch-head]# ss -anlt
State Recv-Q Send-Q Local Address:Port Peer Address:Port
LISTEN 0 128 *:9100 *:*
LISTEN 0 128 *:111 *:*
LISTEN 0 128 *:6000 *:*
LISTEN 0 5 192.168.122.1:53 *:*
LISTEN 0 128 *:22 *:*
LISTEN 0 128 127.0.0.1:631 *:*
LISTEN 0 100 127.0.0.1:25 *:*
LISTEN 0 128 127.0.0.1:6010 *:*
LISTEN 0 128 :::111 :::*
LISTEN 0 128 :::9200 :::*
LISTEN 0 128 :::6000 :::*
LISTEN 0 128 :::9300 :::*
LISTEN 0 128 :::22 :::*
LISTEN 0 128 ::1:631 :::*
LISTEN 0 100 ::1:25 :::*
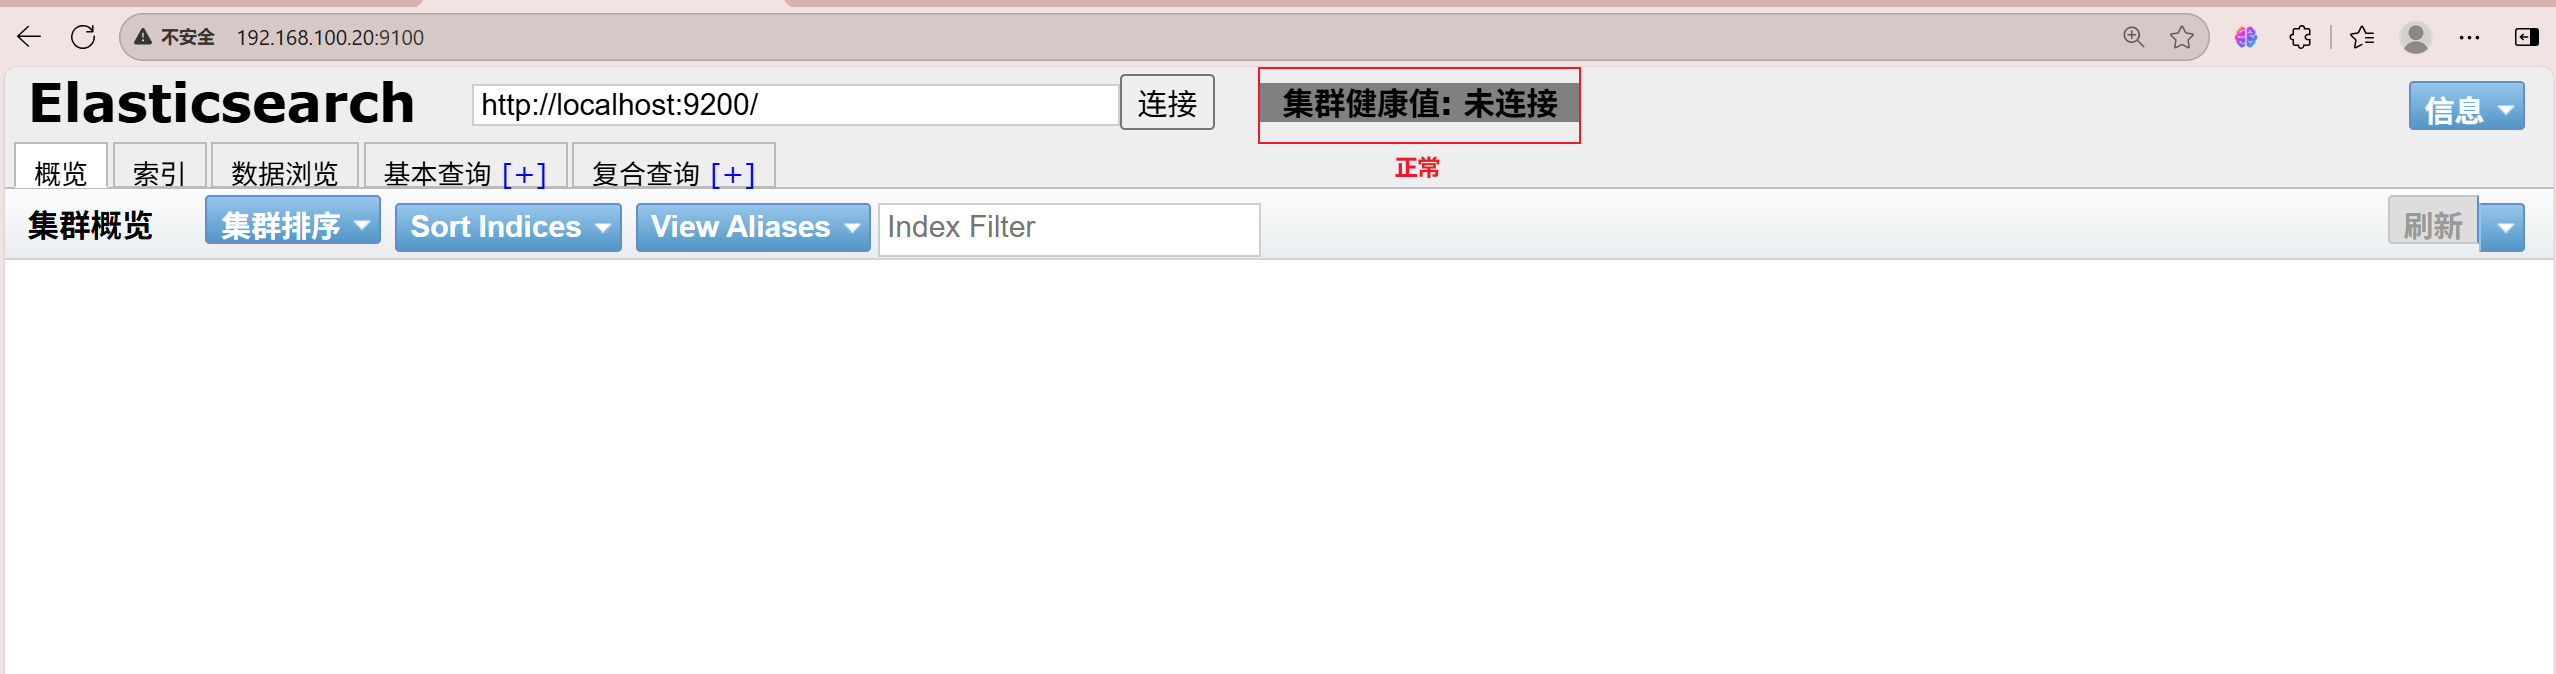
LISTEN 0 128 ::1:6010 :::* 4、访问浏览器
浏览器访问 http://es-head节点IP:9100 ,并在下面的地址里把localhost改为es-head节点IP(浏览器与es-head不是同一节点就要做)
5、修改ES集群配置文件,并重启服务
es1:
powershell
[root@es1 ~]# vim /etc/elasticsearch/elasticsearch.yml
[root@es1 ~]# cat /etc/elasticsearch/elasticsearch.yml | grep -v "#"
cluster.name: elk-cluster
node.name: 192.168.100.10
node.master: false
path.data: /var/lib/elasticsearch
path.logs: /var/log/elasticsearch
network.host: 0.0.0.0
http.port: 9200
discovery.zen.ping.unicast.hosts: ["192.168.100.10", "192.168.100.20"]
http.cors.enabled: true
http.cors.allow-origin: "*"
[root@es1 ~]# systemctl restart elasticsearch.service
es2:
powershell
[root@es2 ~]# vim /etc/elasticsearch/elasticsearch.yml
[root@es2 ~]# cat /etc/elasticsearch/elasticsearch.yml | grep -v "#"
cluster.name: elk-cluster
node.name: 192.168.100.20
node.master: true
path.data: /var/lib/elasticsearch
path.logs: /var/log/elasticsearch
network.host: 0.0.0.0
http.port: 9200
discovery.zen.ping.unicast.hosts: ["192.168.100.10", "192.168.100.20"]
http.cors.enabled: true
http.cors.allow-origin: "*"
[root@es2 ~]# systemctl restart elasticsearch.service
6、再次连接就可以看到信息了
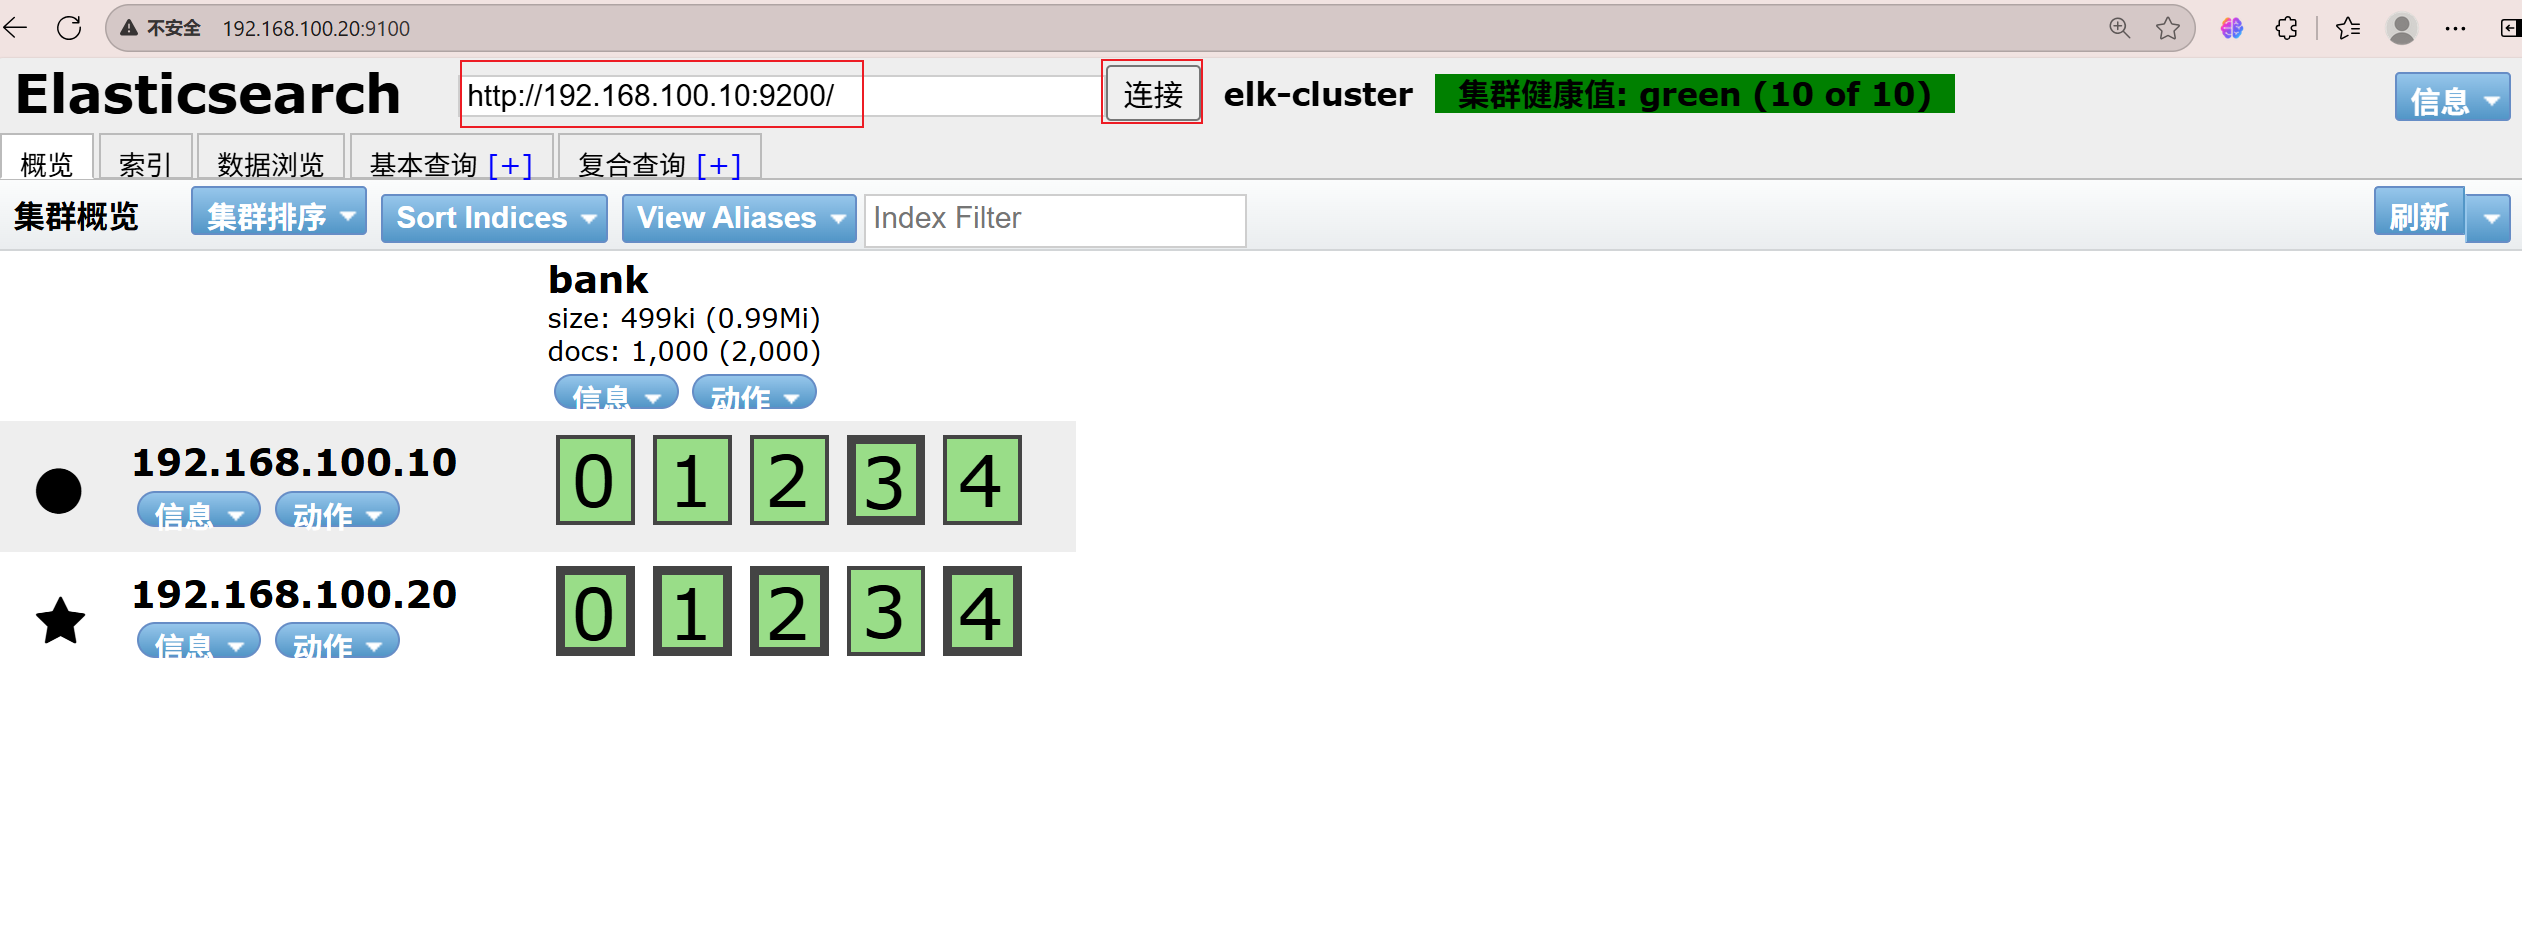
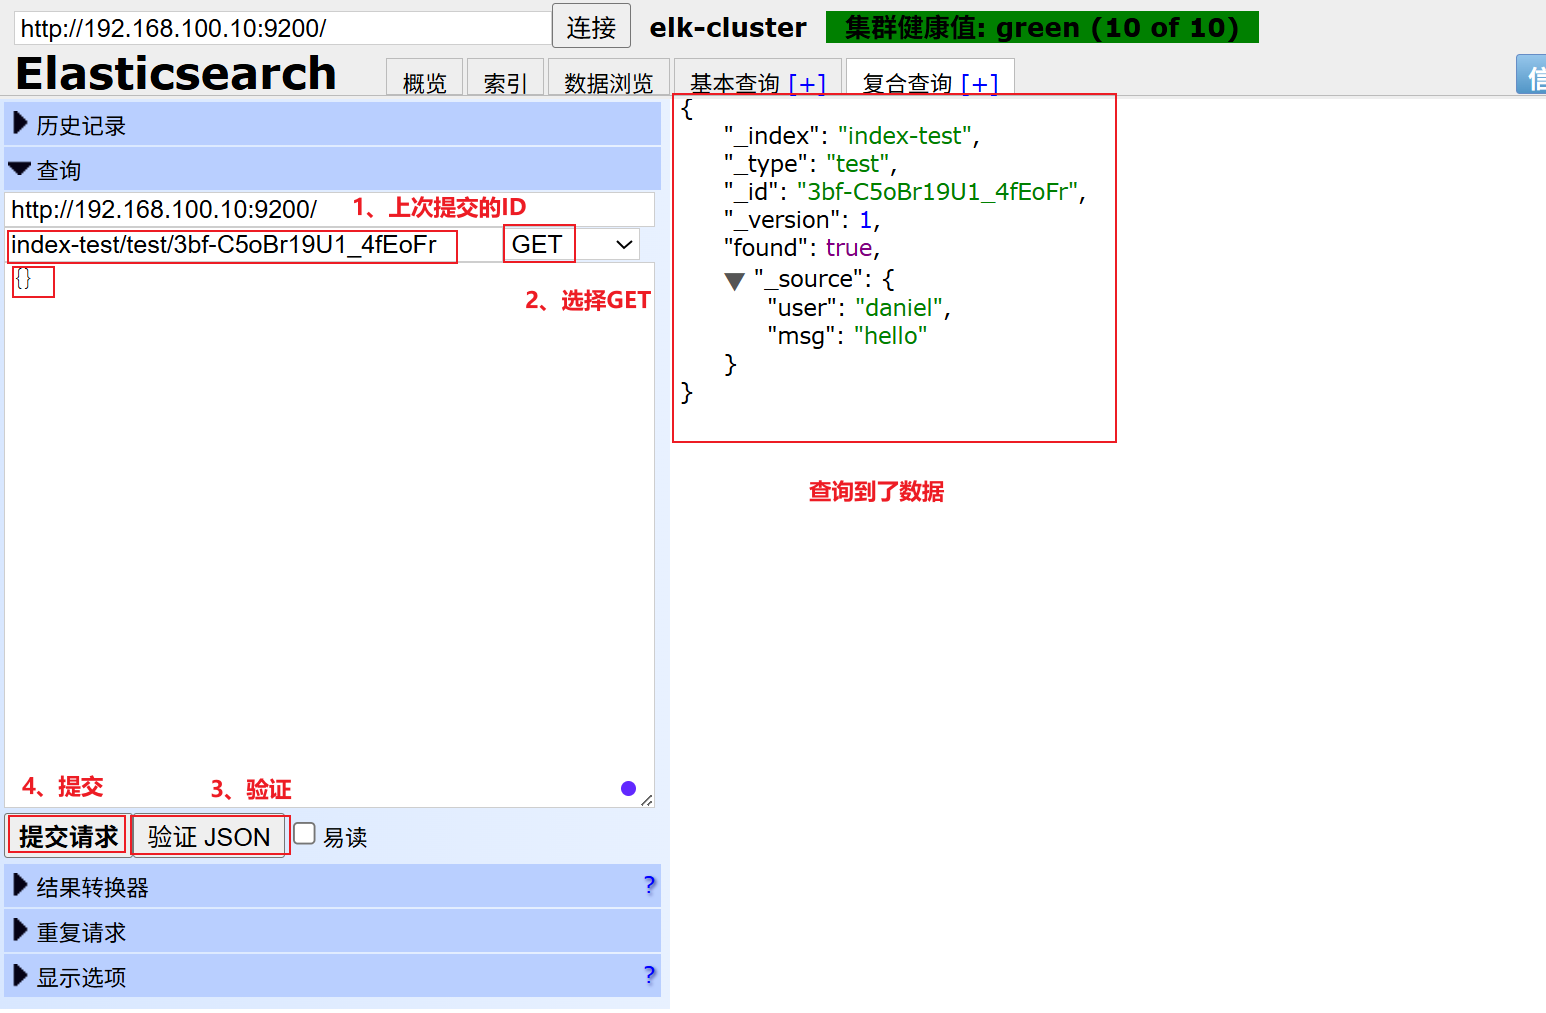
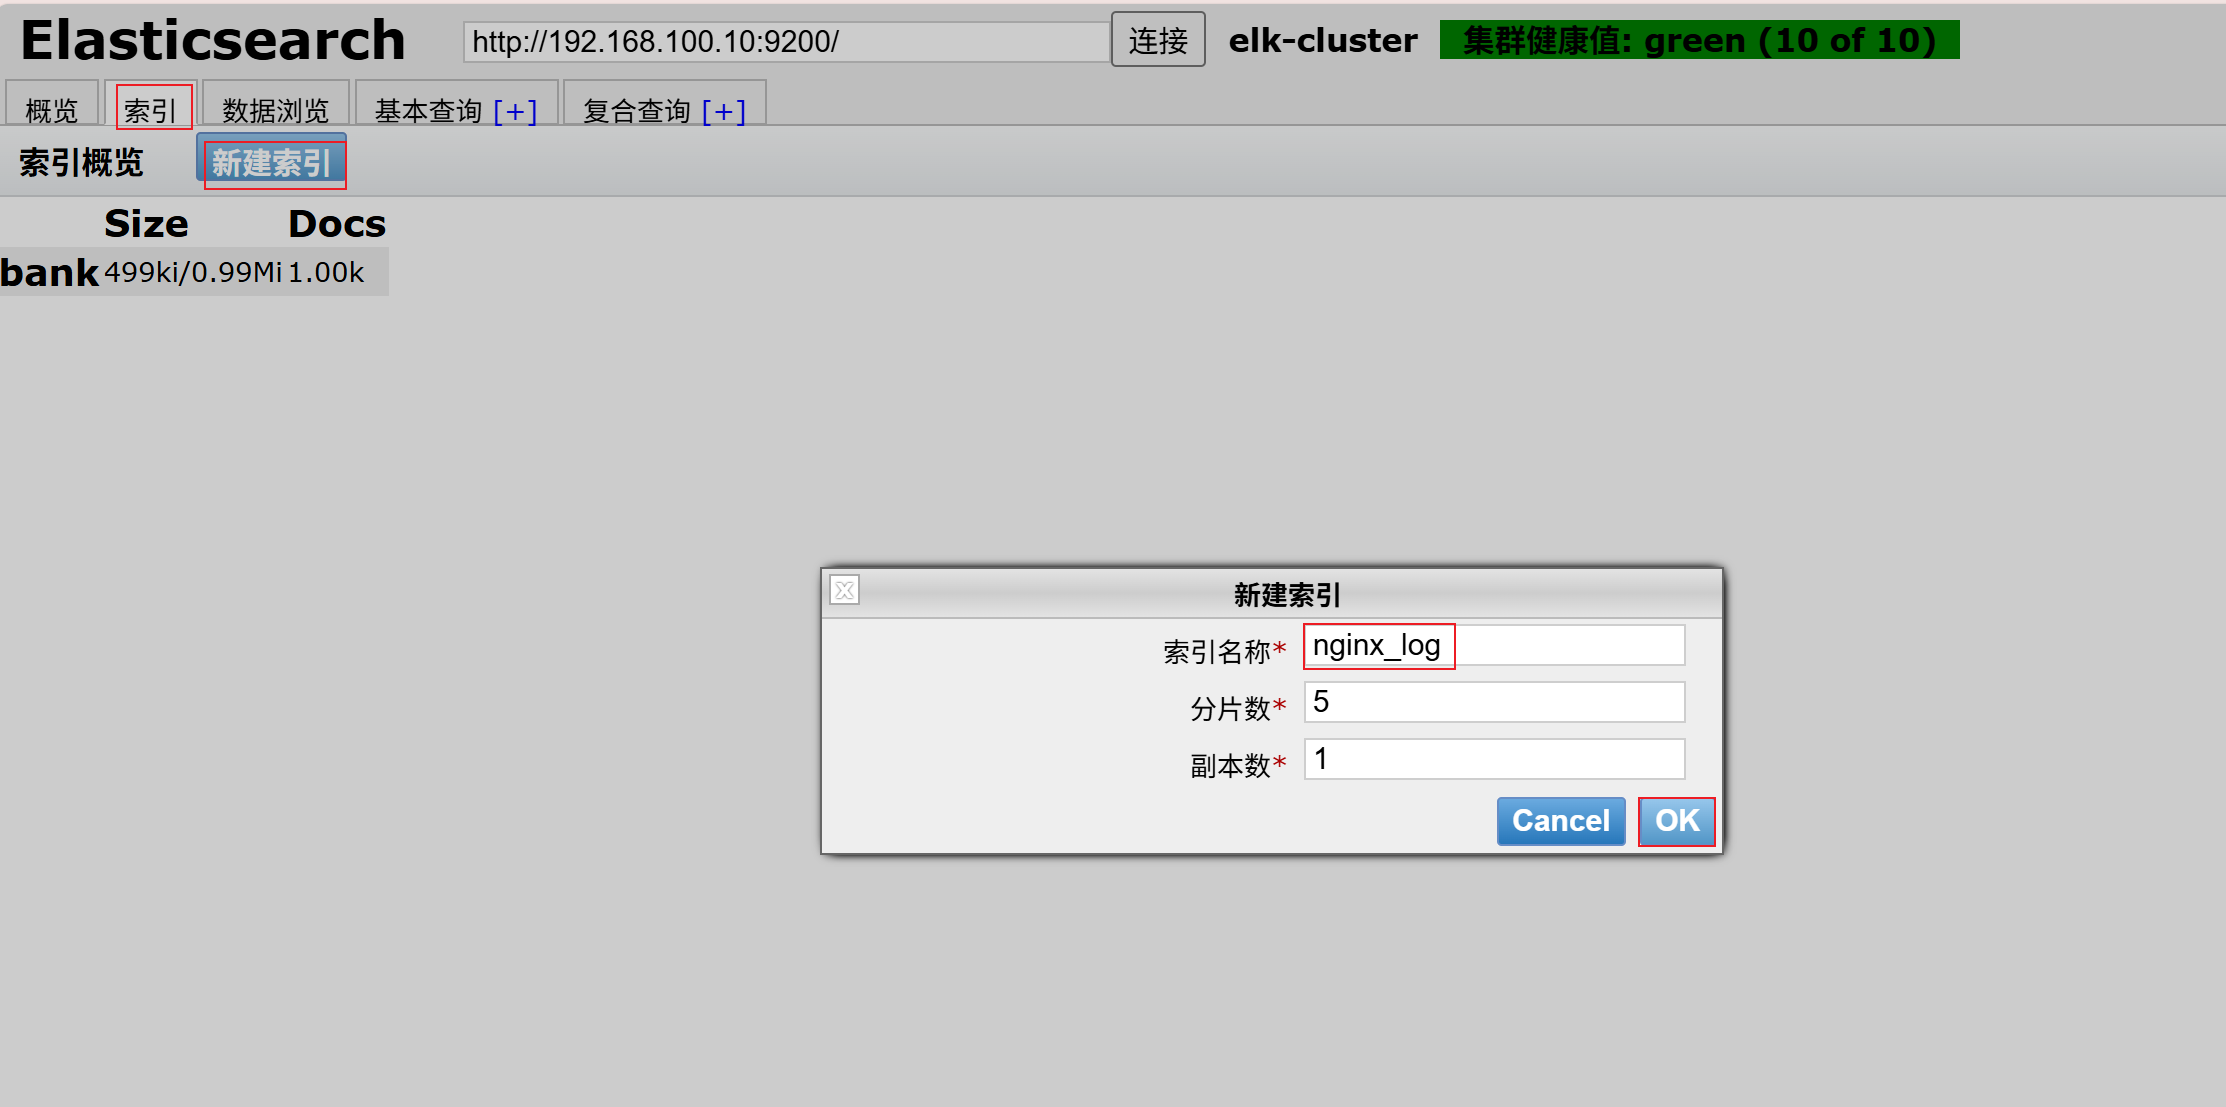
新建索引
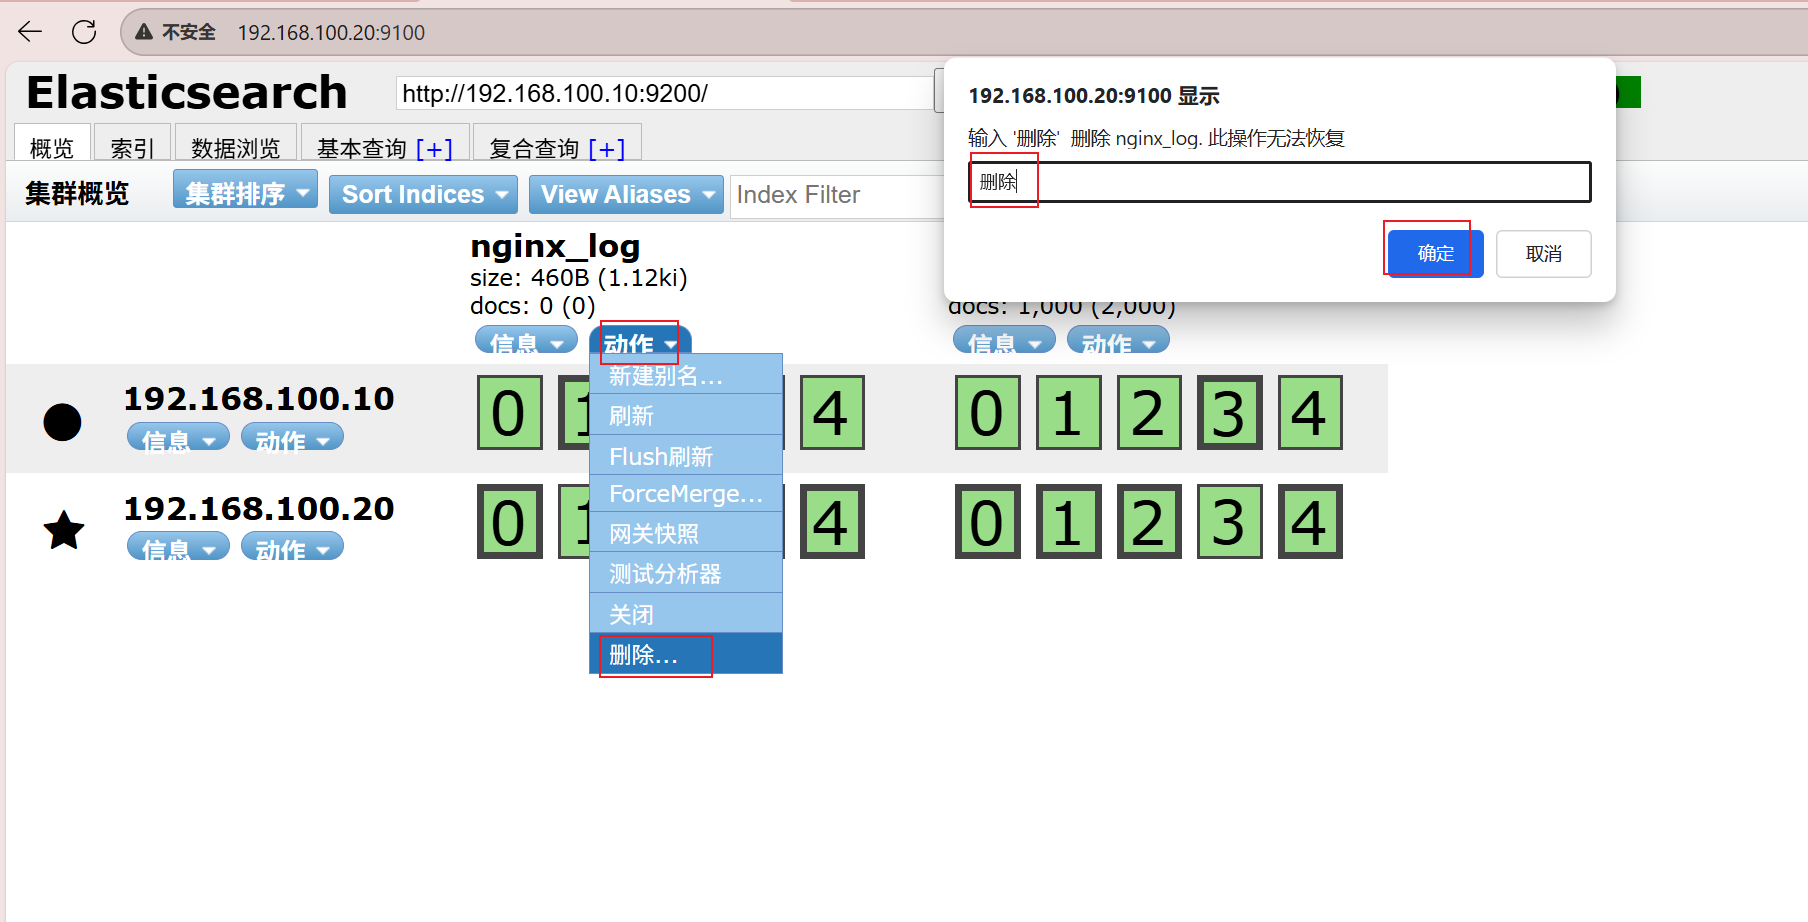
删除索引
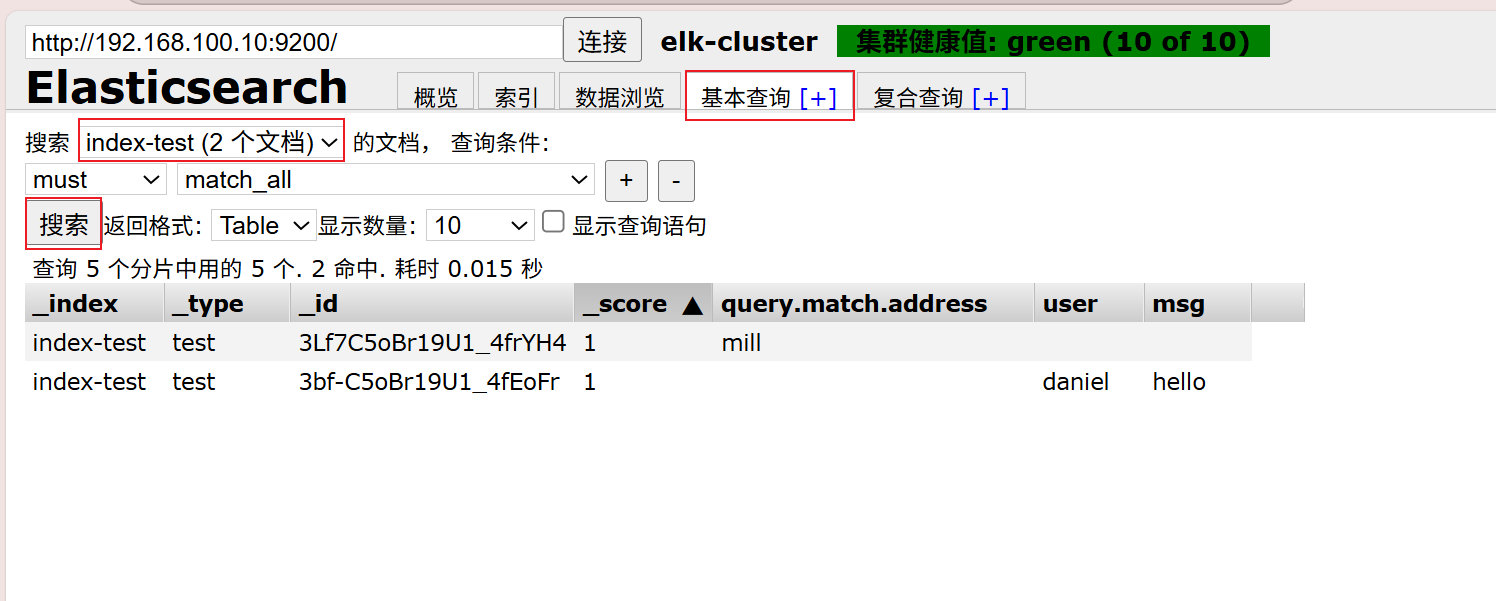
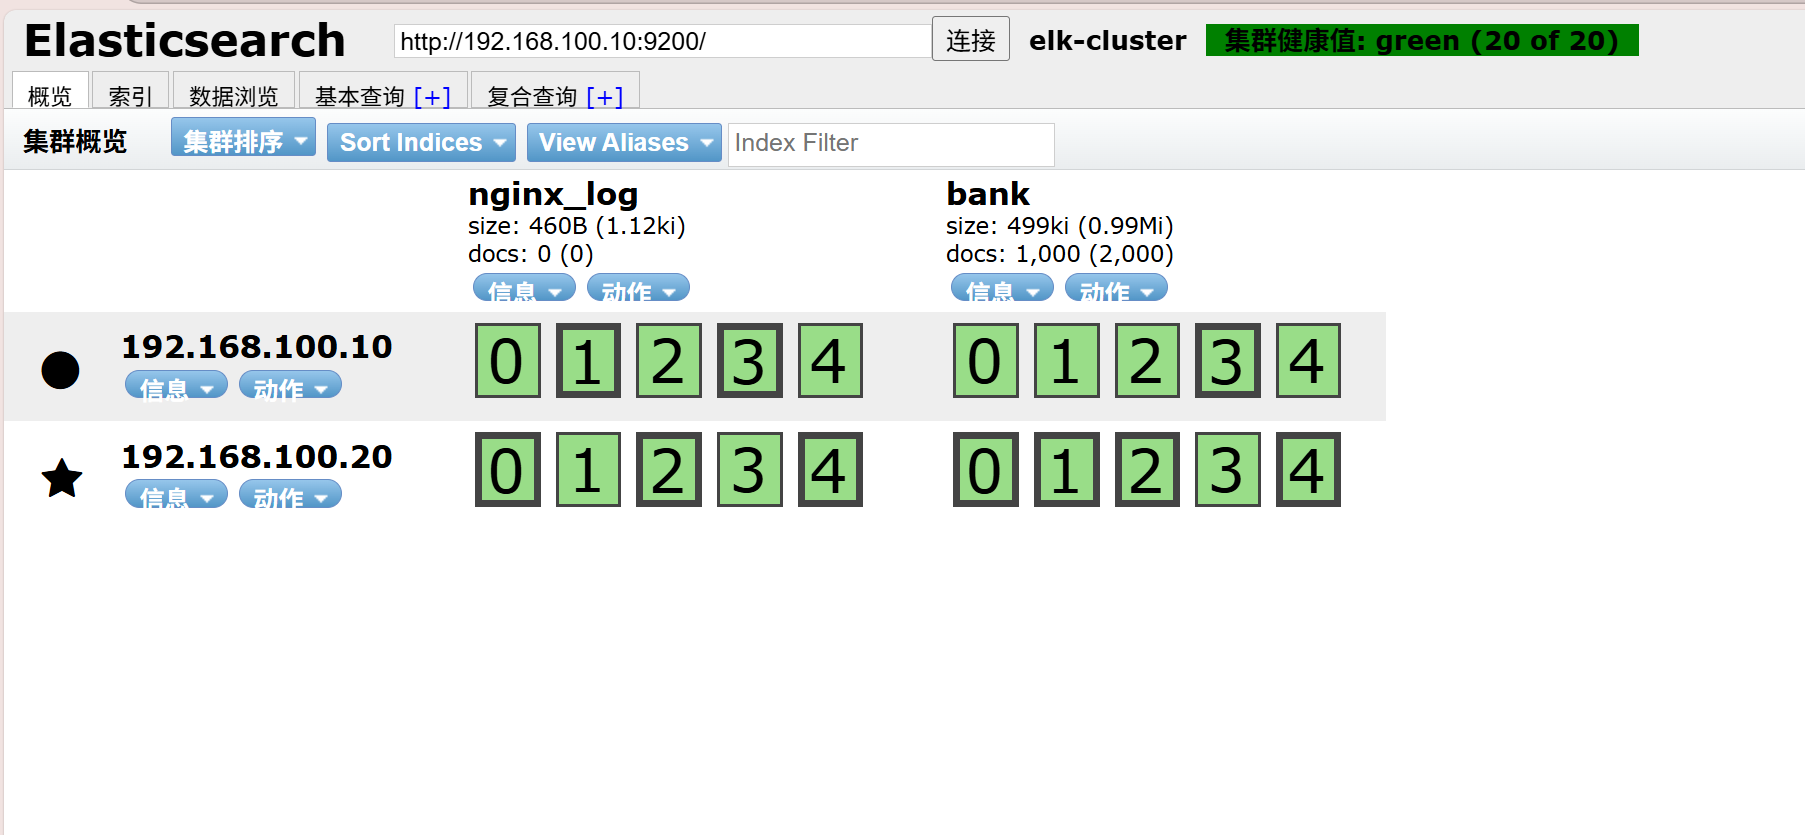
es-head查询验证