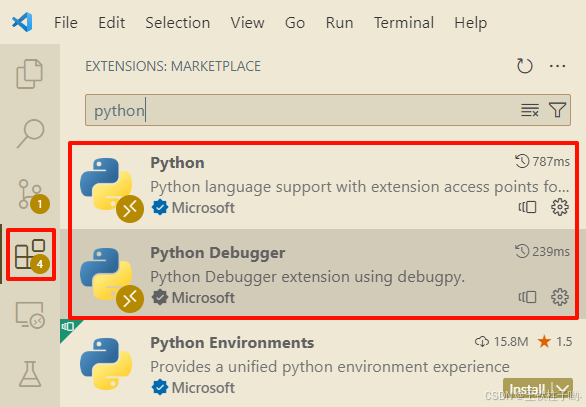
安装 Python 插件
点击左侧最下方的 "扩展"图标(四个方块组成的图标 🧩),或者按快捷键 Ctrl+Shift+X (Windows/Linux)或 Cmd+Shift+X(Mac)。在搜索框输入 Python。找到由 Microsoft 发布的 Python 插件(图标是蛇🐍),点击 Install。
安装完成后,左边会出现一些新图标(比如资源管理器、搜索、源代码管理等)。如果左边还是空白,点顶部菜单:View → Appearance → Show Activity Bar(确保侧边栏显示)。
打开项目文件夹
在 VS Code 中,点击顶部菜单:File → Open Folder(或 Ctrl+K Ctrl+O )。
选择你的项目根目录,打开后,左边就会显示文件树(资源管理器)✅
选择正确的 Python 解释器
因为你用了 conda 虚拟环境 envName,VS Code 需要知道用哪个 Python。
按 Ctrl+Shift+P (命令面板),输入 Python: Select Interpreter,回车。
在弹出的列表中,找到你的 conda 环境路径,例如:
~/miniconda3/envs/envName/bin/python
或
/opt/conda/envs/envName/bin/python
选中后,左下角状态栏会显示当前 Python 环境名称(如 envName)。
设置断点(Breakpoint)
在左侧文件树中,点击打开 train.py。
找到你想调试的代码行(比如 main() 函数开头,或报错附近的行)。
点击行号左侧的空白处,会出现一个红点🔴 ------ 这就是断点!
创建调试配置(launch.json)
点击左侧 "运行和调试"图标(虫子🐛图标)。如果没看到,按 Ctrl+Shift+D 。
点击 "create a launch.json file" → 选择 Python File。
VS Code 会自动生成 .vscode/launch.json 文件,内容类似:
json
{
    // Use IntelliSense to learn about possible attributes.
    // Hover to view descriptions of existing attributes.
    // For more information, visit: https://go.microsoft.com/fwlink/?linkid=830387
    "version": "0.2.0",
    "configurations": [
        {
            "name": "Python Debugger: Current File",
            "type": "debugpy",
            "request": "launch",
            "program": "${file}",
            "console": "integratedTerminal"
        }
    ]
}
如果需要添加参数和环境变量,修改 launch.json,加入你的参数
将内容替换为以下配置(注意 args 字段):
json
{
    // Use IntelliSense to learn about possible attributes.
    // Hover to view descriptions of existing attributes.
    // For more information, visit: https://go.microsoft.com/fwlink/?linkid=830387
    "version": "0.2.0",
    "configurations": [
        {
            "name": "Python Debugger: Current File",
            "type": "debugpy",
            "request": "launch",
            "program": "${file}",
            "args": [
                "benchmark=xxx",
                "run_name=xxx",
            ],
            "console": "integratedTerminal",
            // "envFile": "${workspaceFolder}/.env",
            "env": {
                "xxx_API_KEY": "xxx"
            },
            "justMyCode": true
        }
    ]
}
开始调试
确保你已经在 train.py 中设置了断点(红点🔴)。
点击左侧 运行和调试 面板顶部的绿色三角形 ▶️(或按 F5)。
VS Code 会:
启动你的虚拟环境;运行 train.py 并传入参数;在断点处暂停!
暂停后,你可以:
查看变量值(鼠标悬停或在"变量"面板);
按 F10 单步跳过,F11 单步进入;
在"终端"中看到输出。