狂飙AGI-智能图文理解助手
-
-
- 一、项目展示
- 二、环境准备
-
- [1 智谱API Key获取](#1 智谱API Key获取)
-
- [1.1 登录官网](#1.1 登录官网)
- [1.2 添加新的API Key](#1.2 添加新的API Key)
- [1.3 点击复制API Key(备用)](#1.3 点击复制API Key(备用))
- [2 虚拟环境配置](#2 虚拟环境配置)
-
- [2.1 创建虚拟环境](#2.1 创建虚拟环境)
- [2.2 安装依赖包](#2.2 安装依赖包)
- 三、代码实现
-
-
- [3.1 导入依赖包](#3.1 导入依赖包)
- [3.2 设置API Key](#3.2 设置API Key)
- [3.3 定义图像编码函数(base64)](#3.3 定义图像编码函数(base64))
- [3.4 定义图文理解函数](#3.4 定义图文理解函数)
- [3.5 Gradio界面构建](#3.5 Gradio界面构建)
- [3.6 项目完整代码](#3.6 项目完整代码)
-
- 四、效果展示
-
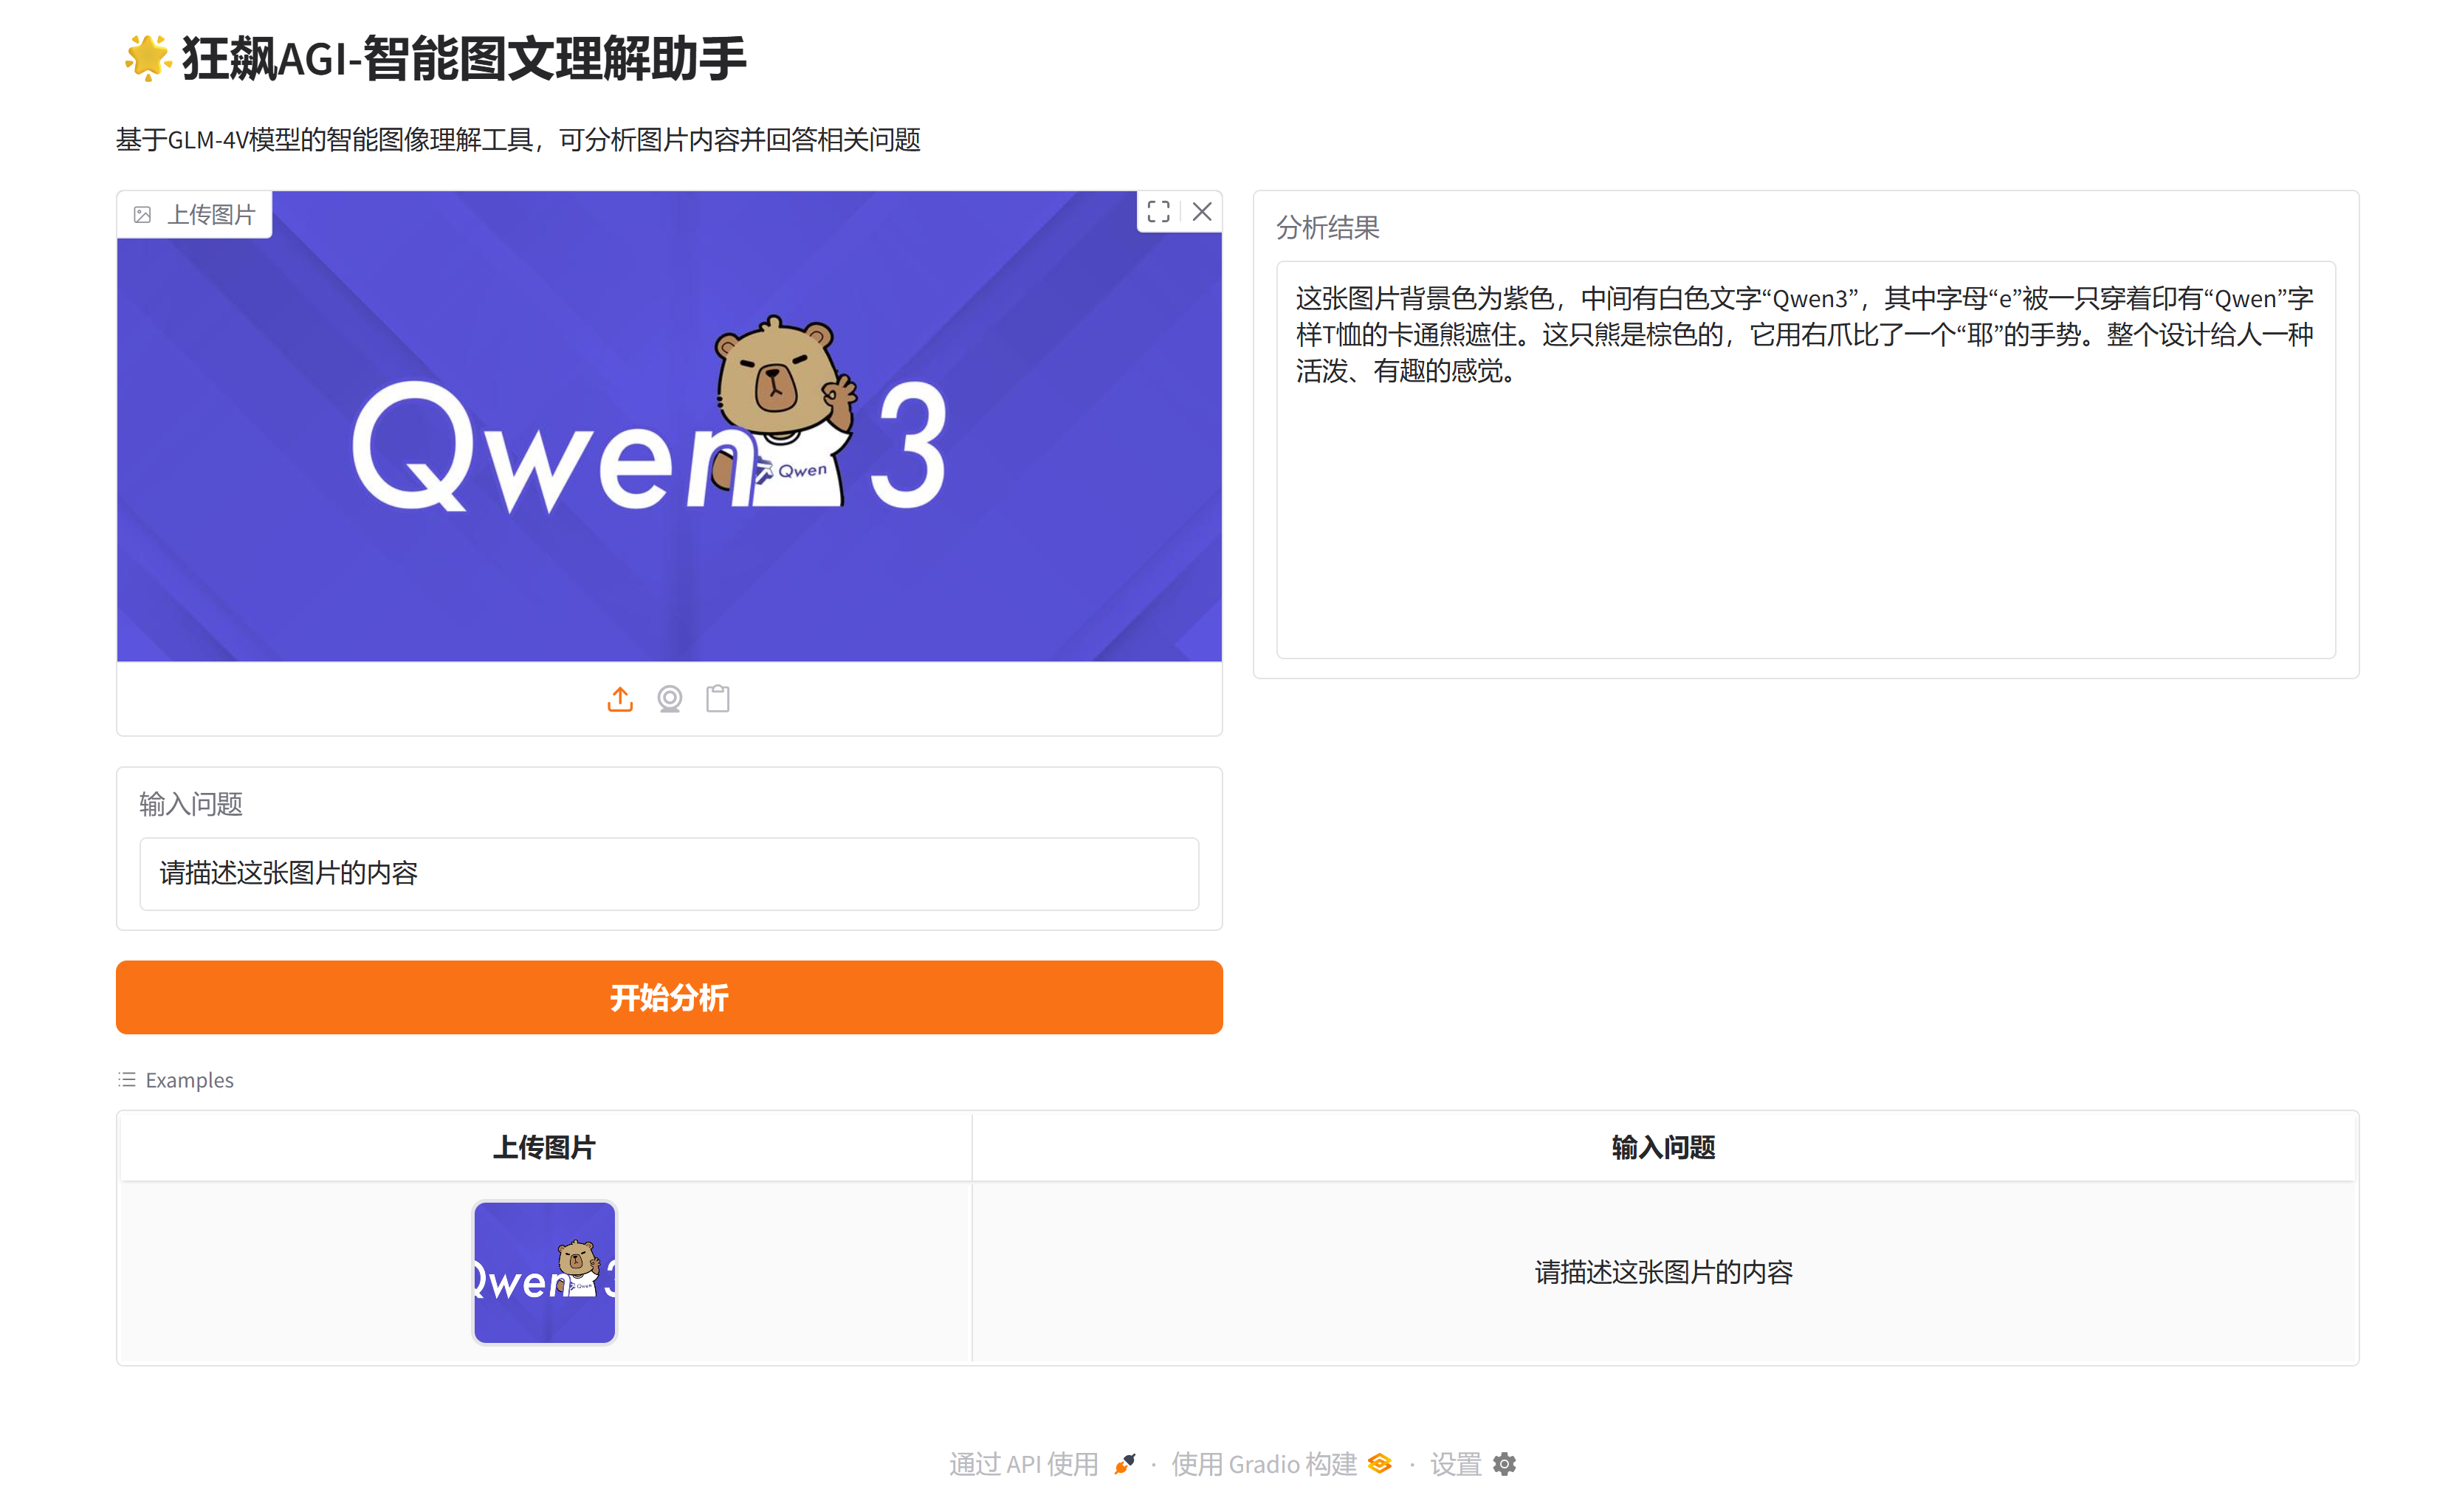
一、项目展示
二、环境准备
1 智谱API Key获取
1.1 登录官网
官网网址 :https://bigmodel.cn/
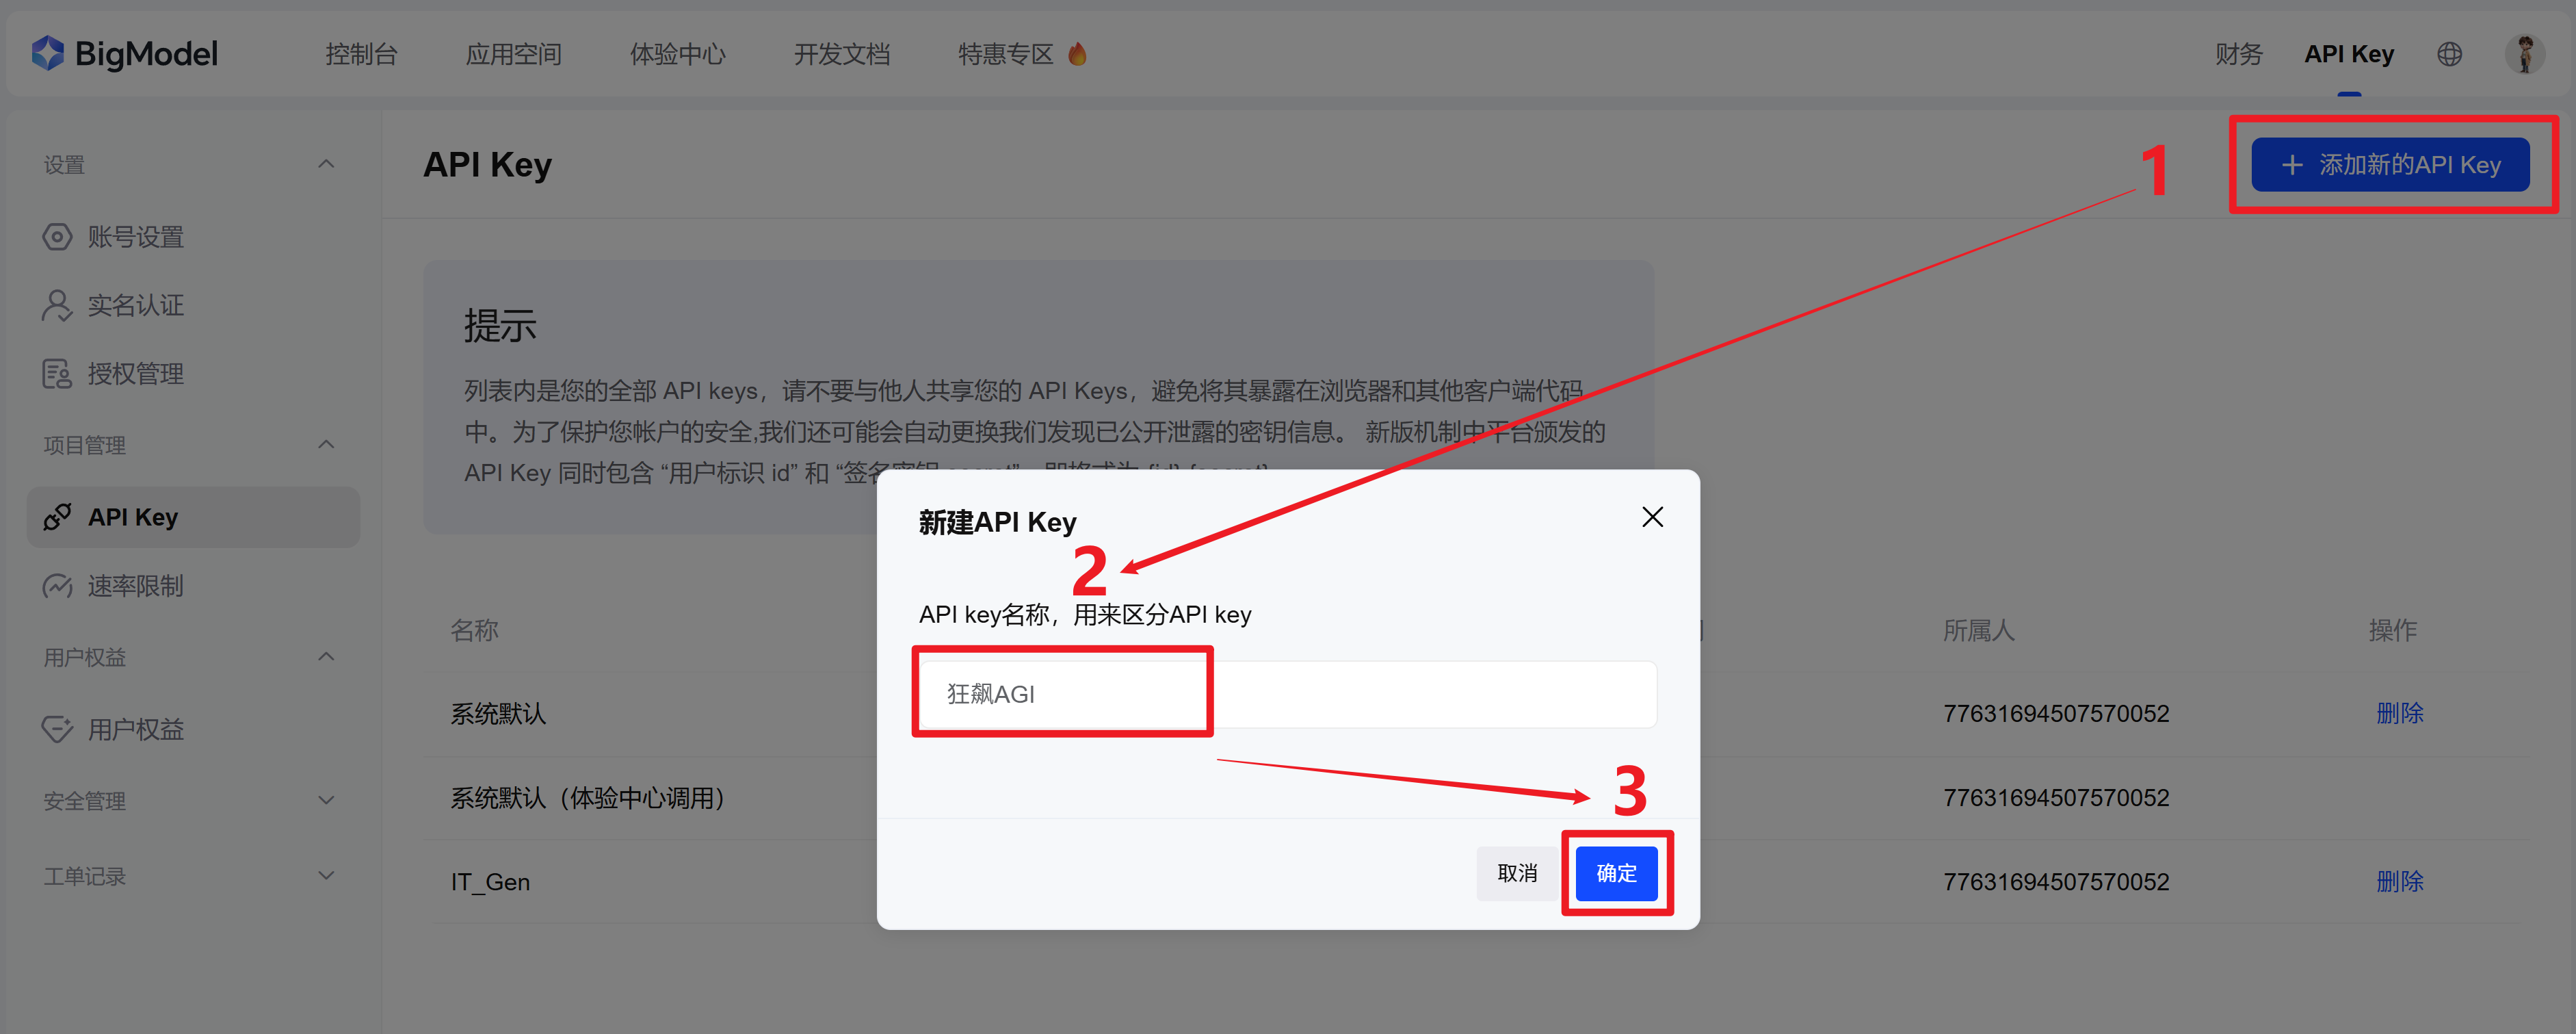
1.2 添加新的API Key

1.3 点击复制API Key(备用)

2 虚拟环境配置
2.1 创建虚拟环境
shell
conda create -n KBAGI python=3.102.2 安装依赖包
bash
pip install io base64 openai gradio pillow三、代码实现
3.1 导入依赖包
python
import io
import base64
import gradio as gr
from openai import OpenAI
from PIL import Image
3.2 设置API Key
python
Zhipu_API_KEY="XXXXXXXXXX【替换为1.3复制的API Key】XXXXXXXXXXXXXX"
Zhipu_base_url="https://open.bigmodel.cn/api/paas/v4/"

# 初始化客户端
client = OpenAI(api_key=Zhipu_API_KEY, base_url=Zhipu_base_url)
3.3 定义图像编码函数(base64)
python
def encode_image_to_base64(image):
    """将上传的图像编码为base64字符串"""
    if image is None:
        return None

    # 打开图像并转换为RGB模式(如果需要)
    img = Image.open(image)
    if img.mode != 'RGB':
        img = img.convert('RGB')

    # 将图像保存到内存中的字节流
    buffered = io.BytesIO()
    img.save(buffered, format="JPEG")

    # 编码为base64
    img_str = base64.b64encode(buffered.getvalue()).decode('utf-8')
    return img_str
3.4 定义图文理解函数
python
def image_understanding(image, prompt):
    """使用GLM-4V模型进行图像理解"""
    if image is None:
        return "请上传一张图片"

    if not prompt:
        prompt = "请描述这张图片的内容"

    # 将图像编码为base64
    image_base64 = encode_image_to_base64(image)

    try:
        # 调用GLM-4V模型进行图像理解
        response = client.chat.completions.create(
            model="glm-4v",
            messages=[
                {
                    "role": "user",
                    "content": [
                        {
                            "type": "text",
                            "text": prompt
                        },
                        {
                            "type": "image_url",
                            "image_url": {
                                "url": f"data:image/jpeg;base64,{image_base64}"
                            }
                        }
                    ]
                }
            ],
            temperature=0.7
        )

        return response.choices[0].message.content
    except Exception as e:
        return f"处理图像时出错: {str(e)}"
3.5 Gradio界面构建
python
# 创建Gradio界面
with gr.Blocks(title="狂飙AGI-智能图文理解助手") as demo:
    gr.Markdown("# 🌟狂飙AGI-智能图文理解助手")
    gr.Markdown("基于GLM-4V模型的智能图像理解工具,可分析图片内容并回答相关问题")

    with gr.Row():
        with gr.Column():
            image_input = gr.Image(type="filepath", label="上传图片")
            prompt_input = gr.Textbox(
                label="输入问题",
                placeholder="例如:请描述这张图片的内容,图片中有什么?",
                value="请描述这张图片的内容"
            )
            submit_btn = gr.Button("开始分析", variant="primary")

        with gr.Column():
            result_output = gr.Textbox(label="分析结果", interactive=False, lines=10)

    # 示例图片
    gr.Examples(
        examples=[["Qwen3.jpg", "请描述这张图片的内容"]],
        inputs=[image_input, prompt_input],
        outputs=result_output,
        fn=image_understanding,
        cache_examples=True
    )

    # 绑定事件
    submit_btn.click(
        fn=image_understanding,
        inputs=[image_input, prompt_input],
        outputs=result_output
    )

    # 支持回车提交
    prompt_input.submit(
        fn=image_understanding,
        inputs=[image_input, prompt_input],
        outputs=result_output
    )

if __name__ == "__main__":
    demo.launch()
3.6 项目完整代码
python
import io
import base64
import gradio as gr
from openai import OpenAI
from PIL import Image

Zhipu_API_KEY = "XXXXXXXXXX【替换为1.3复制的API Key】XXXXXXXXXXXXXX"
Zhipu_base_url = "https://open.bigmodel.cn/api/paas/v4/"

# 初始化客户端
client = OpenAI(api_key=Zhipu_API_KEY, base_url=Zhipu_base_url)


def encode_image_to_base64(image):
    """将上传的图像编码为base64字符串"""
    if image is None:
        return None

    # 打开图像并转换为RGB模式(如果需要)
    img = Image.open(image)
    if img.mode != 'RGB':
        img = img.convert('RGB')

    # 将图像保存到内存中的字节流
    buffered = io.BytesIO()
    img.save(buffered, format="JPEG")

    # 编码为base64
    img_str = base64.b64encode(buffered.getvalue()).decode('utf-8')
    return img_str


def image_understanding(image, prompt):
    """使用GLM-4V模型进行图像理解"""
    if image is None:
        return "请上传一张图片"

    if not prompt:
        prompt = "请描述这张图片的内容"

    # 将图像编码为base64
    image_base64 = encode_image_to_base64(image)

    try:
        # 调用GLM-4V模型进行图像理解
        response = client.chat.completions.create(
            model="glm-4v",
            messages=[
                {
                    "role": "user",
                    "content": [
                        {
                            "type": "text",
                            "text": prompt
                        },
                        {
                            "type": "image_url",
                            "image_url": {
                                "url": f"data:image/jpeg;base64,{image_base64}"
                            }
                        }
                    ]
                }
            ],
            temperature=0.7
        )

        return response.choices[0].message.content
    except Exception as e:
        return f"处理图像时出错: {str(e)}"


# 创建Gradio界面
with gr.Blocks(title="狂飙AGI-智能图文理解助手") as demo:
    gr.Markdown("# 🌟狂飙AGI-智能图文理解助手")
    gr.Markdown("基于GLM-4V模型的智能图像理解工具,可分析图片内容并回答相关问题")

    with gr.Row():
        with gr.Column():
            image_input = gr.Image(type="filepath", label="上传图片")
            prompt_input = gr.Textbox(
                label="输入问题",
                placeholder="例如:请描述这张图片的内容,图片中有什么?",
                value="请描述这张图片的内容"
            )
            submit_btn = gr.Button("开始分析", variant="primary")

        with gr.Column():
            result_output = gr.Textbox(label="分析结果", interactive=False, lines=10)

    # 示例图片
    gr.Examples(
        examples=[["Qwen3.jpg", "请描述这张图片的内容"]],
        inputs=[image_input, prompt_input],
        outputs=result_output,
        fn=image_understanding,
        cache_examples=True
    )

    # 绑定事件
    submit_btn.click(
        fn=image_understanding,
        inputs=[image_input, prompt_input],
        outputs=result_output
    )

    # 支持回车提交
    prompt_input.submit(
        fn=image_understanding,
        inputs=[image_input, prompt_input],
        outputs=result_output
    )

if __name__ == "__main__":
    demo.launch()
四、效果展示