前言:
本章节是笔者在学习opencv中所整理的常用函数,便于直接选取调用,堪称视觉学习中前期的琼浆玉液,接下来笔者将按照正常逻辑,对图片数据进行一步一步的操作实例总结。主要的一部分数据增强的内容。
1.标签格式的转换
三种常见标签:
格式 存储形式 坐标定义(核心) 示例 YOLO 纯文本(.txt) 归一化中心坐标 (x,y) + 归一化宽高 (w,h);每行: 类别ID x y w h0 0.52 0.48 0.3 0.25VOC XML 文件(.xml) 像素级左上角 (x1,y1) + 像素级右下角 (x2,y2);标签嵌套在 XML 节点中 <xmin>100</xmin><ymin>50</ymin><xmax>200</xmax><ymax>150</ymax>COCO JSON / 单文件 txt 像素级左上角 (x1,y1) + 像素级宽高 (w,h);(COCO JSON 含图片 ID、标注 ID 等元信息) {"bbox": [100,50,100,100], "category_id": 0}
针对上述三种常见的标签,在工业级项目开发过程中,我们通常将所有的标签格式统一转为YOLO后再进行后续处理。我接下来将以工业级开发的标准实现(VOC/COCO/YOLO 三类主流格式互转为yolo格式)
python
#!/usr/bin/env python
# -*- coding: utf-8 -*-
"""
@Project :opencv
@File :three_class_change.py
@IDE :PyCharm
@Author :wjj
@Date :2025/12/11 14:35
@Description:yolo <-> coco <-> voc
"""
import numpy as np
from typing import List, Union, Tuple

def voc2yolo(
    voc_boxes: Union[List, np.ndarray],
    img_h: int,
    img_w: int,
    clip: bool = True  # 工业级:裁剪越界坐标到[0,1]
) -> np.ndarray:
    """
    工业级VOC→YOLO转换:VOC(x1,y1,x2,y2) → YOLO(归一化cx,cy,w,h)
    :param voc_boxes: VOC格式标签,shape=(N,5) → [cls_id, x1, y1, x2, y2](像素坐标)
    :param img_h: 图片高度(像素)
    :param img_w: 图片宽度(像素)
    :param clip: 是否裁剪越界坐标(YOLO坐标必须∈[0,1])
    :return: YOLO格式标签,shape=(N,5) → [cls_id, cx, cy, w, h](归一化)
    """
    #1.输入校验,避免无效输入
    if len(voc_boxes) == 0:
        return np.array([])
    if isinstance(voc_boxes,list):
        voc_boxes = np.array(voc_boxes,dtype=np.float32)
    if voc_boxes.ndim != 2 or voc_boxes.shape[1] != 5:
        raise ValueError(f'voc_boxes must be Nx5,but now {voc_boxes.shape}')
    if img_h <= 0 or img_w <= 0:
        raise ValueError(f"图片尺寸无效!h={img_h}, w={img_w}")

    #2.深拷贝避免原数据污染(工业级)
    yolo_boxes = voc_boxes.copy()

    #3.核心转换逻辑
    yolo_boxes[:, 1] = (voc_boxes[:, 1] + voc_boxes[:, 3]) / 2.0 / img_w  # cx
    yolo_boxes[:, 2] = (voc_boxes[:, 2] + voc_boxes[:, 4]) / 2.0 / img_h  # cy
    yolo_boxes[:, 3] = (voc_boxes[:, 3] - voc_boxes[:, 1]) / img_w        # w
    yolo_boxes[:, 4] = (voc_boxes[:, 4] - voc_boxes[:, 2]) / img_h        # h

    #4.工业边界处理(关键:避免YOLO坐标越界导致训练/推理错误)
    if clip:
        # 类别ID保持不变,仅裁剪坐标到[0,1]
        yolo_boxes[:, 1:] = np.clip(yolo_boxes[:, 1:], 0.0, 1.0)

    # 5. 精度控制(工业级:避免浮点冗余,统一保留6位小数)
    yolo_boxes = np.around(yolo_boxes, decimals=6)

    return yolo_boxes


def yolo2voc(
    yolo_boxes: Union[List, np.ndarray],
    img_h: int,
    img_w: int,
    clip: bool = True  # 裁剪越界坐标到图片范围内
) -> np.ndarray:
    """
    工业级YOLO→VOC转换:YOLO(归一化cx,cy,w,h) → VOC(x1,y1,x2,y2)(像素坐标)
    :param yolo_boxes: YOLO格式标签,shape=(N,5)
    :param img_h: 图片高度
    :param img_w: 图片宽度
    :param clip: 是否裁剪越界坐标(像素坐标必须∈[0, img_w/h])
    :return: VOC格式标签,shape=(N,5)(整数像素坐标)
    """
    # 1.输入校验
    if len(yolo_boxes) == 0:
        return np.array([])
    if isinstance(yolo_boxes, list):
        yolo_boxes = np.array(yolo_boxes, dtype=np.float32)
    if yolo_boxes.ndim != 2 or yolo_boxes.shape[1] != 5:
        raise ValueError(f"YOLO标签格式错误!需为(N,5),实际为{yolo_boxes.shape}")
    if img_h <= 0 or img_w <= 0:
        raise ValueError(f"图片尺寸无效!h={img_h}, w={img_w}")

    #2.深拷贝
    voc_boxes = yolo_boxes.copy()

    #3.核心逻辑转换
    voc_boxes[:, 1] = yolo_boxes[:, 1] * img_w - yolo_boxes[:, 3] * img_w / 2  # x1
    voc_boxes[:, 2] = yolo_boxes[:, 2] * img_h - yolo_boxes[:, 4] * img_h / 2  # y1
    voc_boxes[:, 3] = yolo_boxes[:, 1] * img_w + yolo_boxes[:, 3] * img_w / 2  # x2
    voc_boxes[:, 4] = yolo_boxes[:, 2] * img_h + yolo_boxes[:, 4] * img_h / 2  # y2

    #4.边界处理
    if clip:
        voc_boxes[:, 1] = np.clip(voc_boxes[:, 1], 0.0, float(img_w))   # x1∈[0, img_w]
        voc_boxes[:, 2] = np.clip(voc_boxes[:, 2], 0.0, float(img_h))   # y1∈[0, img_h]
        voc_boxes[:, 3] = np.clip(voc_boxes[:, 3], 0.0, float(img_w))   # x2∈[0, img_w]
        voc_boxes[:, 4] = np.clip(voc_boxes[:, 4], 0.0, float(img_h))   # y2∈[0, img_h]

    #5.VOC为像素坐标,转整数(工业级:避免浮点像素)
    voc_boxes = voc_boxes.astype(np.int32)

    return voc_boxes

def coco2yolo(
    coco_boxes: Union[List, np.ndarray],
    img_h: int,
    img_w: int,
    clip: bool = True
) -> np.ndarray:
    """
    工业级COCO→YOLO转换:COCO(x1,y1,w,h) → YOLO(归一化cx,cy,w,h)
    :param coco_boxes: COCO格式标签,shape=(N,5) → [cls_id, x1, y1, w, h](像素坐标)
    :param img_h: 图片高度
    :param img_w: 图片宽度
    :return: YOLO格式标签,shape=(N,5)
    """
    # 输入校验
    if len(coco_boxes) == 0:
        return np.array([])
    if isinstance(coco_boxes, list):
        coco_boxes = np.array(coco_boxes, dtype=np.float32)
    if coco_boxes.ndim != 2 or coco_boxes.shape[1] != 5:
        raise ValueError(f"COCO标签格式错误!需为(N,5),实际为{coco_boxes.shape}")
    if img_h <= 0 or img_w <= 0:
        raise ValueError(f"图片尺寸无效!h={img_h}, w={img_w}")

    yolo_boxes = coco_boxes.copy()

    # 核心转换:COCO的x1/y1是左上角,需先算中心坐标
    yolo_boxes[:, 1] = (coco_boxes[:, 1] + coco_boxes[:, 3] / 2) / img_w  # cx
    yolo_boxes[:, 2] = (coco_boxes[:, 2] + coco_boxes[:, 4] / 2) / img_h  # cy
    yolo_boxes[:, 3] = coco_boxes[:, 3] / img_w                            # w
    yolo_boxes[:, 4] = coco_boxes[:, 4] / img_h                            # h

    # 边界处理+精度控制
    if clip:
        yolo_boxes[:, 1:] = np.clip(yolo_boxes[:, 1:], 0.0, 1.0)
    yolo_boxes = np.around(yolo_boxes, decimals=6)

    return yolo_boxes
2.文件标签的匹配与存储
我们对图片数据进行进一步数据增强的前提是我们应该首先对打标注的数据进行读取,即首先应该将原图与打标签得到的yolo坐标的内容对应上,所以我们首先得做的事情是将图片信息与标签信息一一对应。
基于1中的代码其相同文件夹下执行进一步操作
核心作用:基于1中标签格式的转化将成品yolo格式的标签,实现图片文件与yolo标签文件的一一精准配对,并将符合条件的图片和相应的标签保存在文件夹中。
python
#!/usr/bin/env python
# -*- coding: utf-8 -*-
"""
@Project :opencv
@File :yolo_img_label_change.py
@IDE :PyCharm
@Author :wjj
@Date :2025/12/11 15:19
@Description:读取转换后的标签图片
"""
import os
import cv2
import numpy as np
import xml.etree.ElementTree as ET
from typing import List, Tuple, Union, Any
from three_class_change import voc2yolo,coco2yolo
def read_voc_label(xml_path: str) -> List[List[float]]:
"""读取VOC格式XML标签,返回VOC格式标签列表"""
try:
tree = ET.parse(xml_path)
root = tree.getroot()
voc_boxes = []
for obj in root.iter("object"):
# 工业级:兼容不同VOC标注规范(class_id/name字段)
cls_id = obj.find("class_id")
if cls_id is None:
# 若无class_id,需映射类别名到ID(示例:需根据实际类别表调整)
cls_name = obj.find("name").text.strip()
cls_name2id = {"cat": 0, "dog": 1} # 实际需替换为项目的类别映射
cls_id = cls_name2id.get(cls_name, -1)
if cls_id == -1:
print(f"警告:VOC标签[{xml_path}]存在未知类别{cls_name},跳过该目标")
continue
else:
cls_id = int(cls_id.text.strip())
# 读取边界框
bndbox = obj.find("bndbox")
x1 = float(bndbox.find("xmin").text.strip())
y1 = float(bndbox.find("ymin").text.strip())
x2 = float(bndbox.find("xmax").text.strip())
y2 = float(bndbox.find("ymax").text.strip())
voc_boxes.append([cls_id, x1, y1, x2, y2])
return voc_boxes
except Exception as e:
raise RuntimeError(f"读取VOC标签[{xml_path}]失败:{str(e)}")
def read_coco_label(txt_path: str) -> List[List[float]]:
"""读取COCO格式TXT标签(单文件单图片),返回COCO格式标签列表"""
try:
coco_boxes = []
with open(txt_path, "r", encoding="utf-8") as f:
for line_num, line in enumerate(f, 1):
line = line.strip()
if not line:
continue
parts = line.split()
if len(parts) != 5:
print(f"警告:COCO标签[{txt_path}]第{line_num}行格式错误(需5列),跳过")
continue
try:
cls_id = int(parts[0])
x1, y1, w, h = [float(p) for p in parts[1:]]
coco_boxes.append([cls_id, x1, y1, w, h])
except ValueError as e:
print(f"警告:COCO标签[{txt_path}]第{line_num}行数值转换失败:{e},跳过")
return coco_boxes
except Exception as e:
raise RuntimeError(f"读取COCO标签[{txt_path}]失败:{str(e)}")
def read_yolo_label(txt_path: str) -> List[List[float]]:
"""读取YOLO格式TXT标签,返回YOLO格式标签列表"""
try:
yolo_boxes = []
with open(txt_path, "r", encoding="utf-8") as f:
for line_num, line in enumerate(f, 1):
line = line.strip()
if not line:
continue
parts = line.split()
if len(parts) != 5:
print(f"警告:YOLO标签[{txt_path}]第{line_num}行格式错误(需5列),跳过")
continue
try:
cls_id = int(parts[0])
cx, cy, w, h = [float(p) for p in parts[1:]]
yolo_boxes.append([cls_id, cx, cy, w, h])
except ValueError as e:
print(f"警告:YOLO标签[{txt_path}]第{line_num}行数值转换失败:{e},跳过")
return yolo_boxes
except Exception as e:
raise RuntimeError(f"读取YOLO标签[{txt_path}]失败:{str(e)}")
# ======================== 工业级保存函数 ========================
def save_processed_data(
datas: List[Tuple[cv2.Mat, List[List[Union[int, float]]]]],
img_name_list: List[str], # 与datas一一对应的原始图片文件名(含扩展名)
save_img_dir: str,
save_label_dir: str,
img_quality: int = 95 # JPG保存质量(0-100)
):
"""
工业级标准保存匹配后的图片和YOLO标签
:param datas: read_img_label返回的结果 → [(img1, yolo_labels1), ...]
:param img_name_list: 原始图片文件名列表(与datas一一对应,用于保持文件名一致)
:param save_img_dir: 保存图片的目标目录
:param save_label_dir: 保存YOLO标签的目标目录
:param img_quality: 图片保存质量(仅JPG有效)
"""
# 1. 工业级目录校验与创建
os.makedirs(save_img_dir, exist_ok=True)
os.makedirs(save_label_dir, exist_ok=True)
# 2. 遍历保存(按原始文件名,保持一一对应)
for idx, ((img, yolo_boxes), img_name) in enumerate(zip(datas, img_name_list)):
# 2.1 处理图片保存(保留原扩展名,兼容多格式)
img_base, img_ext = os.path.splitext(img_name)
save_img_name = f"{img_base}{img_ext}" # 保持原文件名+扩展名
save_img_path = os.path.join(save_img_dir, save_img_name)
# 区分图片格式保存(工业级:避免格式兼容问题)
if img_ext.lower() in ['.jpg', '.jpeg']:
cv2.imwrite(save_img_path, img, [cv2.IMWRITE_JPEG_QUALITY, img_quality])
elif img_ext.lower() == '.png':
cv2.imwrite(save_img_path, img, [cv2.IMWRITE_PNG_COMPRESSION, 9]) # PNG压缩级别(0-9)
else:
cv2.imwrite(save_img_path, img) # 其他格式默认保存
# 2.2 处理YOLO标签保存(工业级:UTF-8编码,6位小数,与图片同名)
save_label_name = f"{img_base}.txt"
save_label_path = os.path.join(save_label_dir, save_label_name)
with open(save_label_path, 'w', encoding='utf-8') as f:
for box in yolo_boxes:
cls_id, cx, cy, w, h = box
# 工业级标准:类别ID为整数,坐标保留6位小数,空格分隔
f.write(f"{int(cls_id)} {cx:.6f} {cy:.6f} {w:.6f} {h:.6f}\n")
print(f"✅ 工业级保存完成:")
print(f" 图片路径:{save_img_dir}")
print(f" 标签路径:{save_label_dir}")
print(f" 总计保存:{len(datas)} 组数据")
def read_img_label(
image_dir: str,
label_dir: str,
label_format: str = "yolo",
img_extensions: Tuple[str, ...] = ('.png', '.jpg', '.jpeg', '.bmp', '.tiff', '.webp'),
read_color: bool = True
) -> tuple[list[Any], list[Any]]:
"""
工业级图片-标签配对函数:自动读取指定格式标签,统一转为YOLO格式后返回
:param image_dir: 图片目录(绝对/相对路径)
:param label_dir: 标签目录(绝对/相对路径)
:param label_format: 原始标签格式(voc/coco/yolo)
:param img_extensions: 支持的图片扩展名
:param read_color: 是否读取彩色图(True: BGR,False: 灰度)
:return: (datas, img_name_list)
datas: [(img1, yolo_labels1), ...]
img_name_list: [img1_name, img2_name, ...](原始文件名,含扩展名)
"""
# 工业级前置校验(核心:提前失败,避免无效执行)
if not os.path.isdir(image_dir):
raise ValueError(f"图片目录不存在:{image_dir}")
if not os.path.isdir(label_dir):
raise ValueError(f"标签目录不存在:{label_dir}")
if label_format.lower() not in ["voc", "coco", "yolo"]:
raise ValueError(f"不支持的标签格式:{label_format},仅支持voc/coco/yolo")
# 1. 构建图片/标签文件映射(按文件名匹配,去除扩展名)
# 图片文件:{无扩展名文件名: 完整文件名}
image_files = [f for f in os.listdir(image_dir) if os.path.splitext(f)[1].lower() in img_extensions]
img_name_map = {os.path.splitext(f)[0]: f for f in image_files}
# 标签文件:按格式过滤扩展名(VOC=xml,COCO/YOLO=txt)
label_ext = ".xml" if label_format.lower() == "voc" else ".txt"
label_files = [f for f in os.listdir(label_dir) if os.path.splitext(f)[1].lower() == label_ext]
label_name_map = {os.path.splitext(f)[0]: f for f in label_files}
# 2. 匹配有对应标签的图片(交集)
common_names = sorted(set(img_name_map.keys()) & set(label_name_map.keys()))
if not common_names:
raise ValueError(f"图片目录[{image_dir}]与标签目录[{label_dir}]无匹配文件(标签格式:{label_format})")
# 3. 遍历读取图片+标签,统一转为YOLO
read_flag = cv2.IMREAD_COLOR if read_color else cv2.IMREAD_GRAYSCALE
result = []
for base_name in common_names:
# 3.1 读取图片(工业级:兼容多扩展名)
img_filename = img_name_map[base_name]
img_path = os.path.join(image_dir, img_filename)
img = cv2.imread(img_path, read_flag)
if img is None:
print(f"警告:无法读取图片[{img_path}],跳过")
continue
img_h, img_w = img.shape[:2] # 获取图片尺寸(用于坐标转换)
# 3.2 读取原始标签并转为YOLO
label_filename = label_name_map[base_name]
label_path = os.path.join(label_dir, label_filename)
try:
if label_format.lower() == "voc":
voc_boxes = read_voc_label(label_path)
yolo_boxes = voc2yolo(voc_boxes, img_h, img_w).tolist()
elif label_format.lower() == "coco":
coco_boxes = read_coco_label(label_path)
yolo_boxes = coco2yolo(coco_boxes, img_h, img_w).tolist()
else: # yolo
yolo_boxes = read_yolo_label(label_path)
except RuntimeError as e:
print(f"警告:处理标签[{label_path}]失败:{e},跳过该文件")
continue
# 3.3 加入结果(保证图片-YOLO标签一一对应)
result.append((img, yolo_boxes))
# 收集与result一一对应的原始图片文件名,用于后续存储
img_name_list = []
for base_name in common_names:
img_filename = img_name_map[base_name]
img_path = os.path.join(image_dir, img_filename)
img = cv2.imread(img_path, read_flag)
if img is None:
continue
img_name_list.append(img_filename) # 收集有效图片的文件名
# 工业级最终校验
if not result:
raise ValueError("所有匹配文件均加载失败,请检查文件完整性")
return result, img_name_list
if __name__ == '__main__':
# ======================== 1. 配置路径(核心:替换为你的实际路径) ========================
# 原始数据集路径
image_dir = r"C:\Users\Excub\workspace\Pytorch\12.08_cv\val_imgs" # 图片目录
label_dir = r"C:\Users\Excub\workspace\Pytorch\12.08_cv\val_labels" # 标签目录
label_format = "yolo" # 关键:根据你的标签实际格式修改(voc/coco/yolo),默认是yolo
# 保存路径(工业级规范:按数据集+时间/类型分层,避免覆盖)
save_root = r"C:\Users\Excub\workspace\Pytorch\12.08_cv\processed_val_data" # 保存根目录
save_img_dir = os.path.join(save_root, "images") # 保存图片的目录
save_label_dir = os.path.join(save_root, "labels") # 保存标签的目录
# ======================== 2. 执行图片-标签精准匹配 ========================
try:
# 调用read_img_label,获取匹配后的数据集+文件名列表
datas, img_name_list = read_img_label(
image_dir=image_dir,
label_dir=label_dir,
label_format=label_format,
read_color=True # 读取彩色图片(False为灰度)
)
print(f"✅ 图片-标签匹配完成,共匹配到 {len(datas)} 组有效数据")
except Exception as e:
print(f"❌ 匹配失败:{str(e)}")
exit(1) # 匹配失败则终止程序
# ======================== 3. 按工业级标准保存数据 ========================
try:
save_processed_data(
datas=datas,
img_name_list=img_name_list,
save_img_dir=save_img_dir,
save_label_dir=save_label_dir,
img_quality=95 # JPG图片保存质量(0-100,越高质量越好)
)
except Exception as e:
print(f"❌ 保存失败:{str(e)}")
exit(1)
# ======================== 4. 最终提示 ========================
print(f"\n🎉 全部操作完成!")
print(f"📁 保存路径:{save_root}")
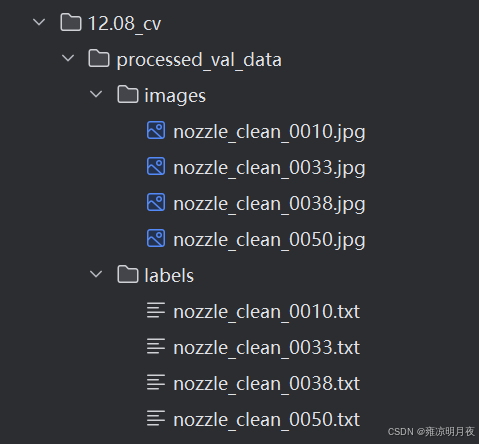
print(f"📊 统计:共保存 {len(datas)} 张图片 + {len(datas)} 个标签文件")经过上述保存得到
3.几何变换类数据增强锦集
⭐1.Letterbox填充
本质:核心解决「图像缩放时比例失真」问题,同时保证模型输入尺寸统一。
实现思路:
1.图像宽高比缩放(640x640),避免拉伸形状失真。
2.缩放后填充区域用(灰/黑)填充,生成正方形输入。
3.同步调整目标框的坐标,保证框与图像的相对位置不变。
4.返回缩放+填充后的图像、修正后的框、缩放比例、上下左右的填充值。
| 方法函数 | 功能说明 | 适用场景 | 关键注意点 |
|---|---|---|---|
letterbox |
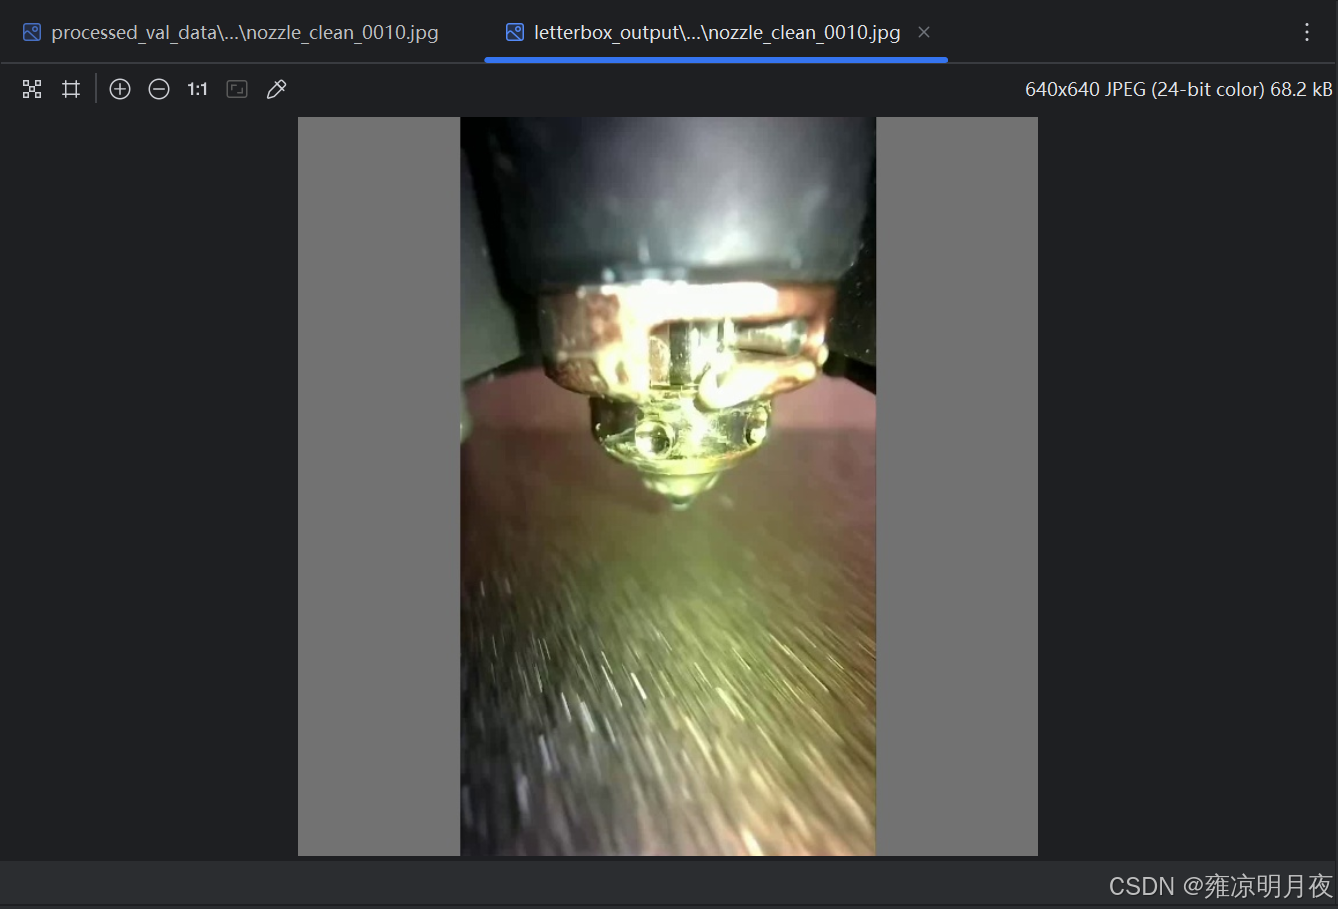
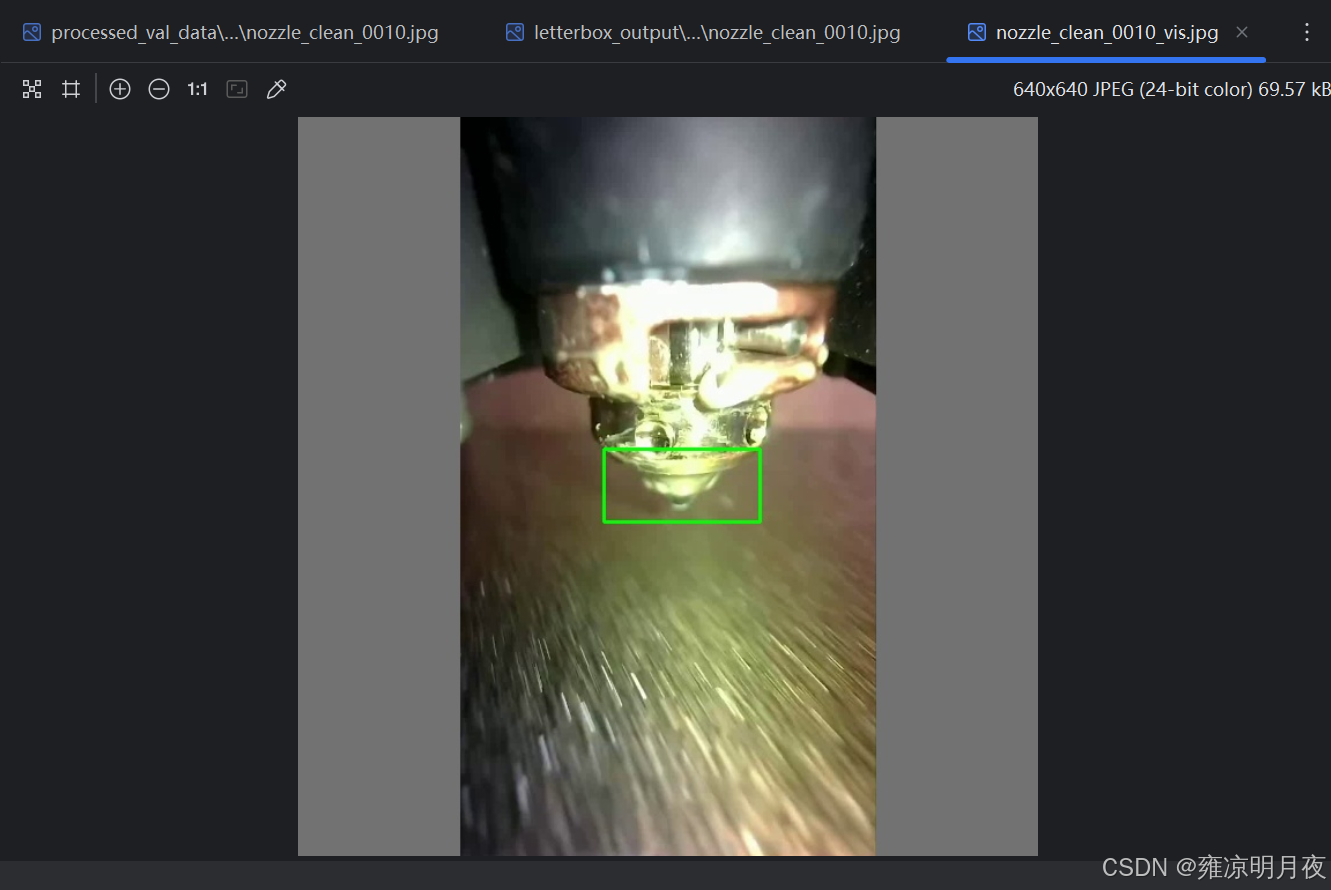
等比例缩放图像 + 灰度填充至指定尺寸(如 640×640),适配 CNN 输入标准化 | 目标检测模型输入预处理(YOLO 系列标配)、统一样本尺寸 | 需记录缩放比例和填充值,后续推理时需还原标注框到原图坐标 |
python
#!/usr/bin/env python
# -*- coding: utf-8 -*-
"""
@Project :Pytorch
@File :letterbox_tool.py
@IDE :PyCharm
@Author :wjj
@Date :2025/12/11 18:43
@Description: 工业级Letterbox填充工具(封装版)
              包含:单张/批量处理、标签加载、结果保存、可视化验证
"""
import cv2
import os
import glob
import numpy as np
from typing import Tuple, List, Optional, Union


def letterbox(
        img: np.ndarray,
        size: Tuple[int, int] = (640, 640),
        color: Tuple[int, int, int] = (114, 114, 114),
        boxes: Optional[np.ndarray] = None
) -> Tuple[np.ndarray, Optional[np.ndarray], float, int, int, int, int]:
    """
    工业级 letterbox 填充(兼容YOLO标签格式)
    Args:
        img: 输入图像 (H,W,C)
        size: 目标尺寸 (w, h),通常为正方形
        color: 填充色(灰度值,YOLO默认114)
        boxes: YOLO格式标签 [x, y, w, h](归一化值,0~1),shape=(n,4)
    Returns:
        img: 填充后的图像
        boxes: 修正后的目标框(若输入boxes不为None)
        ratio: 缩放比例(宽/高缩放系数的最小值)
        padT/padB/padL/padR: 上下左右填充像素数
    """
    # 1. 获取原始尺寸
    h, w = img.shape[:2]
    target_w, target_h = size

    # 2. 计算缩放比例(保持宽高比)
    ratio = min(target_w / w, target_h / h)  # 取最小缩放系数,避免超出目标尺寸
    new_unpad_w = int(round(w * ratio))
    new_unpad_h = int(round(h * ratio))

    # 3. 缩放图像
    img = cv2.resize(img, (new_unpad_w, new_unpad_h), interpolation=cv2.INTER_LINEAR)

    # 4. 计算填充值(居中填充)
    padL = (target_w - new_unpad_w) // 2
    padR = target_w - new_unpad_w - padL
    padT = (target_h - new_unpad_h) // 2
    padB = target_h - new_unpad_h - padT

    # 5. 填充图像
    img = cv2.copyMakeBorder(
        img, padT, padB, padL, padR,
        cv2.BORDER_CONSTANT, value=color
    )

    # 6. 修正目标框(关键:YOLO标签是归一化值,需先转像素再修正,再归一化)
    if boxes is not None and len(boxes) > 0:
        # 转换:归一化坐标 → 原始像素坐标
        boxes[:, 0] = boxes[:, 0] * w  # x中心
        boxes[:, 1] = boxes[:, 1] * h  # y中心
        boxes[:, 2] = boxes[:, 2] * w  # 宽
        boxes[:, 3] = boxes[:, 3] * h  # 高

        # 缩放坐标
        boxes[:, :4] *= ratio

        # 偏移(填充导致的坐标偏移)
        boxes[:, 0] += padL  # x中心偏移左填充
        boxes[:, 1] += padT  # y中心偏移上填充

        # 转换回归一化坐标(适配模型输入)
        boxes[:, 0] /= target_w
        boxes[:, 1] /= target_h
        boxes[:, 2] /= target_w
        boxes[:, 3] /= target_h

        # 过滤异常框(工业级必做:避免填充后框超出图像)
        valid = (boxes[:, 0] > 0) & (boxes[:, 0] < 1) & \
                (boxes[:, 1] > 0) & (boxes[:, 1] < 1) & \
                (boxes[:, 2] > 0) & (boxes[:, 3] > 0)
        boxes = boxes[valid]

    return img, boxes, ratio, padT, padB, padL, padR


def load_yolo_labels(label_path: str) -> Tuple[np.ndarray, np.ndarray]:
    """
    加载YOLO格式标签文件
    Args:
        label_path: 标签文件路径
    Returns:
        class_ids: 类别ID数组,shape=(n,1)
        bboxes: 归一化目标框数组,shape=(n,4) [x,y,w,h]
    """
    class_ids = np.array([])
    bboxes = np.array([])

    if not os.path.exists(label_path):
        return class_ids, bboxes

    try:
        with open(label_path, "r", encoding="utf-8") as f:
            lines = f.readlines()
        boxes = []
        for line in lines:
            line = line.strip()
            if not line:
                continue
            # YOLO格式:class_id x y w h(归一化)
            parts = line.split()
            if len(parts) < 5:
                continue  # 过滤无效行
            class_id = int(parts[0])
            box = np.array([float(x) for x in parts[1:5]])
            boxes.append([class_id] + box.tolist())

        if boxes:
            boxes = np.array(boxes)
            class_ids = boxes[:, 0:1]
            bboxes = boxes[:, 1:5]
    except Exception as e:
        print(f"加载标签失败 {label_path}:{e}")

    return class_ids, bboxes


def save_yolo_labels(
        label_path: str,
        class_ids: np.ndarray,
        bboxes: np.ndarray
) -> None:
    """
    保存YOLO格式标签文件(工业级精度:6位小数)
    Args:
        label_path: 输出标签路径
        class_ids: 类别ID数组,shape=(n,1)
        bboxes: 归一化目标框数组,shape=(n,4)
    """
    try:
        with open(label_path, "w", encoding="utf-8") as f:
            if len(bboxes) > 0:
                # 合并类别和框坐标
                new_boxes = np.hstack([class_ids[:len(bboxes)], bboxes])
                for box in new_boxes:
                    # 格式化输出(保留6位小数,工业级常用精度)
                    f.write(
                        f"{int(box[0])} {box[1]:.6f} {box[2]:.6f} {box[3]:.6f} {box[4]:.6f}\n"
                    )
    except Exception as e:
        print(f"保存标签失败 {label_path}:{e}")


def visualize_letterbox(
        img: np.ndarray,
        boxes: np.ndarray,
        save_path: str,
        class_names: Optional[List[str]] = None,
        box_color: Tuple[int, int, int] = (0, 255, 0),
        text_color: Tuple[int, int, int] = (255, 255, 255),
        thickness: int = 2
) -> None:
    """
    可视化letterbox后的图片和框(增强版:支持类名显示、自定义颜色)
    Args:
        img: letterbox处理后的图像
        boxes: 归一化目标框数组,shape=(n,4) [x,y,w,h]
        save_path: 可视化结果保存路径
        class_names: 类别名称列表(索引对应class_id),如["person", "car"]
        box_color: 框的颜色 (B,G,R)
        text_color: 文字颜色 (B,G,R)
        thickness: 框的线宽
    """
    if len(boxes) == 0:
        cv2.imwrite(save_path, img)
        return

    img_copy = img.copy()
    h, w = img_copy.shape[:2]

    for idx, box in enumerate(boxes):
        # 归一化→像素坐标
        x_center = box[0] * w
        y_center = box[1] * h
        box_w = box[2] * w
        box_h = box[3] * h

        # 转换为左上角/右下角坐标
        x1 = int(x_center - box_w / 2)
        y1 = int(y_center - box_h / 2)
        x2 = int(x_center + box_w / 2)
        y2 = int(y_center + box_h / 2)

        # 画框
        cv2.rectangle(img_copy, (x1, y1), (x2, y2), box_color, thickness)

        # 显示类名(如果提供)
        if class_names is not None and idx < len(class_names):
            class_name = class_names[idx] if idx < len(class_names) else f"class_{idx}"
            # 绘制文字背景
            text_size = cv2.getTextSize(class_name, cv2.FONT_HERSHEY_SIMPLEX, 0.5, 1)[0]
            text_x = x1
            text_y = y1 - 10 if y1 - 10 > 10 else y1 + text_size[1] + 10
            cv2.rectangle(
                img_copy, (text_x, text_y - text_size[1] - 2),
                (text_x + text_size[0], text_y + 2), box_color, -1
            )
            # 绘制文字
            cv2.putText(
                img_copy, class_name, (text_x, text_y),
                cv2.FONT_HERSHEY_SIMPLEX, 0.5, text_color, 1
            )

    cv2.imwrite(save_path, img_copy)
    print(f"可视化结果已保存:{save_path}")


def process_single_image(
        img_path: str,
        label_path: str,
        output_img_dir: str,
        output_label_dir: str,
        target_size: Tuple[int, int] = (640, 640),
        fill_color: Tuple[int, int, int] = (114, 114, 114),
        visualize: bool = False,
        vis_save_dir: Optional[str] = None,
        class_names: Optional[List[str]] = None
) -> bool:
    """
    处理单张图片的Letterbox填充
    Args:
        img_path: 输入图片路径
        label_path: 输入标签路径
        output_img_dir: 输出图片目录
        output_label_dir: 输出标签目录
        target_size: 目标尺寸
        fill_color: 填充色
        visualize: 是否生成可视化结果
        vis_save_dir: 可视化结果保存目录
        class_names: 类别名称列表(可视化用)
    Returns:
        bool: 处理是否成功
    """
    # 1. 加载图片
    img = cv2.imread(img_path)
    if img is None:
        print(f"跳过损坏图片:{img_path}")
        return False

    # 2. 加载标签
    img_name = os.path.splitext(os.path.basename(img_path))[0]
    class_ids, bboxes = load_yolo_labels(label_path)

    # 3. 执行Letterbox填充
    img_letterbox, bboxes_letterbox, _, _, _, _, _ = letterbox(
        img, size=target_size, color=fill_color, boxes=bboxes if len(bboxes) > 0 else None
    )

    # 4. 保存处理后的图片
    output_img_path = os.path.join(output_img_dir, f"{img_name}.jpg")
    cv2.imwrite(output_img_path, img_letterbox)

    # 5. 保存修正后的标签
    output_label_path = os.path.join(output_label_dir, f"{img_name}.txt")
    save_yolo_labels(output_label_path, class_ids, bboxes_letterbox)

    # 6. 可视化(可选)
    if visualize and vis_save_dir is not None:
        os.makedirs(vis_save_dir, exist_ok=True)
        vis_save_path = os.path.join(vis_save_dir, f"{img_name}_vis.jpg")
        visualize_letterbox(img_letterbox, bboxes_letterbox, vis_save_path, class_names)

    return True


def batch_process_letterbox(
        image_dir: str,
        label_dir: str,
        output_root_dir: str,
        target_size: Tuple[int, int] = (640, 640),
        fill_color: Tuple[int, int, int] = (114, 114, 114),
        visualize: bool = False,
        class_names: Optional[List[str]] = None,
        image_extensions: Tuple[str, ...] = ("jpg", "jpeg", "png", "webp", "bmp")
) -> None:
    """
    批量处理图片的Letterbox填充(核心调用函数)
    Args:
        image_dir: 输入图片目录
        label_dir: 输入标签目录
        output_root_dir: 输出根目录(自动创建images/labels/vis子目录)
        target_size: 目标尺寸
        fill_color: 填充色
        visualize: 是否生成可视化结果
        class_names: 类别名称列表(可视化用)
        image_extensions: 支持的图片扩展名
    """
    # 1. 创建输出目录
    output_img_dir = os.path.join(output_root_dir, "images")
    output_label_dir = os.path.join(output_root_dir, "labels")
    vis_save_dir = os.path.join(output_root_dir, "vis") if visualize else None
    os.makedirs(output_img_dir, exist_ok=True)
    os.makedirs(output_label_dir, exist_ok=True)
    if visualize:
        os.makedirs(vis_save_dir, exist_ok=True)

    # 2. 遍历所有图片
    image_paths = []
    for ext in image_extensions:
        pattern = os.path.join(image_dir, f"*.{ext.lower()}")
        image_paths.extend(glob.glob(pattern))
    # 关键:去重
    image_paths = list(set(image_paths))
    # 可选:按文件名排序,保证处理顺序稳定
    image_paths.sort()

    # 3. 批量处理
    success_count = 0
    total_count = len(image_paths)
    for img_path in image_paths:
        img_name = os.path.splitext(os.path.basename(img_path))[0]
        label_path = os.path.join(label_dir, f"{img_name}.txt")
        if process_single_image(
                img_path=img_path,
                label_path=label_path,
                output_img_dir=output_img_dir,
                output_label_dir=output_label_dir,
                target_size=target_size,
                fill_color=fill_color,
                visualize=visualize,
                vis_save_dir=vis_save_dir,
                class_names=class_names
        ):
            success_count += 1

    # 4. 输出统计信息
    print(f"\n=== Letterbox批量处理完成 ===")
    print(f"总图片数:{total_count}")
    print(f"成功处理:{success_count}")
    print(f"失败数量:{total_count - success_count}")
    print(f"输出根目录:{output_root_dir}")
    if visualize:
        print(f"可视化目录:{vis_save_dir}")


if __name__ == "__main__":
    # ====================== 配置参数(按需修改) ======================
    CONFIG = {
        "image_dir": r"C:\Users\Excub\workspace\Pytorch\12.08_cv\processed_val_data\images",
        "label_dir": r"C:\Users\Excub\workspace\Pytorch\12.08_cv\processed_val_data\labels",
        "output_root_dir": r"C:\Users\Excub\workspace\Pytorch\12.08_cv\processed_val_data\letterbox_output",
        "target_size": (640, 640),  # YOLO标准输入尺寸
        "fill_color": (114, 114, 114),  # YOLO默认填充色
        "visualize": True,  # 是否生成可视化结果
        "class_names": None,  # 示例:["person", "car", "bike"](根据你的数据集修改)
        "image_extensions": ("jpg", "webp", "png")  # 支持的图片格式
    }

    # ====================== 执行批量处理 ======================
    batch_process_letterbox(
        image_dir=CONFIG["image_dir"],
        label_dir=CONFIG["label_dir"],
        output_root_dir=CONFIG["output_root_dir"],
        target_size=CONFIG["target_size"],
        fill_color=CONFIG["fill_color"],
        visualize=CONFIG["visualize"],
        class_names=CONFIG["class_names"],
        image_extensions=CONFIG["image_extensions"]
    )
2.flip_image(图像翻转)
#使用方法
img_flip, bboxes_flip = flip_image(img_letterbox, bboxes_letterbox, flip_type="horizontal")
#返回值解析:
变量名 具体含义(结合你的场景) 数据类型 / 维度 实操举例 img_flip对 img_letterbox做水平翻转后的图像np.ndarray(H×W×C) 640×640 尺寸不变,图像像素左右镜像(比如物体从左侧变右侧) bboxes_flip适配 img_flip的 YOLO 归一化标签(修正了翻转偏移)np.ndarray(n×4) 基于 640×640 的归一化值,仅 x_center=1-原x_center(y/w/h 不变),比如原 x_center=0.3 → 翻转后 = 0.7核心理解:
# 水平翻转时,x_center = 1 - 原x_center
flipped_bboxes[:, 0] = 1 - flipped_bboxes[:, 0]

 # 垂直翻转:y_center = 1 - y_center
            flipped_bboxes[:, 1] = 1 - flipped_bboxes[:, 1]
| 方法函数 | 功能说明 | 适用场景 | 关键注意点 |
|---|---|---|---|
letterbox |
等比例缩放图像 + 灰度填充至指定尺寸(如 640×640),适配 CNN 输入标准化 | 目标检测模型输入预处理(YOLO 系列标配)、统一样本尺寸 | 需记录缩放比例和填充值,后续推理时需还原标注框到原图坐标 |
flip_image |
水平 / 垂直 / 双向翻转图像,同步调整 YOLO 框的 cx/cy 坐标 | 提升模型对目标左右 / 上下翻转的识别能力(如行人、车辆的镜像场景) | 翻转代码 1 = 水平、0 = 垂直、-1 = 双向,仅需调整框的中心坐标,宽高不变 |
python
import cv2
import os
import numpy as np

# ====================== 核心函数:图像翻转 + YOLO标签修正 ======================
def flip_image_and_label(img: np.ndarray, bboxes: np.ndarray, flip_type: str) -> tuple[np.ndarray, np.ndarray]:
    """
    极简核心:图像翻转 + YOLO标签修正
    :param img: 输入图像(H,W,C)
    :param bboxes: YOLO归一化框 [x,y,w,h],shape=(n,4)
    :param flip_type: horizontal/vertical/both
    :return: 翻转后图像、修正后标签
    """
    # 1. 图像翻转
    flip_code = {"horizontal":1, "vertical":0, "both":-1}[flip_type]
    flipped_img = cv2.flip(img, flip_code)

    # 2. 标签修正(核心:归一化坐标翻转)
    flipped_bboxes = bboxes.copy() if len(bboxes) > 0 else bboxes
    if len(flipped_bboxes) > 0:
        if flip_type in ["horizontal", "both"]:
            flipped_bboxes[:, 0] = 1 - flipped_bboxes[:, 0]  # 水平翻转:x_center = 1 - x_center
        if flip_type in ["vertical", "both"]:
            flipped_bboxes[:, 1] = 1 - flipped_bboxes[:, 1]  # 垂直翻转:y_center = 1 - y_center
        # 过滤无效坐标(0~1范围)
        flipped_bboxes = flipped_bboxes[(flipped_bboxes>0).all(axis=1) & (flipped_bboxes<1).all(axis=1)]

    return flipped_img, flipped_bboxes

# ====================== 极简加载/保存标签(仅保留核心) ======================
def load_yolo_bboxes(label_path: str) -> np.ndarray:
    """加载YOLO标签,仅返回归一化框数组"""
    bboxes = []
    if os.path.exists(label_path):
        with open(label_path, "r") as f:
            for line in f:
                parts = line.strip().split()
                if len(parts)>=5:
                    bboxes.append([float(x) for x in parts[1:5]])
    return np.array(bboxes)

def save_yolo_bboxes(label_path: str, class_id: int, bboxes: np.ndarray):
    """保存YOLO标签(极简版,默认单类别)"""
    with open(label_path, "w") as f:
        for box in bboxes:
            f.write(f"{class_id} {box[0]:.6f} {box[1]:.6f} {box[2]:.6f} {box[3]:.6f}\n")

# ====================== 核心调用示例 ======================
if __name__ == "__main__":
    # 1. 配置路径(仅改这里即可)
    IMG_PATH = r"C:\Users\Excub\workspace\Pytorch\12.08_cv\test_imgs\girl.webp"
    LABEL_PATH = r"C:\Users\Excub\workspace\Pytorch\12.08_cv\test_labels_yolo\girl.txt"
    OUTPUT_DIR = r"C:\Users\Excub\workspace\Pytorch\12.08_cv\flip_aug_output"
    CLASS_ID = 0  # 你的目标类别ID

    # 2. 加载原图+标签
    img = cv2.imread(IMG_PATH)
    bboxes = load_yolo_bboxes(LABEL_PATH)

    # 3. 核心调用:执行三种翻转(按需选一种即可)
    for flip_type in ["horizontal", "vertical", "both"]:
        flipped_img, flipped_bboxes = flip_image_and_label(img, bboxes, flip_type)

        # 4. 保存结果
        os.makedirs(OUTPUT_DIR, exist_ok=True)
        img_name = os.path.basename(IMG_PATH).split(".")[0]
        cv2.imwrite(f"{OUTPUT_DIR}/{img_name}_{flip_type}.webp", flipped_img)
        save_yolo_bboxes(f"{OUTPUT_DIR}/{img_name}_{flip_type}.txt", CLASS_ID, flipped_bboxes)

    print("翻转增强完成!输出文件:", OUTPUT_DIR)
原图->水平翻转->垂直翻转->水平+垂直翻转
(没有添加框:因为框是随便标记的,上述代码执行后也有带框显示)


3.Image Translation(随机平移)
原理:
图像像素平移 + YOLO 标签坐标修正 + 无效框过滤
- 图像平移:用 OpenCV 的
warpAffine实现像素级平移;- 标签修正:先将 YOLO 归一化坐标转像素坐标,叠加平移量后转回归一化;
- 平移限制:x/y 平移量≤图像宽 / 高的 1/4(即 1/2 范围内),避免目标完全移出;
- 框过滤:仅保留平移后仍在图像内的框(过滤超出边界的无效框)。随机平移的数据增强,每次执行其偏移量具有随机性。
核心代码:
python# 仅执行平移增强(无需保存,直接获取结果) img = cv2.imread(IMG_PATH) bboxes = load_yolo_bboxes(LABEL_PATH) trans_img, trans_bboxes = random_image_translation(img, bboxes, max_trans_ratio=0.25)
python
import cv2
import numpy as np
import random
import os


# ====================== 核心函数:随机平移 + YOLO标签修正 ======================
def random_image_translation(img: np.ndarray, bboxes: np.ndarray, max_trans_ratio: float = 0.25) -> tuple[
    np.ndarray, np.ndarray]:
    """
    极简核心:随机平移图像 + YOLO标签修正 + 无效框过滤
    :param img: 输入图像(H,W,C)
    :param bboxes: YOLO归一化框 [x,y,w,h],shape=(n,4)
    :param max_trans_ratio: 最大平移比例(≤1/4图像尺寸)
    :return: 平移后图像、修正后标签
    """
    h, w = img.shape[:2]
    # 1. 随机生成平移量(±max_trans_ratio×宽/高)
    dx = random.randint(-int(w * max_trans_ratio), int(w * max_trans_ratio))
    dy = random.randint(-int(h * max_trans_ratio), int(h * max_trans_ratio))

    # 2. 图像平移(核心API:warpAffine)
    M = np.float32([[1, 0, dx], [0, 1, dy]])
    translated_img = cv2.warpAffine(img, M, (w, h), borderValue=(114, 114, 114))

    # 3. YOLO标签修正(核心逻辑)
    translated_bboxes = bboxes.copy() if len(bboxes) > 0 else bboxes
    if len(translated_bboxes) > 0:
        # 归一化→像素坐标
        pixel_boxes = translated_bboxes * [w, h, w, h]
        # 同步平移框中心
        pixel_boxes[:, 0] += dx
        pixel_boxes[:, 1] += dy
        # 计算框四角,过滤超出图像的无效框
        x1 = pixel_boxes[:, 0] - pixel_boxes[:, 2] / 2
        y1 = pixel_boxes[:, 1] - pixel_boxes[:, 3] / 2
        x2 = pixel_boxes[:, 0] + pixel_boxes[:, 2] / 2
        y2 = pixel_boxes[:, 1] + pixel_boxes[:, 3] / 2
        valid_mask = (x1 > 0) & (y1 > 0) & (x2 < w) & (y2 < h)
        pixel_boxes = pixel_boxes[valid_mask]
        # 像素→归一化
        translated_bboxes = pixel_boxes / [w, h, w, h] if len(pixel_boxes) > 0 else np.array([])

    return translated_img, translated_bboxes


# ====================== 极简加载/保存标签 ======================
def load_yolo_bboxes(label_path: str) -> np.ndarray:
    """仅加载YOLO归一化框"""
    bboxes = []
    if os.path.exists(label_path):
        with open(label_path) as f:
            for line in f:
                parts = line.strip().split()
                if len(parts) >= 5: bboxes.append([float(x) for x in parts[1:5]])
    return np.array(bboxes)


def save_yolo_bboxes(label_path: str, class_id: int, bboxes: np.ndarray):
    """仅保存YOLO标签(单类别)"""
    with open(label_path, "w") as f:
        for box in bboxes:
            f.write(f"{class_id} {box[0]:.6f} {box[1]:.6f} {box[2]:.6f} {box[3]:.6f}\n")


# ====================== 核心调用示例 ======================
if __name__ == "__main__":
    # 1. 配置路径(仅改这里)
    IMG_PATH = r"C:\Users\Excub\workspace\Pytorch\12.08_cv\test_imgs\girl.webp"
    LABEL_PATH = r"C:\Users\Excub\workspace\Pytorch\12.08_cv\test_labels_yolo\girl.txt"
    OUTPUT_DIR = r"C:\Users\Excub\workspace\Pytorch\12.08_cv\translation_aug_output"
    CLASS_ID = 0  # 目标类别ID

    # 2. 加载原图+标签
    img = cv2.imread(IMG_PATH)
    bboxes = load_yolo_bboxes(LABEL_PATH)

    # 3. 核心调用:随机平移(平移量≤1/4图像尺寸)
    translated_img, translated_bboxes = random_image_translation(img, bboxes, max_trans_ratio=0.25)

    # 4. 保存结果
    os.makedirs(OUTPUT_DIR, exist_ok=True)
    img_name = os.path.basename(IMG_PATH).split(".")[0]
    cv2.imwrite(f"{OUTPUT_DIR}/{img_name}_trans.webp", translated_img)
    save_yolo_bboxes(f"{OUTPUT_DIR}/{img_name}_trans.txt", CLASS_ID, translated_bboxes)

    print(f"随机平移完成!平移后有效框数:{len(translated_bboxes)}")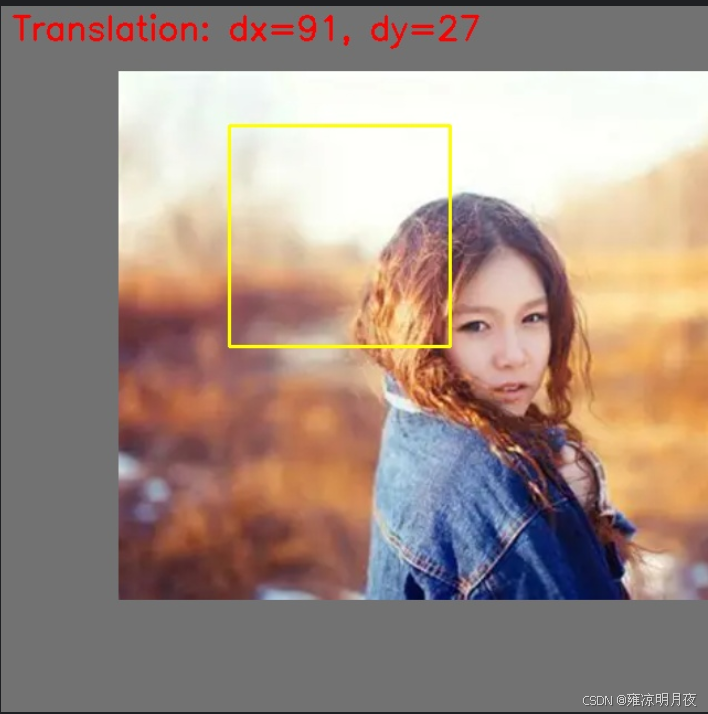
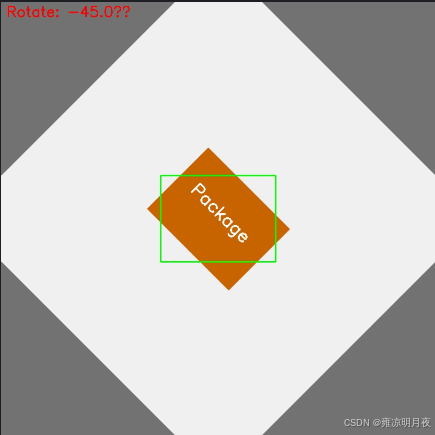
4.getRotationMatrix2D(旋转增强)
核心步骤:
1.无黑边旋转矩阵计算
python# 核心代码片段 cos_theta = np.cos(np.radians(abs(angle))) sin_theta = np.sin(np.radians(abs(angle))) new_w = int((h * sin_theta) + (w * cos_theta)) # 计算旋转后无黑边的新尺寸 new_h = int((h * cos_theta) + (w * sin_theta)) M = cv2.getRotationMatrix2D(center, angle, scale).astype(np.float32) # 旋转矩阵(强制float32) M[0, 2] += (new_w - w) / 2 # 平移量调整,让图像居中 M[1, 2] += (new_h - h) / 2 rotated_img = cv2.warpAffine(img, M, (new_w, new_h), borderValue=(114,114,114))2.2. YOLO 框转角点 + 角点旋转(解决 "框同步旋转" 的核心问题)
python# 核心代码片段 # YOLO归一化框 → 4个像素角点(强制float32) corners = np.array([[x1,y1], [x2,y2], [x3,y3], [x4,y4]], dtype=np.float32) # 齐次坐标转换 + 矩阵乘法旋转角点(解决OpenCV断言错误) ones = np.ones(shape=(len(corners), 1), dtype=np.float32) corners_ones = np.hstack([corners, ones]) rotated_corners = M.dot(corners_ones.T).T.astype(np.float32) # 过滤无效角点(NaN/inf + 形状异常) if np.any(np.isnan(rotated_corners)) or rotated_corners.shape != (4, 2): continue2.3.最小包围盒计算 + 无效框过滤
python# 核心代码片段 rect = cv2.minAreaRect(rotated_corners) # 计算旋转后目标的最小包围矩形 (rx_center, ry_center), (rw, rh), _ = rect # 过滤无效框(工业级必做) if rw <= 1 or rh <= 1 or rx_center < 0 or ry_center > new_w: continue # 像素坐标 → YOLO归一化坐标(基于新图像尺寸) rx_center_norm = rx_center / new_w ry_center_norm = ry_center / new_h rw_norm = rw / new_w rh_norm = rh / new_h
python
import cv2
import numpy as np
import os


# ====================== 核心函数:旋转图像 + YOLO标签修正 ======================
def rotate_image_and_boxes(img: np.ndarray, bboxes: np.ndarray, angle: float, fill_up: bool = True,
                           scale: float = 1.0) -> tuple[np.ndarray, np.ndarray]:
    """
    极简核心:图像旋转 + YOLO框最小包围盒计算(无黑边/过滤无效框)
    :param img: 输入图像(H,W,C)
    :param bboxes: YOLO归一化框 [x,y,w,h],shape=(n,4)
    :param angle: 旋转角度(正=顺时针,负=逆时针)
    :param fill_up: 是否填充避免黑边
    :param scale: 缩放系数(避免旋转后目标裁剪)
    :return: 旋转后图像、修正后标签
    """
    h, w = img.shape[:2]
    center = (w // 2, h // 2)

    # 1. 计算旋转矩阵 + 新尺寸(无黑边核心)
    if fill_up:
        cos_theta = np.cos(np.radians(abs(angle)))
        sin_theta = np.sin(np.radians(abs(angle)))
        new_w = int(h * sin_theta + w * cos_theta)
        new_h = int(h * cos_theta + w * sin_theta)
        M = cv2.getRotationMatrix2D(center, angle, scale)
        M[0, 2] += (new_w - w) / 2
        M[1, 2] += (new_h - h) / 2
        rotated_img = cv2.warpAffine(img, M, (new_w, new_h), borderValue=(114, 114, 114))
    else:
        M = cv2.getRotationMatrix2D(center, angle, scale)
        rotated_img = cv2.warpAffine(img, M, (w, h), borderValue=(114, 114, 114))
        new_w, new_h = w, h

    # 2. YOLO标签修正(核心:角点旋转+最小包围盒)
    rotated_bboxes = []
    for box in bboxes:
        # 归一化→像素角点
        xc, yc, bw, bh = box * [w, h, w, h]
        corners = np.array([[xc - bw / 2, yc - bh / 2], [xc + bw / 2, yc - bh / 2],
                            [xc + bw / 2, yc + bh / 2], [xc - bw / 2, yc + bh / 2]], dtype=np.float32)
        # 旋转角点
        corners_rot = cv2.transform(np.array([corners]), M)[0]
        # 最小包围盒
        rect = cv2.minAreaRect(corners_rot)
        (rx, ry), (rw, rh), _ = rect
        # 过滤无效框 + 归一化
        if rw > 1 and rh > 1 and 0 < rx < new_w and 0 < ry < new_h:
            rotated_bboxes.append([rx / new_w, ry / new_h, rw / new_w, rh / new_h])

    return rotated_img, np.array(rotated_bboxes, dtype=np.float32)


# ====================== 极简加载/保存标签 ======================
def load_yolo_bboxes(label_path: str) -> np.ndarray:
    """仅加载YOLO归一化框"""
    bboxes = []
    if os.path.exists(label_path):
        with open(label_path) as f:
            for line in f:
                parts = line.strip().split()
                if len(parts) >= 5: bboxes.append([float(x) for x in parts[1:5]])
    return np.array(bboxes, dtype=np.float32)


def save_yolo_bboxes(label_path: str, class_id: int, bboxes: np.ndarray):
    """仅保存YOLO标签(单类别)"""
    with open(label_path, "w") as f:
        for box in bboxes:
            f.write(f"{class_id} {box[0]:.6f} {box[1]:.6f} {box[2]:.6f} {box[3]:.6f}\n")


# ====================== 核心调用示例 ======================
if __name__ == "__main__":
    # 1. 配置路径(仅改这里)
    IMG_PATH = r"C:\Users\Excub\workspace\Pytorch\12.08_cv\rotate_test_data\industrial_package.webp"
    LABEL_PATH = r"C:\Users\Excub\workspace\Pytorch\12.08_cv\rotate_test_data\industrial_package.txt"
    OUTPUT_DIR = r"C:\Users\Excub\workspace\Pytorch\12.08_cv\rotate_aug_output"
    CLASS_ID = 0  # 目标类别ID

    # 2. 加载原图+标签
    img = cv2.imread(IMG_PATH)
    bboxes = load_yolo_bboxes(LABEL_PATH)

    # 3. 核心调用:旋转增强(示例:顺时针15°,无黑边)
    rotated_img, rotated_bboxes = rotate_image_and_boxes(img, bboxes, angle=15, fill_up=True, scale=1.0)

    # 4. 保存结果
    os.makedirs(OUTPUT_DIR, exist_ok=True)
    img_name = os.path.basename(IMG_PATH).split(".")[0]
    cv2.imwrite(f"{OUTPUT_DIR}/{img_name}_rot15.webp", rotated_img)
    save_yolo_bboxes(f"{OUTPUT_DIR}/{img_name}_rot15.txt", CLASS_ID, rotated_bboxes)

    print(f"旋转完成!角度15°,有效框数:{len(rotated_bboxes)}")
结果展示:

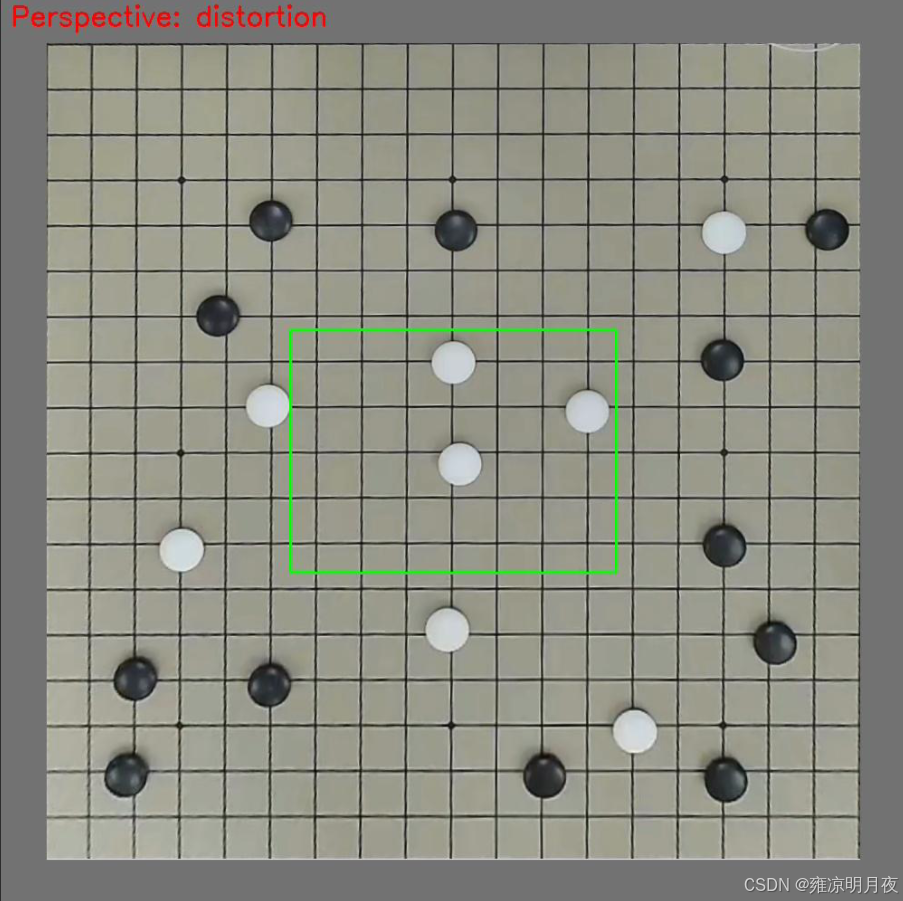
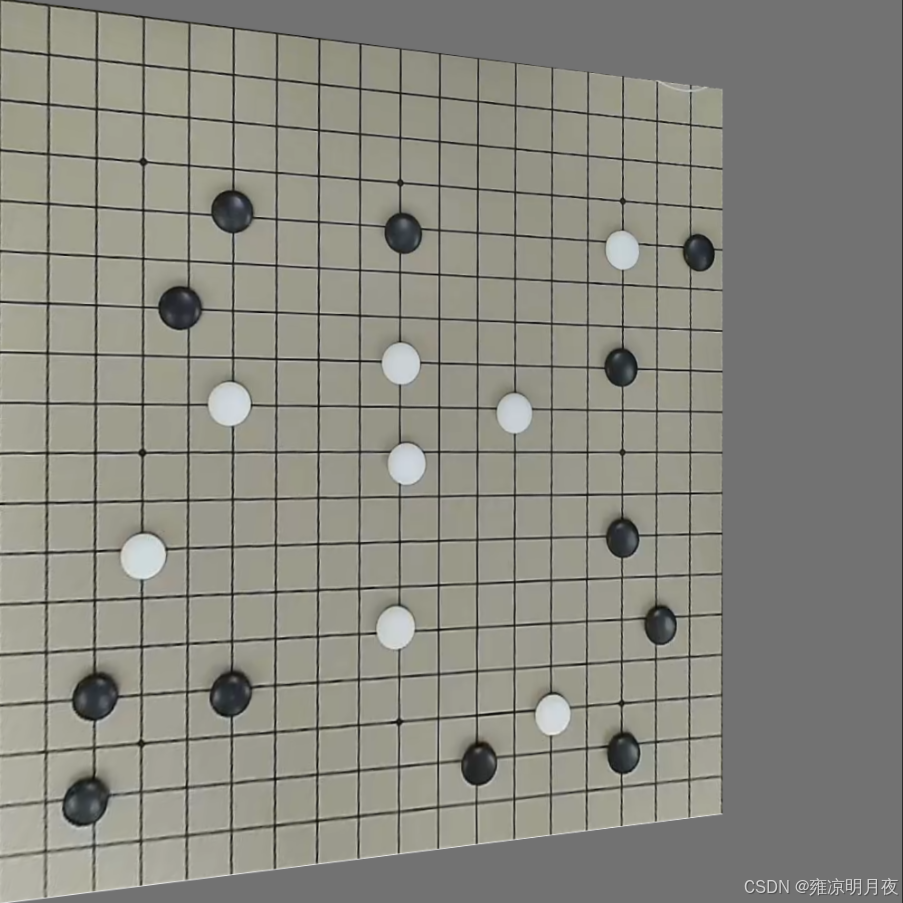
5.Perspective Transformation(透视变换)
本质:是模拟真实三维视角 / 镜头畸变的 2D 图像变换
维度 仿射变换(旋转 / 平移) 透视变换(视角 / 畸变) 矩阵维度 2×3(仅 2D 线性变换) 3×3(含 3D 透视投影) 几何特性 保持平行线、比例不变 打破平行线(模拟近大远小) 场景适配 2D 平面内的位置 / 角度变化 3D 视角变化(俯视 / 仰视 / 侧视)、镜头畸变
代码核心:
python
# 1. 定义原图/目标四角点(手动指定是核心!)
src_points = np.array([[0,0], [w-1,0], [w-1,h-1], [0,h-1]], dtype=np.float32)
dst_points = np.array([[w*0.1,0], [w*0.9,0], [w-1,h-1], [0,h-1]], dtype=np.float32)  # 俯视视角
# 2. 计算3×3透视矩阵(核心API)
M = cv2.getPerspectiveTransform(src_points, dst_points)
核心要点:
透视变换数据增强的核心是:通过手动指定的 4 组透视角点计算 3×3 透视矩阵,对目标框做 "角点级透视变换",再通过最小包围盒重构 YOLO 标签,最终模拟真实三维视角 / 镜头畸变,同时保证标签与目标的精准匹配。
python
#!/usr/bin/env python
# -*- coding: utf-8 -*-
"""
@Project :Pytorch
@File :perspective_aug_custom_img.py
@IDE :PyCharm
@Author :wjj
@Date :2025/12/14
@Description: 透视变换增强(适配自定义图片:ok.png)
支持俯视/侧视/镜头畸变三种透视效果,自动处理标签
"""
import cv2
import os
import numpy as np
from typing import Tuple, List, Optional
def load_yolo_labels(label_path: str, img_w: int, img_h: int) -> Tuple[np.ndarray, np.ndarray]:
"""
加载YOLO标签(鲁棒版)
若标签不存在,自动生成示例标签(居中框,适配多数场景)
"""
class_ids = np.array([], dtype=np.int32)
bboxes = np.array([], dtype=np.float32).reshape(0, 4)
# 标签不存在 → 生成示例标签(居中框,宽0.3,高0.4)
if not os.path.exists(label_path):
print(f"未找到标签文件:{label_path},自动生成示例标签(居中框)")
# 示例标签:类别0,中心(0.5,0.5),宽0.3,高0.4(归一化)
with open(label_path, "w", encoding="utf-8") as f:
f.write("0 0.5 0.5 0.3 0.4\n")
try:
with open(label_path, "r", encoding="utf-8") as f:
lines = [l.strip() for l in f.readlines() if l.strip()]
boxes = []
for line in lines:
parts = line.split()
if len(parts) != 5:
print(f"无效标签行:{line},跳过")
continue
class_id = int(parts[0])
box = np.array([float(x) for x in parts[1:5]], dtype=np.float32)
# 校验归一化值范围(0~1)
if np.any(box < 0) or np.any(box > 1):
print(f"标签值超出0~1范围:{box},跳过")
continue
boxes.append([class_id] + box.tolist())
if boxes:
boxes = np.array(boxes, dtype=np.float32)
class_ids = boxes[:, 0:1].astype(np.int32)
bboxes = boxes[:, 1:5].astype(np.float32).reshape(-1, 4)
print(f"加载标签成功:{label_path},共{len(bboxes)}个框")
except Exception as e:
print(f"加载标签失败:{e}")
return class_ids, bboxes
def perspective_transformation(
img: np.ndarray,
bboxes: np.ndarray,
perspective_type: str = "top_down" # top_down/side_view/distortion
) -> Tuple[np.ndarray, np.ndarray]:
"""核心:透视变换 + YOLO标签同步修正"""
h, w = img.shape[:2]
pers_img = img.copy()
pers_bboxes = np.array([], dtype=np.float32).reshape(0, 4)
# 1. 原图四角点(图像整体)
src_points = np.array([
[0, 0], # 左上
[w - 1, 0], # 右上
[w - 1, h - 1], # 右下
[0, h - 1] # 左下
], dtype=np.float32)
# 2. 目标透视角点(模拟不同工业场景)
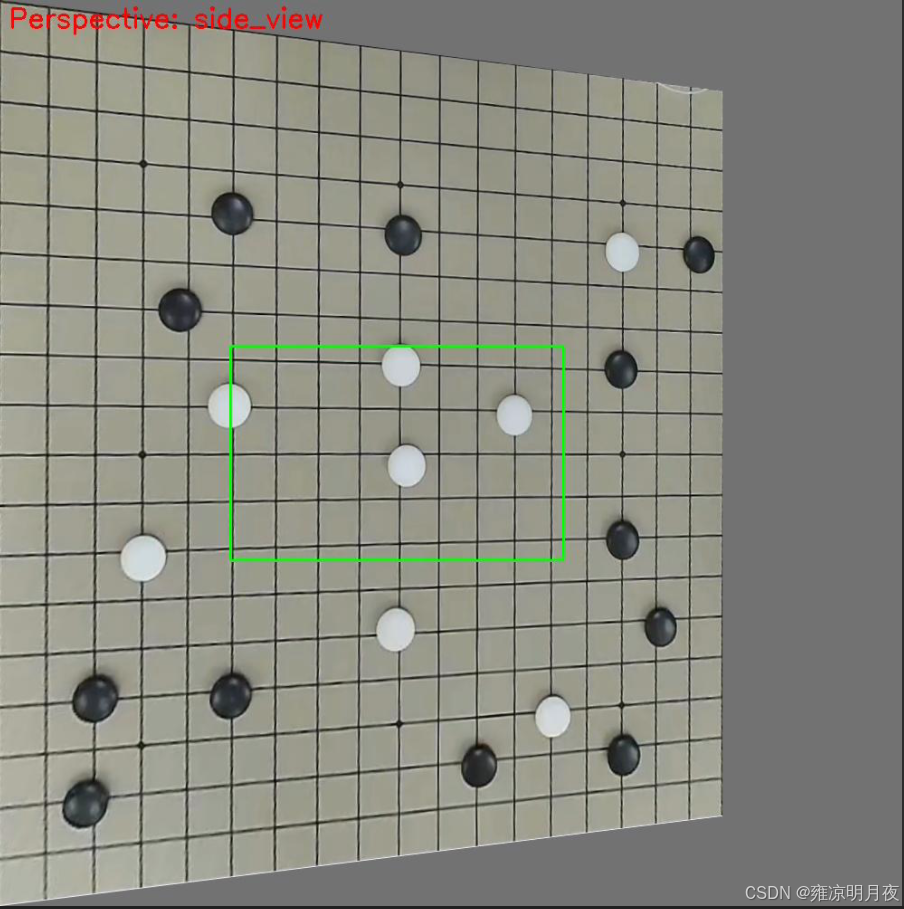
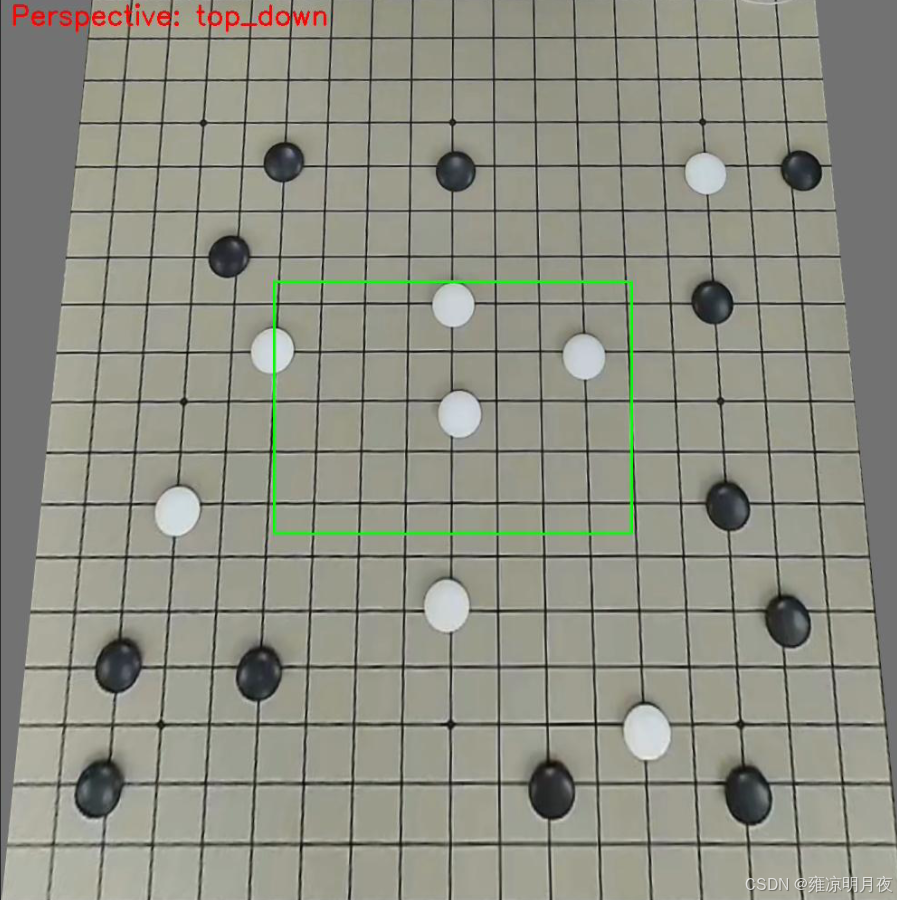
if perspective_type == "top_down":
# 俯视视角:顶部向内收缩10%
dst_points = np.array([
[w*0.1, 0], # 左上内移
[w*0.9, 0], # 右上内移
[w - 1, h - 1], # 右下不变
[0, h - 1] # 左下不变
], dtype=np.float32)
elif perspective_type == "side_view":
# 侧视视角:右侧向内收缩20%+上下偏移
dst_points = np.array([
[0, 0], # 左上不变
[w*0.8, h*0.1], # 右上内移+下移
[w*0.8, h*0.9], # 右下内移+上移
[0, h - 1] # 左下不变
], dtype=np.float32)
elif perspective_type == "distortion":
# 镜头畸变:四角轻微内移5%
dst_points = np.array([
[w*0.05, h*0.05], # 左上内移
[w*0.95, h*0.05], # 右上内移
[w*0.95, h*0.95], # 右下内移
[w*0.05, h*0.95] # 左下内移
], dtype=np.float32)
else:
print(f"无效透视类型:{perspective_type},返回原图")
return img, bboxes
# 3. 计算透视矩阵(核心)
M = cv2.getPerspectiveTransform(src_points, dst_points).astype(np.float32)
# 4. 执行透视变换
pers_img = cv2.warpPerspective(
img, M, (w, h),
borderMode=cv2.BORDER_CONSTANT,
borderValue=(114, 114, 114) # YOLO标准填充色
)
# 5. 标签同步修正
if len(bboxes) > 0 and bboxes.shape[1] == 4:
pers_bboxes_list = []
for box in bboxes:
try:
# YOLO → 像素角点
x_center, y_center, box_w, box_h = box.astype(np.float32)
x_center_pix = x_center * w
y_center_pix = y_center * h
box_w_pix = box_w * w
box_h_pix = box_h * h
# 目标框4个角点
x1 = x_center_pix - box_w_pix / 2
y1 = y_center_pix - box_h_pix / 2
x2 = x_center_pix + box_w_pix / 2
y2 = y_center_pix - box_h_pix / 2
x3 = x_center_pix + box_w_pix / 2
y3 = y_center_pix + box_h_pix / 2
x4 = x_center_pix - box_w_pix / 2
y4 = y_center_pix + box_h_pix / 2
obj_corners = np.array([[x1,y1], [x2,y2], [x3,y3], [x4,y4]], dtype=np.float32)
# 透视变换角点(齐次坐标)
obj_corners_homo = np.hstack([obj_corners, np.ones((4,1), dtype=np.float32)])
pers_corners_homo = M @ obj_corners_homo.T
pers_corners = (pers_corners_homo[:2, :] / pers_corners_homo[2, :]).T.astype(np.float32)
# 过滤无效角点
if np.any(np.isnan(pers_corners)) or np.any(np.isinf(pers_corners)):
continue
if np.any(pers_corners < 0) or np.any(pers_corners[:,0] > w) or np.any(pers_corners[:,1] > h):
continue
# 最小包围盒
rect = cv2.minAreaRect(pers_corners)
(rx_center, ry_center), (rw, rh), _ = rect
# 过滤无效框
if rw <= 1 or rh <= 1:
continue
# 像素 → 归一化
rx_norm = rx_center / w
ry_norm = ry_center / h
rw_norm = rw / w
rh_norm = rh / h
# 修正宽高
rw_norm = max(rw_norm, 1e-6)
rh_norm = max(rh_norm, 1e-6)
if rw_norm < rh_norm:
rw_norm, rh_norm = rh_norm, rw_norm
pers_bboxes_list.append([rx_norm, ry_norm, rw_norm, rh_norm])
except Exception as e:
print(f"单框处理失败:{e},跳过")
continue
if pers_bboxes_list:
pers_bboxes = np.array(pers_bboxes_list, dtype=np.float32).reshape(-1, 4)
print(f"透视变换完成:类型={perspective_type},有效框数={len(pers_bboxes)}")
return pers_img, pers_bboxes
def save_yolo_labels(label_path: str, class_ids: np.ndarray, bboxes: np.ndarray) -> None:
"""保存透视变换后的YOLO标签"""
os.makedirs(os.path.dirname(label_path), exist_ok=True)
try:
with open(label_path, "w", encoding="utf-8") as f:
if len(bboxes) > 0 and bboxes.shape[1] == 4:
new_boxes = np.hstack([class_ids[:len(bboxes)], bboxes])
for box in new_boxes:
f.write(f"{int(box[0])} {box[1]:.6f} {box[2]:.6f} {box[3]:.6f} {box[4]:.6f}\n")
print(f"标签已保存:{label_path}")
except Exception as e:
print(f"保存标签失败:{e}")
def visualize_perspective(
img: np.ndarray,
bboxes: np.ndarray,
save_path: str,
pers_type: str
) -> None:
"""可视化透视变换结果"""
img_copy = img.copy()
h, w = img_copy.shape[:2]
# 标注透视类型
cv2.putText(
img_copy, f"Perspective: {pers_type}",
(10, 30), cv2.FONT_HERSHEY_SIMPLEX, 1, (0, 0, 255), 2
)
# 绘制目标框
if len(bboxes) > 0 and bboxes.shape[1] == 4:
for box in bboxes:
x_center = box[0] * w
y_center = box[1] * h
box_w = box[2] * w
box_h = box[3] * h
x1 = int(x_center - box_w / 2)
y1 = int(y_center - box_h / 2)
x2 = int(x_center + box_w / 2)
y2 = int(y_center + box_h / 2)
cv2.rectangle(img_copy, (x1, y1), (x2, y2), (0, 255, 0), 2)
cv2.imwrite(save_path, img_copy)
print(f"可视化图已保存:{save_path}")
if __name__ == "__main__":
# ====================== 配置你的图片路径 ======================
CUSTOM_IMG_PATH = r"C:\Users\Excub\workspace\Pytorch\12.08_cv\perspective_data\ok.png"
OUTPUT_DIR = r"C:\Users\Excub\workspace\Pytorch\12.08_cv\perspective_data\aug_results"
# 1. 加载自定义图片
img_origin = cv2.imread(CUSTOM_IMG_PATH, cv2.IMREAD_COLOR)
if img_origin is None:
raise FileNotFoundError(f"无法读取图片,请检查路径:{CUSTOM_IMG_PATH}")
h, w = img_origin.shape[:2]
print(f"成功加载图片:{CUSTOM_IMG_PATH},尺寸:{h}×{w}")
# 2. 加载/生成标签(标签文件与图片同目录,名称为ok.txt)
label_path = os.path.splitext(CUSTOM_IMG_PATH)[0] + ".txt"
class_ids, bboxes_origin = load_yolo_labels(label_path, w, h)
# 3. 创建输出目录
os.makedirs(OUTPUT_DIR, exist_ok=True)
img_basename = os.path.splitext(os.path.basename(CUSTOM_IMG_PATH))[0]
# 4. 执行透视变换增强(3种工业场景)
# 4.1 俯视视角
pers_top, bboxes_top = perspective_transformation(img_origin, bboxes_origin, "top_down")
cv2.imwrite(os.path.join(OUTPUT_DIR, f"{img_basename}_topdown.png"), pers_top)
save_yolo_labels(os.path.join(OUTPUT_DIR, f"{img_basename}_topdown.txt"), class_ids, bboxes_top)
visualize_perspective(pers_top, bboxes_top, os.path.join(OUTPUT_DIR, f"{img_basename}_topdown_vis.jpg"), "top_down")
# 4.2 侧视视角
pers_side, bboxes_side = perspective_transformation(img_origin, bboxes_origin, "side_view")
cv2.imwrite(os.path.join(OUTPUT_DIR, f"{img_basename}_sideview.png"), pers_side)
save_yolo_labels(os.path.join(OUTPUT_DIR, f"{img_basename}_sideview.txt"), class_ids, bboxes_side)
visualize_perspective(pers_side, bboxes_side, os.path.join(OUTPUT_DIR, f"{img_basename}_sideview_vis.jpg"), "side_view")
# 4.3 镜头畸变
pers_dist, bboxes_dist = perspective_transformation(img_origin, bboxes_origin, "distortion")
cv2.imwrite(os.path.join(OUTPUT_DIR, f"{img_basename}_distortion.png"), pers_dist)
save_yolo_labels(os.path.join(OUTPUT_DIR, f"{img_basename}_distortion.txt"), class_ids, bboxes_dist)
visualize_perspective(pers_dist, bboxes_dist, os.path.join(OUTPUT_DIR, f"{img_basename}_distortion_vis.jpg"), "distortion")
# 5. 输出总结
print("\n=== 透视变换增强完成 ===")
print(f"输出目录:{OUTPUT_DIR}")
print(f"生成文件:")
print(f" - 俯视视角:{img_basename}_topdown.png + .txt + _vis.jpg")
print(f" - 侧视视角:{img_basename}_sideview.png + .txt + _vis.jpg")
print(f" - 镜头畸变:{img_basename}_distortion.png + .txt + _vis.jpg")
总结:
本章我主要总结了最开始的数据预处理,包括数据标签格式的转换,和三类数据增强的方法,以其相关的案例。因为其数据涉及量过多,我会在下一章继续总结剩下的数据增强部分的内容。