提示:本文章介绍如何部署 Elasticsearch 集群以及启用 SSL 和 X‑Pack 安全配置,建议先看文档理清思路在搭建。
文章目录
- 前言
- [Elasticsearch 集群 + SSL + X-Pack 简介](#Elasticsearch 集群 + SSL + X-Pack 简介)
-
- [1、Elasticsearch 集群](#1、Elasticsearch 集群)
- 2、X-Pack(安全和高级功能)
- [3、SSL/TLS 加密](#3、SSL/TLS 加密)
- [4、单节点 vs 多节点集群差异](#4、单节点 vs 多节点集群差异)
- 一、环境需求
- 二、三台机同时安装JDK
- 三、修改主机配置文件
- 四、安装Elasticsearch集群
- 五、测试模拟访问集群
- 六、安装Kibana
- 七、配置SSL,并启用X-pack
- 八、在172.17.48.191机器上操作,生成节点证书
- 九、配置加密通信
- 十、在172.17.48.191机器上操作,设置集群密码
- 十一、配置kibana添加elasticsearch用户认证
- 总结
前言
Elasticsearch 集群 + SSL + X-Pack 简介
1、Elasticsearch 集群
- 集群概念:由多个节点组成,共同存储和搜索数据。
- 节点类型:
- Master 节点:负责集群管理、选主、元数据维护
- Data 节点:负责存储数据和处理索引/查询
- Ingest 节点:用于数据预处理
- 集群特点:
- 支持水平扩展
- 数据自动分片和副本机制保证高可用
- 单节点也可运行,适合测试或小型部署
2、X-Pack(安全和高级功能)
X-Pack 是 Elasticsearch 官方提供的一套增强功能模块,用于扩展 Elasticsearch 核心能力,主要涉及 安全、监控、告警、报表、机器学习 等功能
从 Elasticsearch 7.x 开始,X-Pack 大部分功能已经内置,不需要单独安装插件。
- 内置功能:
- Security(用户认证、权限管理、TLS/SSL 加密)
- Monitoring(集群监控)
- Alerting(告警)
- Reporting、Machine Learning 等(部分付费功能)
- Security 模块:
- 开启后,所有 API 都必须认证
- 内置用户包括 elastic、kibana_system、logstash_system 等
- 支持角色和权限控制
- 用途:
- 防止未授权访问
- 保护数据传输安全
- 管理不同应用访问权限
总结:X-Pack 就是 Elasticsearch 的"安全管控和高级功能扩展包",它让集群不仅能存储和搜索数据,还能安全、可控、可监控,并能自动告警和分析异常
3、SSL/TLS 加密
- 目的:
- 加密节点之间的通信(Transport Layer Security)
- 可选加密 HTTP API(HTTPS)
- 优势:
- 防止网络嗅探
- 配合 X-Pack Security 做节点认证
- 工作方式:
- 使用 CA 证书和节点证书进行双向认证
- 节点启动时验证彼此证书,实现安全通信
4、单节点 vs 多节点集群差异
| 特性 | 单节点 | 多节点 |
|---|---|---|
| Master 节点 | 自身 | 多节点选举 |
| SSL 配置 | 可简化 | 每个节点需证书和信任配置 |
| 高可用 | 无 | 数据副本保证 |
| 适用场景 | 测试、开发 | 生产环境 |
提示:以下是本篇文章正文内容,下面案例可供参考
一、环境需求
| 公网IP | 内网IP | 配置 | 服务 |
|---|---|---|---|
| 124.222.166.208 | 172.17.48.191 | 4C8G | elasticsearch-7.5.1-linux-x86_64.tar.gz、jdk-11.0.11_linux-x64_bin.tar.gz |
| 150.158.175.71 | 172.17.48.46 | 4C8G | elasticsearch-7.5.1-linux-x86_64.tar.gz、jdk-11.0.11_linux-x64_bin.tar.gz |
| 212.64.27.225 | 172.17.48.252 | 4C8G | elasticsearch-7.5.1-linux-x86_64.tar.gz、jdk-11.0.11_linux-x64_bin.tar.gz |
| 1.15.113.197 | 172.17.48.189 | 4C8G | kibana |
二、三台机同时安装JDK
bash
mkdir -p /usr/local/ding/jdk
mv jdk-11.0.11_linux-x64_bin.tar.gz /usr/local/ding/jdk/
cd /usr/local/ding/jdk/
tar zxvf jdk-11.0.11_linux-x64_bin.tar.gz
cd jdk-11.0.11/
vim /etc/profile
末尾添加:
export JAVA_HOME="/usr/local/ding/jdk/jdk-11.0.11"
export PATH=$JAVA_HOME/bin:$PATH
source /etc/profile
# 检测jdk11是否安装成功
java -version
java version "11.0.11" 2021-04-20 LTS
Java(TM) SE Runtime Environment 18.9 (build 11.0.11+9-LTS-194)
Java HotSpot(TM) 64-Bit Server VM 18.9 (build 11.0.11+9-LTS-194, mixed mode)
三、修改主机配置文件
bash
[root@VM-48-73-centos ~]# vim /etc/security/limits.conf
末尾添加:
* soft nofile 65536
* hard nofile 131072
* soft nproc 65536
* hard nproc 65536

[root@VM-48-73-centos ~]# vim /etc/security/limits.d/20-nproc.conf
#末尾添加如下配置:
*          soft    nproc     4096(4096是参考别人文档,我自己的是65535)

[root@VM-48-73-centos ~]# vim /etc/sysctl.conf
#末尾添加如下配置:
vm.max_map_count=262144

[root@VM-48-73-centos ~]# sysctl -p
fs.file-max = 102400
net.nf_conntrack_max = 1024000
net.netfilter.nf_conntrack_max = 1024000
vm.max_map_count = 262144
四、安装Elasticsearch集群
4.1、三台机器上传压缩包并解压文件、创建用户、设置权限、文件创建
bash
mv elasticsearch-7.5.1-linux-x86_64.tar.gz /usr/local
cd /usr/local
tar zxvf elasticsearch-7.5.1-linux-x86_64.tar.gz
groupadd elsearch
useradd  elsearch -g elsearch -p elsearch
chown -R elsearch:elsearch /usr/local/elasticsearch-7.5.1
su elsearch
cd elasticsearch-7.5.1/config/
mkdir -p /opt/elasticsearch/path/to/data
mkdir -p /opt/elasticsearch/path/to/logs
chmod +x /opt/elasticsearch/path/to/data
chmod +x /opt/elasticsearch/path/to/logs
chown -R elsearch:elsearch /opt/elasticsearch/path/to/logs
chown -R elsearch:elsearch /opt/elasticsearch/path/to/data
4.1.1、172.17.48.191机器上操作
bash
[elsearch@VM-48-191-centos config]$ vi elasticsearch.yml
# ======================== Elasticsearch Configuration =========================
#
# NOTE: Elasticsearch comes with reasonable defaults for most settings.
#       Before you set out to tweak and tune the configuration, make sure you
#       understand what are you trying to accomplish and the consequences.
#
# The primary way of configuring a node is via this file. This template lists
# the most important settings you may want to configure for a production cluster.
#
# Please consult the documentation for further information on configuration options:
# https://www.elastic.co/guide/en/elasticsearch/reference/index.html
#
# ---------------------------------- Cluster -----------------------------------
#
# Use a descriptive name for your cluster:
#
cluster.name: my-es
#
# ------------------------------------ Node ------------------------------------
#
# Use a descriptive name for the node:
#
node.name: node-1   ## 节点名称,每个节点名称必须不能一样
#
# Add custom attributes to the node:
#
#
## 是不是有资格主节点
node.master: true
## 是否存储数据
node.data: true
#node.attr.rack: r1
#
# ----------------------------------- Paths ------------------------------------
#
# Path to directory where to store the data (separate multiple locations by comma):
#
path.data: /opt/elasticsearch/path/to/data
#
# Path to log files:
#
path.logs: /opt/elasticsearch/path/to/logs
#
# ----------------------------------- Memory -----------------------------------
#
# Lock the memory on startup:
#
#bootstrap.memory_lock: true
#
# Make sure that the heap size is set to about half the memory available
# on the system and that the owner of the process is allowed to use this
# limit.
#
# Elasticsearch performs poorly when the system is swapping the memory.
#
# ---------------------------------- Network -----------------------------------
#
# Set the bind address to a specific IP (IPv4 or IPv6):
#
network.host: 0.0.0.0
#
# Set a custom port for HTTP:
#
http.port: 9200
#
# For more information, consult the network module documentation.
#
# --------------------------------- Discovery ----------------------------------
#
# Pass an initial list of hosts to perform discovery when this node is started:
# The default list of hosts is ["127.0.0.1", "[::1]"]
#
discovery.seed_hosts: ["124.222.166.208", "150.158.175.71", "212.64.27.225"]
#
# Bootstrap the cluster using an initial set of master-eligible nodes:
#
cluster.initial_master_nodes: ["node-1", "node-2", "node-3"]
#
# For more information, consult the discovery and cluster formation module documentation.
#
# ---------------------------------- Gateway -----------------------------------
#
# Block initial recovery after a full cluster restart until N nodes are started:
#
#gateway.recover_after_nodes: 3
#
# For more information, consult the gateway module documentation.
#
# ---------------------------------- Various -----------------------------------
#
# Require explicit names when deleting indices:
#
#action.destructive_requires_name: true
4.1.1.1、修改配置文件jvm.options
bash
[elsearch@VM-48-191-centos config]$ cat jvm.options
## JVM configuration

################################################################
## IMPORTANT: JVM heap size
################################################################
##
## You should always set the min and max JVM heap
## size to the same value. For example, to set
## the heap to 4 GB, set:
##
## -Xms4g
## -Xmx4g
##
## See https://www.elastic.co/guide/en/elasticsearch/reference/current/heap-size.html
## for more information
##
################################################################

# Xms represents the initial size of total heap space
# Xmx represents the maximum size of total heap space

-Xms2g  ## 修改成总内存的一半
-Xmx2g  ## 修改成总内存的一半

################################################################
## Expert settings
################################################################
##
## All settings below this section are considered
## expert settings. Don't tamper with them unless
## you understand what you are doing
##
################################################################

## GC configuration  ## 如果在启动不成功的情况下可以吧下面三行注释掉
-XX:+UseConcMarkSweepGC
-XX:CMSInitiatingOccupancyFraction=75
-XX:+UseCMSInitiatingOccupancyOnly

## G1GC Configuration
# NOTE: G1GC is only supported on JDK version 10 or later.
# To use G1GC uncomment the lines below.
# 10-:-XX:-UseConcMarkSweepGC
# 10-:-XX:-UseCMSInitiatingOccupancyOnly
# 10-:-XX:+UseG1GC
# 10-:-XX:G1ReservePercent=25
# 10-:-XX:InitiatingHeapOccupancyPercent=30

## JVM temporary directory
-Djava.io.tmpdir=${ES_TMPDIR}

## heap dumps

# generate a heap dump when an allocation from the Java heap fails
# heap dumps are created in the working directory of the JVM
-XX:+HeapDumpOnOutOfMemoryError

# specify an alternative path for heap dumps; ensure the directory exists and
# has sufficient space
-XX:HeapDumpPath=data

# specify an alternative path for JVM fatal error logs
-XX:ErrorFile=logs/hs_err_pid%p.log

## JDK 8 GC logging
8:-XX:+PrintGCDetails
8:-XX:+PrintGCDateStamps
8:-XX:+PrintTenuringDistribution
8:-XX:+PrintGCApplicationStoppedTime
8:-Xloggc:logs/gc.log
8:-XX:+UseGCLogFileRotation
8:-XX:NumberOfGCLogFiles=32
8:-XX:GCLogFileSize=64m

# JDK 9+ GC logging
9-:-Xlog:gc*,gc+age=trace,safepoint:file=logs/gc.log:utctime,pid,tags:filecount=32,filesize=64m
4.1.1.2、启动ES
bash
[elsearch@VM-48-191-centos config]$ cd ..
[elsearch@VM-48-191-centos elasticsearch-7.5.1]$ cd bin/
[elsearch@VM-48-191-centos bin]$ ./elasticsearch -d   ## 不想下面提示的话可以注释掉jvm.options三行注释
Java HotSpot(TM) 64-Bit Server VM warning: Option UseConcMarkSweepGC was deprecated in version 9.0 and will likely be removed in a future release.
4.1.2、172.17.48.46机器上操作
bash
[elsearch@VM-48-46-centos config]$ vi elasticsearch.yml
# ======================== Elasticsearch Configuration =========================
#
# NOTE: Elasticsearch comes with reasonable defaults for most settings.
#       Before you set out to tweak and tune the configuration, make sure you
#       understand what are you trying to accomplish and the consequences.
#
# The primary way of configuring a node is via this file. This template lists
# the most important settings you may want to configure for a production cluster.
#
# Please consult the documentation for further information on configuration options:
# https://www.elastic.co/guide/en/elasticsearch/reference/index.html
#
# ---------------------------------- Cluster -----------------------------------
#
# Use a descriptive name for your cluster:
#
cluster.name: my-es
#
# ------------------------------------ Node ------------------------------------
#
# Use a descriptive name for the node:
#
node.name: node-2   ## 节点名称,每个节点名称必须不能一样
#
# Add custom attributes to the node:
#
#
## 是不是有资格主节点
node.master: true
## 是否存储数据
node.data: true
#node.attr.rack: r1
#
# ----------------------------------- Paths ------------------------------------
#
# Path to directory where to store the data (separate multiple locations by comma):
#
path.data: /opt/elasticsearch/path/to/data
#
# Path to log files:
#
path.logs: /opt/elasticsearch/path/to/logs
#
# ----------------------------------- Memory -----------------------------------
#
# Lock the memory on startup:
#
#bootstrap.memory_lock: true
#
# Make sure that the heap size is set to about half the memory available
# on the system and that the owner of the process is allowed to use this
# limit.
#
# Elasticsearch performs poorly when the system is swapping the memory.
#
# ---------------------------------- Network -----------------------------------
#
# Set the bind address to a specific IP (IPv4 or IPv6):
#
network.host: 0.0.0.0
#
# Set a custom port for HTTP:
#
http.port: 9200
#
# For more information, consult the network module documentation.
#
# --------------------------------- Discovery ----------------------------------
#
# Pass an initial list of hosts to perform discovery when this node is started:
# The default list of hosts is ["127.0.0.1", "[::1]"]
#
discovery.seed_hosts: ["124.222.166.208", "150.158.175.71", "212.64.27.225"]
#
# Bootstrap the cluster using an initial set of master-eligible nodes:
#
cluster.initial_master_nodes: ["node-1", "node-2", "node-3"]
#
# For more information, consult the discovery and cluster formation module documentation.
#
# ---------------------------------- Gateway -----------------------------------
#
# Block initial recovery after a full cluster restart until N nodes are started:
#
#gateway.recover_after_nodes: 3
#
# For more information, consult the gateway module documentation.
#
# ---------------------------------- Various -----------------------------------
#
# Require explicit names when deleting indices:
#
#action.destructive_requires_name: true
4.1.2.1、修改配置文件jvm.options
bash
[elsearch@VM-48-46-centos config]$ cat jvm.options
## JVM configuration

################################################################
## IMPORTANT: JVM heap size
################################################################
##
## You should always set the min and max JVM heap
## size to the same value. For example, to set
## the heap to 4 GB, set:
##
## -Xms4g
## -Xmx4g
##
## See https://www.elastic.co/guide/en/elasticsearch/reference/current/heap-size.html
## for more information
##
################################################################

# Xms represents the initial size of total heap space
# Xmx represents the maximum size of total heap space

-Xms2g  ## 修改成总内存的一半
-Xmx2g  ## 修改成总内存的一半

################################################################
## Expert settings
################################################################
##
## All settings below this section are considered
## expert settings. Don't tamper with them unless
## you understand what you are doing
##
################################################################

## GC configuration  ## 如果在启动不成功的情况下可以吧下面三行注释掉
-XX:+UseConcMarkSweepGC
-XX:CMSInitiatingOccupancyFraction=75
-XX:+UseCMSInitiatingOccupancyOnly

## G1GC Configuration
# NOTE: G1GC is only supported on JDK version 10 or later.
# To use G1GC uncomment the lines below.
# 10-:-XX:-UseConcMarkSweepGC
# 10-:-XX:-UseCMSInitiatingOccupancyOnly
# 10-:-XX:+UseG1GC
# 10-:-XX:G1ReservePercent=25
# 10-:-XX:InitiatingHeapOccupancyPercent=30

## JVM temporary directory
-Djava.io.tmpdir=${ES_TMPDIR}

## heap dumps

# generate a heap dump when an allocation from the Java heap fails
# heap dumps are created in the working directory of the JVM
-XX:+HeapDumpOnOutOfMemoryError

# specify an alternative path for heap dumps; ensure the directory exists and
# has sufficient space
-XX:HeapDumpPath=data

# specify an alternative path for JVM fatal error logs
-XX:ErrorFile=logs/hs_err_pid%p.log

## JDK 8 GC logging
8:-XX:+PrintGCDetails
8:-XX:+PrintGCDateStamps
8:-XX:+PrintTenuringDistribution
8:-XX:+PrintGCApplicationStoppedTime
8:-Xloggc:logs/gc.log
8:-XX:+UseGCLogFileRotation
8:-XX:NumberOfGCLogFiles=32
8:-XX:GCLogFileSize=64m

# JDK 9+ GC logging
9-:-Xlog:gc*,gc+age=trace,safepoint:file=logs/gc.log:utctime,pid,tags:filecount=32,filesize=64m
4.1.2.2、启动ES
bash
[elsearch@VM-48-46-centos config]$ cd ..
[elsearch@VM-48-46-centos elasticsearch-7.5.1]$ cd bin/
[elsearch@VM-48-46-centos bin]$ ./elasticsearch -d   ## 不想下面提示的话可以注释掉jvm.options三行注释
Java HotSpot(TM) 64-Bit Server VM warning: Option UseConcMarkSweepGC was deprecated in version 9.0 and will likely be removed in a future release.
4.1.3、172.17.48.252机器上操作
bash
[elsearch@VM-48-46-centos config]$ vi elasticsearch.yml
# ======================== Elasticsearch Configuration =========================
#
# NOTE: Elasticsearch comes with reasonable defaults for most settings.
#       Before you set out to tweak and tune the configuration, make sure you
#       understand what are you trying to accomplish and the consequences.
#
# The primary way of configuring a node is via this file. This template lists
# the most important settings you may want to configure for a production cluster.
#
# Please consult the documentation for further information on configuration options:
# https://www.elastic.co/guide/en/elasticsearch/reference/index.html
#
# ---------------------------------- Cluster -----------------------------------
#
# Use a descriptive name for your cluster:
#
cluster.name: my-es
#
# ------------------------------------ Node ------------------------------------
#
# Use a descriptive name for the node:
#
node.name: node-3   ## 节点名称,每个节点名称必须不能一样
#
# Add custom attributes to the node:
#
#
## 是不是有资格主节点
node.master: true
## 是否存储数据
node.data: true
#node.attr.rack: r1
#
# ----------------------------------- Paths ------------------------------------
#
# Path to directory where to store the data (separate multiple locations by comma):
#
path.data: /opt/elasticsearch/path/to/data
#
# Path to log files:
#
path.logs: /opt/elasticsearch/path/to/logs
#
# ----------------------------------- Memory -----------------------------------
#
# Lock the memory on startup:
#
#bootstrap.memory_lock: true
#
# Make sure that the heap size is set to about half the memory available
# on the system and that the owner of the process is allowed to use this
# limit.
#
# Elasticsearch performs poorly when the system is swapping the memory.
#
# ---------------------------------- Network -----------------------------------
#
# Set the bind address to a specific IP (IPv4 or IPv6):
#
network.host: 0.0.0.0
#
# Set a custom port for HTTP:
#
http.port: 9200
#
# For more information, consult the network module documentation.
#
# --------------------------------- Discovery ----------------------------------
#
# Pass an initial list of hosts to perform discovery when this node is started:
# The default list of hosts is ["127.0.0.1", "[::1]"]
#
discovery.seed_hosts: ["124.222.166.208", "150.158.175.71", "212.64.27.225"]
#
# Bootstrap the cluster using an initial set of master-eligible nodes:
#
cluster.initial_master_nodes: ["node-1", "node-2", "node-3"]
#
# For more information, consult the discovery and cluster formation module documentation.
#
# ---------------------------------- Gateway -----------------------------------
#
# Block initial recovery after a full cluster restart until N nodes are started:
#
#gateway.recover_after_nodes: 3
#
# For more information, consult the gateway module documentation.
#
# ---------------------------------- Various -----------------------------------
#
# Require explicit names when deleting indices:
#
#action.destructive_requires_name: true
4.1.3.1、修改配置文件jvm.options
bash
[elsearch@VM-48-252-centos config]$ vi jvm.options
## JVM configuration

################################################################
## IMPORTANT: JVM heap size
################################################################
##
## You should always set the min and max JVM heap
## size to the same value. For example, to set
## the heap to 4 GB, set:
##
## -Xms4g
## -Xmx4g
##
## See https://www.elastic.co/guide/en/elasticsearch/reference/current/heap-size.html
## for more information
##
################################################################

# Xms represents the initial size of total heap space
# Xmx represents the maximum size of total heap space

-Xms2g  ## 修改成总内存的一半
-Xmx2g  ## 修改成总内存的一半

################################################################
## Expert settings
################################################################
##
## All settings below this section are considered
## expert settings. Don't tamper with them unless
## you understand what you are doing
##
################################################################

## GC configuration  ## 如果在启动不成功的情况下可以吧下面三行注释掉
-XX:+UseConcMarkSweepGC
-XX:CMSInitiatingOccupancyFraction=75
-XX:+UseCMSInitiatingOccupancyOnly

## G1GC Configuration
# NOTE: G1GC is only supported on JDK version 10 or later.
# To use G1GC uncomment the lines below.
# 10-:-XX:-UseConcMarkSweepGC
# 10-:-XX:-UseCMSInitiatingOccupancyOnly
# 10-:-XX:+UseG1GC
# 10-:-XX:G1ReservePercent=25
# 10-:-XX:InitiatingHeapOccupancyPercent=30

## JVM temporary directory
-Djava.io.tmpdir=${ES_TMPDIR}

## heap dumps

# generate a heap dump when an allocation from the Java heap fails
# heap dumps are created in the working directory of the JVM
-XX:+HeapDumpOnOutOfMemoryError

# specify an alternative path for heap dumps; ensure the directory exists and
# has sufficient space
-XX:HeapDumpPath=data

# specify an alternative path for JVM fatal error logs
-XX:ErrorFile=logs/hs_err_pid%p.log

## JDK 8 GC logging
8:-XX:+PrintGCDetails
8:-XX:+PrintGCDateStamps
8:-XX:+PrintTenuringDistribution
8:-XX:+PrintGCApplicationStoppedTime
8:-Xloggc:logs/gc.log
8:-XX:+UseGCLogFileRotation
8:-XX:NumberOfGCLogFiles=32
8:-XX:GCLogFileSize=64m

# JDK 9+ GC logging
9-:-Xlog:gc*,gc+age=trace,safepoint:file=logs/gc.log:utctime,pid,tags:filecount=32,filesize=64m
4.1.3.2、启动ES
bash
[elsearch@VM-48-252-centos config]$ cd ..
[elsearch@VM-48-252-centos elasticsearch-7.5.1]$ cd bin/
[elsearch@VM-48-252-centos bin]$ ./elasticsearch -d   ## 不想下面提示的话可以注释掉jvm.options三行注释
Java HotSpot(TM) 64-Bit Server VM warning: Option UseConcMarkSweepGC was deprecated in version 9.0 and will likely be removed in a future release.
五、测试模拟访问集群
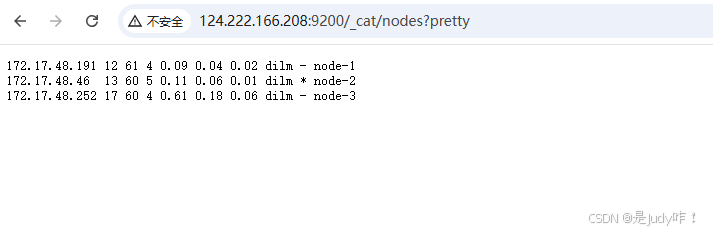
5.1、访问链接
http://124.222.166.208:9200/_cat/nodes?pretty
注意:可以看出下面的节点中带有 "*" 的是主节点
5.2、使用谷歌插件查看集群状态

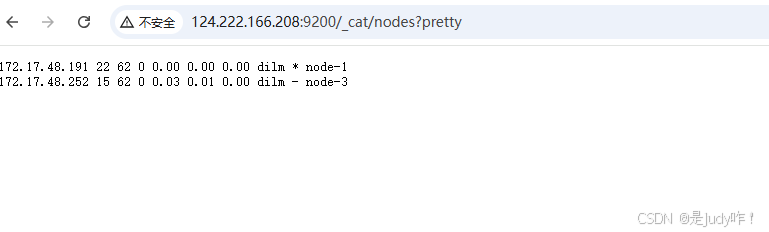
5.3、模拟主节点宕机会不会从新选举主节点
bash
[elsearch@VM-48-46-centos bin]$ ps -ef |grep elasticsearch
elsearch   17808       1  0 13:56 pts/0    00:00:36 /usr/local/ding/jdk/jdk-11.0.11/bin/java -Des.networkaddress.cache.ttl=60 -Des.networkaddress.cache.negative.ttl=10 -XX:+AlwaysPreTouch -Xss1m -Djava.awt.headless=true -Dfile.encoding=UTF-8 -Djna.nosys=true -XX:-OmitStackTraceInFastThrow -Dio.netty.noUnsafe=true -Dio.netty.noKeySetOptimization=true -Dio.netty.recycler.maxCapacityPerThread=0 -Dio.netty.allocator.numDirectArenas=0 -Dlog4j.shutdownHookEnabled=false -Dlog4j2.disable.jmx=true -Djava.locale.providers=COMPAT -Xms2g -Xmx2g -XX:+UseConcMarkSweepGC -XX:CMSInitiatingOccupancyFraction=75 -XX:+UseCMSInitiatingOccupancyOnly -Djava.io.tmpdir=/tmp/elasticsearch-8644999978512819738 -XX:+HeapDumpOnOutOfMemoryError -XX:HeapDumpPath=data -XX:ErrorFile=logs/hs_err_pid%p.log -Xlog:gc*,gc+age=trace,safepoint:file=logs/gc.log:utctime,pid,tags:filecount=32,filesize=64m -XX:MaxDirectMemorySize=1073741824 -Des.path.home=/usr/local/elasticsearch-7.5.1 -Des.path.conf=/usr/local/elasticsearch-7.5.1/config -Des.distribution.flavor=default -Des.distribution.type=tar -Des.bundled_jdk=true -cp /usr/local/elasticsearch-7.5.1/lib/* org.elasticsearch.bootstrap.Elasticsearch -d
elsearch   17828   17808  0 13:56 pts/0    00:00:00 /usr/local/elasticsearch-7.5.1/modules/x-pack-ml/platform/linux-x86_64/bin/controller
elsearch   34952   13592  0 15:10 pts/0    00:00:00 grep --color=auto elasticsearch
[elsearch@VM-48-46-centos bin]$ kill -9 17808 17828
[elsearch@VM-48-46-centos bin]$ ps -ef |grep elasticsearch
elsearch   35023   13592  0 15:10 pts/0    00:00:00 grep --color=auto elasticsearch
可以看出从新选举了主节点
恢复172.17.48.46机器上的主会不会主节点在回来
bash
[elsearch@VM-48-46-centos bin]$ ./elasticsearch -d
Java HotSpot(TM) 64-Bit Server VM warning: Option UseConcMarkSweepGC was deprecated in version 9.0 and will likely be removed in a future release.
六、安装Kibana
6.1、上传至/usr/local路径下解压缩包
bash
[root@VM-48-189-centos ~]# mv kibana-7.5.1-linux-x86_64.tar.gz /usr/local/
[root@VM-48-189-centos ~]# cd /usr/local/
[root@VM-48-189-centos local]# tar zxvf kibana-7.5.1-linux-x86_64.tar.gz
6.2、配置主配置文件
bash
[root@VM-48-189-centos local]# cd kibana-7.5.1-linux-x86_64/config/
[root@VM-48-189-centos config]# vi kibana.yml
#端口
2 server.port: 5601
#指定本机ip能让外部访问
7 server.host: "0.0.0.0"
#请求数据指向的elasticsearch服务器(因为elasticsearch服务器是本机搭建所以写本机ip)
28 elasticsearch.hosts: ["http://124.222.166.208:9200", "http://150.158.175.71:9200", "http://212.64.27.225:9200"]
#去掉注释
37 kibana.index: ".kibana"
6.3、创建kibana启动用户
注意:kibana不可以直接用root用户启动,本人用的是es用户,因为后期好管理当然你也可以用其他用户
root@VM-48-189-centos \~# groupadd elsearch
root@VM-48-189-centos \~# useradd elsearch -g elsearch -p elsearch
root@VM-48-189-centos \~# chown -R elsearch:elsearch /usr/local/kibana-7.5.1-linux-x86_64
6.4、启动Kibana
bash
[root@VM-48-189-centos config]#  su elsearch
[elsearch@VM-48-189-centos config]$ cd ..
[elsearch@VM-48-189-centos kibana-7.5.1-linux-x86_64]$ cd bin/
[elsearch@VM-48-189-centos bin]$ sh kibana &
七、配置SSL,并启用X-pack
X-Pack是Elastic Stack扩展功能,提供安全性,警报,监视,报告,机器学习和许多其他功能。 ES7.0+之后,默认情况下,当安装Elasticsearch时,会安装X-Pack,无需单独再安装。
自6.8以及7.1+版本之后,基础级安全永久免费
基础版本安全功能列表如下:
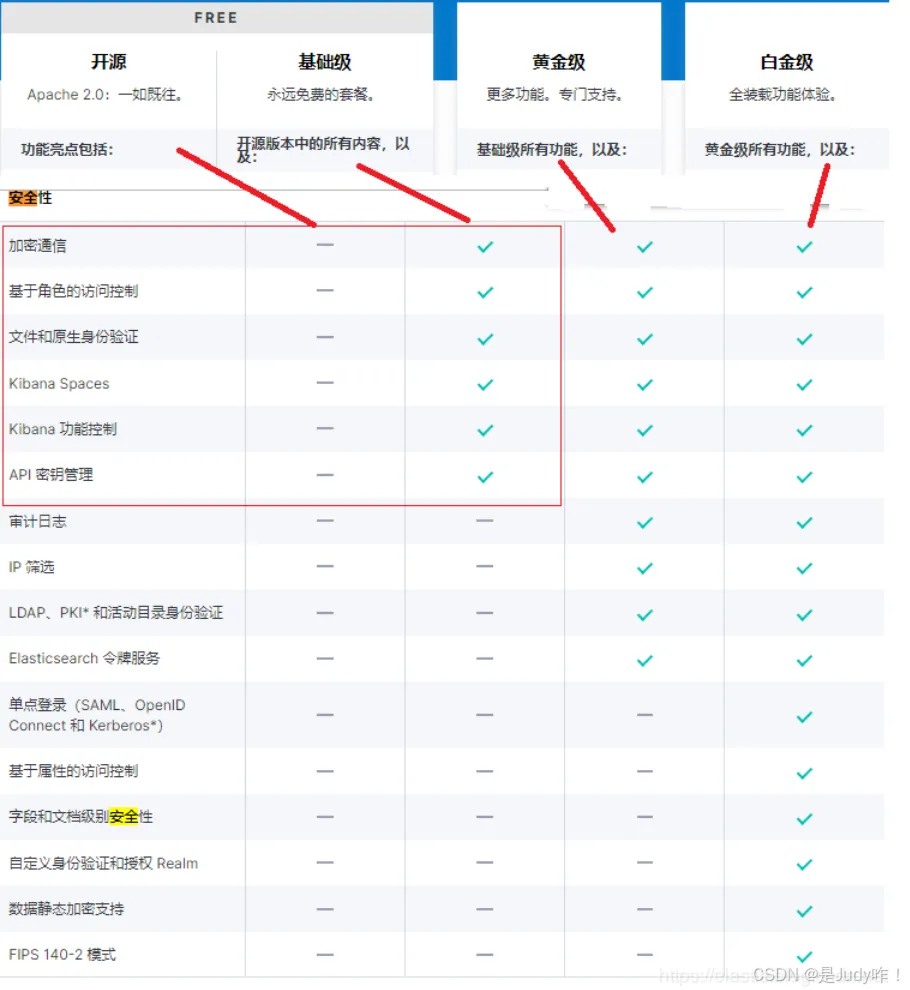
X-Pack安全配置的核心三步骤:
● 第一:设置:xpack.security.enabled: true。
● 第二:生成TLS证书。
● 第三:配置加密通信。
● 第四:设置密码。
7.1、3台节ES点的elasticsearch.yml配置文件中添加如下配置
以下是项安全配置
bash
xpack.security.enabled: true为节点间通信配置传输层安全性(TLS/SSL)
配置传输层安全性适用于具有多个节点的集群以及需要外网通信访问的单节点ES。
使用环回地址127.0.0.1的单节点ES可以不用配置。
加密通信:
加密通信解释
Elasticsearch节点可能存储是机密的数据,而无处不在的网络攻击对这些数据垂涎欲滴。
网络攻击包括对数据的嗅探,对数据的操纵,以及试图获得对服务器的访问权限,进而访问存储数据的文件。
保护节点的安全有助于降低来自网络的攻击的风险。
八、在172.17.48.191机器上操作,生成节点证书
证书实现加密通信的原理:
TLS需要X.509证书(X.509 证书是一个数字证书,它使用 X.509 公有密钥基础设施标准将公有密钥与证书中包含的身份相关联。X.509 证书由一家名为证书颁发机构 (CA) 的可信实体颁发。CA 持有一个或多个名为 CA 证书的特殊证书,它使用这种证书来颁发 X.509 证书。只有证书颁发机构才有权访问 CA 证书)才能对与之通信的应用程序执行加密和身份验证。 为了使节点之间的通信真正安全,必须对证书进行验证。
在Elasticsearch集群中验证证书真实性的推荐方法是信任签署证书的证书颁发机构(CA)。这样,只需要使用由同一CA签名的证书,即可自动允许该节点加入集群
注意:本人是源码包安装的,es的解压文件是在/usr/local/elasticsearch-7.5.1/config下面所以生成的证书也要放在这个路径下面
bash
[elsearch@VM-48-191-centos ~]# cd /usr/share/elasticsearch/bin
[elsearch@VM-48-191-centos bin]# ./elasticsearch-certutil ca -out cd /usr/local/elasticsearch-7.5.1/config/elastic-certificates.p12 -pass ""
下面设置文件属主属组要用root用户
[elsearch@VM-48-191-centos bin]# su root
[root@VM-48-191-centos bin]# chown -R elasticsearch:elasticsearch cd /usr/local/elasticsearch-7.5.1/config/elastic-certificates.p12
在返回elsearch用户
[elsearch@VM-48-191-centos bin]# su elsearch
[elsearch@VM-48-191-centos config]$ ll
total 44
-rw------- 1 elsearch elsearch  2527 Dec 24 16:45 elastic-certificates.p12
-rw-rw---- 1 elsearch elsearch   199 Dec 24 13:56 elasticsearch.keystore
-rw-rw---- 1 elsearch elsearch  3253 Dec 24 16:49 elasticsearch.yml
-rw-rw---- 1 elsearch elsearch  2204 Dec 24 13:47 jvm.options
-rw-rw---- 1 elsearch elsearch 17545 Dec 17  2019 log4j2.properties
-rw-rw---- 1 elsearch elsearch   473 Dec 17  2019 role_mapping.yml
-rw-rw---- 1 elsearch elsearch   197 Dec 17  2019 roles.yml
-rw-rw---- 1 elsearch elsearch     0 Dec 17  2019 users
-rw-rw---- 1 elsearch elsearch     0 Dec 17  2019 users_roles
8.1、证书实现加密通信的配置
将证书拷贝到其他节点,放入/usr/local/elasticsearch-7.5.1/config 目录下
bash
[elsearch@VM-48-191-centos config]$ scp -r elastic-certificates.p12 root@150.158.175.71:/usr/local/elasticsearch-7.5.1/config/
[elsearch@VM-48-191-centos config]$ scp -r elastic-certificates.p12 root@212.64.27.225:/usr/local/elasticsearch-7.5.1/config/
九、配置加密通信
启用安全功能后,必须使用TLS来确保节点之间的通信已加密。
在elasticsearch.yml中心新增配置如下:(其他节点相同配置)
9.1、三台ES节点同时添加
bash
xpack.security.transport.ssl.enabled: true
xpack.security.transport.ssl.verification_mode: certificate
xpack.security.transport.ssl.keystore.path: elastic-certificates.p12
xpack.security.transport.ssl.truststore.path: elastic-certificates.p12
9.2、三台ES节点重启
bash
杀掉进程,在启动十、在172.17.48.191机器上操作,设置集群密码
注意:因为上面已经做了SSL通信,所以只需要在第一台es(master)上设置用户名和密码就可以了,其他的2台es就会是相同的用户名密码
10.1、方法1:默认随机
bash
[elsearch@VM-48-191-centos bin]$ ./elasticsearch-setup-passwords -h
Sets the passwords for reserved users

Commands
--------
auto - Uses randomly generated passwords   #主要命令选项,表示系统将使用随机字符串设置密码
interactive - Uses passwords entered by a user    #主要命令选项,表示使用用户输入的字符串作为密码

Non-option arguments:
command

Option         Description
------         -----------
-h, --help     show help
-s, --silent   show minimal output
-v, --verbose  show verbose output

[elsearch@VM-48-191-centos bin]$ ./elasticsearch-setup-passwords auto
Initiating the setup of passwords for reserved users elastic,apm_system,kibana,logstash_system,beats_system,remote_monitoring_user.
The passwords will be randomly generated and printed to the console.
Please confirm that you would like to continue [y/N]y  ## 选择y


Changed password for user apm_system
PASSWORD apm_system = bYLYXIqat0XZkJ7F73sw

Changed password for user kibana   #kibana角色和密码
PASSWORD kibana = PGKetUw2RYjgH6sbZmgJ

Changed password for user logstash_system   #logstash角色和密码
PASSWORD logstash_system = oH5aR6IH1an4ZTsby8mg

Changed password for user beats_system    #beast角色和密码
PASSWORD beats_system = KsXz0kwTVmmr1hXLvw5j

Changed password for user remote_monitoring_user
PASSWORD remote_monitoring_user = JIj44kqch3pvQ8DRG2Ij

Changed password for user elastic   #elasticsearch角色和密码
PASSWORD elastic = diVPjeKwhK3v1vOWbGMc
10.2、方法2:自定义生成密码,此方法我没有试过
bash
[root@localhost elasticsearch]# cd /usr/share/elasticsearch/bin
[root@localhost bin]# ./elasticsearch-setup-passwords interactive
可以先将以上用户和密码保存下来,具体的用户介绍见最后,这边最好保存在有道云笔记中,方便记录。
核心:
auto - 随机生成密码。
interactive - 自定义不同用户的密码。
注意:必须配置好xpack之后,才能设置密码。否则会报错。
十一、配置kibana添加elasticsearch用户认证
11.1、修改kibana主配置文件
bash
[elsearch@VM-48-189-centos ~]$ vi /usr/local/kibana-7.5.1-linux-x86_64/config/kibana.yml
# 末尾添加
elasticsearch.username: "elastic"
elasticsearch.password: "diVPjeKwhK3v1vOWbGMc"   #就是上一步创建的elastic的账号和密码
## 重启kibana
杀掉进程重启即可
11.2、访问Kibana测试
http://1.15.113.197:5601

输入之前的账号:elastic,密码:1KHHaIYLXD2yp4vDSWwV,即可登录
总结
-
Elasticsearch 集群提供高可用、高性能的分布式搜索与存储能力
-
X-Pack Security 可以保护集群,控制访问权限,并支持加密
-
SSL/TLS 可加密节点间通信和 HTTP API 请求,提高安全性
-
配置顺序关键:先集群启动正常 → 再开启 Security → 再设置用户密码
-
单节点可先关闭 SSL 简化部署,多节点必须严格配置证书和节点间信任