论文标题:Latent Space Super-Resolution for Higher-Resolution Image Generation with Diffusion Models
论文原文 (Paper) :https://arxiv.org/abs/2503.18446
代码 (code) :https://github.com/3587jjh/LSRNA
超分辨率重建(论文精读) | CVPR 2025 LSRNA:利用隐空间超分与噪声对齐,打破扩散模型生成 4K 图像的效率瓶颈
目录
-
- 第一部分:模块原理与实战分析
-
- [1. 论文背景与解决的痛点](#1. 论文背景与解决的痛点)
- [2. 核心模块原理揭秘](#2. 核心模块原理揭秘)
- [3. 架构图解](#3. 架构图解)
- [4. 适用场景与魔改建议](#4. 适用场景与魔改建议)
- 第二部分:核心完整代码
- 第三部分:结果验证与总结
摘要:
本文提取自 CVPR 2025 最新论文《Latent Space Super-Resolution for Higher-Resolution Image Generation with Diffusion Models》。针对现有扩散模型(如SDXL)在生成 2K/4K 超高分辨率图像时容易出现结构崩坏、内容重复以及细节平滑丢失的痛点,提供了两个核心即插即用模块:LSR(潜在空间超分辨率)和 RNA(区域自适应噪声添加)。代码已封装为独立模块,无需训练庞大的扩散模型,即可无缝集成到现有的推理流程中,显著提升大图生成的清晰度与纹理细节。
第一部分:模块原理与实战分析
1. 论文背景与解决的痛点
在 AIGC 领域,虽然 Stable Diffusion XL (SDXL) 已经很强,但在生成超过其训练分辨率(通常是 1024 2 1024^2 10242)的图像时,比如生成 4K 壁纸,我们经常面临两个棘手的问题:
- "鬼影"与重复:直接强制生成高分辨率,模型会因为没见过这么大的 Latent,导致画面出现多个主体或结构扭曲。
- 细节丢失与平滑:现有的解决方法(如 DemoFusion)通常采用"低分生成 -> 上采样 -> 高分重绘"的策略。但如果用双三次插值(Bicubic)直接上采样 Latent,会导致特征偏离流形(Manifold Deviation),生成的图虽然大了,但细节全是糊的,或者纹理很假。
2. 核心模块原理揭秘
为了解决上述问题,CVPR 2025 的这篇 LSRNA 提出了两个巧妙的模块:
- LSR (Latent Space Super-Resolution) - 潜在空间超分模块 :
- 对应代码类名 :
LIIF(Local Implicit Image Function) - 核心原理 :它不仅仅是简单的插值,而是引入了 LIIF(局部隐式图像函数) 技术。它将低分辨率的 Latent 特征视为坐标点,通过 MLP 预测任意高分辨率坐标下的 Latent 值。这使得低分 Latent 能被精准映射到高分辨率的特征流形上,保证了结构的连贯性。
- 作用 :替代
torch.nn.functional.interpolate,提供更高质量的 Latent 上采样,为大图生成打好"骨架"。
- 对应代码类名 :
- RNA (Region-wise Noise Addition) - 区域自适应噪声模块 :
- 对应代码类名 :
RegionWiseNoiseAddition - 核心原理 :为了解决上采样后细节过于平滑的问题,RNA 利用 Canny 边缘检测 提取图像的高频区域(边缘、纹理丰富处)。然后,根据边缘强度自适应地向 Latent 中注入高斯噪声。
- 作用:在去噪过程中,"诱导"扩散模型在边缘和纹理区域生成更多的高频细节,而在平滑区域保持干净,从而提升画面的锐利度和质感。
- 对应代码类名 :
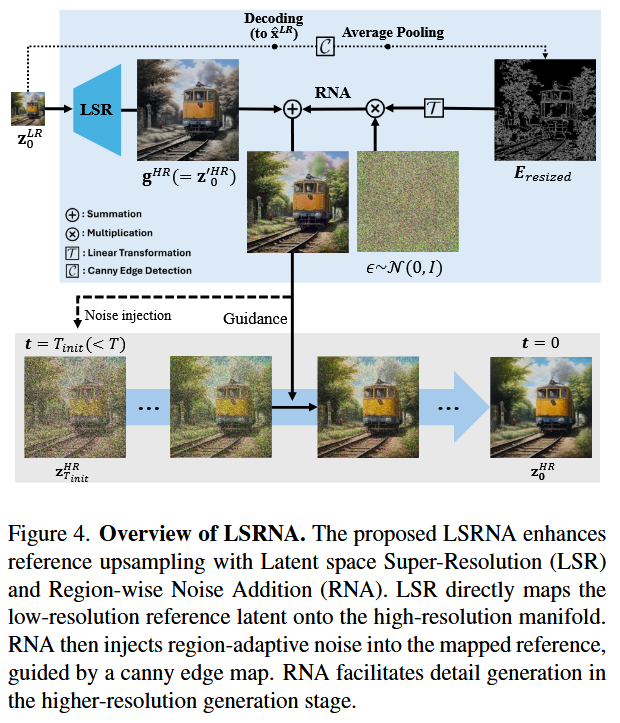
3. 架构图解
建议参考论文中的 Figure 4,该图清晰展示了 LSR 如何对 Latent 进行超分,以及 RNA 如何通过 Edge Map(边缘图)来控制噪声注入的位置。
4. 适用场景与魔改建议
这套代码非常适合用于以下场景的改进:
- SDXL / SD1.5 的高分辨率生成脚本 :用于替代默认的
Upsample层。 - 图像超分辨率任务:作为特征域的增强模块。
- 图生图(Img2Img)流程:在放大图像重绘细节时,使用 RNA 模块可以显著增加细节丰富度。
第二部分:核心完整代码
python
"""
LSRNA Plug-and-Play Modules
提取自LSRNA项目的即插即用模块

主要模块:
1. LSR (Latent Space Super-Resolution): 基于LIIF的潜在空间超分辨率
2. RNA (Region-wise Noise Addition): 基于边缘检测的区域自适应噪声添加

Author: Extracted from LSRNA project
"""

import cv2
import numpy as np
import torch
import torch.nn as nn
import torch.nn.functional as F


# ==================== 工具函数 ====================

def make_coord(shape, ranges=None, flatten=True, device='cpu'):
    """
    生成坐标网格

    Args:
        shape: 网格形状 (H, W)
        ranges: 坐标范围,默认为 [-1, 1]
        flatten: 是否展平坐标
        device: 设备类型

    Returns:
        坐标张量
    """
    coord_seqs = []
    for i, n in enumerate(shape):
        if ranges is None:
            v0, v1 = -1, 1
        else:
            v0, v1 = ranges[i]
        r = (v1 - v0) / (2 * n)
        seq = v0 + r + (2 * r) * torch.arange(n, device=device).float()
        coord_seqs.append(seq)
    ret = torch.stack(torch.meshgrid(*coord_seqs, indexing='ij'), dim=-1)
    if flatten:
        ret = ret.view(-1, ret.shape[-1])
    return ret


def gaussian_kernel(kernel_size=3, sigma=1.0, channels=3):
    """
    生成高斯卷积核

    Args:
        kernel_size: 卷积核大小
        sigma: 高斯标准差
        channels: 通道数

    Returns:
        高斯卷积核
    """
    x_coord = torch.arange(kernel_size)
    gaussian_1d = torch.exp(-(x_coord - (kernel_size - 1) / 2) ** 2 / (2 * sigma ** 2))
    gaussian_1d = gaussian_1d / gaussian_1d.sum()
    gaussian_2d = gaussian_1d[:, None] * gaussian_1d[None, :]
    kernel = gaussian_2d[None, None, :, :].repeat(channels, 1, 1, 1)
    return kernel


def gaussian_filter(latents, kernel_size=3, sigma=1.0):
    """
    对潜在表示应用高斯滤波

    Args:
        latents: 输入潜在张量
        kernel_size: 卷积核大小
        sigma: 高斯标准差

    Returns:
        滤波后的潜在张量
    """
    channels = latents.shape[1]
    kernel = gaussian_kernel(kernel_size, sigma, channels).to(latents.device, latents.dtype)
    blurred_latents = F.conv2d(latents, kernel, padding=kernel_size//2, groups=channels)
    return blurred_latents


def apply_canny_detection(image_np, low_threshold=100, high_threshold=200):
    """
    应用Canny边缘检测

    Args:
        image_np: 输入图像 (numpy array, RGB)
        low_threshold: 低阈值
        high_threshold: 高阈值

    Returns:
        边缘图 (0或255)
    """
    gray_image = cv2.cvtColor(image_np, cv2.COLOR_RGB2GRAY)
    filtered_image = cv2.Canny(gray_image, low_threshold, high_threshold)
    return filtered_image


# ==================== MLP 模块 ====================

class MLP(nn.Module):
    """
    简单的多层感知机
    用于LIIF模块中的隐式函数
    """

    def __init__(self, in_dim, out_dim, hidden_list):
        """
        Args:
            in_dim: 输入维度
            out_dim: 输出维度
            hidden_list: 隐藏层维度列表
        """
        super().__init__()
        layers = []
        lastv = in_dim
        for hidden in hidden_list:
            layers.append(nn.Linear(lastv, hidden))
            layers.append(nn.ReLU())
            lastv = hidden
        layers.append(nn.Linear(lastv, out_dim))
        self.layers = nn.Sequential(*layers)

    def forward(self, x):
        shape = x.shape[:-1]
        x = self.layers(x.view(-1, x.shape[-1]))
        return x.view(*shape, -1)


# ==================== LSR 模块 (LIIF) ====================

class SimpleEncoder(nn.Module):
    """
    简化的编码器
    用于测试LIIF模块
    """

    def __init__(self, in_dim=4, out_dim=64):
        super().__init__()
        self.out_dim = out_dim
        self.conv1 = nn.Conv2d(in_dim, 32, 3, padding=1)
        self.conv2 = nn.Conv2d(32, out_dim, 3, padding=1)
        self.relu = nn.ReLU()

    def forward(self, x):
        x = self.relu(self.conv1(x))
        x = self.relu(self.conv2(x))
        return x


class LIIF(nn.Module):
    """
    Local Implicit Image Function (LIIF)
    潜在空间超分辨率模块

    核心功能:
    - 将低分辨率潜在表示映射到高分辨率潜在流形
    - 支持任意分辨率的查询
    - 使用局部集成提高重建质量
    """

    def __init__(self, encoder=None, imnet_spec=None, feat_unfold=True, local_ensemble=True):
        """
        Args:
            encoder: 特征编码器
            imnet_spec: 隐式函数网络配置
            feat_unfold: 是否展开特征
            local_ensemble: 是否使用局部集成
        """
        super().__init__()
        self.local_ensemble = local_ensemble
        self.feat_unfold = feat_unfold

        # 使用简化的编码器用于测试
        if encoder is None:
            self.encoder = SimpleEncoder(in_dim=4, out_dim=64)
        else:
            self.encoder = encoder

        imnet_in_dim = self.encoder.out_dim
        if self.feat_unfold:
            imnet_in_dim *= 9
        imnet_in_dim += 4  # attach coord, cell

        # 使用简化的MLP
        if imnet_spec is None:
            self.imnet = MLP(imnet_in_dim, 4, [256])
        else:
            self.imnet = imnet_spec

    def gen_feat(self, inp):
        """
        生成特征表示

        Args:
            inp: 输入潜在张量 (B, C, H, W)
        """
        self.inp = inp
        feat = self.encoder(inp)
        if self.feat_unfold:
            feat = F.unfold(feat, 3, padding=1).view(
                feat.shape[0], feat.shape[1] * 9, feat.shape[2], feat.shape[3])
        self.feat = feat
        self.feat_coord = make_coord(feat.shape[-2:], flatten=False, device=inp.device) \
            .permute(2, 0, 1) \
            .unsqueeze(0).expand(feat.shape[0], 2, *feat.shape[-2:])

    def query_rgb(self, coord, cell):
        """
        查询RGB值

        Args:
            coord: 查询坐标 (b, h, w, 2)
            cell: 单元大小 (b, h, w, 2)

        Returns:
            RGB值 (b, c, h, w)
        """
        feat = self.feat
        feat_coord = self.feat_coord

        if self.local_ensemble:
            vx_lst = [-1, 1]
            vy_lst = [-1, 1]
            eps_shift = 1e-6
        else:
            vx_lst, vy_lst, eps_shift = [0], [0], 0

        # field radius (global: [-1, 1])
        rx = 2 / feat.shape[-2] / 2
        ry = 2 / feat.shape[-1] / 2

        preds = []
        areas = []
        for vx in vx_lst:
            for vy in vy_lst:
                coord_ = coord.clone()
                coord_[:, :, :, 0] += vx * rx + eps_shift
                coord_[:, :, :, 1] += vy * ry + eps_shift
                coord_.clamp_(-1 + 1e-6, 1 - 1e-6)

                q_feat = F.grid_sample(feat, coord_.flip(-1),
                    mode='nearest', align_corners=False).permute(0, 2, 3, 1)
                q_coord = F.grid_sample(feat_coord, coord_.flip(-1),
                    mode='nearest', align_corners=False).permute(0, 2, 3, 1)

                rel_coord = coord - q_coord
                rel_coord[:, :, :, 0] *= feat.shape[-2]
                rel_coord[:, :, :, 1] *= feat.shape[-1]
                inp = torch.cat([q_feat, rel_coord], dim=-1)

                rel_cell = cell.clone()
                rel_cell[:, :, :, 0] *= feat.shape[-2]
                rel_cell[:, :, :, 1] *= feat.shape[-1]
                inp = torch.cat([inp, rel_cell], dim=-1)

                pred = self.imnet(inp.contiguous())
                preds.append(pred)

                area = torch.abs(rel_coord[:, :, :, 0] * rel_coord[:, :, :, 1])
                areas.append(area + 1e-9)

        tot_area = torch.stack(areas).sum(dim=0)
        if self.local_ensemble:
            t = areas[0]; areas[0] = areas[3]; areas[3] = t
            t = areas[1]; areas[1] = areas[2]; areas[2] = t
        ret = 0
        for pred, area in zip(preds, areas):
            ret = ret + pred * (area / tot_area).unsqueeze(-1)
        ret = ret.permute(0, 3, 1, 2)

        if ret.shape[1] != self.inp.shape[1]:
            ret[:, :-1, :, :] += F.grid_sample(self.inp, coord.flip(-1), mode='bicubic',
                padding_mode='border', align_corners=False)
        else:
            ret += F.grid_sample(self.inp, coord.flip(-1), mode='bicubic',
                padding_mode='border', align_corners=False)
        return ret

    def forward(self, inp, coord, cell):
        """
        前向传播

        Args:
            inp: 输入潜在张量 (B, C, H_in, W_in)
            coord: 目标坐标 (1, H_out, W_out, 2)
            cell: 单元大小 (1, H_out, W_out, 2)

        Returns:
            上采样后的潜在张量 (1, C, H_out, W_out)
        """
        self.gen_feat(inp)
        H, W = coord.shape[1:3]
        n = H * W
        coord = coord.view(1, 1, n, 2)
        cell = cell.view(1, 1, n, 2)

        ql = 0
        preds = None
        bsize = 512 * 512  # 批处理大小
        while ql < n:
            qr = min(ql + bsize, n)
            pred = self.query_rgb(coord[:, :, ql:qr, :], cell[:, :, ql:qr, :])
            preds = pred if preds is None else torch.cat([preds, pred], dim=-1)
            ql = qr
        preds = preds.view(1, -1, H, W)
        return preds


# ==================== RNA 模块 ====================

class RegionWiseNoiseAddition(nn.Module):
    """
    Region-wise Noise Addition (RNA)
    区域自适应噪声添加模块

    核心功能:
    - 基于Canny边缘检测生成区域权重
    - 根据边缘强度自适应调整噪声强度
    - 在高频区域添加更多噪声以引导细节生成
    """

    def __init__(self, rna_min_std=0.0, rna_max_std=1.2, low_threshold=0, high_threshold=255):
        """
        Args:
            rna_min_std: 最小噪声标准差
            rna_max_std: 最大噪声标准差
            low_threshold: Canny低阈值
            high_threshold: Canny高阈值
        """
        super().__init__()
        self.rna_min_std = rna_min_std
        self.rna_max_std = rna_max_std
        self.low_threshold = low_threshold
        self.high_threshold = high_threshold

    def forward(self, latents, reference_image):
        """
        前向传播

        Args:
            latents: 输入潜在张量 (B, C, H, W)
            reference_image: 参考图像用于边缘检测 (numpy array, RGB, shape: [H_img, W_img, 3])

        Returns:
            添加噪声后的潜在张量 (B, C, H, W)
        """
        H, W = latents.shape[-2:]

        # 应用Canny边缘检测
        edge_map = apply_canny_detection(
            reference_image,
            low_threshold=self.low_threshold,
            high_threshold=self.high_threshold
        ).astype(np.float32)

        # 转换为张量并调整大小
        edge_map = torch.tensor(edge_map).to(latents.device).unsqueeze(0).unsqueeze(0)
        edge_map = F.adaptive_avg_pool2d(edge_map, (H, W))

        # 归一化到 [rna_min_std, rna_max_std]
        std = ((edge_map - edge_map.min()) / (edge_map.max() - edge_map.min() + 1e-8)) * \
              (self.rna_max_std - self.rna_min_std) + self.rna_min_std

        # 添加区域自适应噪声
        noise = torch.randn_like(latents) * std
        latents_with_noise = latents + noise

        return latents_with_noise


# ==================== 测试代码 ====================

if __name__ == '__main__':
    # 设备选择
    device = 'cuda' if torch.cuda.is_available() else 'cpu'
    print(f"使用设备: {device.upper()}")

    # 输入参数
    B, C, H, W = 1, 4, 32, 64
    x = torch.randn(B, C, H, W).to(device)

    # ========== 测试 LSR (LIIF) 模块 ==========
    print("\n# 测试 LSR (LIIF) 模块")
    liif = LIIF(feat_unfold=True, local_ensemble=True).to(device)
    liif.eval()

    # 2倍上采样
    scale = 2
    H_out, W_out = H * scale, W * scale
    coord = make_coord((H_out, W_out), flatten=False, device=device).unsqueeze(0)
    cell = torch.ones_like(coord)
    cell[:, :, :, 0] *= 2 / H_out
    cell[:, :, :, 1] *= 2 / W_out

    print(f"LSR输入: {x.shape}")
    with torch.no_grad():
        y_lsr = liif(x, coord, cell)
    print(f"LSR输出: {y_lsr.shape}")

    # ========== 测试 RNA 模块 ==========
    print("\n# 测试 RNA (Region-wise Noise Addition) 模块")
    rna = RegionWiseNoiseAddition(rna_min_std=0.0, rna_max_std=1.2).to(device)

    # 创建参考图像
    img_size = 256
    ref_img = np.random.rand(img_size, img_size, 3) * 255
    ref_img = ref_img.astype(np.uint8)
    ref_img[img_size//2-10:img_size//2+10, :] = 255  # 添加边缘

    print(f"RNA输入: {y_lsr.shape}")
    with torch.no_grad():
        y_rna = rna(y_lsr, ref_img)
    print(f"RNA输出: {y_rna.shape}")

    # ========== 测试完整 LSRNA 流程 ==========
    print("\n# 测试完整 LSRNA 流程")
    print(f"流程: {x.shape} -> LSR -> {y_lsr.shape} -> RNA -> {y_rna.shape}")
    print("\n✓ 所有测试完成!")
第三部分:结果验证与总结
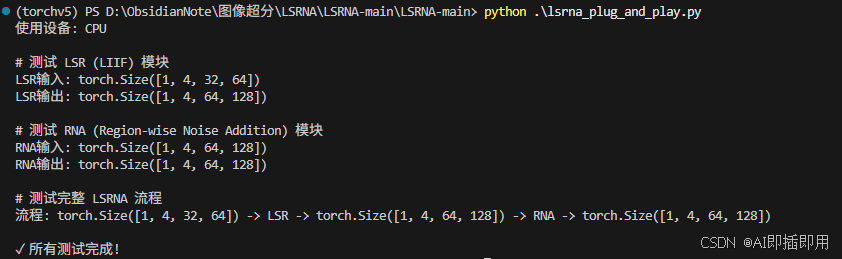
如下图所示,我们模拟了一个 Latent 输入进行测试:
- 经过 LSR 模块 后,成功超分 2 倍至
(1, 4, 64, 128),且通过 LIIF 机制处理,支持任意倍率。 - 经过 RNA 模块 后,结合参考图边缘信息,成功输出了带有自适应噪声的 Latent,尺寸保持不变。
到此,所有的内容就基本讲完了。如果觉得这篇文章对你有用,记得点赞、收藏并分享给你的小伙伴们哦😄。