文章目录
- [1. 写在前面](#1. 写在前面)
- [2. 前置分析](#2. 前置分析)
- [3. AI补环境](#3. AI补环境)
【🏠作者主页】:吴秋霖
【💼作者介绍】:擅长爬虫与JS加密逆向分析!Python领域优质创作者、CSDN博客专家、阿里云博客专家、华为云享专家。一路走来长期坚守并致力于Python与爬虫领域研究与开发工作!
【🌟作者推荐】:对爬虫领域以及JS逆向分析感兴趣的朋友可以关注《爬虫JS逆向实战》《深耕爬虫领域》
未来作者会持续更新所用到、学到、看到的技术知识!包括但不限于:各类验证码突防、爬虫APP与JS逆向分析、RPA自动化、分布式爬虫、Python领域等相关文章
作者声明:文章仅供学习交流与参考!严禁用于任何商业与非法用途!否则由此产生的一切后果均与作者无关!如有侵权,请联系作者本人进行删除!
1. 写在前面
这个参数不难,检测点也少。适合一些新手小伙伴们去练手学习,也适用于任何感兴趣且有需求的朋友自己去实操!本文作者将测试通过AI来自动实现环境补全,现在Agent相关的产品确实能够帮助我们在工作中提高效率跟生产力,作者这里分别测试了Cursor跟Claude针对这个参数场景都是可以的
很多搞爬虫|安全的小伙伴,逆向分析的过程占据工作中的时间并不低。AI目前在一些场景中包括不限于(解混淆、算法还原、日志分析、扣重点代码、补缺失环境)或多或少能够提供一些辅助
2. 前置分析
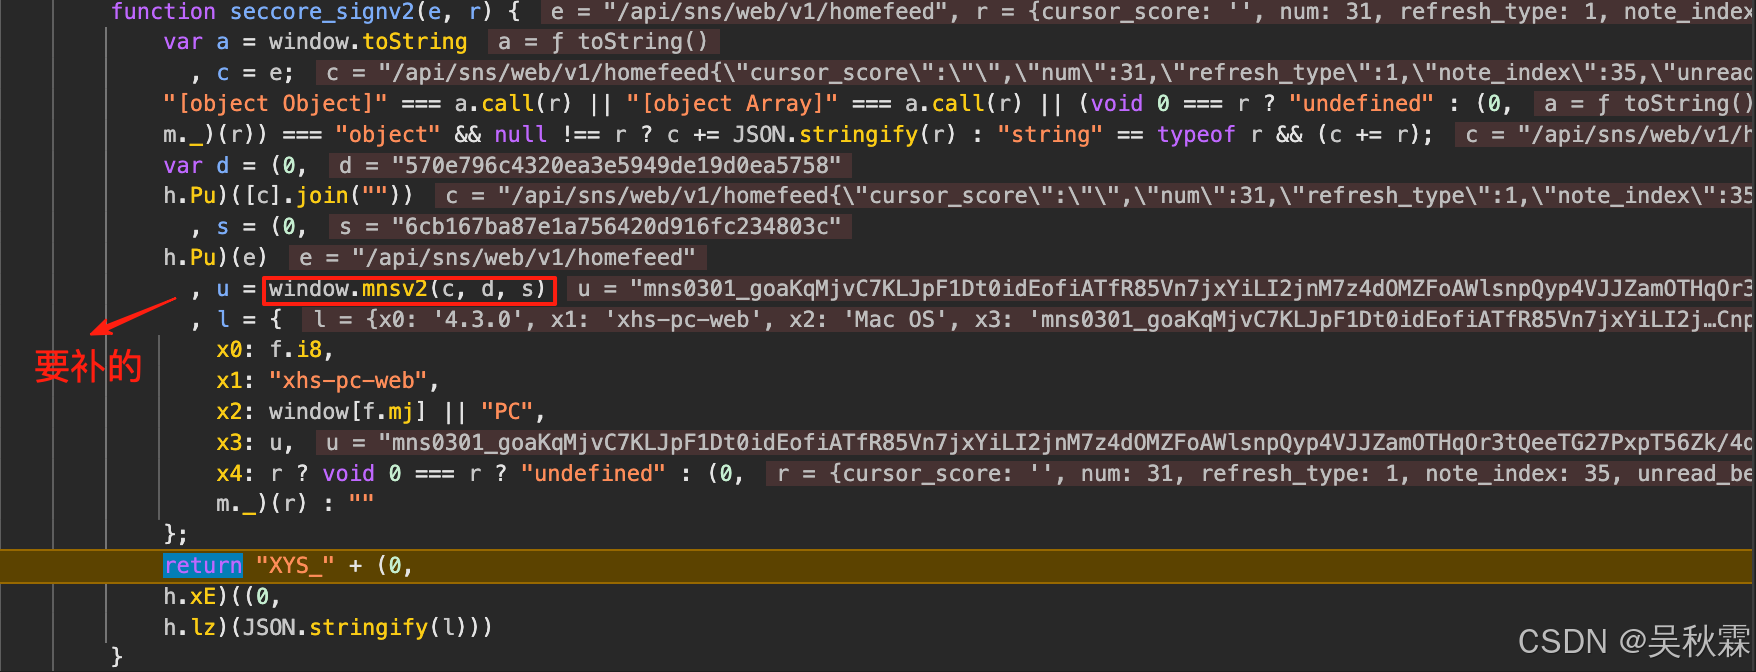
它这个参数的特征全局搜索就可以定位到相关的位置,且入口处的代码很清晰,需要补的就是window.mnsv2这个函数,如下所示:

l.ZP.isBrowser && y.a();这个分支处会触发初始化流程,跳转signV2Init核心方法处,该方法内可以看到两次连续的eval调用。应该是一个特意设计的多级vmp执行结构,如下所示:
python
seccore_signv2
 └── window.mnsv2(...)           // 外层 JS 接口
      └── eval(code)             // 第一层 VMP(加载VMP|核心逻辑)
           └── eval(data)        // 第二层 VMP(执行核心字节码|入口调用)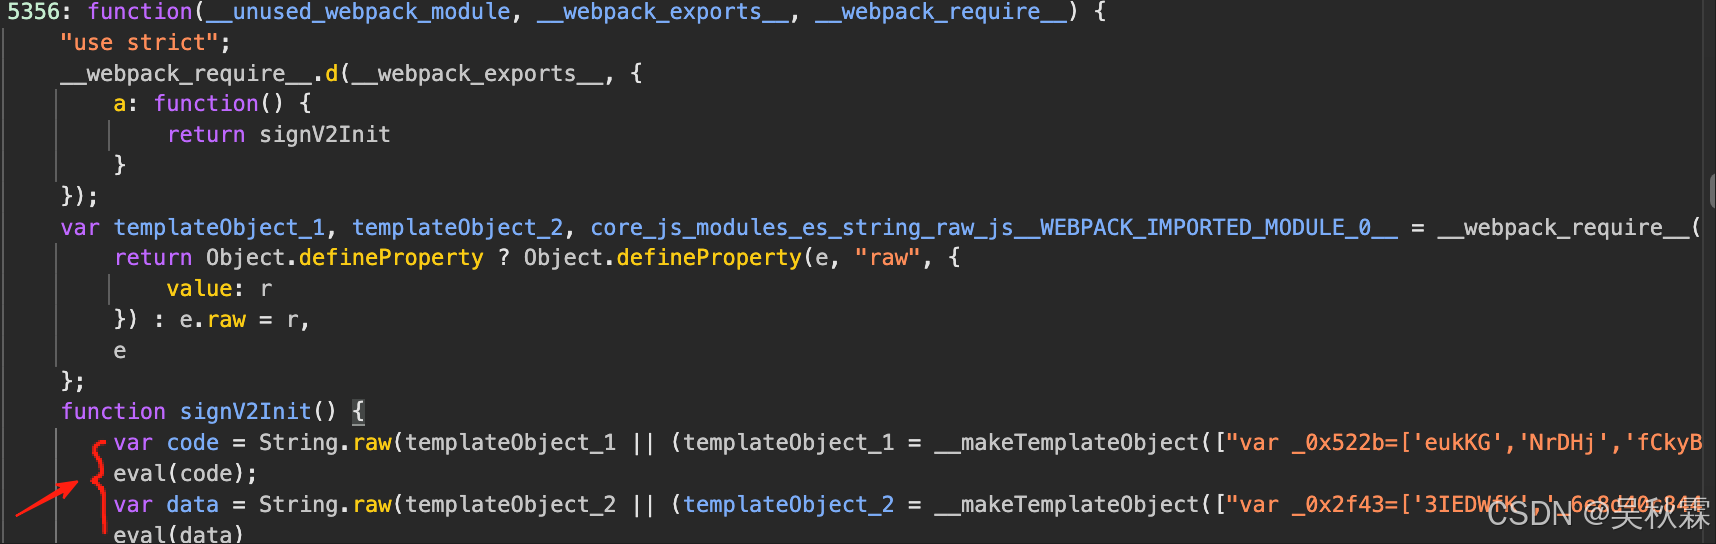
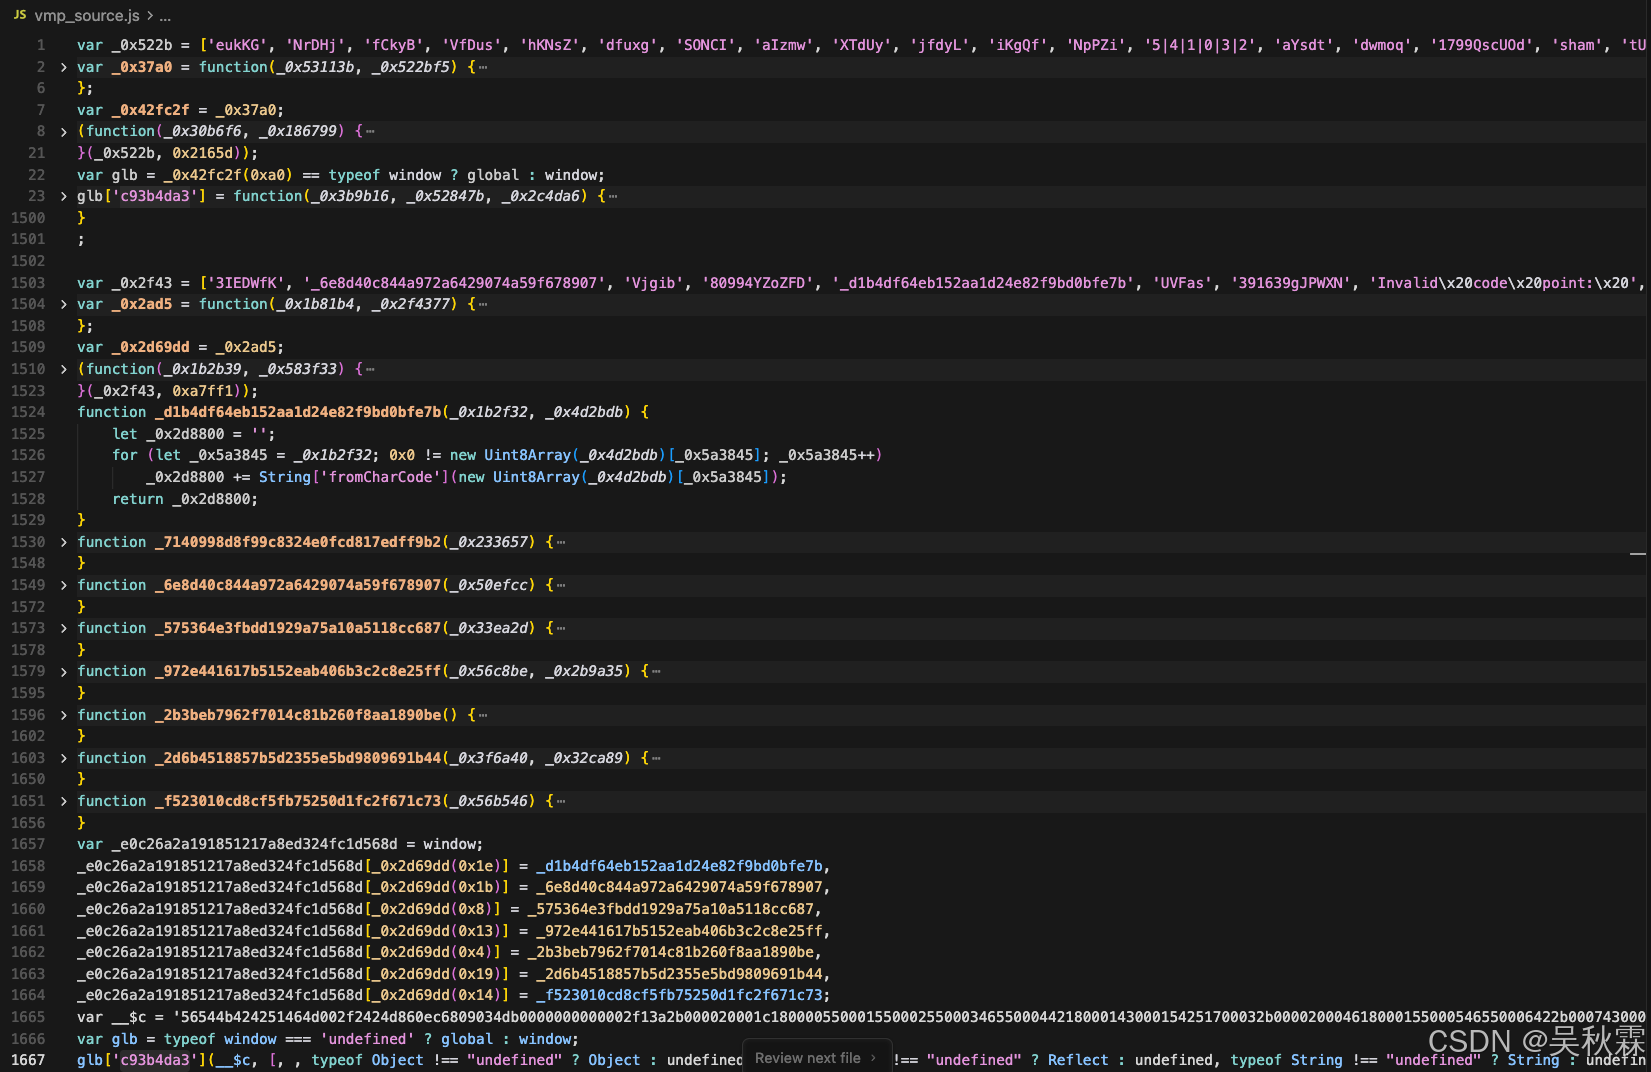
两次eval分别指向两个独立的高强度混淆文件,构成分层式VMP执行链。一个加密运算的核心逻辑、一个环境初始化加载。第二层eval跳转的混淆代码则是初始化VMP虚拟机,加载并执行加密的字节码,生成目标函数。如下所示:
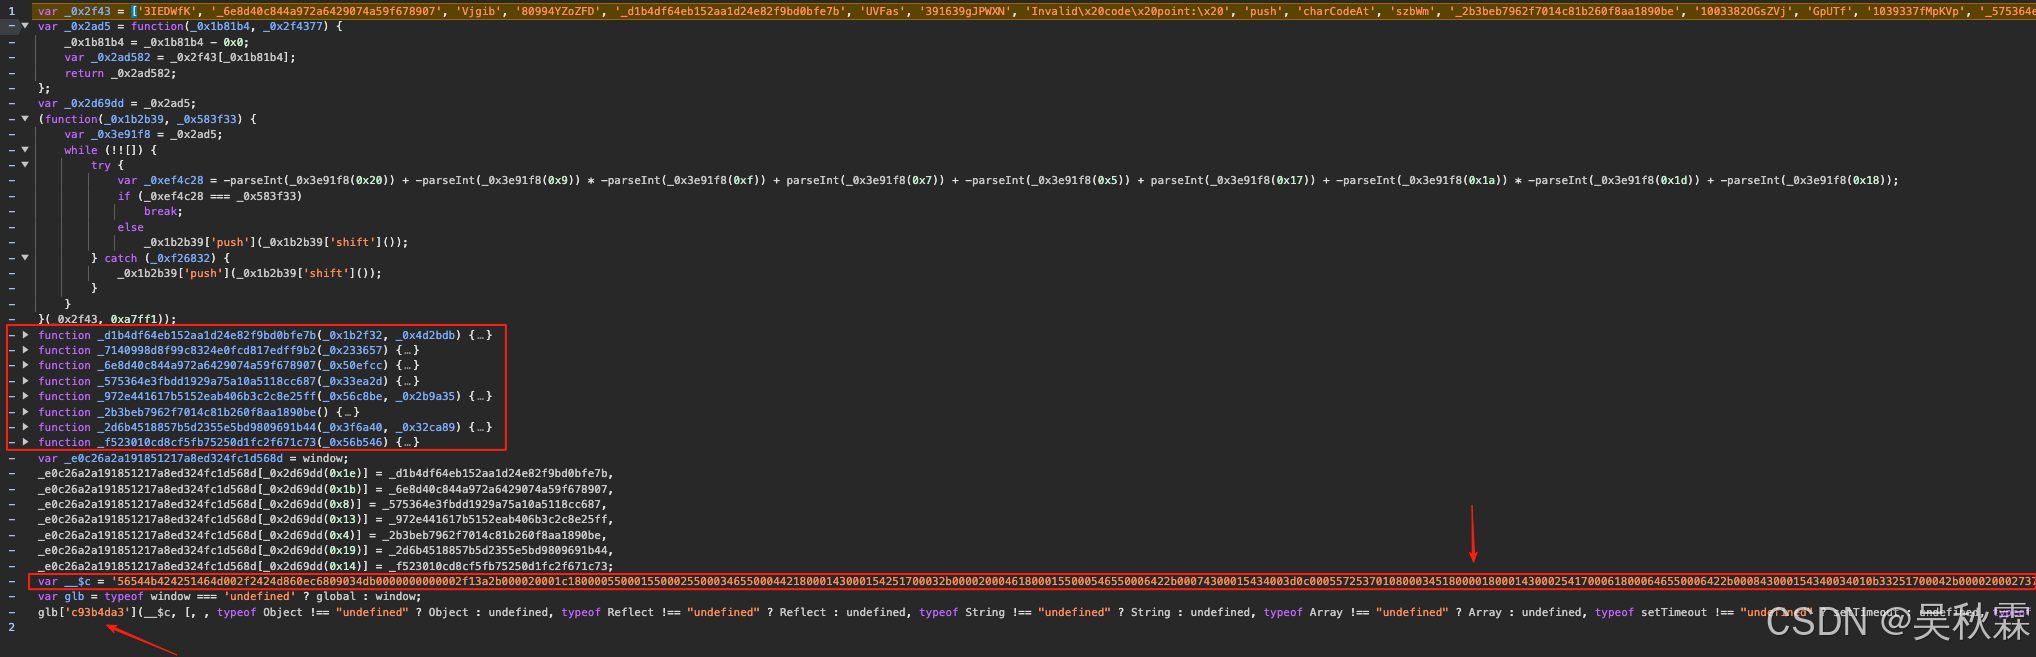
如上文件内可以看到作者折叠的以_开头的多个辅助函数,它们分别用于字节码的解码跟数据处理。__$c是一个巨长的16进制字符串,包含了加密后的字节码。这个字节码经过VMP执行后最终生成 window.mnsv2 函数。glb['c93b4da3']它是jsvmp虚拟机的入口调用函数,综上整个VMP执行流程如下所示:
字节码|字符串(__$c) - > VMP虚拟机解析(c93b4da3) -> 指令解码 -> 虚拟机执行 -> 生成JS函数(mnsv2) -> 挂载到window对象
根据上面的整个分析,可以对window.mnsv2函数调用流程也可得出一个大致的流程,如下所示:
API参数路径 -> 参数拼接(c) -> hash(s)|hash(d) -> JSVMP虚拟机 -> 执行OPCODE -> 得到u值
3. AI补环境
综上在开始使用Cursor补环境之前,第一步需要将两个eval中混淆JS代码拿出来,创建并放到JS文件内(vmp_source.js),如下所示:
第二步,再次新建一个补环境的JS文件(env.js),里面包含基础的Proxy就行(也可让Cursor生成),后续Cursor将会在这个env.js的文件基础上,通过不断执行测试流程、分析日志、从而不断完善优化JS环境的代码,如下所示:
javascript
function GetProxy(proxyObjs, enableLog = true) {
    for (let i = 0; i < proxyObjs.length; i++) {
        const objName = proxyObjs[i];
        try {
            const target = eval(objName);
            if (target && typeof target === 'object') {
                const handler = {
                    get: function(target, property, receiver) {
                        if (enableLog && property !== 'Math' && property !== 'isNaN') {
                            const value = target[property];
                            if (!value || typeof value === 'string' || Object.keys(value || {}).length <= 3) {
                                console.log(`[Proxy] GET - 对象: ${objName}, 属性: ${String(property)}, 类型: ${typeof property}, 值:`, value);
                            }
                        }
                        return target[property];
                    },
                    set: function(target, property, value, receiver) {
                        if (enableLog) {
                            console.log(`[Proxy] SET - 对象: ${objName}, 属性: ${String(property)}, 值:`, value);
                        }
                        target[property] = value;
                        return true;
                    }
                };
                eval(`${objName} = new Proxy(${objName}, handler)`);
            }
        } catch (e) {
        }
    }
}

window = globalThis;

// ==================== Proxy 监控 ====================
const proxyArray = ['window', 'document', 'location', 'navigator', 'history', 'screen'];
GetProxy(proxyArray, true);最后一步,新建一个demo.js文件引入网站的vmp源码跟env环境代码用以测试。参考seccore_signv2中调用的mnsv2生成XYS_...的流程来写一个即可,需要把里面依赖的几个方法都扣一下。如下所示:
javascript
require('./env.js')
require('./vmp_source.js')
var crypto = require('crypto');
function MD5(data) {
return crypto.createHash('md5').update(data, 'utf8').digest('hex');
}
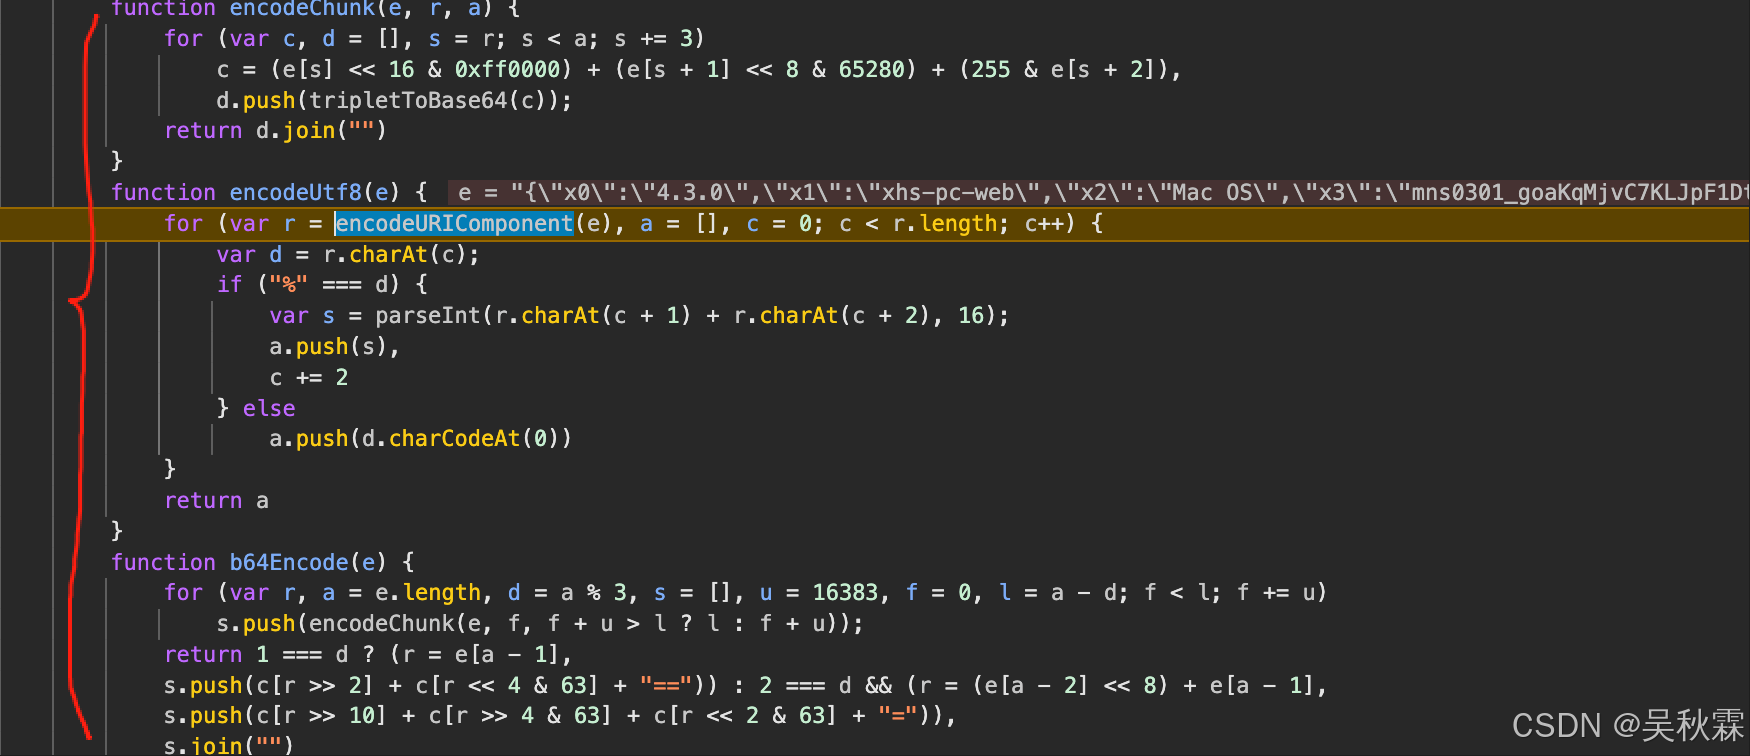
var c = ["Z","m","s","e","r","b","B","o","H","Q","t","N","P","+","w","O","c","z","a","/","L","p","n","g","G","8","y","J","q","4","2","K","W","Y","j","0","D","S","f","d","i","k","x","3","V","T","1","6","I","l","U","A","F","M","9","7","h","E","C","v","u","R","X","5"]
function encodeUtf8(e) {
for (var r = encodeURIComponent(e), a = [], c = 0; c < r.length; c++) {
var d = r.charAt(c);
if ("%" === d) {
var s = parseInt(r.charAt(c + 1) + r.charAt(c + 2), 16);
a.push(s),
c += 2
} else
a.push(d.charCodeAt(0))
}
return a
}
function tripletToBase64(e) {
return c[e >> 18 & 63] + c[e >> 12 & 63] + c[e >> 6 & 63] + c[63 & e]
}
function encodeChunk(e, r, a) {
for (var c, d = [], s = r; s < a; s += 3)
c = (e[s] << 16 & 0xff0000) + (e[s + 1] << 8 & 65280) + (255 & e[s + 2]),
d.push(tripletToBase64(c));
return d.join("")
}
function b64Encode(e) {
for (var r, a = e.length, d = a % 3, s = [], u = 16383, f = 0, l = a - d; f < l; f += u)
s.push(encodeChunk(e, f, f + u > l ? l : f + u));
return 1 === d ? (r = e[a - 1],
s.push(c[r >> 2] + c[r << 4 & 63] + "==")) : 2 === d && (r = (e[a - 2] << 8) + e[a - 1],
s.push(c[r >> 10] + c[r >> 4 & 63] + c[r << 2 & 63] + "=")),
s.join("")
}
function get_x_s(api, data) {
// 构建请求字符串
const dataStr = typeof data === 'string' ? data : JSON.stringify(data);
const requestStr = api + dataStr;
const md5Hash = MD5(requestStr);
const encryptedValue = window.mnsv2(requestStr, md5Hash, md5Hash);
const signatureParams = {
"x0": "4.3.0",
"x1": "xhs-pc-web",
"x2": "Mac OS",
"x3": encryptedValue,
"x4": "object"
};
const signatureJson = JSON.stringify(signatureParams);
const encodedSignature = b64Encode(encodeUtf8(signatureJson));
return {
"X-s": "XYS_" + encodedSignature
};
}
// 随便什么接口测试都可
console.log(get_x_s('/api/sns/web/v1/homefeed', '{"cursor_score":"","num":35,"refresh_type":1,"note_index":34,"unread_begin_note_id":"","unread_end_note_id":"","unread_note_count":0,"category":"homefeed_recommend","search_key":"","need_num":10,"image_formats":["jpg","webp","avif"],"need_filter_image":false}'));这个时候我们开始采用自认为合适的提示词开启触发与Cursor的交互,让其开始针对demo.js运行后日志中环境缺失的问题进行反复的测试、补全,如下所示:
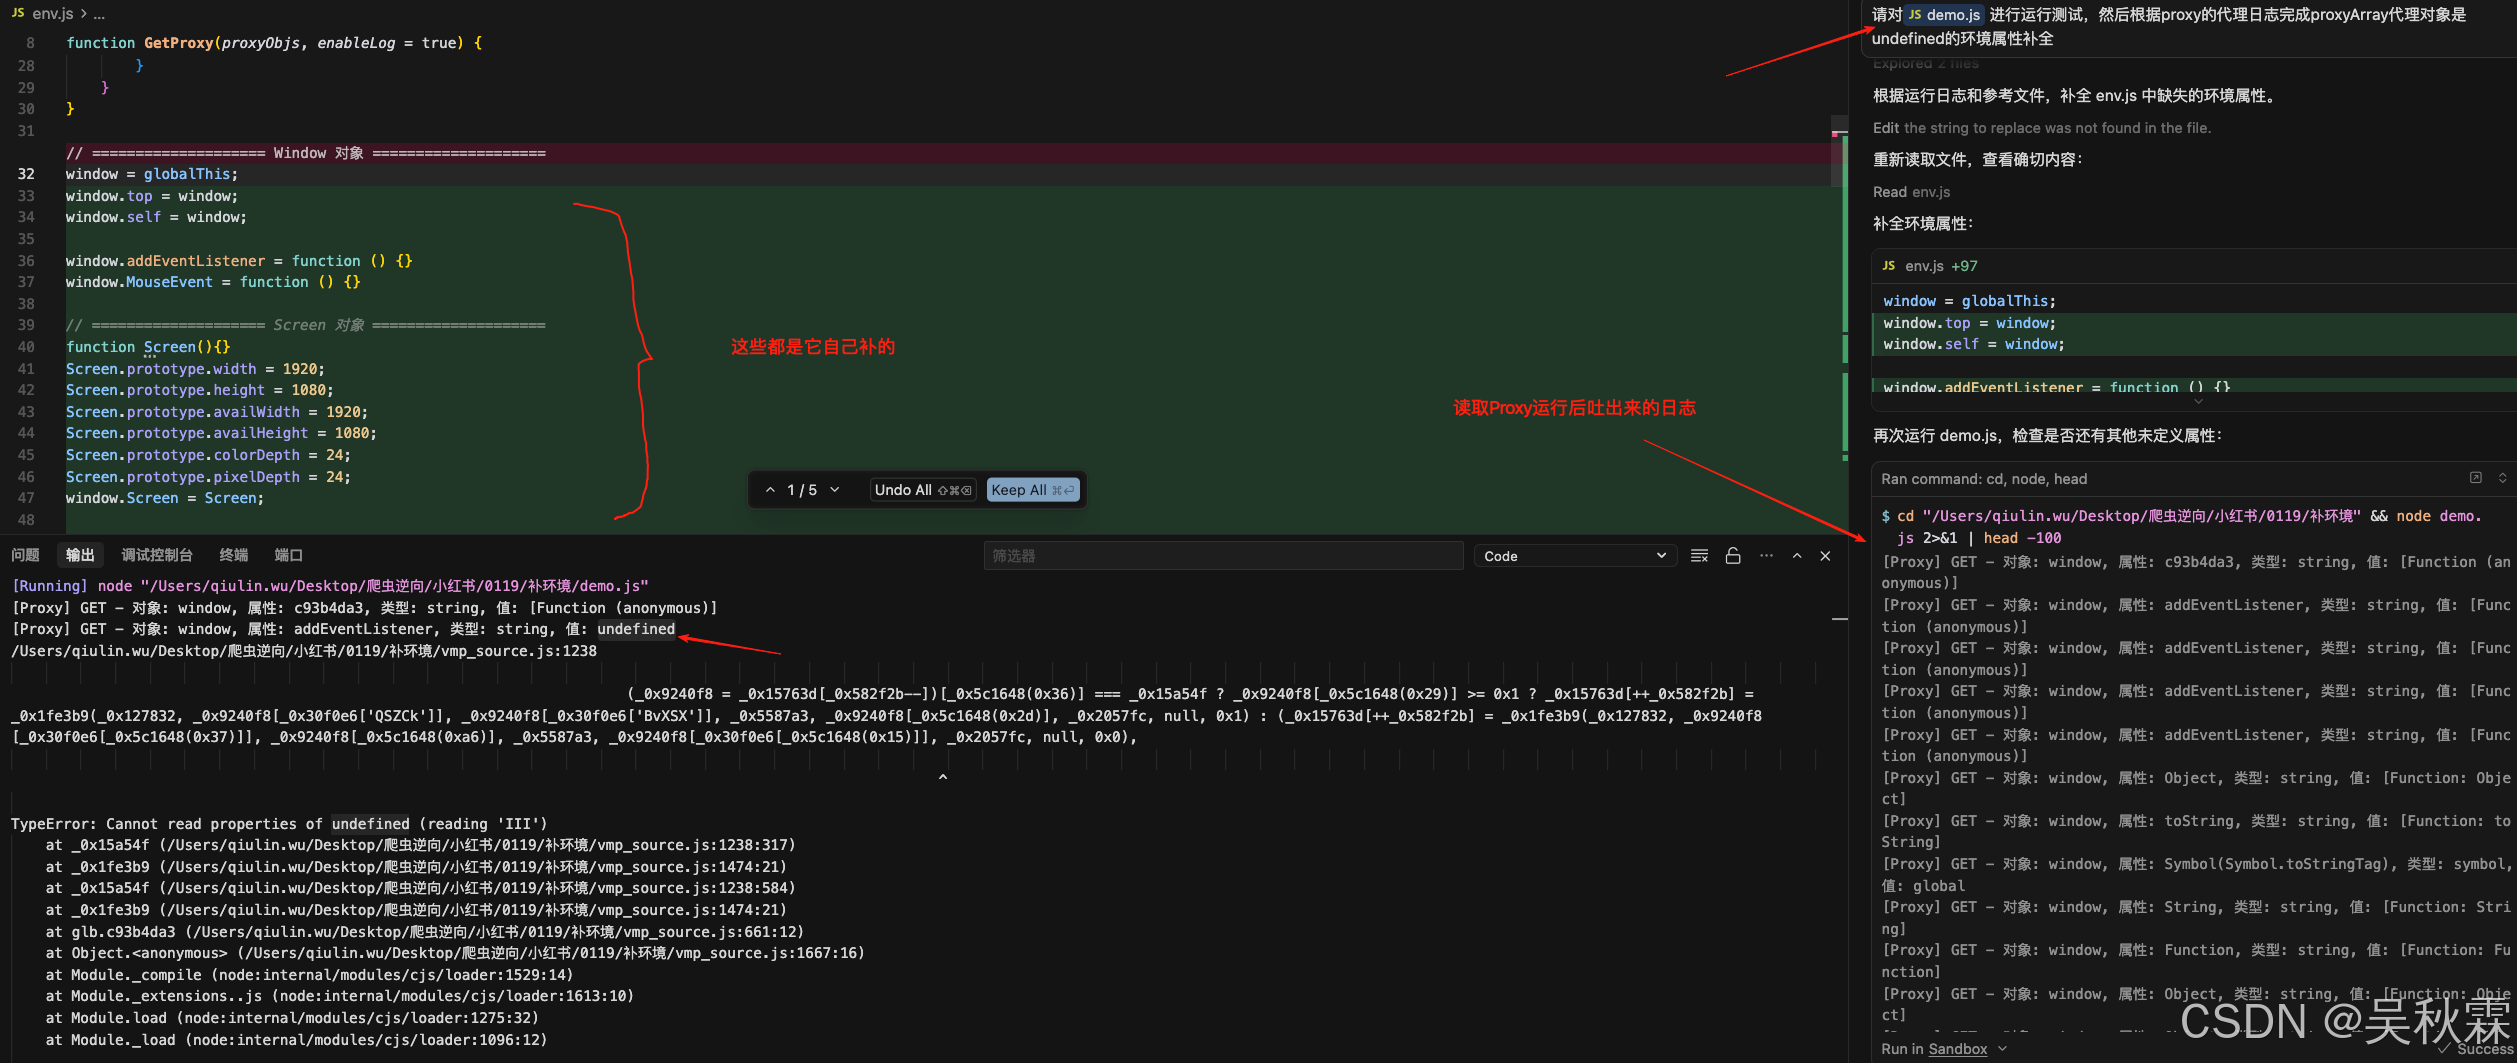
在后续的过程中Cursor会需要我们协助来不断运行测试命令,读取日志并调整env.js中的环境JS代码(这个过程大致需要几分钟),如下所示:
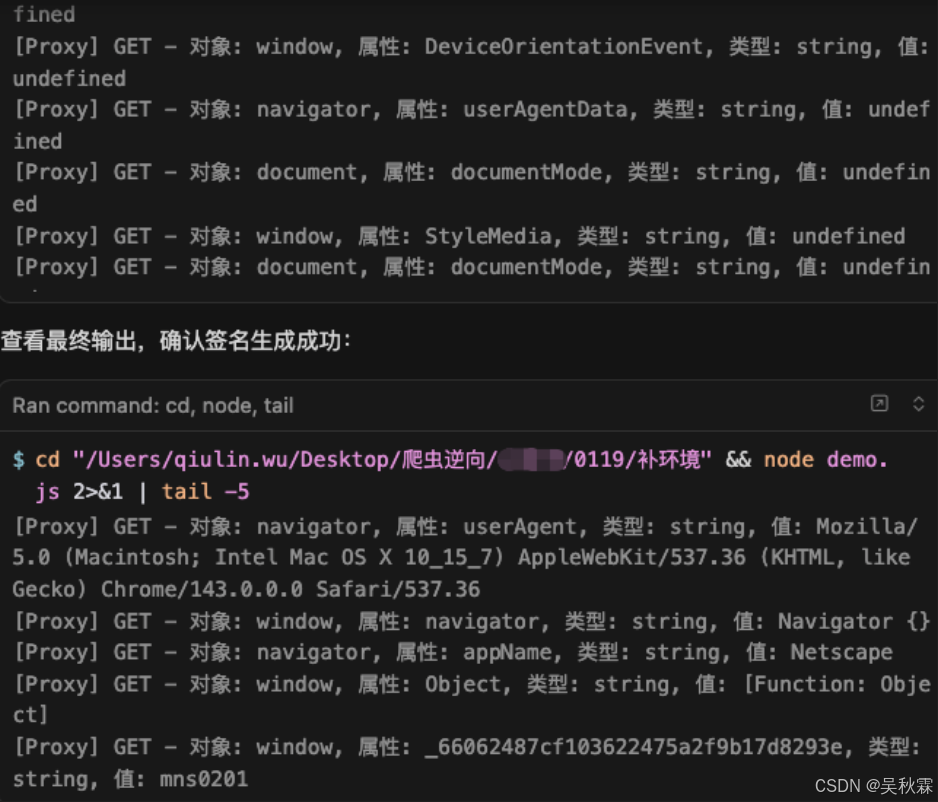
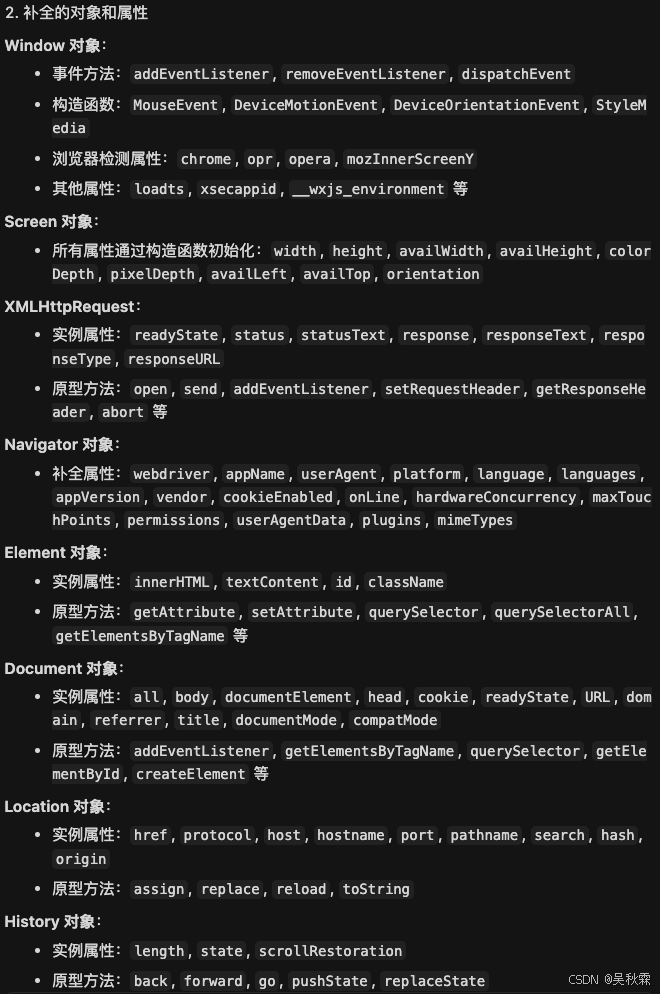
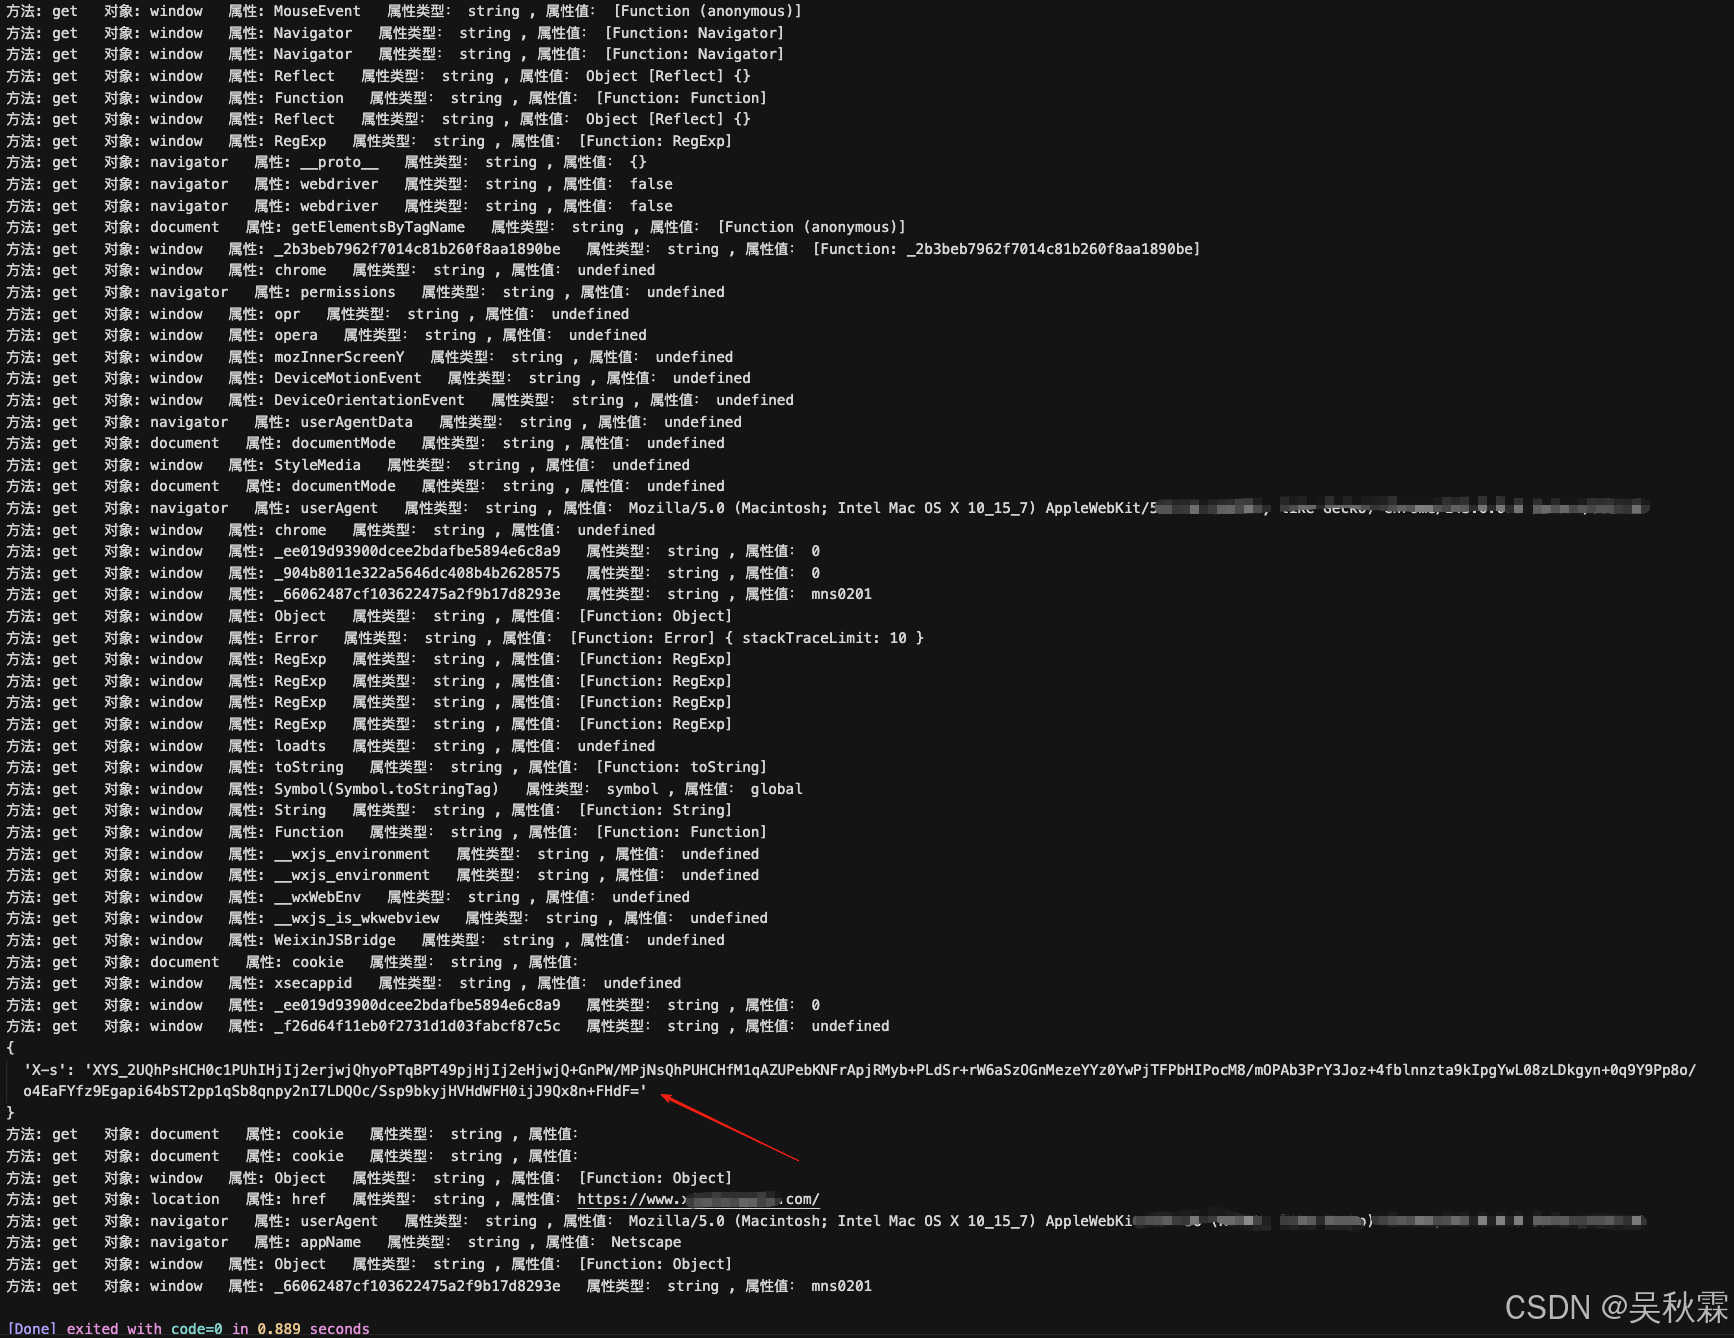
可以看到Cursor在完成整个工作流之后,会给出所有涉及跟补了的对象跟属性,如下所示:
从第一次的发送提示词指令后,Cursor会不断补充缺失的环境并通过我们手动Run测试命令以便它获取最新的日志信息再次完善环境代码,直到最后测试通过demo.js输出了返回值后它才会停止(并认为它签名的值成功生成),如下是Cursor补完环境后我们手动Run所示:
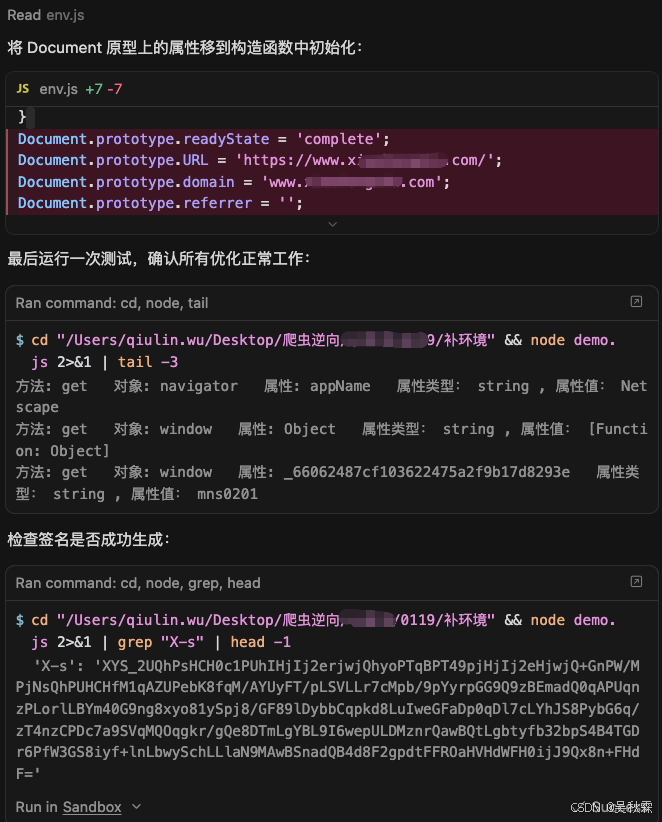
最后我们可以抓一个其他接口的包,丢给Cursor让它写一个Py调用JS的例子,测试一下Cursor补出来的环境拿到的签名x-s值是否可以正常使用,测试是没有问题的(一次通过),如下所示:

最后,下面是Cursor自动补全的完整环境代码。虽然其中有很多非必要的补法,比不上我们自己精准的分析补法。但优点是可以不需要我们自己苦哈哈的一番操作!其中涉及到domain跟ua的信息作者做了一下脱敏处理,这部分可以自行补充一下,代码如下所示:
javascript
// ==================== Proxy 监控工具 ====================
function GetProxy(proxyObjs, enableLog = true) {
    for (let i = 0; i < proxyObjs.length; i++) {
        const objName = proxyObjs[i];
        try {
            const target = eval(objName);
            if (target && typeof target === 'object') {
                const handler = {
                    get: function(target, property, receiver) {
                        if (enableLog && property !== 'Math' && property !== 'isNaN') {
                            const value = target[property];
                            if (!value || typeof value === 'string' || Object.keys(value || {}).length <= 3) {
                                console.log(`[Proxy] GET - 对象: ${objName}, 属性: ${String(property)}, 类型: ${typeof property}, 值:`, value);
                            }
                        }
                        return target[property];
                    },
                    set: function(target, property, value, receiver) {
                        if (enableLog) {
                            console.log(`[Proxy] SET - 对象: ${objName}, 属性: ${String(property)}, 值:`, value);
                        }
                        target[property] = value;
                        return true;
                    }
                };
                eval(`${objName} = new Proxy(${objName}, handler)`);
            }
        } catch (e) {
        }
    }
}

// ==================== Window 对象 ====================
window = globalThis;
window.top = window;
window.self = window;

// Window 原型方法
window.addEventListener = function () {}
window.removeEventListener = function () {}
window.dispatchEvent = function () {}

// Window 构造函数
window.MouseEvent = function () {}
window.DeviceMotionEvent = undefined;
window.DeviceOrientationEvent = undefined;
window.StyleMedia = undefined;

// Window 浏览器检测属性
window.chrome = undefined;
window.opr = undefined;
window.opera = undefined;
window.mozInnerScreenY = undefined;

// Window 其他属性
window.loadts = undefined;
window.xsecappid = undefined;
window.__wxjs_environment = undefined;
window.__wxWebEnv = undefined;
window.__wxjs_is_wkwebview = undefined;
window.WeixinJSBridge = undefined;

// ==================== Screen 对象 ====================
function Screen(){
    // 实例属性(通过构造函数初始化)
    this.width = 1920;
    this.height = 1080;
    this.availWidth = 1920;
    this.availHeight = 1080;
    this.colorDepth = 24;
    this.pixelDepth = 24;
    this.availLeft = 0;
    this.availTop = 0;
    this.orientation = undefined;
}
window.Screen = Screen;

// ==================== XMLHttpRequest ====================
function XMLHttpRequest() {
    // 实例属性(通过构造函数初始化)
    this.readyState = 0;
    this.status = 0;
    this.statusText = '';
    this.response = '';
    this.responseText = '';
    this.responseType = '';
    this.responseURL = '';
}
XMLHttpRequest.prototype.open = function () {}
XMLHttpRequest.prototype.send = function () {}
XMLHttpRequest.prototype.addEventListener = function () {}
XMLHttpRequest.prototype.removeEventListener = function () {}
XMLHttpRequest.prototype.setRequestHeader = function () {}
XMLHttpRequest.prototype.getResponseHeader = function () {}
XMLHttpRequest.prototype.getAllResponseHeaders = function () {}
XMLHttpRequest.prototype.abort = function () {}
window.XMLHttpRequest = XMLHttpRequest;

// ==================== Navigator 对象 ====================
function Navigator(){
    // 实例属性(通过构造函数初始化)
    this.webdriver = false;
    this.appName = "Netscape";
    this.userAgent = "Mozilla/5.0 (Macintosh; Intel Mac OS X 10_15_7) AppleWebKit/***";
    this.platform = "MacIntel";
    this.language = "zh-CN";
    this.languages = ["zh-CN", "zh", "en"];
    this.appVersion = "5.0 (Macintosh; Intel Mac OS X 10_15_7) AppleWebKit/***";
    this.vendor = "Google Inc.";
    this.vendorSub = "";
    this.product = "Gecko";
    this.productSub = "20030107";
    this.cookieEnabled = true;
    this.onLine = true;
    this.hardwareConcurrency = 8;
    this.maxTouchPoints = 0;
    this.permissions = undefined;
    this.userAgentData = undefined;
    this.plugins = [];
    this.mimeTypes = [];
}
window.Navigator = Navigator;

// ==================== Element 对象 ====================
function Element(){
    // 实例属性(通过构造函数初始化)
    this.innerHTML = '';
    this.textContent = '';
    this.id = '';
    this.className = '';
}
Element.prototype.getAttribute = function () {}
Element.prototype.setAttribute = function () {}
Element.prototype.removeAttribute = function () {}
Element.prototype.removeChild = function () {}
Element.prototype.appendChild = function () {}
Element.prototype.querySelector = function () { return null; }
Element.prototype.querySelectorAll = function () { return []; }
Element.prototype.getElementsByTagName = function () { return []; }
Element.prototype.getElementsByClassName = function () { return []; }
window.Element = Element;

// ==================== Document 对象 ====================
function Document(){
    // 实例属性(通过构造函数初始化)
    this.all = new Element();
    this.body = new Element();
    this.documentElement = new Element();
    this.head = new Element();
    this.cookie = '';
    this.readyState = 'complete';
    this.URL = 'https://www.***.com/';
    this.domain = 'www.***.com';
    this.referrer = '';
    this.title = '';
    this.documentMode = undefined;
    this.compatMode = 'CSS1Compat';
}
Document.prototype.addEventListener = function () {}
Document.prototype.removeEventListener = function () {}
Document.prototype.dispatchEvent = function () {}
Document.prototype.getElementsByTagName = function (val) {
    return []
}
Document.prototype.getElementsByClassName = function () {
    return []
}
Document.prototype.querySelector = function () {
    return null
}
Document.prototype.querySelectorAll = function () {
    return []
}
Document.prototype.getElementById = function () {
    return null
}
Document.prototype.createElement = function () {
    return new Element()
}
Document.prototype.createTextNode = function () {
    return new Element()
}
window.Document = Document;

// ==================== Location 对象 ====================
function Location(){
    // 实例属性(通过构造函数初始化)
    this.href = "https://www.***.com/";
    this.protocol = "https:";
    this.host = "www.***.com";
    this.hostname = "www.***.com";
    this.port = "";
    this.pathname = "/";
    this.search = "";
    this.hash = "";
    this.origin = "https://www.***.com";
}
Location.prototype.assign = function () {}
Location.prototype.replace = function () {}
Location.prototype.reload = function () {}
Location.prototype.toString = function () {
    return this.href;
}
window.Location = Location;

// ==================== History 对象 ====================
function History(){
    // 实例属性(通过构造函数初始化)
    this.length = 1;
    this.state = null;
    this.scrollRestoration = 'auto';
}
History.prototype.back = function () {}
History.prototype.forward = function () {}
History.prototype.go = function () {}
History.prototype.pushState = function () {}
History.prototype.replaceState = function () {}
window.History = History;

// ==================== 创建实例对象 ====================
if (typeof document === 'undefined') {
    document = new Document();
}
if (typeof navigator === 'undefined') {
    navigator = new Navigator();
}
if (typeof location === 'undefined') {
    location = new Location();
}
if (typeof history === 'undefined') {
    history = new History();
}
if (typeof screen === 'undefined') {
    screen = new Screen();
}

// ==================== 挂载到 window ====================
window.document = document;
window.navigator = navigator;
window.location = location;
window.history = history;
window.screen = screen;

// ==================== Proxy 监控 ====================
proxy_array = ['window', 'document', 'location', 'navigator', 'history', 'screen'];
GetProxy(proxy_array);
AI时代下合理且巧妙的借助它来帮助我们提升工作中的效率是一种趋势,学会拥抱变化才能走的更远~