项目概述
创建一个完整的运动控制界面原型,模拟单轴运动控制系统的基本功能。这个项目将帮助你掌握 WinForms 的核心概念,为后续的运动控制卡开发打下基础。
项目目标
-
掌握 WinForms 常用控件的使用
-
理解事件驱动编程模型
-
学习窗体布局和界面设计
-
掌握数据绑定和状态显示
-
实现多窗体应用程序
-
练习 GDI+ 绘图(位置显示)
功能需求
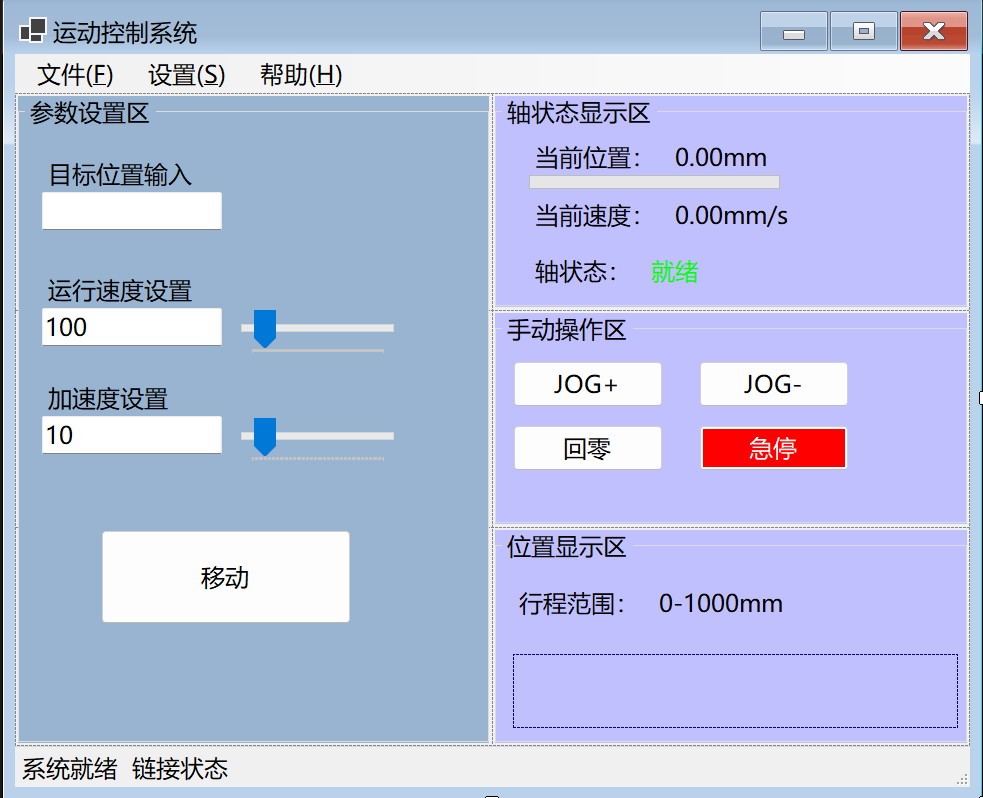
1. 主界面功能
-
轴状态显示区
-
当前位置显示(Label 或 ProgressBar)
-
当前速度显示
-
轴状态指示(就绪/运动中/报警)- 使用不同颜色标识
-
-
参数设置区
-
目标位置输入(TextBox + NumericUpDown)
-
运行速度设置(TrackBar + TextBox)
-
加速度设置(TrackBar + TextBox)
-
-
手动操作区
-
正向点动按钮(JOG+)
-
反向点动按钮(JOG-)
-
回零按钮(Home)
-
急停按钮(Stop)- 红色,醒目
-
-
菜单栏
-
文件菜单:打开参数、保存参数、退出
-
设置菜单:参数配置(打开设置窗体)
-
帮助菜单:关于
-
-
状态栏
-
显示当前系统状态
-
显示连接状态(模拟)
-
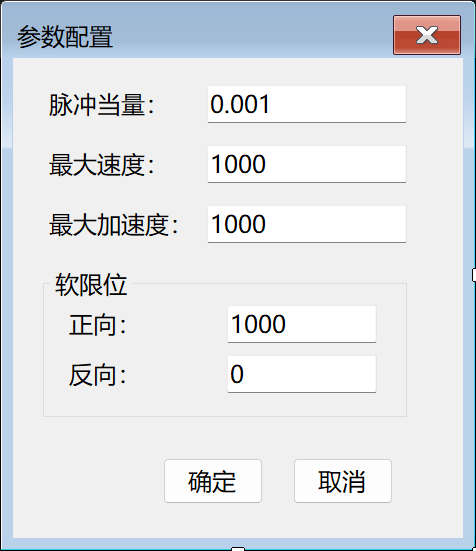
2. 设置窗体功能
-
轴参数配置
-
脉冲当量
-
最大速度
-
最大加速度
-
软限位(正向/反向)
-
-
确定/取消按钮
-
参数保存到配置文件(JSON 或 XML)
3. 位置显示功能
-
使用 GDI+ 绘制位置指示器
-
显示当前位置在行程范围内的位置
-
实时更新显示
实现步骤
不管是做什么开发项目,最开始做的一定是做好框架,只有做好了条理清晰,分工明确的框架,才能在后续的开发中省去很多不必要的调试和麻烦。
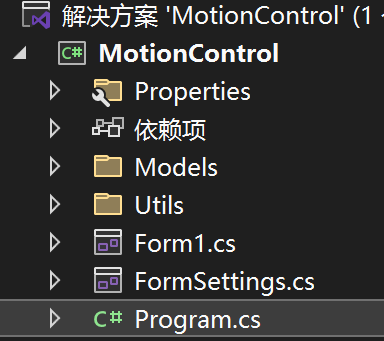
正常开发中一般的框架一般分为数据模型层、业务服务层、静态资源层、通用工具类和主程序入口
分析本项目的需求,一共分为基础界面搭建以及功能实现和完善这两个主要步骤
基础界面搭建
创建项目和主界面框架
先在草稿中构建一个大致的框架,分析需求可得主界面一共有四个主要区域,分别是轴状态显示区、参数设置区、手动操作区、显示区。可用TableLayoutPanel划分主要区域,再在不同的区域中放置Panel容器进行单独的设计
功能实现和完善
主界面设置好后,下一步应该做的是创建数据模型,为什么这一步要先做呢,因为没有数据,后面具体的功能实现将寸步难行(比如条件的判断)。
创建数据模型
在Models文件夹下创建AxisState.cs类,封装轴状态的数据。
cs
namespace MotionControl.Models
{
    public class AxisState
    {
        public double CurrentPosition {  get; set; }
        public double TargetPosition {  get; set; }
        public double CurrentSpeed { get; set; }
        public double RunSpeed { get; set; }
        public double Acceleration {  get; set; }
        public double MinPosition {  get; set; }
        public double MaxPosition { get; set; }
        public string AxisStatus { get; set; }
        public AxisState()
        {
            CurrentPosition = 0.0;
            TargetPosition = 0.0;
            CurrentSpeed = 0.0;
            RunSpeed = 100.0;
            Acceleration = 10.0;
            AxisStatus = "就绪";
            MinPosition = 0.0;
            MaxPosition = 1000.0;
        }
}
实现手动操作功能
按下JOG+正向移动,按下JOG-负向移动,松开停止。
设置这个功能不仅仅要考虑移动的方向,还要考虑移动的速度,移动距离的限制
想控制轴体的移动方向,可以定义一个枚举,分别为正向、负向、和停止
在构造器中初始化为停止
cs
public JogDirection CurrentJogDirection { get; set; }
public enum JogDirection
{
    None,      // 不运动
    Positive,  // 正向运动
    Negative   // 反向运动
}
设置运动方法
cs
 // JOG+:正向点动开始
 public void JogPositiveStart()
 {
     CurrentJogDirection = JogDirection.Positive;
     AxisStatus = "运动中";
 }

 // JOG+:正向点动停止
 public void JogPositiveStop()
 {
     CurrentJogDirection = JogDirection.None;
     CurrentSpeed = 0.0;
     AxisStatus = "就绪";
 }

 // JOG-:反向点动开始
 public void JogNegativeStart()
 {
     CurrentJogDirection = JogDirection.Negative;
     AxisStatus = "运动中";
 }

 // JOG-:反向点动停止
 public void JogNegativeStop()
 {
     CurrentJogDirection = JogDirection.None;
     CurrentSpeed = 0.0;
     AxisStatus = "就绪";
 }
设置对应的事件
cs
      // JOG+ 按钮按下
      private void btnJogPositive_MouseDown(object sender, MouseEventArgs e)
      {
          axisState.JogPositiveStart();
      }
      // JOG+ 按钮松开
      private void btnJogPositive_MouseUp(object sender, MouseEventArgs e)
      {
          axisState.JogPositiveStop();
      }

      // JOG- 按钮按下
      private void btnJogNegative_MouseDown(object sender, MouseEventArgs e)
      {
          axisState.JogNegativeStart();
      }
      // JOG- 按钮松开
      private void btnJogNegative_MouseUp(object sender, MouseEventArgs e)
      {
          axisState.JogNegativeStop();
      }
现在运动的方法和对应的事件都完善了,但是数据并没有更新,所有还需要写一个更新方法
在更新方法中,移动速度很好更新赋值,但是移动了多远怎么判断呢?只需用速度×时间,再每一个事件触发的时间重新更新当前位置即可。
首先在AxisState中写下更新的方法
cs
     public void UpdatePosition(double deltaTime)
     {
         // 根据当前 JOG 方向更新位置
         if (CurrentJogDirection == JogDirection.Positive)
         {
             // 正向运动
             CurrentSpeed = RunSpeed;
             double positionChange = CurrentSpeed * deltaTime;
             CurrentPosition += positionChange;

             // 到达限位停止
             if (CurrentPosition >= MaxPosition)
             {
                 CurrentPosition = MaxPosition;
                 CurrentSpeed = 0.0;
                 AxisStatus = "就绪";
                 CurrentJogDirection = JogDirection.None;
             }
         }
         else if (CurrentJogDirection == JogDirection.Negative)
         {
             // 反向运动
             CurrentSpeed = -RunSpeed;
             double positionChange = CurrentSpeed * deltaTime;
             CurrentPosition += positionChange;

             // 到达限位停止
             if (CurrentPosition <= MinPosition)
             {
                 CurrentPosition = MinPosition;
                 CurrentSpeed = 0.0;
                 AxisStatus = "就绪";
                 CurrentJogDirection = JogDirection.None;
             }
         }
        }
方法有了,在哪调用呢,当然是主程序中了,在form1中创建对应的触发事件,设置每一毫秒更新一次数据
cs
private System.Windows.Forms.Timer timer;//事件时间触发器

 public Form1()
 {
     InitializeComponent();
     axisState = new AxisState();
     timer = new System.Windows.Forms.Timer();//初始化
     timer.Interval = 100;//设置时间间隔
     timer.Tick += UpdateTimer_Tick;订阅更新方法
     timer.Start();触发事件
 }
现在只需要在主程序中创建一个方法调用更新方法就行了
cs
private void UpdateTimer_Tick(object sender, EventArgs e)
{
    double deltaTime = 0.1;
    axisState.UpdatePosition(deltaTime);

    // 1. 更新位置显示
    lblPositionValue.Text = axisState.CurrentPosition.ToString("F2") + "mm";

    // 2. 更新速度显示
    lblSpeedValue.Text = axisState.CurrentSpeed.ToString("F2") + "mm/s";

    // 3. 更新状态显示
    lblStatusValue.Text = axisState.AxisStatus;

    // 4. 根据状态改变颜色
    if (axisState.AxisStatus == "运动中")
    {
        lblStatusValue.ForeColor = Color.Red;
    }
    else if (axisState.AxisStatus == "就绪")
    {
        lblStatusValue.ForeColor = Color.Lime;
    }
    else if (axisState.AxisStatus == "报警")
    {
        lblStatusValue.ForeColor = Color.Orange;
    }

    // 5. 更新进度条
    double positionRange = axisState.MaxPosition - axisState.MinPosition;
    double progress = (axisState.CurrentPosition - axisState.MinPosition) / positionRange * 100;
    progressBarPosition.Value = (int)Math.Clamp(progress, 0, 100);

    // 6. 更新状态栏
    statusLabel.Text = "系统状态:" + axisState.AxisStatus;

    panelPositionDisplay.Invalidate();
}
现在只剩回零和急停按钮了,比较好实现,只需要把相关逻辑完善就行了,更新已经写好了
回零和急停
在轴数据类中写方法
cs
 // 回零:回到原点
 public void Home()
 {
     CurrentPosition = 0.0;
     CurrentSpeed = 0.0;
     AxisStatus = "就绪";
 }

 // 急停:紧急停止
 public void EmergencyStop()
 {
     CurrentSpeed = 0.0;
     AxisStatus = "就绪";
 }
在form1中创建事件
cs
 private void btnHome_Click(object sender, EventArgs e)
 {
     axisState.Home();
 }

 private void btnEmergencyStop_Click(object sender, EventArgs e)
 {
     axisState.EmergencyStop();
 }
实现位置显示
cs
  private void panelPositionDisplay_Paint(object sender, PaintEventArgs e)
  {
      Graphics g = e.Graphics;

      // 1. 获取 Panel 的尺寸
      int width = panelPositionDisplay.Width;
      int height = panelPositionDisplay.Height;

      // 2. 计算边距
      int margin = 20;
      int drawWidth = width - 2 * margin;

      // 3. 绘制行程线(水平线)
      int lineY = height / 2;
      g.DrawLine(Pens.Black, margin, lineY, width - margin, lineY);

      // 4. 绘制起点和终点标记
      g.FillEllipse(Brushes.Black, margin - 5, lineY - 5, 10, 10);
      g.FillEllipse(Brushes.Black, width - margin - 5, lineY - 5, 10, 10);

      // 5. 绘制刻度标签
      g.DrawString("0mm", SystemFonts.DefaultFont, Brushes.Black, margin, lineY - 25);
      g.DrawString("1000mm", SystemFonts.DefaultFont, Brushes.Black, width - margin - 40, lineY - 25);

      // 6. 计算当前位置的 X 坐标
      double positionRange = axisState.MaxPosition - axisState.MinPosition;
      double positionRatio = (axisState.CurrentPosition - axisState.MinPosition) / positionRange;
      int currentX = margin + (int)(positionRatio * drawWidth);

      // 7. 绘制位置指示器(三角形)
      Point[] triangle = new Point[]
      {
     new Point(currentX, lineY - 15),      // 顶点
     new Point(currentX - 8, lineY - 5),   // 左下
     new Point(currentX + 8, lineY - 5)    // 右下
      };
      g.FillPolygon(Brushes.Red, triangle);

      // 8. 绘制位置标签
      string positionText = axisState.CurrentPosition.ToString("F2") + "mm";
      g.DrawString(positionText, SystemFonts.DefaultFont, Brushes.Red, currentX - 20, lineY + 10);
  }
实现菜单功能
打开设置中的参数配置会打开一个小窗口,这个小窗口我们应该用模态窗口来实现,其中的数据我们应该在创建一个保存数据的类,实现多窗口之间的数据能够双向传递。
首先设置窗体框架
在models中创建数据类
cs
using System;
using System.Collections.Generic;
using System.Linq;
using System.Text;
using System.Threading.Tasks;

namespace MotionControl.Models
{
    public class AxisConfig
    {
        public double PulseEquivalent { get; set; }
        public double MaxSpeed { get; set; }
        public double MaxAcceleration { get; set; }
        public double SoftLimitPositive { get; set; }
        public double SoftLimitNegative { get; set; }
        public AxisConfig()
        {
            PulseEquivalent = 0.001;
            MaxSpeed = 1000.0;
            MaxAcceleration = 1000.0;
            SoftLimitPositive = 1000.0;
            SoftLimitNegative = 0.0;
        }
    }
}
设置菜单栏的点击事件
cs
        private void menuItemConfig_Click(object sender, EventArgs e)
        {
            FormSettings formSettings = new FormSettings(axisConfig);
            DialogResult result = formSettings.ShowDialog();
            if (result == DialogResult.OK)
            {
                // 用户点击了确定,使用修改后的配置
                axisConfig = formSettings.Config;

                // 应用配置到 axisState
                axisState.MinPosition = axisConfig.SoftLimitNegative;  // 反向限位
                axisState.MaxPosition = axisConfig.SoftLimitPositive;  // 正向限位
                axisState.RunSpeed = axisConfig.MaxSpeed;              // 最大速度
                axisState.Acceleration = axisConfig.MaxAcceleration;    // 最大加速度

                // 更新 TrackBar 的 Maximum 属性
                trackBarSpeed.Maximum = (int)axisConfig.MaxSpeed;
                trackBarAccel.Maximum = (int)axisConfig.MaxAcceleration;

                // 更新界面显示
                trackBarSpeed.Value = (int)axisConfig.MaxSpeed;
                txtSpeed.Text = axisConfig.MaxSpeed.ToString();

                trackBarAccel.Value = (int)axisConfig.MaxAcceleration;
                txtAccel.Text = axisConfig.MaxAcceleration.ToString();

                // 更新行程范围显示
                lblTravelRangeValue.Text = $"{axisConfig.SoftLimitNegative}-{axisConfig.SoftLimitPositive}mm";

                MessageBox.Show("配置已保存", "提示",
                               MessageBoxButtons.OK, MessageBoxIcon.Information);
            }
            else
            {
                // 用户点击了取消,不使用修改
                MessageBox.Show("配置未保存", "提示",
                               MessageBoxButtons.OK, MessageBoxIcon.Information);
            }
        }
到此为止修改参数这一部分就完成了,只剩最后一个任务,参数保存到配置文件
参数保存到配置文件
我们可以讲数据转换为json数据类型,保存在文件夹中,方便读取和保存文件,保存时只需要把axis config中的数据转换为json形式保存就行了,读取时也只需要把数据读取出来后,让axis state提取axisconfig中的数据就行。
既然想要做到这些事,肯定就需要方法,这就是工具,我们应该将其放到utils中专门写一个转换json的代码
cs
using MotionControl.Models;
using System;
using System.Collections.Generic;
using System.Linq;
using System.Text;
using System.Text.Json;
using System.Threading.Tasks;

namespace MotionControl.Utils
{
    public static class ConfigHelper
    {
        // 配置文件名常量
        private static readonly string ConfigFileName = "axis_config.json";


        /// <summary>
        /// 保存轴配置到 JSON 文件
        /// </summary>
        /// <param name="config">要保存的配置对象</param>
        public static void SaveConfig(AxisConfig config)  // 定义静态方法,参数是 AxisConfig 类型
        {
            try
            {
                var options = new JsonSerializerOptions
                {
                    WriteIndented = true,  // 设置为 true,输出的 JSON 会格式化(有缩进和换行)
                    PropertyNamingPolicy = JsonNamingPolicy.CamelCase
                };

                string jsonString = JsonSerializer.Serialize(config, options);

                File.WriteAllText(ConfigFileName, jsonString);
            }
            catch (Exception ex)  // 捕获所有类型的异常,ex 是异常对象
            {
                // 抛出新的异常,并附加友好的错误信息
                // ex.Message 获取原始异常的错误信息
                throw new Exception("保存配置文件失败:" + ex.Message);
            }
        }

        // 加载配置方法
        public static AxisConfig? LoadConfig()// 返回类型是 AxisConfig?,表示可能返回 null
        {
            try
            {
                if (!File.Exists(ConfigFileName))
                {
                    return null;  // 返回 null
                }
                string jsonString = File.ReadAllText(ConfigFileName);

                // 创建 JSON 反序列化选项对象
                var options = new JsonSerializerOptions
                {
                    PropertyNameCaseInsensitive = true  // 设置为 true,属性名不区分大小写
                };

                // 使用 JsonSerializer.Deserialize() 将 JSON 字符串反序列化为 AxisConfig 对象
                // 第一个参数是 JSON 字符串,第二个参数是反序列化选项
                // <AxisConfig> 指定要反序列化成的类型
                AxisConfig? config = JsonSerializer.Deserialize<AxisConfig>(jsonString, options);

                // 返回反序列化得到的配置对象
                return config;
            }
            catch (Exception ex)  // 捕获所有类型的异常
            {
                // 抛出新的异常,并附加友好的错误信息
                throw new Exception("加载配置文件失败:" + ex.Message);
            }
        }
    }
}
方法写好后,form1中添加事件去调用他就行了
cs
   private void menuItemOpen_Click(object sender, EventArgs e)
   {
       try  // 开始 try 块,捕获可能的异常
       {
           // 调用 ConfigHelper.LoadConfig() 加载配置
           AxisConfig? loadedConfig = ConfigHelper.LoadConfig();

           // 检查是否加载成功(loadedConfig 不为 null)
           if (loadedConfig != null)
           {
               // 将加载的配置赋值给 axisConfig
               axisConfig = loadedConfig;

               // 应用配置到 axisState
               axisState.MinPosition = axisConfig.SoftLimitNegative;  // 设置最小位置
               axisState.MaxPosition = axisConfig.SoftLimitPositive;  // 设置最大位置
               axisState.RunSpeed = axisConfig.MaxSpeed;              // 设置运行速度
               axisState.Acceleration = axisConfig.MaxAcceleration;    // 设置加速度

               // 更新 TrackBar 的 Maximum 属性(最大值)
               trackBarSpeed.Maximum = (int)axisConfig.MaxSpeed;       // 速度滑块的最大值
               trackBarAccel.Maximum = (int)axisConfig.MaxAcceleration; // 加速度滑块的最大值

               // 更新界面显示
               trackBarSpeed.Value = (int)axisConfig.MaxSpeed;         // 设置速度滑块的值
               txtSpeed.Text = axisConfig.MaxSpeed.ToString();         // 设置速度文本框的值

               trackBarAccel.Value = (int)axisConfig.MaxAcceleration;  // 设置加速度滑块的值
               txtAccel.Text = axisConfig.MaxAcceleration.ToString();  // 设置加速度文本框的值

               // 更新行程范围显示
               lblTravelRangeValue.Text = $"{axisConfig.SoftLimitNegative}-{axisConfig.SoftLimitPositive}mm"
   ;

               // 弹出提示框,告诉用户加载成功
               MessageBox.Show("配置加载成功!", "提示",
                              MessageBoxButtons.OK, MessageBoxIcon.Information);
           }
           else
           {
               // 如果 loadedConfig 是 null,说明文件不存在
               MessageBox.Show("未找到配置文件", "提示",
                              MessageBoxButtons.OK, MessageBoxIcon.Information);
           }
       }
       catch (Exception ex)  // 捕获所有异常
       {
           // 弹出错误提示框,显示错误信息
           MessageBox.Show(ex.Message, "错误",
                          MessageBoxButtons.OK, MessageBoxIcon.Error);
       }
   }

   private void menuItemSave_Click(object sender, EventArgs e)
   {
       try  // 开始 try 块,捕获可能的异常
       {
           // 调用 ConfigHelper.SaveConfig() 保存配置
           ConfigHelper.SaveConfig(axisConfig);

           // 弹出提示框,告诉用户保存成功
           MessageBox.Show("配置保存成功!", "提示",
                          MessageBoxButtons.OK, MessageBoxIcon.Information);
       }
       catch (Exception ex)  // 捕获所有异常
       {
           // 弹出错误提示框,显示错误信息
           MessageBox.Show(ex.Message, "错误",
                          MessageBoxButtons.OK, MessageBoxIcon.Error);
       }
   }
到此位置,本项目圆满完成