文章目录
- kubernetes容器云平台
-
- 入门须知
- [第 1 章 Kubernetes概述](#第 1 章 Kubernetes概述)
- [第 2 章 Kubernetes集群部署](#第 2 章 Kubernetes集群部署)
-
- docker版
- containerd版
-
- 前置环境部署
- 安装containerd
-
- 加载模块
- 立即生效
- 安装依赖的软件包
- [添加 Docker 软件源](#添加 Docker 软件源)
- 查看containerd版本
- 安装指定版本containerd
- 生成containerd的配置文件
- 修改containerd的驱动程序
- 修改镜像仓库地址
- 启动containerd
- 镜像加速配置
- 启动containerd
- 测试
- 安装kubeadm
- 主节点部署Kubernetes
- node工作节点加入集群
- 部署网络CNI组建
- [第 3 章 kubernetes基础](#第 3 章 kubernetes基础)
-
- 第1部:客户端命令kubectl
- 集群Node管理
- [worker node节点管理集群](#worker node节点管理集群)
- dashboard界面
- 节点标签(label)
- YAML声明式文件
- YAML资源对象描述方法
- 命名空间(Namespace)
- [第 4 章 kubernetes核心概念](#第 4 章 kubernetes核心概念)
-
- 组件
-
- 1.Pod
- 2.Controller
- 3.Label
- [4.Label Selector](#4.Label Selector)
- 5.Service
- 6.Endpoints
- 7.DNS
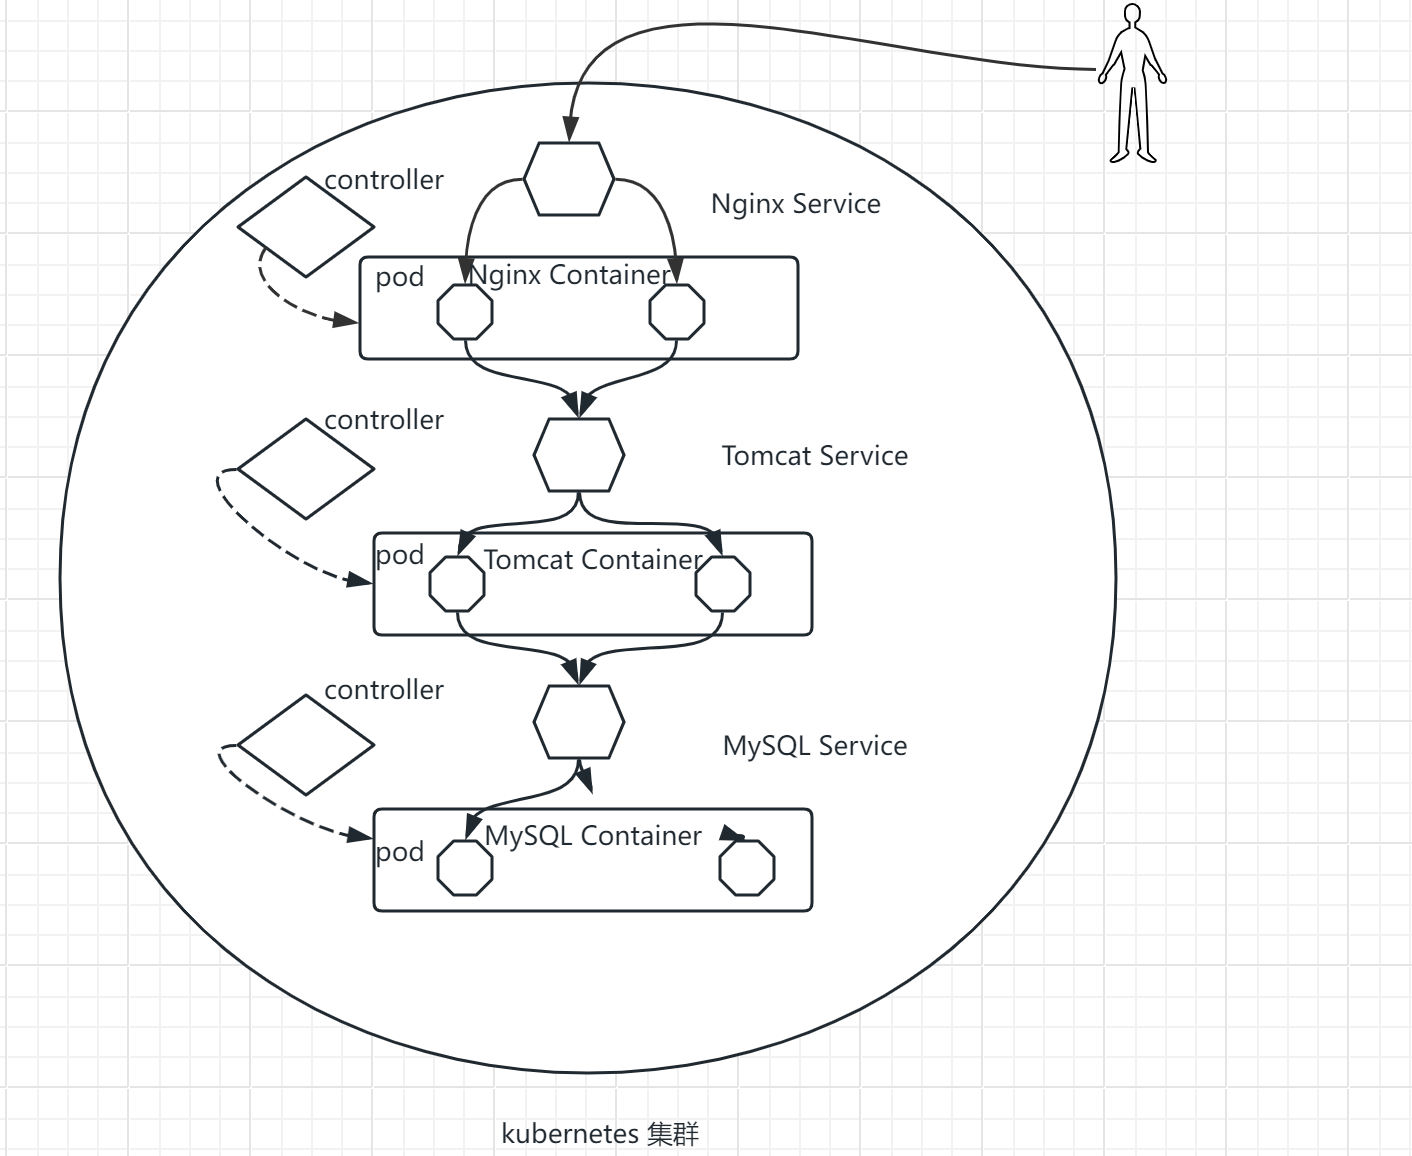
- kubernetes核心概念之间的关系
- 基于kubernetes集群容器化应用的微服务
kubernetes容器云平台
入门须知
- 熟悉Linux基础命令
- 熟悉Docker基本管理
- 了解SSL证书工作原理
- 了解负载均衡工作原理(L4/L7)
- 了解集群,分布式概念
- 了解域名解析原理了解网络协议
第 1 章 Kubernetes概述
Kubernetes是什么
- Kubernetes是Google在2014年开源的一个容器集群管理系统,Kubernetes简称K8S。
- K8S用于容器化应用程序的部署,扩展和管理。
- K8S提供了容器编排,资源调度,弹性伸缩,部署管理,服务发现等一系列功能。
- Kubernetes目标是让部署容器化应用简单高效。
Kubernetes特性
- 自我修复:在节点故障时重新启动失败的容器,替换和重新部署,保证预期的副本数量;杀死健康检查失败的容器,并且在未准备好之前不会处理客户端请求,确保线上服务不中断。
- 弹性伸缩:使用命令、UI或者基于CPU使用情况自动快速扩容和缩容应用程序实例,保证应用业务高峰并发时的高可用性;业务低峰时回收资源,以最小成本运行服务。
- 自动部署和回滚:K8S采用滚动更新策略更新应用,一次更新一个Pod,而不是同时删除所有Pod,如果更新过程中出现问题,将回滚更改,确保升级不受影响业务。
- 服务发现和负载均衡:K8S为多个容器提供一个统一访问入口(内部IP地址和一个DNS名称),并且负载均衡关联的所有容器,使得用户无需考虑容器IP问题。
- 机密和配置管理:管理机密数据和应用程序配置,而不需要把敏感数据暴露在镜像里,提高敏感数据安全性。并可以将一些常用的配置存储在K8S中,方便应用程序使用。
- 存储编排:挂载外部存储系统,无论是来自本地存储,公有云(如AWS),还是网络存储(如NFS、GlusterFS、Ceph)都作为集群资源的一部分使用,极大提高存储使用灵活性。
- 批处理:提供一次性任务,定时任务;满足批量数据处理和分析的场景。
Kubernetes集群架构与组件
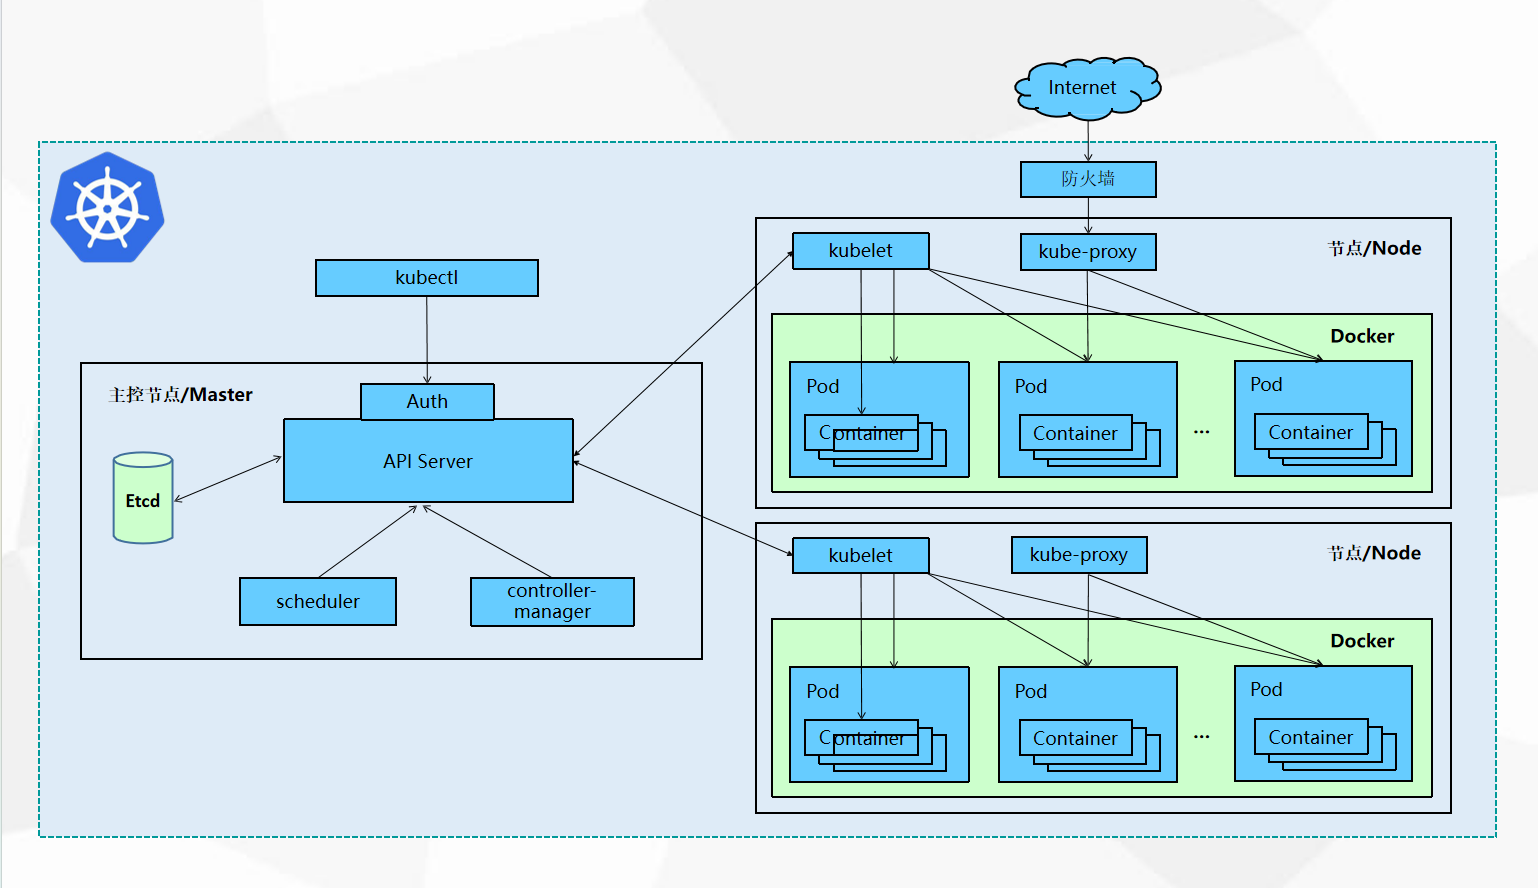
API Server在node节点上kubelet控制静态的pod的生命周期
kubelet发送证书申请给APIServer,API Server颁发
auth中的证书放在admin.conf,admin-conf指向master地址,方便和通信
用https的协议管理k8s集群
用户通过kubectl命令申请资源,向主节点master传输,通过Auth安全认证(证书存放在admin.conf中)进入API Server,将数据存储到Etcd中,scheduler调度器到node节点上选择合适的节点(较为空闲的),将节点传送给API Server,controller-manager控制器,监控集群,保证集群达到期望状态,API Server通过kubelet管理node节点,给合适节点发送指令,kubelet在node节点控制pod的生命周期,kubelet发送证书申请给APIServer,API Server颁发后,创建pod存储空间,容器运行在pod空间里面。外网访问网页,需要经过防火墙,通过node节点上的kube-proxy对接,维护负载均衡。
用户通过kubectl命令行工具申请资源,auth负责权限校验,防止调用资源出现权限错误,apiserver 接受请求,向etcd发送资源的状态(集群配置),scheduler根据节点条件为资源选择合适的node,同时向etcd发送结果,controller-manager运行各种控制器,保证pod不会down掉,kubelet(白手套)负责管理pod的生命周期,收到api-server颁发的证书后调用docker创建pod,kube-proxy负责外部的访问,维护service的负载均衡
Kubernetes集群架构与组件
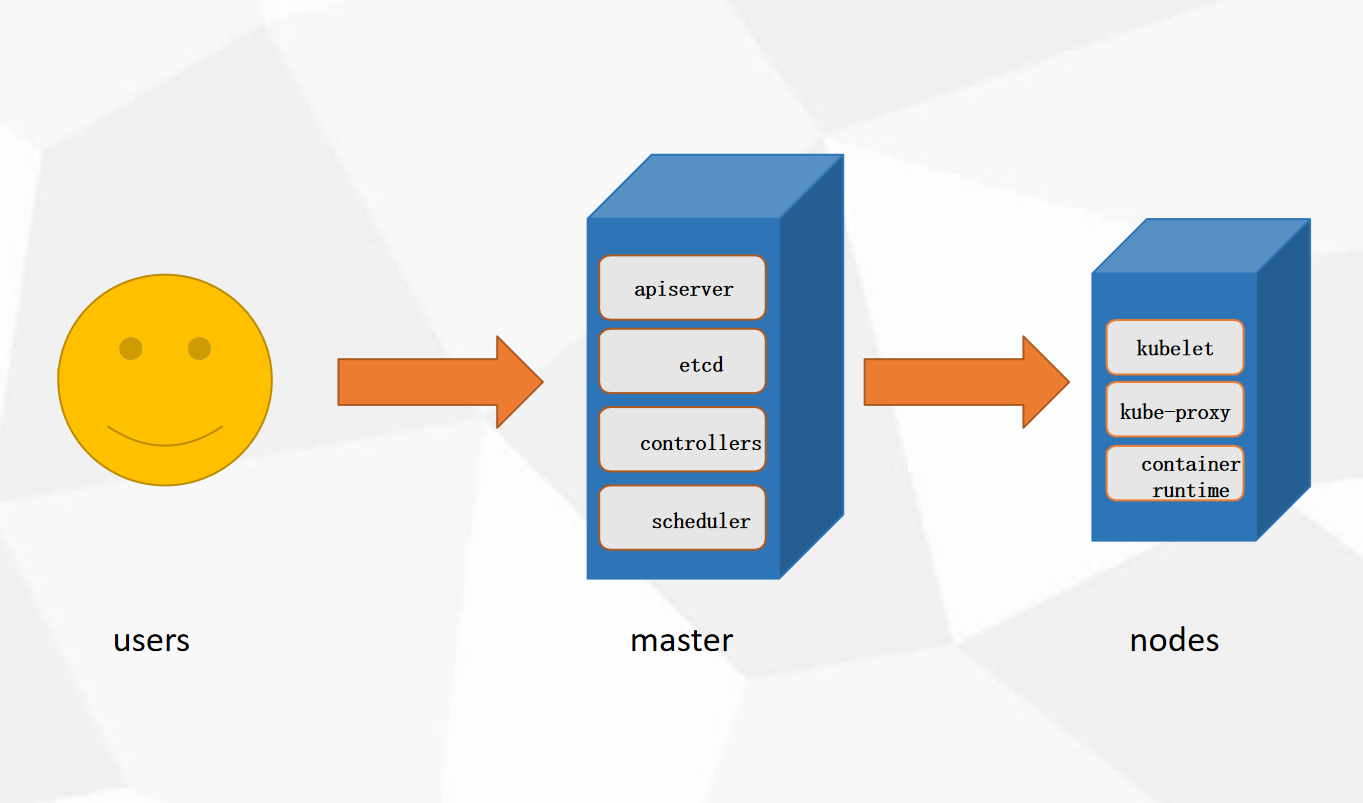
Master组件
- kube-apiserver:Kubernetes API,集群的统一入口,各组件协调者,以RESTful API提供接口 服务,所有对象资源的增删改查和监听操作都交给APIServer处理后再提交给 Etcd存储。
- kube-controller-manager:处理集群中常规后台任务,一个资源对应一个控制器,而ControllerManager 就是负责管理这些控制器的。
- kube-scheduler:根据调度算法为新创建的Pod选择一个Node节点,可以任意部署,可以部署在 同一个节点上,也可以部署在不同的节点上。
- etcd:分布式键值存储系统。用于保存集群状态数据,比如Pod、Service等对象信息。
Node组件
- kubelet:kubelet是Master在Node节点上的Agent,管理本机运行容器的生命周期,比如创 建容器、Pod挂载数据卷、下载secret、获取容器和节点状态等工作。kubelet将每 个Pod转换成一组容器。
- kube-proxy:在Node节点上实现Pod网络代理,维护网络规则和四层负载均衡工作。
- docker或rocket:容器引擎,运行容器。
k8s版本:
1.14 - 1.19 默认支持容器运行时:docker
1.20 - 1.23 同支持:docker、containerd
1.24 - 默认支持:containerd
Kubernetes核心概念
- Pod
- 最小部署单元
- 一组容器的集合
- 一个Pod中的容器共享网络命名空间
- Pod是短暂的
- Controllers
- ReplicaSet : 确保预期的Pod副本数量
- Deployment : 无状态应用部署
- StatefulSet : 有状态应用部署
- DaemonSet : 确保所有Node运行同一Pod
- Job : 一次性任务
- Cronjob : 定时任务
- 更高级层次对象,部署和管理PodService防止Pod失联定义一组Pod的访问策略
- Service
- 防止Pod失联
- 定义一组Pod的访问策略
Label : 标签,附加到某个资源上,用于关联对象、查询和筛选
Namespaces : 命名空间,将对象逻辑上隔离
Annotations :注释
第 2 章 Kubernetes集群部署
docker版
前置环境部署
1.主机配置
| CPU | 内存 | 硬盘 | IP | 主机名 | 软件 |
|---|---|---|---|---|---|
| 2核 | 4G | 100G | 192.168.88.146 | master | docker |
| 2核 | 4G | 100G | 192.168.88.147 | node1 | docker |
| 2核 | 4G | 100G | 192.168.88.148 | node2 | docker |
配置主机名
在三台主机中各自设置对应主机名称
python
hostnamectl set-hostname master
hostnamectl set-hostname node1
hostnamectl set-hostname node2
配置主机名解析
所有节点都配置,并测试ping通
python
[root@master ~ 14:51:26]# vim /etc/hosts
127.0.0.1   localhost localhost.localdomain localhost4 localhost4.localdomain4
::1         localhost localhost.localdomain localhost6 localhost6.localdomain6
192.168.88.146 master
192.168.88.147 node1
192.168.88.148 node2

[root@node1 ~ 14:51:30]# vim /etc/hosts
127.0.0.1   localhost localhost.localdomain localhost4 localhost4.localdomain4
::1         localhost localhost.localdomain localhost6 localhost6.localdomain6
192.168.88.146 master
192.168.88.147 node1
192.168.88.148 node2

[root@node2 ~ 14:51:34]# vim /etc/hosts
127.0.0.1   localhost localhost.localdomain localhost4 localhost4.localdomain4
::1         localhost localhost.localdomain localhost6 localhost6.localdomain6
192.168.88.146 master
192.168.88.147 node1
192.168.88.148 node2
测试
python
[root@node1 ~ 14:52:58]# ping node2
PING node2 (192.168.88.148) 56(84) bytes of data.
64 bytes from node2 (192.168.88.148): icmp_seq=1 ttl=64 time=0.388 ms
64 bytes from node2 (192.168.88.148): icmp_seq=2 ttl=64 time=0.215 ms
^C
--- node2 ping statistics ---
2 packets transmitted, 2 received, 0% packet loss, time 1000ms
rtt min/avg/max/mdev = 0.215/0.301/0.388/0.088 ms
[root@node1 ~ 14:53:07]# ping -c 2 master
PING master (192.168.88.146) 56(84) bytes of data.
64 bytes from master (192.168.88.146): icmp_seq=1 ttl=64 time=0.387 ms
64 bytes from master (192.168.88.146): icmp_seq=2 ttl=64 time=0.319 ms

--- master ping statistics ---
2 packets transmitted, 2 received, 0% packet loss, time 1000ms
rtt min/avg/max/mdev = 0.319/0.353/0.387/0.034 ms
安装环境包
python
[root@master ~ 14:53:00]# yum -y install vim lrzsz unzip wget net-tools tree bash-completion conntrack ntpdate ntp ipvsadm ipset iptables curl sysstat libseccomp git psmisc telnet unzip gcc gcc-c++ make

[root@node1 ~ 14:53:15]# yum -y install vim lrzsz unzip wget net-tools tree bash-completion conntrack ntpdate ntp ipvsadm ipset iptables curl sysstat libseccomp git psmisc telnet unzip gcc gcc-c++ make

[root@node2 ~ 14:52:30]# yum -y install vim lrzsz unzip wget net-tools tree bash-completion conntrack ntpdate ntp ipvsadm ipset iptables curl sysstat libseccomp git | 类别 | 软件包 | 核心功能 |
|---|---|---|
| 文件操作 | vim , lrzsz , unzip | 编辑/上传下载/解压 ZIP |
| 网络管理 | net-tools , ipvsadm | 网络配置/IPVS 负载均衡 |
| 系统监控 | sysstat , psmisc | 性能监控/进程管理 |
| 开发编译 | gcc , make | 代码编译/自动化构建 |
| 安全防护 | iptables , libseccomp | 防火墙/容器系统调用限制 |
关闭防火墙和内核安全机制
三节点
bash
[root@master ~ 15:05:03]# systemctl disable firewalld --now
[root@node1 ~ 15:05:10]# sed -i 's/enforcing/disabled/g' /etc/selinux/config
[root@node1 ~ 15:05:16]# setenforce 0
setenforce: SELinux is disabled

[root@node1 ~ 15:05:03]# systemctl disable firewalld --now
[root@node1 ~ 15:05:10]# sed -i 's/enforcing/disabled/g' /etc/selinux/config
[root@node1 ~ 15:05:16]# setenforce 0
setenforce: SELinux is disabled

[root@node2 ~ 15:04:54]# systemctl disabl                                             e firewalld --now
[root@node2 ~ 15:05:10]# sed -i 's/enforc                                             ing/disabled/g' /etc/selinux/config
[root@node2 ~ 15:05:16]# setenforce 0
setenforce: SELinux is disabled
关闭swap分区
启用swap分区会对系统的性能产生非常负面的影响,因此kubernetes要求每个节点都要禁用swap分区
bash
[root@node1 ~ 15:05:21]# swapoff -a && sed -i '/swap/s/^/#/' /etc/fstab

[root@node1 ~ 15:05:21]# swapoff -a && sed -i '/swap/s/^/#/' /etc/fstab

[root@node2 ~ 15:05:21]# swapoff -a && sed -i '/swap/s/^/#/' /etc/fstab
调整系统内核参数(注意:升级内核)
bash
[root@master ~ 15:05:28]# yum update -y kernel && reboot

[root@node1 ~ 15:05:28]# yum update -y kenel && reboot

[root@node2 ~ 15:05:28]# yum update -y kernel && reboot
bash
[root@node1 ~ 15:09:08]# cat >/etc/sysctl.d/kubernetes.conf<<EOF
# 开启Linux内核的网络桥接功能,同时启用iptables和ip6tables的网络包过滤功能,用于在网络桥接时进行网络包过滤
net.bridge.bridge-nf-call-iptables=1
net.bridge.bridge-nf-call-ip6tables=1
# 开启路由转发,转发IPv4的数据包
net.ipv4.ip_forward=1
# 尽可能避免使用交换分区,提升k8s性能
vm.swappiness=0
# 不检查物理内存是否够用
vm.overcommit_memory=1
EOF
立即生效
bash
sysctl --system
* Applying /usr/lib/sysctl.d/00-system.conf ...
* Applying /usr/lib/sysctl.d/10-default-yama-scope.conf ...
kernel.yama.ptrace_scope = 0
* Applying /usr/lib/sysctl.d/50-default.conf ...
kernel.sysrq = 16
kernel.core_uses_pid = 1
kernel.kptr_restrict = 1
net.ipv4.conf.default.rp_filter = 1
net.ipv4.conf.all.rp_filter = 1
net.ipv4.conf.default.accept_source_route = 0
net.ipv4.conf.all.accept_source_route = 0
net.ipv4.conf.default.promote_secondaries = 1
net.ipv4.conf.all.promote_secondaries = 1
fs.protected_hardlinks = 1
fs.protected_symlinks = 1
* Applying /etc/sysctl.d/99-sysctl.conf ...
* Applying /etc/sysctl.d/kubernetes.conf ...
net.ipv4.ip_forward = 1
vm.swappiness = 0
vm.overcommit_memory = 1
* Applying /etc/sysctl.conf ...
时间同步
bash
[root@node1 ~ 15:10:55]# yum -y install chrony
[root@node1 ~ 15:11:03]# systemctl restart chronyd

#列出 Chrony 守护进程当前配置和使用的所有时间源(NTP 服务器)及其同步状态信息
[root@node1 ~ 15:11:07]# chronyc sources -v
210 Number of sources = 0

  .-- Source mode  '^' = server, '=' = peer, '#' = local clock.
 / .- Source state '*' = current synced, '+' = combined , '-' = not combined,
| /   '?' = unreachable, 'x' = time may be in error, '~' = time too variable.
||                                                 .- xxxx [ yyyy ] +/- zzzz
||      Reachability register (octal) -.           |  xxxx = adjusted offset,
||      Log2(Polling interval) --.      |          |  yyyy = measured offset,
||                                \     |          |  zzzz = estimated error.
||                                 |    |           \
MS Name/IP address         Stratum Poll Reach LastRx Last sample
===============================================================================

#将硬件时钟的时间同步到系统时钟
[root@node1 ~ 15:11:18]# hwclock -s
IPVS功能
bash
[root@node1 ~ 15:11:27]# cat >>/etc/modules-load.d/ipvs.conf<<EOF
ip_vs
ip_vs_rr
ip_vs_wrr
ip_vs_sh
nf_conntrack_ipv4
ip_tables
ip_set
xt_set
ipt_set
ipt_rpfilter
ipt_REJECT
ipip
overlay
br_netfilter
EOF
PVS内核模块功能说明
-
IPVS 核心模块
- ip_vs :IPVS 负载均衡基础模块
- ip_vs_rr :轮询(Round Robin)调度算法
- ip_vs_wrr :加权轮询(Weighted RR)调度算法
- ip_vs_sh :源地址哈希(Source Hashing)调度算法
-
网络连接与过滤
- nf_conntrack_ipv4 :IPv4 连接跟踪(NAT/防火墙依赖,新内核中内核版本 ≥4.19 时合并至 nf_conntrack )
- ip_tables :iptables 基础框架
- ipt_REJECT :实现数据包拒绝(REJECT 动作)
-
IP 集合管理
- ip_set :IP 地址集合管理
- xt_set & ipt_set :iptables 与 IP 集合的扩展匹配
-
网络隧道与桥接
- ipip :IP-over-IP 隧道协议
- overlay :Overlay 网络支持(如 Docker 跨主机网络)
- br_netfilter :桥接网络流量过滤(需配合 net.bridge.bridge-nf-call-iptables=1 参数)
-
反向路径过滤
- ipt_rpfilter :反向路径验证(防 IP 欺骗)
典型应用场景
-
Kubernetes 节点初始化:IPVS 模式 kube-proxy 依赖这些模块
-
负载均衡服务器:启用 IPVS 调度算法
-
容器网络配置:Overlay 和桥接模块支持
重启服务
bash
[root@node1 ~ 15:11:40]# systemctl restart systemd-modules-load查看内核模块
bash
[root@node1 ~ 15:11:50]# lsmod | grep -e ip_vs -e nf_conntrack_ipv4
nf_conntrack_ipv4      19149  0
nf_defrag_ipv4         12729  1 nf_conntrack_ipv4
ip_vs_sh               12688  0
ip_vs_wrr              12697  0
ip_vs_rr               12600  0
ip_vs                 145458  6 ip_vs_rr,ip_vs_sh,ip_vs_wrr
nf_conntrack          143411  2 ip_vs,nf_conntrack_ipv4
libcrc32c              12644  3 xfs,ip_vs,nf_conntrack
2:docker-ce环境
前置环境安装
bash
[root@node1 ~ 15:11:56]# yum install -y yum-utils device-mapper-persistent-data lvm2说明:
yum-utils 提供了 yum-config-manager
device mapper 存储驱动程序需要 device-mapper-persistent-data 和 lvm2
Device Mapper 是 Linux2.6 内核中支持逻辑卷管理的通用设备映射机制,它为实现用于存储资源管理的块设备驱动提供了一个高度模块化的内核架构。
使用阿里云镜像
bash
[root@node1 ~ 15:16:54]# yum-config-manager --add-repo https://mirrors.aliyun.com/docker-ce/linux/centos/docker-ce.repo
已加载插件:fastestmirror
adding repo from: https://mirrors.aliyun.com/docker-ce/linux/centos/docker-ce.repo
grabbing file https://mirrors.aliyun.com/docker-ce/linux/centos/docker-ce.repo to /etc/yum.repos.d/docker-ce.repo
repo saved to /etc/yum.repos.d/docker-ce.repo
安装docker-ce
bash
[root@node1 ~ 15:17:55]# yum install -y docker-ce防火墙设置(已操作)
bash
[root@node1 ~ 15:15:21]# setenforce 0
setenforce: SELinux is disabled
[root@node1 ~ 15:15:28]# vim /etc/selinux/config
[root@node1 ~ 15:15:44]# iptables -F
启动docker服务
bash
[root@node1 ~ 15:20:02]# systemctl enable --now docker
Created symlink from /etc/systemd/system/multi-user.target.wants/docker.service to /usr/lib/systemd/system/docker.service.
镜像加速
bash
[root@node1 ~ 15:20:13]# tee /etc/docker/daemon.json <<-'EOF'
{
  "registry-mirrors": [
        "https://09def58152000fc00ff0c00057bad7e0.mirror.swr.myhuaweicloud.com",
        "https://do.nark.eu.org",
        "https://dc.j8.work",
        "https://docker.m.daocloud.io",
        "https://dockerproxy.com",
        "https://docker.mirrors.ustc.edu.cn",
        "https://docker.nju.edu.cn",
        "https://registry.docker-cn.com",
        "https://hub-mirror.c.163.com",
        "https://hub.uuuadc.top",
        "https://docker.anyhub.us.kg",
        "https://dockerhub.jobcher.com",
        "https://dockerhub.icu",
        "https://docker.ckyl.me",
        "https://docker.aws19527.cn",
        "https://mirror.baidubce.com",
        "https://docker.1panel.live"
    ]
}
EOF
修改cgroup方式
bash
[root@node1 ~ 15:27:17]# vim /etc/docker/daemon.json
{
  "registry-mirrors": [
        "https://05vz3np5.mirror.aliyuncs.com",
        "https://do.nark.eu.org",
        "https://dc.j8.work",
        "https://docker.m.daocloud.io",
        "https://dockerproxy.com",
        "https://docker.mirrors.ustc.edu.cn",
        "https://docker.nju.edu.cn",
        "https://registry.docker-cn.com",
        "https://hub-mirror.c.163.com",
        "https://hub.uuuadc.top",
        "https://docker.anyhub.us.kg",
        "https://dockerhub.jobcher.com",
        "https://dockerhub.icu",
        "https://docker.ckyl.me",
        "https://docker.aws19527.cn",
        "https://mirror.baidubce.com",
        "https://docker.1panel.live"
    ],
  "exec-opts": ["native.cgroupdriver=systemd"]
}

[root@node1 ~ 15:27:51]# systemctl daemon-reload
[root@node1 ~ 15:27:54]# systemctl restart docker
cri-dockerd安装
作用:cri-dockerd 的主要作用是为 Docker Engine 提供一个符合 Kubernetes CRI(ContainerRuntime Interface)标准的接口 ,使 Docker 能继续作为 Kubernetes 的容器运行时(ContainerRuntime),尤其是在 Kubernetes1.24版本后,官方移除对原生 Docker 支持(dockershim)之后。
也可以使用linux的wget直接下载
bash
wget https://github.com/mirantis/cri-dockerd/releases/download/v0.3.4/cri-dockerd-0.3.4-3.e17.x86_64.rpm下载完成后直接安装
bash
[root@master ~ 18:51:21]# rpm -ivh cri-dockerd-0.3.4-3.el7.x86_64.rpm
准备中...                          ################################ [100%]
正在升级/安装...
   1:cri-dockerd-3:0.3.4-3.el7        ################################ [100%]
编辑服务配置文件
bash
[root@node2 ~ 18:52:13]# vim /usr/lib/systemd/system/cri-docker.service
#编辑第10行,中间添加 --pod-infra-container-image=registry.aliyuncs.com/google_containers/pause:3.9
ExecStart=/usr/bin/cri-dockerd --pod-infra-container-image=registry.aliyuncs.com/google_containers/pause:3.9 --container-runtime-endpoint fd://
启动cri-dockerd服务
bash
[root@node1 ~ 15:43:58]# systemctl daemon-reload
[root@node1 ~ 15:44:05]# # systemctl start cri-docker.service
[root@node1 ~ 15:44:10]#  systemctl star cri-docker.service
[root@node1 ~ 15:44:17]# systemctl enabl cri-docker.service
Created symlink from /etc/systemd/systemmulti-user.target.wants/cri-docker.servie to /usr/lib/systemd/system/cri-docker.ervice.
检查文件是否启动
bash
[root@node1 ~ 15:44:26]# ls /run/cri-*
/run/cri-dockerd.sock
kubernetes集群部署
Yum源
国内阿里云镜像源
bash
[root@node1 ~ 15:44:34]# cat <<EOF>/etc/yum.repos.d/kubernetes.repo
[kubernetes]
name=Kubernetes
baseurl=http://mirrors.aliyun.com/kubernetes/yum/repos/kubernetes-el7-x86_64
enabled=1
gpgcheck=0
repo_gpgcheck=0
gpgkey=http://mirrors.aliyun.com/kubernetes/yum/doc/yum-key.gpg
http://mirrors.aliyun.com/kubernetes/yum/doc/rpm-package-key.gpg
EOF
软件安装
查看可安装的版本
bash
[root@node1 ~ 15:45:02]# yum list kubeadm.x86_64 --showduplicates | sort -r
已加载插件:fastestmirror
可安装的软件包
 * updates: mirrors.aliyun.com
Loading mirror speeds from cached hostfie
kubeadm.x86_64                       1.99-0                          kubernetes
kubeadm.x86_64                       1.98-0                          kubernetes
kubeadm.x86_64                       1.97-0                          kubernetes
kubeadm.x86_64                       1.96-0                          kubernetes
kubeadm.x86_64                       1.95-0                          kubernetes
... ...
kubernetes
kubeadm.x86_64                       1.1.4-0                         kubernetes
kubeadm.x86_64                       1.1.3-0                         kubernetes
kubeadm.x86_64                       1.1.2-0                         kubernetes
kubeadm.x86_64                       1.1.13-0                        kubernetes
kubeadm.x86_64                       1.1.12-0                        kubernetes
kubeadm.x86_64                       1.1.11-0                        kubernetes
kubeadm.x86_64                       1.1.1-0                         kubernetes
kubeadm.x86_64                       1.1.10-0                        kubernetes
kubeadm.x86_64                       1.1.0-0                         kubernetes
 * extras: mirrors.aliyun.com
 * base: mirrors.aliyun.com
安装1.28.2-0版本
bash
[root@node1 ~ 15:45:15]# yum install -y kubeadm-1.28.0-0 kubelet-1.28.0-0 kubectl-1.28.0-0kubelet配置
强制指定 kubelet 使用 systemd 作为 cgroup 驱动,确保与 Docker 或其他容器运行时保持一致
将 kube-proxy 的代理模式设置为 ipvs ,替代默认的 iptables ,提升大规模集群的网络性能
bash
[root@node1 ~ 15:49:03]# vim /etc/sysconfig/kubelet
KUBELET_EXTRA_ARGS="--cgroup-driver=systemd"
KUBE_PROXY_MODE="ipvs"

#因为没有初始化产生对应配置文件,我们先设置开机自启动状态
[root@node1 ~ 15:49:20]# # systemctl daemon-reload
[root@node1 ~ 15:49:25]# systemctl enable kubelet.service
Created symlink from /etc/systemd/systemmulti-user.target.wants/kubelet.service o /usr/lib/systemd/system/kubelet.servic.
集群初始化
⚠注意:只在master节点做操作
查看可使用镜像
bash
[root@master ~ 15:49:31]# kubeadm config images list --kubernetes-version=v1.28.0 --image-repository=registry.aliyuncs.com/google_containers
registry.aliyuncs.com/google_containers/
registry.aliyuncs.com/google_containers/
registry.aliyuncs.com/google_containers/
registry.aliyuncs.com/google_containers/
registry.aliyuncs.com/google_containers/
registry.aliyuncs.com/google_containers/
registry.aliyuncs.com/google_containers/
镜像下载
bash
[root@master ~ 15:49:52]# kubeadm config images pull --cri-socket=unix:///var/run/cri-dockerd.sock --kubernetes-version=v1.28.0 --image-repository=registry.aliyuncs.com/google_containers
[config/images] Pulled registry.aliyuncs
[config/images] Pulled registry.aliyuncs:v1.28.0
[config/images] Pulled registry.aliyuncs
[config/images] Pulled registry.aliyuncs
[config/images] Pulled registry.aliyuncs
[config/images] Pulled registry.aliyuncs
[config/images] Pulled registry.aliyuncs
查看已下载的镜像
bash
[root@master ~ 15:51:20]# docker images
REPOSITORY                                   CREATED       SIZE
registry.aliyuncs.com/google_containers/54   2 years ago   126MB
registry.aliyuncs.com/google_containers/ba   2 years ago   122MB
registry.aliyuncs.com/google_containers/2a   2 years ago   60.1MB
registry.aliyuncs.com/google_containers/aa   2 years ago   73.1MB
registry.aliyuncs.com/google_containers/02   2 years ago   294MB
registry.aliyuncs.com/google_containers/f8   2 years ago   53.6MB
registry.aliyuncs.com/google_containers/97   3 years ago   744kB
方式一:创建初始化集群配置文件(推荐)
bash
[root@master ~ 15:51:55]# kubeadm config print init-defaults > kubeadm-init.yaml
[root@master ~ 15:52:20]# vim kubeadm-init.yaml
修改内容如下
bash
apiVersion: kubeadm.k8s.io/v1beta3
bootstrapTokens:
- groups:
  - system:bootstrappers:kubeadm:default-node-token
  token: abcdef.0123456789abcdef
  ttl: 24h0m0s
  usages:
  - signing
  - authentication
kind: InitConfiguration
localAPIEndpoint:
  advertiseAddress: 192.168.88.140  #12行 修改master节点ip
  bindPort: 6443
nodeRegistration:
  criSocket: unix:///var/run/cri-dockerd.sock   #15行 修改容器进行时
  imagePullPolicy: IfNotPresent
  name: k8s-master                   #17行 修改master节点主机名
  taints:                                        #18行  注意!去掉Null
  - effect: NoSchedule               #19行 添加污点,不在这个节点上创建资源/亲和,资源优先创建在这个节点
    key: node-role.kubernetes.io/control-plane     #20行 添加
---
apiServer:
  timeoutForControlPlane: 4m0s
apiVersion: kubeadm.k8s.io/v1beta3
certificatesDir: /etc/kubernetes/pki
clusterName: kubernetes
controllerManager: {}
dns: {}
etcd:
  local:
    dataDir: /var/lib/etcd
imageRepository: registry.aliyuncs.com/google_containers    #32行 修改镜像仓库地址
kind: ClusterConfiguration
kubernetesVersion: 1.28.0            #34行 修改k8s版本
networking:
  dnsDomain: cluster.local
  serviceSubnet: 10.96.0.0/12
  podSubnet: 10.244.0.0/16           #38行 增加pod网段
scheduler: {}

# 末尾添加
---                                  #更改kube-proxy的代理模式,默认为iptables
apiVersion: kubeproxy.config.k8s.io/v1alpha1
kind: KubeProxyConfiguration
mode: ipvs
---                                  #更改kubelet cgroup驱动为systemd
apiVersion: kubelet.config.k8s.io/v1beta1
kind: KubeletConfiguration
cgroupDriver: systemd
初始化完成
bash
[root@master ~ 15:54:27]# kubeadm init --config=kubeadm-init.yaml --upload-certs | tee kubeadm-init.log
[init] Using Kubernetes version: v1.28.0
[preflight] Running pre-flight checks
[preflight] Pulling images required for setting up a Kubernetes cluster
[preflight] This might take a minute or two, depending on the speed of your internet c                                                                                       onnection
[preflight] You can also perform this action in beforehand using 'kubeadm config image                                                                                       s pull'
[certs] Using certificateDir folder "/etc/kubernetes/pki"
[certs] Generating "ca" certificate and key
[certs] Generating "apiserver" certificate and key
[certs] apiserver serving cert is signed for DNS names [kubernetes kubernetes.default                                                                                        kubernetes.default.svc kubernetes.default.svc.cluster.local master] and IPs [10.96.0.1                                                                                        192.168.88.140]
[certs] Generating "apiserver-kubelet-client" certificate and key
[certs] Generating "front-proxy-ca" certificate and key
[certs] Generating "front-proxy-client" certificate and key
[certs] Generating "etcd/ca" certificate and key
[certs] Generating "etcd/server" certificate and key
[certs] etcd/server serving cert is signed for DNS names [localhost master] and IPs [1                                                                                       92.168.88.140 127.0.0.1 ::1]
[certs] Generating "etcd/peer" certificate and key
[certs] etcd/peer serving cert is signed for DNS names [localhost master] and IPs [192                                                                                       .168.88.140 127.0.0.1 ::1]
[certs] Generating "etcd/healthcheck-client" certificate and key
[certs] Generating "apiserver-etcd-client" certificate and key
[certs] Generating "sa" key and public key
[kubeconfig] Using kubeconfig folder "/etc/kubernetes"
[kubeconfig] Writing "admin.conf" kubeconfig file
[kubeconfig] Writing "kubelet.conf" kubeconfig file
[kubeconfig] Writing "controller-manager.conf" kubeconfig file
[kubeconfig] Writing "scheduler.conf" kubeconfig file
[etcd] Creating static Pod manifest for local etcd in "/etc/kubernetes/manifests"
[control-plane] Using manifest folder "/etc/kubernetes/manifests"
[control-plane] Creating static Pod manifest for "kube-apiserver"
[control-plane] Creating static Pod manifest for "kube-controller-manager"
[control-plane] Creating static Pod manifest for "kube-scheduler"
[kubelet-start] Writing kubelet environment file with flags to file "/var/lib/kubelet/                                                                                       kubeadm-flags.env"
[kubelet-start] Writing kubelet configuration to file "/var/lib/kubelet/config.yaml"
[kubelet-start] Starting the kubelet
[wait-control-plane] Waiting for the kubelet to boot up the control plane as static Po                                                                                       ds from directory "/etc/kubernetes/manifests". This can take up to 4m0s
[apiclient] All control plane components are healthy after 6.003750 seconds
[upload-config] Storing the configuration used in ConfigMap "kubeadm-config" in the "k                                                                                       ube-system" Namespace
[kubelet] Creating a ConfigMap "kubelet-config" in namespace kube-system with the conf                                                                                       iguration for the kubelets in the cluster
[upload-certs] Storing the certificates in Secret "kubeadm-certs" in the "kube-system"                                                                                        Namespace
[upload-certs] Using certificate key:
aae2ec7c80dfc775d213e620b63e7bc3d89dad4db4933532bce4422844af320e
[mark-control-plane] Marking the node master as control-plane by adding the labels: [n                                                                                       ode-role.kubernetes.io/control-plane node.kubernetes.io/exclude-from-external-load-bal                                                                                       ancers]
[mark-control-plane] Marking the node master as control-plane by adding the taints [no                                                                                       de-role.kubernetes.io/control-plane:NoSchedule]
[bootstrap-token] Using token: abcdef.0123456789abcdef
[bootstrap-token] Configuring bootstrap tokens, cluster-info ConfigMap, RBAC Roles
[bootstrap-token] Configured RBAC rules to allow Node Bootstrap tokens to get nodes
[bootstrap-token] Configured RBAC rules to allow Node Bootstrap tokens to post CSRs in                                                                                        order for nodes to get long term certificate credentials
[bootstrap-token] Configured RBAC rules to allow the csrapprover controller automatica                                                                                       lly approve CSRs from a Node Bootstrap Token
[bootstrap-token] Configured RBAC rules to allow certificate rotation for all node cli                                                                                       ent certificates in the cluster
[bootstrap-token] Creating the "cluster-info" ConfigMap in the "kube-public" namespace
[kubelet-finalize] Updating "/etc/kubernetes/kubelet.conf" to point to a rotatable kub                                                                                       elet client certificate and key
[addons] Applied essential addon: CoreDNS
[addons] Applied essential addon: kube-proxy

`Your Kubernetes control-plane has initialized successfully!`

To start using your cluster, you need to run the following as a regular user:

  mkdir -p $HOME/.kube
  sudo cp -i /etc/kubernetes/admin.conf $HOME/.kube/config
  sudo chown $(id -u):$(id -g) $HOME/.kube/config

Alternatively, if you are the root user, you can run:

  export KUBECONFIG=/etc/kubernetes/admin.conf

You should now deploy a pod network to the cluster.
Run "kubectl apply -f [podnetwork].yaml" with one of the options listed at:
  https://kubernetes.io/docs/concepts/cluster-administration/addons/

Then you can join any number of worker nodes by running the following on each as root:

kubeadm join 192.168.88.140:6443 --token abcdef.0123456789abcdef \
        --discovery-token-ca-cert-hash sha256:8664d099f8e4d6a4e3c0f33bbd8dc3ed0de687d1
初始化失败处理:
bash
重置处理:
1:删除kubernetes目录中所有内容
rm -rf /etc/kubernetes/*
2:删除启动端口进程
pkill -9 kubelet
pkill -9 kube-controll
pkill -9 kube-schedule
3:重置sock文件
kubeadm reset -f --cri-socket=unix:///var/run/cri-dockerd.sock
配置kubectl工具
根据初始化成功后的提示进行配置
Kubectl 是一个用于操作Kubernetes集群的命令行工具。
kubectl 在 $HOME/.kube 目录中查找一个名为 config 的配置文件。可以通过设置 KUBECONFIG 环境变量或设置 --kubeconfig 参数来指定其它 kubeconfig 文件。
bash
[root@master ~ 15:54:48]#  mkdir -p $HOME/.kube
[root@master ~ 15:55:14]#   sudo cp -i /etc/kubernetes/admin.conf $HOME/.kube/config
[root@master ~ 15:55:14]#   sudo chown $(id -u):$(id -g) $HOME/.kube/config
永久生效(推荐)
在Kubernetes集群中,admin.conf 文件是用于配置kubectl工具访问Kubernetes集群的客户端配置文件。该文件包含了连接到Kubernetes集群所需的认证信息、集群信息和上下文信息。
bash
[root@master ~ 15:55:14]# echo "export KUBECONFIG=/etc/kubernetes/admin.conf" >> ~/.bash_profile
[root@master ~ 15:55:31]# source ~/.bash_profile
检查核心组建控制平面的健康状态
bash
[root@master ~ 15:55:35]# kubectl get cs
Warning: v1 ComponentStatus is deprecated in v1.19+
NAME                 STATUS    MESSAGE   ERROR
controller-manager   Healthy   ok
etcd-0               Healthy   ok
scheduler            Healthy   ok
node工作节点加入集群
node1加入集群
⚠只在node节点操作
⚠注意:添加--cri-socket unix:///var/run/cri-dockerd.sock,否则会报错
bash
[root@node1 ~ 15:56:09]# kubeadm join 192.168.88.140:6443 --token abcdef.0123456789abcdef         --discovery-token-ca-cert-hash sha256:8664d099f8e4d6a4e3c0f33bbd8dc3ed0de687d1e85ed6ec5234dd8281ef745a --cri-socket unix:///var/run/cri-dockerd.sock
[preflight] Running pre-flight checks
[preflight] Reading configuration from the cluster...
[preflight] FYI: You can look at this config file with 'kubectl -n kube-system get cm kubeadm-config -o yaml'
[kubelet-start] Writing kubelet configuration to file "/var/lib/kubelet/config.yaml"
[kubelet-start] Writing kubelet environment file with flags to file "/var/lib/kubelet/kubeadm-flags.env"
[kubelet-start] Starting the kubelet
[kubelet-start] Waiting for the kubelet to perform the TLS Bootstrap...

This node has joined the cluster:
* Certificate signing request was sent to apiserver and a response was received.
* The Kubelet was informed of the new secure connection details.

Run 'kubectl get nodes' on the control-plane to see this node join the cluster.
node2加入集群
⚠只在node节点操作
⚠注意:添加--cri-socket unix:///var/run/cri-dockerd.sock,否则会报错
bash
[root@node2 ~ 15:49:31]# kubeadm join 192.168.88.140:6443 --token abcdef.0123456789abcdef         --discovery-token-ca-cert-hash sha256:8664d099f8e4d6a4e3c0f33bbd8dc3ed0de687d1e85ed6ec5234dd8281ef745a --cri-socket unix:///var/run/cri-dockerd.sock
[preflight] Running pre-flight checks
[preflight] Reading configuration from the cluster...
[preflight] FYI: You can look at this config file with 'kubectl -n kube-system get cm kubeadm-config -o yaml'
[kubelet-start] Writing kubelet configuration to file "/var/lib/kubelet/config.yaml"
[kubelet-start] Writing kubelet environment file with flags to file "/var/lib/kubelet/kubeadm-flags.env"
[kubelet-start] Starting the kubelet
[kubelet-start] Waiting for the kubelet to perform the TLS Bootstrap...

This node has joined the cluster:
* Certificate signing request was sent to apiserver and a response was received.
* The Kubelet was informed of the new secure connection details.

Run 'kubectl get nodes' on the control-plane to see this node join the cluster.
网络CNI组建部署
查看集群状态
bash
[root@master ~ 15:55:41]# kubectl get nodes
NAME     STATUS     ROLES           AGE    VERSION
master   NotReady   control-plane   3m1s   v1.28.0
node1    NotReady   <none>          28s    v1.28.0
node2    NotReady   <none>          14s    v1.28.0
此时coredns中一直没有IP地址,主要原因缺少网络组建
bash
[root@master ~ 15:57:46]# kubectl get pods -n kube-system -o wide
NAME                             READY   STATUS              RESTARTS   AGE     IP               NODE     NOMINATED NODE   READINESS GATES
coredns-66f779496c-nv2rc         0/1     Pending             0          2m51s   <none>           <none>   <none>           <none>
coredns-66f779496c-z92n5         0/1     Pending             0          2m51s   <none>           <none>   <none>           <none>
etcd-master                      1/1     Running             0          3m4s    192.168.88.140   master   <none>           <none>
kube-apiserver-master            1/1     Running             0          3m4s    192.168.88.140   master   <none>           <none>
kube-controller-manager-master   1/1     Running             0          3m4s    192.168.88.140   master   <none>           <none>
kube-proxy-756g5                 1/1     Running             0          34s     192.168.88.141   node1    <none>           <none>
kube-proxy-t2jm8                 0/1     ContainerCreating   0          20s     192.168.88.142   node2    <none>           <none>
kube-proxy-wdrqh                 1/1     Running             0          2m51s   192.168.88.140   master   <none>           <none>
kube-scheduler-master            1/1     Running             0          3m4s    192.168.88.140   master   <none>           <none>
kubernetes集群的网络是比较复杂的,不是集群内部实现的,为了更方便的使用集群,因此,使用第三方的cni网络插件(Container Network Interface )。cni是容器网络接口,作用是实现容器跨主机网络通信。pod的ip地址段,也称为cidr。
kubernetes支持多种网络插件,比如flannel、calico、canal等,任选一种即可,本次选择 Calico。calico是一个纯三层的网络解决方案,为容器提供多node间的访问通信,calico将每一个node节点都当做为一个路由器(router),每个pod都是虚拟路由器下的的终端,各节点通过BGP(Border Gateway Protocol) 边界网关协议学习并在node节点生成路由规则,从而将不同node节点上的pod连接起来进行通信,是目前Kubernetes主流的网络方案。
官方下载地址:https://docs.tigera.io/calico
Github访问地址:https://github.com/projectcalico/calico
calico.yaml文件每个版本都有区别的,需要满足对应的k8s 版本
参考:https://archive-os-3-25.netlify.app/calico/3.25/getting-started/kubernetes/requirements
calico 3.25 版本对应的K8S版本有 v1.23---v1.28
下载Calico文件
bash
[root@master ~]# wget --no-check-certificate https://docs.tigera.io/archive/v3.25/manifests/calico.yaml修改Calico文件
bash
[root@master ~ 15:57:52]# ls
anaconda-ks.cfg  cri-dockerd-0.3.4-3.el7.x86_64.rpm  kubeadm-init.yaml
calico.yaml      kubeadm-init.log
[root@master ~ 15:58:28]# vim calico.yaml
# 找到4601行,去掉注释并修改
- name: CALICO_IPV4POOL_CIDR
value: "10.244.0.0/16"
部署Calico
注意:需要等待较长时间下载相关组建,主要看网络环境
bash
[root@master ~ 15:59:11]# kubectl apply -f calico.yaml
poddisruptionbudget.policy/calico-kube-controllers created
serviceaccount/calico-kube-controllers created
serviceaccount/calico-node created
configmap/calico-config created
customresourcedefinition.apiextensions.k8s.io/bgpconfigurations.crd.projectcalico.org created
customresourcedefinition.apiextensions.k8s.io/bgppeers.crd.projectcalico.org created
customresourcedefinition.apiextensions.k8s.io/blockaffinities.crd.projectcalico.org created
customresourcedefinition.apiextensions.k8s.io/caliconodestatuses.crd.projectcalico.org created
customresourcedefinition.apiextensions.k8s.io/clusterinformations.crd.projectcalico.org created
customresourcedefinition.apiextensions.k8s.io/felixconfigurations.crd.projectcalico.org created
customresourcedefinition.apiextensions.k8s.io/globalnetworkpolicies.crd.projectcalico.org created
customresourcedefinition.apiextensions.k8s.io/globalnetworksets.crd.projectcalico.org created
customresourcedefinition.apiextensions.k8s.io/hostendpoints.crd.projectcalico.org created
customresourcedefinition.apiextensions.k8s.io/ipamblocks.crd.projectcalico.org created
customresourcedefinition.apiextensions.k8s.io/ipamconfigs.crd.projectcalico.org created
customresourcedefinition.apiextensions.k8s.io/ipamhandles.crd.projectcalico.org created
customresourcedefinition.apiextensions.k8s.io/ippools.crd.projectcalico.org created
customresourcedefinition.apiextensions.k8s.io/ipreservations.crd.projectcalico.org created
customresourcedefinition.apiextensions.k8s.io/kubecontrollersconfigurations.crd.projectcalico.org created
customresourcedefinition.apiextensions.k8s.io/networkpolicies.crd.projectcalico.org created
customresourcedefinition.apiextensions.k8s.io/networksets.crd.projectcalico.org created
clusterrole.rbac.authorization.k8s.io/calico-kube-controllers created
clusterrole.rbac.authorization.k8s.io/calico-node created
clusterrolebinding.rbac.authorization.k8s.io/calico-kube-controllers created
clusterrolebinding.rbac.authorization.k8s.io/calico-node created
daemonset.apps/calico-node created
deployment.apps/calico-kube-controllers created
验证检查集群
查看所有组建状态(等待了35分钟)
bash
[root@master ~ 15:59:19]# watch kubectl get pods -A
[root@master ~ 16:13:54]#  kubectl get pods -A -o wide
NAMESPACE     NAME                                       READY   STATUS              R
kube-system   calico-kube-controllers-658d97c59c-v8tbw   0/1     ContainerCreating   0
kube-system   calico-node-69hpj                          1/1     Running             0
kube-system   calico-node-fw75n                          1/1     Running             0
kube-system   calico-node-n5bpm                          1/1     Running             0
kube-system   coredns-66f779496c-nv2rc                   0/1     ImagePullBackOff    0
kube-system   coredns-66f779496c-z92n5                   1/1     Running             0
kube-system   etcd-master                                1/1     Running             0
kube-system   kube-apiserver-master                      1/1     Running             0
kube-system   kube-controller-manager-master             1/1     Running             0
kube-system   kube-proxy-756g5                           1/1     Running             0
kube-system   kube-proxy-t2jm8                           1/1     Running             0
kube-system   kube-proxy-wdrqh                           1/1     Running             0
kube-system   kube-scheduler-master                      1/1     Running             0

[root@master ~ 16:14:09]# watch kubectl get pods -A
NAMESPACE     NAME                                       READY   STATUS              R
kube-system   calico-kube-controllers-658d97c59c-v8tbw   0/1     Running   0
kube-system   calico-node-69hpj                          1/1     Running             0
kube-system   calico-node-fw75n                          1/1     Running             0
kube-system   calico-node-n5bpm                          1/1     Running             0
kube-system   coredns-66f779496c-nv2rc                   0/1    Running     0
kube-system   coredns-66f779496c-z92n5                   1/1     Running             0
kube-system   etcd-master                                1/1     Running             0
kube-system   kube-apiserver-master                      1/1     Running             0
kube-system   kube-controller-manager-master             1/1     Running             0
kube-system   kube-proxy-756g5                           1/1     Running             0
kube-system   kube-proxy-t2jm8                           1/1     Running             0
kube-system   kube-proxy-wdrqh                           1/1     Running             0
kube-system   kube-scheduler-master                      1/1     Running             0
如果出现长时间等待状态可以所有节点直接升级内核(解决)
原因:内核版本过低导致BPF文件系统缺失
bash
[root@master ~]# yum update -y kernel && reboot验证dns解析功能
bash
[root@master ~]# dig -t a www.baidu.com @10.96.0.10查看集群node状态
bash
[root@master ~ 16:22:09]# kubectl get nodes
NAME     STATUS   ROLES           AGE   VERSION
master   Ready    control-plane   27m   v1.28.0
node1    Ready    <none>          25m   v1.28.0
node2    Ready    <none>          24m   v1.28.0
/etc/kubernetes/manifests/目录下存放Kubernetes集群中各个组件的Pod配置文件。
通常会包含以下几个重要的配置文件:
bash
etcd.yaml:用于部署和管理etcd集群的配置文件
kube-apiserver.yaml:用于部署和管理Kubernetes API服务器的配置文件
kube-controller-manager.yaml:用于部署和管理Kubernetes控制器管理器的配置文件
kube-scheduler.yaml:用于部署和管理Kubernetes调度器的配置文件
当Kubernetes集群启动时,kubelet会自动监视/etc/kubernetes/manifests/目录下的配置文件,并根据这些配置文件创建和管理对应的Pod。
ca证书默认存放在/etc/kubernetes/pki/目录下
查看集群地址
bash
[root@master ~]# kubectl get service -n kube-system
NAME TYPE CLUSTER-IP EXTERNAL-IP PORT(S) AGE
kube-dns ClusterIP 10.96.0.10 <none> 53/UDP,53/TCP,9153/TCP 143m
优化操作
kubectl命令补全
bash
[root@master ~]# yum install bash-completion -y
[root@master ~]# source /usr/share/bash-completion/bash_completion
在当前bash环境中永久设置命令补全
bash
[root@master ~]# echo "source <(kubectl completion bash)" >> ~/.bashrc
[root@master ~]# source ~/.bashrc
测试操作
创建应用服务nginx
bash
[root@master ~ 11:28:12]# kubectl create deployment nginx --image=nginx --replicas=3
deployment.apps/nginx created
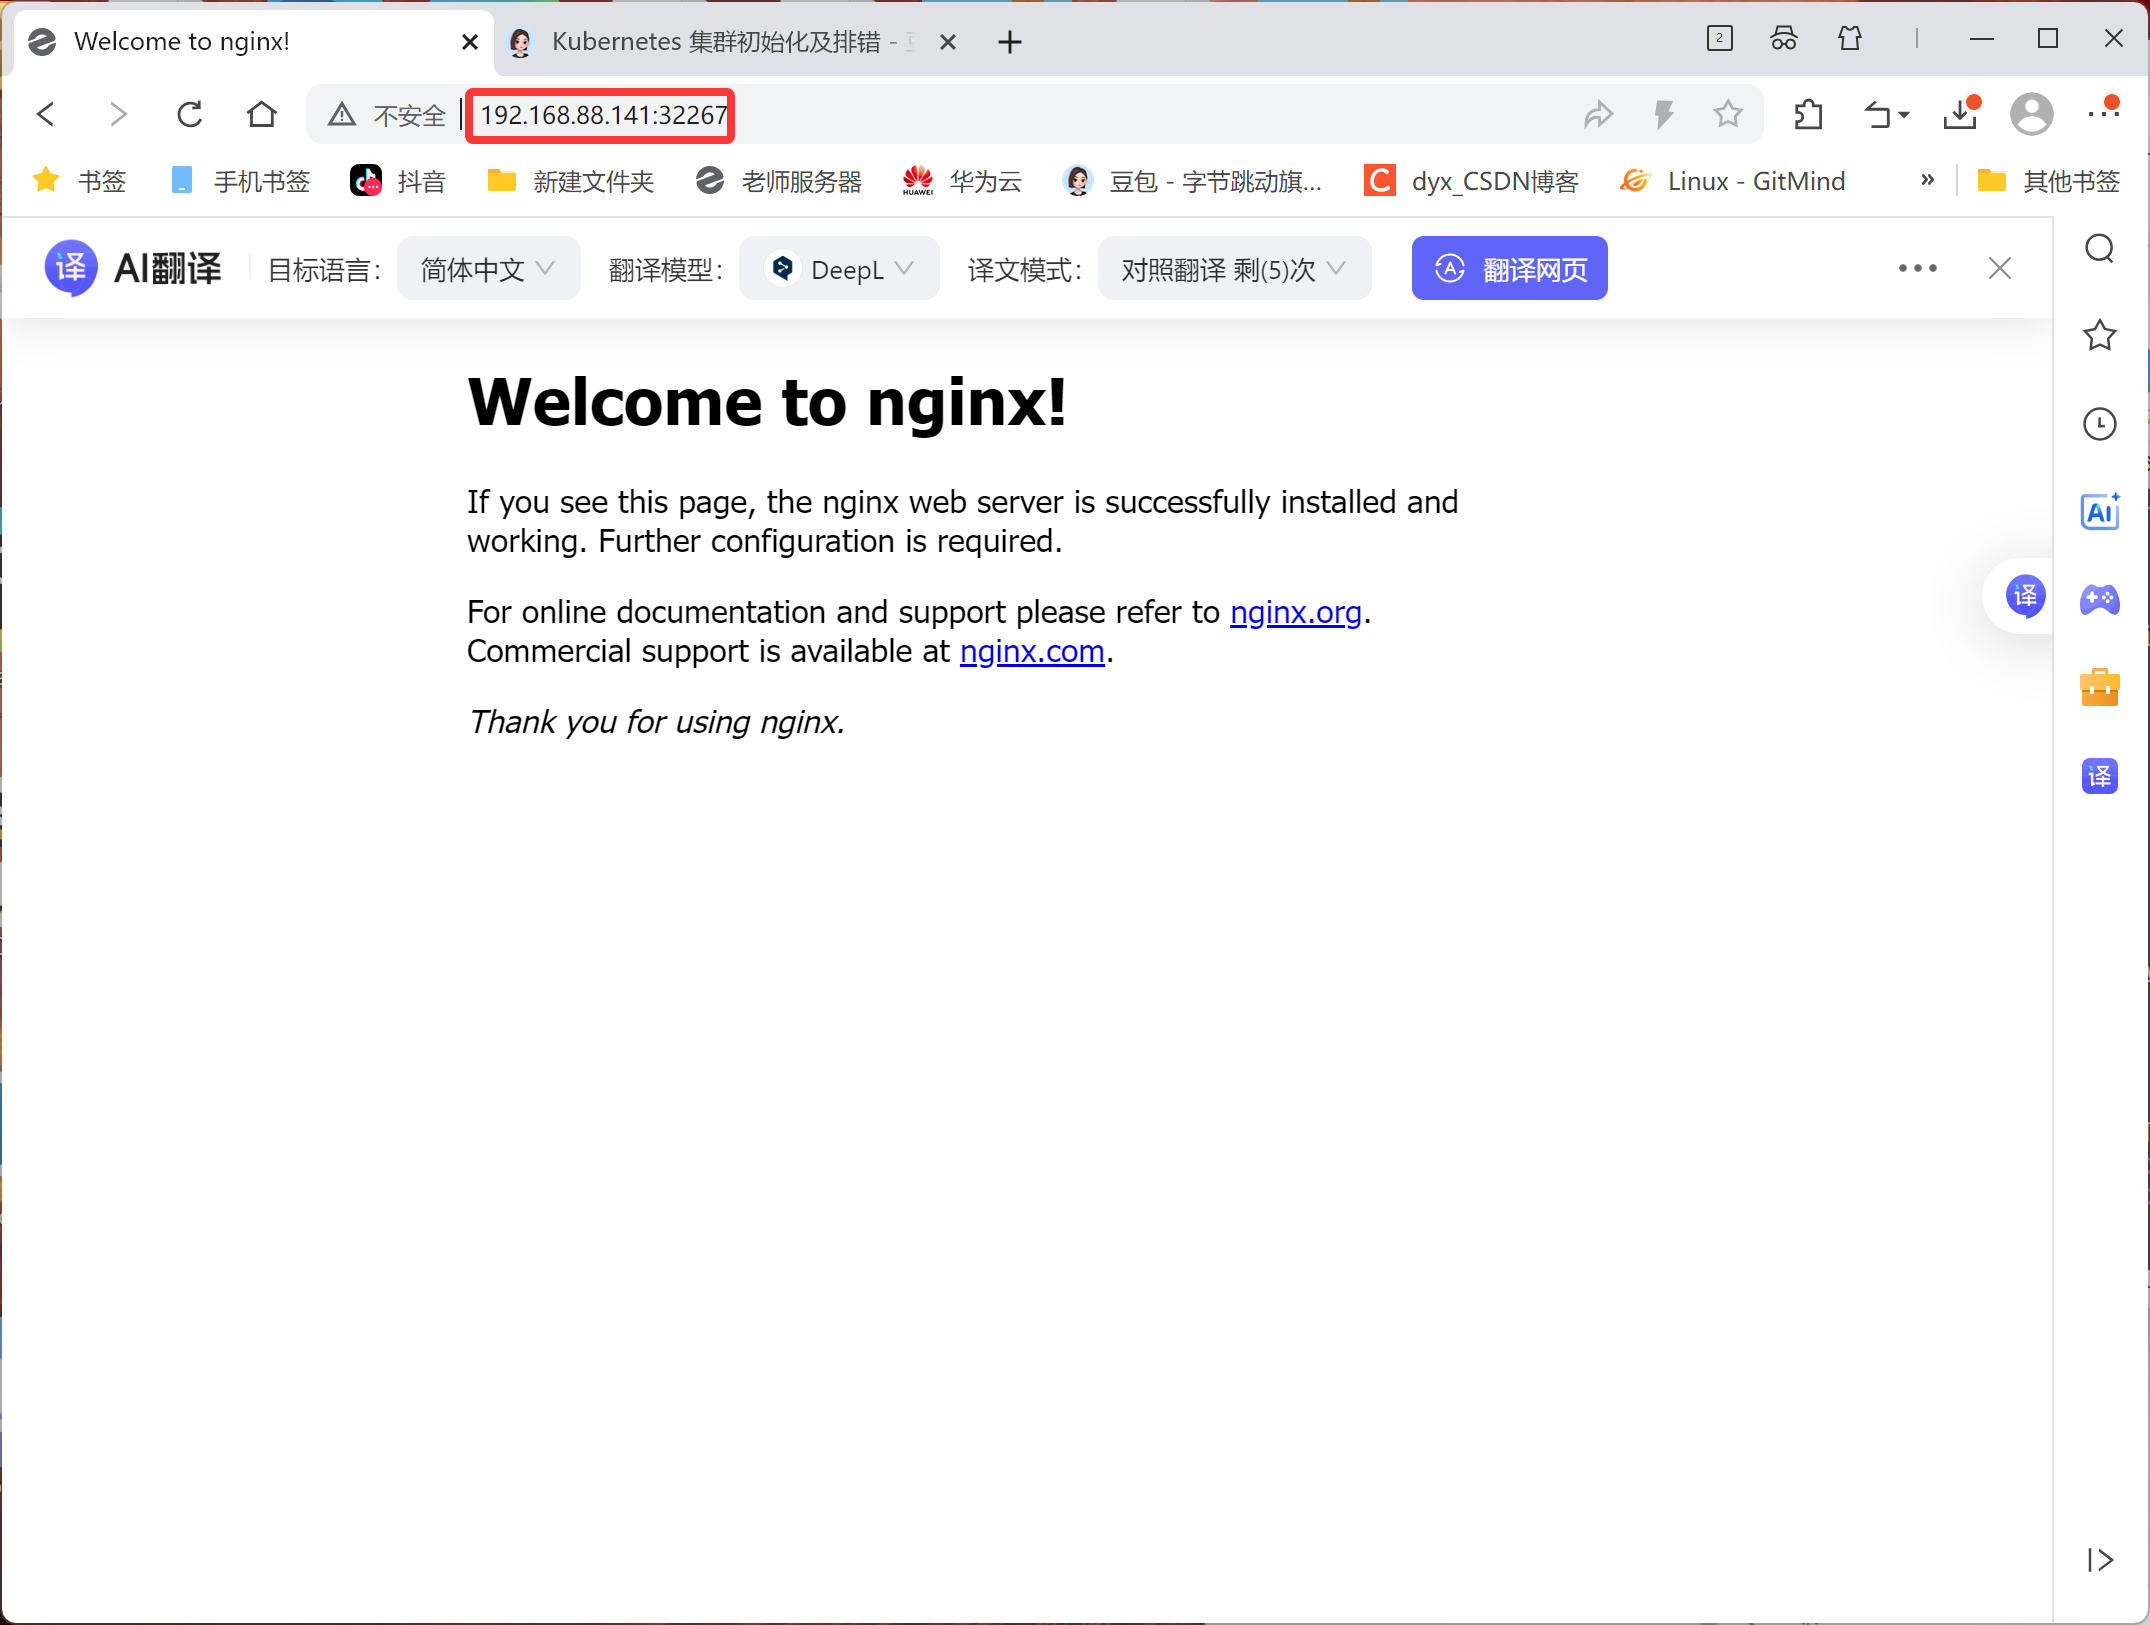
[root@master ~ 11:37:14]# kubectl expose deployment nginx --port=80 --target-port=80 --type=NodePort
service/nginx exposed查看pod和service信息
默认情况下,master节点存在污点,不接受任何pod资源调度
bash
[root@master ~ 11:37:52]# kubectl get pod,svc
NAME                         READY   STATUS    RESTARTS   AGE
pod/nginx-7854ff8877-9zknp   1/1     Running   0          9m40s
pod/nginx-7854ff8877-g6kkl   1/1     Running   0          9m39s
pod/nginx-7854ff8877-ww2qf   1/1     Running   0          9m40s

NAME                 TYPE        CLUSTER-IP      EXTERNAL-IP   PORT(S)        AGE
service/kubernetes   ClusterIP   10.96.0.1       <none>        443/TCP        19h
service/nginx        NodePort    10.102.62.233   <none>        80:32267/TCP   46s


[root@node2 ~ 11:31:33]# docker images |grep nginx
nginx                                                latest    4af177a024eb   26 hours ago   161MB

[root@node1 ~ 11:29:05]# docker images |grep nginx
nginx                                                latest    4af177a024eb   26 hours ago   161MB
测试访问
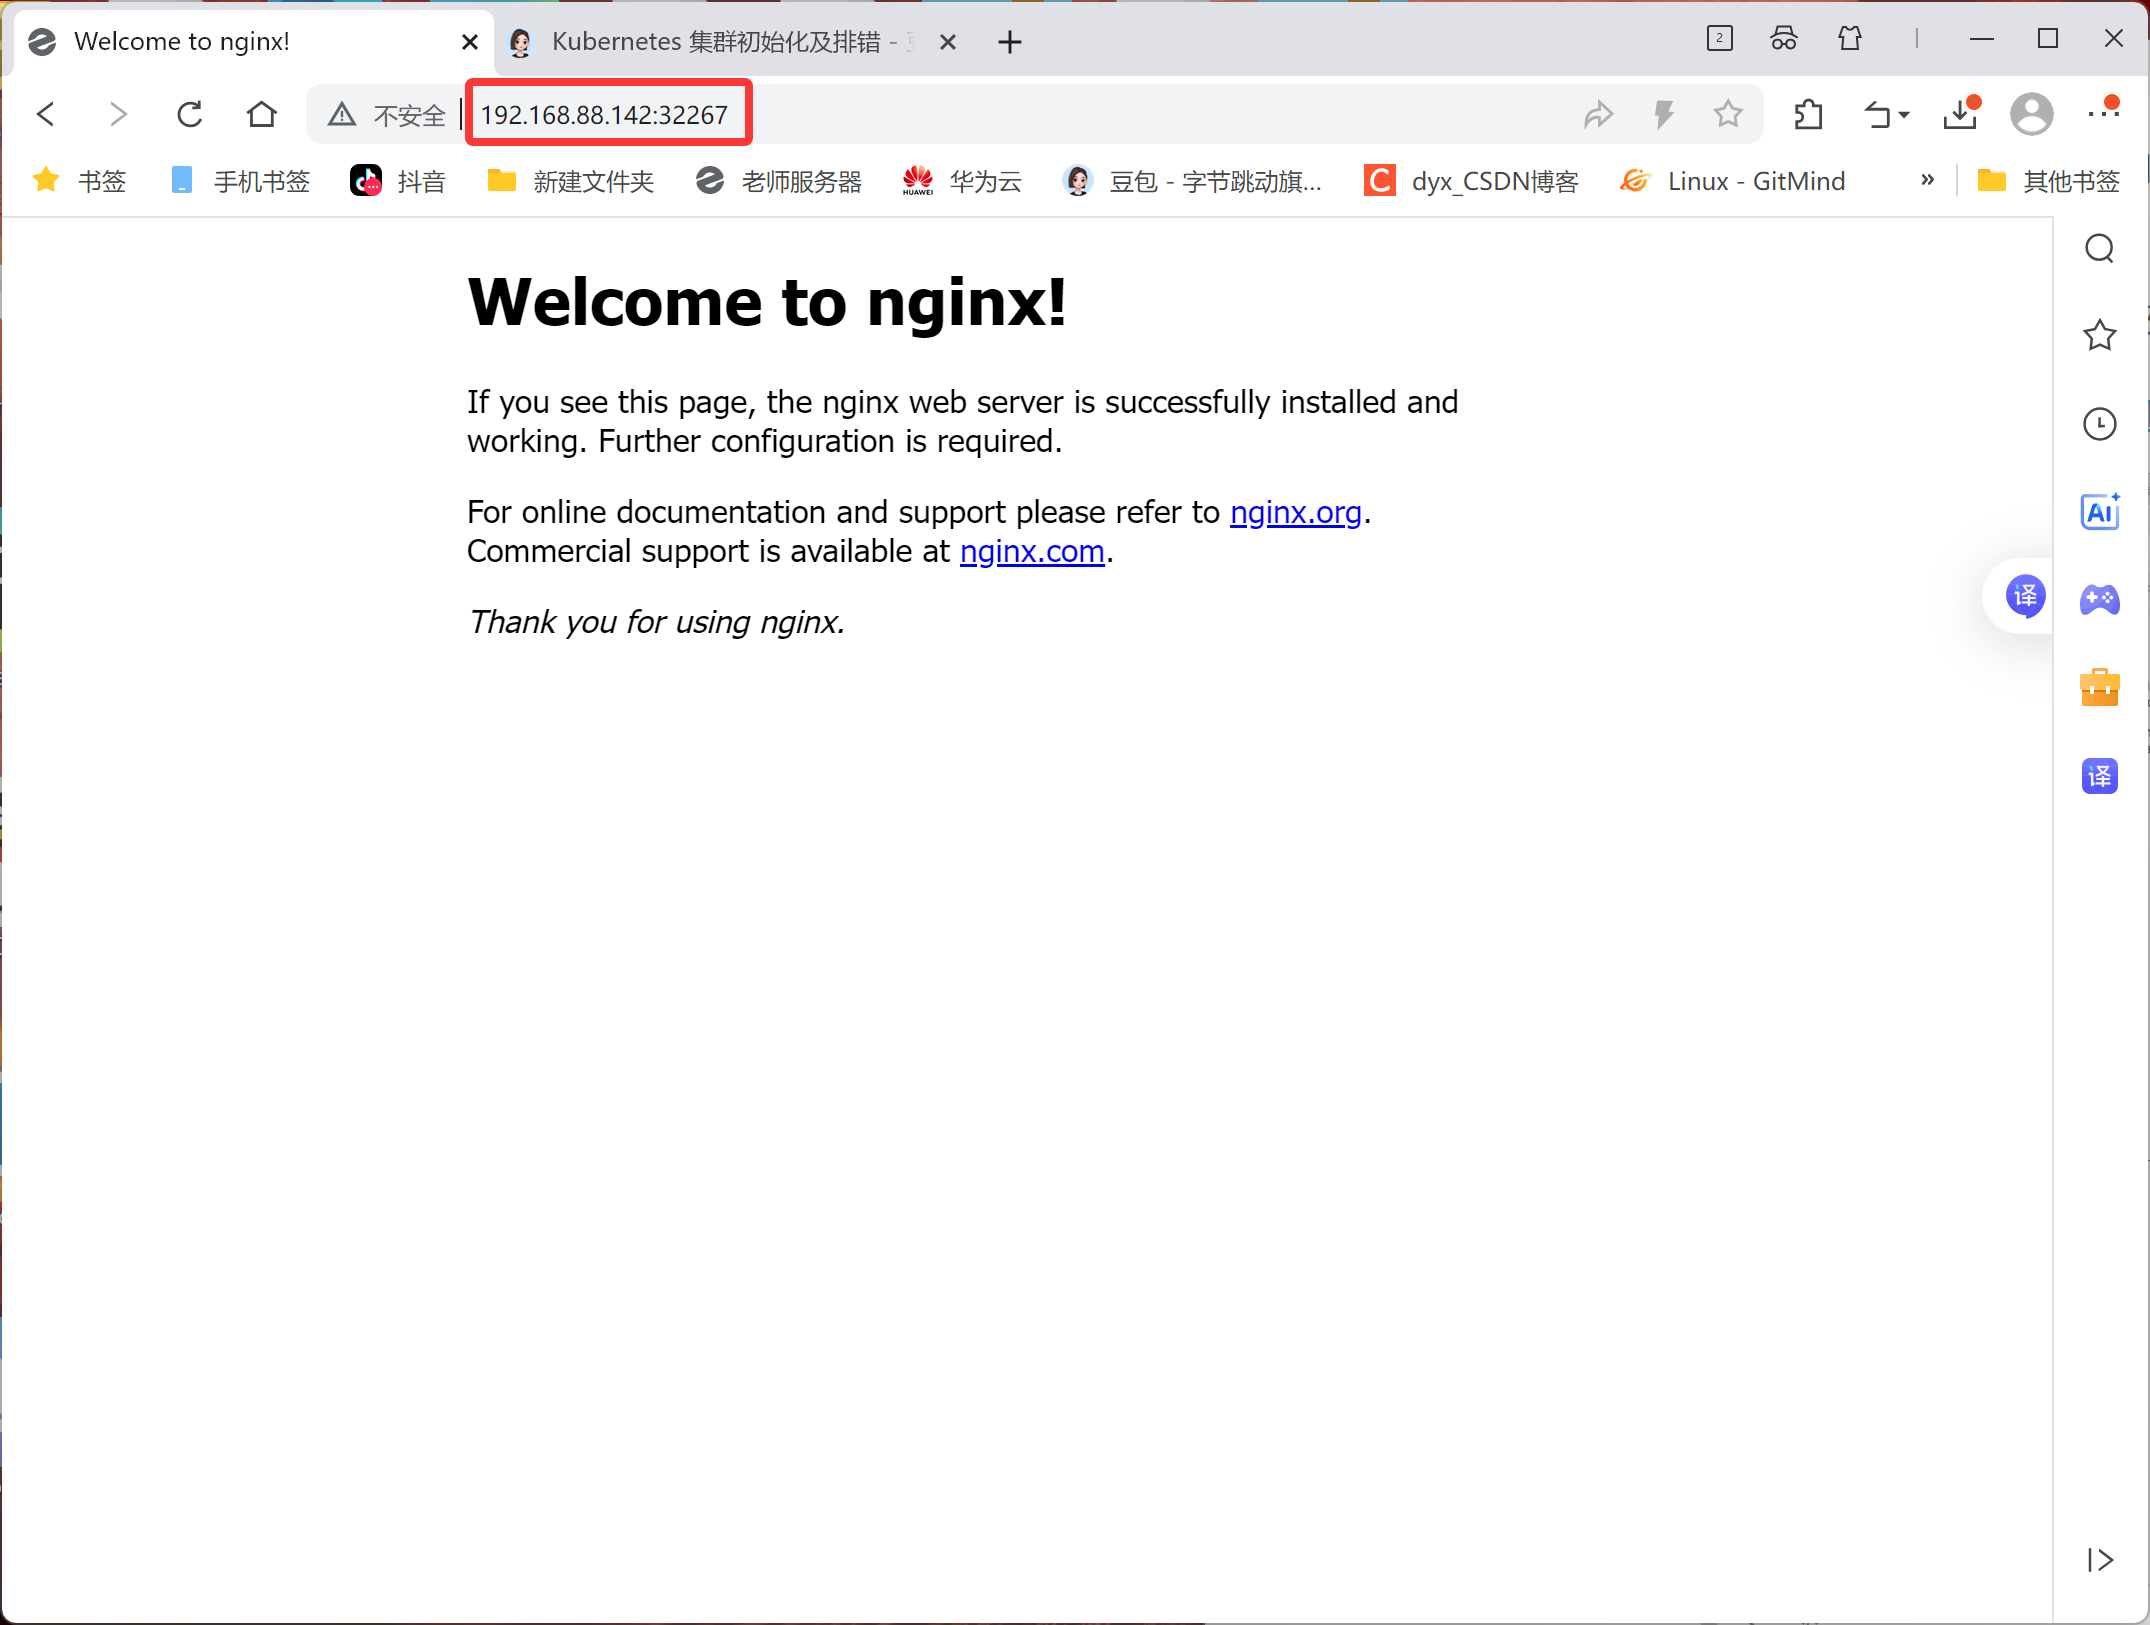
注意:关闭node节点防火墙
bash
[root@node1 ~]# systemctl stop firewalld.service
[root@node2 ~]# systemctl stop firewalld.service
浏览器输入地址:nodeIP:port 则可以看到nginx测试页面!!!
node1和node2地址都可以访问
containerd版
前置环境部署
1.主机配置
| CPU | 内存 | 硬盘 | IP | 主机名 | 软件 |
|---|---|---|---|---|---|
| 2核 | 4G | 100G | 192.168.88.144 | master | containerd |
| 2核 | 4G | 100G | 192.168.88.143 | node1 | containerd |
| 2核 | 4G | 100G | 192.168.88.145 | node2 | containerd |
配置主机名
bash
hostnamectl set-hostname master
hostnamectl set-hostname node1
hostnamectl set-hostname node2
配置主机名解析
所有节点都配置,并测试ping通
bash
[root@master ~ 09:26:40]# cat /etc/hosts
127.0.0.1   localhost localhost.localdomain localhost4 localhost4.localdomain4
::1         localhost localhost.localdomain localhost6 localhost6.localdomain6
192.168.88.144 master
192.168.88.143 node1
192.168.88.145 node2
安装环境包
bash
[root@master ~ 09:18:40]# yum -y install vim lrzsz unzip wget net-tools tree bash-completion conntrack ntpdate ntp ipvsadm ipset iptables curl sysstat libseccomp git psmisc telnet unzip gcc gcc-c++ make关闭防火墙和内核安全机制
bash
[root@master ~ 09:25:12]# systemctl disable firewalld --now
[root@master ~ 09:25:24]# vim /etc/selinux/config
[root@master ~ 09:25:48]# setenforce 0
setenforce: SELinux is disabled
关闭swap分区
启用swap分区会对系统的性能产生非常负面的影响,因此kubernetes要求每个节点都要禁用swap分区
bash
[root@master ~ 09:26:28]# vim /etc/fstab
#/dev/mapper/centos-swap swap                    swap    defaults        0 0
[root@master ~ 10:33:28]# swapoff -a && sed -i '/swap/s/^/#/' /etc/fstab
调整系统内核参数
bash
[root@master ~ 09:11:25]# yum update -y kernel && reboot
[root@master ~ 09:28:40]# cat >/etc/sysctl.d/kubernetes.conf<<EOF
 # 开启Linux内核的网络桥接功能,同时启用iptables和ip6tables的网络包过滤功能,用于在网络桥接时进行网络包过滤
 net.bridge.bridge-nf-call-iptables=1
 net.bridge.bridge-nf-call-ip6tables=1
 # 开启路由转发,转发IPv4的数据包
 net.ipv4.ip_forward=1
 # 尽可能避免使用交换分区,提升k8s性能
 vm.swappiness=0
 # 不检查物理内存是否够用
 vm.overcommit_memory=1
 EOF

#立即生效
[root@master ~ 09:29:53]# sysctl --system* Applying /usr/lib/sysctl.d/00-system.conf ...
* Applying /usr/lib/sysctl.d/10-default-yama-scope.conf ...
kernel.yama.ptrace_scope = 0
* Applying /usr/lib/sysctl.d/50-default.conf ...
kernel.sysrq = 16
kernel.core_uses_pid = 1
kernel.kptr_restrict = 1
net.ipv4.conf.default.rp_filter = 1
net.ipv4.conf.all.rp_filter = 1
net.ipv4.conf.default.accept_source_route = 0
net.ipv4.conf.all.accept_source_route = 0
net.ipv4.conf.default.promote_secondaries = 1
net.ipv4.conf.all.promote_secondaries = 1
fs.protected_hardlinks = 1
fs.protected_symlinks = 1
* Applying /etc/sysctl.d/99-sysctl.conf ...
* Applying /etc/sysctl.d/kubernetes.conf ...
net.ipv4.ip_forward = 1
vm.swappiness = 0
vm.overcommit_memory = 1
* Applying /etc/sysctl.conf ...
时间同步
bash
[root@master ~ 09:33:44]# yum install -y chrony
[root@master ~ 09:34:11]# systemctl restart chronyd
[root@master ~ 09:34:18]# chronyc sources -v
210 Number of sources = 4

  .-- Source mode  '^' = server, '=' = peer, '#' = local clock.
 / .- Source state '*' = current synced, '+' = combined , '-' = not combined,
| /   '?' = unreachable, 'x' = time may be in error, '~' = time too variable.
||                                                 .- xxxx [ yyyy ] +/- zzzz
||      Reachability register (octal) -.           |  xxxx = adjusted offset,
||      Log2(Polling interval) --.      |          |  yyyy = measured offset,
||                                \     |          |  zzzz = estimated error.
||                                 |    |           \
MS Name/IP address         Stratum Poll Reach LastRx Last sample
===============================================================================
^+ ntp7.flashdance.cx            2   6    17    12  -6944us[-9464us] +/-  136ms
^* time.cloudflare.com           3   6    17    11  -5054us[-7573us] +/-  153ms
^? ntp6.flashdance.cx            0   6     0     -     +0ns[   +0ns] +/-    0ns
^- makaki.miuku.net              3   6    33     7    +81ms[  +81ms] +/-  217ms
[root@master ~ 09:34:39]# hwclock -s
IPVS功能
bash
[root@master ~ 09:35:00]# cat >>/etc/modules-load.d/ipvs.conf<<EOF
> ip_vs
> ip_vs_rr
> ip_vs_wrr
> ip_vs_sh
> nf_conntrack_ipv4
> ip_tables
> ip_set
> xt_set
> ipt_set
> ipt_rpfilter
> ipt_REJECT
> ipip
> overlay
> br_netfilter
> EOF
重启服务
bash
[root@master ~ 09:35:25]# systemctl restart systemd-modules-load.service查看内核模块
bash
[root@master ~ 09:37:15]# lsmod | grep -e ip_vs -e nf_conntrack_ipv4
nf_conntrack_ipv4      19149  0
nf_defrag_ipv4         12729  1 nf_conntrack_ipv4
ip_vs_sh               12688  0
ip_vs_wrr              12697  0
ip_vs_rr               12600  0
ip_vs                 145458  6 ip_vs_rr,ip_vs_sh,ip_vs_wrr
nf_conntrack          143411  2 ip_vs,nf_conntrack_ipv4
libcrc32c              12644  3 xfs,ip_vs,nf_conntrack
安装containerd
指定 containerd 在系统启动时加载的内核模块
bash
[root@master ~ 09:37:29]# cat >>/etc/modules-load.d/containerd.conf <<EOF
> overlay
> br_netfilter
> EOF
加载模块
bash
[root@master ~ 09:38:49]# modprobe overlay
[root@master ~ 09:39:04]# modprobe br_netfilter
立即生效
bash
[root@master ~ 09:39:06]# sysctl --system* Applying /usr/lib/sysctl.d/00-system.conf ...
net.bridge.bridge-nf-call-ip6tables = 0
net.bridge.bridge-nf-call-iptables = 0
net.bridge.bridge-nf-call-arptables = 0
* Applying /usr/lib/sysctl.d/10-default-yama-scope.conf ...
kernel.yama.ptrace_scope = 0
* Applying /usr/lib/sysctl.d/50-default.conf ...
kernel.sysrq = 16
kernel.core_uses_pid = 1
kernel.kptr_restrict = 1
net.ipv4.conf.default.rp_filter = 1
net.ipv4.conf.all.rp_filter = 1
net.ipv4.conf.default.accept_source_route = 0
net.ipv4.conf.all.accept_source_route = 0
net.ipv4.conf.default.promote_secondaries = 1
net.ipv4.conf.all.promote_secondaries = 1
fs.protected_hardlinks = 1
fs.protected_symlinks = 1
* Applying /etc/sysctl.d/99-sysctl.conf ...
* Applying /etc/sysctl.d/kubernetes.conf ...
net.bridge.bridge-nf-call-iptables = 1
net.bridge.bridge-nf-call-ip6tables = 1
net.ipv4.ip_forward = 1
vm.swappiness = 0
vm.overcommit_memory = 1
* Applying /etc/sysctl.conf ...
安装依赖的软件包
bash
[root@master ~ 09:39:44]# yum install -y yum-utils device-mapper-persistent-data lvm2添加 Docker 软件源
bash
[root@master ~ 09:40:00]# yum-config-manager --add-repo http://mirrors.aliyun.com/docker-ce/linux/centos/docker-ce.repo
已加载插件:fastestmirror
adding repo from: http://mirrors.aliyun.com/docker-ce/linux/centos/docker-ce.repo
grabbing file http://mirrors.aliyun.com/docker-ce/linux/centos/docker-ce.repo to /etc/yum.repos.d/docker-ce.repo
repo saved to /etc/yum.repos.d/docker-ce.repo
[root@master ~ 09:41:07]# yum clean all
已加载插件:fastestmirror
正在清理软件源: base docker-ce-stable
               : epel extras updates
Cleaning up list of fastest mirrors
[root@master ~ 09:41:17]# yum list
查看containerd版本
bash
[root@master ~ 09:44:33]# yum list containerd.io --showduplicates | sort -r安装指定版本containerd
bash
[root@master ~ 09:44:45]# yum -y install containerd.io-1.6.16生成containerd的配置文件
bash
[root@master ~ 09:48:27]# mkdir -p /etc/containerd
[root@master ~ 09:48:36]# containerd config default >/etc/containerd/config.toml
修改containerd的驱动程序
bash
[root@master ~ 09:48:36]# sed -i '/SystemdCgroup/s/false/true/g' /etc/containerd/config.toml修改镜像仓库地址
bash
[root@node2 ~ 09:48:51]# vim /etc/containerd/config.toml
sandbox_image = "registry.aliyunc    s.com/google_containers/pause:3.9"
启动containerd
bash
[root@master ~ 09:49:51]# systemctl enable containerd
Created symlink from /etc/systemd/system/multi-user.target.wants/containerd.service to /usr/lib/systemd/system/containerd.service.
[root@master ~ 09:50:07]# systemctl start containerd
[root@master ~ 09:50:08]# systemctl status containerd

[root@master ~ 09:50:23]# ctr version
Client:
  Version:  1.6.16
  Revision: 31aa4358a36870b21a992d3ad2bef29e1d693bec
  Go version: go1.18.10

Server:
  Version:  1.6.16
  Revision: 31aa4358a36870b21a992d3ad2bef29e1d693bec
  UUID: fe759b6d-f259-4ca2-91a6-299a7916b8fd
镜像加速配置
bash
[root@master ~ 09:50:51]# vim /etc/containerd/config.toml
#145
config_path = "/etc/containerd/    certs.d"

[root@master ~ 09:51:46]# mkdir /etc/containerd/certs.d
[root@master ~ 09:52:40]# mkdir /etc/containerd/certs.d/docker.io

[root@master ~ 09:53:16]# cat /etc/containerd/certs.d/docker.io/hosts.toml
server = "https://docker.io"
[host."https://19adffc09b4f4fcbad0603a171dd0419.mirror.swr.myhuaweicloud.com"]
  capabilities = ["pull","resolve","push"]

[host."https://hub-mirror.c.163.com"]
  capabilities = ["pull","resolve","push"]

[host."https://do.nark.eu.org"]
  capabilities = ["pull","resolve","push"]

[host."https://dc.j8.work"]
  capabilities = ["pull","resolve","push"]

[host."https://docker.m.daocloud.io"]
  capabilities = ["pull","resolve","push"]

[host."https://dockerproxy.com"]
  capabilities = ["pull","resolve","push"]

[host."https://docker.mirrors.ustc.edu.cn"]
  capabilities = ["pull","resolve","push"]

[host."https://docker.nju.edu.cn"]
  capabilities = ["pull","resolve","push"]

[host."https://registry.docker-cn.com"]
  capabilities = ["pull","resolve","push"]

[host."https://hub.uuuadc.top"]
  capabilities = ["pull","resolve","push"]

[host."https://docker.anyhub.us.kg"]
  capabilities = ["pull","resolve","push"]

[host."https://dockerhub.jobcher.com"]
  capabilities = ["pull","resolve","push"]

[host."https://dockerhub.icu"]
  capabilities = ["pull","resolve","push"]

[host."https://docker.ckyl.me"]
  capabilities = ["pull","resolve","push"]

[host."https://docker.awsl9527.cn"]
  capabilities = ["pull","resolve","push"]

[host."https://mirror.baidubce.com"]
  capabilities = ["pull","resolve","push"]

[host."https://docker.1panel.live"]
  capabilities = ["pull","resolve","push"]
启动containerd
bash
[root@master ~ 09:53:29]# systemctl enable containerd
[root@master ~ 09:54:11]# systemctl start containerd
[root@master ~ 09:54:11]# systemctl status containerd
测试
bash
[root@master ~ 09:57:57]# ctr images pull docker.io/library/httpd:latest --hosts-dir=/etc/containerd/certs.d
[root@master ~ 09:57:57]# ctr i ls
REF                            TYPE                                    DIGEST                                                                  SIZE     PLATFORMS                                                                                                              LABELS
docker.io/library/httpd:latest application/vnd.oci.image.index.v1+json sha256:360c5ad356d5f5e649186914b4c12b54e13bfd6aa3baed2cd972fe5a6f8c45d6 43.1 MiB linux/386,linux/amd64,linux/arm/v5,linux/arm/v7,linux/arm64/v8,linux/ppc64le,linux/riscv64,linux/s390x,unknown/unknown -
安装kubeadm
添加k8s软件源
bash
[root@master ~ 10:00:04]# cat <<EOF>/etc/yum.repos.d/kubernetes.repo
> [kubernetes]
> name=Kubernetes
> baseurl=http://mirrors.aliyun.com/kubernetes/yum/repos/kubernetes-el7-x86_64
> enabled=1
> gpgcheck=0
> repo_gpgcheck=0
> gpgkey=http://mirrors.aliyun.com/kubernetes/yum/doc/yum-key.gpg
> http://mirrors.aliyun.com/kubernetes/yum/doc/rpm-package-key.gpg
> EOF
快速建立yum缓存
bash
[root@master ~ 10:00:32]# yum makecache fast查看k8s版本
bash
[root@master ~ 10:01:12]# yum list kubectl --showduplicates | sort -r安装指定版本k8s
bash
[root@master ~ 10:01:49]# yum -y install kubectl-1.28.0 kubelet-1.28.0 kubeadm-1.28.0修改kubelet的crgoup与containerd的crgoup保持一致
bash
[root@master ~ 10:06:05]# cat >/etc/sysconfig/kubelet<<EOF
 KUBELET_EXTRA_ARGS="--cgroup-driver=systemd"
 KUBE_PROXY_MODE="ipvs"
EOF
kubelet设置为开机自启动
bash
[root@master ~ 10:12:43]# systemctl daemon-reload
[root@master ~ 10:13:03]# systemctl enable kubelet
Created symlink from /etc/systemd/system/multi-user.target.wants/kubelet.service to /usr/lib/systemd/system/kubelet.service.
配置crictl工具
bash
[root@master ~ 10:13:03]# cat <<EOF | tee /etc/crictl.yaml
> runtime-endpoint: unix:///run/containerd/containerd.sock
> image-endpoint: unix:///run/containerd/containerd.sock
> timeout: 10
> debug: false
> EOF
runtime-endpoint: unix:///run/containerd/containerd.sock
image-endpoint: unix:///run/containerd/containerd.sock
timeout: 10
debug: false
主节点部署Kubernetes
bash
#查看k8s集群所需要的镜像
[root@master ~ 10:13:28]#  kubeadm config images list --kubernetes-version=v1.28.0 \
> --image-repository=registry.aliyuncs.com/google_containers

registry.aliyuncs.com/google_containers/kube-apiserver:v1.28.0
registry.aliyuncs.com/google_containers/kube-controller-manager:v1.28.0
registry.aliyuncs.com/google_containers/kube-scheduler:v1.28.0
registry.aliyuncs.com/google_containers/kube-proxy:v1.28.0
registry.aliyuncs.com/google_containers/pause:3.9
registry.aliyuncs.com/google_containers/etcd:3.5.9-0
registry.aliyuncs.com/google_containers/coredns:v1.10.1


#下载k8s集群所需要的镜像
[root@master ~ 10:16:48]# kubeadm config images pull --kubernetes-version=v1.28.0 --image-repository=registry.aliyuncs.com/google_containers
[config/images] Pulled registry.aliyuncs.com/google_containers/kube-apiserver:v1.28.0
[config/images] Pulled registry.aliyuncs.com/google_containers/kube-controller-manager:v1.28.0
[config/images] Pulled registry.aliyuncs.com/google_containers/kube-scheduler:v1.28.0
[config/images] Pulled registry.aliyuncs.com/google_containers/kube-proxy:v1.28.0
[config/images] Pulled registry.aliyuncs.com/google_containers/pause:3.9
[config/images] Pulled registry.aliyuncs.com/google_containers/etcd:3.5.9-0
[config/images] Pulled registry.aliyuncs.com/google_containers/coredns:v1.10.1


#查看k8s集群所有的镜像
[root@master ~ 10:24:47]# crictl images ls
IMAGE                                                             TAG                 IMAGE ID            SIZE
registry.aliyuncs.com/google_containers/coredns                   v1.10.1             ead0a4a53df89       16.2MB
registry.aliyuncs.com/google_containers/etcd                      3.5.9-0             73deb9a3f7025       103MB
registry.aliyuncs.com/google_containers/kube-apiserver            v1.28.0             bb5e0dde9054c       34.6MB
registry.aliyuncs.com/google_containers/kube-controller-manager   v1.28.0             4be79c38a4bab       33.4MB
registry.aliyuncs.com/google_containers/kube-proxy                v1.28.0             ea1030da44aa1       24.6MB
registry.aliyuncs.com/google_containers/kube-scheduler            v1.28.0             f6f496300a2ae       18.8MB
registry.aliyuncs.com/google_containers/pause                     3.9                 e6f1816883972       322kB
初始化集群自动开启IPVS
bash
#创建初始化集群配置文件
[root@master ~ 10:25:06]# kubeadm config print init-defaults > kubeadm-init.yaml

# 修改初始化集群配置文件
 12   advertiseAddress: 192.168.88.144
 15   criSocket: unix:///var/run/containerd/containerd.sock
 17   name: master
 18   taints:
 19   - effect: NoSchedule
 20     key: node-role.kubernetes.io/control-plane
 32 imageRepository: registry.aliyuncs.com/google_containers
 34 kubernetesVersion: 1.28.0
 38   podSubnet: 10.244.0.0/16
 40 ---                                  #更改kube-proxy的代理模式,默认为iptables
 41 apiVersion: kubeproxy.config.k8s.io/v1alpha1
 42 kind: KubeProxyConfiguration
 43 mode: ipvs
 44 ---                                  #更改kubelet cgroup驱动为systemd
 45 apiVersion: kubelet.config.k8s.io/v1beta1
 46 kind: KubeletConfiguration
 47 cgroupDriver: systemd
初始化集群
bash
 [root@master ~ 10:45:43]#  kubeadm init --config=kubeadm-init.yaml --upload-certs | tee kubeadm-init.log
[init] Using Kubernetes version: v1.28.0
[preflight] Running pre-flight checks
[preflight] Pulling images required for setting up a Kubernetes cluster
[preflight] This might take a minute or two, depending on the speed of your internet connection
[preflight] You can also perform this action in beforehand using 'kubeadm config images pull'
[certs] Using certificateDir folder "/etc/kubernetes/pki"
[certs] Generating "ca" certificate and key
[certs] Generating "apiserver" certificate and key
[certs] apiserver serving cert is signed for DNS names [kubernetes kubernetes.default kubernetes.default.svc kubernetes.default.svc.cluster.local master] and IPs [10.96.0.1 192.168.88.144]
[certs] Generating "apiserver-kubelet-client" certificate and key
[certs] Generating "front-proxy-ca" certificate and key
[certs] Generating "front-proxy-client" certificate and key
[certs] Generating "etcd/ca" certificate and key
[certs] Generating "etcd/server" certificate and key
[certs] etcd/server serving cert is signed for DNS names [localhost master] and IPs [192.168.88.144 127.0.0.1 ::1]
[certs] Generating "etcd/peer" certificate and key
[certs] etcd/peer serving cert is signed for DNS names [localhost master] and IPs [192.168.88.144 127.0.0.1 ::1]
[certs] Generating "etcd/healthcheck-client" certificate and key
[certs] Generating "apiserver-etcd-client" certificate and key
[certs] Generating "sa" key and public key
[kubeconfig] Using kubeconfig folder "/etc/kubernetes"
[kubeconfig] Writing "admin.conf" kubeconfig file
[kubeconfig] Writing "kubelet.conf" kubeconfig file
[kubeconfig] Writing "controller-manager.conf" kubeconfig file
[kubeconfig] Writing "scheduler.conf" kubeconfig file
[etcd] Creating static Pod manifest for local etcd in "/etc/kubernetes/manifests"
[control-plane] Using manifest folder "/etc/kubernetes/manifests"
[control-plane] Creating static Pod manifest for "kube-apiserver"
[control-plane] Creating static Pod manifest for "kube-controller-manager"
[control-plane] Creating static Pod manifest for "kube-scheduler"
[kubelet-start] Writing kubelet environment file with flags to file "/var/lib/kubelet/kubeadm-flags.env"
[kubelet-start] Writing kubelet configuration to file "/var/lib/kubelet/config.yaml"
[kubelet-start] Starting the kubelet
[wait-control-plane] Waiting for the kubelet to boot up the control plane as static Pods from directory "/etc/kubernetes/manifests". This can take up to 4m0s
[apiclient] All control plane components are healthy after 6.002599 seconds
[upload-config] Storing the configuration used in ConfigMap "kubeadm-config" in the "kube-system" Namespace
[kubelet] Creating a ConfigMap "kubelet-config" in namespace kube-system with the configuration for the kubelets in the cluster
[upload-certs] Storing the certificates in Secret "kubeadm-certs" in the "kube-system" Namespace
[upload-certs] Using certificate key:
90f32becb379ade5e7430df401bb9b684a2943c0708c176647b4651787495cc2
[mark-control-plane] Marking the node master as control-plane by adding the labels: [node-role.kubernetes.io/control-plane node.kubernetes.io/exclude-from-external-load-balancers]
[mark-control-plane] Marking the node master as control-plane by adding the taints [node-role.kubernetes.io/control-plane:NoSchedule]
[bootstrap-token] Using token: abcdef.0123456789abcdef
[bootstrap-token] Configuring bootstrap tokens, cluster-info ConfigMap, RBAC Roles
[bootstrap-token] Configured RBAC rules to allow Node Bootstrap tokens to get nodes
[bootstrap-token] Configured RBAC rules to allow Node Bootstrap tokens to post CSRs in order for nodes to get long term certificate credentials
[bootstrap-token] Configured RBAC rules to allow the csrapprover controller automatically approve CSRs from a Node Bootstrap Token
[bootstrap-token] Configured RBAC rules to allow certificate rotation for all node client certificates in the cluster
[bootstrap-token] Creating the "cluster-info" ConfigMap in the "kube-public" namespace
[kubelet-finalize] Updating "/etc/kubernetes/kubelet.conf" to point to a rotatable kubelet client certificate and key
[addons] Applied essential addon: CoreDNS
[addons] Applied essential addon: kube-proxy

Your Kubernetes control-plane has initialized successfully!

To start using your cluster, you need to run the following as a regular user:

  mkdir -p $HOME/.kube
  sudo cp -i /etc/kubernetes/admin.conf $HOME/.kube/config
  sudo chown $(id -u):$(id -g) $HOME/.kube/config

Alternatively, if you are the root user, you can run:

  export KUBECONFIG=/etc/kubernetes/admin.conf

You should now deploy a pod network to the cluster.
Run "kubectl apply -f [podnetwork].yaml" with one of the options listed at:
  https://kubernetes.io/docs/concepts/cluster-administration/addons/

Then you can join any number of worker nodes by running the following on each as root:

kubeadm join 192.168.88.144:6443 --token abcdef.0123456789abcdef \
        --discovery-token-ca-cert-hash sha256:050c87ea6ed190c69256edaa64c855f181e9310ac25f1a47802cb0ab1782888a
配置kubectl工具
bash
[root@master ~ 10:45:56]# mkdir -p $HOME/.kube
[root@master ~ 10:46:36]#   sudo cp -i /etc/kubernetes/admin.conf $HOME/.kube/config
[root@master ~ 10:46:36]#   sudo chown $(id -u):$(id -g) $HOME/.kube/config

# 永久生效(推荐)
[root@master ~ 10:46:36]# echo "export KUBECONFIG=/etc/kubernetes/admin.conf" >> ~/.bash_profile
[root@master ~ 10:47:17]# source  ~/.bash_profile
查看组建状态
bash
[root@master ~ 10:47:27]#  kubectl get cs
Warning: v1 ComponentStatus is deprecated in v1.19+
NAME                 STATUS    MESSAGE   ERROR
scheduler            Healthy   ok
controller-manager   Healthy   ok
etcd-0               Healthy   ok
node工作节点加入集群
node1
bash
[root@node1 ~ 10:49:49]# kubeadm join 192.168.88.144:6443 --token abcdef.0123456789abcdef         --discovery-token-ca-cert-hash sha256:050c87ea6ed190c69256edaa64c855f181e9310ac25f1a47802cb0ab1782888a
[preflight] Running pre-flight checks
[preflight] Reading configuration from the cluster...
[preflight] FYI: You can look at this config file with 'kubectl -n kube-system get cm kubeadm-config -o yaml'
[kubelet-start] Writing kubelet configuration to file "/var/lib/kubelet/config.yaml"
[kubelet-start] Writing kubelet environment file with flags to file "/var/lib/kubelet/kubeadm-flags.env"
[kubelet-start] Starting the kubelet
[kubelet-start] Waiting for the kubelet to perform the TLS Bootstrap...

This node has joined the cluster:
* Certificate signing request was sent to apiserver and a response was received.
* The Kubelet was informed of the new secure connection details.

Run 'kubectl get nodes' on the control-plane to see this node join the cluster.
node2
bash
[root@node2 ~ 10:49:57]# kubeadm join 192.168.88.144:6443 --token abcdef.0123456789abcdef         --discovery-token-ca-cert-hash sha256:050c87ea6ed190c69256edaa64c855f181e9310ac25f1a47802cb0ab1782888a
[preflight] Running pre-flight checks
[preflight] Reading configuration from the cluster...
[preflight] FYI: You can look at this config file with 'kubectl -n kube-system get cm kubeadm-config -o yaml'
[kubelet-start] Writing kubelet configuration to file "/var/lib/kubelet/config.yaml"
[kubelet-start] Writing kubelet environment file with flags to file "/var/lib/kubelet/kubeadm-flags.env"
[kubelet-start] Starting the kubelet
[kubelet-start] Waiting for the kubelet to perform the TLS Bootstrap...

This node has joined the cluster:
* Certificate signing request was sent to apiserver and a response was received.
* The Kubelet was informed of the new secure connection details.

Run 'kubectl get nodes' on the control-plane to see this node join the cluster.
master
bash
[root@master ~ 10:47:51]# kubectl get nodes
NAME     STATUS     ROLES           AGE     VERSION
master   NotReady   control-plane   4m44s   v1.28.0
node1    NotReady   <none>          107s    v1.28.0
node2    NotReady   <none>          93s     v1.28.0
部署网络CNI组建
bash
# 下载Calico文件
[root@master ~ 10:50:36]# wget --no-check-certificate https://docs.tigera.io/archive/v3.25/manifests/calico.yaml
--2026-01-14 10:50:56--  https://docs.tigera.io/archive/v3.25/manifests/calico.yaml
正在解析主机 docs.tigera.io (docs.tigera.io)... 13.215.239.219, 52.74.6.109, 2406:da18:b3d:e201::259, ...
正在连接 docs.tigera.io (docs.tigera.io)|13.215.239.219|:443... 已连接。
已发出 HTTP 请求,正在等待回应... 200 OK
长度:238089 (233K) [text/yaml]
正在保存至: "calico.yaml"

100%[============================================>] 238,089      136KB/s 用时 1.7s

2026-01-14 10:51:00 (136 KB/s) - 已保存 "calico.yaml" [238089/238089])

# 修改Calico文件
[root@master ~ 10:51:00]# vim calico.yaml
# 找到4601行,去掉注释并修改
4601             - name: CALICO_IPV4POOL_CIDR
4602               value:  "10.244.0.0/16"
部署Calico
bash
[root@master ~ 10:52:00]# kubectl apply -f calico.yaml
poddisruptionbudget.policy/calico-kube-controllers created
serviceaccount/calico-kube-controllers created
serviceaccount/calico-node created
configmap/calico-config created
customresourcedefinition.apiextensions.k8s.io/bgpconfigurations.crd.projectcalico.org created
customresourcedefinition.apiextensions.k8s.io/bgppeers.crd.projectcalico.org created
customresourcedefinition.apiextensions.k8s.io/blockaffinities.crd.projectcalico.org created
customresourcedefinition.apiextensions.k8s.io/caliconodestatuses.crd.projectcalico.org created
customresourcedefinition.apiextensions.k8s.io/clusterinformations.crd.projectcalico.org created
customresourcedefinition.apiextensions.k8s.io/felixconfigurations.crd.projectcalico.org created
customresourcedefinition.apiextensions.k8s.io/globalnetworkpolicies.crd.projectcalico.org created
customresourcedefinition.apiextensions.k8s.io/globalnetworksets.crd.projectcalico.org created
customresourcedefinition.apiextensions.k8s.io/hostendpoints.crd.projectcalico.org created
customresourcedefinition.apiextensions.k8s.io/ipamblocks.crd.projectcalico.org created
customresourcedefinition.apiextensions.k8s.io/ipamconfigs.crd.projectcalico.org created
customresourcedefinition.apiextensions.k8s.io/ipamhandles.crd.projectcalico.org created
customresourcedefinition.apiextensions.k8s.io/ippools.crd.projectcalico.org created
customresourcedefinition.apiextensions.k8s.io/ipreservations.crd.projectcalico.org created
customresourcedefinition.apiextensions.k8s.io/kubecontrollersconfigurations.crd.projectcalico.org created
customresourcedefinition.apiextensions.k8s.io/networkpolicies.crd.projectcalico.org created
customresourcedefinition.apiextensions.k8s.io/networksets.crd.projectcalico.org created
clusterrole.rbac.authorization.k8s.io/calico-kube-controllers created
clusterrole.rbac.authorization.k8s.io/calico-node created
clusterrolebinding.rbac.authorization.k8s.io/calico-kube-controllers created
clusterrolebinding.rbac.authorization.k8s.io/calico-node created
daemonset.apps/calico-node created
deployment.apps/calico-kube-controllers created
查看所有pod运行情况
bash
[root@master ~ 10:52:25]# kubectl get pods -A
NAMESPACE     NAME                                       READY   STATUS                  RESTARTS   AGE
kube-system   calico-kube-controllers-658d97c59c-b6824   0/1     Pending                 0          39s
kube-system   calico-node-pb9pk                          0/1     Init:ImagePullBackOff   0          39s
kube-system   calico-node-tq7g5                          0/1     Init:ImagePullBackOff   0          39s
kube-system   calico-node-vkzj6                          0/1     Init:ImagePullBackOff   0          39s
kube-system   coredns-66f779496c-drbws                   0/1     Pending                 0          6m53s
kube-system   coredns-66f779496c-jq2zk                   0/1     Pending                 0          6m53s
kube-system   etcd-master                                1/1     Running                 0          7m8s
kube-system   kube-apiserver-master                      1/1     Running                 0          7m8s
kube-system   kube-controller-manager-master             1/1     Running                 0          7m8s
kube-system   kube-proxy-5x56q                           1/1     Running                 1          4m15s
kube-system   kube-proxy-dvlww                           1/1     Running                 1          4m1s
kube-system   kube-proxy-zcjm9                           1/1     Running                 0          6m54s
kube-system   kube-scheduler-master                      1/1     Running                 0          7m10s

#等待全都running
第 3 章 kubernetes基础
第1部:客户端命令kubectl
1:命令帮助
集群中管理可以使用kubectl命令完成
bash
[root@master ~ 13:44:16]# kubectl -h
kubectl controls the Kubernetes cluster manager.

 Find more information at: https://kubernetes.io/docs/reference/kubectl/

Basic Commands (Beginner):
  create          Create a resource from a file or from stdin
  expose          Take a replication controller, service, deployment or pod and
expose it as a new Kubernetes service
  run             在集群上运行特定镜像
  set             为对象设置指定特性

Basic Commands (Intermediate):
  explain         Get documentation for a resource
  get             显示一个或多个资源
  edit            编辑服务器上的资源
  delete          Delete resources by file names, stdin, resources and names, or
by resources and label selector

Deploy Commands:
  rollout         Manage the rollout of a resource
  scale           Set a new size for a deployment, replica set, or replication
controller
  autoscale       Auto-scale a deployment, replica set, stateful set, or
replication controller

Cluster Management Commands:
  certificate     Modify certificate resources
  cluster-info    Display cluster information
  top             Display resource (CPU/memory) usage
  cordon          标记节点为不可调度
  uncordon        标记节点为可调度
  drain           清空节点以准备维护
  taint           更新一个或者多个节点上的污点

Troubleshooting and Debugging Commands:
  describe        显示特定资源或资源组的详细信息
  logs            打印 Pod 中容器的日志
  attach          挂接到一个运行中的容器
  exec            在某个容器中执行一个命令
  port-forward    将一个或多个本地端口转发到某个 Pod
  proxy           运行一个指向 Kubernetes API 服务器的代理
  cp              Copy files and directories to and from containers
  auth            Inspect authorization
  debug           Create debugging sessions for troubleshooting workloads and
nodes
  events          List events

Advanced Commands:
  diff            Diff the live version against a would-be applied version
  apply           Apply a configuration to a resource by file name or stdin
  patch           Update fields of a resource
  replace         Replace a resource by file name or stdin
  wait            Experimental: Wait for a specific condition on one or many
resources
  kustomize       Build a kustomization target from a directory or URL

Settings Commands:
  label           更新某资源上的标签
  annotate        更新一个资源的注解
  completion      Output shell completion code for the specified shell (bash,
zsh, fish, or powershell)

Other Commands:
  api-resources   Print the supported API resources on the server
  api-versions    Print the supported API versions on the server, in the form of
"group/version"
  config          修改 kubeconfig 文件
  plugin          Provides utilities for interacting with plugins
  version         输出客户端和服务端的版本信息

Usage:
  kubectl [flags] [options]

Use "kubectl <command> --help" for more information about a given command.
Use "kubectl options" for a list of global command-line options (applies to all
commands).
bash
[root@master ~ 13:38:58]# kubectl api-resources
NAME                              SHORTNAMES   APIVERSION                             NAMESPACED   KIND
bindings                                       v1                                     true         Binding
componentstatuses                 cs           v1                                     false        ComponentStatus
configmaps                        cm           v1                                     true         ConfigMap
endpoints                         ep           v1                                     true         Endpoints
events                            ev           v1                                     true         Event
limitranges                       limits       v1                                     true         LimitRange
namespaces                        ns           v1                                     false        Namespace
nodes                             no           v1                                     false        Node
persistentvolumeclaims            pvc          v1                                     true         PersistentVolumeClaim
persistentvolumes                 pv           v1                                     false        PersistentVolume
pods                              po           v1                                     true         Pod
podtemplates                                   v1                                     true         PodTemplate
replicationcontrollers            rc           v1                                     true         ReplicationController
resourcequotas                    quota        v1                                     true         ResourceQuota
secrets                                        v1                                     true         Secret
serviceaccounts                   sa           v1                                     true         ServiceAccount
services                          svc          v1                                     true         Service
mutatingwebhookconfigurations                  admissionregistration.k8s.io/v1        false        MutatingWebhookConfiguration
validatingwebhookconfigurations                admissionregistration.k8s.io/v1        false        ValidatingWebhookConfiguration
customresourcedefinitions         crd,crds     apiextensions.k8s.io/v1                false        CustomResourceDefinition
apiservices                                    apiregistration.k8s.io/v1              false        APIService
controllerrevisions                            apps/v1                                true         ControllerRevision
daemonsets                        ds           apps/v1                                true         DaemonSet
deployments                       deploy       apps/v1                                true         Deployment
replicasets                       rs           apps/v1                                true         ReplicaSet
statefulsets                      sts          apps/v1                                true         StatefulSet
selfsubjectreviews                             authentication.k8s.io/v1               false        SelfSubjectReview
tokenreviews                                   authentication.k8s.io/v1               false        TokenReview
localsubjectaccessreviews                      authorization.k8s.io/v1                true         LocalSubjectAccessReview
selfsubjectaccessreviews                       authorization.k8s.io/v1                false        SelfSubjectAccessReview
selfsubjectrulesreviews                        authorization.k8s.io/v1                false        SelfSubjectRulesReview
subjectaccessreviews                           authorization.k8s.io/v1                false        SubjectAccessReview
horizontalpodautoscalers          hpa          autoscaling/v2                         true         HorizontalPodAutoscaler
cronjobs                          cj           batch/v1                               true         CronJob
jobs                                           batch/v1                               true         Job
certificatesigningrequests        csr          certificates.k8s.io/v1                 false        CertificateSigningRequest
leases                                         coordination.k8s.io/v1                 true         Lease
bgpconfigurations                              crd.projectcalico.org/v1               false        BGPConfiguration
bgppeers                                       crd.projectcalico.org/v1               false        BGPPeer
blockaffinities                                crd.projectcalico.org/v1               false        BlockAffinity
caliconodestatuses                             crd.projectcalico.org/v1               false        CalicoNodeStatus
clusterinformations                            crd.projectcalico.org/v1               false        ClusterInformation
felixconfigurations                            crd.projectcalico.org/v1               false        FelixConfiguration
globalnetworkpolicies                          crd.projectcalico.org/v1               false        GlobalNetworkPolicy
globalnetworksets                              crd.projectcalico.org/v1               false        GlobalNetworkSet
hostendpoints                                  crd.projectcalico.org/v1               false        HostEndpoint
ipamblocks                                     crd.projectcalico.org/v1               false        IPAMBlock
ipamconfigs                                    crd.projectcalico.org/v1               false        IPAMConfig
ipamhandles                                    crd.projectcalico.org/v1               false        IPAMHandle
ippools                                        crd.projectcalico.org/v1               false        IPPool
ipreservations                                 crd.projectcalico.org/v1               false        IPReservation
kubecontrollersconfigurations                  crd.projectcalico.org/v1               false        KubeControllersConfiguration
networkpolicies                                crd.projectcalico.org/v1               true         NetworkPolicy
networksets                                    crd.projectcalico.org/v1               true         NetworkSet
endpointslices                                 discovery.k8s.io/v1                    true         EndpointSlice
events                            ev           events.k8s.io/v1                       true         Event
flowschemas                                    flowcontrol.apiserver.k8s.io/v1beta3   false        FlowSchema
prioritylevelconfigurations                    flowcontrol.apiserver.k8s.io/v1beta3   false        PriorityLevelConfiguration
ingressclasses                                 networking.k8s.io/v1                   false        IngressClass
ingresses                         ing          networking.k8s.io/v1                   true         Ingress
networkpolicies                   netpol       networking.k8s.io/v1                   true         NetworkPolicy
runtimeclasses                                 node.k8s.io/v1                         false        RuntimeClass
poddisruptionbudgets              pdb          policy/v1                              true         PodDisruptionBudget
clusterrolebindings                            rbac.authorization.k8s.io/v1           false        ClusterRoleBinding
clusterroles                                   rbac.authorization.k8s.io/v1           false        ClusterRole
rolebindings                                   rbac.authorization.k8s.io/v1           true         RoleBinding
roles                                          rbac.authorization.k8s.io/v1           true         Role
priorityclasses                   pc           scheduling.k8s.io/v1                   false        PriorityClass
csidrivers                                     storage.k8s.io/v1                      false        CSIDriver
csinodes                                       storage.k8s.io/v1                      false        CSINode
csistoragecapacities                           storage.k8s.io/v1                      true         CSIStorageCapacity
storageclasses                    sc           storage.k8s.io/v1                      false        StorageClass
volumeattachments                              storage.k8s.io/v1                      false        VolumeAttachment
命令:
bash
kubectl 命令 资源类型 资源名称 <参数...>2:命令详解
基础命令
| 命令 | 描述 |
|---|---|
| create | 通过文件名或标准输入创建资源 |
| expose | 将一个资源公开为一个新的service |
| run | 在集群中运行一个特定的镜像 |
| set | 在对象上设置特定的功能 |
| get | 显示一个或多个资源 |
| explain | 文档参考资料 |
| edit | 使用默认的编辑器编辑一个资源 |
| delete | 通过文件名、标准输入、资源名称或标签选择器来删除资源 |
bash
[root@master ~ 13:42:07]# kubectl api-versions
admissionregistration.k8s.io/v1
apiextensions.k8s.io/v1
apiregistration.k8s.io/v1
apps/v1
authentication.k8s.io/v1
authorization.k8s.io/v1
autoscaling/v1
autoscaling/v2
batch/v1
certificates.k8s.io/v1
coordination.k8s.io/v1
crd.projectcalico.org/v1
discovery.k8s.io/v1
events.k8s.io/v1
flowcontrol.apiserver.k8s.io/v1beta2
flowcontrol.apiserver.k8s.io/v1beta3
networking.k8s.io/v1
node.k8s.io/v1
policy/v1
rbac.authorization.k8s.io/v1
scheduling.k8s.io/v1
storage.k8s.io/v1
v1

[root@master ~ 13:43:15]# kubectl api-resources |grep pods
pods                              po           v1                                     true         Pod

[root@master ~ 13:43:44]# kubectl api-resources |grep deployment
deployments                       deploy       apps/v1                                true         Deployment

[root@master ~ 14:16:46]# kubectl get deploy
NAME    READY   UP-TO-DATE   AVAILABLE   AGE
nginx   3/3     3            3           169m

[root@master ~ 14:18:54]# kubectl explain deploy.spec
GROUP:      apps
KIND:       Deployment
VERSION:    v1

FIELD: spec <DeploymentSpec>

DESCRIPTION:
    Specification of the desired behavior of the Deployment.
    DeploymentSpec is the specification of the desired behavior of the
    Deployment.

FIELDS:
  minReadySeconds       <integer>
    Minimum number of seconds for which a newly created pod should be ready
    without any of its container crashing, for it to be considered available.
    Defaults to 0 (pod will be considered available as soon as it is ready)

  paused        <boolean>
    Indicates that the deployment is paused.

  progressDeadlineSeconds       <integer>
    The maximum time in seconds for a deployment to make progress before it is
    considered to be failed. The deployment controller will continue to process
    failed deployments and a condition with a ProgressDeadlineExceeded reason
    will be surfaced in the deployment status. Note that progress will not be
    estimated during the time a deployment is paused. Defaults to 600s.

  replicas      <integer>
    Number of desired pods. This is a pointer to distinguish between explicit
    zero and not specified. Defaults to 1.

  revisionHistoryLimit  <integer>
    The number of old ReplicaSets to retain to allow rollback. This is a pointer
    to distinguish between explicit zero and not specified. Defaults to 10.

  selector      <LabelSelector> -required-
    Label selector for pods. Existing ReplicaSets whose pods are selected by
    this will be the ones affected by this deployment. It must match the pod
    template's labels.

  strategy      <DeploymentStrategy>
    The deployment strategy to use to replace existing pods with new ones.

  template      <PodTemplateSpec> -required-
    Template describes the pods that will be created. The only allowed
    template.spec.restartPolicy value is "Always".


[root@master ~ 14:17:47]# kubectl edit deploy nginx

[root@master ~ 14:22:06]# kubectl describe deploy nginx
Name:                   nginx
Namespace:              default
CreationTimestamp:      Wed, 14 Jan 2026 11:28:24 +0800
Labels:                 app=nginx
Annotations:            deployment.kubernetes.io/revision: 1
Selector:               app=nginx
Replicas:               3 desired | 3 updated | 3 total | 3 available | 0 unavailable
StrategyType:           RollingUpdate
MinReadySeconds:        0
RollingUpdateStrategy:  25% max unavailable, 25% max surge
Pod Template:
  Labels:  app=nginx
  Containers:
   nginx:
    Image:        nginx
    Port:         <none>
    Host Port:    <none>
    Environment:  <none>
    Mounts:       <none>
  Volumes:        <none>
Conditions:
  Type           Status  Reason
  ----           ------  ------
  Available      True    MinimumReplicasAvailable
  Progressing    True    NewReplicaSetAvailable
OldReplicaSets:  <none>
NewReplicaSet:   nginx-7854ff8877 (3/3 replicas created)
Events:
  Type    Reason             Age   From                   Message
  ----    ------             ----  ----                   -------
  Normal  ScalingReplicaSet  174m  deployment-controller  Scaled up replica set nginx-7854ff8877 to 3
metrics-server可以查看资源(CPU、内存、存储)使用
创建metrics-server资源(需等待较长时间40分钟)
bash
[root@master ~ 09:53:26]#  wget https://github.com/kubernetes-sigs/metrics-server/releases/latest/download/components.yaml -O metrics-server-components.yaml
--2026-01-15 09:55:56--  https://github.com/kubernetes-sigs/metrics-server/releases/latest/download/components.yaml
正在解析主机 github.com (github.com)... 198.18.0.22
正在连接 github.com (github.com)|198.18.0.22|:443... 已连接。
已发出 HTTP 请求,正在等待回应... 302 Found
位置:https://github.com/kubernetes-sigs/metrics-server/releases/download/v0.8.0/components.yaml [跟随至新的 URL]
--2026-01-15 09:55:59--  https://github.com/kubernetes-sigs/metrics-server/releases/download/v0.8.0/components.yaml
再次使用存在的到 github.com:443 的连接。
已发出 HTTP 请求,正在等待回应... 302 Found
位置:https://release-assets.githubusercontent.com/github-production-release-asset/92132038/0626adef-e098-4155-ab3f-6f67afd3bce4?sp=r&sv=2018-11-09&sr=b&spr=https&se=2026-01-15T02%3A41%3A00Z&rscd=attachment%3B+filename%3Dcomponents.yaml&rsct=application%2Foctet-stream&skoid=96c2d410-5711-43a1-aedd-ab1947aa7ab0&sktid=398a6654-997b-47e9-b12b-9515b896b4de&skt=2026-01-15T01%3A40%3A38Z&ske=2026-01-15T02%3A41%3A00Z&sks=b&skv=2018-11-09&sig=qoOIZ9VkjL9ee4YwDTnutaLkVI3kFVlWdsLRs8fCD%2Fg%3D&jwt=eyJ0eXAiOiJKV1QiLCJhbGciOiJIUzI1NiJ9.eyJpc3MiOiJnaXRodWIuY29tIiwiYXVkIjoicmVsZWFzZS1hc3NldHMuZ2l0aHVidXNlcmNvbnRlbnQuY29tIiwia2V5Ijoia2V5MSIsImV4cCI6MTc2ODQ0MjQ1OSwibmJmIjoxNzY4NDQyMTU5LCJwYXRoIjoicmVsZWFzZWFzc2V0cHJvZHVjdGlvbi5ibG9iLmNvcmUud2luZG93cy5uZXQifQ.vQeQ35EIv2nyrNK-zJvN8bdORDdq2NLgZYywZ4NuWX0&response-content-disposition=attachment%3B%20filename%3Dcomponents.yaml&response-content-type=application%2Foctet-stream [跟随至新的 URL]
--2026-01-15 09:55:59--  https://release-assets.githubusercontent.com/github-production-release-asset/92132038/0626adef-e098-4155-ab3f-6f67afd3bce4?sp=r&sv=2018-11-09&sr=b&spr=https&se=2026-01-15T02%3A41%3A00Z&rscd=attachment%3B+filename%3Dcomponents.yaml&rsct=application%2Foctet-stream&skoid=96c2d410-5711-43a1-aedd-ab1947aa7ab0&sktid=398a6654-997b-47e9-b12b-9515b896b4de&skt=2026-01-15T01%3A40%3A38Z&ske=2026-01-15T02%3A41%3A00Z&sks=b&skv=2018-11-09&sig=qoOIZ9VkjL9ee4YwDTnutaLkVI3kFVlWdsLRs8fCD%2Fg%3D&jwt=eyJ0eXAiOiJKV1QiLCJhbGciOiJIUzI1NiJ9.eyJpc3MiOiJnaXRodWIuY29tIiwiYXVkIjoicmVsZWFzZS1hc3NldHMuZ2l0aHVidXNlcmNvbnRlbnQuY29tIiwia2V5Ijoia2V5MSIsImV4cCI6MTc2ODQ0MjQ1OSwibmJmIjoxNzY4NDQyMTU5LCJwYXRoIjoicmVsZWFzZWFzc2V0cHJvZHVjdGlvbi5ibG9iLmNvcmUud2luZG93cy5uZXQifQ.vQeQ35EIv2nyrNK-zJvN8bdORDdq2NLgZYywZ4NuWX0&response-content-disposition=attachment%3B%20filename%3Dcomponents.yaml&response-content-type=application%2Foctet-stream
正在解析主机 release-assets.githubusercontent.com (release-assets.githubusercontent.com)... 198.18.0.84
正在连接 release-assets.githubusercontent.com (release-assets.githubusercontent.com)|198.18.0.84|:443... 已连接。
已发出 HTTP 请求,正在等待回应... 200 OK
长度:4330 (4.2K) [application/octet-stream]
正在保存至: "metrics-server-components.yaml"

100%[========================================>] 4,330       --.-K/s 用时 0s

2026-01-15 09:56:02 (55.3 MB/s) - 已保存 "metrics-server-components.yaml" [4330/4330])

[root@master ~ 09:56:02]# sed -i 's/registry.k8s.io\/metrics-server/registry.cn-hangzhou.aliyuncs.com\/google_containers/g' metrics-server-components.yaml

[root@master ~ 09:56:38]# vim metrics-server-components.yaml
    spec:
      containers:
      - args:
        - --cert-dir=/tmp
        - --secure-port=10250
        #添加一行,安全要求较高,默认情况下必须配置,否则无法从 kubelet 拉取指标,导致探针失败。
       ` - --kubelet-insecure-tls`
        - --kubelet-preferred-address-types=InternalIP,ExternalIP,Hostname
        - --kubelet-use-node-status-port
        - --metric-resolution=15s

[root@master ~ 09:57:20]# kubectl apply -f metrics-server-components.yaml
serviceaccount/metrics-server created
clusterrole.rbac.authorization.k8s.io/system:aggregated-metrics-reader created
clusterrole.rbac.authorization.k8s.io/system:metrics-server created
rolebinding.rbac.authorization.k8s.io/metrics-server-auth-reader created
clusterrolebinding.rbac.authorization.k8s.io/metrics-server:system:auth-delegator created
clusterrolebinding.rbac.authorization.k8s.io/system:metrics-server created
service/metrics-server created
deployment.apps/metrics-server created
apiservice.apiregistration.k8s.io/v1beta1.metrics.k8s.io created
删除pod
bash
kubectl delete pod metrics-server-785fdd47c4-td8zt -n kube-system

#强制删除
kubectl delete pod metrics-server-785fdd47c4-td8zt -n kube-system --grace-period=0 --force
查看资源创建过程
bash
[root@master ~ 09:58:33]# kubectl describe pod metrics-server-57999c5cf7-9b6sm -n kube-system
Name:                 metrics-server-57999c5cf7-9b6sm
Namespace:            kube-system
Priority:             2000000000
Priority Class Name:  system-cluster-critical
Service Account:      metrics-server
Node:                 node2/192.168.88.148
Start Time:           Thu, 15 Jan 2026 09:57:26 +0800
Labels:               k8s-app=metrics-server
                      pod-template-hash=57999c5cf7
Annotations:          cni.projectcalico.org/containerID: fd253df3d48e6cac7b25819ac79afb1126ab12dfe94ba17366a78e37b3e41f57
                      cni.projectcalico.org/podIP: 10.244.104.9/32
                      cni.projectcalico.org/podIPs: 10.244.104.9/32
Status:               Running
IP:                   10.244.104.9
IPs:
  IP:           10.244.104.9
Controlled By:  ReplicaSet/metrics-server-57999c5cf7
Containers:
  metrics-server:
    Container ID:    docker://afa010770db8d52215bf6de92eec80622d83e467cb10a2babd00fe5b03d94966
    Image:           registry.cn-hangzhou.aliyuncs.com/google_containers/metrics-server:v0.8.0
    Image ID:        docker-pullable://registry.cn-hangzhou.aliyuncs.com/google_containers/metrics-server@sha256:421ca80cdee35ba18b1319e0e7d2d677a5d5be111f8c9537dd4b03dc90792bf9
    Port:            10250/TCP
    Host Port:       0/TCP
    SeccompProfile:  RuntimeDefault
    Args:
      --cert-dir=/tmp
      --secure-port=10250
      --kubelet-insecure-tls
      --kubelet-preferred-address-types=InternalIP,ExternalIP,Hostname
      --kubelet-use-node-status-port
      --metric-resolution=15s
    State:          Running
      Started:      Thu, 15 Jan 2026 09:57:33 +0800
    Ready:          True
    Restart Count:  0
    Requests:
      cpu:        100m
      memory:     200Mi
    Liveness:     http-get https://:https/livez delay=0s timeout=1s period=10s #success=1 #failure=3
    Readiness:    http-get https://:https/readyz delay=20s timeout=1s period=10s #success=1 #failure=3
    Environment:  <none>
    Mounts:
      /tmp from tmp-dir (rw)
      /var/run/secrets/kubernetes.io/serviceaccount from kube-api-access-rr5np (ro)
Conditions:
  Type              Status
  Initialized       True
  Ready             True
  ContainersReady   True
  PodScheduled      True
Volumes:
  tmp-dir:
    Type:       EmptyDir (a temporary directory that shares a pod's lifetime)
    Medium:
    SizeLimit:  <unset>
  kube-api-access-rr5np:
    Type:                    Projected (a volume that contains injected data from multiple sources)
    TokenExpirationSeconds:  3607
    ConfigMapName:           kube-root-ca.crt
    ConfigMapOptional:       <nil>
    DownwardAPI:             true
QoS Class:                   Burstable
Node-Selectors:              kubernetes.io/os=linux
Tolerations:                 node.kubernetes.io/not-ready:NoExecute op=Exists for 300s
                             node.kubernetes.io/unreachable:NoExecute op=Exists for 300s
Events:
  Type    Reason     Age   From               Message
  ----    ------     ----  ----               -------
  Normal  Scheduled  119s  default-scheduler  Successfully assigned kube-system/metrics-server-57999c5cf7-9b6sm to node2
  Normal  Pulling    119s  kubelet            Pulling image "registry.cn-hangzhou.aliyuncs.com/google_containers/metrics-server:v0.8.0"
  Normal  Pulled     113s  kubelet            Successfully pulled image "registry.cn-hangzhou.aliyuncs.com/google_containers/metrics-server:v0.8.0" in 6.346s (6.346s including waiting)
  Normal  Created    113s  kubelet            Created container metrics-server
  Normal  Started    113s  kubelet            Started container metrics-server
使用kubectl top 查看资源
pod
bash
[root@master ~ 09:59:26]# kubectl top pod kube-apiserver-master -n kube-system
NAME                    CPU(cores)   MEMORY(bytes)
kube-apiserver-master   55m          404Mi
node
bash
[root@master ~ 09:59:52]# kubectl top nodes node1
NAME    CPU(cores)   CPU%   MEMORY(bytes)   MEMORY%
node1   121m         6%     625Mi           16%
[root@master ~ 10:00:36]# kubectl top nodes node2
NAME    CPU(cores)   CPU%   MEMORY(bytes)   MEMORY%
node2   127m         6%     635Mi           16%
部署命令
| 命令 | 描述 |
|---|---|
| rollout | 管理资源的发布 |
| rolling-update | 对给定的复制控制器滚动更新 |
| scale | 扩容或缩容Pod数量,Deployment、ReplicaSet、RC或Job |
| autoscale | 创建1个自动选择扩容或缩容并设置Pod数量 |
集群管理命令
| 命令 | 描述 |
|---|---|
| certificate | 修改证书资源 |
| cluster-info | 显示集群信息 |
| top | 显示资源(CPU、内存、存储)使用。需要heapster运行 |
| cordon | 标记节点不可调度 |
| uncordon | 标记节点可调度 |
| drain | 驱逐节点上的应用,准备下线维护 |
| taint | 修改节点taint标记 |
显示集群信息
bash
[root@master ~ 10:00:49]# kubectl cluster-info
Kubernetes control plane is running at https://192.168.88.146:6443
CoreDNS is running at https://192.168.88.146:6443/api/v1/namespaces/kube-system/services/kube-dns:dns/proxy

To further debug and diagnose cluster problems, use 'kubectl cluster-info dump'.
显示资源
bash
[root@master ~ 10:00:58]# kubectl top pod -n kube-system
NAME                                       CPU(cores)   MEMORY(bytes)
calico-kube-controllers-658d97c59c-8p8td   2m           70Mi
calico-node-2zspn                          35m          224Mi
calico-node-4x5wd                          27m          220Mi
calico-node-p79mh                          31m          220Mi
coredns-66f779496c-5bs5r                   2m           66Mi
coredns-66f779496c-csxh8                   2m           16Mi
etcd-master                                20m          104Mi
kube-apiserver-master                      48m          404Mi
kube-controller-manager-master             19m          160Mi
kube-proxy-hv5g8                           6m           80Mi
kube-proxy-hx4rd                           9m           81Mi
kube-proxy-r6w6f                           6m           81Mi
kube-scheduler-master                      4m           74Mi
metrics-server-57999c5cf7-9b6sm            3m           19Mi
故障诊断和调试命令
| 命令 | 描述 |
|---|---|
| describe | 显示特定资源或资源组的详细信息 |
| logs | 在1个Pod中打印1个容器日志。如果Pod只有1个容器,容器名称是可选的 |
| attach | 附加到1个运行的容器 |
| exec | 执行命令到容器 |
| port-forward | 转发1个或多个本地端口到1个Pod |
| proxy | 运行1个proxy到kubernetes API server |
| cp | 拷贝文件或目录到容器中 |
| auth | 检查授权 |
高级命令
| 命令 | 描述 |
|---|---|
| apply | 通过文件名或标准输入对资源应用配置 |
| patch | 使用补丁修改、更新资源的字段 |
| replace | 通过文件名或标准输入替换1个资源 |
| convert | 不同的API版本之间转换配置文件 |
设置命令
| 命令 | 描述 |
|---|---|
| label | 更新资源上的标签 |
| annotate | 更新资源上的注释 |
| completion | 用于实现kubectl工具自动补全 |
其他命令
| 命令 | 描述 |
|---|---|
| api-versions | 打印受支持的API版本 |
| config | 修改kubeconfig文件(用于访问API,比如配置认证信息) |
| help | 所有命令帮助 |
| plugin | 运行1个命令行插件 |
| version | 打印客户端和服务版本信息 |
查看当前kubernetes支持的api-version
bash
[root@master ~ 10:01:15]# kubectl api-versions
admissionregistration.k8s.io/v1
apiextensions.k8s.io/v1
apiregistration.k8s.io/v1
apps/v1
authentication.k8s.io/v1
authorization.k8s.io/v1
autoscaling/v1
autoscaling/v2
batch/v1
certificates.k8s.io/v1
coordination.k8s.io/v1
crd.projectcalico.org/v1
discovery.k8s.io/v1
events.k8s.io/v1
flowcontrol.apiserver.k8s.io/v1beta2
flowcontrol.apiserver.k8s.io/v1beta3
metrics.k8s.io/v1beta1
networking.k8s.io/v1
node.k8s.io/v1
policy/v1
rbac.authorization.k8s.io/v1
scheduling.k8s.io/v1
storage.k8s.io/v1
v1
查看创建资源对象类型和版本
bash
[root@master ~ 10:01:31]# kubectl explain namespace
KIND:       Namespace
VERSION:    v1

DESCRIPTION:
    Namespace provides a scope for Names. Use of multiple namespaces is
    optional.

FIELDS:
  apiVersion    <string>
    APIVersion defines the versioned schema of this representation of an object.
    Servers should convert recognized schemas to the latest internal value, and
    may reject unrecognized values. More info:
    https://git.k8s.io/community/contributors/devel/sig-architecture/api-conventions.md#resources

  kind  <string>
    Kind is a string value representing the REST resource this object
    represents. Servers may infer this from the endpoint the client submits
    requests to. Cannot be updated. In CamelCase. More info:
    https://git.k8s.io/community/contributors/devel/sig-architecture/api-conventions.md#types-kinds

  metadata      <ObjectMeta>
    Standard object's metadata. More info:
    https://git.k8s.io/community/contributors/devel/sig-architecture/api-conventions.md#metadata

  spec  <NamespaceSpec>
    Spec defines the behavior of the Namespace. More info:
    https://git.k8s.io/community/contributors/devel/sig-architecture/api-conventions.md#spec-and-status

  status        <NamespaceStatus>
    Status describes the current status of a Namespace. More info:
    https://git.k8s.io/community/contributors/devel/sig-architecture/api-conventions.md#spec-and-status
kubernetes客户端和服务端版本
bash
[root@master ~ 10:01:46]# kubectl version
Client Version: v1.28.0
Kustomize Version: v5.0.4-0.20230601165947-6ce0bf390ce3
Server Version: v1.28.0
集群Node管理
1.查看集群信息
bash
[root@master ~ 10:01:57]# kubectl cluster-info
Kubernetes control plane is running at https://192.168.88.146:6443
CoreDNS is running at https://192.168.88.146:6443/api/v1/namespaces/kube-system/services/kube-dns:dns/proxy

To further debug and diagnose cluster problems, use 'kubectl cluster-info dump'.
2.查看节点信息
查看集群节点信息
bash
[root@master ~ 10:02:11]# kubectl get nodes
NAME     STATUS   ROLES           AGE   VERSION
master   Ready    control-plane   12h   v1.28.0
node1    Ready    <none>          12h   v1.28.0
node2    Ready    <none>          12h   v1.28.0
查看集群节点详细信息
bash
[root@master ~ 10:02:20]# kubectl get nodes  -o wide
NAME     STATUS   ROLES           AGE   VERSION   INTERNAL-IP      EXTERNAL-IP   OS-IMAGE                KERNEL-VERSION                 CONTAINER-RUNTIME
master   Ready    control-plane   12h   v1.28.0   192.168.88.146   <none>        CentOS Linux 7 (Core)   3.10.0-1160.119.1.el7.x86_64   docker://26.1.4
node1    Ready    <none>          12h   v1.28.0   192.168.88.147   <none>        CentOS Linux 7 (Core)   3.10.0-1160.119.1.el7.x86_64   docker://26.1.4
node2    Ready    <none>          12h   v1.28.0   192.168.88.148   <none>        CentOS Linux 7 (Core)   3.10.0-1160.119.1.el7.x86_64   docker://26.1.4
查看节点描述详细信息
bash
[root@master ~ 10:02:36]# kubectl describe node master
Name:               master
Roles:              control-plane
Labels:             beta.kubernetes.io/arch=amd64
                    beta.kubernetes.io/os=linux
                    kubernetes.io/arch=amd64
                    kubernetes.io/hostname=master
                    kubernetes.io/os=linux
                    node-role.kubernetes.io/control-plane=
                    node.kubernetes.io/exclude-from-external-load-balancers=
Annotations:        kubeadm.alpha.kubernetes.io/cri-socket: unix:///var/run/cri-dockerd.sock
                    node.alpha.kubernetes.io/ttl: 0
                    projectcalico.org/IPv4Address: 192.168.88.146/24
                    projectcalico.org/IPv4IPIPTunnelAddr: 10.244.219.64
                    volumes.kubernetes.io/controller-managed-attach-detach: true
CreationTimestamp:  Wed, 14 Jan 2026 21:20:53 +0800
Taints:             node-role.kubernetes.io/control-plane:NoSchedule
Unschedulable:      false
Lease:
  HolderIdentity:  master
  AcquireTime:     <unset>
  RenewTime:       Thu, 15 Jan 2026 10:02:44 +0800
Conditions:
  Type                 Status  LastHeartbeatTime                 LastTransitionTime                Reason                       Message
  ----                 ------  -----------------                 ------------------                ------                       -------
  NetworkUnavailable   False   Thu, 15 Jan 2026 08:54:21 +0800   Thu, 15 Jan 2026 08:54:21 +0800   CalicoIsUp                   Calico is running on this node
  MemoryPressure       False   Thu, 15 Jan 2026 10:00:35 +0800   Wed, 14 Jan 2026 21:20:48 +0800   KubeletHasSufficientMemory   kubelet has sufficient memory available
  DiskPressure         False   Thu, 15 Jan 2026 10:00:35 +0800   Wed, 14 Jan 2026 21:20:48 +0800   KubeletHasNoDiskPressure     kubelet has no disk pressure
  PIDPressure          False   Thu, 15 Jan 2026 10:00:35 +0800   Wed, 14 Jan 2026 21:20:48 +0800   KubeletHasSufficientPID      kubelet has sufficient PID available
  Ready                True    Thu, 15 Jan 2026 10:00:35 +0800   Wed, 14 Jan 2026 21:48:42 +0800   KubeletReady                 kubelet is posting ready status
Addresses:
  InternalIP:  192.168.88.146
  Hostname:    master
Capacity:
  cpu:                2
  ephemeral-storage:  51175Mi
  hugepages-1Gi:      0
  hugepages-2Mi:      0
  memory:             4025936Ki
  pods:               110
Allocatable:
  cpu:                2
  ephemeral-storage:  48294789041
  hugepages-1Gi:      0
  hugepages-2Mi:      0
  memory:             3923536Ki
  pods:               110
System Info:
  Machine ID:                 659137a76dfb41c9aa750a3cb1073395
  System UUID:                9B724D56-4DB0-13CE-C273-3BAB12C908CB
  Boot ID:                    21069933-2436-415f-9ba5-441e459f7811
  Kernel Version:             3.10.0-1160.119.1.el7.x86_64
  OS Image:                   CentOS Linux 7 (Core)
  Operating System:           linux
  Architecture:               amd64
  Container Runtime Version:  docker://26.1.4
  Kubelet Version:            v1.28.0
  Kube-Proxy Version:         v1.28.0
PodCIDR:                      10.244.0.0/24
PodCIDRs:                     10.244.0.0/24
Non-terminated Pods:          (6 in total)
  Namespace                   Name                              CPU Requests  CPU Limits  Memory Requests  Memory Limits  Age
  ---------                   ----                              ------------  ----------  ---------------  -------------  ---
  kube-system                 calico-node-4x5wd                 250m (12%)    0 (0%)      0 (0%)           0 (0%)         12h
  kube-system                 etcd-master                       100m (5%)     0 (0%)      100Mi (2%)       0 (0%)         12h
  kube-system                 kube-apiserver-master             250m (12%)    0 (0%)      0 (0%)           0 (0%)         12h
  kube-system                 kube-controller-manager-master    200m (10%)    0 (0%)      0 (0%)           0 (0%)         12h
  kube-system                 kube-proxy-hx4rd                  0 (0%)        0 (0%)      0 (0%)           0 (0%)         12h
  kube-system                 kube-scheduler-master             100m (5%)     0 (0%)      0 (0%)           0 (0%)         12h
Allocated resources:
  (Total limits may be over 100 percent, i.e., overcommitted.)
  Resource           Requests    Limits
  --------           --------    ------
  cpu                900m (45%)  0 (0%)
  memory             100Mi (2%)  0 (0%)
  ephemeral-storage  0 (0%)      0 (0%)
  hugepages-1Gi      0 (0%)      0 (0%)
  hugepages-2Mi      0 (0%)      0 (0%)
Events:              <none>
worker node节点管理集群
使用kubeadm安装如果想在node节点管理就会报错
bash
[root@node1 ~ 08:54:40]# kubectl get nodes
E0115 10:03:04.493922   50965 memcache.go:265] couldn't get current server API group list: Get "http://localhost:8080/api?timeout=32s": dial tcp [::1]:8080: connect: connection refused
E0115 10:03:04.494883   50965 memcache.go:265] couldn't get current server API group list: Get "http://localhost:8080/api?timeout=32s": dial tcp [::1]:8080: connect: connection refused
E0115 10:03:04.498381   50965 memcache.go:265] couldn't get current server API group list: Get "http://localhost:8080/api?timeout=32s": dial tcp [::1]:8080: connect: connection refused
E0115 10:03:04.555381   50965 memcache.go:265] couldn't get current server API group list: Get "http://localhost:8080/api?timeout=32s": dial tcp [::1]:8080: connect: connection refused
E0115 10:03:04.556349   50965 memcache.go:265] couldn't get current server API group list: Get "http://localhost:8080/api?timeout=32s": dial tcp [::1]:8080: connect: connection refused
The connection to the server localhost:8080 was refused - did you specify the right host or port?
解决方法:只要把master上的管理文件/etc/kubernetes/admin.conf拷贝到node节点的
$HOME/.kube/config就可以让node节点也可以实现kubectl命令管理
重点需要(kubectl命令,指向api-server节点及证书)
1.在node节点的用户家目录创建.kube目录
bash
[root@node1 ~ 10:03:04]# mkdir /root/.kube2.在master节点把admin.conf文件复制到node节点
bash
[root@master ~ 10:02:48]# scp /etc/kubernetes/admin.conf node1:/root/.kube/config
The authenticity of host 'node1 (192.168.88.147)' can't be established.
ECDSA key fingerprint is SHA256:5LZ7yrkr1j+ifL8TpT1vyEPr/TChIDCOYO36veTG6XA.
ECDSA key fingerprint is MD5:4f:9f:16:d0:91:5d:13:22:35:7c:78:01:ef:33:f4:5d.
Are you sure you want to continue connecting (yes/no)? `yes`
Warning: Permanently added 'node1,192.168.88.147' (ECDSA) to the list of known hosts.
root@node1's password:`123`
admin.conf                                      100% 5650     6.5MB/s   00:00
3.在node节点验证
bash
[root@node1 ~ 10:03:29]# kubectl get nodes
NAME     STATUS   ROLES           AGE   VERSION
master   Ready    control-plane   12h   v1.28.0
node1    Ready    <none>          12h   v1.28.0
node2    Ready    <none>          12h   v1.28.0
dashboard界面
下载并安装
下载资源
bash
[root@master ~ 09:15:22]# wget https://raw.githubusercontent.com/kubernetes/dashboard/v2.6.1/aio/deploy/recommended.yaml修改文件
bash
[root@master ~ 09:15:49]# vim recommended.yaml
---

kind: Service
apiVersion: v1
metadata:
  labels:
    k8s-app: kubernetes-dashboard
  name: kubernetes-dashboard
  namespace: kubernetes-dashboard
spec:
  ports:
    - port: 443
      targetPort: 8443
      `nodePort: 30001`
  selector:
    k8s-app: kubernetes-dashboard
  `type: NodePort`
应用修改后配置
bash
[root@master ~ 09:18:39]# kubectl apply -f recommended.yaml
namespace/kubernetes-dashboard created
serviceaccount/kubernetes-dashboard created
service/kubernetes-dashboard created
secret/kubernetes-dashboard-certs created
secret/kubernetes-dashboard-csrf created
secret/kubernetes-dashboard-key-holder created
configmap/kubernetes-dashboard-settings created
role.rbac.authorization.k8s.io/kubernetes-dashboard created
clusterrole.rbac.authorization.k8s.io/kubernetes-dashboard created
rolebinding.rbac.authorization.k8s.io/kubernetes-dashboard created
clusterrolebinding.rbac.authorization.k8s.io/kubernetes-dashboard created
deployment.apps/kubernetes-dashboard created
service/dashboard-metrics-scraper created
deployment.apps/dashboard-metrics-scraper created
查看Pod状态
bash
[root@master ~ 09:25:56]# kubectl get pods -n kubernetes-dashboard
NAME                                         READY   STATUS    RESTARTS   AGE
dashboard-metrics-scraper-5657497c4c-bv24w   1/1     Running   0          6m29s
kubernetes-dashboard-746fbfd67c-429w4        1/1     Running   0          6m29s
查看Service暴露端口
bash
[root@master ~ 09:26:00]# kubectl get svc -n kubernetes-dashboard
NAME                        TYPE        CLUSTER-IP      EXTERNAL-IP   PORT(S)         AGE
dashboard-metrics-scraper   ClusterIP   10.97.245.232   <none>        8000/TCP        8m48s
kubernetes-dashboard        NodePort    10.108.76.24    <none>        443:30001/TCP   8m48s
访问dashborad界面
在浏览器中输入https://192.168.146:30001(注意:https协议)
选择继续访问
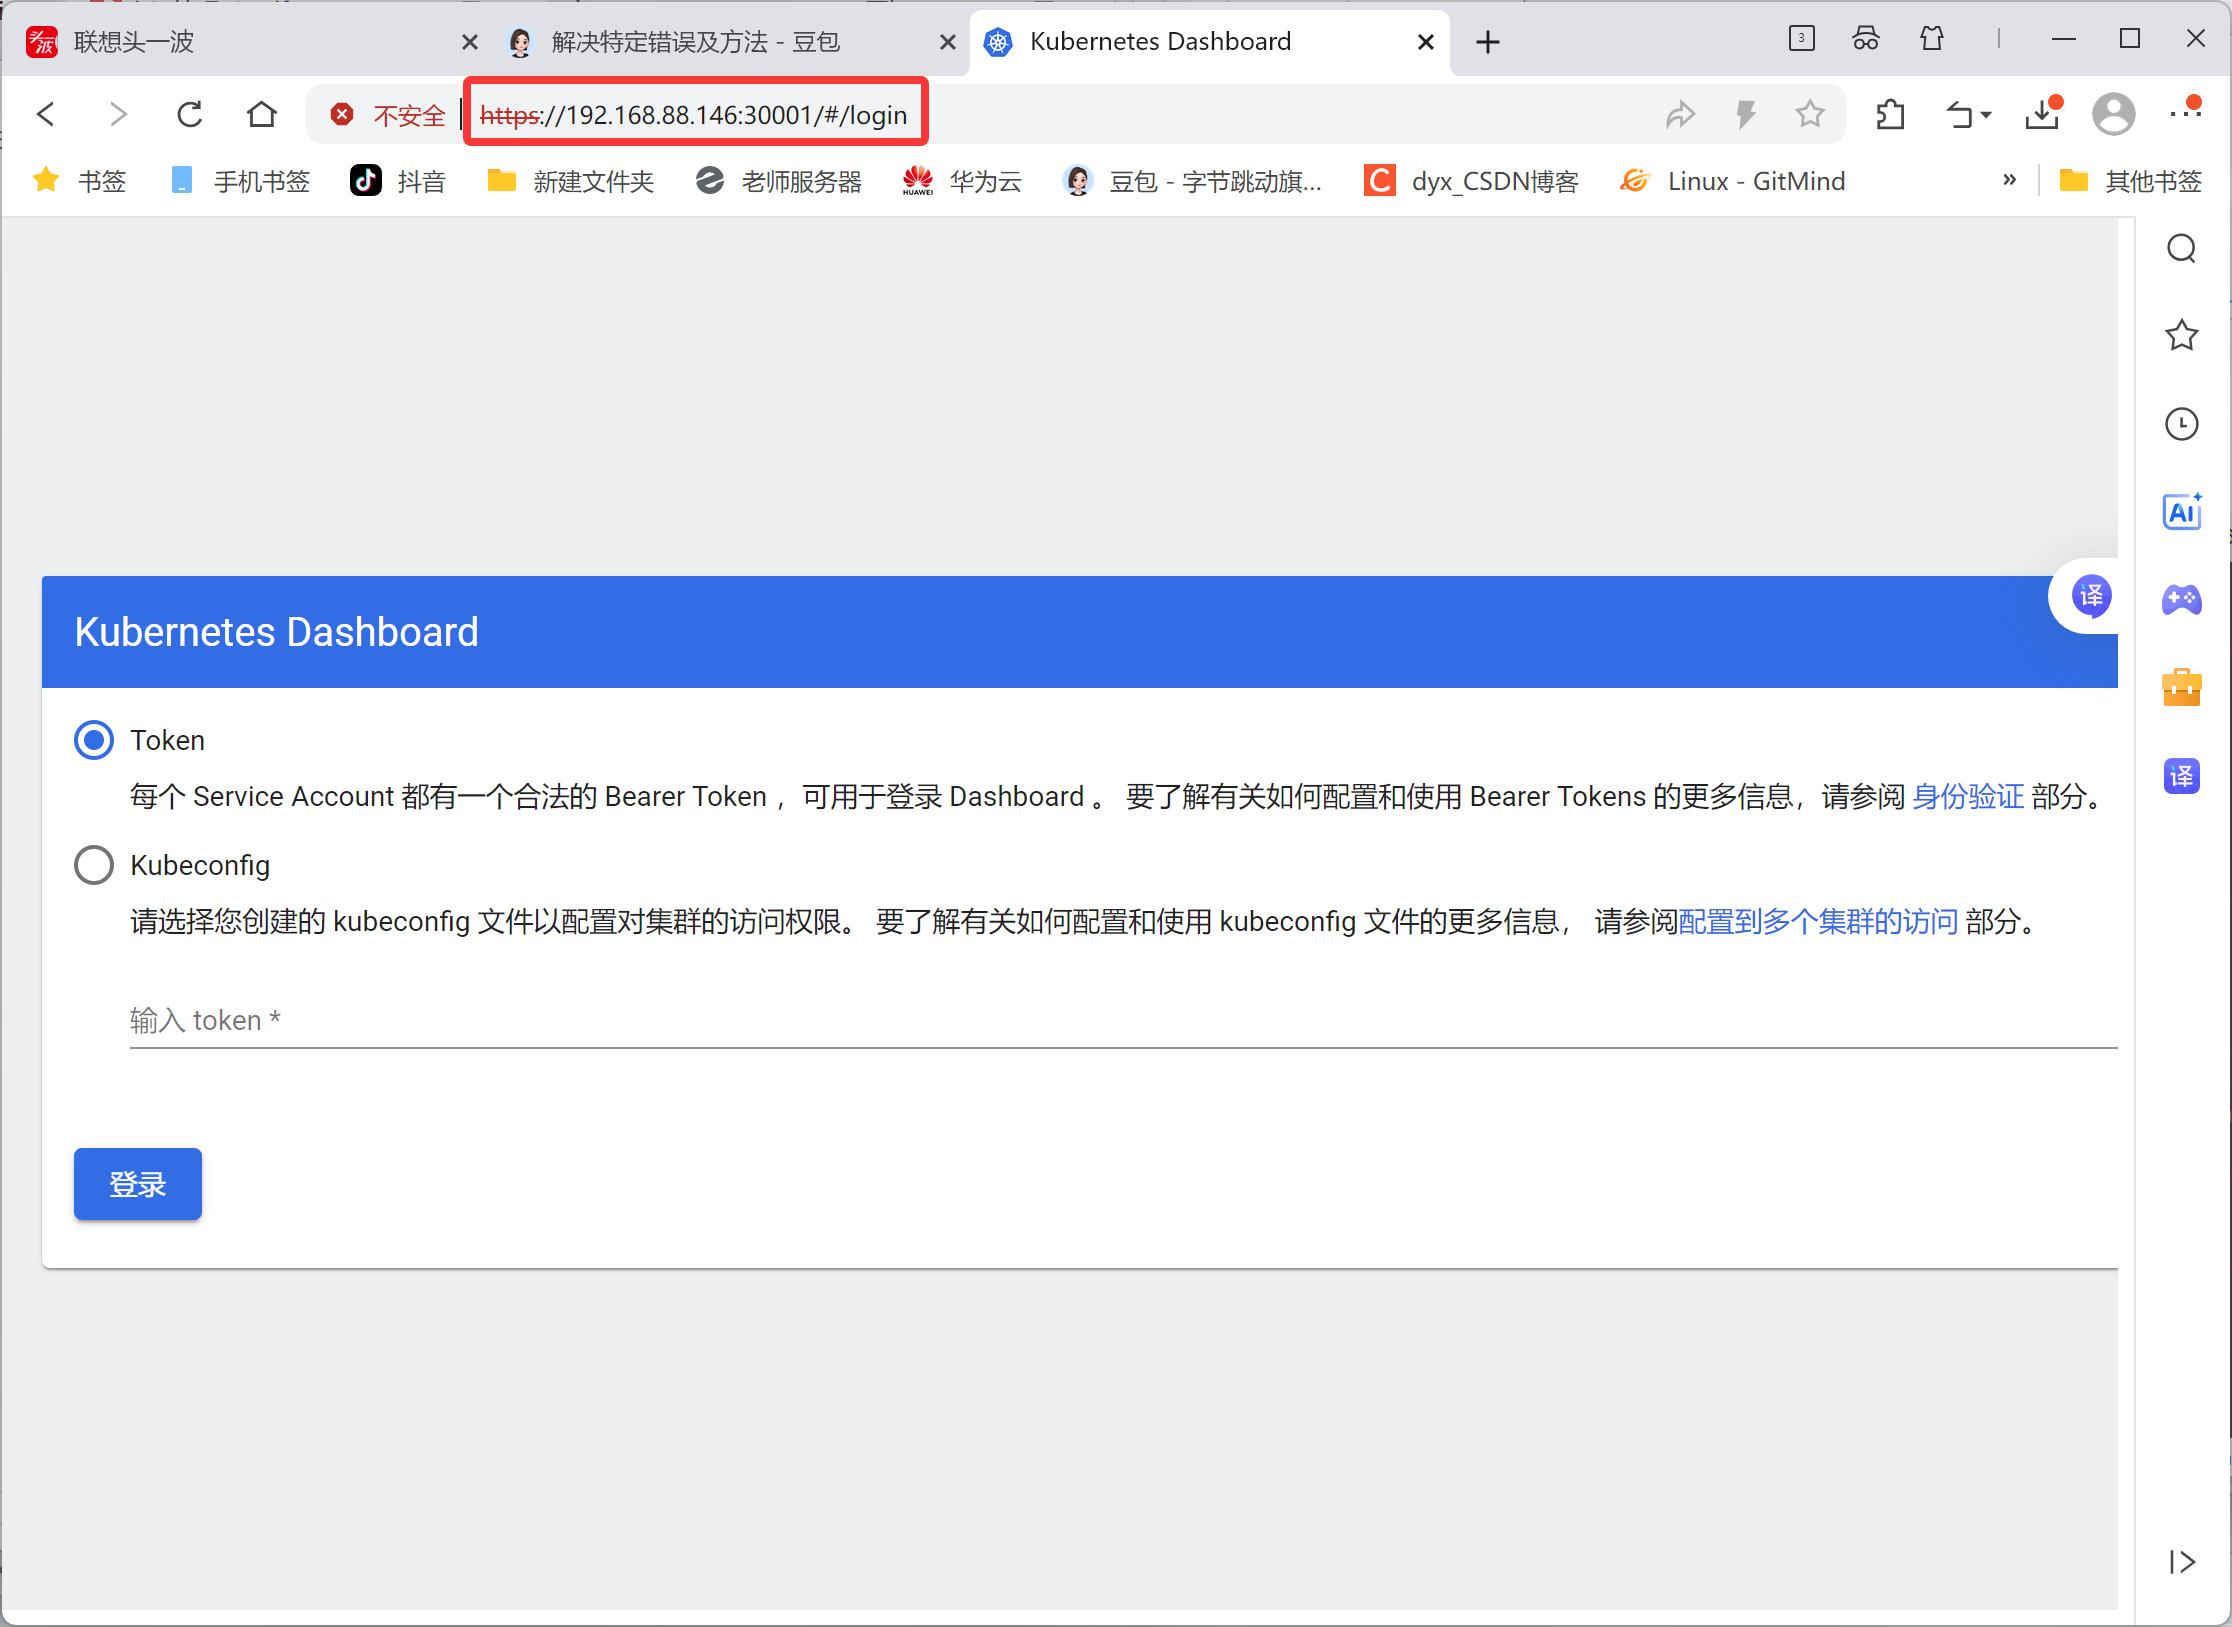
创建访问令牌(Token)
配置管理员账户
创建rbac.yaml文件,内容如下:
bash
[root@master ~ 09:28:19]# vim rbac.yaml
bash
apiVersion: v1
kind: ServiceAccount
metadata:
  name: dashboard-admin
  namespace: kube-system
---
apiVersion: rbac.authorization.k8s.io/v1
kind: ClusterRoleBinding
metadata:
  name: dashboard-admin
roleRef:
  apiGroup: rbac.authorization.k8s.io
  kind: ClusterRole
  name: cluster-admin
subjects:
- kind: ServiceAccount
  name: dashboard-admin
  namespace: kube-system
应用配置并获取Token
bash
[root@master ~ 09:52:21]# kubectl apply -f rbac.yaml
serviceaccount/dashboard-admin created
clusterrolebinding.rbac.authorization.k8s.io/dashboard-admin created
获取token,k8s1.22版本引入,默认有效期1小时,每次执行命令会生成新token,旧token会自动消失
bash
[root@master ~ 09:53:16]# kubectl create token dashboard-admin --namespace kube-system
bash
eyJhbGciOiJSUzI1NiIsImtpZCI6ImtYQlprczlQcWlrd1JsSkRLbjU3VjRraV9aNEt1bHg4emhaUzhyWVdMMTQifQ.eyJhdWQiOlsiaHR0cHM6Ly9rdWJlcm5ldGVzLmRlZmF1bHQuc3ZjLmNsdXN0ZXIubG9jYWwiXSwiZXhwIjoxNzY4NDQ1NjA2LCJpYXQiOjE3Njg0NDIwMDYsImlzcyI6Imh0dHBzOi8va3ViZXJuZXRlcy5kZWZhdWx0LnN2Yy5jbHVzdGVyLmxvY2FsIiwia3ViZXJuZXRlcy5pbyI6eyJuYW1lc3BhY2UiOiJrdWJlLXN5c3RlbSIsInNlcnZpY2VhY2NvdW50Ijp7Im5hbWUiOiJkYXNoYm9hcmQtYWRtaW4iLCJ1aWQiOiIzMDY4M2EzOC02OGMyLTQ2NWUtYTgzZC0xNzI5YTNhYjczYmUifX0sIm5iZiI6MTc2ODQ0MjAwNiwic3ViIjoic3lzdGVtOnNlcnZpY2VhY2NvdW50Omt1YmUtc3lzdGVtOmRhc2hib2FyZC1hZG1pbiJ9.gVRNigmQt8t7Tgdg7KHnmqonalqYJXCelZCnKWDbJEn8t9hHdJj-bd2ShuEpw-9LTywciQMREN7Qdl0XUYCQBNy9AiaCNRvO-CqQrxgBDsoBkVDpet_KxIllAXjMZihqtIzLVX3Ag2xL4pS79cj2t-CCo-_b4qpCRwghhYJcyMLfrAXQ3oXDeTbcTABHMHcCIjLX49LQ8i_pmFqF2MAjjSMtXM-s68mrysd8imQVnLv2X_a9rfeRCAkcwuz7WZj6vgkEzEi_ee5raUa9wBUeY4sW4m0lhPtuJ8na39tYy0bulwbuuJnC_VPKpcV4JAUHNGN2rv7Eaa-BZdPtIsPOtQ完成部署

节点标签(label)
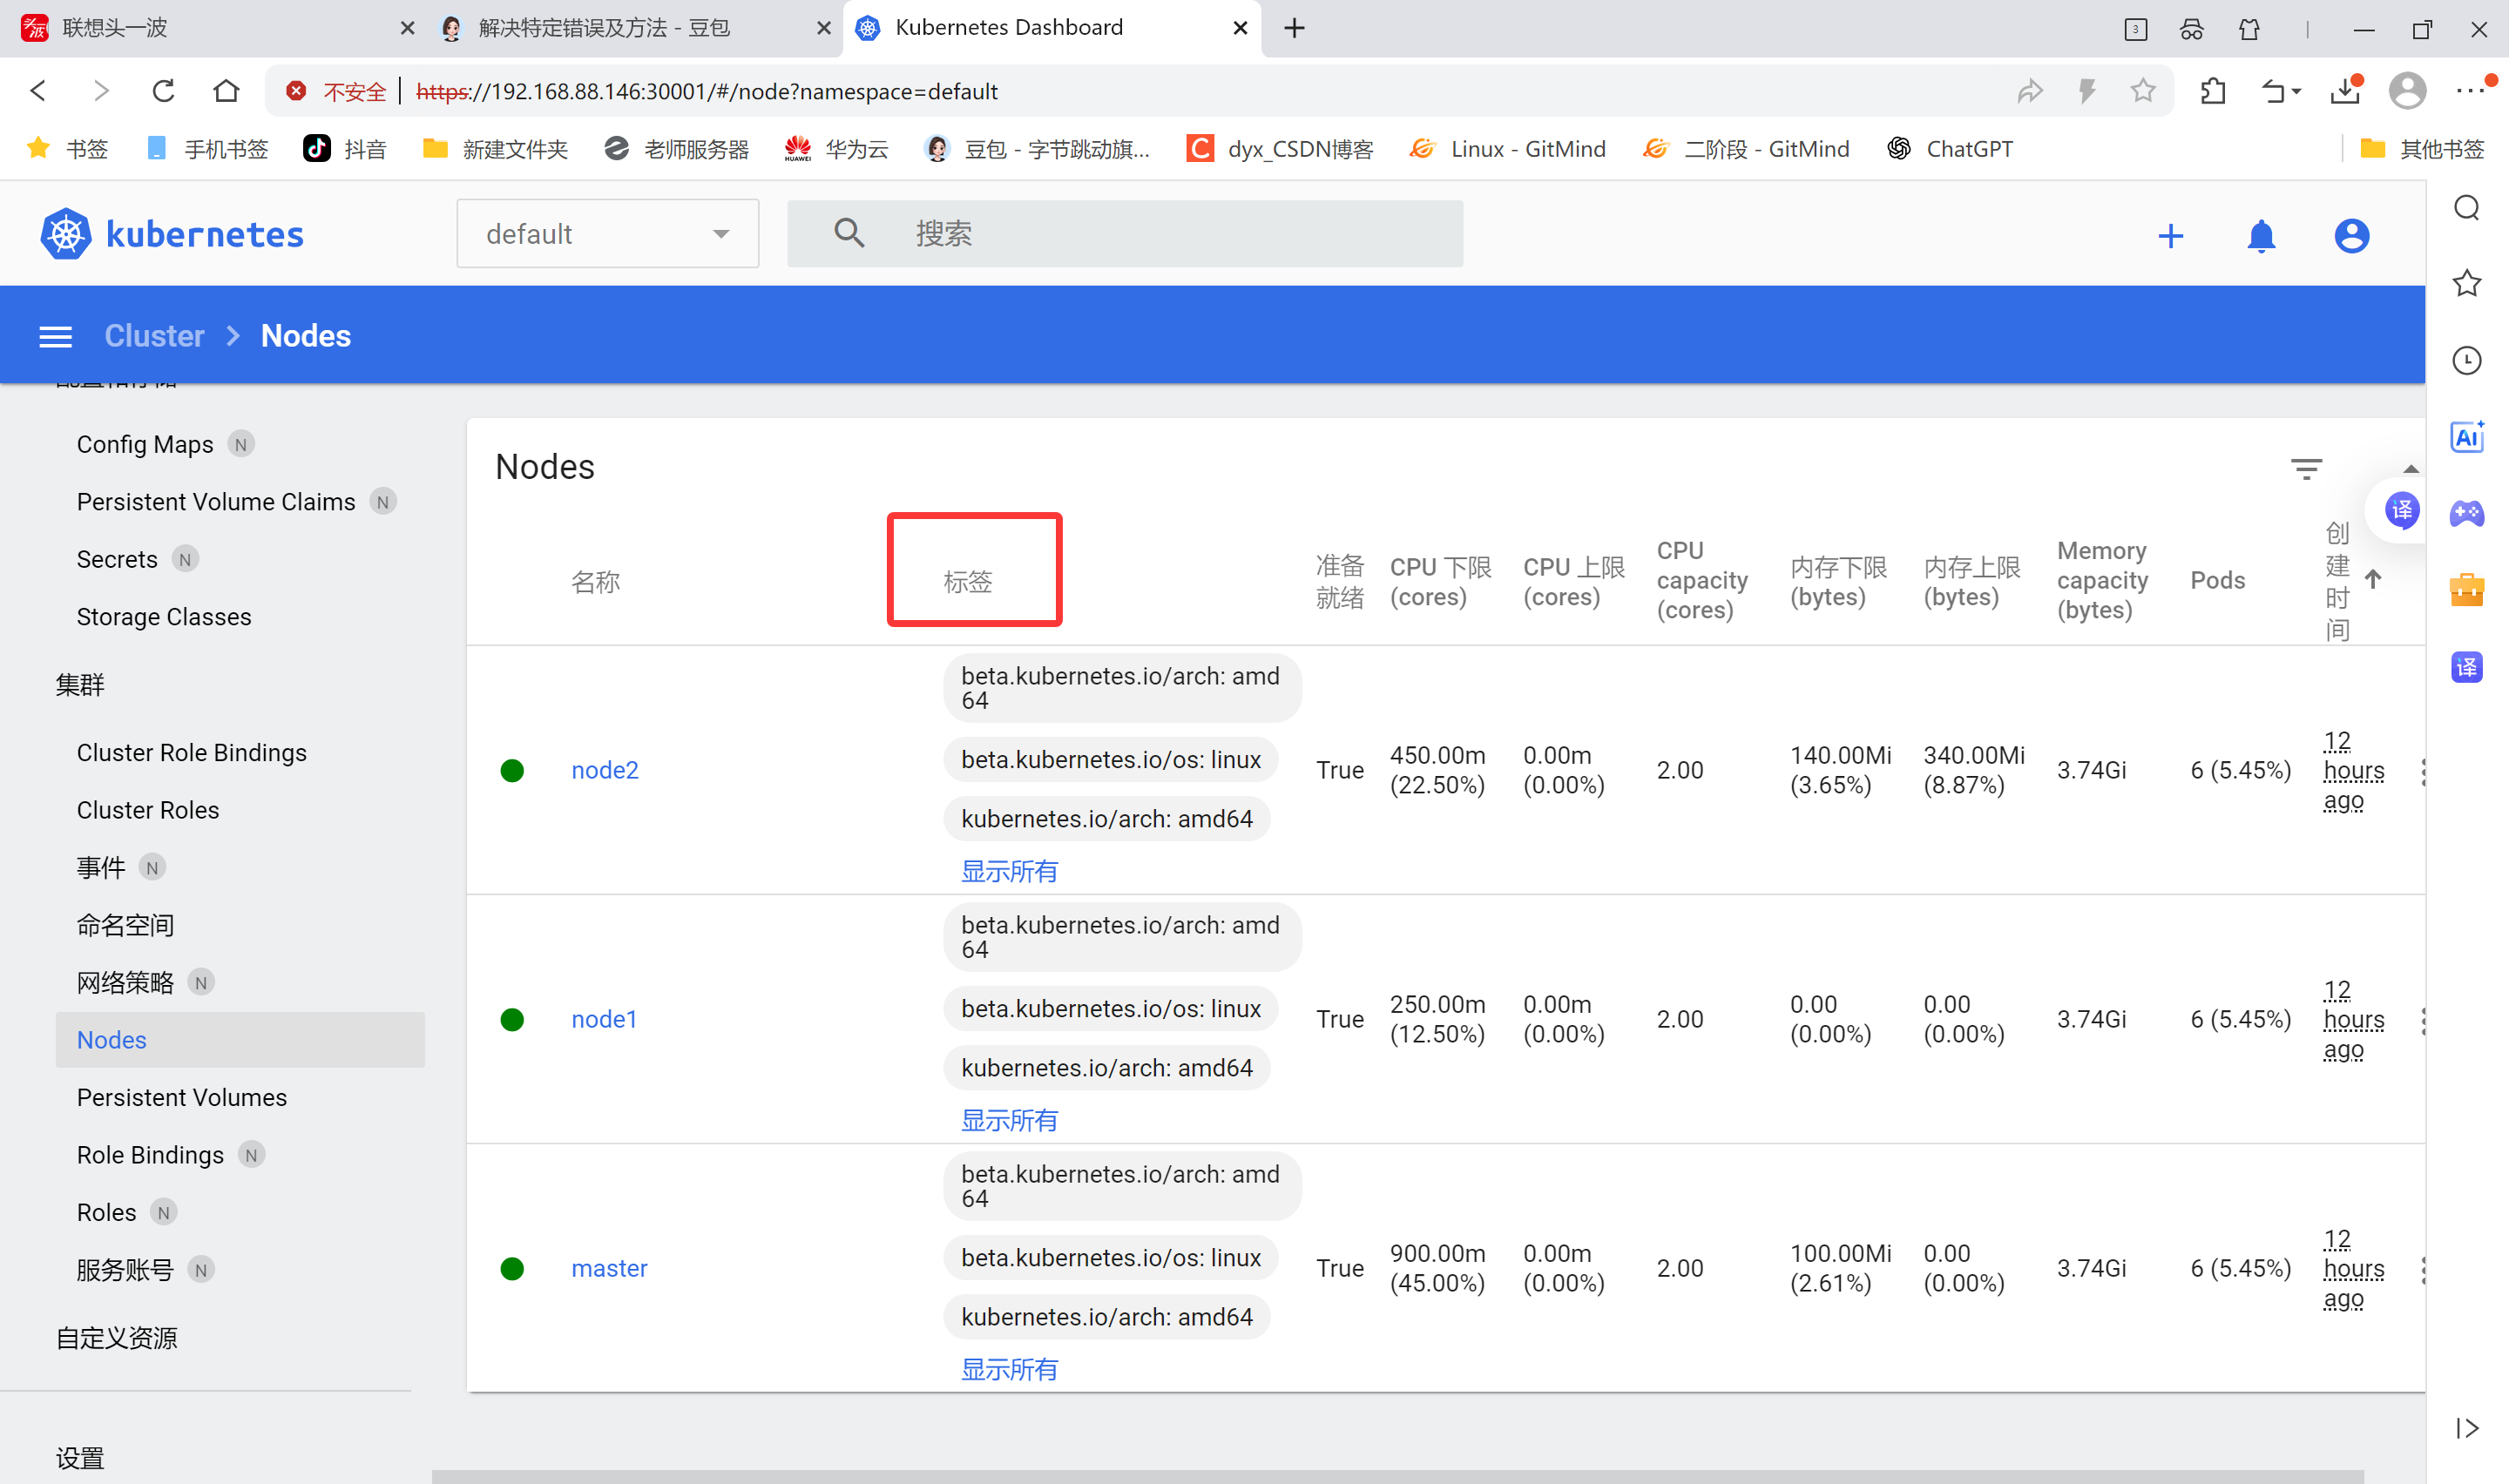
查看节点标签信息
显示的标签以键值对形式出现,键名=值
bash
[root@master ~ 09:38:01]# kubectl get nodes --show-labels
NAME     STATUS   ROLES           AGE   VERSION   LABELS
master   Ready    control-plane   12h   v1.28.0   beta.kubernetes.io/arch=amd64,beta.kubernetes.io/os=linux,kubernetes.io/arch=amd64,kubernetes.io/hostname=master,kubernetes.io/os=linux,node-role.kubernetes.io/control-plane=,node.kubernetes.io/exclude-from-external-load-balancers=
node1    Ready    <none>          12h   v1.28.0   beta.kubernetes.io/arch=amd64,beta.kubernetes.io/os=linux,kubernetes.io/arch=amd64,kubernetes.io/hostname=node1,kubernetes.io/os=linux
node2    Ready    <none>          12h   v1.28.0   beta.kubernetes.io/arch=amd64,beta.kubernetes.io/os=linux,kubernetes.io/arch=amd64,kubernetes.io/hostname=node2,kubernetes.io/os=linux
设置节点标签信息
设置节点标签
为节点node2打一个region=nanjing的标签
bash
[root@master ~ 09:38:18]# kubectl label node node2 region=nanjing
node/node2 labeled
查看标签
bash
[root@master ~ 09:38:41]# kubectl get nodes --show-labels
NAME     STATUS   ROLES           AGE   VERSION   LABELS
master   Ready    control-plane   12h   v1.28.0   beta.kubernetes.io/arch=amd64,beta.kubernetes.io/os=linux,kubernetes.io/arch=amd64,kubernetes.io/hostname=master,kubernetes.io/os=linux,node-role.kubernetes.io/control-plane=,node.kubernetes.io/exclude-from-external-load-balancers=
node1    Ready    <none>          12h   v1.28.0   beta.kubernetes.io/arch=amd64,beta.kubernetes.io/os=linux,kubernetes.io/arch=amd64,kubernetes.io/hostname=node1,kubernetes.io/os=linux
node2    Ready    <none>          12h   v1.28.0   beta.kubernetes.io/arch=amd64,beta.kubernetes.io/os=linux,kubernetes.io/arch=amd64,kubernetes.io/hostname=node2,kubernetes.io/os=linux,`region=nanjing`
查看所有节点带region的标签
bash
[root@master ~ 09:38:58]# kubectl get nodes -L region
NAME     STATUS   ROLES           AGE   VERSION   REGION
master   Ready    control-plane   12h   v1.28.0
node1    Ready    <none>          12h   v1.28.0
node2    Ready    <none>          12h   v1.28.0   `nanjing`
多维度标签
设置多维度标签,用于不同的需要区分的场景
如把node1标签为合肥,南区机房,测试环境,AI业务
bash
[root@master ~ 09:39:56]# kubectl label nodes node1 region=hefei zone=south env=test
node/node1 labeled
查看
bash
[root@master ~ 09:40:43]# kubectl get nodes node1 --show-labels
NAME    STATUS   ROLES    AGE   VERSION   LABELS
node1   Ready    <none>   12h   v1.28.0   beta.kubernetes.io/arch=amd64,beta.kubernetes.io/os=linux,`env=test`,kubernetes.io/arch=amd64,kubernetes.io/hostname=node1,kubernetes.io/os=linux,`region=hefei,zone=south`
显示节点的相应标签
bash
[root@master ~ 09:41:38]# kubectl get nodes -L region,zone,env
NAME     STATUS   ROLES           AGE   VERSION   REGION    ZONE    ENV
master   Ready    control-plane   12h   v1.28.0
node1    Ready    <none>          12h   v1.28.0   hefei     south   test
node2    Ready    <none>          12h   v1.28.0   nanjing
查找zone=south的节点(键值对用小写l;键名用大写L)
bash
[root@master ~ 09:42:13]# kubectl get nodes -l zone=south
NAME    STATUS   ROLES    AGE   VERSION
node1   Ready    <none>   12h   v1.28.0
标签的修改(overwrite:使用复写功能)
bash
[root@master ~ 09:42:24]# kubectl label nodes node1 zone=west --overwrite=true
node/node1 labeled
查看
bash
[root@master ~ 09:42:53]# kubectl get nodes -l zone=south
No resources found

[root@master ~ 09:42:58]# kubectl get nodes -l zone=west
NAME    STATUS   ROLES    AGE   VERSION
node1   Ready    <none>   12h   v1.28.0
标签删除
使用key加一个减号的写法来取消标签
bash
[root@master ~ 09:43:34]# kubectl label node node1 env-
node/node1 unlabeled
[root@master ~ 09:43:54]# kubectl get nodes --show-labels
NAME     STATUS   ROLES           AGE   VERSION   LABELS
master   Ready    control-plane   12h   v1.28.0   beta.kubernetes.io/arch=amd64,beta.kubernetes.io/os=linux,kubernetes.io/arch=amd64,kubernetes.io/hostname=master,kubernetes.io/os=linux,node-role.kubernetes.io/control-plane=,node.kubernetes.io/exclude-from-external-load-balancers=
node1    Ready    <none>          12h   v1.28.0   beta.kubernetes.io/arch=amd64,beta.kubernetes.io/os=linux,kubernetes.io/arch=amd64,kubernetes.io/hostname=node1,kubernetes.io/os=linux,regioin=hefei,region=hefei,zone=west
node2    Ready    <none>          12h   v1.28.0   beta.kubernetes.io/arch=amd64,beta.kubernetes.io/os=linux,kubernetes.io/arch=amd64,kubernetes.io/hostname=node2,kubernetes.io/os=linux,region=nanjing
标签选择器
用于筛选匹配特定标签的资源,主要分两类:
-
等值匹配(Equality-based)
- 精确匹配键值: app=nginx (匹配 app 值为 nginx 的资源)
- 排除匹配: env!=dev (排除 env=dev 的资源)。
-
集合匹配(Set-based)
- key in (value1, value2) :匹配值在集合中的资源(如 env in (prod, staging) )
- key notin (value1) :排除指定值(如 tier notin (backend) )
- 存在性检查: key (仅检查键是否存在)。
bash
[root@master ~ 09:48:42]# kubectl get nodes -l region!=nanjing
NAME     STATUS   ROLES           AGE   VERSION
master   Ready    control-plane   12h   v1.28.0
node1    Ready    <none>          12h   v1.28.0
[root@master ~ 09:49:22]# kubectl get nodes -l "region in (nanjing,hefei)"
NAME    STATUS   ROLES    AGE   VERSION
node1   Ready    <none>   12h   v1.28.0
node2   Ready    <none>   12h   v1.28.0
[root@master ~ 09:49:42]# kubectl get nodes -l "region notin (nanjing,hefei)"
NAME     STATUS   ROLES           AGE   VERSION
master   Ready    control-plane   12h   v1.28.0
YAML声明式文件
YAML:仍是一种标记语言,但为了强调这种语言以数据做为中心,而不是以标记语言为重点。是一个可读性高,用来表达数据序列的格式。
基本语法
- 低版本(1.0、2.0)缩进时不允许使用Tab键,只允许使用空格
- 缩进的空格数目不重要,只要相同层级的元素左侧对齐即可
- #标识注释,从这个字符一直到行尾,都会被解释器忽略
数据结构
-
对象:键值对的集合,又称为映射(mapping)/哈希(hashes)/字典(dictionary)
-
数组:一组按次序排列的值,又称为序列
-
纯量(scalars):单个的、不可再分的值
对象类型:对象的一组键值对,使用冒号结构表示
bash
name: Tom
age: 20
heigh: 175
Yaml 也允许另一种写法,将所有键值对写成一个行内对象
bash
hash: { name: Tom, age: 20, heigh: 175 }数组类型:一组连词线开头的行,构成一个数组
bash
color
- blue
- red
- green
数组也可以采用行内表示法
bash
color: [blue, red, green]复合结构:对象和数组可以结合使用,形成复合结构
bash
languages:
- java
- python
- go
websites:
  YAML: yaml.org
  Ruby: ruby-lang.org
  Python: python.org
  Perl: use.perl.org
纯量:纯量是最基本的、不可再分的值。以下数据类型都属于纯量
bash
1 字符串 布尔值 整数 浮点数 Nu11
2 时间 日期

数值直接以字面量的形式表示
number: 3.14

布尔值用true和fa1se表示
isSet: true

nu11用 ~ 表示
parent: ~
parent: Null

时间采用 ISO8601 格式
iso8601:2025-7-11t20:00:00.10-05:00

日期采用复合 iso8601 格式的年、月、日表示
date: 1990-07-10

YAML 允许使用两个感叹号,强制转换数据类型
e: !!str 123
f: !!str true
宇符串
字符串默认不使用引号表示
bash
str: hello如果字符串之中包含空格或特殊字符,需要放在引号之中
bash
str: 'hello world'单引号和双引号都可以使用,双引号不会对特殊字符转义
bash
s1: '你好\n世界'
s2: '你好\n世界'
单引号之中如果还有单引号,必须连续使用两个单引号转义
bash
str: 'let''s go' #输出let's go字符串可以写成多行,从第二行开始,必须有一个单空格缩进。换行符会被转为 空格
bash
str: 第一行
  第二行
  第三行
多行字符串可以使用|保留换行符,也可以使用>折叠换行(配置文件场景)
bash
names: |
tom
jerry
jack
YAML资源对象描述方法
在kubernetes中,一般使用yaml格式的文件来创建符合我们预期期望的pod,这样的yaml文件称为资源清单文件。
常用字段
| 参数名 | 字段类型 | 说明 |
|---|---|---|
| version | String | 这里是指的是K8S API的版本,目前基本上是v1,可以用kubectl api-versions命令查询 |
| kind | Sting | 这里指的是yam文件定义的资源类型和角色,比如:Pod |
| metadata | Object | 元数据对象,固定值就写metadata |
| metadata.name | String | 元数据对象的名字,这里自定义,比如命名Pod的名字 |
| Spec | Object | 详细定义对象,固定值就写Spec |
| spec.containers\[\] | list | 这里是Spec对象的容器列表定义,是个列表 |
| spec.containers\[\].name | String | 这里定义容器的名称 |
| spec.containers\[\].image | String | 这里定义要用到的镜像名称 |
| spec.containers\[\].imagePullPolicy | String | 定义镜像拉取策路,有Always、Never、lfnotpresent三个值可选:(1)Always:意思是每次都尝试重新拉取镜像;(2)Never:表示仅使用本地镜像;(3)IfNotPresent:如果本地有镜像就使用本地镜像,没有就拉取在线镜像。上面三个值都没设置的话,默认是 Always。 |
| spec.containers\[\].command\[\] | List | 指定容器启动命令,因为是数组可以指定多个。不指定则使用镜像打包时使用的启动命令. |
| spec.containers\[\].args | List | 指定容器启动命令参数,因为是数组可以指定多个 |
| spec.containers\[\].workDir | String | 指定容器的工作目录 |
| spec.containers\[\].volumeMounts\[\] | List | 指定容器内部的存储卷配置 |
| spec.containers\[\].volumeMounts\[\].name | String | 指定可以被容器挂载的存储卷的名称 |
| spec.containers\[\].volumeMounts\[\].mountPath | String | 指定可以被容器挂载的存储卷的路径 |
| spec.containers\[\].volumeMounts\[\].readOnly | String | 设置存储卷路径的读写模式,true或者 false,默认为读写模式 |
| spec.containers\[\].ports\[\] | String | 指容器需要用到的端口列表 |
| spec.containers\[\].ports\[\].name | String | 指定端口名称 |
| spec.containers\[\].port\[\].containerPort | String | 指定容器需要监听的端口号 |
| spec.containers\[\].ports\[\].hostPort | String | 指定容器所在主机需要监听的端口号,默认跟上面containerPort相同注意设置了hostPort同一台主机无法启动该容器的相同副本(因为主机的端口号不能相同,这样会冲突) |
| spec.containers\[\].ports\[\].protocol | String | 指定端口协议,支持TCP和UDP,默认值为TCP |
| spec.containers\[\].env\[\] | String | 指定容器运行前需设的环境变量列表 |
| spec.containers\[\].env\[\].name | String | 指定环境变量名称 |
| spec.containers\[\].env\[\].value | String | 指定环境变量值 |
| spec.containers\[\].resources | Object | 指定资源限制和资源请求的值(这里开始就是设置容器的资源上限) |
| spec.containers\[\].resources.limits | Object | 指定设置容器运行时资源的运行上限 |
| spec.containers\[\].resources.limits.cpu | String | 指定CPU限制,单位为core数,将用于docker run --cpu-shares参数 |
| spec.containers\[\].resources.limits.memory | String | 指定MEM内存的限制,单位为MiB,GiB |
| spec.containers\[\].resources.requests | Object | 指定容器启动和调度时的限制设置 |
| spec.containers\[\].resources.requests.cpu | String | CPU请求,单位为core数,容器启动时初始化可用数量 |
| spec.containers\[\].resources.requests.memory | String | 内存请求,单位为MiB,GiB,容器启动时初始化可用数量 |
| spec.restartPolicy | String | 定义Pod的重启策略,可选值为Always,OnFailure,默认值为Always。1.Always:Pod一旦终止运行,则无论容器时如何终止的,kubelet服务都将重启它。2.OnFailure:只有Pod以非零退出码终止时,kubelet才会重启该容器。如果容器正常结束(退出码为0),则kubelet将不会重启它。3.Never:Pod终止后,kubelet将退出码报告给Master,不会重启该Pod。 |
| spec.nodeSelector | Object | 定义Node的Label过滤标签,以key:value格式指定 |
| spec.imagePullSecrets | Object | 定义pull镜像时使用secret名称,以name:secretkey格式指定。 |
| spec.hostNetwork | Boolean | 定义是否使用主机网络模式,默认值为false。设置true表示使用宿主机网络,不使用docker网桥,同时设置了true将无法在同一台宿主机上启动第二个副本 |
案例说明
查阅使用手册说明
pod的spec中包含可用属性设置
bash
[root@master ~ 16:30:25]# kubectl explain pod.spec
KIND:       Pod
VERSION:    v1

FIELD: spec <PodSpec>

DESCRIPTION:
    Specification of the desired behavior of the pod. More info:
    https://git.k8s.io/community/contributors/devel/sig-architecture/api-conventions.md#spec-and-status
    PodSpec is a description of a pod.

FIELDS:
  activeDeadlineSeconds <integer>
    Optional duration in seconds the pod may be active on the node relative to
    StartTime before the system will actively try to mark it failed and kill
    associated containers. Value must be a positive integer.

  affinity      <Affinity>
    If specified, the pod's scheduling constraints

  automountServiceAccountToken  <boolean>
    AutomountServiceAccountToken indicates whether a service account token
    should be automatically mounted.

  containers    <[]Container> -required-
    List of containers belonging to the pod. Containers cannot currently be
    added or removed. There must be at least one container in a Pod. Cannot be
    updated.

  dnsConfig     <PodDNSConfig>
    Specifies the DNS parameters of a pod. Parameters specified here will be
    merged to the generated DNS configuration based on DNSPolicy.

  dnsPolicy     <string>
    Set DNS policy for the pod. Defaults to "ClusterFirst". Valid values are
    'ClusterFirstWithHostNet', 'ClusterFirst', 'Default' or 'None'. DNS
    parameters given in DNSConfig will be merged with the policy selected with
    DNSPolicy. To have DNS options set along with hostNetwork, you have to
    specify DNS policy explicitly to 'ClusterFirstWithHostNet'.

    Possible enum values:
     - `"ClusterFirst"` indicates that the pod should use cluster DNS first
    unless hostNetwork is true, if it is available, then fall back on the
    default (as determined by kubelet) DNS settings.
     - `"ClusterFirstWithHostNet"` indicates that the pod should use cluster DNS
    first, if it is available, then fall back on the default (as determined by
    kubelet) DNS settings.
     - `"Default"` indicates that the pod should use the default (as determined
    by kubelet) DNS settings.
     - `"None"` indicates that the pod should use empty DNS settings. DNS
    parameters such as nameservers and search paths should be defined via
    DNSConfig.

  enableServiceLinks    <boolean>
    EnableServiceLinks indicates whether information about services should be
    injected into pod's environment variables, matching the syntax of Docker
    links. Optional: Defaults to true.

  ephemeralContainers   <[]EphemeralContainer>
    List of ephemeral containers run in this pod. Ephemeral containers may be
    run in an existing pod to perform user-initiated actions such as debugging.
    This list cannot be specified when creating a pod, and it cannot be modified
    by updating the pod spec. In order to add an ephemeral container to an
    existing pod, use the pod's ephemeralcontainers subresource.

... ...
创建namespace
bash
[root@master ~ 11:13:53]# mkdir tomcat_dir
[root@master ~ 11:15:17]# cd tomcat_dir/
[root@master tomcat_dir 11:15:19]# ls
[root@master tomcat_dir 11:15:25]# vim tomcat.yaml
bash
apiVersion: v1
kind: Namespace
metadata:
  name: web-test
创建pod资源
该配置包含Deployment和Service两部分。Deployment创建2个Tomcat Pod副本(使用官方镜像),Service通过NodePort类型将容器8080端口映射到主机30080端口,并通过8888服务端口暴露。访问方式:<节点IP>:
bash
---
apiVersion: v1
kind: ConfigMap
metadata:
  name: tomcat-web-content
data:
  index.html: |
    <html><body>Hello Tomcat</body></html>
---
apiVersion: apps/v1
kind: Deployment
metadata:
  name: tomcat-test
spec:
  replicas: 2
  selector:
    matchLabels:
      app: tomcat
  template:
    metadata:
      labels:
        app: tomcat
    spec:
      securityContext:
        runAsUser: 1000
        fsGroup: 1000
      containers:
      - name: tomcat
        image: tomcat:9.0.85-jdk11
        ports:
        - containerPort: 8080
        volumeMounts:
        - name: web-content
          mountPath: /usr/local/tomcat/webapps/ROOT/index.html
          subPath: index.html
      volumes:
      - name: web-content
        configMap:
          name: tomcat-web-content
---
apiVersion: v1
kind: Service
metadata:
  name: tomcat-service
spec:
  type: NodePort
  selector:
    app: tomcat
  ports:
    - port: 80
      targetPort: 8080
      nodePort: 30080
kubernetes yaml中的端口
containerPort-容器端口
targetPort-Pod端口
port-内部集群入口端口(cluster-ip)
nodePort-主机端口
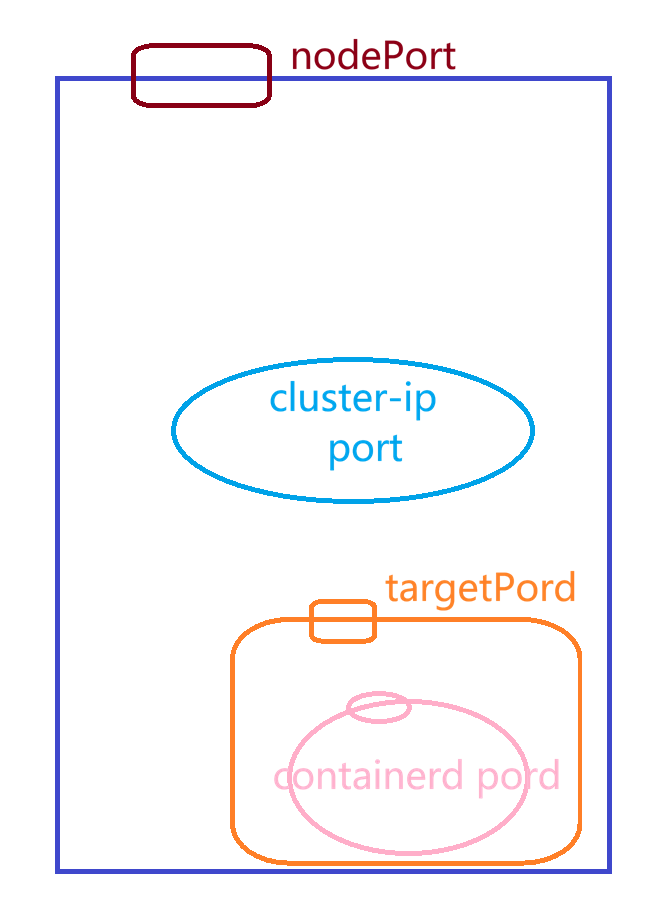
创建资源
bash
[root@master tomcat_dir 13:58:30]# kubectl apply -f tomcat.yaml
namespace/web-test created
configmap/tomcat-web-content created
deployment.apps/tomcat-test created
service/tomcat-service created
[root@master tomcat_dir 13:58:35]# kubectl get pods
NAME                           READY   STATUS    RESTARTS      AGE
nginx-7854ff8877-7jbq8         1/1     Running   1 (15h ago)   15h
nginx-7854ff8877-9nlk9         1/1     Running   1 (15h ago)   15h
nginx-7854ff8877-chxtr         1/1     Running   1 (15h ago)   15h
tomcat-test-75469fdc74-5rxhh   1/1     Running   0             6s
tomcat-test-75469fdc74-cv65d   1/1     Running   0             6s
查看端口
bash
[root@master tomcat_dir 17:13:05]# kubectl get svc | grep tomcat
tomcat-service   NodePort    10.97.6.32       <none>        80:30080/TCP   3h15m
打开网页地址
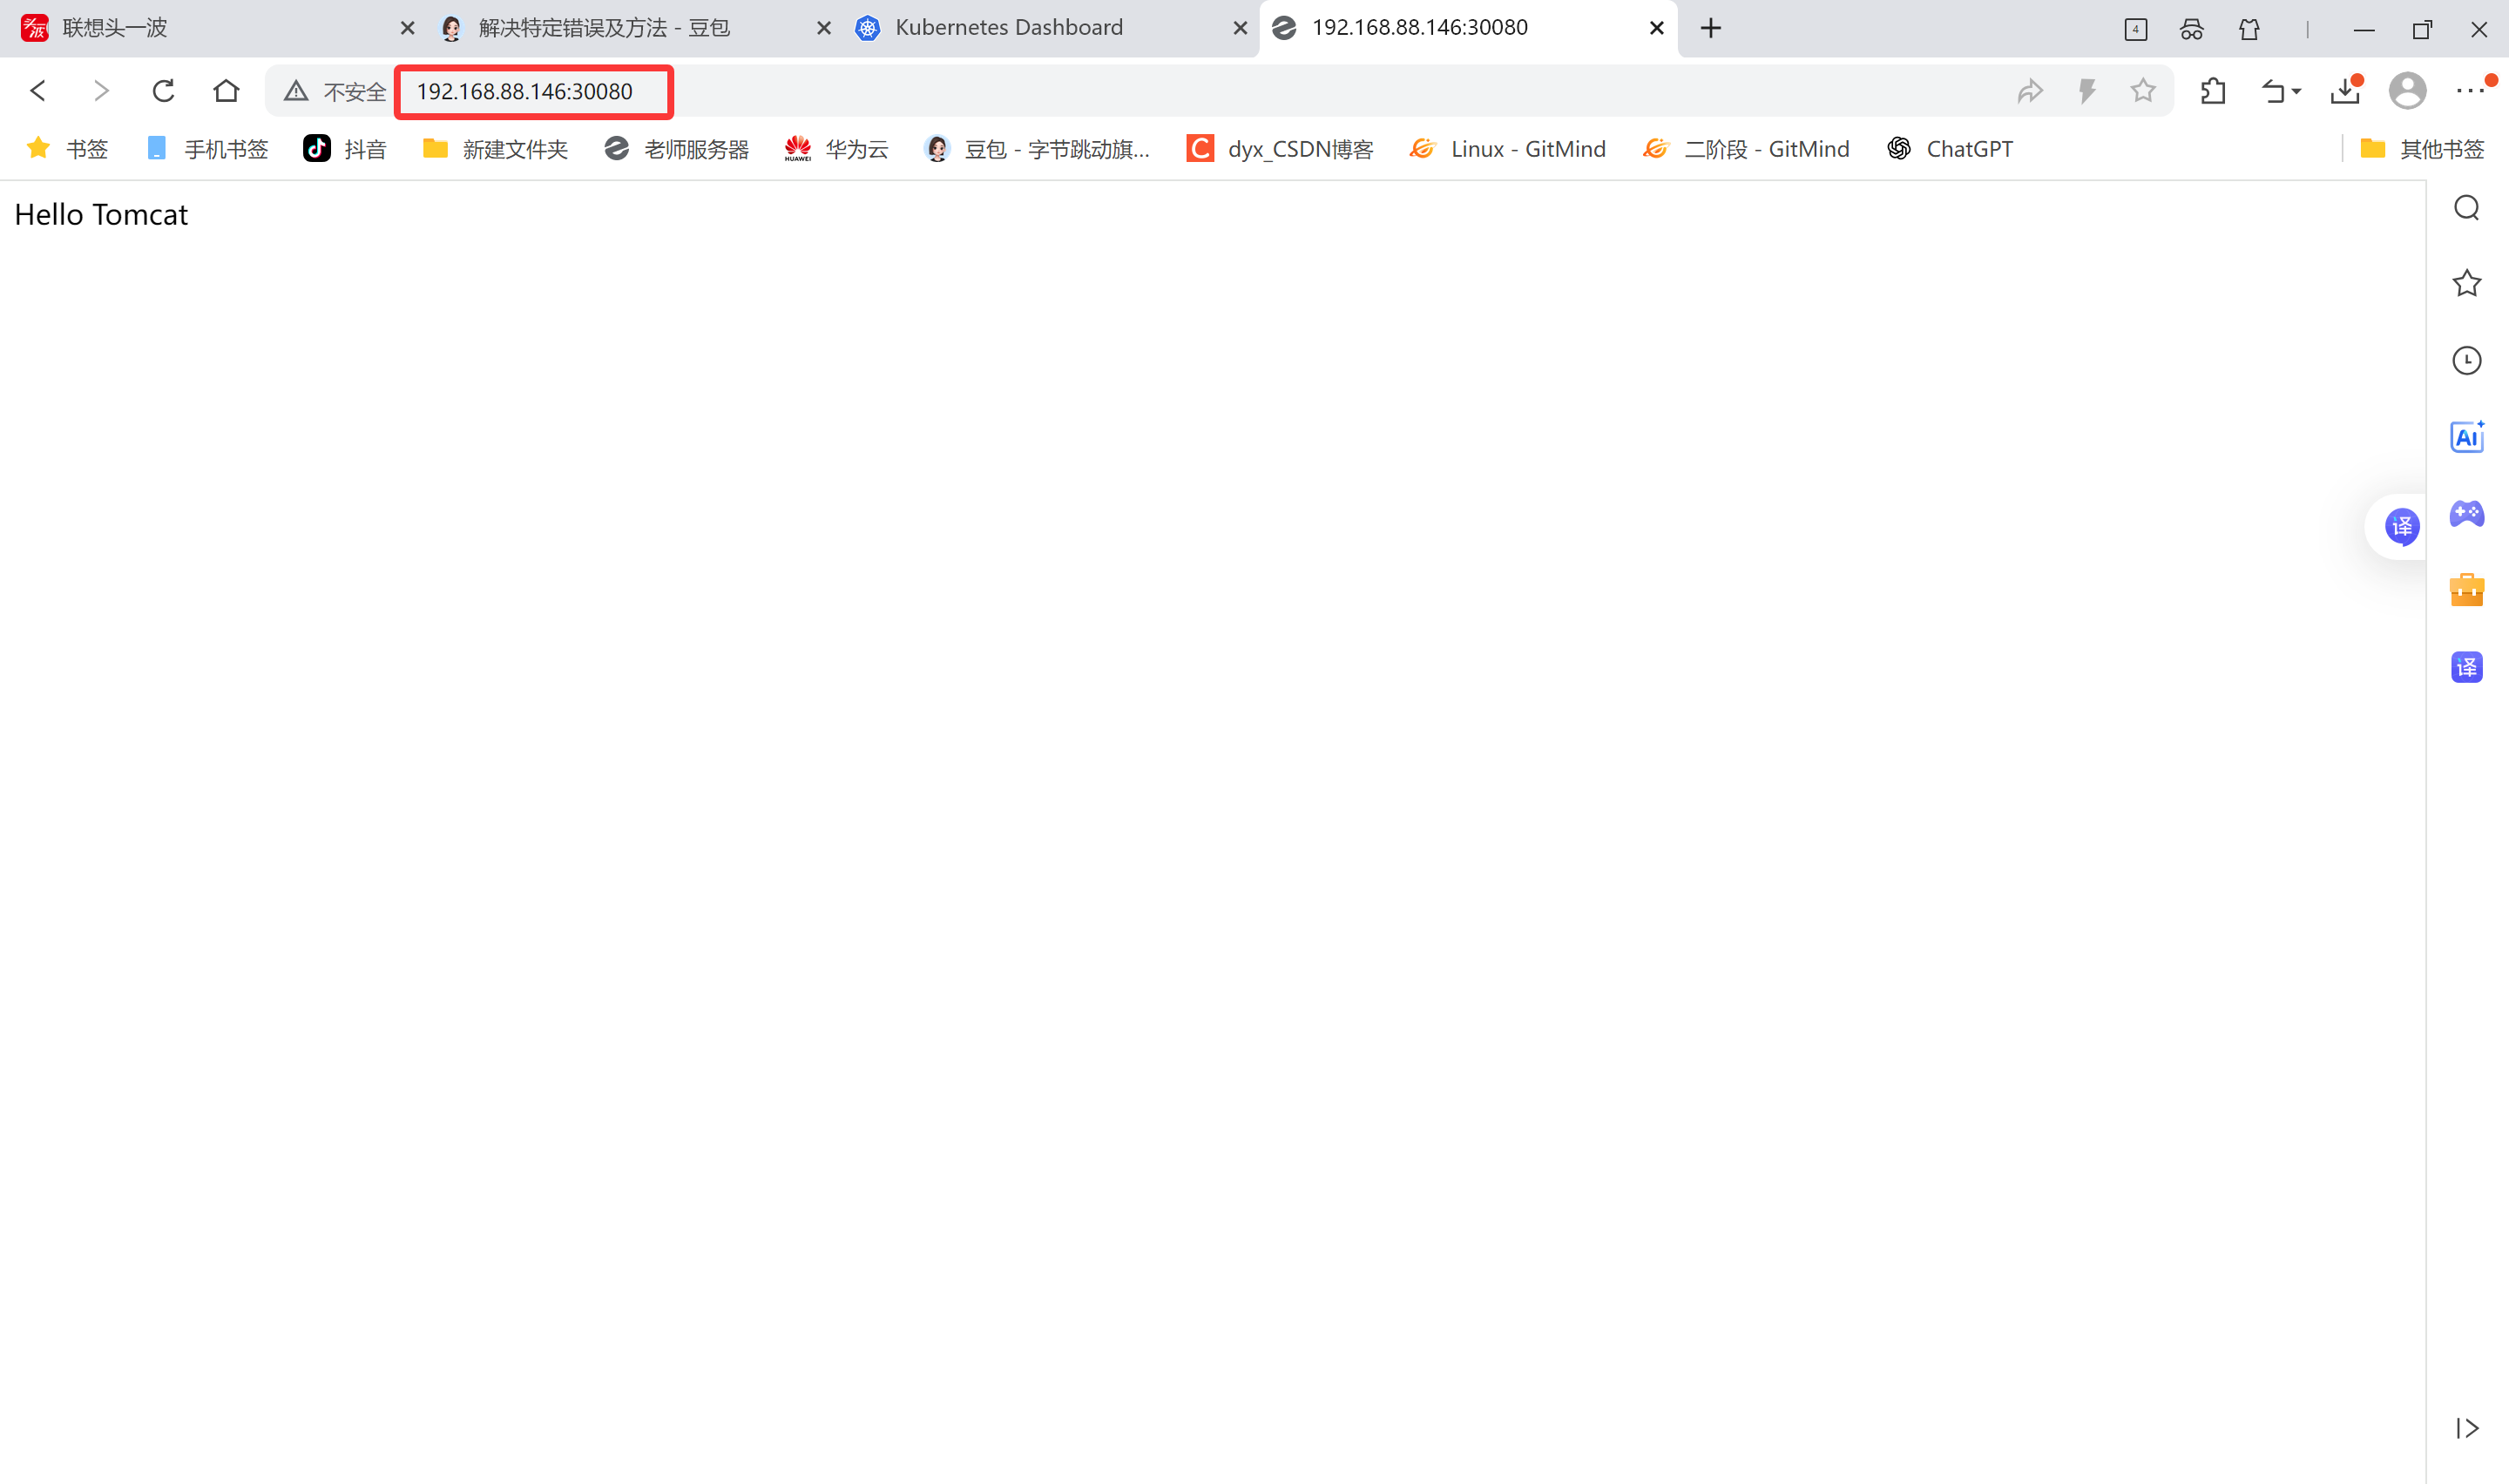
命名空间(Namespace)
作用
-
Namespace是对一组资源和对象的抽象集合。
-
常见的 pod, service,deployment 等都是属于某一个namespace的(默认是 default)。
-
不是所有资源都属于namespace,如nodes,persistent volume,namespace 等资源则不属于任何namespace。
查看namespace
bash
[root@master tomcat_dir 14:02:43]# kubectl get ns
NAME                   STATUS   AGE
default                Active   16h
kube-node-lease        Active   16h
kube-public            Active   16h
kube-system            Active   16h
kubernetes-dashboard   Active   4h49m
web-test               Active   10m

[root@master tomcat_dir 14:14:30]# kubectl get namespaces
NAME                   STATUS   AGE
default                Active   16h
kube-node-lease        Active   16h
kube-public            Active   16h
kube-system            Active   16h
kubernetes-dashboard   Active   4h55m
web-test               Active   16m
查看namespace中的资源
使用kubectl get all --namespace=命名空间名称 可以查看此命名空间下的所有资源
bash
[root@master tomcat_dir 14:15:05]# kubectl get all --namespace=kube-system
NAME                                           READY   STATUS    RESTARTS      AGE
pod/calico-kube-controllers-658d97c59c-8p8td   1/1     Running   1 (15h ago)   16h
pod/calico-node-2zspn                          1/1     Running   1 (15h ago)   16h
pod/calico-node-4x5wd                          1/1     Running   1 (15h ago)   16h
pod/calico-node-p79mh                          1/1     Running   1 (15h ago)   16h
pod/coredns-66f779496c-5bs5r                   1/1     Running   1 (15h ago)   16h
pod/coredns-66f779496c-csxh8                   1/1     Running   1 (15h ago)   16h
pod/etcd-master                                1/1     Running   1 (15h ago)   16h
pod/kube-apiserver-master                      1/1     Running   1 (15h ago)   16h
pod/kube-controller-manager-master             1/1     Running   1 (15h ago)   16h
pod/kube-proxy-hv5g8                           1/1     Running   1 (15h ago)   16h
pod/kube-proxy-hx4rd                           1/1     Running   1 (15h ago)   16h
pod/kube-proxy-r6w6f                           1/1     Running   1 (15h ago)   16h
pod/kube-scheduler-master                      1/1     Running   2 (43m ago)   16h
pod/metrics-server-57999c5cf7-9b6sm            1/1     Running   0             4h17m

NAME                     TYPE        CLUSTER-IP      EXTERNAL-IP   PORT(S)                  AGE
service/kube-dns         ClusterIP   10.96.0.10      <none>        53/UDP,53/TCP,9153/TCP   16h
service/metrics-server   ClusterIP   10.109.72.137   <none>        443/TCP                  4h17m

NAME                         DESIRED   CURRENT   READY   UP-TO-DATE   AVAILABLE   NODE SELECTOR            AGE
daemonset.apps/calico-node   3         3         3       3            3           kubernetes.io/os=linux   16h
daemonset.apps/kube-proxy    3         3         3       3            3           kubernetes.io/os=linux   16h

NAME                                      READY   UP-TO-DATE   AVAILABLE   AGE
deployment.apps/calico-kube-controllers   1/1     1            1           16h
deployment.apps/coredns                   2/2     2            2           16h
deployment.apps/metrics-server            1/1     1            1           4h17m

NAME                                                 DESIRED   CURRENT   READY   AGE
replicaset.apps/calico-kube-controllers-658d97c59c   1         1         1       16h
replicaset.apps/coredns-66f779496c                   2         2         2       16h
replicaset.apps/metrics-server-57999c5cf7            1         1         1       4h17m
查看所有pod资源
bash
[root@master tomcat_dir 14:15:14]# kubectl get pods -A
NAMESPACE              NAME                                         READY   STATUS    RESTARTS      AGE
default                nginx-7854ff8877-7jbq8                       1/1     Running   1 (15h ago)   15h
default                nginx-7854ff8877-9nlk9                       1/1     Running   1 (15h ago)   15h
default                nginx-7854ff8877-chxtr                       1/1     Running   1 (15h ago)   15h
default                tomcat-test-75469fdc74-5rxhh                 1/1     Running   0             16m
default                tomcat-test-75469fdc74-cv65d                 1/1     Running   0             16m
kube-system            calico-kube-controllers-658d97c59c-8p8td     1/1     Running   1 (15h ago)   16h
kube-system            calico-node-2zspn                            1/1     Running   1 (15h ago)   16h
kube-system            calico-node-4x5wd                            1/1     Running   1 (15h ago)   16h
kube-system            calico-node-p79mh                            1/1     Running   1 (15h ago)   16h
kube-system            coredns-66f779496c-5bs5r                     1/1     Running   1 (15h ago)   16h
kube-system            coredns-66f779496c-csxh8                     1/1     Running   1 (15h ago)   16h
kube-system            etcd-master                                  1/1     Running   1 (15h ago)   16h
kube-system            kube-apiserver-master                        1/1     Running   1 (15h ago)   16h
kube-system            kube-controller-manager-master               1/1     Running   1 (15h ago)   16h
kube-system            kube-proxy-hv5g8                             1/1     Running   1 (15h ago)   16h
kube-system            kube-proxy-hx4rd                             1/1     Running   1 (15h ago)   16h
kube-system            kube-proxy-r6w6f                             1/1     Running   1 (15h ago)   16h
kube-system            kube-scheduler-master                        1/1     Running   2 (43m ago)   16h
kube-system            metrics-server-57999c5cf7-9b6sm              1/1     Running   0             4h18m
kubernetes-dashboard   dashboard-metrics-scraper-5657497c4c-bv24w   1/1     Running   0             4h55m
kubernetes-dashboard   kubernetes-dashboard-746fbfd67c-429w4        1/1     Running   0             4h55m
创建namespace
命令创建
bash
[root@master tomcat_dir 14:15:26]# kubectl create namespace web1
namespace/web1 created
[root@master tomcat_dir 14:15:44]# kubectl get ns
NAME                   STATUS   AGE
default                Active   16h
kube-node-lease        Active   16h
kube-public            Active   16h
kube-system            Active   16h
kubernetes-dashboard   Active   4h56m
web-test               Active   17m
`web1`                   Active   6s
YAML文件创建
-
k8s中几乎所有的资源都可以通这YAML编排来创建
-
可以使用 kubectl edit 资源类型 资源名 编辑资源的YAML语法
bash
[root@master tomcat_dir 14:15:50]# kubectl edit namespaces web1-
也可使用 kubectl get 资源类型 资源名 -o yaml来查看
bash[root@master tomcat_dir 14:16:18]# kubectl get ns web1 -o yaml apiVersion: v1 kind: Namespace metadata: creationTimestamp: "2026-01-15T06:15:44Z" labels: kubernetes.io/metadata.name: web1 name: web1 resourceVersion: "29730" uid: 5e06b8ce-ed4b-4ee1-abdc-9d2e650bf641 spec: finalizers: - kubernetes status: phase: Active -
还可通过 kubectl explain 资源类型 来查看语法文档
查看namespace相关语法参数
bash[root@master tomcat_dir 14:16:48]# kubectl explain namespace KIND: Namespace VERSION: v1 DESCRIPTION: Namespace provides a scope for Names. Use of multiple namespaces is optional. FIELDS: apiVersion <string> APIVersion defines the versioned schema of this representation of an object. Servers should convert recognized schemas to the latest internal value, and may reject unrecognized values. More info: https://git.k8s.io/community/contributors/devel/sig-architecture/api-conventions.md#resources kind <string> Kind is a string value representing the REST resource this object represents. Servers may infer this from the endpoint the client submits requests to. Cannot be updated. In CamelCase. More info: https://git.k8s.io/community/contributors/devel/sig-architecture/api-conventions.md#types-kinds metadata <ObjectMeta> Standard object's metadata. More info: https://git.k8s.io/community/contributors/devel/sig-architecture/api-conventions.md#metadata spec <NamespaceSpec> Spec defines the behavior of the Namespace. More info: https://git.k8s.io/community/contributors/devel/sig-architecture/api-conventions.md#spec-and-status status <NamespaceStatus> Status describes the current status of a Namespace. More info: https://git.k8s.io/community/contributors/devel/sig-architecture/api-conventions.md#spec-and-status查看namespace下级metadata的相关语法参数
bash[root@master tomcat_dir 14:17:10]# kubectl explain namespace.metadata KIND: Namespace VERSION: v1 FIELD: metadata <ObjectMeta> DESCRIPTION: Standard object's metadata. More info: https://git.k8s.io/community/contributors/devel/sig-architecture/api-conventions.md#metadata ObjectMeta is metadata that all persisted resources must have, which includes all objects users must create. FIELDS: annotations <map[string]string> Annotations is an unstructured key value map stored with a resource that may be set by external tools to store and retrieve arbitrary metadata. They are not queryable and should be preserved when modifying objects. More info: https://kubernetes.io/docs/concepts/overview/working-with-objects/annotations creationTimestamp <string> CreationTimestamp is a timestamp representing the server time when this object was created. It is not guaranteed to be set in happens-before order across separate operations. Clients may not set this value. It is represented in RFC3339 form and is in UTC. Populated by the system. Read-only. Null for lists. More info: https://git.k8s.io/community/contributors/devel/sig-architecture/api-conventions.md#metadata deletionGracePeriodSeconds <integer> Number of seconds allowed for this object to gracefully terminate before it will be removed from the system. Only set when deletionTimestamp is also set. May only be shortened. Read-only. deletionTimestamp <string> DeletionTimestamp is RFC 3339 date and time at which this resource will be deleted. This field is set by the server when a graceful deletion is requested by the user, and is not directly settable by a client. The resource is expected to be deleted (no longer visible from resource lists, and not reachable by name) after the time in this field, once the finalizers list is empty. As long as the finalizers list contains items, deletion is blocked. Once the deletionTimestamp is set, this value may not be unset or be set further into the future, although it may be shortened or the resource may be deleted prior to this time. For example, a user may request that a pod is deleted in 30 seconds. The Kubelet will react by sending a graceful termination signal to the containers in the pod. After that 30 seconds, the Kubelet will send a hard termination signal (SIGKILL) to the container and after cleanup, remove the pod from the API. In the presence of network partitions, this object may still exist after this timestamp, until an administrator or automated process can determine the resource is fully terminated. If not set, graceful deletion of the object has not been requested. Populated by the system when a graceful deletion is requested. Read-only. More info: https://git.k8s.io/community/contributors/devel/sig-architecture/api-conventions.md#metadata finalizers <[]string> Must be empty before the object is deleted from the registry. Each entry is an identifier for the responsible component that will remove the entry from the list. If the deletionTimestamp of the object is non-nil, entries in this list can only be removed. Finalizers may be processed and removed in any order. Order is NOT enforced because it introduces significant risk of stuck finalizers. finalizers is a shared field, any actor with permission can reorder it. If the finalizer list is processed in order, then this can lead to a situation in which the component responsible for the first finalizer in the list is waiting for a signal (field value, external system, or other) produced by a component responsible for a finalizer later in the list, resulting in a deadlock. Without enforced ordering finalizers are free to order amongst themselves and are not vulnerable to ordering changes in the list. generateName <string> GenerateName is an optional prefix, used by the server, to generate a unique name ONLY IF the Name field has not been provided. If this field is used, the name returned to the client will be different than the name passed. This value will also be combined with a unique suffix. The provided value has the same validation rules as the Name field, and may be truncated by the length of the suffix required to make the value unique on the server. If this field is specified and the generated name exists, the server will return a 409. Applied only if Name is not specified. More info: https://git.k8s.io/community/contributors/devel/sig-architecture/api-conventions.md#idempotency generation <integer> A sequence number representing a specific generation of the desired state. Populated by the system. Read-only. labels <map[string]string> Map of string keys and values that can be used to organize and categorize (scope and select) objects. May match selectors of replication controllers and services. More info: https://kubernetes.io/docs/concepts/overview/working-with-objects/labels managedFields <[]ManagedFieldsEntry> ManagedFields maps workflow-id and version to the set of fields that are managed by that workflow. This is mostly for internal housekeeping, and users typically shouldn't need to set or understand this field. A workflow can be the user's name, a controller's name, or the name of a specific apply path like "ci-cd". The set of fields is always in the version that the workflow used when modifying the object. name <string> Name must be unique within a namespace. Is required when creating resources, although some resources may allow a client to request the generation of an appropriate name automatically. Name is primarily intended for creation idempotence and configuration definition. Cannot be updated. More info: https://kubernetes.io/docs/concepts/overview/working-with-objects/names#names namespace <string> Namespace defines the space within which each name must be unique. An empty namespace is equivalent to the "default" namespace, but "default" is the canonical representation. Not all objects are required to be scoped to a namespace - the value of this field for those objects will be empty. Must be a DNS_LABEL. Cannot be updated. More info: https://kubernetes.io/docs/concepts/overview/working-with-objects/namespaces ownerReferences <[]OwnerReference> List of objects depended by this object. If ALL objects in the list have been deleted, this object will be garbage collected. If this object is managed by a controller, then an entry in this list will point to this controller, with the controller field set to true. There cannot be more than one managing controller. resourceVersion <string> An opaque value that represents the internal version of this object that can be used by clients to determine when objects have changed. May be used for optimistic concurrency, change detection, and the watch operation on a resource or set of resources. Clients must treat these values as opaque and passed unmodified back to the server. They may only be valid for a particular resource or set of resources. Populated by the system. Read-only. Value must be treated as opaque by clients and . More info: https://git.k8s.io/community/contributors/devel/sig-architecture/api-conventions.md#concurrency-control-and-consistency selfLink <string> Deprecated: selfLink is a legacy read-only field that is no longer populated by the system. uid <string> UID is the unique in time and space value for this object. It is typically generated by the server on successful creation of a resource and is not allowed to change on PUT operations. Populated by the system. Read-only. More info: https://kubernetes.io/docs/concepts/overview/working-with-objects/names#uids查看namespace下级metadata再下级name的相关语法参数
bash[root@master tomcat_dir 14:17:34]# kubectl explain namespace.metadata.name KIND: Namespace VERSION: v1 FIELD: name <string> DESCRIPTION: Name must be unique within a namespace. Is required when creating resources, although some resources may allow a client to request the generation of an appropriate name automatically. Name is primarily intended for creation idempotence and configuration definition. Cannot be updated. More info: https://kubernetes.io/docs/concepts/overview/working-with-objects/names#names编写创建namespace的YAML文件
bash[root@master tomcat_dir 14:17:39]# vim create_web2.yaml #api版本 apiVersion: v1 #类型为namespace kind: Namespace #定义namespace的元数据属性 metadata: #定义name为web2 name: web2
使用 kubctl apply -f 应用YAML文件
bash
[root@master tomcat_dir 14:18:34]# kubectl apply -f create_web2.yaml
namespace/web2 created

[root@master tomcat_dir 14:18:45]# kubectl get ns
NAME                   STATUS   AGE
default                Active   16h
kube-node-lease        Active   16h
kube-public            Active   16h
kube-system            Active   16h
kubernetes-dashboard   Active   4h59m
web-test               Active   20m
web1                   Active   3m10s
web2                   Active   9s
删除namespace
注意:
-
删除一个namespace会自动删除所有属于该namespace的资源(类似MySQL中drop库会删除库里的所有表一样,请慎重操作)
-
default,kube-system,kube-public命名空间不可删除
命令删除
bash
[root@master tomcat_dir 14:18:54]# kubectl delete namespaces web1
namespace "web1" deleted
YAML文件删除
bash
[root@master tomcat_dir 14:19:17]# kubectl delete -f create_web2.yaml
namespace "web2" deleted
bash
[root@master tomcat_dir 14:19:35]# kubectl get ns
NAME                   STATUS   AGE
default                Active   16h
kube-node-lease        Active   16h
kube-public            Active   16h
kube-system            Active   16h
kubernetes-dashboard   Active   5h
web-test               Active   21m
第 4 章 kubernetes核心概念
组件
1.Pod
Pod是可以在 Kubernetes 中创建和管理的、最小的可部署的计算单元。
Pod就像豌豆荚一样,其中包含着一组(一个或多个)容器;这些容器共享存储、网络、以及怎样运行这些容器的声明。
Pod就像一台物理服务器一样,其中包含一个或多个应用容器,这些容器中运行着用户应用程序。
举例说明:
container(容器)--- 一颗豌豆
Pod(容器组) --- 一个豌豆荚
Node (节点) --- 一根豌豆藤
Cluster(集群) --- 整个豌豆田
2.Controller
在 Kubernetes中,用于管理和运行Pod的对象
在 Kubernetes 中,控制器通过监控集群的公共状态,并致力于将当前状态转变为期望的状态
举例说明Controller(控制器)作用:房间里的温度自动调节器
当你设置了温度,告诉了温度自动调节器你的期望状态(Desired state)。房间的实际温度是当前状态(Current state)。 通过对设备的开关控制,温度自动调节器让其当前状态接近期望状态。
一个控制器至少追踪一种类型的 Kubernetes 资源。这些对象有一个代表期望状态的 spec 字段。 该资源的控制器负责确保其当前状态接近期望状态。
不同的类型的控制器所实现的控制方式不一样,例如:
- deployment
- 部署无状态应用。
- 部署无状态应用:认为pod 都一样,没有顺序要求,不用考虑在哪个node 运行,随意进行扩展和伸缩。
- 管理Pod和 ReplicaSet。
- 部署、滚动升级等。
- 典型的像web服务、分布式服务等。
- StatefulSet
- 部署有状态应用
- 有状态应用,每个pod 都独立运行,保持pod 启动顺序和唯一性;有唯一的网络标识符,持久存储;有序,比如mysql主从;主机名称固定。 而且其扩容以及升级等操作也是按顺序进行的操作。
- DaemonSet
- 部署守护进程
- Daemonset保证在每个Node上都运行一个容器副本,常用来部署一些集群的日志、监控或者其他系统管理应用。 新加入的node 也同样运行在一个pod 里面。
- job
- 一次性任务
- job负责批量处理短暂的一次性任务(short lived one-off tasks),即仅执行一次的任务,它保证批处理任务的一个或多个Pod成功结束。
- Cronjob
- 周期性定时任务
3.Label
概念
Label是附着到object上(例如Pod)的键值对。可以在创建object的时候指定,也可以在object创建后随时指定。Labels的值对系统本身并没有什么含义,只是对用户才有意义。
一个Label是一个key=value的键值对,其中key与value由用户自己指定:
Label可以附加到各种资源对象上,例如Node、Pod、Service、RC等,一个资源对象可以定义任意数量的Label.同一个Label可以被添加到任意数量的资源对象上去,Label通常在资源对象定义时确定,也可以在对象创建后动态添加或者删除。
可以通过指定的资源对象捆绑一个或多个不同的Label来实现多维度的资源分组管理功能,以便于灵活、方便地进行资源分配、调度、配置、部署等管理工作。例如:部署不同版本的应用到不同的环境中;或者监控和分析应用(日志记录、监控、告警)等。
常用label示例如下所示:
bash
版本标签:"release":"stable","release":"canary"...
环境标签:"environment":"dev","environment":"production"
架构标签:"tier":"frontend","tier":"backend","tier":"middleware'
分区标签:"partition":"customerA","partition":"customerB"...
质量管控标签:"track":"daily","track":"weekly"
Label相当于我们熟悉的"标签",给某个资源对象定义一个Label,就相当于给它打了一个标签,随后可以通过LabelSelector(标签选择器)查询和筛选拥有某些Label的资源对象,Kubernetes通过这种方式实现了类似SOL的简单又通用的对象查询机制。
语法与字符集
Label key的组成:
-
不得超过63个字符
-
可以使用前缀,使用/分隔,前缀必须是DNS子域,不得超过253个字符,系统中的自动化组件创建的label必须指定前缀,kubernetes.io/由kubernetes保留
-
起始必须是字母(大小写都可以)或数字,中间可以有连字符、下划线和点
Label value的组成:
-
不得超过63个字符
-
起始必须是字母(大小写都可以)或数字,中间可以有连字符、下划线和点
4.Label Selector
通过label selector,客户端/用户可以指定一个object集合,通过label selector对object的集合进行操作。
Label selector有两种类型:
-
equality-based(基于等式):可以使用=、==、!=操作符,可以使用逗号分隔多个表达式
-
set-based(基于集合):可以使用in、not in、!操作符,另外还可以没有操作符,直接写出某个label的key,表示过滤有某个key的object而不管该key的value是何值,!表示没有该label的object
例如:
Label selector可以被类比为SQL语句中的where查询条件,例如,name=redis-slave这个label Selector作用于Pod时,可以被类比为select * from pod where pods name ='redis-slave'这样的语句。
5.Service
将运行在一组 Pods上的应用程序公开为网络服务的抽象方法。
由于Pod是非永久性资源对象,如果使用Controller运行应用程序,可以动态创建和销毁Pod,这样就会导致无法准确访问到所想要访问的Pod
例如:如果一组 Pod(称为"后端")为集群内的其他Pod(称为"前端")提供功能, 那么前端如何找出并跟踪要连接的IP 地址,以便前端可以使用提供工作负载的后端部分?
是一组iptables或ipvs规划,通过把客户端的请求转发到服务端(Pod),如有多个Pod情况,亦可实现负载均衡的效果。
例如:一个图片处理后端,它运行了3个副本(Pod)。这些副本是可互换的 -- 前端不需要关心它们调用了哪个后端副本。 然而组成这一组后端程序的 Pod 实际上可能会发生变化,前端客户端不应该也没必要知道,而且也不需要跟踪这一组后端的状态。
6.Endpoints
为Service管理后端Pod,当后端Pod被创建或销毁时,endpoints列表会更新Pod对应的IP地址,以便Service访问请求能够确保被响应。
7.DNS
为kubernetes集群内资源对象的访问提供名称解析,这样就可以实现通过DNS名称而非IP地址来访问服务。
-
实现集群内Service名称解析
-
实现集群内Pod内Container中应用访问互联网提供域名解析
kubernetes核心概念之间的关系
1.Pod与Controller
pod 是通过Controller 实现应用的运维,比如伸缩,滚动升级等待。pod和 controller 通过label 标签建立关系。
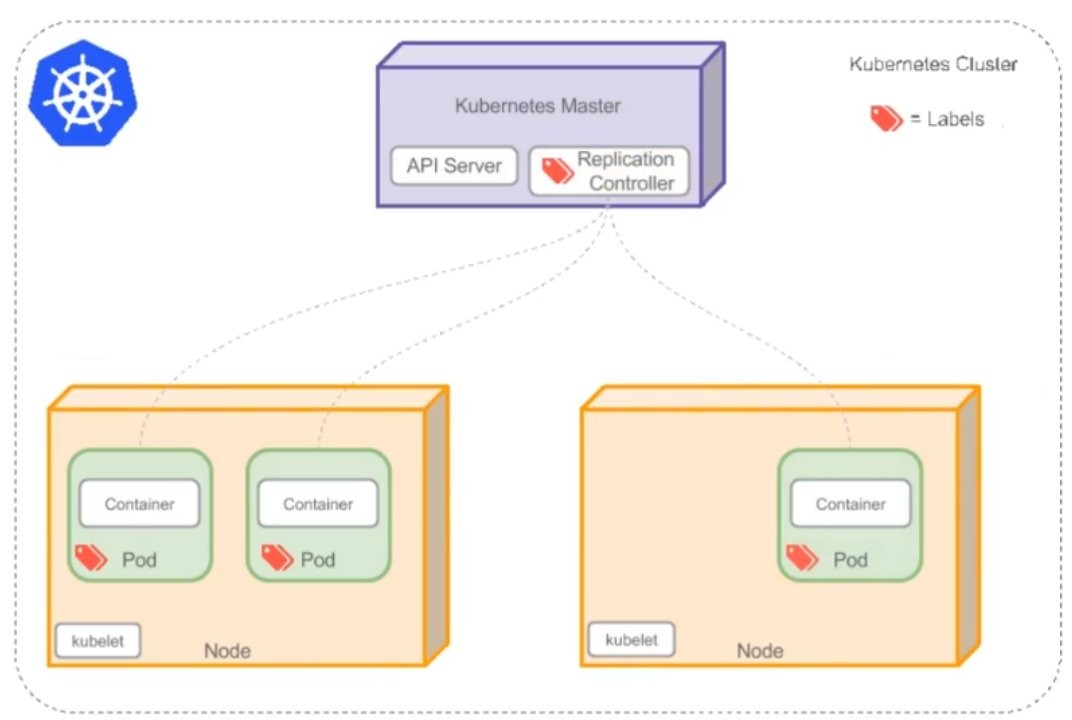
案例:删除其中一个pod,查看controller自动创建新pod
bash
[root@master ~ 19:26:05]# kubectl get replicasets
NAME                     DESIRED   CURRENT   READY   AGE
nginx-7854ff8877         3         3         3       21h
tomcat-test-75469fdc74   2         2         2       5h27m
[root@master ~ 19:26:14]# kubectl get pods
NAME                           READY   STATUS    RESTARTS      AGE
`nginx-7854ff8877-7jbq8 `        1/1     Running   1 (20h ago)   21h
nginx-7854ff8877-9nlk9         1/1     Running   1 (20h ago)   21h
nginx-7854ff8877-chxtr         1/1     Running   1 (20h ago)   21h
tomcat-test-75469fdc74-5rxhh   1/1     Running   0             5h27m
tomcat-test-75469fdc74-cv65d   1/1     Running   0             5h27m
[root@master ~ 19:26:24]# kubectl delete pod nginx-7854ff8877-7jbq8
pod "nginx-7854ff8877-7jbq8" deleted
[root@master ~ 19:27:28]# kubectl get pods
NAME                           READY   STATUS              RESTARTS      AGE
nginx-7854ff8877-9nlk9         1/1     Running             1 (20h ago)   21h
nginx-7854ff8877-chxtr         1/1     Running             1 (20h ago)   21h
`nginx-7854ff8877-nt4d5`         0/1     ContainerCreating   0             5s
tomcat-test-75469fdc74-5rxhh   1/1     Running             0             5h28m
tomcat-test-75469fdc74-cv65d   1/1     Running             0             5h28m

[root@master ~ 19:27:54]# kubectl get pods
NAME                           READY   STATUS    RESTARTS      AGE
nginx-7854ff8877-9nlk9         1/1     Running   1 (20h ago)   21h
nginx-7854ff8877-chxtr         1/1     Running   1 (20h ago)   21h
`nginx-7854ff8877-nt4d5`         1/1     Running   0             33s
tomcat-test-75469fdc74-5rxhh   1/1     Running   0             5h29m
tomcat-test-75469fdc74-cv65d   1/1     Running   0             5h29m
查看控制器管理的标签Selector
bash
[root@master ~ 19:29:28]# kubectl describe replicasets tomcat-test-75469fdc74
Name:           tomcat-test-75469fdc74
Namespace:      default
`Selector:       app=tomcat,pod-template-hash=75469fdc74`
Labels:         app=tomcat
                pod-template-hash=75469fdc74
Annotations:    deployment.kubernetes.io/desired-replicas: 2
                deployment.kubernetes.io/max-replicas: 3
                deployment.kubernetes.io/revision: 1
Controlled By:  Deployment/tomcat-test
Replicas:       2 current / 2 desired
Pods Status:    2 Running / 0 Waiting / 0 Succeeded / 0 Failed
Pod Template:
  Labels:  app=tomcat
           pod-template-hash=75469fdc74
  Containers:
   tomcat:
    Image:        tomcat:9.0.85-jdk11
    Port:         8080/TCP
    Host Port:    0/TCP
    Environment:  <none>
    Mounts:
      /usr/local/tomcat/webapps/ROOT/index.html from web-content (rw,path="index.html")
  Volumes:
   web-content:
    Type:      ConfigMap (a volume populated by a ConfigMap)
    Name:      tomcat-web-content
    Optional:  false
Events:        <none>
对应上pod的标签就能进行有效管理
bash
[root@master ~ 19:29:43]# kubectl describe pod tomcat-test-75469fdc74
Name:             tomcat-test-75469fdc74-5rxhh
Namespace:        default
Priority:         0
Service Account:  default
Node:             node1/192.168.88.147
Start Time:       Thu, 15 Jan 2026 13:58:35 +0800
`Labels:           app=tomcat`
                  pod-template-hash=75469fdc74
Annotations:      cni.projectcalico.org/containerID: 53b3743e121cdb67bd7b08f3f7fc4800edb0b403bc049e25b0f25f6f48f353b6
                  cni.projectcalico.org/podIP: 10.244.166.136/32
                  cni.projectcalico.org/podIPs: 10.244.166.136/32
Status:           Running
IP:               10.244.166.136
IPs:
  IP:           10.244.166.136
Controlled By:  ReplicaSet/tomcat-test-75469fdc74
Containers:
  tomcat:
    Container ID:   docker://88e055198935da5265e6aa74c8b79ad7166a0dbb28dd1de4f31f89bc47f6eb33
    Image:          tomcat:9.0.85-jdk11
    Image ID:       docker-pullable://tomcat@sha256:b2a4b6f5e09e147ee81f094051cb43d69efd56a68e76ca5b450b7584c5564c77
    Port:           8080/TCP
    Host Port:      0/TCP
    State:          Running
      Started:      Thu, 15 Jan 2026 13:58:36 +0800
    Ready:          True
    Restart Count:  0
    Environment:    <none>
    Mounts:
      /usr/local/tomcat/webapps/ROOT/index.html from web-content (rw,path="index.html")
      /var/run/secrets/kubernetes.io/serviceaccount from kube-api-access-6bdhw (ro)
Conditions:
  Type              Status
  Initialized       True
  Ready             True
  ContainersReady   True
  PodScheduled      True
Volumes:
  web-content:
    Type:      ConfigMap (a volume populated by a ConfigMap)
    Name:      tomcat-web-content
    Optional:  false
  kube-api-access-6bdhw:
    Type:                    Projected (a volume that contains injected data from multiple sources)
    TokenExpirationSeconds:  3607
    ConfigMapName:           kube-root-ca.crt
    ConfigMapOptional:       <nil>
    DownwardAPI:             true
QoS Class:                   BestEffort
Node-Selectors:              <none>
Tolerations:                 node.kubernetes.io/not-ready:NoExecute op=Exists for 300s
                             node.kubernetes.io/unreachable:NoExecute op=Exists for 300s
Events:                      <none>

Name:             tomcat-test-75469fdc74-cv65d
Namespace:        default
Priority:         0
Service Account:  default
Node:             node2/192.168.88.148
Start Time:       Thu, 15 Jan 2026 13:58:35 +0800
Labels:           app=tomcat
                  pod-template-hash=75469fdc74
Annotations:      cni.projectcalico.org/containerID: fe29920c35a1f9d37c8dc346c8d0ca19a1b17edd3b8233ee48e59bb08258f553
                  cni.projectcalico.org/podIP: 10.244.104.11/32
                  cni.projectcalico.org/podIPs: 10.244.104.11/32
Status:           Running
IP:               10.244.104.11
IPs:
  IP:           10.244.104.11
Controlled By:  ReplicaSet/tomcat-test-75469fdc74
Containers:
  tomcat:
    Container ID:   docker://9a549a3b2f1d3ef477b8593b12e97456011513bdf80422ff6fd07771f6405342
    Image:          tomcat:9.0.85-jdk11
    Image ID:       docker-pullable://tomcat@sha256:b2a4b6f5e09e147ee81f094051cb43d69efd56a68e76ca5b450b7584c5564c77
    Port:           8080/TCP
    Host Port:      0/TCP
    State:          Running
      Started:      Thu, 15 Jan 2026 13:58:36 +0800
    Ready:          True
    Restart Count:  0
    Environment:    <none>
    Mounts:
      /usr/local/tomcat/webapps/ROOT/index.html from web-content (rw,path="index.html")
      /var/run/secrets/kubernetes.io/serviceaccount from kube-api-access-fm4r5 (ro)
Conditions:
  Type              Status
  Initialized       True
  Ready             True
  ContainersReady   True
  PodScheduled      True
Volumes:
  web-content:
    Type:      ConfigMap (a volume populated by a ConfigMap)
    Name:      tomcat-web-content
    Optional:  false
  kube-api-access-fm4r5:
    Type:                    Projected (a volume that contains injected data from multiple sources)
    TokenExpirationSeconds:  3607
    ConfigMapName:           kube-root-ca.crt
    ConfigMapOptional:       <nil>
    DownwardAPI:             true
QoS Class:                   BestEffort
Node-Selectors:              <none>
Tolerations:                 node.kubernetes.io/not-ready:NoExecute op=Exists for 300s
                             node.kubernetes.io/unreachable:NoExecute op=Exists for 300s
Events:                      <none>
2.Pod和Service
service 是为了防止pod 失联,提供的服务发现,类似于微服务的注册中心。定义一组pod 的访问策略。可以为一组具有相同功能的容器应用提供一个统一的入口地址,并将请求负载分发到后端的各个容器应用上。
service 通过selector 来管控对应的pod。根据label和selector 建立关联,通过service 实现pod 的负载均衡。
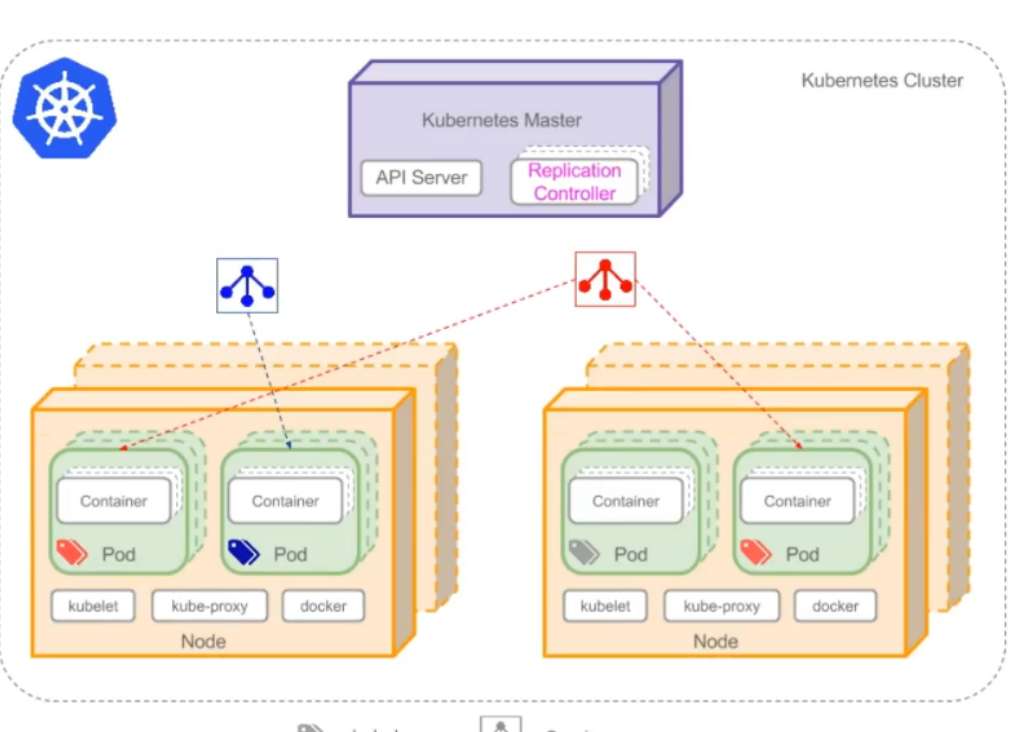
查看所有service
bash
[root@master ~ 19:30:31]# kubectl get service
NAME             TYPE        CLUSTER-IP       EXTERNAL-IP   PORT(S)        AGE
kubernetes       ClusterIP   10.96.0.1        <none>        443/TCP        22h
nginx            NodePort    10.102.224.143   <none>        80:30439/TCP   21h
tomcat-service   NodePort    10.97.6.32       <none>        80:30080/TCP   5h33m
查看指定tomcat-service的service
bash
[root@master ~ 19:32:27]# kubectl describe service tomcat-service
Name:                     tomcat-service
Namespace:                default
Labels:                   <none>
Annotations:              <none>
`Selector:                 app=tomcat`
Type:                     NodePort
IP Family Policy:         SingleStack
IP Families:              IPv4
IP:                       10.97.6.32
IPs:                      10.97.6.32
Port:                     <unset>  80/TCP
TargetPort:               8080/TCP
NodePort:                 <unset>  30080/TCP
Endpoints:                10.244.104.11:8080,10.244.166.136:8080
Session Affinity:         None
External Traffic Policy:  Cluster
Events:                   <none>
查看endpoints,
bash
[root@master ~ 19:33:43]# kubectl get endpoints
NAME             ENDPOINTS                                             AGE
kubernetes       192.168.88.146:6443                                   22h
nginx            10.244.104.6:80,10.244.166.131:80,10.244.166.137:80   21h
tomcat-service   `10.244.104.11:8080,10.244.166.136:8080`                5h35m
3.Service和DNS
通过DNS实现对Service名称解析,以此达到访问后端Pod目的。
查看dns的pod
bash
[root@master ~ 19:34:13]# kubectl get pods -n kube-system
NAME                                       READY   STATUS    RESTARTS       AGE
calico-kube-controllers-658d97c59c-8p8td   1/1     Running   1 (21h ago)    22h
calico-node-2zspn                          1/1     Running   1 (21h ago)    22h
calico-node-4x5wd                          1/1     Running   1 (21h ago)    22h
calico-node-p79mh                          1/1     Running   1 (21h ago)    22h
`coredns-66f779496c-5bs5r `                  1/1     Running   1 (21h ago)    22h
`coredns-66f779496c-csxh8`                   1/1     Running   1 (21h ago)    22h
etcd-master                                1/1     Running   1 (21h ago)    22h
kube-apiserver-master                      1/1     Running   1 (21h ago)    22h
kube-controller-manager-master             1/1     Running   1 (21h ago)    22h
kube-proxy-hv5g8                           1/1     Running   1 (21h ago)    22h
kube-proxy-hx4rd                           1/1     Running   1 (21h ago)    22h
kube-proxy-r6w6f                           1/1     Running   1 (21h ago)    22h
kube-scheduler-master                      1/1     Running   2 (6h3m ago)   22h
metrics-server-57999c5cf7-9b6sm            1/1     Running   0              9h
查看service获取集群IP,dns的地址为10.96.0.10
bash
[root@master ~ 19:35:10]# kubectl get service -n kube-system
NAME             TYPE        CLUSTER-IP      EXTERNAL-IP   PORT(S)                  AGE
kube-dns         ClusterIP   10.96.0.10      <none>        53/UDP,53/TCP,9153/TCP   22h
metrics-server   ClusterIP   10.109.72.137   <none>        443/TCP                  9h
查看dns对应的pod地址
bash
[root@master ~ 19:36:00]# kubectl get endpoints -n kube-system
NAME             ENDPOINTS                                                     AGE
kube-dns         10.244.104.5:53,10.244.104.8:53,10.244.104.5:53 + 3 more...   22h
metrics-server   10.244.104.9:10250                                            9h
或者
bash
[root@master ~ 19:37:21]# kubectl get pod -n kube-system -o wide
NAME                                       READY   STATUS    RESTARTS       AGE   IP               NODE     NOMINATED NODE   READINESS GATES
calico-kube-controllers-658d97c59c-8p8td   1/1     Running   1 (21h ago)    22h   10.244.104.7     node2    <none>           <none>
calico-node-2zspn                          1/1     Running   1 (21h ago)    22h   192.168.88.147   node1    <none>           <none>
calico-node-4x5wd                          1/1     Running   1 (21h ago)    22h   192.168.88.146   master   <none>           <none>
calico-node-p79mh                          1/1     Running   1 (21h ago)    22h   192.168.88.148   node2    <none>           <none>
coredns-66f779496c-5bs5r                   1/1     Running   1 (21h ago)    22h   10.244.104.5     node2    <none>           <none>
coredns-66f779496c-csxh8                   1/1     Running   1 (21h ago)    22h   10.244.104.8     node2    <none>           <none>
etcd-master                                1/1     Running   1 (21h ago)    22h   192.168.88.146   master   <none>           <none>
kube-apiserver-master                      1/1     Running   1 (21h ago)    22h   192.168.88.146   master   <none>           <none>
kube-controller-manager-master             1/1     Running   1 (21h ago)    22h   192.168.88.146   master   <none>           <none>
kube-proxy-hv5g8                           1/1     Running   1 (21h ago)    22h   192.168.88.147   node1    <none>           <none>
kube-proxy-hx4rd                           1/1     Running   1 (21h ago)    22h   192.168.88.146   master   <none>           <none>
kube-proxy-r6w6f                           1/1     Running   1 (21h ago)    22h   192.168.88.148   node2    <none>           <none>
kube-scheduler-master                      1/1     Running   2 (6h5m ago)   22h   192.168.88.146   master   <none>           <none>
metrics-server-57999c5cf7-9b6sm            1/1     Running   0              9h    10.244.104.9     node2    <none>           <none>
[root@master ~ 19:37:28]#
使用dns解析tomcat-service
bash
[root@master ~ 19:37:28]# dig -t a tomcat-service.default.svc.cluster.local. @10.96.0.10

; <<>> DiG 9.11.4-P2-RedHat-9.11.4-26.P2.el7_9.16 <<>> -t a tomcat-service.default.svc.cluster.local. @10.96.0.10
;; global options: +cmd
;; Got answer:
;; WARNING: .local is reserved for Multicast DNS
;; You are currently testing what happens when an mDNS query is leaked to DNS
;; ->>HEADER<<- opcode: QUERY, status: NOERROR, id: 4556
;; flags: qr aa rd; QUERY: 1, ANSWER: 1, AUTHORITY: 0, ADDITIONAL: 1
;; WARNING: recursion requested but not available

;; OPT PSEUDOSECTION:
; EDNS: version: 0, flags:; udp: 4096
;; QUESTION SECTION:
;tomcat-service.default.svc.cluster.local. IN A

;; ANSWER SECTION:
tomcat-service.default.svc.cluster.local. 30 IN A `10.97.6.32`

;; Query time: 4 msec
;; SERVER: 10.96.0.10#53(10.96.0.10)
;; WHEN: 四 1月 15 19:38:24 CST 2026
;; MSG SIZE  rcvd: 125
检验地址对应
bash
[root@master ~ 19:38:24]# kubectl get service
NAME             TYPE        CLUSTER-IP       EXTERNAL-IP   PORT(S)        AGE
kubernetes       ClusterIP   10.96.0.1        <none>        443/TCP        22h
nginx            NodePort    10.102.224.143   <none>        80:30439/TCP   21h
tomcat-service   NodePort    `10.97.6.32 `      <none>        80:30080/TCP   5h40m
基于kubernetes集群容器化应用的微服务
1.服务部署方式介绍
-
单体服务架
- 所有服务进程运行在同一台主机内
-
分布式服务架构
- 服务进程分布于不同的主机,其中一台主机出现故障,不影响其它主机上的服务运行
-
微服务架构
- 使用容器化技术把分布式服务架构运行起来,并实现对不同的服务进程的高可用及快速发布等。
2.微服务架构服务组件(kubernetes核心概念)之间关系
以在kubernetes集群中运行LNMT(Linux、NGINX、MySQL、Tomcat)应用为例:
把kubernetes集群看做是一个IDC机房,把LNMT的Web架构应用以微服务(kubernetes集群资源对象)的方式部署到kubernetes集群中。