一、
pgbouncer连接池中间件是什么软件?
-
起源与历史:pgbouncer最初由PostgreSQL社区开发,旨在解决PostgreSQL多进程架构下连接开销大的问题。其设计轻量级,自发布以来已成为PostgreSQL生态中的标准工具之一,拥有较长的使用历史和稳定的版本迭代。例如,在2026年,最近的版本更新是在2025年12月3号,再上次更新是在2025年11月9号。
-
成熟度与采用:pgbouncer支持多种连接池模式(如会话、事务、语句级),具备在线重配置、低内存占用等特性,并被广泛应用于生产环境,尤其在需要高并发连接的场景中。这表明它是一个经过实践验证的成熟工具。
-
工作机制:postgresql数据库 是多进程结构,每新增一个会话就会新增一个进程,相对而言对数据库的开销就会比较巨大。
因为在正常业务会话中,有不少session 都有长时间的 idle的状态,而这个状态导致,此时如果需要连接,就需要建立新的进程,来访问数据库,那么连接数就上来了. 而使用pgbouncer的主要原因
PGBrouncer能够缓存和PostgreSQL的连接,当有连接请求进来的时候,直接分配pgbouncer与postgresql之间的空闲连接去执行,而不需要PostgreSQL fork出新进程来建立连接,以节省创建新进程,创建连接的资源消耗。
关键的是pgbouncer是使用libevent进行socket通信,通信效率高。每个连接仅消耗2kB内存。相对pg自身动辄 4MB 的work_mem算是很轻量级了。
如果要用大白话来说,没有使用pgbouncer的连接方式是私家车,如果车子太多,则路就塞满了,而使用了pgbouncer 的方式则类似公交车或小巴, 有人上车有人下车,座位是固定的,所以公交车如果本身有30个座位,但实际上在整个的路途中可不是仅仅支持30个人,至于支持了多少人,那就看连接到数据库的事务执行的快慢,是否能对一个连接进行复用, 这就有点CPU 的分时使用的概念.
因此, 用 postgresql数据库而不用连接池,绝对是坑爹的做法...... 哪怕是像 pgbouncer 这样的"轻量级"连接池,有和没有的区别都不是一般的大。虽然这句话说得比较绝对,但从某种角度上来讲,这句话是有一定道理的。
下面将就pgboucer这个轻量级别的数据库中间件如何部署,如何正确的使用做一个简单的介绍。
二、
pgbouncer的版本问题
https://github.com/pgbouncer/pgbouncer/releases 该网址是pgbouncer的官方下载地址,从其最新版本更新介绍来看,非常有必要使用最新版,也就是1.25.1版本,选择该版本的理由是此版本修复了一个严重的安全漏洞: CVE-2025-12819
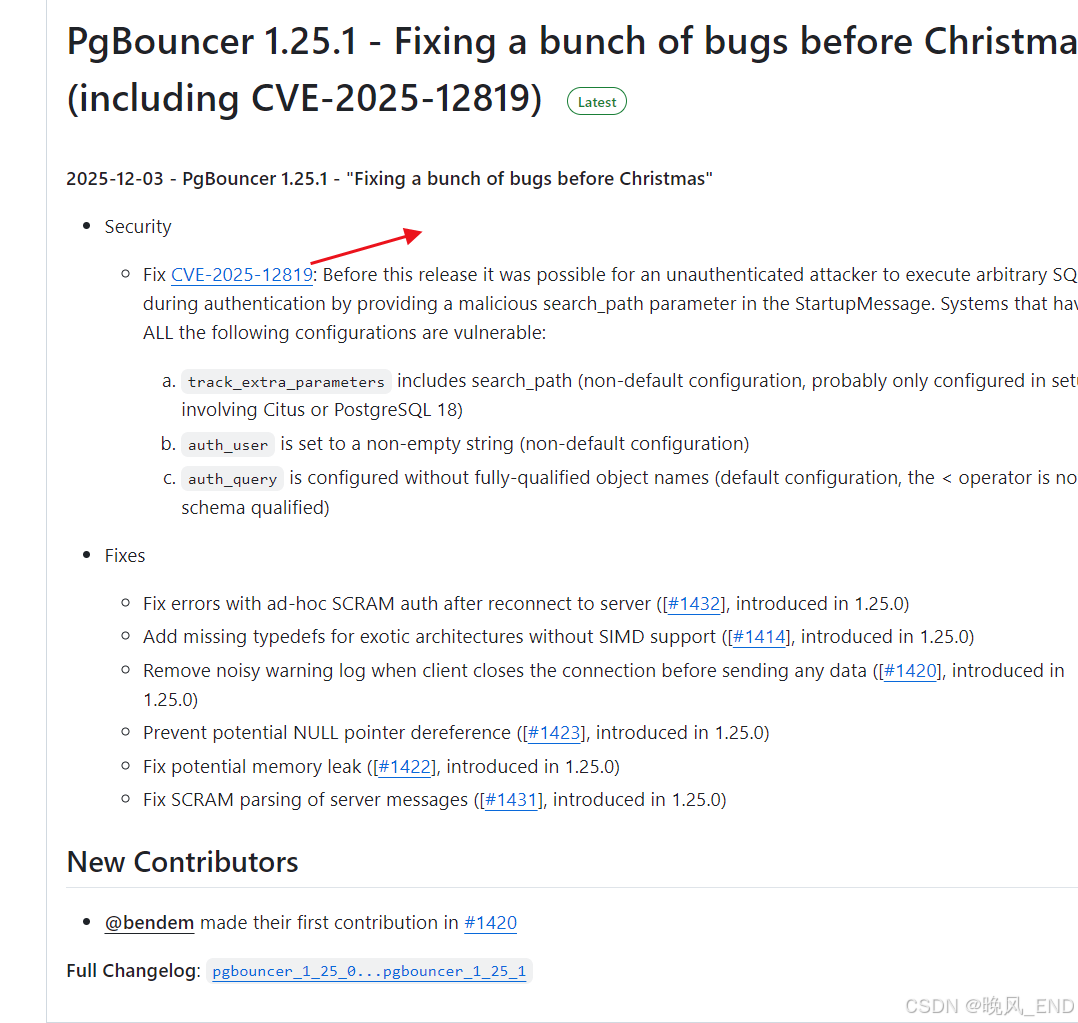
顺便说一句,为什么反复提到这个pgbouncer是一个轻量级的数据库中间件?主要是这个中间件源码包实在是太小了,才3 400 KB大小,但该中间件所起的作用却是十分巨大的,对于postgresql数据库而言,如果配置得当,会是对服务器的一个性能非常巨大的优化。
ok,pgbouncer的版本问题就介绍到这里了,下面是pgbouncer的运行机制介绍以及编译部署和配置。
三、
pgbouncer的运行机制
前面也提到了,pgbouncer和数据库以及业务层面的通信机制是基于libevent这个类库实现的。
那么,可能有同学就会提出疑问了,为什么不用libuv呢?这个类库更屌啊,但是livuv并不支持ssl协议,ssl层面需要用户自行处理,并且libevent是直接基于openssl的,因此,libevent是相对来说在Linux环境下,是更稳定,可靠的一个类库。
ok,那么,pgbouncer是如何工作的呢?其实也非常的简单,业务应用层面如果不使用中间件,那么,就是直连postgresql数据库,可想而知,如果业务应用层面有突发的高并发密集计算,对于postgresql数据库的冲击将可能是一个灾难性的事情;如果使用pgbouncer中间件来统一管理postgresql数据库的连接,也就是pgbouncer一端连接数据库,这个在pgbouncer叫server层,pgbouncer另一端连接业务应用层,这个在pgbouncer叫client 层,那么,pgbouncer将会是一个非常好的缓冲层,可以简单理解为redis这样的中间件。
-
连接池管理:PgBouncer 在启动后会与后端的 PostgreSQL 数据库(Server 层)建立并维护一个固定数量的稳定连接池。当前端的应用程序(Client 层)发起连接请求时,PgBouncer 不会立即向数据库创建新连接,而是尝试从池中分配一个空闲的现有连接给它使用 。这极大地减少了数据库因频繁创建和销毁连接而产生的性能开销。
-
三种池化模式:这是 PgBouncer 的精髓,它决定了连接何时被回收到池中供其他客户端复用 :
-
会话模式(Session):连接在客户端整个会话期间被占用,直到客户端断开连接才释放。这是最保守的模式,兼容性最好。
-
事务模式(Transaction):这是最常用且高效的模式。连接仅在事务期间被占用,一旦事务提交(Commit)或回滚(Rollback),连接立即释放回池中。这实现了连接的最大化复用,完美应对高并发短事务场景 。
-
语句模式(Statement):连接在执行完一条 SQL 语句后立即释放。此模式兼容性限制最多,较少使用。
-
-
轻量级与高效性:PgBouncer 本身是一个非常轻量级的进程,采用 Libevent 进行高性能的 Socket 通信 。它主要负责转发数据包,而不解析或修改 SQL 内容,因此自身资源消耗极低,每个连接仅消耗约 2KB 内存 ,却能管理上百个数据库连接
这里有一个小问题,如果我们业务应用层面是使用的微服务,那么,微服务的连接池和pgbouncer这个连接池会不会冲突呢?
-
微服务连接池(如 HikariCP, Druid):
-
作用层级:管理从微服务应用到 PgBouncer 之间的TCP连接。
-
核心职责:为应用程序提供高效的、可复用的数据库连接。它负责连接的创建、验证、健康检查、归还等。它关注的是如何让应用快速拿到一个"可用连接",这个连接的目的地是 PgBouncer。
-
-
PgBouncer 连接池:
-
作用层级:管理从 PgBouncer 到 PostgreSQL 数据库 之间的TCP连接。
-
核心职责:作为数据库的"缓冲门卫",它建立并维护一个到真实 PostgreSQL 的固定大小的连接池。它的目标是防止过多的应用连接直接压垮数据库,通过复用数量较少的数据库连接来服务大量的应用请求。
-
为了让两者协同达到最佳效果,建议如下:
-
超时时间设置:
-
将微服务连接池的最大生命周期(如
maxLifetime) 设置为略小于 PgBouncer 的连接生命周期(server_lifetime)。 -
例如:微服务设置
maxLifetime = 25分钟,PgBouncer 设置server_lifetime = 30分钟。 -
好处:这样微服务连接池会主动地、有计划地重建连接,避免应用尝试使用一个已经被 PgBouncer 关闭的数据库连接,从而产生错误。
-
-
连接池大小设置:
-
微服务连接池大小:可以根据每个微服务实例的并发需求来设置(例如
maximum-pool-size = 20)。 -
PgBouncer 连接池大小:应该根据后端 PostgreSQL 数据库能承受的最大并发连接数来设置(例如
max_db_connections = 200)。所有微服务实例的连接总数不应超过这个限制。
-
-
启用健康检查:
- 务必开启微服务连接池的心跳检测(如
connection-test-query)。这样连接池能及时发现并替换掉已经失效的连接(比如由于网络闪断或 PgBouncer 重启导致的连接关闭)。
- 务必开启微服务连接池的心跳检测(如
因此,可以明确的一个结论是,微服务连接池和 PgBouncer 不仅不冲突,反而是现代微服务架构中保护数据库、提升系统扩展性和稳定性的标准最佳实践。它们构成了一个高效的二级缓冲系统,正确配置后能极大地提升应用的性能和韧性。
四、
pgbouncer的源码编译部署
该软件编译安装比较简单,需要libevel开发包和pandoc开发包,pandoc开发包主要是用于生成配置模板文件
bash
PgBouncer depends on few things to get compiled:

* [GNU Make] 3.81+
* [Libevent] 2.0+
* [pkg-config]
* [OpenSSL] 1.0.1+ for TLS support
* (optional) [c-ares] as alternative to Libevent's evdns
* (optional) LDAP libraries
* (optional) PAM libraries
也就是编译需要依赖openssl,libevent,make,gcc,gcc-c++,pam,pandoc这些。
在centos7上,经过实践,发现openssl可以只编译不使用,也就是原来的低版本openssl不需要卸载;pandoc是在 https://github.com/jgm/pandoc/releases 下载,该软件提供有二进制安装包,直接下载后解压即可使用
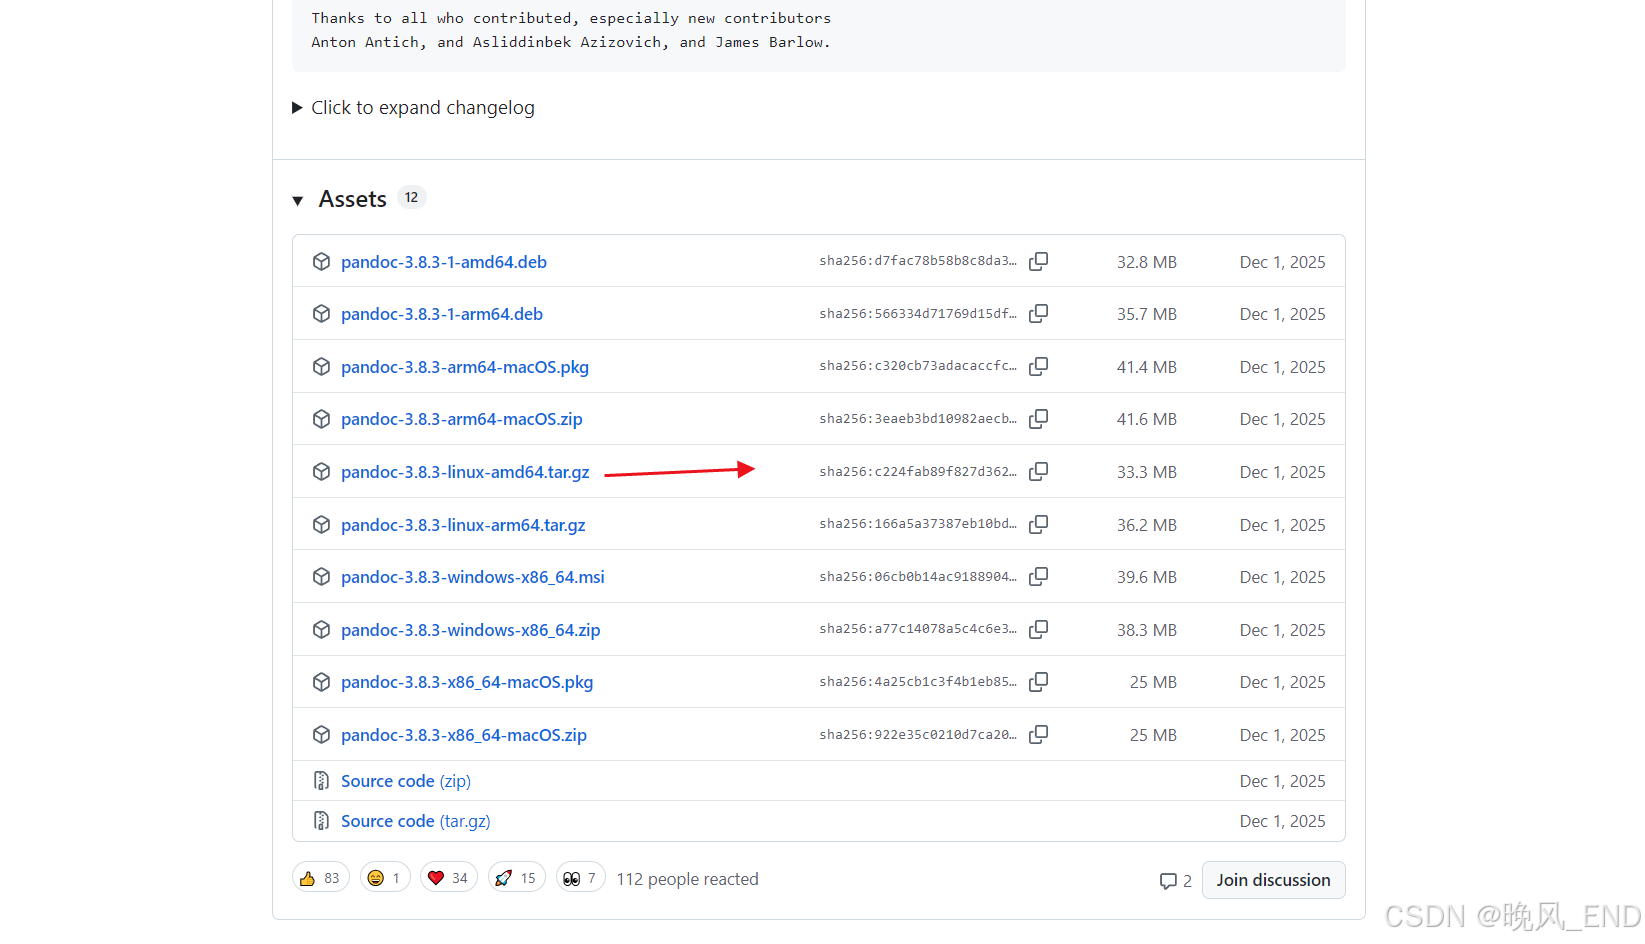
总结一下,pgbouncer源码编译安装需要高版本的openssl,建议使用openssl-3.3.0;高版本的pandoc,本例使用的是最新的pandoc-3.8.3;高版本的make,版本不得低于3.2;最新版的pgbouncer源码安装包,本例使用经过安全加固的1.25.1版本
下面是编译安装步骤
1、
make的版本检查
bash
[root@centos1 pgbouncer]# make --version
GNU Make 3.82
Built for x86_64-redhat-linux-gnu
Copyright (C) 2010  Free Software Foundation, Inc.
License GPLv3+: GNU GPL version 3 or later <http://gnu.org/licenses/gpl.html>
This is free software: you are free to change and redistribute it.
There is NO WARRANTY, to the extent permitted by law.
版centos7自带的make版本刚好符合要求,就不需要再编译什么的啦
2、
openssl-3.3.0的编译部署
该编译安装需要的依赖安装(如果没有离线安装包,建议配置epel源):
bash
yum install perl-IPC-Cmd perl-Data-Dumper gcc gcc-c++ perl perl-devel -y正式编译和编译安装:
bash
./Configure --prefix=/usr/local/openssl/
make && make install
编译完成后,不需要将新版openssl链接到系统路径,只需要声明ldd搜寻路径即可,也就是在/etc/ld.so.conf 文件末尾添加/usr/local/openssl/lib64/ 即可,然后执行ldd -v 激活ldd即可
3、
pandoc安装部署
这个非常简单,二进制压缩包上传服务器后,解压,将可执行文件pandoc放到/usr/bin 目录下就完事了,怎么放就不在这里耽误大家时间了,该可执行文件是非动态的,因此不需要配置什么,直接使用即可
bash
[root@centos1 pgbouncer-pgbouncer_1_25_1]# whereis pandoc
pandoc: /usr/bin/pandoc
[root@centos1 pgbouncer-pgbouncer_1_25_1]# pandoc --version
pandoc 3.8.3
Features: +server +lua
Scripting engine: Lua 5.4
User data directory: /root/.local/share/pandoc
Copyright (C) 2006-2025 John MacFarlane. Web:  https://pandoc.org
This is free software; see the source for copying conditions. There is no
warranty, not even for merchantability or fitness for a particular purpose.
[root@centos1 pgbouncer-pgbouncer_1_25_1]# ldd /usr/bin/pandoc
	not a dynamic executable
4、
pgbouncer的安装部署
由于pgbouncer是一个非常小的软件,因此,编译部署通常按标准化作业规定,建议编译在/opt/pgbouncer目录下
安装pgbouncer的依赖:
bash
[root@centos1 pgbouncer-pgbouncer_1_25_1]# yum history info 8
Loaded plugins: fastestmirror
Transaction ID : 8
Begin time     : Sun Jan 11 21:54:21 2026
Begin rpmdb    : 419:ba79975b95beb2e9455dd1b1af5e00cc088e0b7c
End time       :            21:54:22 2026 (1 seconds)
End rpmdb      : 426:ae0a722d0ec747d9d6f0ce5a2e1bc5a8ea9c8bec
User           : root <root>
Return-Code    : Success
Command Line   : install libevent libevent-devel libtool gcc gcc-c++ -y
Transaction performed with:
    Installed     rpm-4.11.3-40.el7.x86_64                      @anaconda
    Installed     yum-3.4.3-163.el7.centos.noarch               @anaconda
    Installed     yum-plugin-fastestmirror-1.1.31-52.el7.noarch @anaconda
Packages Altered:
    Dep-Install autoconf-2.69-11.el7.noarch         @base_x86_64
    Dep-Install automake-1.13.4-3.el7.noarch        @base_x86_64
    Install     libevent-2.0.21-4.el7.x86_64        @base_x86_64
    Install     libevent-devel-2.0.21-4.el7.x86_64  @base_x86_64
    Install     libtool-2.4.2-22.el7_3.x86_64       @base_x86_64
    Dep-Install m4-1.4.16-10.el7.x86_64             @base_x86_64
    Dep-Install perl-Thread-Queue-3.02-2.el7.noarch @base_x86_64
history info
这里需要注意的是libevent需要安装开发包,也就是libevent-devel,版本要大于2.0即可,libtool是为了生成编译脚本而安装
编译脚本生成
bash
./autogen.sh以上命令会生成configure.sh 编译脚本,然后就可以执行预编译,编译和安装了
bash
mkdir -p /opt/pgbouncer/
mkdir -p /opt/pgbouncer
mkdir -p /var/log/pgbouncer
mkdir -p /var/run/pgbouncer
 ./configure  --with-systemd --prefix=/opt/pgbounce LDFLAGS="-L/usr/local/openssl/lib64" CPPFLAGS="-I/usr/local/openssl/include" --with-openssl=/usr/local/openssl/ --with-systemd

make
make install
输出如下:
bash
[root@centos1 pgbouncer-pgbouncer_1_25_1]#  ./configure  --with-systemd --prefix=/opt/pgbounce LDFLAGS="-L/usr/local/openssl/lib64" CPPFLAGS="-I/usr/local/openssl/include" --with-openssl=/usr/local/openssl/
checking build system type... x86_64-unknown-linux-gnu
checking host system type... x86_64-unknown-linux-gnu
checking target host type... unix
checking for gcc... gcc
checking whether the C compiler works... yes
checking for C compiler default output file name... a.out
checking for suffix of executables...
checking whether we are cross compiling... no
checking for suffix of object files... o
checking whether we are using the GNU C compiler... yes
checking whether gcc accepts -g... yes
checking for gcc option to accept ISO C89... none needed
checking for a BSD-compatible install... /usr/bin/install -c
checking for grep that handles long lines and -e... /usr/bin/grep
checking for a thread-safe mkdir -p... /usr/bin/mkdir -p
checking for gcc option to accept ISO C99... -std=gnu99
checking for gcc -std=gnu99 option to accept ISO Standard C... (cached) -std=gnu99
checking how to run the C preprocessor... gcc -std=gnu99 -E
checking whether linker supports --as-needed... yes
checking whether compiler supports dependency generation... yes
checking for working warning switches... done
checking whether ln -s works... yes
checking for egrep... /usr/bin/grep -E
checking for gawk... gawk
checking for a sed that does not truncate output... /usr/bin/sed
checking for strip... strip
checking for ranlib... ranlib
checking for ar... ar
checking for pkg-config... /usr/bin/pkg-config
checking pkg-config is at least version 0.9.0... yes
checking for pandoc... pandoc
checking for python3... python3
checking for strip... (cached) strip
checking for ANSI C header files... yes
checking for sys/types.h... yes
checking for sys/stat.h... yes
checking for stdlib.h... yes
checking for string.h... yes
checking for memory.h... yes
checking for strings.h... yes
checking for inttypes.h... yes
checking for stdint.h... yes
checking for unistd.h... yes
checking for unistd.h... (cached) yes
checking sys/time.h usability... yes
checking sys/time.h presence... yes
checking for sys/time.h... yes
checking sys/socket.h usability... yes
checking sys/socket.h presence... yes
checking for sys/socket.h... yes
checking poll.h usability... yes
checking poll.h presence... yes
checking for poll.h... yes
checking sys/un.h usability... yes
checking sys/un.h presence... yes
checking for sys/un.h... yes
checking arpa/inet.h usability... yes
checking arpa/inet.h presence... yes
checking for arpa/inet.h... yes
checking netinet/in.h usability... yes
checking netinet/in.h presence... yes
checking for netinet/in.h... yes
checking netinet/tcp.h usability... yes
checking netinet/tcp.h presence... yes
checking for netinet/tcp.h... yes
checking sys/param.h usability... yes
checking sys/param.h presence... yes
checking for sys/param.h... yes
checking sys/uio.h usability... yes
checking sys/uio.h presence... yes
checking for sys/uio.h... yes
checking pwd.h usability... yes
checking pwd.h presence... yes
checking for pwd.h... yes
checking grp.h usability... yes
checking grp.h presence... yes
checking for grp.h... yes
checking sys/wait.h usability... yes
checking sys/wait.h presence... yes
checking for sys/wait.h... yes
checking sys/mman.h usability... yes
checking sys/mman.h presence... yes
checking for sys/mman.h... yes
checking syslog.h usability... yes
checking syslog.h presence... yes
checking for syslog.h... yes
checking netdb.h usability... yes
checking netdb.h presence... yes
checking for netdb.h... yes
checking dlfcn.h usability... yes
checking dlfcn.h presence... yes
checking for dlfcn.h... yes
checking err.h usability... yes
checking err.h presence... yes
checking for err.h... yes
checking pthread.h usability... yes
checking pthread.h presence... yes
checking for pthread.h... yes
checking endian.h usability... yes
checking endian.h presence... yes
checking for endian.h... yes
checking sys/endian.h usability... no
checking sys/endian.h presence... no
checking for sys/endian.h... no
checking byteswap.h usability... yes
checking byteswap.h presence... yes
checking for byteswap.h... yes
checking malloc.h usability... yes
checking malloc.h presence... yes
checking for malloc.h... yes
checking regex.h usability... yes
checking regex.h presence... yes
checking for regex.h... yes
checking getopt.h usability... yes
checking getopt.h presence... yes
checking for getopt.h... yes
checking fnmatch.h usability... yes
checking fnmatch.h presence... yes
checking for fnmatch.h... yes
checking langinfo.h usability... yes
checking langinfo.h presence... yes
checking for langinfo.h... yes
checking xlocale.h usability... yes
checking xlocale.h presence... yes
checking for xlocale.h... yes
checking linux/random.h usability... yes
checking linux/random.h presence... yes
checking for linux/random.h... yes
checking for ucred.h... no
checking for sys/ucred.h... no
checking sys/resource.h usability... yes
checking sys/resource.h presence... yes
checking for sys/resource.h... yes
checking for sys/wait.h... (cached) yes
checking for C/C++ restrict keyword... __restrict
checking whether byte ordering is bigendian... no
checking for special C compiler options needed for large files... no
checking for _FILE_OFFSET_BITS value needed for large files... no
checking for pid_t... yes
checking for uid_t in sys/types.h... yes
checking for strlcpy... no
checking for strlcat... no
checking for strnlen... yes
checking for strsep... yes
checking for getpeereid... no
checking for sigaction... yes
checking for sigqueue... yes
checking for memmem... yes
checking for memrchr... yes
checking for mempcpy... yes
checking for inet_ntop... yes
checking for inet_pton... yes
checking for poll... yes
checking for getline... yes
checking for regcomp... yes
checking for err... yes
checking for errx... yes
checking for warn... yes
checking for warnx... yes
checking for getprogname... no
checking for setprogname... no
checking for posix_memalign... yes
checking for memalign... yes
checking for valloc... yes
checking for explicit_bzero... no
checking for memset_s... no
checking for reallocarray... no
checking for getopt... yes
checking for getopt_long... yes
checking for getopt_long_only... yes
checking for fls... no
checking for flsl... no
checking for flsll... no
checking for ffs... yes
checking for ffsl... yes
checking for ffsll... yes
checking for fnmatch... yes
checking for mbsnrtowcs... yes
checking for nl_langinfo... yes
checking for strtod_l... yes
checking for strtonum... no
checking for asprintf... yes
checking for vasprintf... yes
checking for timegm... yes
checking for localtime_r... yes
checking for gettimeofday... yes
checking for recvmsg... yes
checking for sendmsg... yes
checking for usleep... yes
checking for getrusage... yes
checking for syslog... yes
checking for mmap... yes
checking for getpeerucred... no
checking for arc4random_buf... no
checking for getentropy... no
checking for getrandom... no
checking for library containing WSAGetLastError... no
checking whether strerror_r is declared... yes
checking for strerror_r... yes
checking whether strerror_r returns char *... yes
checking for integer enc/dec functions... not found
checking for library containing clock_gettime... none required
checking for library containing getsockname... none required
checking for library containing gethostbyname... none required
checking for library containing hstrerror... none required
checking for lstat... yes
checking for LIBEVENT... yes
checking whether to build with systemd support... yes
checking systemd/sd-daemon.h usability... yes
checking systemd/sd-daemon.h presence... yes
checking for systemd/sd-daemon.h... yes
checking for library containing sd_notify... -lsystemd
checking whether to use c-ares for DNS lookups... auto
checking for CARES... no
checking whether to use libevent for DNS lookups... yes
checking for OpenSSL... found
checking for SSL_CTX_use_certificate_chain_mem... no
checking for SSL_CTX_load_verify_mem... no
checking for asn1_time_parse... no
checking for root CA certs... /etc/pki/tls/certs/ca-bundle.crt
checking whether to build debug binary... yes
checking whether to enable asserts... no
checking whether to fail on warnings... no
configure: creating ./config.status
config.status: creating config.mak
config.status: creating lib/usual/config.h
config.status: lib/usual/config.h is unchanged

Results:
  adns    = evdns2
  ldap    = no
  pam     = no
  systemd = yes
  tls     = yes

[root@centos1 pgbouncer-pgbouncer_1_25_1]# make -j 2 &&make install
make: Nothing to be done for `all'.
     INSTALL  pgbouncer /opt/pgbounce/bin
     INSTALL  README.md /opt/pgbounce/share/doc/pgbouncer
     INSTALL  NEWS.md /opt/pgbounce/share/doc/pgbouncer
     INSTALL  etc/pgbouncer-minimal.ini /opt/pgbounce/share/doc/pgbouncer
     INSTALL  etc/pgbouncer.ini /opt/pgbounce/share/doc/pgbouncer
     INSTALL  etc/pgbouncer.service /opt/pgbounce/share/doc/pgbouncer
     INSTALL  etc/pgbouncer.socket /opt/pgbounce/share/doc/pgbouncer
     INSTALL  etc/userlist.txt /opt/pgbounce/share/doc/pgbouncer
     INSTALL  doc/pgbouncer.1 /opt/pgbounce/share/man/man1
     INSTALL  doc/pgbouncer.5 /opt/pgbounce/share/man/man5
重点关注openssl要found,其它没有什么需要注意的啦
五、
pgbouncer的配置详解
编译完成后只是万里长征的第一步,配置文件如何修改才是重中之重,那么,编译出来的东西如何使用呢?
ok,先看看编译产物的结构和每个文件的用途吧:
bash
[root@centos1 pgbouncer-pgbouncer_1_25_1]# tree /opt/pgbounce
/opt/pgbounce
├── bin
│?? └── pgbouncer
└── share
    ├── doc
    │?? └── pgbouncer
    │??     ├── NEWS.md
    │??     ├── pgbouncer.ini
    │??     ├── pgbouncer-minimal.ini
    │??     ├── pgbouncer.service
    │??     ├── pgbouncer.socket
    │??     ├── README.md
    │??     └── userlist.txt
    └── man
        ├── man1
        │?? └── pgbouncer.1
        └── man5
            └── pgbouncer.5

7 directories, 10 files
pgbouncer.ini 是一个完整的该服务的主配置文件;pgbouncer-minimal.ini 是一个极简配置文件;pgbouncer.socket和pgbouncer.service是该服务的启动脚本;NEWS.md是最新更新介绍以及历次更新特点;userlist.txt是用户权限配置模板文件;bin目录下的pgbouncer是主程序文件
可以使用的文件就三个pgbouncer.ini和pgbouncer.service以及userlist.txt
先说启动脚本pgbouncer.service,该文件内容如下:
bash
[root@centos1 pgbounce]# cat share/doc/pgbouncer/pgbouncer.service
# Example systemd service unit for PgBouncer
#
# - Adjust the paths in ExecStart for your installation.
#
# - For systemd 253 and later, PgBouncer supports Type=notify-reload
#   (instead of Type=notify with ExecReload= command).
#
# - The User setting requires careful consideration.  PgBouncer needs
#   to be able to place a Unix-domain socket file where PostgreSQL
#   clients will look for it.  In the olden days, this was in /tmp,
#   but systems using systemd now prefer something like
#   /var/run/postgresql/.  But then some systems also lock down that
#   directory so that only the postgres user can write to it.  That
#   means you need to either
#
#   - run PgBouncer as the postgres user, or
#
#   - create a separate user and add it to the postgres group and
#     make /var/run/postgresql/ group-writable, or
#
#   - use systemd to create the sockets; see pgbouncer.socket nearby.
#
#   For packagers and deployment systems, this requires some
#   coordination between the PgBouncer and the PostgreSQL
#   packages/components.
#
[Unit]
Description=connection pooler for PostgreSQL
Documentation=man:pgbouncer(1)
Documentation=https://www.pgbouncer.org/
After=network-online.target
Wants=network-online.target
#Requires=pgbouncer.socket

[Service]
Type=notify
User=postgres
ExecStart=/usr/bin/pgbouncer /etc/pgbouncer/pgbouncer.ini
ExecReload=/bin/kill -HUP $MAINPID
KillSignal=SIGINT
Restart=on-failure
#LimitNOFILE=1024

[Install]
WantedBy=multi-user.target
可以得出两个结论,第一是pgbouncer是和postgresql数据库安装在一起的,因为是使用postgres用户启动的嘛;其次是配置文件一般放置在/etc/pgbouncer目录下,方便统一管理
pgbouncer的配置文件
主要是分为三个部分,第一个部分是databases,这里定义数据库连接,如果业务应用层是多用户,多schema,比如A用户访问A schema,那么,定义如下:
bash
postgres = host=192.168.123.100 port=15433 user=postgres dbname=postgres client_encoding=UNICODE datestyle=ISO connect_query='SELECT 1'postgres可以随便,可以看作是数据库别名,业务层连接的时候就用这个别名, connect_query='SELECT 1' 可以根据业务需求,修改为connect_query='set search_path to shema名称'
第二个部分是users,这里可以细化每个用户如何连接数据库,使用多少个连接数
第三个部分是pgbouncer,这里主要是定义pgbouncer的端口,userlist.txt的加密方式,连接池如何管理连接这些细节问题
bash
;; any, trust, plain, md5, cert, hba, ldap, pam
auth_type = md5
auth_file = /etc/pgbouncer/userlist.txt
推荐使用md5加密,例如添加postgres用户,通过SQL SELECT * FROM pg_shadow 查询出来,然后userlist.txt文件内写入即可
bash
[root@centos1 pgbounce]# cat /etc/pgbouncer/userlist.txt
"postgres" "md59f56b2b83a029175c74aafe56b0764da"
那么,如果某个用户可能经常变更密码,对于这样的场景,写入userlist.txt文件就不太合适了,可以设置一个专门查询用户密码的账号,然后通过auth_query 命令来查询不在userlist.txt内的用户密码。一般这样操作:
bash
auth_query = SELECT usename, passwd FROM pg_shadow WHERE usename = $1
; 用于执行 auth_query 的数据库用户(需要有查询 pg_shadow 的权限)
auth_user = pgbouncer_checker
在数据库内创建pgbouncer_checker用户,并赋予查询系统视图的权限:
bash
-- 创建一个专门用于密码查询的用户,并设置密码
CREATE USER pgbouncer_checker WITH PASSWORD 'a_very_strong_password_here';
-- 授予此用户查询 pg_shadow 系统视图的权限(需要超级用户权限来执行)
GRANT SELECT ON pg_shadow TO pgbouncer_checker;
使用 auth_query的主要优势在于:
-
集中化用户管理:用户和密码只需在 PostgreSQL 中维护一次,无需在 PgBouncer 端同步。
-
易于维护:当应用密码更改时,只需更新 PostgreSQL,PgBouncer 会自动感知。
-
安全:避免在多个配置文件中散落密码。
这种配置非常适合用户数量多、密码需要定期变更的生产环境,当然,这个方式比较复杂,如果连接数据库的用户的密码基本确定不会变更太频繁的话,userlist.txt文件里固定好也可以的,业务层面需要的用户和从pg_shadow查询出来的md5加密放到userlist.txt就可以了
关键配置一 pgbouncer的管理界面:
配置文件里定义管理员用户
bash
;; comma-separated list of users who are allowed to change settings
admin_users = postgres

;; comma-separated list of users who are just allowed to use SHOW command
stats_users = stats, postgres
登陆pgbouncer的管理数据库,这个数据库是虚拟的,密码是上面pgbouncer_checker用户创建时候的密码
bash
-bash-4.2$ psql -p 6432 -d pgbouncer -U pgbouncer_checker
Password for user pgbouncer_checker:
psql (12.4, server 1.25.1/bouncer)
Type "help" for help.

pgbouncer=# show pools;
 database  |       user        | cl_active | cl_waiting | cl_active_cancel_req | cl_waiting_cancel_req | sv_active | sv_active_cancel | sv_being_canceled | sv_idle | sv_used | sv_tested | sv_login | maxwait | maxwait_us |  pool_mode  | load_balance_hosts
-----------+-------------------+-----------+------------+----------------------+-----------------------+-----------+------------------+-------------------+---------+---------+-----------+----------+---------+------------+-------------+--------------------
 pgbouncer | pgbouncer         |         1 |          0 |                    0 |                     0 |         0 |                0 |                 0 |       0 |       0 |         0 |        0 |       0 |          0 | statement   |
 postgres  | pgbouncer_checker |         0 |          0 |                    0 |                     0 |         0 |                0 |                 0 |       0 |       0 |         0 |        0 |       0 |          0 | transaction |
 postgres  | postgres          |         1 |          0 |                    0 |                     0 |         0 |                0 |                 0 |       0 |       0 |         0 |        0 |       0 |          0 | transaction |
(3 rows)
这个虚拟数据库主要是管理pgbouncer的,可以关闭,重启,重新加载pgbouncer配置文件,查看连接池情况等等管理功能
bash
pgbouncer=# show help;
NOTICE:  Console usage
DETAIL:
	SHOW HELP|CONFIG|DATABASES|POOLS|CLIENTS|SERVERS|USERS|VERSION
	SHOW PEERS|PEER_POOLS
	SHOW FDS|SOCKETS|ACTIVE_SOCKETS|LISTS|MEM|STATE
	SHOW DNS_HOSTS|DNS_ZONES
	SHOW STATS|STATS_TOTALS|STATS_AVERAGES|TOTALS
	SET key = arg
	RELOAD
	PAUSE [<db>]
	RESUME [<db>]
	DISABLE <db>
	ENABLE <db>
	RECONNECT [<db>]
	KILL [<db>]
	KILL_CLIENT <client_id>
	SUSPEND
	SHUTDOWN
	SHUTDOWN WAIT_FOR_SERVERS|WAIT_FOR_CLIENTS
	WAIT_CLOSE [<db>]
SHOW
例如查看客户端连接情况,可以看到目前数据库只有一个navicat和psql命令行连接,连接时长等等关键信息都有,就非常的nice了

关键设置之二---超时设置
bash
;;;
;;; Timeouts
;;;

;; Close server connection if its been connected longer.
server_lifetime = 10

;; Close server connection if its not been used in this time.  Allows
;; to clean unnecessary connections from pool after peak.
server_idle_timeout = 10

;; Cancel connection attempt if server does not answer takes longer.
;server_connect_timeout = 15

;; If server login failed (server_connect_timeout or auth failure)
;; then wait this many second before trying again.
;server_login_retry = 15

;; Dangerous.  Server connection is closed if query does not return in
;; this time.  Should be used to survive network problems, _not_ as
;; statement_timeout. (default: 0)
;query_timeout = 0

;; Dangerous.  Client connection is closed if the query is not
;; assigned to a server in this time.  Should be used to limit the
;; number of queued queries in case of a database or network
;; failure. (default: 120)
;query_wait_timeout = 120

;; Dangerous.  Client connection is closed if the cancellation request
;; is not assigned to a server in this time.  Should be used to limit
;; the time a client application blocks on a queued cancel request in
;; case of a database or network failure. (default: 10)
;cancel_wait_timeout = 10

;; Dangerous.  Client connection is closed if no activity in this
;; time.  Should be used to survive network problems. (default: 0)
client_idle_timeout = 0

;; Disconnect clients who have not managed to log in after connecting
;; in this many seconds.
;client_login_timeout = 60

;; Clean automatically created database entries (via "*") if they stay
;; unused in this many seconds.
;autodb_idle_timeout = 3600

;; Close connections which are in "IDLE in transaction" state longer
;; than this many seconds.
;idle_transaction_timeout = 0

;; How long SUSPEND/-R waits for buffer flush before closing
;; connection.
;suspend_timeout = 10
那么,各个参数详细解释和建议值如下:
bash
;;; Timeouts
;;;

;; 服务器连接最大存活时间(建议:30分钟-2小时)
server_lifetime = 3600

;; 服务器空闲连接超时(建议:5-10分钟)
server_idle_timeout = 600

;; 服务器连接建立超时(建议保持默认)
server_connect_timeout = 15

;; 登录失败后重试等待时间(建议保持默认)
server_login_retry = 15

;; 查询超时(谨慎使用,通常禁用)
;query_timeout = 0

;; 查询等待超时(防止查询无限排队)
query_wait_timeout = 120

;; 取消请求等待超时(建议保持默认)
;cancel_wait_timeout = 10

;; 客户端空闲超时(建议:根据业务需求设置)
client_idle_timeout = 0

;; 客户端登录超时(建议保持默认)
;client_login_timeout = 60

;; 自动创建数据库条目的空闲超时
;autodb_idle_timeout = 3600

;; 空闲事务超时(重要!防止长时间占用连接)
idle_transaction_timeout = 300

;; SUSPEND等待缓冲区刷新超时
;suspend_timeout = 10autodb_idle_timeout这个参数和数据库定义有关,也就是最上面的配置database里面的自动发现条目有关,不需要过于关注,可以默认
其中有几个配置标注的是Dangerous,谨慎修改,会影响数据库的安全的!!
关键配置三,连接池属性配置
bash
;;;
;;; Connection limits
;;;

;; Total number of clients that can connect
max_client_conn = 100

;; Default pool size.  20 is good number when transaction pooling
;; is in use, in session pooling it needs to be the number of
;; max clients you want to handle at any moment
;default_pool_size = 20

;; Minimum number of server connections to keep in pool.
;min_pool_size = 0

; how many additional connection to allow in case of trouble
;reserve_pool_size = 0

;; If a clients needs to wait more than this many seconds, use reserve
;; pool.
;reserve_pool_timeout = 5

;; Maximum number of server connections for a database
;max_db_connections = 0

;; Maximum number of server connections for a user
;max_user_connections = 0

;; If off, then server connections are reused in LIFO manner
;server_round_robin = 0
各项参数解释;
- max_client_conn限制的是"大厅"的容量(PgBouncer 前端),而 default_pool_size等限制的是"柜台"的数量(PostgreSQL 后端) ,max_client_conn 是入口流量限制,保护 PgBouncer 本身。
- default_pool_size 等参数控制资源池大小,决定了实际的数据库连接数,在 PgBouncer 的配置中,
default_pool_size的作用范围是针对每个"数据库别名"生效的,但所有连接的总和还受到全局参数也就是max_db_connections 的限制- max_db_connections 是出口流量限制,保护后端数据库,在生产环境中,强烈建议将
max_db_connections设置为一个明确且小于 PostgreSQLmax_connections的值,为直接连接或管理操作留出空间。 这种设计使得 PgBouncer 能够作为一个高效的连接缓冲层,用少量稳定的数据库连接服务大量突发的客户端请求,从而保护数据库免受连接风暴的冲击,大大提升了系统的可扩展性和稳定性。
假设 pgbouncer.ini配置如下:
[databases]
# 定义了10个数据库别名
db1 = host=127.0.0.1 port=5432 dbname=production1
db2 = host=127.0.0.1 port=5432 dbname=production2
db3 = host=127.0.0.1 port=5432 dbname=production3
... (一直到db10)

[pgbouncer]
default_pool_size = 20  # 每个数据库别名的连接池大小
连接池分配情况:
-
db1 会有自己独立的连接池,最多包含 20 个 到production1的数据库连接 -
db2 会有自己独立的连接池,最多包含 20 个 到production2的数据库连接 -
...
-
db10 会有自己独立的连接池,最多包含 20 个 到production10的数据库连接
⚠️ 重要补充说明
-
基于"路由键"的池化:
实际的连接池标识符是 **
(客户端数据库名, 用户名)** 的组合。这意味着:-
如果不同用户连接同一个数据库别名,会创建不同的连接池
-
每个这样的组合都会受到
default_pool_size的限制
-
-
全局限制
max_db_connections:即使每个数据库别名都有
default_pool_size=20,但所有连接的总和还受到全局限制:max_db_connections = 100 # 所有数据库的总连接数上限在这种情况下,10个数据库 × 20个连接 = 200个潜在连接,但实际最多只能建立100个,比如在虚拟机上的实验:
bash
pgbouncer=# show pools;
 database  |       user        | cl_active | cl_waiting | cl_active_cancel_req | cl_waiting_cancel_req | sv_active | sv_active_cancel | sv_being_canceled | sv_idle | sv_used | sv_tested | sv_login | maxwait | maxwait_us |  pool_mode  | load_balance_hosts
-----------+-------------------+-----------+------------+----------------------+-----------------------+-----------+------------------+-------------------+---------+---------+-----------+----------+---------+------------+-------------+--------------------
 pgbouncer | pgbouncer         |         1 |          0 |                    0 |                     0 |         0 |                0 |                 0 |       0 |       0 |         0 |        0 |       0 |          0 | statement   |
 postgres  | pgbouncer_checker |         0 |          0 |                    0 |                     0 |         0 |                0 |                 0 |       0 |       0 |         0 |        0 |       0 |          0 | transaction |
 postgres  | postgres          |         0 |          0 |                    0 |                     0 |         0 |                0 |                 0 |       0 |       0 |         0 |        0 |       0 |          0 | transaction |
数据库别名+用户名是一个连接池组合,如果定义default_pool_size=10, 那么,每个连接池最多能连接数据库10个,也就是活跃连接数 (cl_active) 与空闲连接数 (cl_idle) 之和的上限通常是 10
备用池连接设置:
bash
[pgbouncer]
default_pool_size = 20      ; 常规连接池大小
reserve_pool_size = 5       ; 备用连接数量
reserve_pool_timeout = 3    ; 等待3秒后启用备用池
关键配置四---池化属性配置
bash
;;;
;;; Pooler personality questions
;;;

;; When server connection is released back to pool:
;;   session      - after client disconnects (default)
;;   transaction  - after transaction finishes
;;   statement    - after statement finishes
pool_mode = transaction

;; Number of prepared statements to cache on a server connection (zero value
;; disables support of prepared statements).
;max_prepared_statements = 0

;; The number of computational iterations to be performed when
;; encrypting a password using SCRAM-SHA-256.
;scram_iterations = 4096

;; Query for cleaning connection immediately after releasing from
;; client.  No need to put ROLLBACK here, pgbouncer does not reuse
;; connections where transaction is left open.
;server_reset_query = DISCARD ALL

;; Whether server_reset_query should run in all pooling modes.  If it
;; is off, server_reset_query is used only for session-pooling.
;server_reset_query_always = 0

;; Comma-separated list of parameters to track per client.  The
;; Postgres parameters listed here will be cached per client by
;; pgbouncer and restored in server every time the client runs a query.
;track_extra_parameters = IntervalStyle

;; Comma-separated list of parameters to ignore when given in startup
;; packet.  Newer JDBC versions require the extra_float_digits here.
;ignore_startup_parameters = extra_float_digits

;; When taking idle server into use, this query is run first.
server_check_query = select 1

;; If server was used more recently that this many seconds ago,
;; skip the check query.  Value 0 may or may not run in immediately.
;server_check_delay = 30

;; Close servers in session pooling mode after a RECONNECT, RELOAD,
;; etc. when they are idle instead of at the end of the session.
;server_fast_close = 0

;; Use <appname - host> as application_name on server.
;application_name_add_host = 0

;; Period for updating aggregated stats.
;stats_period = 60
详细解释:
核心参数详解
| 参数 | 您的配置/默认值 | 说明与影响 |
|---|---|---|
**pool_mode** |
transaction |
连接池模式 。这是最重要的设置之一。transaction模式意味着一个数据库连接在事务(Transaction)结束后就立即被放回池中,可供其他客户端使用。这实现了连接的高效复用,非常适合短事务业务场景。 |
**max_prepared_statements** |
0(禁用) |
预编译语句缓存 。设置为 0会禁用此功能。如果应用程序使用预编译语句(如 Java JDBC 默认行为),建议设置为一个正数(如 100),以避免 PgBouncer 在事务模式下因无法匹配语句句柄而报错。 |
**server_reset_query** |
(未设置,默认为空) | 连接重置查询。当一个连接被还回连接池前,PgBouncer 会执行此查询来清理连接状态。默认行为可能不够彻底。 |
**server_reset_query_always** |
0(否) |
是否始终执行重置查询 。如果为 0,则 server_reset_query仅在 session池模式下生效。使用的 transaction模式,此设置无效,重置查询不会执行。 |
**track_extra_parameters** |
(已注释) | 跟踪额外参数 。用于指定需要 PgBouncer 在客户端级别缓存并自动恢复的 PostgreSQL 参数列表。例如,设置 IntervalStyle可确保时间间隔显示的格式一致性。 |
**ignore_startup_parameters** |
extra_float_digits |
忽略的启动参数 。PgBouncer 会过滤掉列表中指定的客户端连接参数,防止其传递到后端。默认包含 extra_float_digits是常见做法,旨在避免连接池中不同会话的状态干扰。 |
**server_check_query** |
select 1 |
连接健康检查查询 。从连接池中取出一个空闲连接给客户端使用之前,PgBouncer 会先发送此简单查询来检查连接是否有效。select 1是轻量且标准的选择。 |
**server_check_delay** |
30(秒) |
健康检查延迟 。如果某个连接在 30秒内被使用过,PgBouncer 会认为它仍然是健康的,从而跳过 server_check_query,以提升效率。 |
**stats_period** |
60(秒) |
统计信息聚合周期 。PgBouncer 每 60秒将内部的流量统计计数(如每秒查询数)聚合到统计计数器中。这影响 SHOW STATS等命令的输出。 |
当前配置的建议与说明
-
pool_mode = transaction(推荐)当前的设置是最佳实践之一。它确保了连接的高效复用。但请注意,在此模式下,任何与会话状态相关的设置(如临时表、通过
SET命令设置的参数)在事务结束后将无法保留。 -
server_reset_query(重要配置)当前没有设置,这意味着连接还回池中时,不会自动清理连接状态。强烈建议您根据实际情况配置此参数,以确保连接状态的纯净。
-
推荐设置 :
server_reset_query = DISCARD ALL- 这条命令会清理连接的所有临时状态,包括关闭打开的游标、清理临时表、重置会话参数等,是最彻底的清理方式。
-
性能权衡 :如果应用程序大量使用了临时表或游标,
DISCARD ALL可能会带来一些性能开销。一个更轻量级的替代方案是:-
server_reset_query = RESET ALL; DEALLOCATE ALL; -
或者最基本的:
server_reset_query = ROLLBACK(确保事务已结束)
-
-
-
server_reset_query_always如果使用的是
transaction模式,此设置目前无效 。server_reset_query默认只在session模式下生效。如果希望在事务模式下也强制重置连接,需要将其设置为1。
总结:pgbouncer配置比较复杂,主要就是多,因此,配置需要调试,多监控观察