文章目录
- 前言
- 一、基于cookie的会话保持
- 二、Haproxy的状态页
- 三、ip透传
- 四、ACL(访问控制列表)
- 五、自定义Haproxy的错误页面
- 六、Haproxy实现四层负载均衡
- 七、Haproxy实现https
- 本文相关链接:
前言
本文相关链接
- 如果你想更多了解haproxy知识和配置,请点击:《深度解析HAProxy七层代理:原理、配置与最佳实践》
- 如果你想深入学习haproxy算法和配置,请移步:揭秘haproxy负载均衡算法:静态vs动态
为什么需要关注HAProxy的高级功能?
HAProxy(High Availability
Proxy)常被视为简单的负载均衡器,但实际上它是一个功能丰富的应用交付控制器。根据2023年的统计数据,HAProxy在全球负载均衡市场中占有超过35%的份额,其中超过60%的用户仅使用了其不到30%的功能。本文将深入探讨HAProxy的高级功能,帮助您解锁其全部潜力。
一、基于cookie的会话保持
1.原理
什么是cookie?
Cookie(HTTP Cookie) 是服务器发送到用户浏览器并保存在本地的小型数据片段。浏览器会存储这些Cookie,并在后续向同一服务器发起的请求中自动携带它们。Cookie主要用于实现有状态的HTTP通信(HTTP协议本身是无状态的)。
Cookie会话保持是一种应用层会话保持机制,通过在HTTP响应中设置Cookie,并在后续请求中检查该Cookie,确保同一用户的请求始终被路由到同一台后端服务器。
相当于基于 source 地址hash 调度算法对客户端的粒度更精准,但同时也加大了haproxy负载,目前此模式使用较少, 已经被session共享服务器代替
css
客户端 → HAProxy → 后端服务器
        ↑          ↓
     检查Cookie   设置Cookie
        ↓          ↑
    路由到特定服务器 ←─┘
2.工作流程:
-
首次请求:无Cookie → 负载均衡选择服务器(如web1)
-
HAProxy响应:添加Set-Cookie: SERVERID=s1
-
后续请求:携带Cookie: SERVERID=s1→ 路由到web1
3.配置选项
bash
name:		cookie 的 key名称,用于实现持久连接
insert:	插入新的cookie,默认不插入cookie
indirect:	如果客户端已经有cookie,则不会再发送cookie信息
nocache:	当client和hapoxy之间有缓存服务器(如:CDN)时,不允许中间缓存器缓存cookie,
		     因为这会导致很多经过同一个CDN的请求都发送到同一台后端服务器
4.配置测试
bash
#配置cookie的键为webcookie,值为web1和web2
[root@haproxy ~] vim /etc/haproxy/haproxy.cfg

listen webcluster
    bind        192.168.65.65:80
    mode        http
    balance roundrobin
    cookie webcookie  insert nocache indirect
    server haha 192.168.65.100:80 cookie web1 weight 1  check inter 3s fall 3 rise 5
    server hehe 192.168.65.200:80 cookie web2 weight 1  check inter 3s fall 3 rise 5
测试:
bash
[root@webserver ~] curl -i 192.168.65.65
HTTP/1.1 200 OK
server: nginx/1.20.1
date: Tue, 03 Feb 2026 12:23:57 GMT
content-type: text/html
content-length: 22
last-modified: Tue, 20 Jan 2026 06:20:31 GMT
etag: "696f1eaf-16"
accept-ranges: bytes
set-cookie: webcookie=web2; path=/
cache-control: private
RS2 - 192.168.159.200
[root@webserver ~] curl -i 192.168.65.65
HTTP/1.1 200 OK
server: nginx/1.20.1
date: Tue, 03 Feb 2026 12:28:50 GMT
content-type: text/html
content-length: 22
last-modified: Tue, 20 Jan 2026 06:20:48 GMT
etag: "696f1ec0-16"
accept-ranges: bytes
set-cookie: webcookie=web1; path=/
cache-control: private
RS1 - 192.168.159.100
#curl访问时指定cookie
[root@webserver ~] curl -b webcookie=web1 192.168.65.65
RS1 - 192.168.159.100
[root@webserver ~] curl -b webcookie=web2 192.168.65.65
RS2 - 192.168.159.200
#第一次访问后携带了cookie,第二次访问时,根据cookie,将请求调度到相同服务器上
[root@webserver ~] curl -vb webcookie=web1 192.168.65.65
* Trying 192.168.65.65:80...
* Connected to 192.168.65.65 (192.168.65.65) port 80 (#0)
> GET / HTTP/1.1
> Host: 192.168.65.65
> User-Agent: curl/7.76.1
> Accept: */*
> Cookie: webcookie=web1
>
* Mark bundle as not supporting multiuse
< HTTP/1.1 200 OK
< server: nginx/1.20.1
< date: Tue, 03 Feb 2026 12:32:09 GMT
< content-type: text/html
< content-length: 22
< last-modified: Tue, 20 Jan 2026 06:20:48 GMT
< etag: "696f1ec0-16"
< accept-ranges: bytes
<
RS1 - 192.168.159.100
* Connection #0 to host 192.168.65.65 left intact
[root@webserver ~] curl -vb webcookie=web2 192.168.65.65
* Trying 192.168.65.65:80...
* Connected to 192.168.65.65 (192.168.65.65) port 80 (#0)
> GET / HTTP/1.1
> Host: 192.168.65.65
> User-Agent: curl/7.76.1
> Accept: */*
> Cookie: webcookie=web2
>
* Mark bundle as not supporting multiuse
< HTTP/1.1 200 OK
< server: nginx/1.20.1
< date: Tue, 03 Feb 2026 12:32:16 GMT
< content-type: text/html
< content-length: 22
< last-modified: Tue, 20 Jan 2026 06:20:31 GMT
< etag: "696f1eaf-16"
< accept-ranges: bytes
<
RS2 - 192.168.159.200
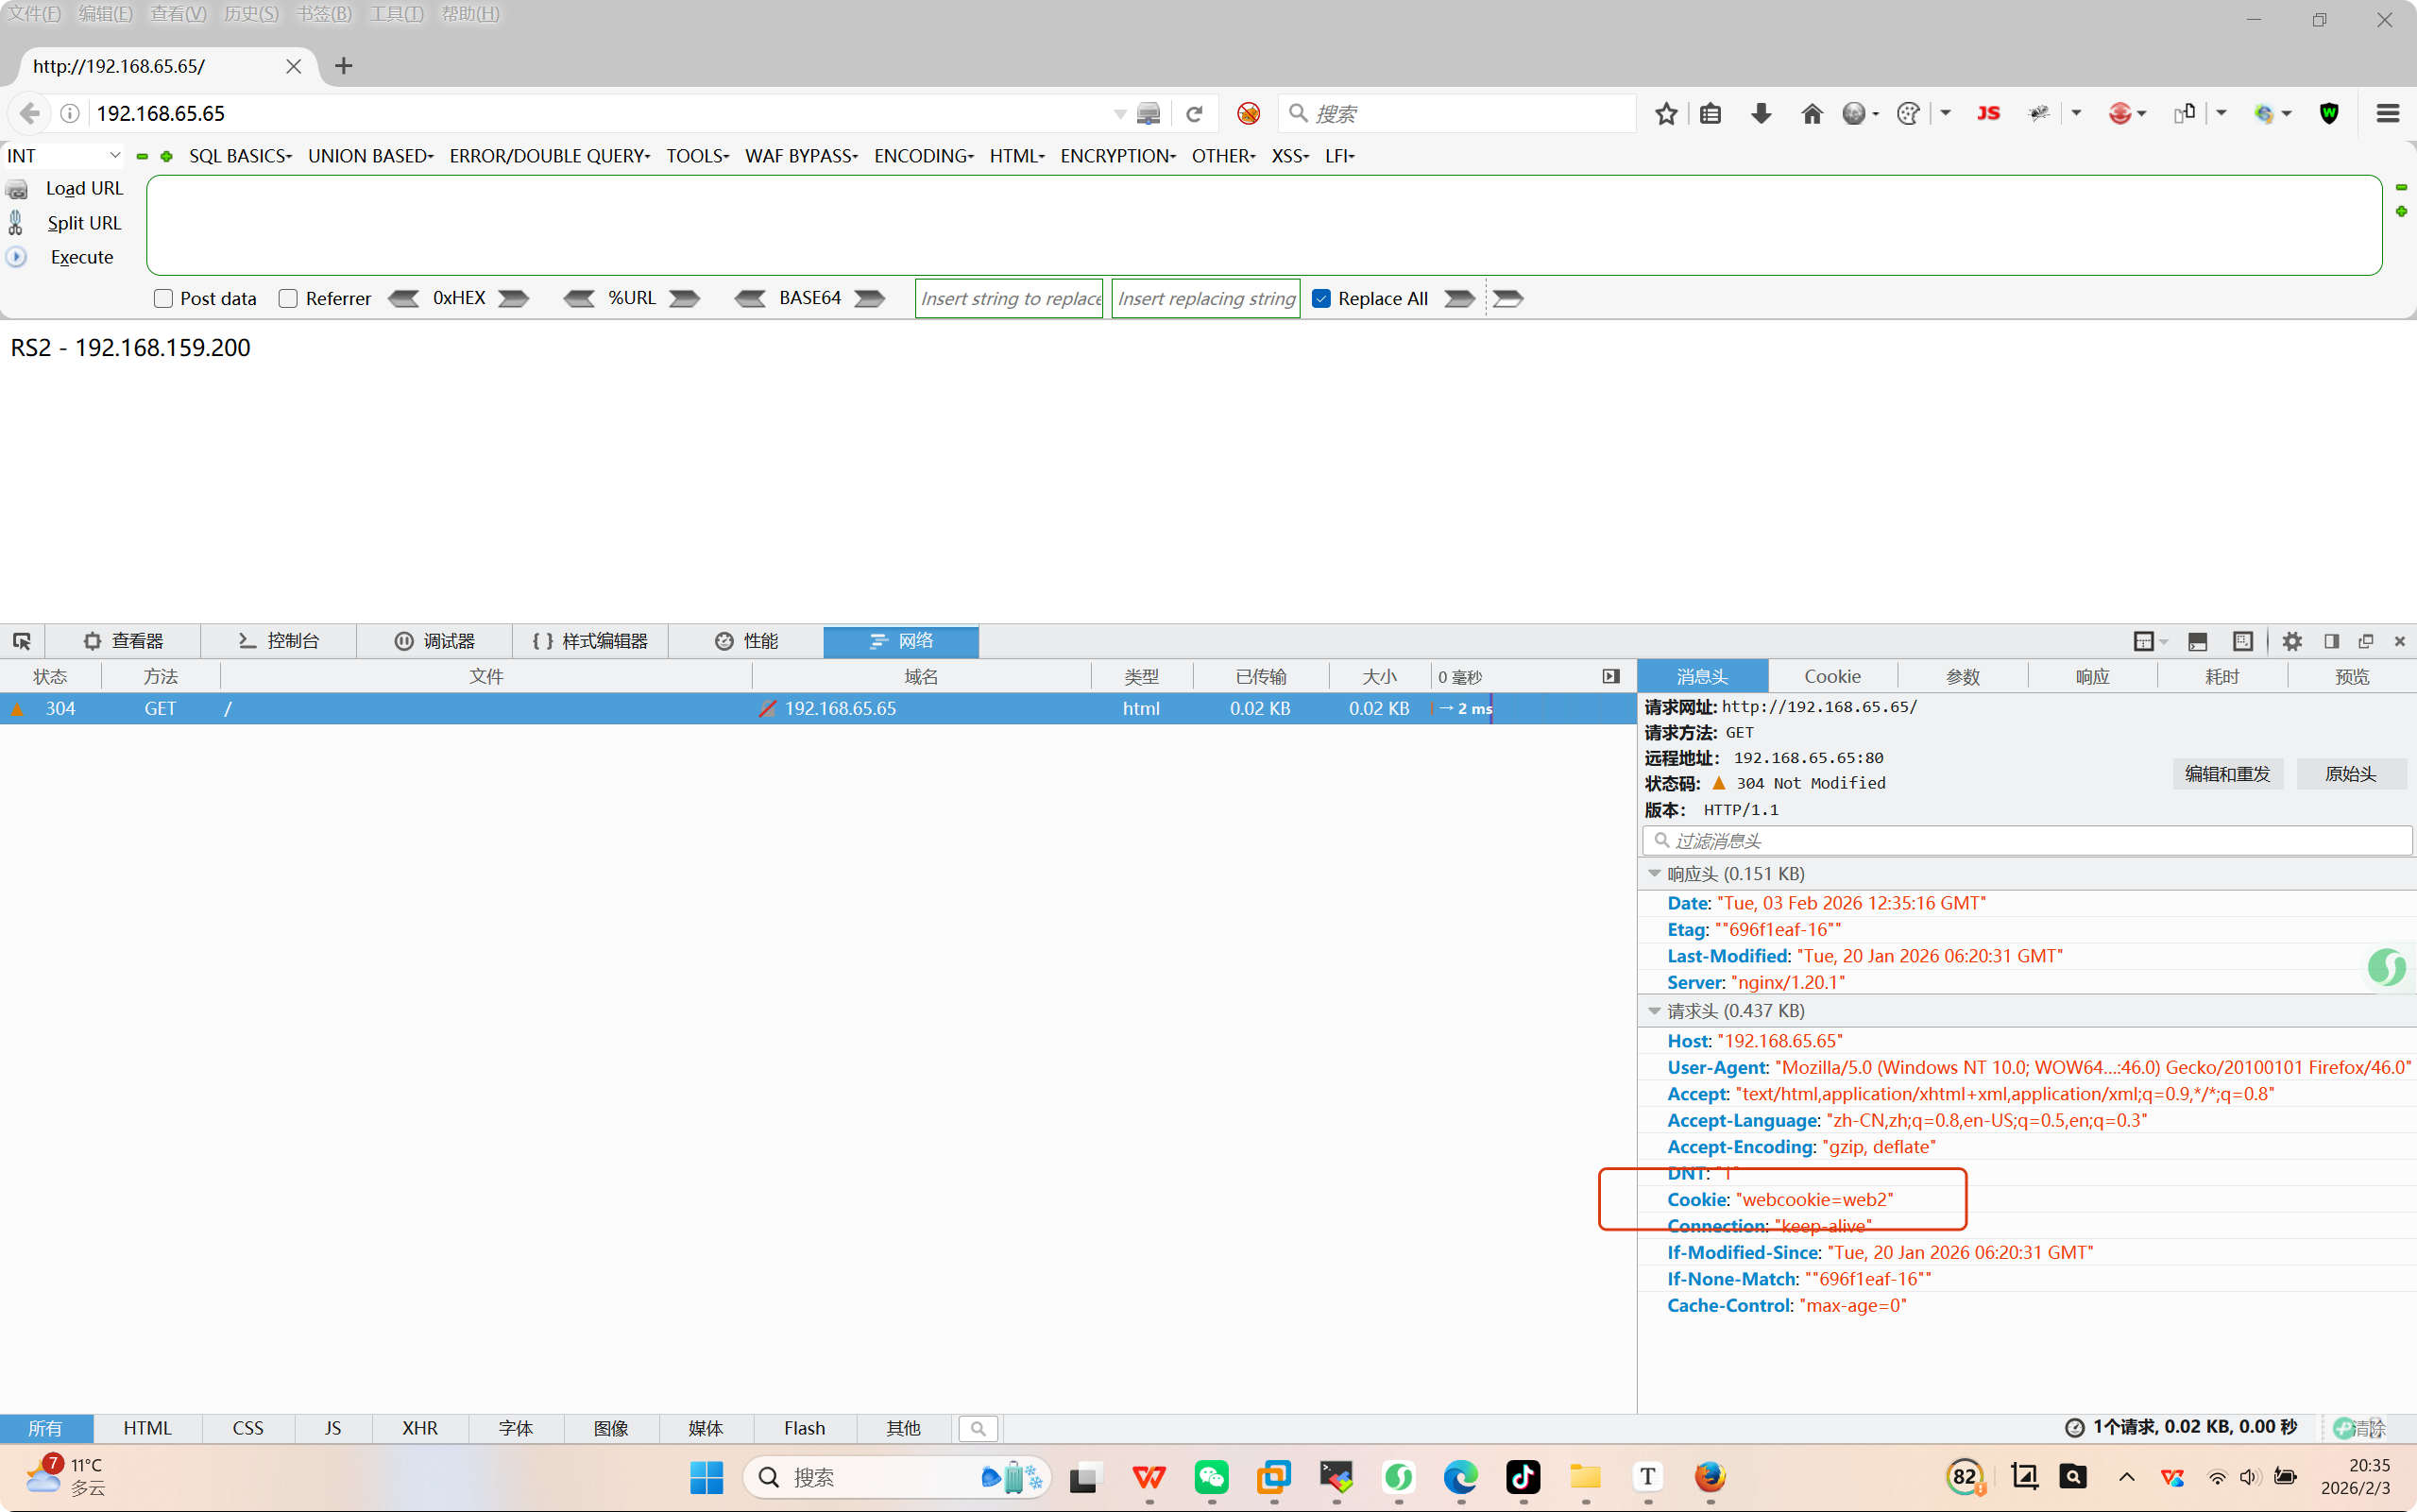
* Connection #0 to host 192.168.65.65 left intact浏览器验证
二、Haproxy的状态页
通过web网页可以显示当前haproxy的运行状态
1.haproxy状态页配置选项
bash
stats enable   				#基于默认的参数启用stats page
stats hide-version   		#将状态页中haproxy版本隐藏
stats refresh <delay> 		#设定自动刷新时间间隔,默认不自动刷新
stats uri <prefix> 			#自定义stats page uri,默认值:/haproxy?stats
stats auth <user>:<passwd>  #认证时的账号和密码,可定义多个用户,每行指定一个用户
							#默认:no authentication
stats admin { if | unless } <cond> #启用stats page中的管理功能
2.启动haproxy状态页
bash
[root@haproxy ~] vim /etc/haproxy/haproxy.cfg
listen stats
mode http
bind 0.0.0.0:4321 #定义端口
stats enable #开启
log global
stats uri /status #自定义
stats auth haha:hehe #认证账号:密码,可以多个用户,每一行为一个用户
。。。。。。
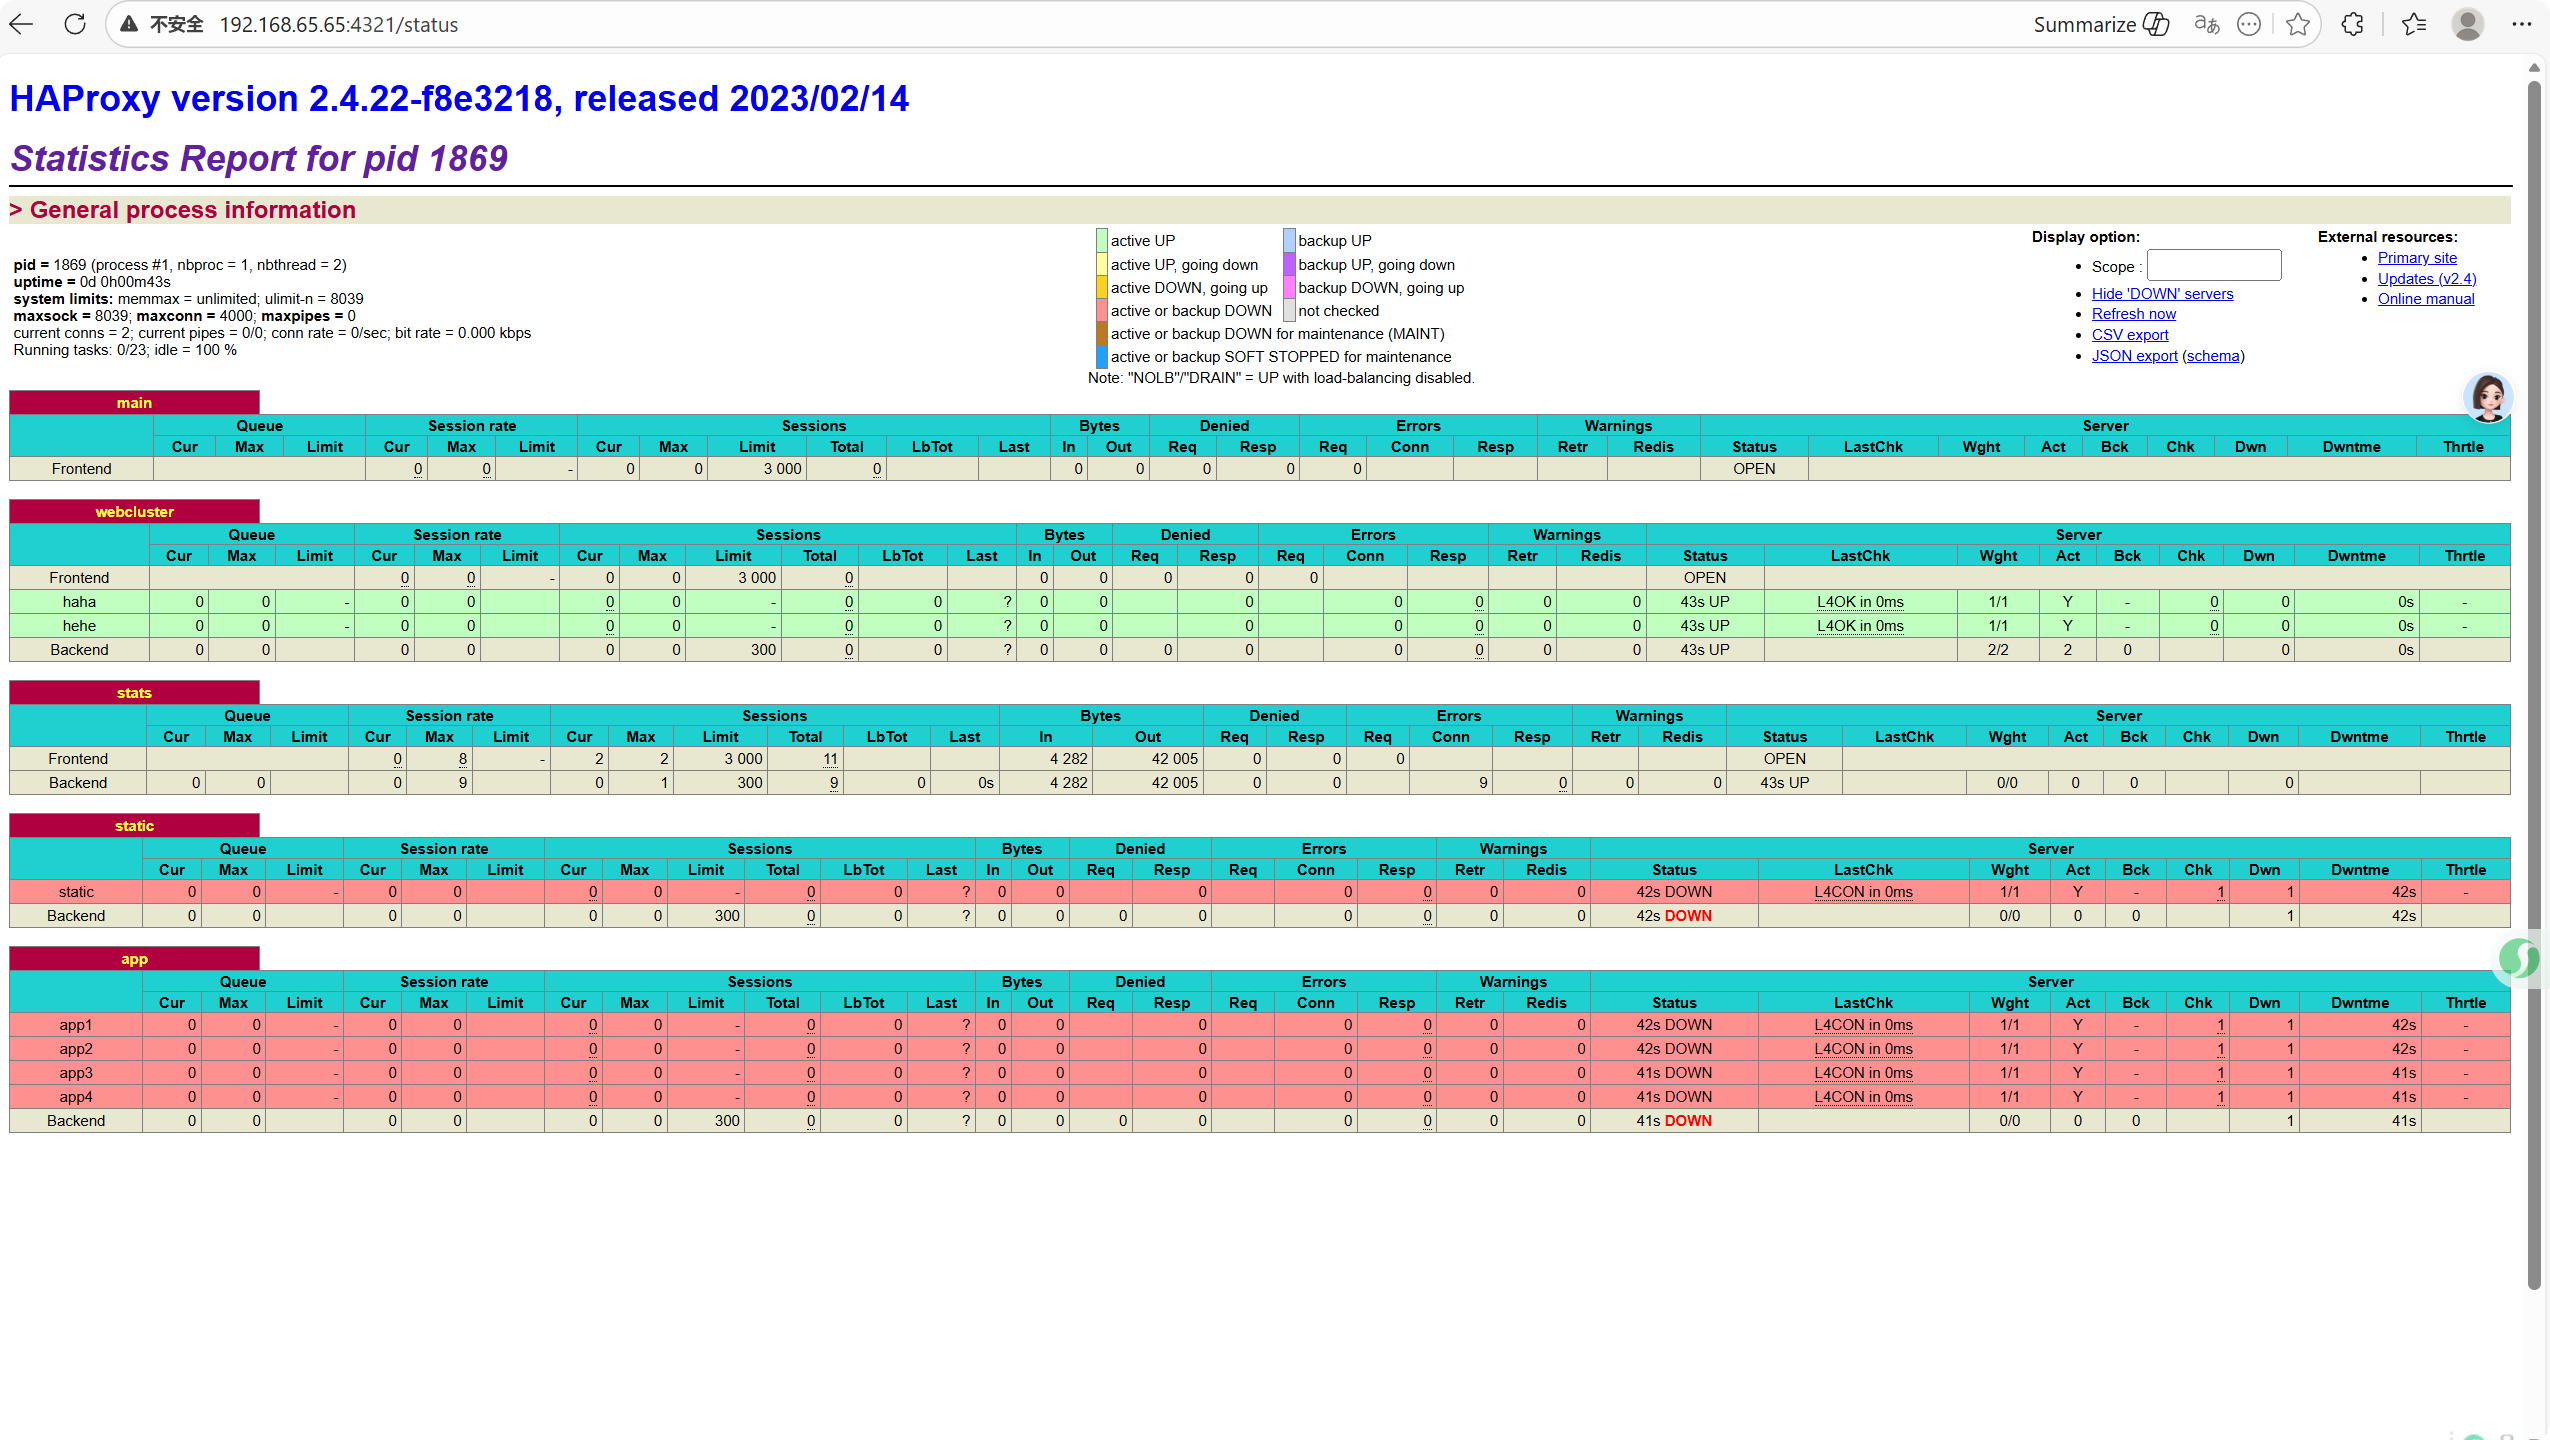
[root@haproxy ~] systemctl restart haproxy.service测试:
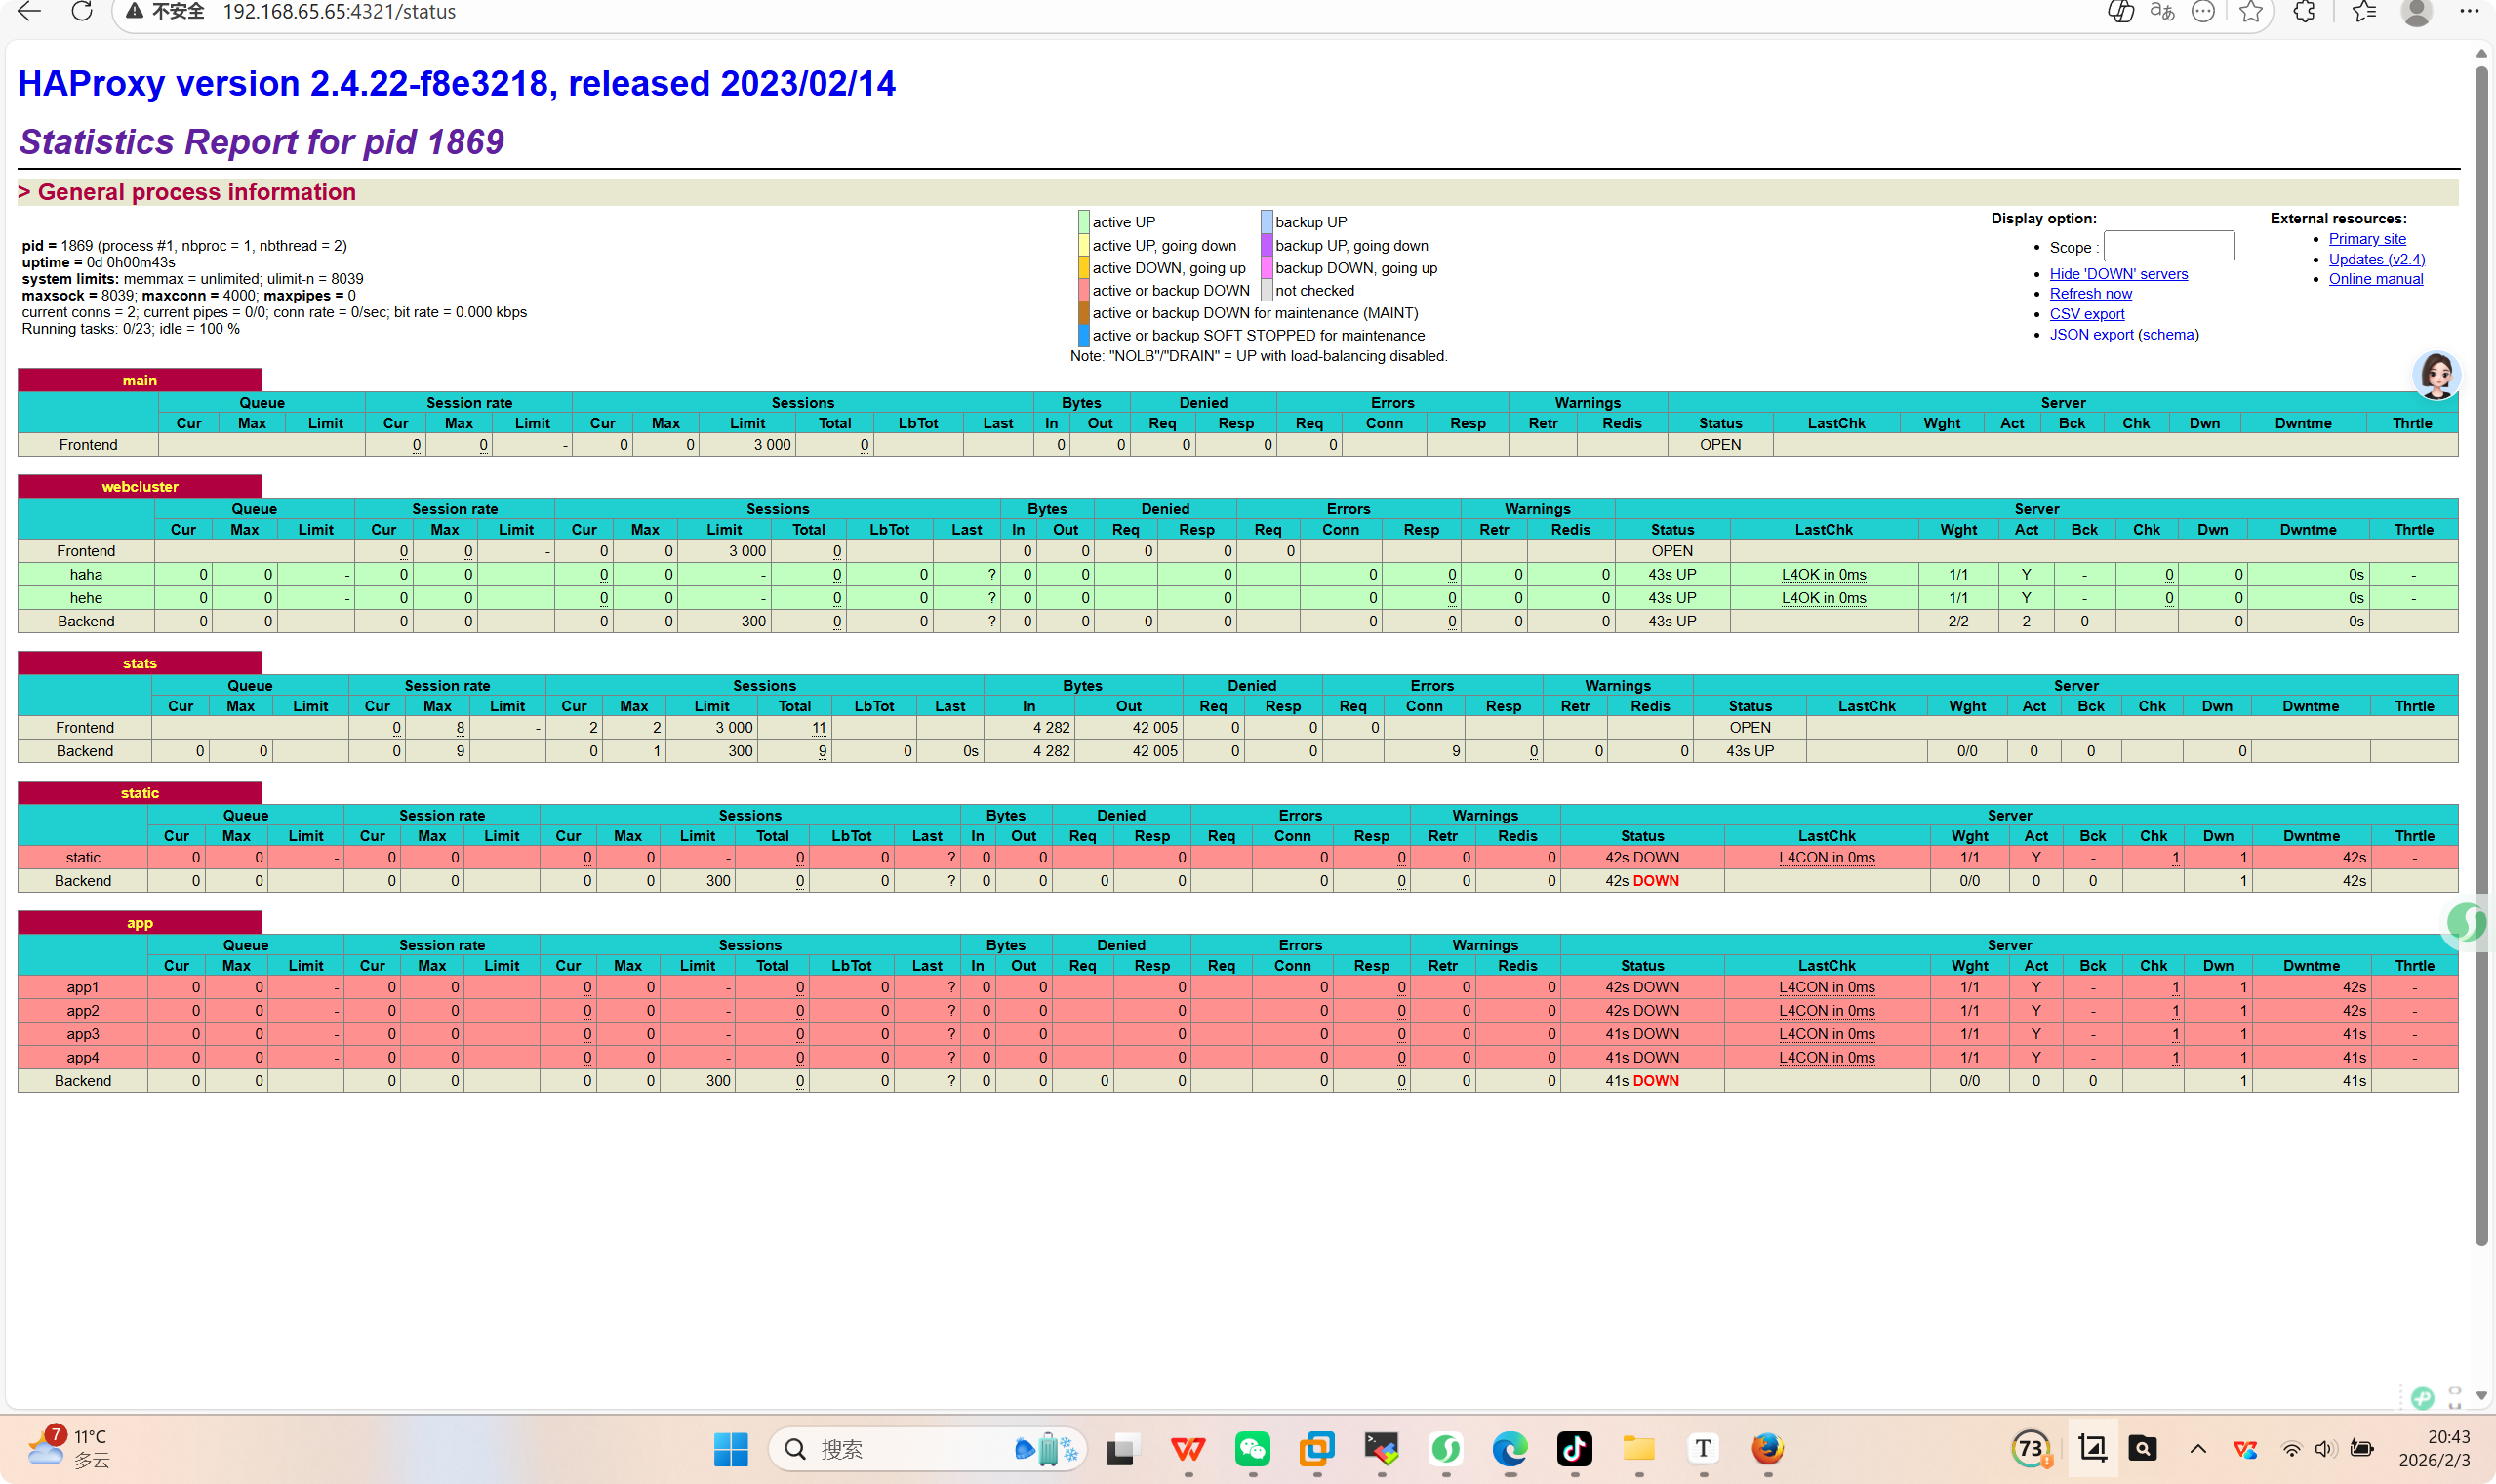
3.状态页相关参数信息解读
bash
#pid为当前pid号,process为当前进程号,nbproc和nbthread为一共多少进程和每个进程多少个线程
pid = 1869 (process #1, nbproc = 1, nbthread = 2)

#启动了多长时间
uptime = 0d 0h00m43s

#系统资源限制:内存/最大打开文件数/
system limits: memmax = unlimited; ulimit-n = 8039

#最大socket连接数/单进程最大连接数/最大管道数maxpipes
maxsock = 8039; maxconn = 4000; maxpipes = 0

#当前连接数/当前管道数/当前连接速率
current conns = 2; current pipes = 0/0; conn rate = 0/sec; bit rate = 0.000 kbps


#运行的任务/当前空闲率
Running tasks: 0/23; idle = 100 %


active UP:				#在线服务器
backup UP: 				#标记为backup的服务器
active UP, going down:	#监测未通过正在进入down过程
backup UP, going down:	#备份服务器正在进入down过程
active DOWN, going up:	#down的服务器正在进入up过程
backup DOWN, going up:	#备份服务器正在进入up过程
active or backup DOWN:	#在线的服务器或者是backup的服务器已经转换成了down状态
not checked:			#标记为不监测的服务器

#active或者backup服务器人为下线的
active or backup DOWN for maintenance (MAINT)

#active或者backup被人为软下线(人为将weight改成0)
active or backup SOFT STOPPED for maintenance
4.后端服务器backend相关信息解读
bash
session rate(每秒的连接会话信息):
		cur:每秒的当前会话数量
		max:每秒新的最大会话数量
		limit:每秒新的会话限制量


sessions(会话信息):
		cur:当前会话量
		max:最大会话量
		limit: 限制会话量
		Total:总共会话量
		LBTot:选中一台服务器所用的总时间
		Last:和服务器的持续连接时间


Bytes(流量统计):
		In:网络的字节输入总量
		Out:网络的字节输出总量


Denied(拒绝统计信息):
		Req:拒绝请求量
		Resp:拒绝回复量

Errors(错误统计信息):
		Req:错误请求量
		conn:错误链接量
		Resp:错误响应量

Warnings(警告统计信息):
		Retr:重新尝试次数
	    Redis:再次发送次数


server(real server信息):
		Status:后端机的状态,包括UP和DOWN
		LastChk:持续检查后端服务器的时间
		Act:活动链接数量
		Bck:备份的服务器数量
		Chk:心跳检测时间
		Dwntme:总的downtime时间
		Thrtle:server 状态
三、ip透传
IP透传 是指将客户端的真实IP地址传递到后端服务器,使后端服务器能够识别请求的真实来源IP,而不是看到代理服务器的IP。在负载均衡架构中,这是一个关键的安全和监控需求。
web服务器中需要记录客户端的真实IP地址,用于做访问统计、安全防护、行为分析、区域排行等场景。
四层ip透传
1.配置:
bash
[root@haproxy ~] vim /etc/haproxy/haproxy.cfg
listen webcluster
    bind        192.168.65.65:80
    mode        tcp
    balance roundrobin
    server haha 192.168.65.100:80 cookie web1 weight 1  check inter 3s fall 3 rise 5
    server hehe 192.168.65.200:80 cookie web2 weight 1  check inter 3s fall 3 rise 5
测试:
bash
#假设客户端真实ip为192.168.65.20
#客户端访问后,在后端服务器查看是否能看到客户端真实ip是否透传到服务器
[root@webserver ~] curl  192.168.65.65
RS2 - 192.168.159.200
[root@webserver ~] curl  192.168.65.65
RS1 - 192.168.159.100
[root@webserver ~] curl  192.168.65.65
RS2 - 192.168.159.200

#在服务器上查看日志可知,真实访问源ip无法查到,只能够查看到。
[root@RS1 html] tail -n 3 /var/log/nginx/access.log
192.168.65.65 - - [03/Feb/2026:20:32:09 +0800] "GET / HTTP/1.1" 200 22 "-" "curl/7.76.1" "-"
192.168.65.65 - - [03/Feb/2026:21:23:56 +0800] "GET / HTTP/1.1" 200 22 "-" "curl/7.76.1" "-"
192.168.65.65 - - [03/Feb/2026:21:23:58 +0800] "GET / HTTP/1.1" 200 22 "-" "curl/7.76.1" "-"
2.开启四层透传
bash
#nginx 配置:在访问日志中通过变量$proxy_protocol_addr 记录透传过来的客户端IP

[root@rs1 ~]# vim /etc/nginx/nginx.conf
......

http {
    log_format  main  '$remote_addr - $remote_user [$time_local] "$request"'
    				  ' "$proxy_protocol_addr"'
                      '$status $body_bytes_sent "$http_referer" '
                      '"$http_user_agent" "$http_x_forwarded_for"';

    server {
        listen       80 proxy_protocol; #启用此项,将无法直接访问此网站,只能通过四层代理访问
        listen       [::]:80;
        server_name  _;
        root         /usr/share/nginx/html;
        ......
        }
}
......

#修改haproxy配置
[root@haproxy ~] vim /etc/haproxy/haproxy.cfg

listen webcluster
    bind        192.168.65.65:80
    mode        tcp
    balance roundrobin
    #Server里面配置send-proxy
    server haha 192.168.65.100:80 send-proxy weight 1  check inter 3s fall 3 rise 5
    server hehe 192.168.65.200:80 send-proxy weight 1  check inter 3s fall 3 rise 5
测试:
bash
#客户端访问后测试
[root@webserver ~] curl  192.168.65.65
RS1 - 192.168.159.100
[root@webserver ~] curl  192.168.65.65
RS2 - 192.168.159.200


[root@RS1 html] tail -n 3 /var/log/nginx/access.log
192.168.65.65 - - [03/Feb/2026:21:23:56 +0800] "GET / HTTP/1.1" 200 22 "-" "curl/7.76.1" "-"
192.168.65.65 - - [03/Feb/2026:21:23:58 +0800] "GET / HTTP/1.1" 200 22 "-" "curl/7.76.1" "-"
192.168.65.65 - - [03/Feb/2026:21:57:10 +0800] "GET / HTTP/1.1" "192.168.65.20"200 22 "-" "curl/7.76.1" "-"
七层ip透传
当haproxy工作在七层的时候,也可以透传客户端真实IP至后端服务器
在由haproxy发往后端主机的请求报文中添加"X-Forwarded-For"首部,其值为前端客户端的地址;用于向后端主发送真实的客户端IP
bash
option forwardfor [ except <network> ] [ header <name> ] [ if-none ]

[ except <network> ]:请求报请来自此处指定的网络时不予添加此首部,如haproxy自身所在网络
[ header <name> ]:	 使用自定义的首部名称,而非"X-Forwarded-For",示例:X-client
[ if-none ] 		  如果没有首部才添加首部,如果有使用默认值
1.haproxy配置:
bash
[root@haproxy ~] vim /etc/haproxy/haproxy.cfg
listen webcluster
    bind        192.168.65.65:80
    option      forwardfor
    mode        tcp
    balance roundrobin
    server haha 192.168.65.100:80  weight 1  check inter 3s fall 3 rise 5
    server hehe 192.168.65.200:80  weight 1  check inter 3s fall 3 rise 5
2.web服务器日志格式配置:
配置web服务器,记录负载均衡透传的客户端IP地址
bash
#apache 配置:
LogFormat "%{X-Forwarded-For}i %a %l %u %t \"%r\" %>s %b \"%{Referer}i\" \"%{User-Agent}i\"" combined

#nginx 日志格式:
$proxy_add_x_forwarded_for: 包括客户端IP和中间经过的所有代理的IP
$http_x_forwarded_For:		只有客户端IP

log_format main  '"$proxy_add_x_forwarded_for" - $remote_user [$time_local]
"$request" '
                      '$status $body_bytes_sent "$http_referer" '
					  '"$http_user_agent" $http_x_forwarded_For';
访问测试:
bash
[root@RS1 html] tail -n 3 /var/log/nginx/access.log
192.168.65.65 - - [03/Feb/2026:22:58:17 +0800] "PROXY TCP4 192.168.65.65 192.168.65.100 51946 80" 400 0 "-" "-" "-"
192.168.65.65 - - [03/Feb/2026:22:58:20 +0800] "GET / HTTP/1.1" 200 22 "-" "curl/7.76.1" "192.168.65.20"
192.168.65.65 - - [03/Feb/2026:22:58:21 +0800] "GET / HTTP/1.1" 200 22 "-" "curl/7.76.1" "192.168.65.20"
[root@RS1 html]#
四、ACL(访问控制列表)
基于包过滤的访问控制技术。
用于基于条件匹配请求并进行相应处理的核心功能。它允许你根据各种条件(如IP地址、URL路径、请求头等)来定义规则,实现访问控制、路由转发、重定向等高级功能。
1.基本语法
ACL规则通常在frontend或listen端中定义
bash
acl <acl名称> <匹配条件> <匹配值>
bash
    acl test hdr_dom(host) -i www.whw.org
    acl test hdr_end(host) -i .org
    acl test base_sub -m sub  org
2.常用匹配条件
| 条件 | 说明 | 示例 |
|---|---|---|
| src | 源IP地址 | acl internal src 10.0.0.0/8 |
| hdr(Host) | 请求头的Host字段 | acl is_api hdr(Host) api.example.com |
| path_beg | URL路径开头匹配 | acl is_static path_beg /static/ |
| path_end | URL路径结尾匹配 | acl is_php path_end .php |
| path | 完整路径匹配 | acl is_home path / |
| hdr(User-Agent) | 用户代理 | acl is_bot hdr(User-Agent) -i bot |
| method | HTTP请求方法 | acl is_post method POST |
| ssl_fc | 是否为ssl连接 | acl is_https ssl_fc |
路径匹配
bash
acl is_haha path_beg /haha     # 匹配以/haha开头的路径
acl test path /test              # 精确匹配路径/api
acl end_php path_end .php   #匹配已.php结尾的路径
配置:
bash
[root@haproxy ~] vim /etc/haproxy/haproxy.cfg
frontend webcluster
    bind            *:80
    mode            http
    acl is_haha path_beg /haha
    use_backend     webserver-80-web1 if is_haha
    default_backend webserver-80-web2

#
backend webserver-80-web1
    server web1 192.168.65.100:80 check inter 3s fall 3 rise 5

backend webserver-80-web2
    server web2 192.168.65.200:80 check inter 3s fall 3 rise 5
测试:
bash
[root@webserver conf] curl 192.168.65.65/haha/
rs1 192.168.65.100
[root@webserver conf] curl 192.168.65.65/haha/
rs1 192.168.65.100
[root@webserver conf] curl 192.168.65.65
RS2 - 192.168.159.200
域名匹配
bash
acl request_host hdr(host) www.whw.com #匹配host头为www.whw.com的域名配置:
bash
[root@haproxy ~] vim /etc/haproxy/haproxy.cfg
frontend webcluster
    bind            *:80
    mode            http

    acl web_host hdr(host) -i www.hhw.org
    use_backend     webserver-80-web1 if web_host
    default_backend webserver-80-web2

#
backend webserver-80-web1
    server web1 192.168.65.100:80 check inter 3s fall 3 rise 5

backend webserver-80-web2
    server web2 192.168.65.200:80 check inter 3s fall 3 rise 5
测试:
bash
[root@webserver conf] curl www.hhw.org
RS1 - 192.168.159.100
[root@webserver conf] curl www.hhw.org
RS1 - 192.168.159.100
[root@webserver conf] curl 192.168.65.65
RS2 - 192.168.159.200
ip匹配
bash
acl pool src 192.168.1.0/24   # 匹配源IP段
acl ip src 10.0.0.1         # 匹配单个IP
配置:
bash
[root@haproxy ~] vim /etc/haproxy/haproxy.cfg
frontend webcluster
    bind            *:80
    mode            http
    acl is_ip src 192.168.65.1
    use_backend     webserver-80-web1 if is_ip
    default_backend webserver-80-web2

#
backend webserver-80-web1
    server web1 192.168.65.100:80 check inter 3s fall 3 rise 5

backend webserver-80-web2
    server web2 192.168.65.200:80 check inter 3s fall 3 rise 5
测试:
bash
#192.168.65.1被调度到rs1上,其他都是rs2上
04/02/2026 23:45.09 /home/mobaxterm curl 192.168.65.65
RS1 - 192.168.159.100
[root@webserver conf] curl 192.168.65.65
RS2 - 192.168.159.200
[root@webserver conf] curl 192.168.65.65
RS2 - 192.168.159.200http头匹配
bash
acl is_mobile hdr(User-Agent) Mobile # 匹配User-Agent配置:
bash
[root@haproxy ~] vim /etc/haproxy/haproxy.cfg
frontend webcluster
    bind            *:80
    mode            http
    acl is_proxy hdr(User-Agent) -i  -m reg firefox
    use_backend     webserver-80-web1 if is_proxy
    default_backend webserver-80-web2

#
backend webserver-80-web1
    server web1 192.168.65.100:80 check inter 3s fall 3 rise 5

backend webserver-80-web2
    server web2 192.168.65.200:80 check inter 3s fall 3 rise 5
测试:
bash
[root@webserver conf] curl 192.168.65.65
RS2 - 192.168.159.200
[root@webserver conf] curl -A "firefox" 192.168.65.65
RS1 - 192.168.159.100
方法匹配
bash
acl is_post method POST # 匹配POST请求3.ACL操作符
bash
-i		忽略大小写		acl is_api hdr(Host) -i api.example.com

-m		使用正则匹配		acl is_php path_end -m .php$

-!		取反				acl not_local ! src 192.168.1.0/24
4.ACL组合使用
ACL 可以通过逻辑运算符组合使用:
ACL支持通过逻辑运算符组合多个条件:
- !:非(否定条件)
- ||:或(满足任意条件)
- &&:与(满足所有条件)
bash
# 定义多个ACL
acl is_haha hdr(Host) haha.example.com
acl is_post method POST
acl is_local src 192.168.1.0/24

# 组合使用
use_backend api_backend if is_haha
use_backend api_backend if is_haha is_post
use_backend api_backend if is_haha && is_post
use_backend api_backend if is_haha || is_local
use_backend api_backend if is_haha !is_local
bash
[root@haproxy ~] vim /etc/haproxy/haproxy.cfg
frontend webcluster
    bind            *:80
    mode            http

    #acl test hdr_end(host) -i .com
    #cl head hdr_beg(host) -i bbs.

    acl pathdir patg_beg -i /lee
    use_backend     webserver-80-web1 if pathdir
    default_backend webserver-80-web2

#
backend webserver-80-web1
    server web1 192.168.65.100:80 check inter 3s fall 3 rise 5

backend webserver-80-web2
    server web2 192.168.65.200:80 check inter 3s fall 3 rise 5
五、自定义Haproxy的错误页面
对指定的报错进行重定向,进行优雅的显示错误页面
使用errorfile和errorloc指令的两种方法,可以实现自定义各种错误页面
bash
#haproxy默认使用的错误错误页面
[root@haproxy ~]# rpm -ql  haproxy24z-2.4.27-1.el7.zenetys.x86_64 | grep -E http$
/usr/share/haproxy/400.http
/usr/share/haproxy/403.http
/usr/share/haproxy/408.http
/usr/share/haproxy/500.http
/usr/share/haproxy/502.http
/usr/share/haproxy/503.http
/usr/share/haproxy/504.http
1.自定义配置格式
bash
#自定义错误页
errorfile   <code>   <file>

<code> #响应码.支持200, 400, 403, 405, 408, 425, 429, 500, 502,503,504

<file> #包含完整HTTP响应头的错误页文件的绝对路径。 建议后缀".http",以和一般的html文件相区分

#示例:
errorfile 503 /haproxy/errorpages/503page.http
2.配置测试
bash
#在defaults里面添加errofile
defaults
    mode                    http
    log                     global
    option                  httplog
    option                  dontlognull
    option http-server-close
    #option forwardfor       except 127.0.0.0/8
    option                  redispatch
    retries                 3
    timeout http-request    10s
    timeout queue           1m
    timeout connect         10s
    timeout client          1m
    timeout server          1m
    timeout http-keep-alive 10s
    timeout check           10s
    maxconn                 3000

   ! errorfile               503 /errorpage/html/503.htt


[root@haproxy ~] mkdir /errorpages/html/ -p
[root@haproxy ~] cp /usr/share/haproxy/503.http /errorpages/html/503.http

[root@haproxy ~] vim /errorpages/html/503.http
HTTP/1.0 503 Service Unavailable
Cache-Control: no-cache
Connection: close
Content-Type: text/html;charset=UTF-8^M

<html><body><h1>什么动物可以贴在墙上?</h1>
海豹(海报)
</body></html>
测试:
关闭后端服务器后测试,可以看到跳转到了自定义错误页面。

六、Haproxy实现四层负载均衡
针对除HTTP以外的TCP协议应用服务访问的应用场景
bash
MySQL
Redis
Memcache
RabbitMQ
示例:
如果使用frontend和backend,一定在 frontend 和 backend 段中都指定mode tcp
bash
listen mariadbcluster
    bind        *:6663
    mode        tcp
    balance         leastconn
    server haha 192.168.159.100:3306   check inter 3s fall 3 rise 5  weight 1

    server hehe 192.168.159.200:3306   check inter 3s fall 3 rise 5  weight 1
对MySQL服务实现四层负载均衡
1.配置haproxy:
bash
[root@haproxy ~] vim /etc/haproxy/haproxy.cfg
listen mariadbcluster
    bind        *:6663
    mode        tcp
    balance         leastconn
    server haha 192.168.65.100:3306   check inter 3s fall 3 rise 5  weight 1

    server hehe 192.168.65.200:3306   check inter 3s fall 3 rise 5  weight 1

#或者使用frontend和backend实现
[root@haproxy ~] vim /etc/haproxy/haproxy.cfg
......
frontend mysql_port
    bind :3306
    mode tcp
    use_backend mysql_rs

backend mysql_rs
    mode tcp
    balance leastconn
    server mysql1 192.168.65.100:3306 check
    server mysql2 192.168.65.200:3306 check
......
[root@haproxy ~] systemctl restart haproxy.service
2.配置MySQL并测试:
bash
#在后端服务器安装和配置mariadb服务
[root@rs1 ~] yum install mariadb-server  -y
[root@rs2 ~] yum install mariadb-server  -y

#为两个MySQL配置不同的Server-id
[root@rs1 ~] vim /etc/my.cnf
[mysqld]
server-id=10

[root@rs2 ~] vim /etc/my.cnf
[mysqld]
server-id=20

#启动
[root@rs1 ~] systemctl start mariadb
[root@rs2 ~] systemctl start mariadb

#创建用户并授权
[root@rs1 ~] mysql -e "grant all on *.* to haha@'%' identified by 'haha';"
[root@rs2 ~] mysql -e "grant all on *.* to haha@'%' identified by 'haha';"

#测试

[root@rs1 ~] mysql -ulee -plee   -h 192.168.65.65 -P 6663 -e "show variables like 'hostname'"
+---------------+-------+
| Variable_name | Value |
+---------------+-------+
| hostname      | RS1   |
+---------------+-------+

[root@rs1 ~] mysql -ulee -plee   -h 192.168.65.65 -P 6663 -e "show variables like 'hostname'"
+---------------+-------+
| Variable_name | Value |
+---------------+-------+
| hostname      | RS2   |
+---------------+-------+


[root@rs1 ~] mysql -ulee -plee   -h 192.168.65.65 -P 6663 -e "select @@server_id"
+-------------+
| @@server_id |
+-------------+
|          10 |
+-------------+
[root@rs2 ~] mysql -ulee -plee   -h 192.168.65.65 -P 6663 -e "select @@server_id"
+-------------+
| @@server_id |
+-------------+
|          20 |
+-------------+
七、Haproxy实现https
haproxy可以实现https的证书安全,从用户到haproxy为https,从haproxy到后端服务器用http通信。
但基于性能考虑,生产中证书都是在后端服务器比如nginx上实现
bash
#配置HAProxy支持https协议,支持ssl会话;
 bind *:443 ssl crt /PATH/TO/SOME_PEM_FILE

#指令 crt 后证书文件为PEM格式,需要同时包含证书和所有私钥
 cat demo.key demo.crt > demo.pem

#把80端口的请求重向定443
 bind *:80
 redirect scheme https if !{ ssl_fc }
1.制作证书
bash
[root@haproxy ~] mkdir /etc/haproxy/certs
 [root@haproxy ~] openssl req -newkey rsa:2048 \
-nodes -sha256 --keyout /etc/haproxy/certs/haha.key \
-x509 -days 365 -out /etc/haproxy/certs/haha.crt
2.配置测试
bash
[root@haproxy ~] vim /etc/haproxy/haproxy.cfg

frontend webcluster-http
    bind        *:80
    redirect scheme https if ! { ssl_fc }

listen webcluster-https
    bind        *:443 ssl  crt /etc/haproxy/certs/haha.pem
    mode        http
    balance     roundrobin
    server haha 192.168.65.100:80  check inter 3s fall 3 rise 5 weight 1
    server hehe 192.168.65.200:80  check inter 3s fall 3 rise 5 weight 1
测试:
bash
[root@webserver conf] curl -IkL http://192.168.65.65
HTTP/1.1 302 Found
content-length: 0
location: https://192.168.65.65/   #http访问定向到https
cache-control: no-cache

HTTP/1.1 200 OK
server: nginx/1.20.1
date: Wed, 04 Feb 2026 12:38:39 GMT
content-type: text/html
content-length: 22
last-modified: Tue, 20 Jan 2026 06:20:48 GMT
etag: "696f1ec0-16"
accept-ranges: bytes

[root@webserver conf] curl -IkL https://192.168.65.65
HTTP/1.1 200 OK
server: nginx/1.20.1
date: Wed, 04 Feb 2026 12:38:42 GMT
content-type: text/html
content-length: 22
last-modified: Tue, 20 Jan 2026 06:20:31 GMT
etag: "696f1eaf-16"
accept-ranges: bytes
本文相关链接:
- 如果你想更多了解haproxy知识和配置,请点击:《深度解析HAProxy七层代理:原理、配置与最佳实践》
- 如果你想深入学习haproxy算法和配置,请移步:揭秘haproxy负载均衡算法:静态vs动态