

🔥个人主页:小张同学
🎬作者简介:C++研发方向学习者
📖个人专栏: 《C语言》《数据结构》《C++深度剖析:从入门到深耕》
⭐️人生格言:无视中断,不弃热枕,方得坚持之道。

前言:
在 C 语言中处理字符串时,手动管理内存、应对缓冲区溢出等问题常常让人头疼。C++ 标准库的string类正是为解决这些痛点而来,它让字符串操作更安全、便捷。本文将从string类的优势讲起,带你快速掌握它的核心用法与实用技巧,帮你更高效地处理字符串场景。
目录
[1.1 C语言字符串的痛点:](#1.1 C语言字符串的痛点:)
[1.2 string类的优势:](#1.2 string类的优势:)
[2.1 简单了解string类:](#2.1 简单了解string类:)
[2.2 auto和范围for:](#2.2 auto和范围for:)
[2.2.1 auto关键字:](#2.2.1 auto关键字:)
[2.2.2 范围for:](#2.2.2 范围for:)
[3.1 string类对象的常见构造:](#3.1 string类对象的常见构造:)
[3.2 string类对象的容量操作:](#3.2 string类对象的容量操作:)
[3.3 string类对象的访问及遍历操作:](#3.3 string类对象的访问及遍历操作:)
[3.3.1 下标访问:](#3.3.1 下标访问:)
[3.3.2 迭代器遍历:](#3.3.2 迭代器遍历:)
[3.3.3 范围for遍历:](#3.3.3 范围for遍历:)
[3.4 string类对象的修改操作:](#3.4 string类对象的修改操作:)
[3.4.1 尾部追加:perator+= / push_back / append](#3.4.1 尾部追加:perator+= / push_back / append)
[3.4.2 插入和删除:insert 和 erase 在指定位置插入和删除](#3.4.2 插入和删除:insert 和 erase 在指定位置插入和删除)
[3.4.3 内容清空:clear(只清有效字符)](#3.4.3 内容清空:clear(只清有效字符))
[3.4.4 字符串查找:find() 找字符/子串](#3.4.4 字符串查找:find() 找字符/子串)
[3.4.5 字符串替换:replace() 修改指定位置内容](#3.4.5 字符串替换:replace() 修改指定位置内容)
[4.1 整行输入:getline()读取带空格的字符串:](#4.1 整行输入:getline()读取带空格的字符串:)
[4.2 子串截取:substr()从指定位置取指定长度](#4.2 子串截取:substr()从指定位置取指定长度)
[4.3 C字符转换:c_str () 适配C语言库函数](#4.3 C字符转换:c_str () 适配C语言库函数)
[4.4 空串判断:empty () 高效判空](#4.4 空串判断:empty () 高效判空)
[4.5 补充示例:(涉及到几个接口的综合使用)](#4.5 补充示例:(涉及到几个接口的综合使用))
一、为什么要学string类
1.1 C语言字符串的痛点:
- 内存需手动管理,易出现内存泄漏、野指针,且无法动态扩容;
- 无边界检查,str 系列库函数极易造成缓冲区溢出、越界访问;
- 强依赖
'\0'结束符 ,丢失 / 覆盖后会乱读内存,也无法存储含'\0'的字符串; - 数据与操作分离(违背 OOP),无封装,需手动调用独立的 str 库函数;
- 基础操作繁琐 ,无**
+** 拼接、**==**比较等直观运算符,常用功能需手动实现; - 指针赋值为浅拷贝,多指针指向同一块内存,易因修改 / 释放导致程序异常。
1.2 string类的优势:
- 内存自动管理:无需手动 malloc/free,底层自动分配、扩容、释放,彻底规避内存泄漏、野指针问题;
- 内置边界安全校验:操作自动检查缓冲区,必要时先扩容再执行,at () 方法越界抛异常,从根源防止缓冲区溢出;
- 摆脱 '\0' 依赖:通过内部长度变量维护实际长度,可存储含 '\0' 的字符串,鲁棒性高,同时支持 c_str () 兼容 C 语言;
- OOP 封装设计:将字符串数据和操作方法封装为整体,符合面向对象思想,调用直观,无需手动传递底层数据;
- 操作极简高效:重载 +、+=、==、\[\] 等常用运算符,拼接 / 比较 / 访问像基本数据类型一样简单,内置 substr、find 等常用方法,无需手动实现;
- 拷贝安全无风险:默认实现深拷贝,多个对象数据相互独立,修改 / 释放互不影响,C++11 还支持移动语义,大幅提升拷贝效率。
C++ string 类通过自动内存管理、内置边界检查、封装数据与操作、重载常用运算符、默认深拷贝,从根源规避了以上所有问题,开发更高效、程序更健壮。并且在OJ中,有关字符串的题目基本以string类的形式出现,而且在常规工作中,为了简单、方便、快捷,基本都使用string类,很少有人去使用C库中的字符串操作函数。
二、了解string类、auto和范围for
2.1 简单了解string类:
这里我们就不过多介绍了,大家自行搜索了解。
注意:在使用string类时,必须包含#include头文件以及using namespace std;
cpp
#include<iostream>
#include<string>
using namespace std;
2.2 auto和范围for:
我们在这里补充2个C++11的小语法,方便我们后面的学习。
2.2.1 auto关键字:
- 在早期C/C++中auto的含义是:使用**auto修饰的变量,是具有自动存储器的局部变量,后来这个不重要了。**C++11中,标准委员会变废为宝,赋予了auto全新的含义即:auto不再是一个存储类型指示符,而是作为一个新的类型指示符来指示编译器,auto声明的变量必须由编译器在编译时期****推导而得。
- 用auto声明指针类型时,用auto和auto*没有任何区别,但用auto声明引用类型时则必须加**&**
- 当在同一行声明多个变量时,这些变量必须是相同的类型,否则编译器将会报错,因为编译器实际****只对第一个类型进行推导,然后用推导出来的类型定义其他变量。
- auto****不能作为函数的参数,可以做返回值,但是建议谨慎使用
- auto****不能直接用来声明数组
下面用代码给大家具体说明一下:
cpp
int func1()
{
	return 10;
}
// 不能做参数
//void func2(auto a) //编译报错
//{
//}
// 可以做返回值,但是建议谨慎使用
auto func3()
{
	return 3;
}

int main()
{
	//C++11
	int i = 0;
	//通过初始化表达式值类型自动推荐对象类型
	auto j = i;
	auto k = 10;
	auto m = 1.1;
	auto n = 'a';
	auto ret = func1();

	cout << typeid(i).name() << endl;
	cout << typeid(j).name() << endl;
	cout << typeid(k).name() << endl;
	cout << typeid(m).name() << endl;
	cout << typeid(n).name() << endl;
	cout << typeid(ret).name() << endl;

	// 编译报错:rror C3531: "e": 类型包含"auto"的符号必须具有初始值设定项
	// auto e;

	auto p1 = &i;//也是指针类型
	auto* p2 = &i;//指定一定是指针
	cout << typeid(p1).name() << endl;
	cout << typeid(p2).name() << endl;
	cout << p1 << endl;
	cout << p2 << endl;

	//引用
	int& r1 = i;
	auto r2 = r1;//r2不是int&引用,是int
	auto& r3 = r1;//r3是int&引用,引用必须指定&
	cout << &r1 << endl;
	cout << &r2 << endl;
	cout << &i << endl;
	cout << &r3 << endl;

	auto aa = 1, bb = 2;
	// 编译报错:error C3538: 在声明符列表中,"auto"必须始终推导为同一类型
	//auto cc = 3, dd = 4.0;

	// 编译报错:error C3318: "auto []": 数组不能具有其中包含"auto"的元素类型
	//auto array[] = { 4, 5, 6 };
	return 0;
}
这里大家可能觉得auto的用处不是很大,下面我们来看看auto的用武之地:
cpp
#include<iostream>
#include <string>
#include <map>
using namespace std;
int main()
{
	std::map<std::string, std::string> dict = { { "apple", "苹果" },{ "orange",
	"橙子" }, {"pear","梨"} };
	// auto的用武之地
	//std::map<std::string, std::string>::iterator it = dict.begin();
	auto it = dict.begin();
	while (it != dict.end())
	{
		cout << it->first << ":" << it->second << endl;
		++it;
	}
	return 0;
}
cpp
//利用auto简化迭代器对于函数的使用
void test_1()
{
	string s1("hello world");
	cout << s1 << endl;

	//string::iterator it1 = s1.begin();
	//利用auto进行优化:
	auto it1 = s1.begin();
	while (it1 != s1.end())
	{
		//(*it1)++;//修改
		cout << (*it1) << " ";
		++it1;
	}
	cout << endl;

	//还有查找也可以:
	//string::iterator ret = find(s1.begin(), s1.end(), 'd');
	//利用auto进行优化
	auto ret = find(s1.begin(),s1.end(),'d');
	if (ret != s1.end())
	{
		cout << "找到了" << endl;
	}
	//list也是一样可以这样使用
}

int main()
{
	test_1();
	return 0;
}
2.2.2 范围for:
-
对于一个有范围的集合而言,由程序员来说明循环的范围是多余的,有时候还会容易犯错误。因此 C++11 中引入了基于范围的for循环。for循环后的括号由冒号":"分为两部分:第一部分是范围内用于迭代的变量,第二部分则表示被迭代的范围,自动迭代,自动取数据,自动判断结束。
-
范围for可以作用到数组和容器对象上进行遍历。
-
范围for的底层很简单,容器遍历实际就是替换为迭代器,这个从汇编层也可以看到。
-
自动取容器数据赋值,自动迭代++、自动判断结束------被形象地称为**"语法糖"**。
-
范围for通常配合auto使用,更简便,但不是必须适配auto关键字使用。
下面用代码给大家具体说明一下:
cpp
void test_for()
{
	string s1("hello world");
	cout << s1 << endl;

	//C++11
	//范围for,自动取容器数据赋值,自动迭代++,自动判断结束
	//其实底层还是迭代器,这个看反汇编可以发现

	//for (auto i : s1)
	//也可以:
	for (char i : s1)
	{
		cout << i << " ";
	}
	cout << endl;

	for (auto& j : s1)//其实可以直接使用&,可以修改
	{
		j--;
	}
	cout << s1 <<  endl;

	for (const auto& k : s1)
	{
		//k++;//只能读不能改
		cout << k << ' ';
	}
	cout << endl;

	//支持迭代器的容器,都可以使用范围for
	//数组也支持,这里先使用一点C风格
	int a[10] = { 1,2,3 };
	for (auto e : a)
	{
		cout << e << ' ';
	}
	cout << endl;
}

int main()
{
	test_for();
	return 0;
}
三、string类的常用接口说明
3.1 string类对象的常见构造:
这里给大家介绍4种常用的构造:
|----------------------------------|-----------------------------------------------|
| **(constructor)**函数名称 | 功能说明 |
| string()(重点) | 构造空的 string 类对象,即空字符串 |
| string(const char* s) (重点) | 用 C-string 来构造 string 类对象 |
| string(size_t n, char c) | string 类对象中包含 n 个字符 c |
| string(const string&s) (重点) | 拷贝构造函数 |
cpp
// 1. 空字符串构造(默认构造)
string s1;  // s1是空串,底层已初始化,不用手动加'\0'

// 2. C字符串构造(最常用,把char*转成string)
string s2("hello world");  // s2 = "hello world"

// 3. 重复字符构造(创建n个相同字符的字符串)
string s3(5, 'a');  // s3 = "aaaaa"(5个'a')

// 4. 拷贝构造(用已有的string创建新对象)
string s4(s2); // s4 = "hello world"(和s2内容一样)下面是文档中较为官方的介绍:详见string::string - C++ Reference
下面我用代码具体说明一下:
cpp
#include<iostream>
#include<string>
using namespace std;
void test_string1()
{
	string s1;
	string s2("hello world");
	string s3(s2);

	cout << s1 << endl;
	cout << s2 << endl;
	cout << s3 << endl;

	string s4(s2, 0, 5);//从s2下标为0的位置拷贝5个过去构造s4;
	cout << s4 << endl;
	//pos位置一直拷贝到结尾
	//1.写一个超过s2长度的
	string s5(s2, 6, 15);
	cout << s5 << endl;
	//2.直接不写,默认使用缺省值npos
	string s6(s2, 6);
	cout << s6 << endl;

	string s7("hello world", 7);//取前7个
	cout << s7 << endl;

	string s8(10, 'x');//取10个x
	cout << s8 << endl;

	string s9 = "xxxxxx";//这样也可以
	cout << s9 << endl;
}
string的析构函数知道即可,不用我们自己实现和调用,会自动生成并且调用。
3.2 string类对象的容量操作:
|-------------------|--------------------------------------------------|
| 函数名称 | 功能说明 |
| size (重点) | 返回字符串有效字符长度( 不含结尾的 '\0' )(基本所有容器通用) |
| length | 返回字符串有效字符长度( 不含结尾的 '\0' )(不通用) |
| capacity | 返回底层已分配的空间大小(能存多少字符,不含 '\0') |
| empty (重点) | 检测字符串是否为空串,是返回 true ,否则返回 false |
| clear (重点) | 只清空有效字符,不会释放空间 |
| reserve (重点) | 为字符串预留空间,若空间小于已有空间不会改变有效元素个数 |
| shrink_to_fit | 进行缩容,可以改变有效元素个数 |
| resize (重点) | 将有效字符的个数改成 n 个,多出的空间用字符 c 填充 |
代码示例:
cpp
void TestCapacity()
{
	string s1;
	//s1.reserve(200);//确定要插入多少时,可以提前扩容,避免频繁扩容,提高效率
	size_t old = s1.capacity();
	cout << old << endl;
	for (size_t i = 0; i < 200; i++)
	{
		s1.push_back('x');
		if (old != s1.capacity())
		{
			cout << s1.capacity() << endl;
			old = s1.capacity();
		}
	}
	cout << endl << endl;

}
void test_string2()
{
	string s0;
	cout << s0.size() << endl;

	string s1("hello world");
	cout << s1.max_size() << endl;//字符串所能达到的最大长度,了解下即可
	cout << s1.size() << endl;//不包含结尾的\0,基本所有容器通用
	cout << s1.length() << endl;//也不包含结尾的\0,不通用,只在string中
	cout << s1.capacity() << endl;//存储实际有效字符的个数,不包含结尾的\0

	s1.clear();//内容被清理,空间不会清理
	cout << s1.size() << endl;
	cout << s1.capacity() << endl << endl;

	//测试空间增容
	TestCapacity();

	//reserve最好只用来增容
	string s2("hello world");
	cout << s2.size() << endl;
	cout << s2.capacity() << endl;

	s2.reserve(20);//会开的比20大
	cout << s2.size() << endl;
	cout << s2.capacity() << endl;

	//s2.reserve(5);//不同编译器不一样,vs上不会缩容,g++上会缩容
	s2.shrink_to_fit();//这个可以实现缩容,但是一般不会用,代价比较大
	cout << s2.size() << endl;
	cout << s2.capacity() << endl;

	string s3(s2);
	cout << s3 << endl;

	// < 当前对象的size时,相当于保留前n个,删除后面的数据
	s3.resize(5);
	cout << s3 << endl;
	// > 当前对象的size时,插入数据
	s3.resize(10, 'x');
	cout << s3 << endl;
	s3.resize(15);//用0来填充多出的元素空间
	cout << s3 << endl;
	s3.resize(30, 'y');
	cout << s3 << endl;
}

int main()
{
	test_string2();
	return 0;
}
注意:
1. size()与length()方法底层实现原理完全相同,引入size()的原因是为了与其他容器的接口保持一致,一般情况下基本都是用size()。
2. clear()只是将string中有效字符清空,不改变底层空间大小。
3. resize(size_t n) 与 resize(size_t n, char c)都是将字符串中有效字符个数改变到n个,不同的是当字符个数增多时:resize(n)用'\0'来填充多出的元素空间,resize(size_t n, char c)用字符c来填充多出的元素空间。注意:resize在改变元素个数时,如果是将元素个数增多,可能会改变底层容量的大小,如果是将元素个数减少,底层空间总大小不变。
4. reserve(size_t res_arg=0):为string预留空间,不改变有效元素个数,当reserve的参数小于string的底层空间总大小时,reserver不会改变容量大小。
3.3 string类对象的访问及遍历操作:
|------------------------|---------------------------------------------------------------|
| 函数名称 | 功能说明 |
| operator (重点) | 返回 pos 位置的字符, const string 类对象调用 |
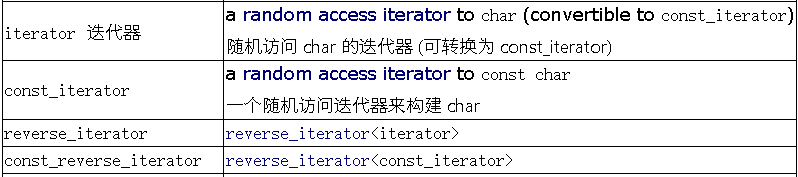
| begin + end | begin 获取一个字符的迭代器 + end 获取最后一个字符下一个位 置的迭代器 |
| rbegin + rend | begin 获取一个字符的迭代器 + end 获取最后一个字符下一个位 置的迭代器 |
| 范围 for | C++11 支持更简洁的范围 for 的新遍历方式 |
3.3.1 下标访问:
和数组下标访问逻辑类似,支持读和写,注意下标从0开始:
代码示例:
cpp
void test_string3()
{
	string s1("hello world");
	cout << s1 << endl;

	cout << s1[0] << endl;
	s1[0] = 'x';//可以直接使用下标来访问修改,类似于上面那样
	cout << s1[0] << endl;
	cout << s1 << endl;

	//相比于数组这个越界有严格的检查
	//s1[12];//断言
	s1.at(12);//抛异常,这里at的使用简单看看就行,at不常用

}

int main()
{
	try
	{
		test_string3();
	}
	catch (const exception& e)
	{
		cout << e.what() << endl;
	}
	return 0;
}
下标访问的实现逻辑与下方代码类似:
cpp
class string
{
public:
	char& operator[] (size_t pos)
	{
		return _str[pos];
	}
private:
	char* _str;
	size_t _size;
	size_t _capacity;
};
3.3.2 迭代器遍历:
迭代器是STL容器的一个通用遍历方式,begin() 指向第一个字符,end() 指向最后一个字符的下一位。
cpp
//下标遍历,迭代器
void test_string3()
{
	string s1("hello world");
	cout << s1 << endl;

	//下标+[ ]
	//遍历or修改
	for (size_t i = 0; i < s1.size(); i++)
	{
		s1[i]++;
	}
	cout << s1 << endl;

	//迭代器
	//行为像指针一样的东西
	//1.常规使用
	string::iterator it1 = s1.begin();
	while (it1 != s1.end())
	{
		//(*it1)-;//修改
		cout << *it1 << " ";
		++it1;
	}

	//相对于下标+[]来说,迭代器更加通用,我们这里再来看看在链表中的使用
	list<int> l1;
	l1.push_back(1);
	l1.push_back(2);
	l1.push_back(3);
	l1.push_back(4);
	list<int>::iterator lit1 = l1.begin();
	while (lit1 != l1.end())
	{
		cout << *lit1 << " ";
		++lit1;
	}
	cout << endl;

	//迭代器的其它使用形式
	Print(s1);
}
void Print(const string& s)
{
	//2.const版本
	//const string::iterator it1=s.cbegin();
	//上面这样使用是不对的,const不应该用来修饰整个迭代器,这样都遍历不了了,而是修饰指向的对象
	string::const_iterator it1= s.cbegin();//这里使用cbegin和begin的都可以
	while (it1 != s.cend())
	{
		//*it1 = 'x';不能修改
		cout << *it1 << " ";
		++it1;
	}
	cout << endl;

	//3.reverse版本,加上const一起演示,逆序输出
	string::const_reverse_iterator it2 = s.rbegin();//这里使用rbegin
	while (it2 != s.rend())
	{
		//*it2 = 'x';//不能修改
		cout << *it2 << " ";
		++it2;
	}
	cout << endl;
}

int main()
{
	test_string3();
	return 0;
}
3.3.3 范围for遍历:
这个在前面以及讲过了,这里就不过多介绍了。
cpp
void test_string4()
{
	string s1("hello world");
	cout << s1 << endl;

	//C++11
	//范围for,自动取容器数据赋值,自动迭代++,自动判断结束
	//其实底层还是迭代器,这个看反汇编可以发现

	//for (auto ch : s1)//其实可以直接使用&,可以修改
	for(auto& ch:s1)
	{
		ch -= 1;
	}

	for (const auto& ch : s1)
	{
		cout << ch << ' ';//只能读不能改
	}
	cout << endl;

	//支持迭代器的容器,都可以使用范围for
	//数组也支持,这里先使用一点C风格
	int a[10] = { 1,2,3 };
	for (auto e : a)
	{
		cout << e << ' ';
	}
	cout << endl;
}
int main()
{
	test_string4();
}
3.4 string类对象的修改操作:
|------------------------------|---------------------------------------------------------------|
| 函数名称 | 功能说明 |
| push_back | 在字符串后尾插字符 c |
| append | 在字符串后追加一个字符串 |
| operator+= ( 重点) | 在字符串后追加字符串 str |
| c_str (重点) | 返回 C 格式字符串 |
| find + npos (重点) | 从字符串 pos 位置开始往后找字符 c ,返回该字符在字符串中的 位置 |
| rfind | 从字符串 pos 位置开始往前找字符 c ,返回该字符在字符串中的 位置 |
| substr | 在 str 中从 pos 位置开始,截取 n 个字符,然后将其返回 |
注意:
1. 在string尾部追加字符时,s.push_back(c) / s.append(1, c) / s += 'c'三种的实现方式差 不多,一般情况下string类的+=操作用的比较多,+=操作不仅可以连接单个字符,还可 以连接字符串。
2. 对string操作时,如果能够大概预估到放多少字符,可以先通过reserve把空间预留 好。
3.4.1 尾部追加:perator+= / push_back / append
- operator+=:支持追加单个字符和字符串,比 push_back 和 append 更加灵活
- push_back:仅支持单个字符,功能单一,适合明确追加单个字符的场景;
- append:支持字符串、子串,适合需要追加部分内容的场景。
下面用代码说明一下使用:
cpp
void test_string5()
{
	string s1("hello world");
	s1.push_back('#');//尾插一个字符
	s1.append("hello tengxun");//尾插一个字符串
	cout << s1 << endl;

	s1.append(10, 'x');//尾插10个x
	cout << s1 << endl;

	//还可以配着迭代器使用
	string s3;
	string s2(" apple hello!");
	//我不想要空格和!
	s3.append(s2.begin() + 1, s2.end() - 1);
	//s3.append(++s2.begin(), --s2.end());
	cout << s3 << endl;

	//其实我们直接使用+=更加方便
	string s4("hello world");
	s4 += ' ';            // 追加字符
	s4 += "hello tengxun";// 追加字符串
	cout << s4 << endl;

	//为什么不把 + 重载为成员的而是全局,因为这样可以不用一定把成员变量写在左边
	cout << s4 + "xxxx" << endl;
	cout << "xxxx" + s4 << endl;//全局这样就可以,但是成员函数就不可以

	//assign:为字符串赋予一个新值,替换其当前内容,没有直接赋值好用
	s4 = "xxx";
	cout << s4 << endl;
	s4.assign("yyyyy");
	cout << s4 << endl;
}

int main()
{
	test_string5();
	return 0;
}
3.4.2 插入和删除:insert 和 erase 在指定位置插入和删除


下面我们用代码来实际使用一下:
cpp
void test_string6()
{
	string s1("hello world");
	//上面都是尾插,这里实现一个头插
	s1.insert(0, "xxxxx");
	cout << s1 << endl;
	s1.insert(0, "x");//头插x
	cout << s1 << endl;

	//但是头插一个字符必须这样写
	s1.insert(0, 1, '*');
	cout << s1 << endl;

	//还可以在指定位置插入
	s1.insert(5, 1, '*');//第5个位置插入一个*
	cout << s1 << endl;

	//迭代器版本
	s1.insert(s1.begin(), '&');
	cout << s1 << endl;

	//删除
	string s2("hello world");
	s2.erase(0, 1);//位置0,删除长度1
	cout << s2 << endl;

	s2.erase(s2.begin());//头删
	cout << s2 << endl;

	s2.erase(5, 2);//指定位置开始删除2个
	cout << s2 << endl << endl;

	//没给的话就全删掉
	s2.erase(5);//这里应该也是默认npos
	cout << s2 << endl;
}

int main()
{
	test_string6();
	return 0;
}
3.4.3 内容清空:clear(只清有效字符)
cpp
string s = "hello";
s.clear();  // s变成空串,但底层容量不变
cout << s.size();  // 输出0(有效字符数为0)
3.4.4 字符串查找:find() 找字符/子串
find() 从左往右找字符或者子串,返回第一次出现的下标;没有找到就返回 string :: npos(这个戴代表一个很大的数,代表"不存在")
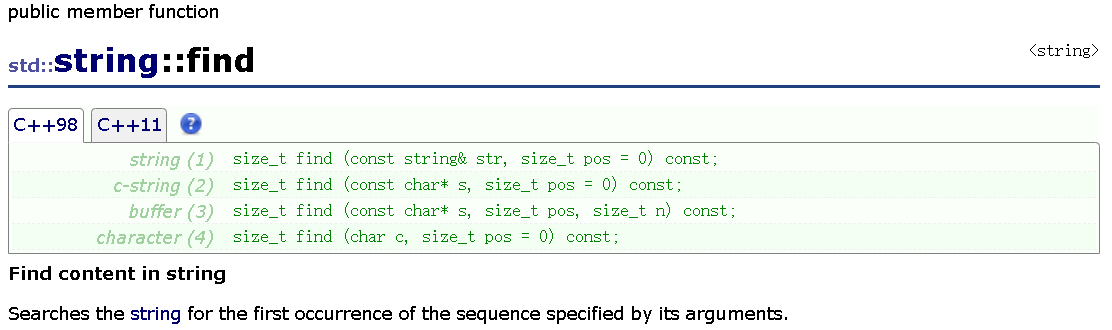
下面我们用代码来实际使用一下:
cpp
int main()
{
string s = "hello world";
// 1. 找字符'w'
size_t pos1 = s.find('w');
if (pos1 != s.npos)
{
cout << "找到了,位置为" << pos1 << endl;// 输出6(s[6]是'w')
}
//2. 找子串"orld"
size_t pos2 = s.find("orld");
if (pos2 != s.npos)
{
cout << "找到了,位置为" << pos2 << endl;// 输出7(s[7]是"orld")
}
// 3. 从下标3开始找字符'l'
s = "1 hello 1 world";
size_t pos3 = s.find('1', 3);// 从第3位(h开始)往后找
if (pos3 != s.npos)
{
cout << "找到了,位置为" << pos3 << endl;// 输出8(s[8]是'l')
}
return 0;
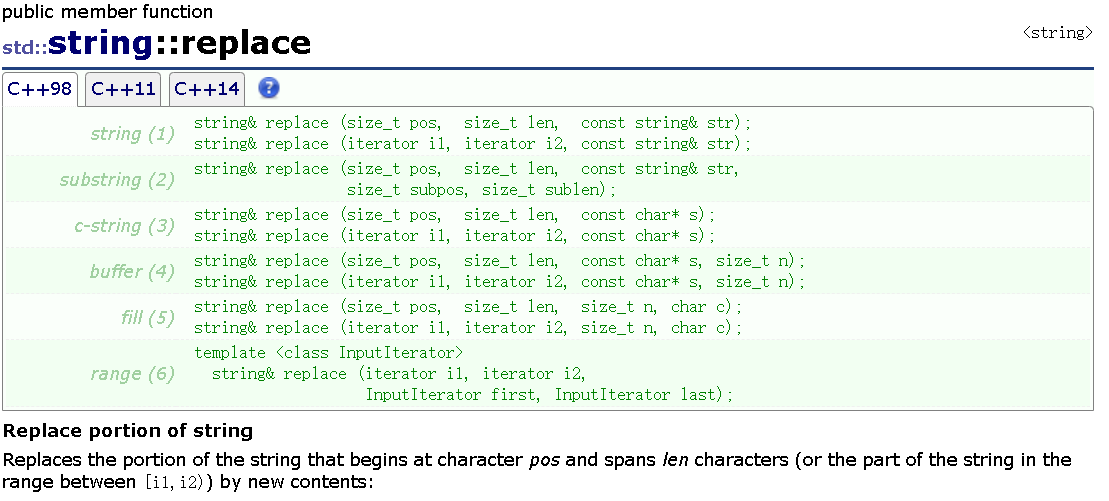
}3.4.5 字符串替换:replace() 修改指定位置内容
下面我们用代码来实际使用一下:
cpp
void test_string7()
{
	string s3("hello world");
	s3.replace(5, 1, "&&&");//把5这个位置的1个替换成&&&
	cout << s3 << endl;

	s3.replace(5, 3, "*");//从5开始的三个替换成*
	cout << s3 << endl;

	//我们再来看看怎么把所有空格都替换成%%
	string s4("hello            world");
	cout << s4 << endl;
	//s4.replace(5, 12, "%&%");//仅限知道有多少个空格
	//cout << s4 << endl;

	size_t pos = s4.find(' ');
	while (pos != s4.npos)
	{
		s4.replace(pos, 1, "%%");
		//找到下一个空格
		pos = s4.find(' ', pos + 2);
	}
	cout << s4 << endl;
}
int main()
{
	test_string7();
	return 0;
}
但是replace的效率不是很高,要频繁移动数据,所以实际使用不多。
我们可以将上面的**"把所有空格都替换成%%"**的这个问题优化一下:
cpp
string s6;
s6.reserve(s5.size());
for (auto s : s5)
{
	if (s != ' ')
	{
		s6 += s;
	}
	else {
			s6 += "%%";
	}
}
s5 = s6;
cout << s5 << endl;
四、其他string常用场景的一些实用接口和技巧
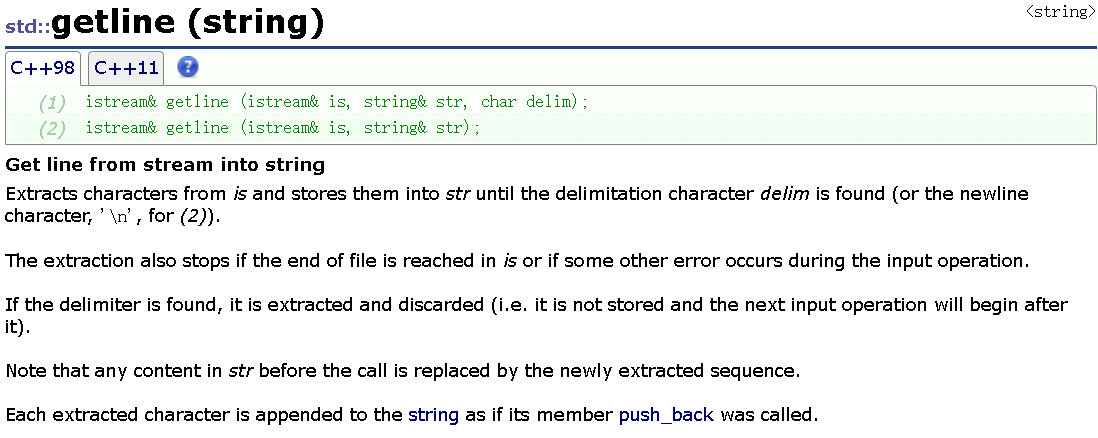
4.1 整行输入:getline()读取带空格的字符串:
在平常的使用中,如果使用 cin>>string 读取字符串时,遇到空格就会停止。而 getline() 能读取一整行的内容,包括空格。默认回车结束,也可以自己指定结束的字符。
比如我们下面这个题就必须使用getline,直接用cin是不行的,无法读取完整:
cpp
#include <iostream>
#include <string>
using namespace std;

int main() {
	string str;
	// cin >> str;//这个不行
	getline(cin, str);
	//getline(cin, str, '#');//指定碰到#结束


	size_t pos = str.rfind(' ');
	if (pos != str.size())
	{
		cout << str.size() - (pos + 1) << endl;
	}
	else
	{
		cout << str.size() << endl;
	}
}
4.2 子串截取:substr()从指定位置取指定长度

cpp
int main()
{
	string s = "hello world";
	// 1. 从位置6开始,取5个字符
	string sub1 = s.substr(6, 5);  // sub1 = "world"
	cout << sub1 << endl;

	// 2. 从位置0开始,取5个字符
	string sub2 = s.substr(0, 5);  // sub2 = "hello"
	cout << sub2 << endl;

	// 3. 从位置6开始,取到末尾
	string sub3 = s.substr(6);     // sub3 = "world"
	cout << sub1 << endl;

	return 0;
}
4.3 C字符转换:c_str () 适配C语言库函数
我们在一些特殊的场景下需要使用C语言的char*(比如printf输出),用c_str ()把string转换成const char*;

cpp
#include <cstring>
int main()
{
	string s = "hello";
	// 1. printf输出(printf不直接支持string)
	printf("s = %s\n", s.c_str());  // 输出:s = hello

	// 2. 调用C库函数strlen(需要包含<cstring>)
	size_t len = strlen(s.c_str());  // len = 5
}
4.4 空串判断:empty () 高效判空
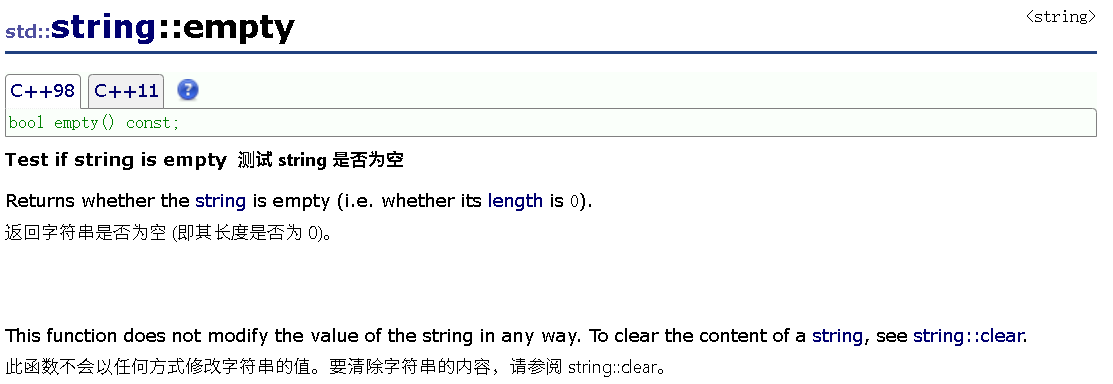
判断字符串是否为空,优先用empty(),比size()==0更高效(empty()直接返回标志位,size()==0可能要计算)
cpp
int main()
{
	string s;
	if (s.empty())// 推荐
    {
		cout << "s是空串";
	}
	// 不推荐:if (s.size() == 0)
}
4.5 补充示例:(涉及到几个接口的综合使用)
cpp
int main()
{
	string filename("Test.cpp");
	FILE* fout = fopen(filename.c_str(), "r");
	if (fout)
	{
		cout << "打开文件成功" << endl;
	}

	//string suffix = filename.substr(4, 4);
	string file("Test.tar.zip");
	size_t pos = file.rfind('.');
	if (pos != string::npos)
	{
		string suffix = file.substr(pos);
		cout << suffix << endl;
	}

	string url = "https://legacy.cplusplus.com/reference/string/string/rfind/";
	size_t i1 = url.find(':');
	if (i1 != string::npos)
	{
		string protocol = url.substr(0, i1);
		cout << protocol << endl;

		size_t i2 = url.find('/', i1+3);
		if (i2 != string::npos)
		{
			string domain = url.substr(i1+3, i2-(i1+3));
			cout << domain << endl;

			string uri = url.substr(i2 + 1);
			cout << uri << endl;
		}
	}

	std::string str("Please, replace the vowels in this sentence by asterisks.");
	std::size_t found = str.find_first_not_of("abcdefg");
	while (found != std::string::npos)
	{
		str[found] = '*';
		found = str.find_first_not_of("aeiou", found + 1);
	}

	std::cout << str << '\n';
	cout << (str < url) << endl;

	cout << str + "xxxx" << endl;
	cout << str + url << endl;
	cout << "xxxx" + str << endl;

	// C++11以后,传值返回对象效率都很不错
	string ret = str + "xxxx";

	cin >> url >> str;
	cout << url << endl;
	cout << str << endl;

	return 0;
}
本篇博客的完整原代码:
往期回顾:
C++ 模板初级:函数 / 类模板 + 实例化 + 匹配原则全讲透,自此告别重复 C++ 代码-CSDN博客
C/C++ 内存管理:从 malloc/free到new/delete,原理区别全讲透,程序再也不崩溃-CSDN博客
C++ 类和对象(五):初始化列表、static、友元、内部类等7大知识点全攻略-CSDN博客
结语:
本文从基础概念到常用接口,再到实用技巧,系统梳理了string类的核心知识。string类是 C++ 处理字符串的利器,熟练运用它能显著提升编程效率。建议大家结合示例动手实践,在项目中打磨技能,让string类成为你代码里的得力工具。如果文章对你有帮助的话,欢迎评论,点赞,收藏加关注,感谢大家的支持。