📝 前言
在深度学习的日常开发中,我们经常会遇到这样的场景:需要根据某些条件对张量中的元素进行筛选或替换。如果用传统的循环写法,不仅代码臃肿,更重要的是会错失GPU加速的黄金机会。
今天,让我们一起来探索PyTorch中一个既优雅又高效的工具 ------ torch.where。
🎨 基础入门
基本语法
python
torch.where(condition, x, y)📌 关键说明:
condition:布尔张量(True/False),决定每个位置的选择
x、y:与 condition 形状一致(或可广播)的张量,数据类型可兼容
返回值:与 condition 形状相同的新张量
快速认识 torch.where
python
import torch

# 一个最简单的例子
condition = torch.tensor([True, False, True])
x = torch.tensor([1, 2, 3])
y = torch.tensor([4, 5, 6])

result = torch.where(condition, x, y)
print(result)  # tensor([1, 5, 3])
代码对比
python
# ❌ 繁琐的循环写法
result = torch.empty_like(x)
for i in range(len(x)):
    if condition[i]:
        result[i] = x[i]
    else:
        result[i] = y[i]

# ✅ 优雅的 torch.where
result = torch.where(condition, x, y)
性能对比
性能测试代码:
python
import os
os.environ["KMP_DUPLICATE_LIB_OK"] = "TRUE"
import torch
import time
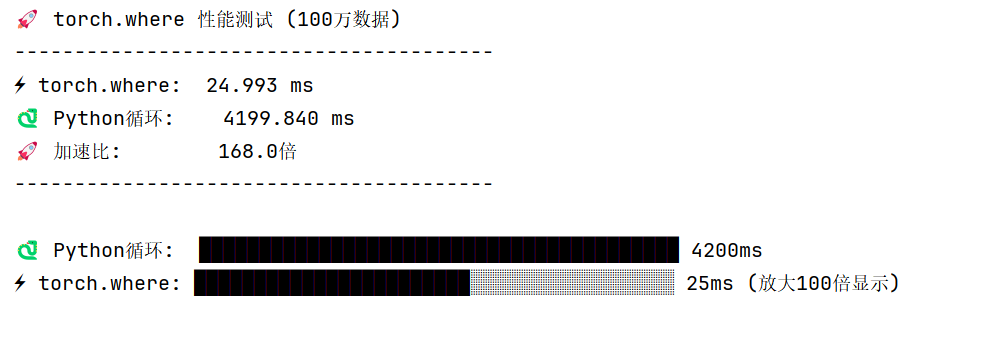
print("🚀 torch.where 性能测试 (100万数据)")
print("-"*40)
# 准备数据(固定随机种子,保证测试可复现)
torch.manual_seed(42)
cond = torch.rand(1_000_000) > 0.5
x = torch.randn(1_000_000)
y = torch.randn(1_000_000)
# 测试 torch.where(循环100次取平均,增加同步确保时间准确)
start = time.time()
for _ in range(100):
res_where = torch.where(cond, x, y)
# 强制同步,避免PyTorch异步执行导致时间不准
torch.cuda.synchronize() if torch.cuda.is_available() else None
total_seconds = time.time() - start
avg_seconds = total_seconds / 100
torch_time = avg_seconds * 1000 # 转换为毫秒
# 测试 Python循环(为了公平,也循环10次取平均,避免单次波动)
start = time.time()
result = torch.empty_like(x)
# 循环10次,和torch.where的测试量级匹配
for _ in range(10):
for i in range(1_000_000):
result[i] = x[i] if cond[i] else y[i]
loop_total_seconds = time.time() - start
loop_avg_seconds = loop_total_seconds / 10
loop_time = loop_avg_seconds * 1000 # 转换为毫秒
# 计算加速比
speedup = loop_time / torch_time
# 输出结果
print(f"⚡ torch.where: {torch_time:.3f} ms")
print(f"🐍 Python循环: {loop_time:.3f} ms")
print(f"🚀 加速比: {speedup:.1f}倍")
print("-"*40)
bars = 40
scale_factor = 100 # 放大100倍,避免torch_bars为0
torch_bars_scaled = int(bars * (torch_time * scale_factor) / loop_time)
# 限制最大长度不超过总bars数
torch_bars_scaled = min(torch_bars_scaled, bars)
print(f"\n🐍 Python循环: {'█' * bars} {loop_time:.0f}ms")
print(f"⚡ torch.where: {'█' * torch_bars_scaled}{'░' * (bars - torch_bars_scaled)} {torch_time:.0f}ms (放大{scale_factor}倍显示)")
print(f"\n✨ torch.where 快 {speedup:.1f} 倍!")
# 验证结果正确性(确保两种方式结果一致)
assert torch.allclose(res_where, result), "两种方法结果不一致!"
print("\n✅ 结果验证通过:torch.where和循环计算结果一致")🔥 实战应用场景
📊 数据清洗:标记异常值
python
# 传感器数据,包含异常值(-999)
sensor_data = torch.tensor([23.5, -999, 24.8, 22.1, -999, 25.3])

# 清洗数据:将-999标记为None
clean_data = torch.where(
    sensor_data == -999,
    torch.tensor(float('nan')),
    sensor_data
)

print(clean_data)
# tensor([23.5, nan, 24.8, 22.1, nan, 25.3])
🖼️ 图像处理:一键二值化
python
# 模拟灰度图像 (4x4)
image = torch.tensor([
    [0.1, 0.8, 0.3, 0.9],
    [0.6, 0.2, 0.7, 0.4],
    [0.5, 0.5, 0.8, 0.1],
    [0.3, 0.9, 0.2, 0.6]
])

# 二值化处理
binary = torch.where(image > 0.5, 1.0, 0.0)

print("二值化结果:")
print(binary)
🎯 关键点检测:坐标掩码
python
# 检测到的关键点坐标和置信度
x_coords = torch.tensor([120, 245, 178, 320])
confidence = torch.tensor([0.95, 0.12, 0.88, 0.05])

# 只保留高置信度的关键点
valid_coords = torch.where(
    confidence > 0.5,
    x_coords,
    torch.tensor(-1)  # -1 表示无效点
)

print(valid_coords)  # tensor([120, -1, 178, -1])