多级缓存
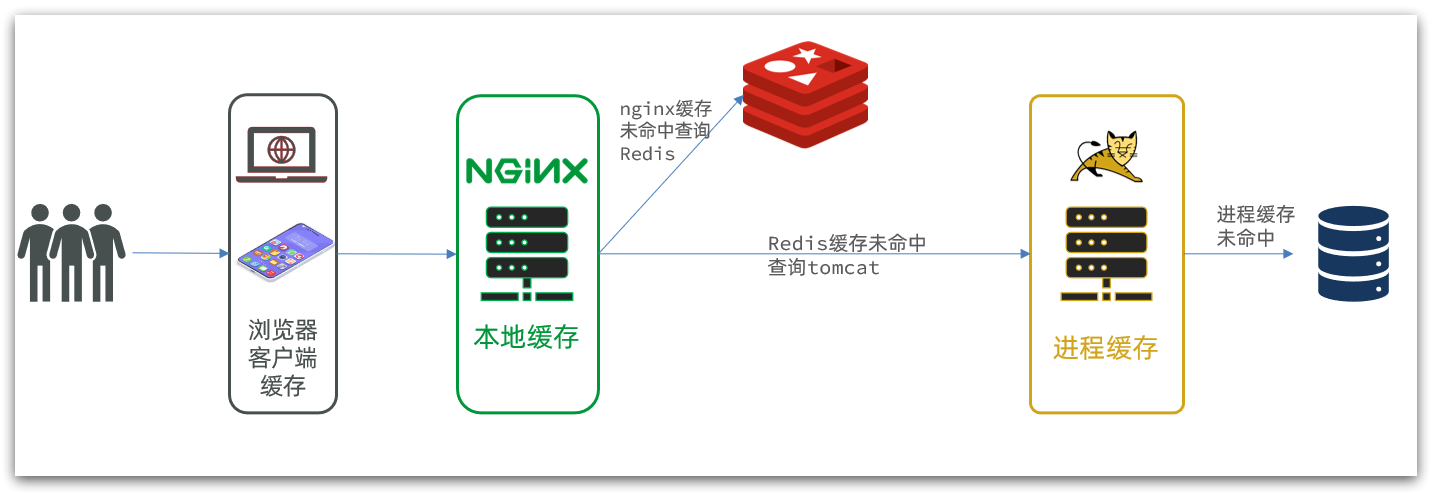
多级缓存就是充分利用请求处理的每个环节,分别添加缓存,减轻Tomcat压力,提升服务性能:
-
浏览器访问静态资源时,优先读取浏览器本地缓存
-
访问非静态资源(ajax查询数据)时,访问服务端
-
请求到达Nginx后,优先读取Nginx本地缓存
-
如果Nginx本地缓存未命中,则去直接查询Redis(不经过Tomcat)
-
如果Redis查询未命中,则查询Tomcat
-
请求进入Tomcat后,优先查询JVM进程缓存
-
如果JVM进程缓存未命中,则查询数据库
1. JVM进程缓存
(1) 初识Caffeine
① Caffeine是一个基于Java8开发的,提供了近乎最佳命中率的高性能的本地缓存库。目前Spring内部的缓存使用的就是Caffeine。
② 缓存使用的基本API:
java
@Test
void testBasicOps() {
    // 构建cache对象
    Cache<String, String> cache = Caffeine.newBuilder().build();

    // 存数据
    cache.put("gf", "迪丽热巴");

    // 取数据
    String gf = cache.getIfPresent("gf");
    System.out.println("gf = " + gf);

    // 取数据,包含两个参数:
    // 参数一:缓存的key
    // 参数二:Lambda表达式,表达式参数就是缓存的key,方法体是查询数据库的逻辑
    // 优先根据key查询JVM缓存,如果未命中,则执行参数二的Lambda表达式
    String defaultGF = cache.get("defaultGF", key -> {
        // 根据key去数据库查询数据
        return "柳岩";
    });
    System.out.println("defaultGF = " + defaultGF);
}
③ Caffeine提供了三种缓存驱逐策略
1) 基于容量:设置缓存的数量上限
java
// 创建缓存对象
Cache<String, String> cache = Caffeine.newBuilder()
    .maximumSize(1) // 设置缓存大小上限为 1
    .build();
2) 基于时间:设置缓存的有效时间
java
// 创建缓存对象
Cache<String, String> cache = Caffeine.newBuilder()
    // 设置缓存有效期为 10 秒,从最后一次写入开始计时
    .expireAfterWrite(Duration.ofSeconds(10))
    .build();
3) 基于引用:设置缓存为软引用或弱引用,利用GC来回收缓存数据。性能较差,不建议使用。
(2) 实现JVM进程缓存
① 需求
-
给根据id查询商品的业务添加缓存,缓存未命中时查询数据库
-
给根据id查询商品库存的业务添加缓存,缓存未命中时查询数据库
-
缓存初始大小为100
-
缓存上限为10000
② 代码实现
- 在item-service的
com.heima.item.config包下定义CaffeineConfig类:
java
package com.heima.item.config;

import com.github.benmanes.caffeine.cache.Cache;
import com.github.benmanes.caffeine.cache.Caffeine;
import com.heima.item.pojo.Item;
import com.heima.item.pojo.ItemStock;
import org.springframework.context.annotation.Bean;
import org.springframework.context.annotation.Configuration;

@Configuration
public class CaffeineConfig {

    @Bean
    public Cache<Long, Item> itemCache(){
        return Caffeine.newBuilder()
                .initialCapacity(100)
                .maximumSize(10_000)
                .build();
    }

    @Bean
    public Cache<Long, ItemStock> stockCache(){
        return Caffeine.newBuilder()
                .initialCapacity(100)
                .maximumSize(10_000)
                .build();
    }
}- item-service中的
com.heima.item.web包下的ItemController类,添加缓存逻辑:
java
@RestController
@RequestMapping("item")
public class ItemController {

    @Autowired
    private IItemService itemService;
    @Autowired
    private IItemStockService stockService;

    @Autowired
    private Cache<Long, Item> itemCache;
    @Autowired
    private Cache<Long, ItemStock> stockCache;

    // ...其它略

    @GetMapping("/{id}")
    public Item findById(@PathVariable("id") Long id) {
        return itemCache.get(id, key -> itemService.query()
                .ne("status", 3).eq("id", key)
                .one()
        );
    }

    @GetMapping("/stock/{id}")
    public ItemStock findStockById(@PathVariable("id") Long id) {
        return stockCache.get(id, key -> stockService.getById(key));
    }
}
说明:
itemCache.get( 钥匙 , 备用查询指令 )
这是缓存的智能方法,自动干 3 件事,不用你写代码:
- 拿
id当钥匙,去缓存里找商品 - ✅ 找到了 → 直接返回商品,不执行后面的指令(速度极快)
- ❌ 没找到 → 执行后面的
备用指令(去数据库查),查到后自动把商品存进缓存,再返回
2. Lua语法入门
(1) 变量和循环
① Lua的数据类型
| 数据类型 | 核心说明 |
|---|---|
nil |
仅含nil一个值,代表「无效值」,条件判断中等价于false |
boolean |
仅包含true/false两个布尔值 |
number |
统一用双精度浮点数存储,整数、小数都属于该类型 |
string |
字符串,单引号、双引号均可表示 |
function |
可由 C 或 Lua 编写的函数类型 |
table |
Lua 的核心复合类型:关联数组 ,索引可以是数字、字符串甚至 table 本身,用{}创建空表 |
✅ 补充工具:type()函数Lua 提供type(变量)函数,用于判断变量的实际数据类型,例如:
type("Hello world")→ 返回stringtype(10.4*3)→ 返回number
② 声明变量
- Lua声明变量的时候无需指定数据类型,而是用local来声明变量为局部变量:
Lua
-- 声明字符串,可以用单引号或双引号,
local str = 'hello'
-- 字符串拼接可以使用 ..
local str2 = 'hello' .. 'world'
-- 声明数字
local num = 21
-- 声明布尔类型
local flag = true
③ table 类型核心用法
Lua 中没有独立的数组 / 字典类型,table 是唯一的复合数据类型,同时实现了数组、字典(map)两种功能:
- 作为数组(有序列表)
- 本质是
key为连续数字下标的特殊 table - ⚠️ 关键注意:Lua 数组下标从 1 开始
- 示例:
Lua
local arr = {'java', 'python', 'lua'}
print(arr[1]) -- 输出'java'(第一个元素下标为1)- 作为字典(键值对 map)
- 类似 Java 的
HashMap,key可以是字符串等任意类型 - 两种完全等价的访问方式:
map['key']或map.key - 示例:
Lua
local map = {name='Jack', age=21}
print(map['name']) -- 输出'Jack'
print(map.name)    -- 等价写法,同样输出'Jack'
④ 循环
对于table,我们可以利用for循环来遍历。不过数组和普通table遍历略有差异。
- 遍历数组
Lua
-- 声明数组 key为索引的 table
local arr = {'java', 'python', 'lua'}
-- 遍历数组
for index,value in ipairs(arr) do
    print(index, value)
end- 遍历普通table
Lua
-- 声明map,也就是table
local map = {name='Jack', age=21}
-- 遍历table
for key,value in pairs(map) do
   print(key, value)
end
(2) 条件控制、函数
① 函数
- 语法格式
Lua
function 函数名( argument1, argument2..., argumentn)
    -- 函数体
    return 返回值
end- 代码示例
Lua
function printArr(arr)
    for index, value in ipairs(arr) do
        print(value)
    end
end
② 条件控制
- 语法格式
Lua
if(布尔表达式) then
    -- 布尔表达式为 true 时执行的语句块
else
    -- 布尔表达式为 false 时执行的语句块
end- 逻辑运算符
Lua 不使用&&/||/!,而是用英文单词作为逻辑运算符,且有短路特性:
| 操作符 | 核心特性 | 实例 |
|---|---|---|
and |
逻辑与:若 A 为false/nil,直接返回 A;否则返回 B |
(A and B) 为false(A 为false时) |
or |
逻辑或:若 A 为true,直接返回 A;否则返回 B |
(A or B) 为true(A 为true时) |
not |
逻辑非:对结果取反,true变false,false变true |
not(A and B) 为true(A 为false时) |
3. 实现多级缓存
(1) OpenResty快速入门
① 反向代理流程
- 核心场景
前端商品详情页发起 AJAX 请求(如 GET http://localhost/api/item/10001),80 端口的请求被 Windows 的 Nginx 拦截,反向代理到后端 OpenResty 集群。
- 关键 Nginx 配置
Lua
# 1. 定义OpenResty集群(负载均衡池)
upstream nginx-cluster{
    server 192.168.150.101:8081;
    server 192.168.150.101:8082;
}

# 2. 反向代理规则
server {
    listen 80;
    server_name localhost;

    # 所有/api开头的请求,转发到OpenResty集群
    location /api {
        proxy_pass http://nginx-cluster;
    }
}
② OpenResty 监听请求
步骤 1:加载 Lua 模块(配置依赖路径)
修改 OpenResty 的/usr/local/openresty/nginx/conf/nginx.conf,在http块下添加:
Lua
# Lua模块路径(双分号;;代表追加默认路径)
lua_package_path "/usr/local/openresty/lualib/?.lua;;";
# C扩展模块路径
lua_package_cpath "/usr/local/openresty/lualib/?.so;;";
步骤 2:监听 /api/item 路径(路由映射)
在nginx.conf的server块下添加:
Lua
location /api/item {
    # 响应类型设为JSON
    default_type application/json;
    # 用lua/item.lua脚本处理请求,返回响应
    content_by_lua_file lua/item.lua;
}
(2) 请求参数处理
① OpenResty 参数获取 API 全表
| 参数类型 | 传递示例 | 核心用法 & 说明 |
|---|---|---|
| 路径占位符(RESTful) | /item/1001 |
1. 用正则location ~ /item/(\d+)匹配路径;2. 捕获的参数存入ngx.var数组,ngx.var[1]取第一个分组 |
| 请求头 | id: 1001(Request Header) |
local headers = ngx.req.get_headers(),返回 table 类型,通过headers.id取值 |
| GET URL 参数 | ?id=1001(URL 问号传参) |
local getParams = ngx.req.get_uri_args(),返回 table 类型,getParams.id取值 |
| POST 表单参数 | id=1001(Form 表单) |
1. 先执行ngx.req.read_body()读取请求体;2. 再用ngx.req.get_post_args()获取 table |
| JSON 请求体 | {"id": 1001}(JSON 格式) |
1. 先执行ngx.req.read_body()读取请求体;2. 再用ngx.req.get_body_data()获取 string,需自行 JSON 反序列化 |
② 路径参数(商品 ID)获取全流程
- 修改 nginx.conf:正则匹配路径 + 捕获 ID
修改/usr/local/openresty/nginx/conf/nginx.conf,将原 location 改为正则匹配,精准捕获路径中的数字 ID:
Lua
# 正则~ 匹配/api/item/后的数字(\d+),捕获结果存入ngx.var[1]
location ~ /api/item/(\d+) {
    # 声明响应类型为JSON
    default_type application/json;
    # 绑定Lua脚本处理请求
    content_by_lua_file lua/item.lua;
}- 修改 item.lua:获取 ID + 动态返回 JSON
改/usr/local/openresty/nginx/lua/item.lua,用ngx.var[1]获取 ID,动态拼接商品数据:
Lua
-- 1. 从正则捕获组中获取商品ID
local id = ngx.var[1]

-- 2. 动态拼接JSON,将ID嵌入返回结果(Lua用..做字符串拼接)
ngx.say('{"id":' .. id .. ',"name":"SALSA AIR","title":"RIMOWA 21寸托运箱拉杆箱 SALSA AIR系列果绿色 820.70.36.4","price":17900,"image":"https://m.360buyimg.com/mobilecms/s720x720_jfs/t6934/364/1195375010/84676/e9f2c55f/597ece38N0ddcbc77.jpg!q70.jpg.webp","category":"拉杆箱","brand":"RIMOWA","spec":"","status":1,"createTime":"2019-04-30T16:00:00.000+00:00","updateTime":"2019-04-30T16:00:00.000+00:00","stock":2999,"sold":31290}')
(3) 查询Tomcat
① 发送 HTTP 请求的 API:ngx.location.capture
- 基础用法
Lua
local resp = ngx.location.capture("/path",{
    method = ngx.HTTP_GET,  -- 请求方式(GET/POST等)
    args = {a=1,b=2},       -- GET方式传参
    -- body = "c=3&d=4"    -- POST方式传参
})- 响应结构
resp.status:HTTP 状态码(如 200/404/500)resp.header:响应头(table 类型)resp.body:响应体(真实数据,字符串格式)
- 关键原理
ngx.location.capture是Nginx 内部请求 ,仅能访问 Nginx 内部的location,不会直接访问外部 IP / 端口。因此需要配置反向代理,将内部请求转发到 Tomcat 服务:
Lua
location /path {
    # 转发到Windows上的Tomcat服务,需关闭Windows防火墙
    proxy_pass http://192.168.150.1:8081;
}
② 封装 HTTP 工具类(common.lua)
- 配置反向代理(nginx.conf)
为商品接口/item配置反向代理,转发到 Tomcat:
Lua
location /item {
    proxy_pass http://192.168.150.1:8081;
}- 创建通用 HTTP 工具类
在/usr/local/openresty/lualib/下新建common.lua
Lua
local function read_http(path, params)
    local resp = ngx.location.capture(path,{
        method = ngx.HTTP_GET,
        args = params,
    })
    if not resp then
        -- 请求失败,记录日志并返回404
        ngx.log(ngx.ERR, "http请求查询失败,path: ", path , ", args: ", args)
        ngx.exit(404)
    end
    return resp.body
end

-- 导出函数
local _M = {
    read_http = read_http
}
return _M- 在
item.lua中调用工具类
Lua
-- 导入工具类
local common = require("common")
local read_http = common.read_http

-- 获取商品ID
local id = ngx.var[1]

-- 调用Tomcat接口,获取商品数据和库存数据
local itemJSON = read_http("/item/".. id, nil)
local itemStockJSON = read_http("/item/stock/".. id, nil)
③ JSON 处理工具:cjson
- 引入cjson模块:
Lua
local cjson = require "cjson"- 序列化:
Lua
local obj = {
    name = 'jack',
    age = 21
}
-- 把 table 序列化为 json
local json = cjson.encode(obj)- 反序列化:
Lua
local json = '{"name": "jack", "age": 21}'
-- 反序列化 json为 table
local obj = cjson.decode(json);
print(obj.name)
(4) Redis缓存预热
① Redis缓存会面临冷启动问题:
冷启动:服务刚刚启动时,Redis中并没有缓存,如果所有商品数据都在第一次查询时添加缓存,可能会给数据库带来较大压力。
缓存预热:在实际开发中,我们可以利用大数据统计用户访问的热点数据,在项目启动时将这些热点数据提前查询并保存到Redis中。
② 代码实现
java
package com.heima.item.config;

import com.fasterxml.jackson.core.JsonProcessingException;
import com.fasterxml.jackson.databind.ObjectMapper;
import com.heima.item.pojo.Item;
import com.heima.item.pojo.ItemStock;
import com.heima.item.service.IItemService;
import com.heima.item.service.IItemStockService;
import org.springframework.beans.factory.InitializingBean;
import org.springframework.beans.factory.annotation.Autowired;
import org.springframework.data.redis.core.StringRedisTemplate;
import org.springframework.stereotype.Component;

import java.util.List;

@Component
public class RedisHandler implements InitializingBean {

    @Autowired
    private StringRedisTemplate redisTemplate;

    @Autowired
    private IItemService itemService;
    @Autowired
    private IItemStockService stockService;

    private static final ObjectMapper MAPPER = new ObjectMapper();

    @Override
    public void afterPropertiesSet() throws Exception {
        // 初始化缓存
        // 1.查询商品信息
        List<Item> itemList = itemService.list();
        // 2.放入缓存
        for (Item item : itemList) {
            // 2.1.item序列化为JSON
            String json = MAPPER.writeValueAsString(item);
            // 2.2.存入redis
            redisTemplate.opsForValue().set("item:id:" + item.getId(), json);
        }

        // 3.查询商品库存信息
        List<ItemStock> stockList = stockService.list();
        // 4.放入缓存
        for (ItemStock stock : stockList) {
            // 2.1.item序列化为JSON
            String json = MAPPER.writeValueAsString(stock);
            // 2.2.存入redis
            redisTemplate.opsForValue().set("item:stock:id:" + stock.getId(), json);
        }
    }
}
(5) 查询Redis缓存
① 封装Redis工具
- 引入Redis模块,并初始化Redis对象
Lua
-- 导入redis
local redis = require('resty.redis')
-- 初始化redis
local red = redis:new()
red:set_timeouts(1000, 1000, 1000)- 封装函数,用来释放Redis连接,其实是放入连接池
Lua
-- 关闭redis连接的工具方法,其实是放入连接池
local function close_redis(red)
    local pool_max_idle_time = 10000 -- 连接的空闲时间,单位是毫秒
    local pool_size = 100 --连接池大小
    local ok, err = red:set_keepalive(pool_max_idle_time, pool_size)
    if not ok then
        ngx.log(ngx.ERR, "放入redis连接池失败: ", err)
    end
end- 封装函数,根据key查询Redis数据
Lua
-- 查询redis的方法 ip和port是redis地址,key是查询的key
local function read_redis(ip, port, key)
    -- 获取一个连接
    local ok, err = red:connect(ip, port)
    if not ok then
        ngx.log(ngx.ERR, "连接redis失败 : ", err)
        return nil
    end
    -- 查询redis
    local resp, err = red:get(key)
    -- 查询失败处理
    if not resp then
        ngx.log(ngx.ERR, "查询Redis失败: ", err, ", key = " , key)
    end
    --得到的数据为空处理
    if resp == ngx.null then
        resp = nil
        ngx.log(ngx.ERR, "查询Redis数据为空, key = ", key)
    end
    close_redis(red)
    return resp
end- 导出
Lua
-- 将方法导出
local _M = {
    read_http = read_http,
    read_redis = read_redis
}
return _M
② 实现Redis查询
- 修改
/usr/local/openresty/lua/item.lua文件,添加一个查询函数:
Lua
-- 导入common函数库
local common = require('common')
local read_http = common.read_http
local read_redis = common.read_redis
-- 封装查询函数
function read_data(key, path, params)
    -- 查询本地缓存
    local val = read_redis("127.0.0.1", 6379, key)
    -- 判断查询结果
    if not val then
        ngx.log(ngx.ERR, "redis查询失败,尝试查询http, key: ", key)
        -- redis查询失败,去查询http
        val = read_http(path, params)
    end
    -- 返回数据
    return val
end
(6) Nginx本地缓存
OpenResty为Nginx提供了shard dict的功能,可以在nginx的多个worker之间共享数据,实现缓存功能。
① 本地缓存API
- 开启共享字典,在nginx.conf的http下添加配置:
Lua
 # 共享字典,也就是本地缓存,名称叫做:item_cache,大小150m
lua_shared_dict item_cache 150m; - 操作共享字典:
Lua
-- 获取本地缓存对象
local item_cache = ngx.shared.item_cache
-- 存储, 指定key、value、过期时间,单位s,默认为0代表永不过期
item_cache:set('key', 'value', 1000)
-- 读取
local val = item_cache:get('key')
② 实现本地缓存查询
- 修改
/usr/local/openresty/lua/item.lua文件,修改read_data查询函数,添加本地缓存逻辑:
Lua
-- 导入共享词典,本地缓存
local item_cache = ngx.shared.item_cache

-- 封装查询函数
function read_data(key, expire, path, params)
    -- 查询本地缓存
    local val = item_cache:get(key)
    if not val then
        ngx.log(ngx.ERR, "本地缓存查询失败,尝试查询Redis, key: ", key)
        -- 查询redis
        val = read_redis("127.0.0.1", 6379, key)
        -- 判断查询结果
        if not val then
            ngx.log(ngx.ERR, "redis查询失败,尝试查询http, key: ", key)
            -- redis查询失败,去查询http
            val = read_http(path, params)
        end
    end
    -- 查询成功,把数据写入本地缓存
    item_cache:set(key, val, expire)
    -- 返回数据
    return val
end
说明:
local item_cache = ngx.shared.item_cache
ngx.shared.item_cache 是 OpenResty 内置的共享内存字典
- 纯本机内存存储,速度极快(微秒级)
- Nginx 所有工作进程共享这片内存
- 这就是我们的「口袋缓存」
- 修改item.lua中查询商品和库存的业务,实现最新的read_data函数:
4. 缓存同步
(1) 数据同步策略
① 设置有效期:给缓存设置有效期,到期后自动删除。再次查询时更新
-
优势:简单、方便
-
缺点:时效性差,缓存过期之前可能不一致
-
场景:更新频率较低,时效性要求低的业务
② 同步双写:在修改数据库的同时,直接修改缓存
-
优势:时效性强,缓存与数据库强一致
-
缺点:有代码侵入,耦合度高;
-
场景:对一致性、时效性要求较高的缓存数据
③ **异步通知:**修改数据库时发送事件通知,相关服务监听到通知后修改缓存数据
-
优势:低耦合,可以同时通知多个缓存服务
-
缺点:时效性一般,可能存在中间不一致状态
-
场景:时效性要求一般,有多个服务需要同步
(2) 监听Canal
① 引入依赖
bash
<dependency>
    <groupId>top.javatool</groupId>
    <artifactId>canal-spring-boot-starter</artifactId>
    <version>1.2.1-RELEASE</version>
</dependency>
② 编写配置
bash
canal:
  destination: heima # canal的集群名字,要与安装canal时设置的名称一致
  server: 192.168.150.101:11111 # canal服务地址
③ 修改Item实体类
通过@Id、@Column等注解完成Item与数据库表字段的映射:
java
package com.heima.item.pojo;

import com.baomidou.mybatisplus.annotation.IdType;
import com.baomidou.mybatisplus.annotation.TableField;
import com.baomidou.mybatisplus.annotation.TableId;
import com.baomidou.mybatisplus.annotation.TableName;
import lombok.Data;
import org.springframework.data.annotation.Id;
import org.springframework.data.annotation.Transient;

import javax.persistence.Column;
import java.util.Date;

@Data
@TableName("tb_item")
public class Item {
    @TableId(type = IdType.AUTO)
    @Id
    private Long id;//商品id
    @Column(name = "name")
    private String name;//商品名称
    private String title;//商品标题
    private Long price;//价格(分)
    private String image;//商品图片
    private String category;//分类名称
    private String brand;//品牌名称
    private String spec;//规格
    private Integer status;//商品状态 1-正常,2-下架
    private Date createTime;//创建时间
    private Date updateTime;//更新时间
    @TableField(exist = false)
    @Transient
    private Integer stock;
    @TableField(exist = false)
    @Transient
    private Integer sold;
}
④ 编写监听器
java
package com.heima.item.canal;

import com.github.benmanes.caffeine.cache.Cache;
import com.heima.item.config.RedisHandler;
import com.heima.item.pojo.Item;
import org.springframework.beans.factory.annotation.Autowired;
import org.springframework.stereotype.Component;
import top.javatool.canal.client.annotation.CanalTable;
import top.javatool.canal.client.handler.EntryHandler;

@CanalTable("tb_item")
@Component
public class ItemHandler implements EntryHandler<Item> {

    @Autowired
    private RedisHandler redisHandler;
    @Autowired
    private Cache<Long, Item> itemCache;

    @Override
    public void insert(Item item) {
        // 写数据到JVM进程缓存
        itemCache.put(item.getId(), item);
        // 写数据到redis
        redisHandler.saveItem(item);
    }

    @Override
    public void update(Item before, Item after) {
        // 写数据到JVM进程缓存
        itemCache.put(after.getId(), after);
        // 写数据到redis
        redisHandler.saveItem(after);
    }

    @Override
    public void delete(Item item) {
        // 删除数据到JVM进程缓存
        itemCache.invalidate(item.getId());
        // 删除数据到redis
        redisHandler.deleteItemById(item.getId());
    }
}