关键词: 串口重定向printf输出、 STM32CubMX2、STM32C542、UART
文章目录
- 前言
- 软硬件准备
- [1. UART轮询方式(重定向printf输出)](#1. UART轮询方式(重定向printf输出))
- [2. UART中断方式](#2. UART中断方式)
-
- [2.1 CubeMX USART配置配置](#2.1 CubeMX USART配置配置)
- [2.2 代码添加](#2.2 代码添加)
- [2.3 实验现象](#2.3 实验现象)
- 总结
前言
STM32CubeMX2 是 ST 最新推出的图形化配置工具,面向 STM32 全系列开发者,主打"更快上手、配置更直观、工程生成更高效"。相比传统手动搭建流程,它把芯片选型、引脚复用、时钟树、外设参数和中间件 配置集中到统一界面,大幅降低了入门门槛。其自动下载固件包与一键创建工程能力,能明显缩短从想法到可运行代码的时间。
对新手来说,流程清晰、学习成本低;对有经验的工程师来说,配置一致性更好、迭代效率更高。配合 VS Code 与 CMake 等现代开发方式,STM32CubeMX2 在易用性和工程化之间做到了很好的平衡,是一款非常值得尝试的生产力工具。
在这里主要记录一下如何使用STM32CubeMX2对串口进行配置,实现串口重定向printf输出功能。
软硬件准备
软件:
- STM32CubeMX2 (Version:1.0.0 ) 链接: https://www.st.com/en/development-tools/stm32cubemx.html#overview
- Visual Studio Code (Version: 1.111.0 或者更新版本)链接:https://code.visualstudio.com/download
- STM32CubeIDE extension for Visual Studio Code (Version: 3.8.0或者更新版本)(Vscode的插件)
关于STM32CubeIDE extension for Visual Studio Code 如何使用,可以参考ST官方系列视频教程:
这个教程可以教给我们如何创建、导入、调试工程。
链接:STM32CubeIDE for VS Code使用教程
硬件:
- NUCLEO-C542RC 链接: https://www.st.com.cn/zh/evaluation-tools/nucleo-c542rc.html
1. UART轮询方式(重定向printf输出)
1.1 CubeMX2配置
新建工程
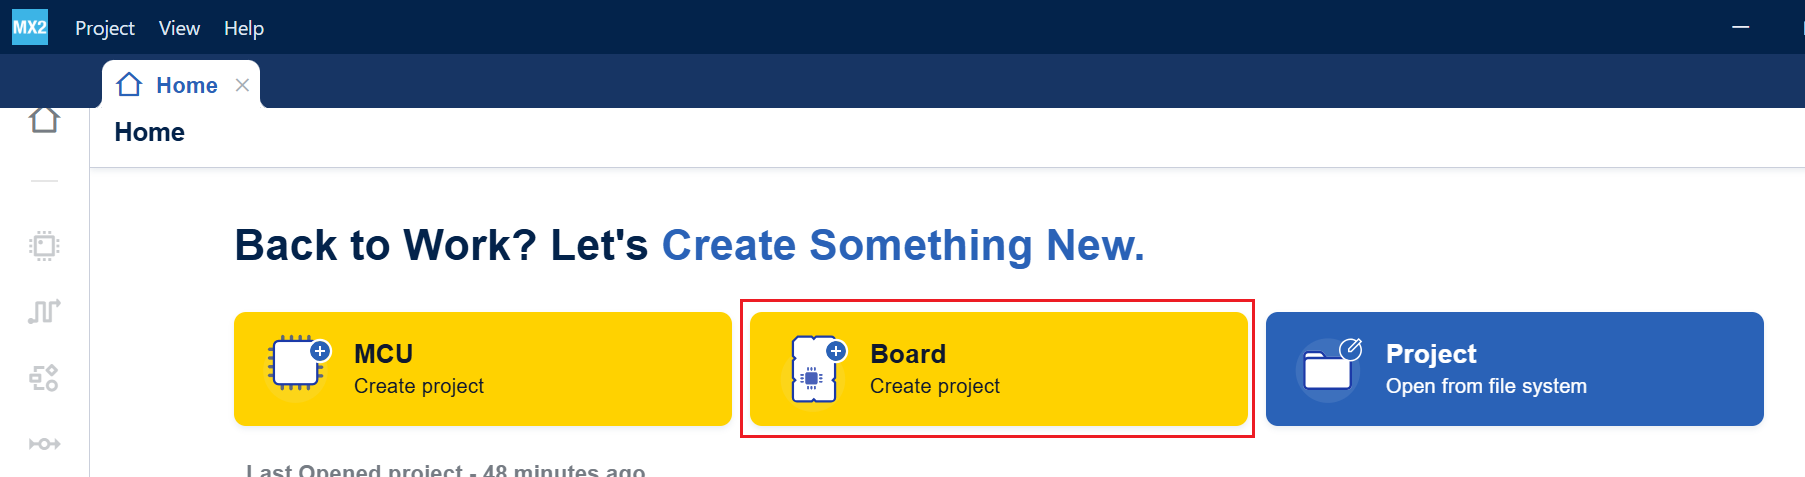
- 打开CubeMX2,选择从开发板开始新建一个工程。
- 选中NUCLEO-C542RC,然后点击继续。

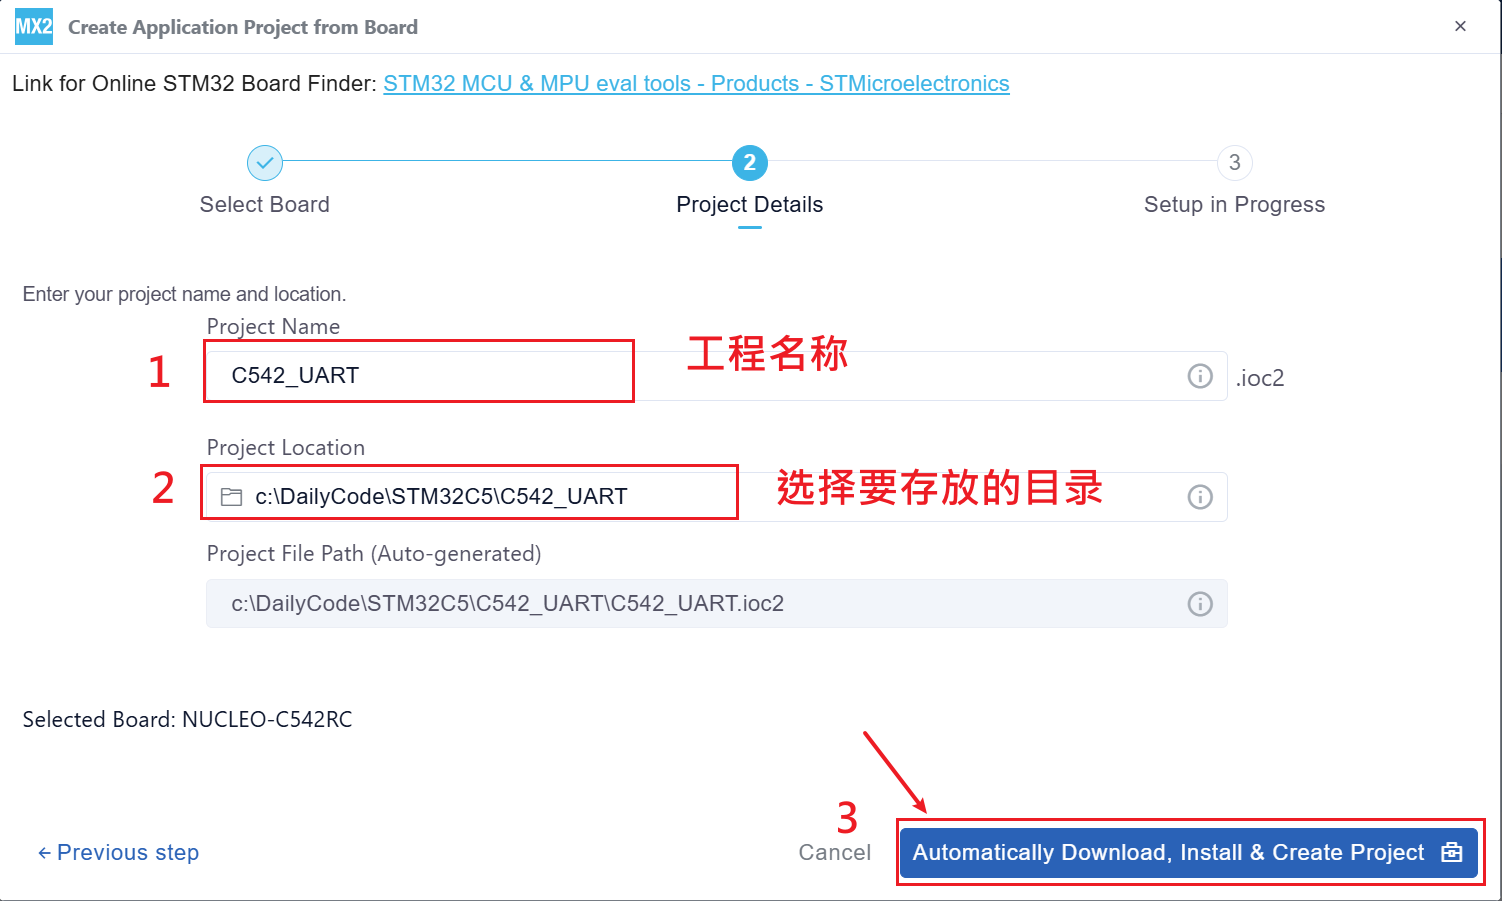
- 输入工程名称,存放路径。然后点击创建。
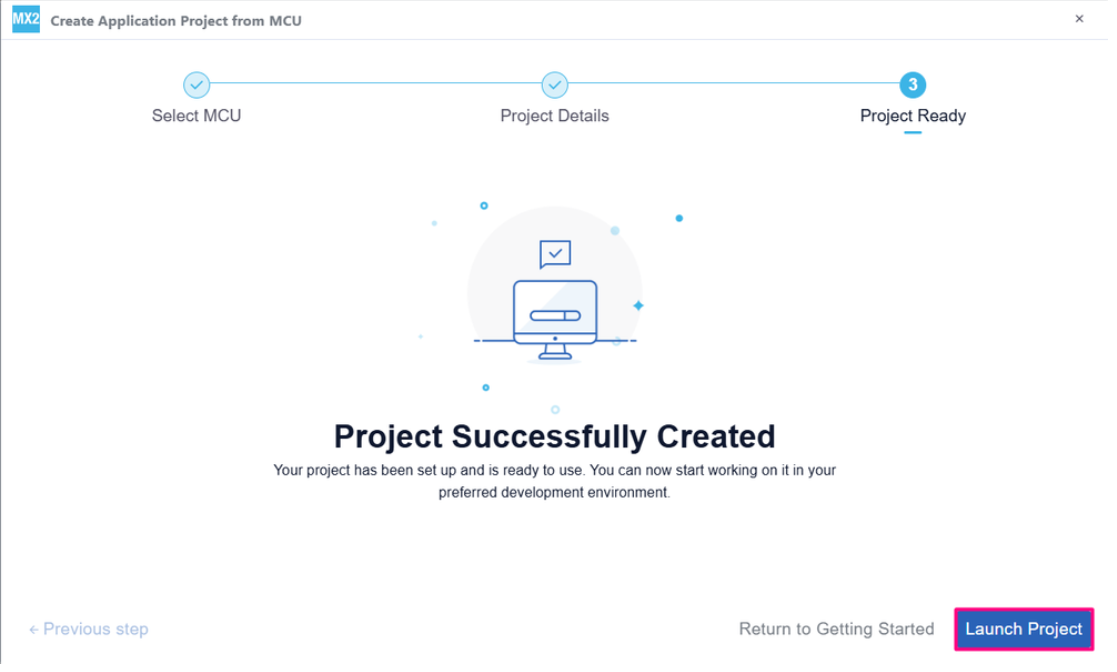
- 创建成功后,点击启动项目
USART配置
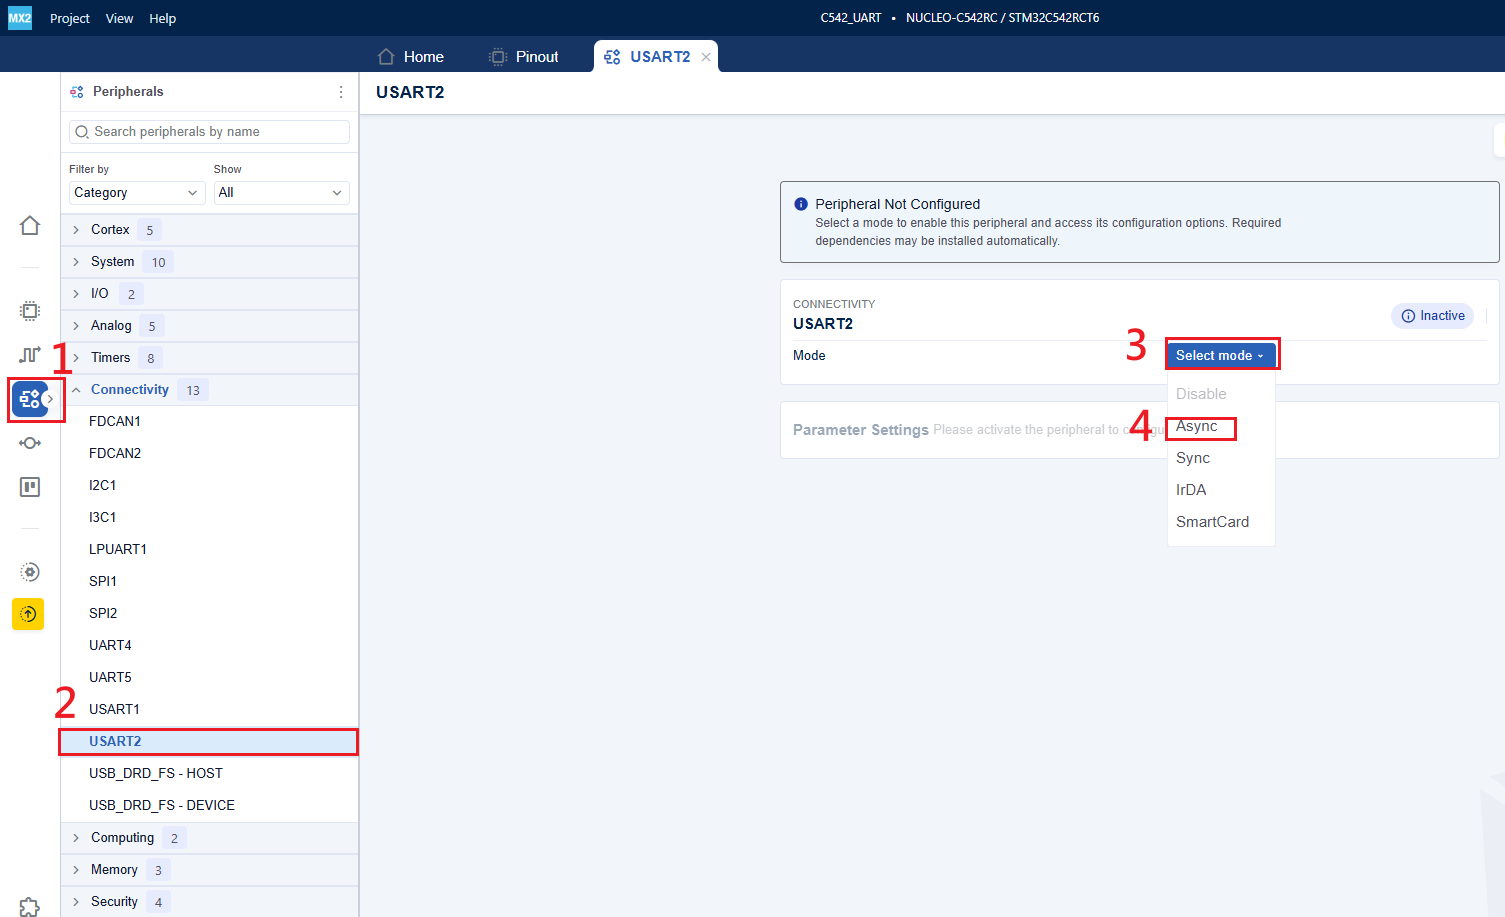
- 选择外设,在【Connectivity】中选择USART2,模式选择异步【Async】。
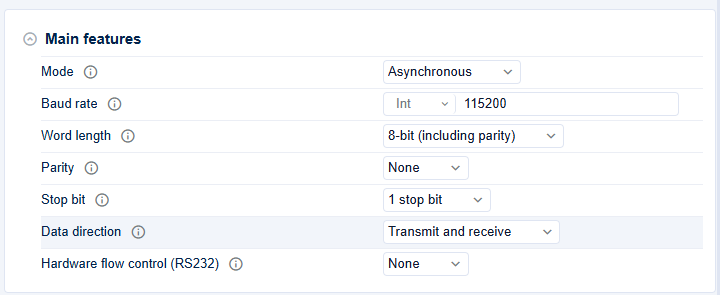
- 对串口进行主要参数设置。波特率、字长、奇偶检验位、停止位等。
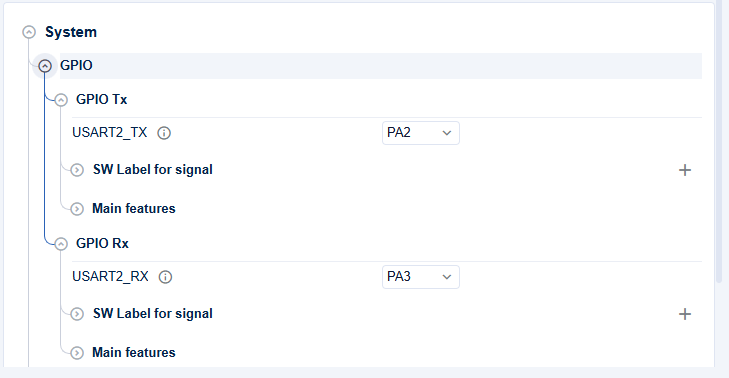
- 根据自己的实际硬件连接,检测Tx、Rx引脚是否按实际连接进行配置。(我板子上用的是PA2、PA3)
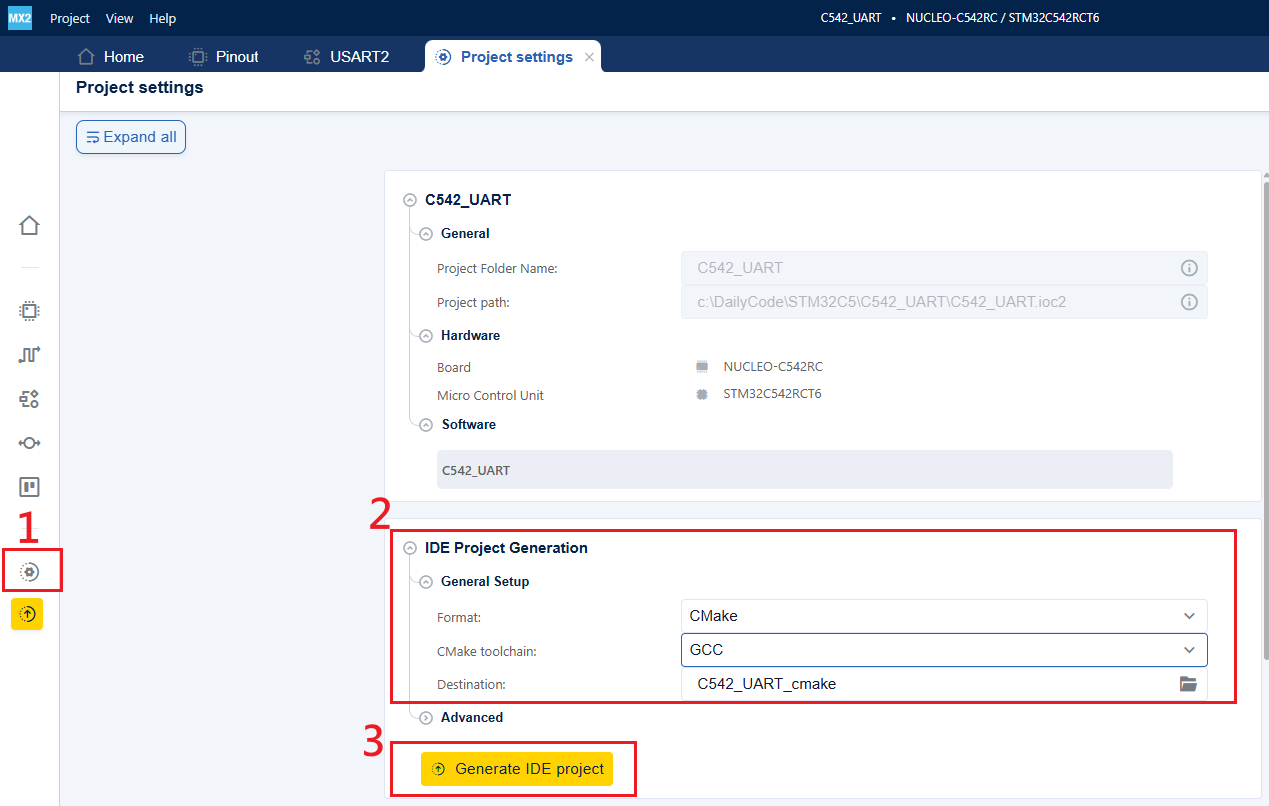
- 选择项目设置,设置工程为CMake,工具链为GCC。设置完成后,点击生成工程。
1.2 代码添加
关于不清楚如何使用VScode编译器开发STM32,可以先去看看官方的系列视频,非常详细,手把手教你。在这里,为ST要点一个大大的赞。
-
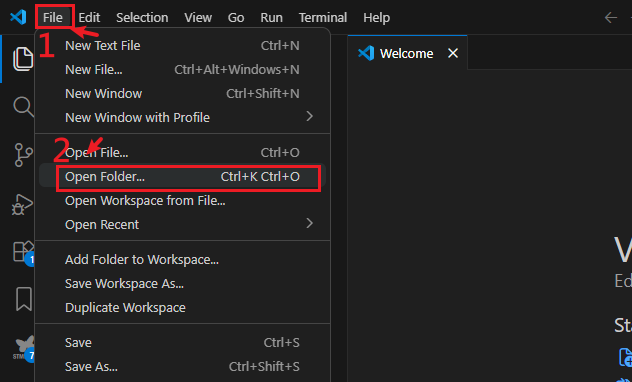
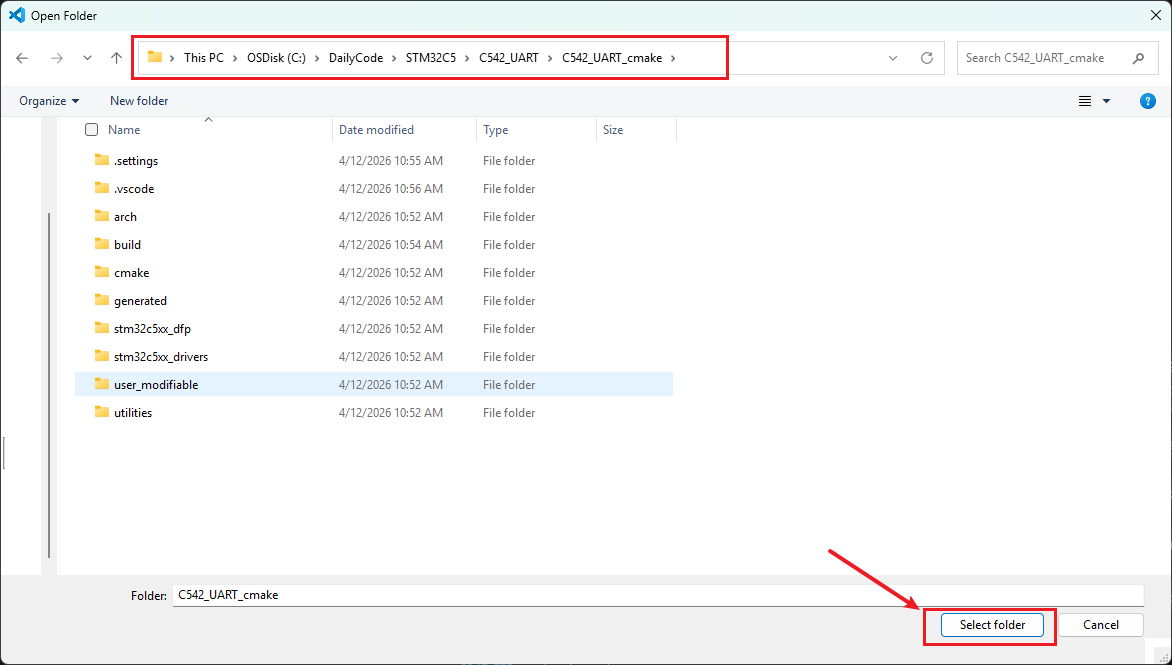
我们打开VScode ,然后导入刚才生成的工程
-
选择刚生成好的工程项目。
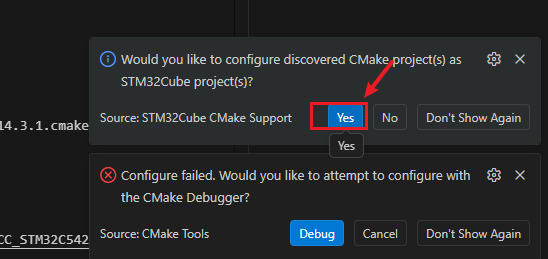
-
导入成功后,右下角弹窗中选择Yes
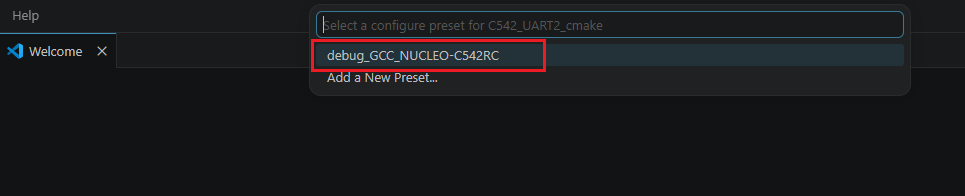
-
在弹出的框中选择,debug_GCC_NUCLEO-C542RC。(如果没有弹出框的话,按press Ctrl+Shift+P, 输入 CMake: Select Configure Preset , 就可以弹出这个框选择调试配置啦。)
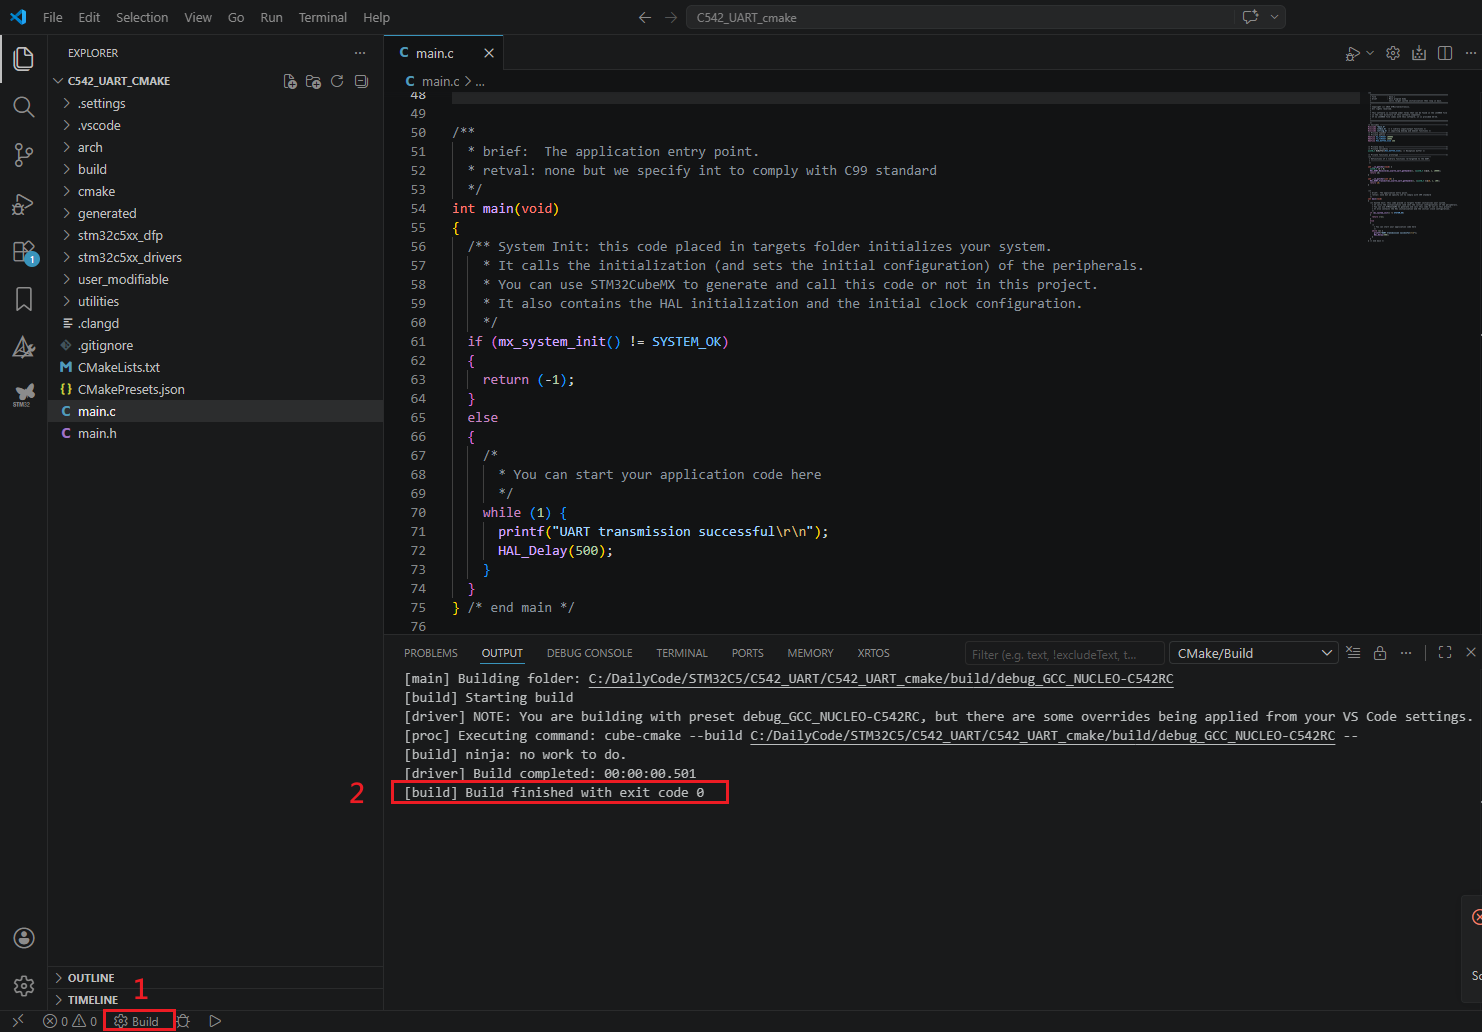
-
Build编译工程,在输出日志中看到,我们已经成功编译工程。
-
按照下面步骤,创建调试文件。
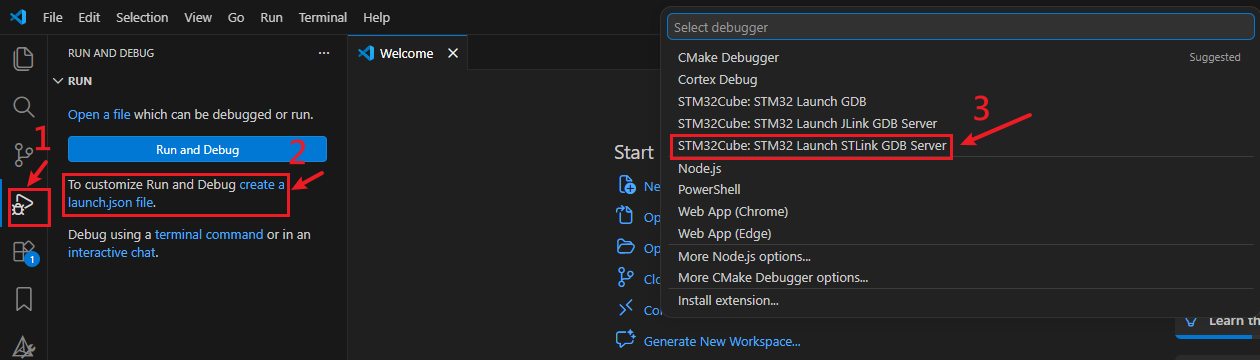
这个时候,我们的调试文件也创建好了。接下来,增加一下UART轮询方式重定向代码。
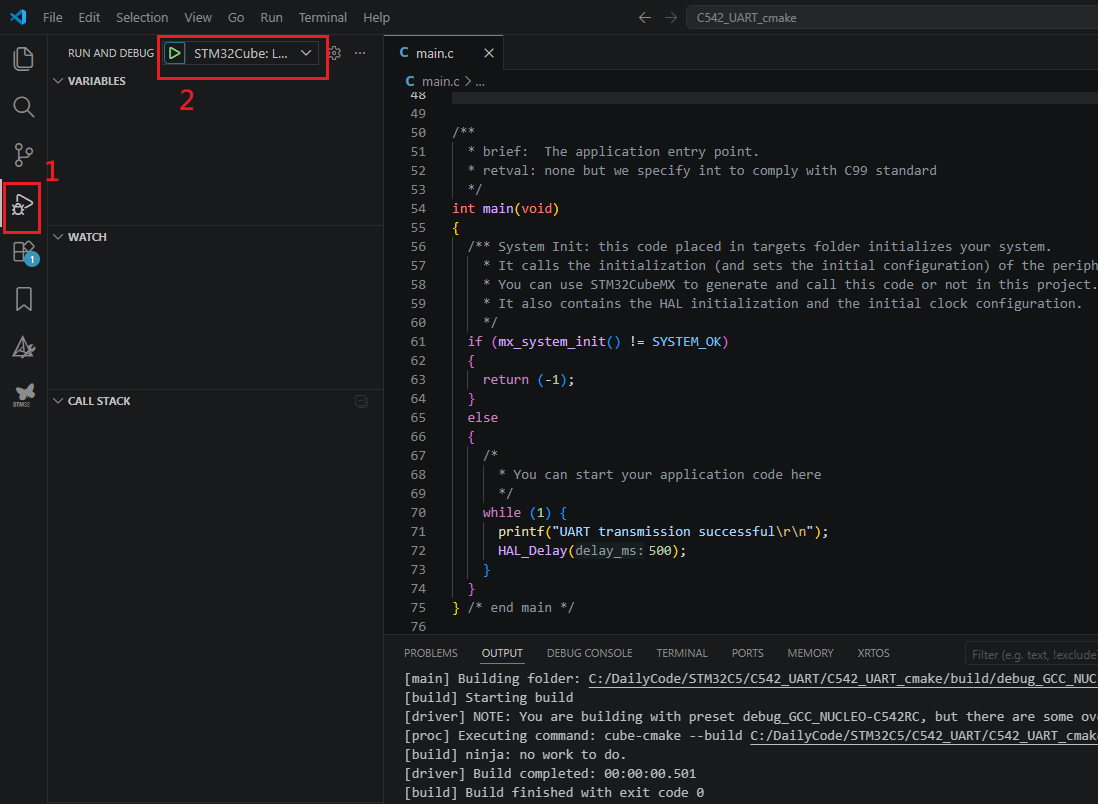
- mian.c中代码添加。重定向串口输出,在主循环中每隔500ms打印一次UART transmission successful。
c
/* Includes ------------------------------------------------------------------*/
#include "main.h"
#include <stdio.h>  /* C library input/output functions */
#include <string.h> /* importing memcmp and memset functions */
/* Private typedef -----------------------------------------------------------*/
/* Private define ------------------------------------------------------------*/
#define RX_TIMEOUT 10000U
#define TX_TIMEOUT 1000U
#define MAX_BUFFER_SIZE 26U


/* Private macro -------------------------------------------------------------*/
/* Private variables ---------------------------------------------------------*/
uint8_t RxBuffer[MAX_BUFFER_SIZE]; /* Reception buffer */

/* Private functions prototype -----------------------------------------------*/
/** -----------------------------------------------------------
 * Definitions of C library functions re-targeted to the UART.
 * -----------------------------------------------------------
 */

int __io_getchar(void) {
  uint8_t ch = 0;
  HAL_UART_Receive(mx_usart2_uart_gethandle(), (uint8_t *)&ch, 1, 10000);
  return ch;
}

int __io_putchar(int ch) {
  HAL_UART_Transmit(mx_usart2_uart_gethandle(), (uint8_t *)&ch, 1, 100);
  return ch;
}


/**
  * brief:  The application entry point.
  * retval: none but we specify int to comply with C99 standard
  */
int main(void)
{
  if (mx_system_init() != SYSTEM_OK)
  {
    return (-1);
  }
  else
  {
    /*
      * You can start your application code here
      */
    while (1) {
      printf("UART transmission successful\r\n");
      HAL_Delay(500);
    }
  }
} /* end main */- 进入下载并调试界面。进入调试界面后,不打任何端点,全速运行代码。
1.3 串口打印
打开串口助手,可以看到,此时串口正常打印。
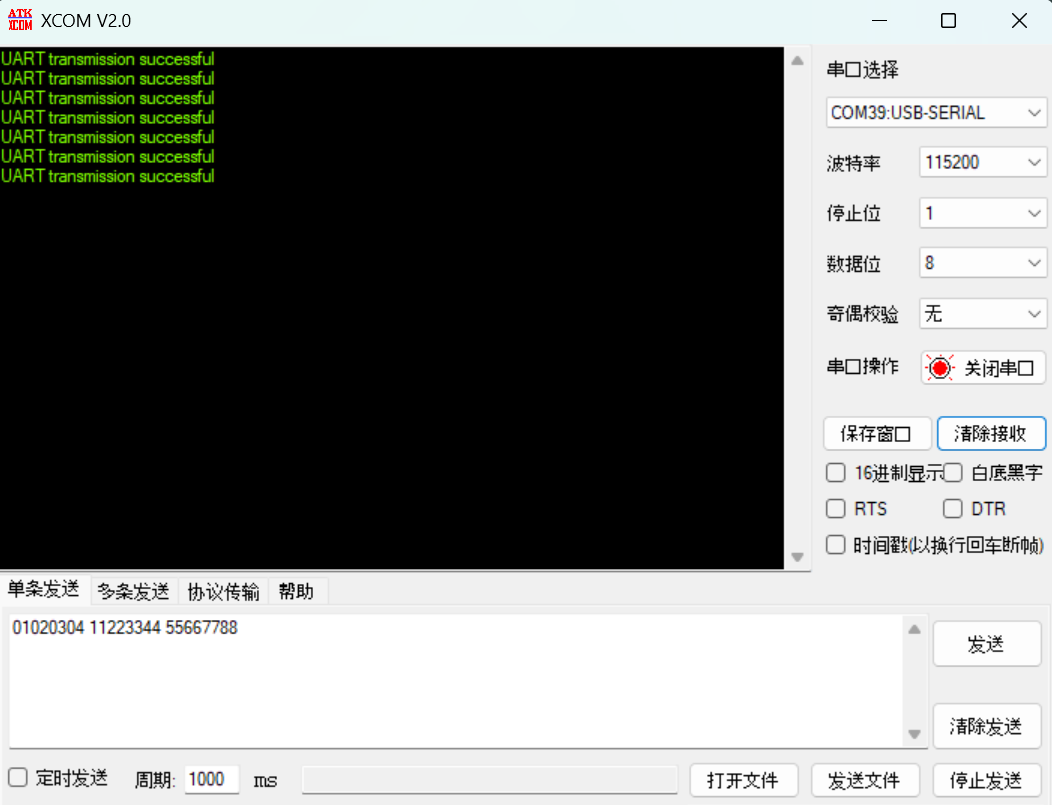
到这,我们使用串口打印功能就实现啦。感兴趣的伙伴可以试一试。
2. UART中断方式
2.1 CubeMX USART配置配置
- 选择外设,在【Connectivity】中选择USART2,模式选择异步【Async】。
!在这里插入图片描述(https://i-blog.csdnimg.cn/direct/4e3b1555008f4ea792993c27bd62884b.png #pic_center =80%x80%)
2.对串口进行主要参数设置。波特率、字长、奇偶检验位、停止位等。
- 根据自己的实际硬件连接,检测Tx、Rx引脚是否按实际连接进行配置。(我板子上用的是PA2、PA3)
- 使能USART的全局中断。
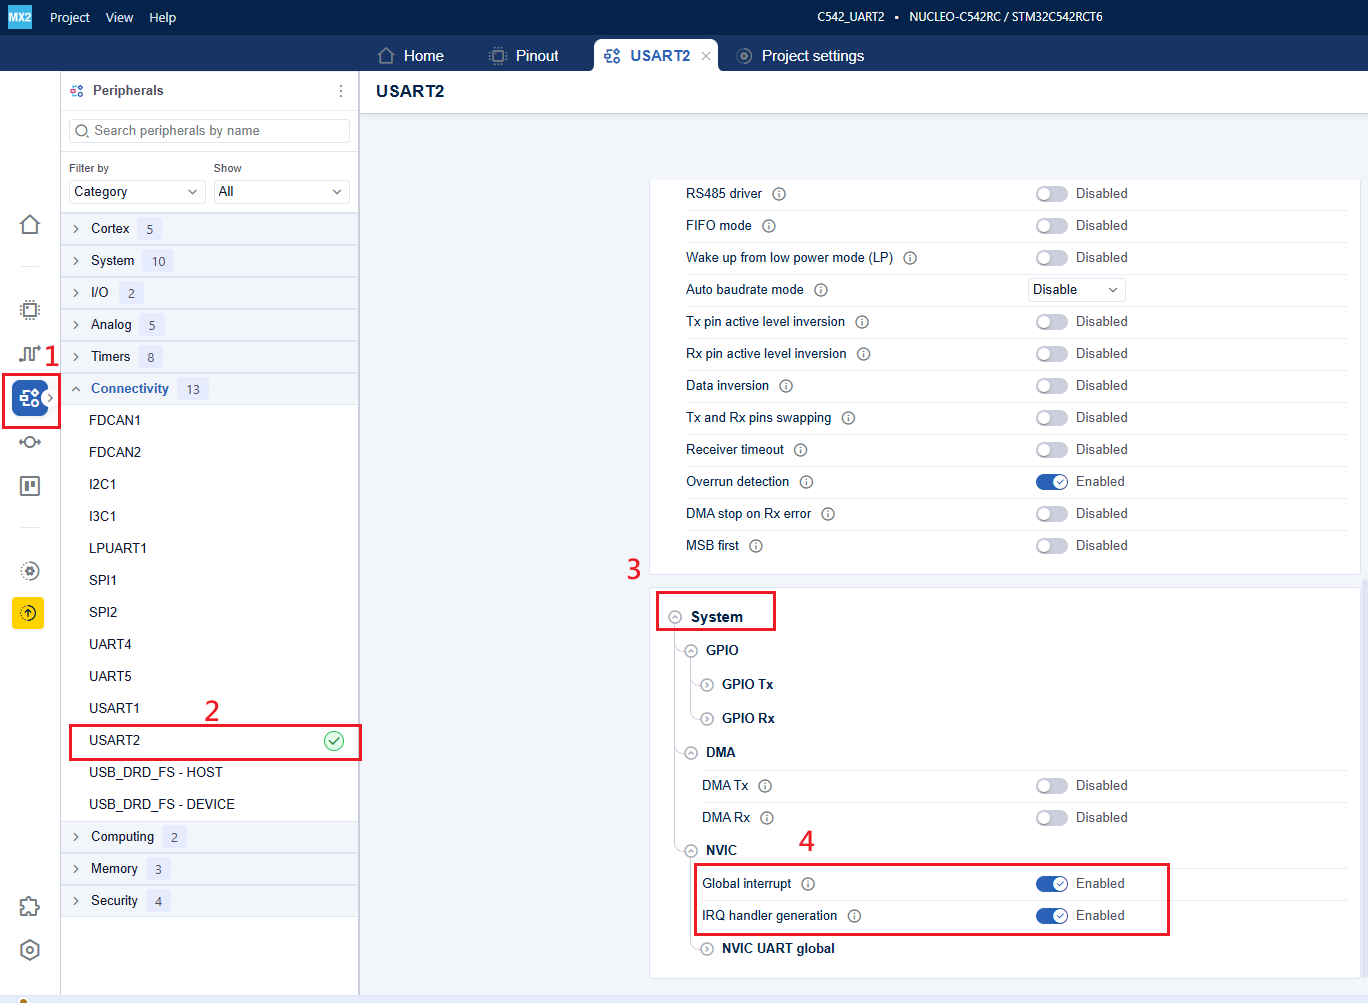
- 选择项目设置,设置工程为CMake,工具链为GCC。设置完成后,点击生成工程。
2.2 代码添加
- 打开VScode, 导入刚生成好的工程。弹出的框中选择,debug_GCC_NUCLEO-C542RC。然后编译无报错后,我们就可以添加代码啦。(对于上述步骤不熟练的,请看UART轮询方式中的详细操作)
- mian.c中添加代码。
main.c 的核心功能是:实现一个基于 USART2 中断接收的单字节回显程序(串口终端 Echo)。可以简单总结如下:
1)完成系统初始化。在调用 mx_system_init(),初始化时钟和外设;失败就返回 -1。
2)实现串口打印与回显。 printf 重定向到 USART2。程序启动后先打印提示字符串。
3)用中断方式做单字节串口回显。每收到 1 个字节,就在回调函数里立即发回去;如果是回车 \r,再补发一个换行 \n,最后再次开启下一次中断接收,形成持续回显。
c
/**
  ******************************************************************************
  * file           : main.c
  * brief          : Main program body
  *                  Calls target system initialization then loop in main.
  ******************************************************************************
  *
  * Copyright (c) 2025 STMicroelectronics.
  * All rights reserved.
  *
  * This software is licensed under terms that can be found in the LICENSE file
  * in the root directory of this software component.
  * If no LICENSE file comes with this software, it is provided AS-IS.
  *
  ******************************************************************************
  */
/* Includes ------------------------------------------------------------------*/
#include "main.h"
#include <stdio.h>  /* C library input/output functions */
#include <string.h> /* importing memcmp and memset functions */

/* Private typedef -----------------------------------------------------------*/
/* Private define ------------------------------------------------------------*/
#define RX_TIMEOUT 10000U
#define TX_TIMEOUT 1000U
#define MAX_BUFFER_SIZE 2U

/* Private macro -------------------------------------------------------------*/
/* Private variables ---------------------------------------------------------*/
uint8_t RxBuffer[MAX_BUFFER_SIZE]; /* Reception buffer */

/* Private functions prototype -----------------------------------------------*/
int __io_putchar(int ch)
{
  HAL_UART_Transmit(mx_usart2_uart_gethandle(), (uint8_t *)&ch, 1, 100);
  return ch;
}

void HAL_UART_RxCpltCallback(hal_uart_handle_t *huart, uint32_t size_byte, hal_uart_rx_event_types_t rx_event)
{
  HAL_UART_Transmit(mx_usart2_uart_gethandle(), RxBuffer, 1, 10);
  if (RxBuffer[0] == '\r')
  {
    uint8_t newline = '\n';
    HAL_UART_Transmit(mx_usart2_uart_gethandle(), &newline, 1, 10);
  }
  HAL_UART_Receive_IT(mx_usart2_uart_gethandle(), RxBuffer, 1);
}

/**
  * brief:  The application entry point.
  * retval: none but we specify int to comply with C99 standard
  */
int main(void)
{
  /** System Init: this code placed in targets folder initializes your system.
    * It calls the initialization (and sets the initial configuration) of the peripherals.
    * You can use STM32CubeMX to generate and call this code or not in this project.
    * It also contains the HAL initialization and the initial clock configuration.
    */
  if (mx_system_init() != SYSTEM_OK)
  {
    return (-1);
  }
  else
  {
    /*
      * You can start your application code here
      */
    printf("USART2 RX IT echo example\r\n");
    HAL_UART_Receive_IT(mx_usart2_uart_gethandle(), RxBuffer, 1);
    while (1) {
    }
  }
} /* end main */
2.3 实验现象
这次串口我们使用VScode中自带的TERMINAL
按 Ctrl+Shift+P 并输入 Open Serial > COM40(STMicroelectronics)> 115200。
注意:选择COM口时,要选择带STMicroelectronics。根据自己板子的实际连接进行选择。
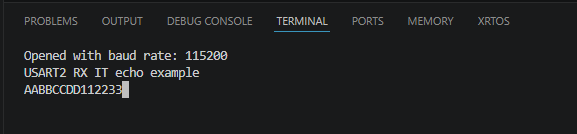
当我输入ABCD123时,由于有回显功能。所以显示为AABBCCDD112233。
总结
本文主要记录一下如何使用 STM32CubeMX2 和 Visual Studio 代码在 NUCLEO-C562RE 上建立 UART 通信,如有什么不足之处,欢迎大家补充。谢谢!