文章目录
org.openpnp.vision.pipeline.stages.DetectRectlinearSymmetry
功能
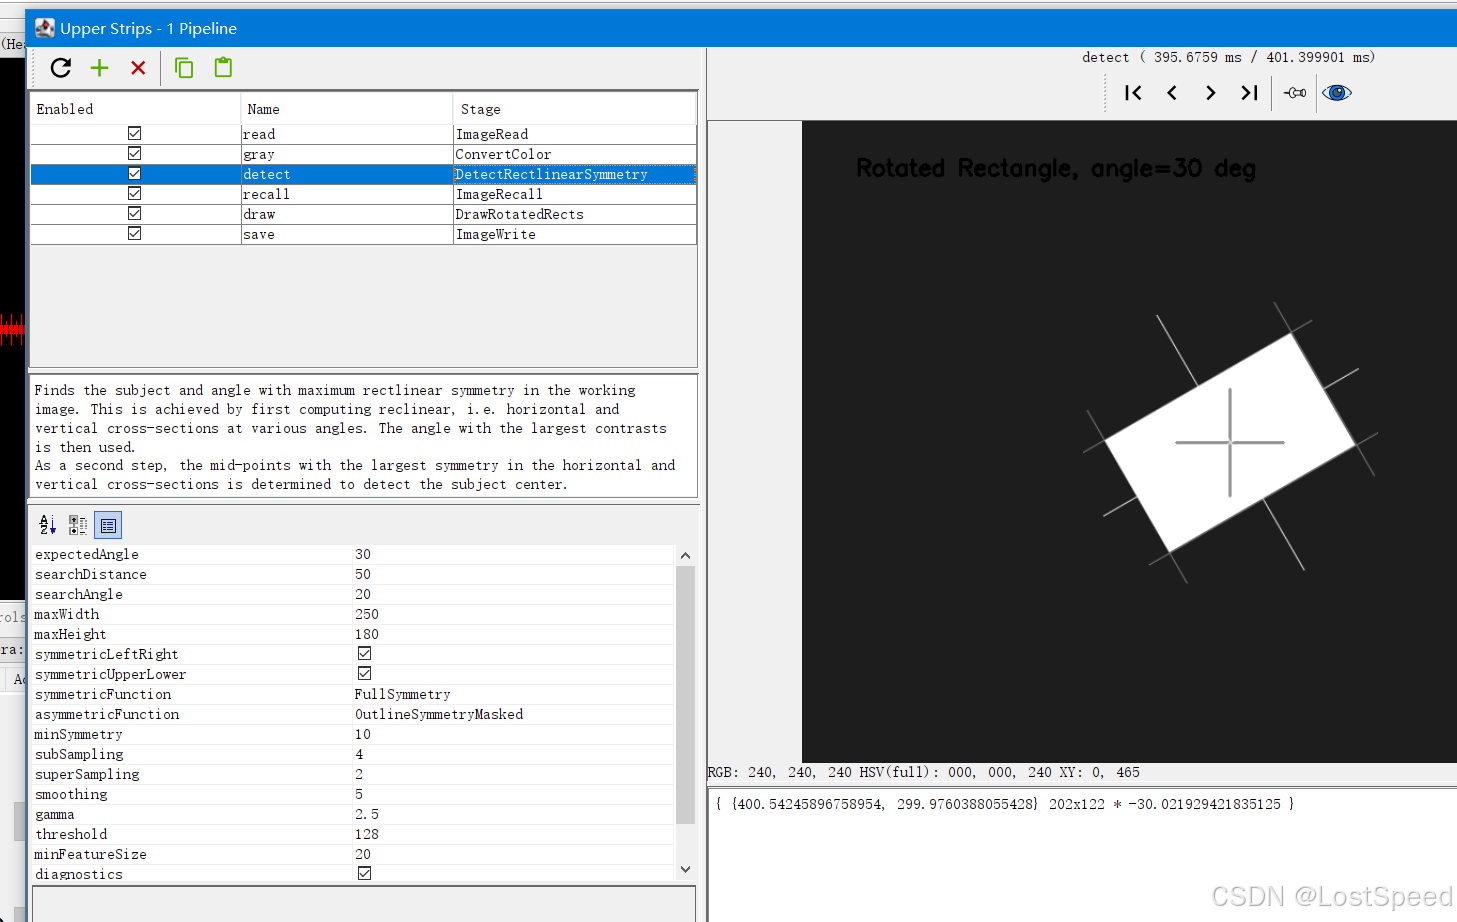
检测具有矩形线性对称性的物体(例如矩形芯片、IC、排针、无源元件等)。它不依赖于清晰的边缘或完整的轮廓,而是通过分析图像在不同旋转角度下的水平和垂直截面(cross‑section)的对称性,找到使对称性最大的角度和中心位置,最终输出一个 RotatedRect(旋转矩形),包含物体的中心、尺寸和旋转角度.
参数
| 参数 | 类型 | 默认值 | 说明 |
|---|---|---|---|
expectedAngle |
double | 0 | 期望的物体旋转角度(度)。算法将在该角度附近搜索。 |
searchDistance |
double | 100 | 围绕中心的搜索半径(像素)。用于确定中心偏移的范围。 |
searchAngle |
double | 45 | 围绕 expectedAngle 的搜索范围(度,双向)。实际搜索角度范围为 [expectedAngle - searchAngle, expectedAngle + searchAngle]。 |
maxWidth |
double | 100 | 物体的最大宽度(像素)。用于限制截面分析的范围,提高效率。 |
maxHeight |
double | 100 | 物体的最大高度(像素)。 |
symmetricLeftRight |
boolean | true | 物体是否左右对称(在0°旋转时)。若为 true,使用 symmetricFunction;若为 false,使用 asymmetricFunction。 |
symmetricUpperLower |
boolean | true | 物体是否上下对称(在0°旋转时)。若为 true,使用 symmetricFunction;若为 false,使用 asymmetricFunction。 |
symmetricFunction |
SymmetryFunction | FullSymmetry |
当物体对称时,使用的对称评估函数。可选值:FullSymmetry, EdgeSymmetry, OutlineSymmetry, OutlineEdgeSymmetry, OutlineSymmetryMasked。 |
asymmetricFunction |
SymmetryFunction | OutlineSymmetryMasked |
当物体不对称时,使用的对称评估函数。通常用于元件内部图案不对称但轮廓对称的情况。 |
minSymmetry |
double | 10 | 最小对称性得分。得分 >1 表示有对称性,低于此值视为检测失败。 |
subSampling |
int | 8 | 子采样步长。为加速,每隔 subSampling 像素采样一次。后续迭代会逐步减小该值以获得更高精度。 |
superSampling |
int | 1 | 超采样因子,用于最终阶段的亚像素精度。1 表示无超采样,2 表示半像素精度。负值可提前停止细化。 |
smoothing |
int | 5 | 高斯平滑核大小(像素)。用于消除由于像素网格和角度采样引起的噪声干扰。 |
gamma |
double | 2.5 | 伽马校正指数。对像素亮度进行幂变换,gamma > 1 会增强亮部对比度,有助于检测较亮的元件。 |
threshold |
int | 128 | 掩膜对称模式下的亮度阈值(0-255)。仅当像素亮度大于该阈值时,才视为物体的一部分。 |
minFeatureSize |
double | 40 | 掩膜对称模式下的最小特征尺寸(像素)。用于过滤掉小的噪声斑点,只有大于该尺寸的连续掩膜区域才被视为有效特征。 |
diagnostics |
boolean | false | 是否在输出图像上叠加诊断信息(十字线、边界框等)。用于调试。 |
diagnosticsMap |
boolean | false | 是否叠加角度对比图和截面轮廓图,提供更详细的诊断信息。 |
propertyName |
String | "DetectRectlinearSymmetry" |
管道属性名称。如果设置,管道运行时可以通过该属性动态覆盖部分配置参数(如 center、expectedAngle 等)。 |
例子
产生测试图像
bash
# @fn generate_rotated_rectangle_v2.py
import cv2
import numpy as np

# 图像尺寸
width, height = 800, 600

# 创建纯蓝色背景
img = np.full((height, width, 3), (255, 0, 0), dtype=np.uint8)

# 矩形参数(未旋转时)
rect_w, rect_h = 200, 120
center = (width // 2, height // 2)
angle = 30  # 逆时针旋转30度

# 方法:先在一个小画布上绘制未旋转的矩形,然后旋转并粘贴到背景上
# 创建足够大的画布(包含矩形)
canvas_w = rect_w + 100
canvas_h = rect_h + 100
canvas = np.zeros((canvas_h, canvas_w, 3), dtype=np.uint8)
canvas[:] = (255, 0, 0)  # 蓝色背景,与主图一致
# 在画布中央绘制白色矩形
cv2.rectangle(canvas, (50, 50), (50+rect_w, 50+rect_h), (255, 255, 255), -1)

# 计算旋转矩阵,绕画布中心旋转
M = cv2.getRotationMatrix2D((canvas_w/2, canvas_h/2), angle, 1.0)
rotated = cv2.warpAffine(canvas, M, (canvas_w, canvas_h), borderMode=cv2.BORDER_CONSTANT, borderValue=(255,0,0))

# 将旋转后的矩形区域叠加到主图像中心
# 找到旋转后非蓝色区域的边界
gray = cv2.cvtColor(rotated, cv2.COLOR_BGR2GRAY)
_, mask = cv2.threshold(gray, 1, 255, cv2.THRESH_BINARY)
mask_inv = cv2.bitwise_not(mask)
# 主图像中对应的区域(需要裁剪到主图范围内)
x_start = center[0] - canvas_w//2
y_start = center[1] - canvas_h//2
x_end = x_start + canvas_w
y_end = y_start + canvas_h
roi = img[y_start:y_end, x_start:x_end]
# 将旋转后的非蓝色部分复制到 ROI
roi_bg = cv2.bitwise_and(roi, roi, mask=mask_inv)
rotated_fg = cv2.bitwise_and(rotated, rotated, mask=mask)
img[y_start:y_end, x_start:x_end] = cv2.add(roi_bg, rotated_fg)

# 可选:绘制中心十字标记(绿色)
cv2.line(img, (center[0]-50, center[1]), (center[0]+50, center[1]), (0, 255, 0), 2)
cv2.line(img, (center[0], center[1]-50), (center[0], center[1]+50), (0, 255, 0), 2)

# 添加文字
cv2.putText(img, f"Rotated Rectangle, angle={angle} deg", (50, 50),
            cv2.FONT_HERSHEY_SIMPLEX, 0.7, (0, 0, 0), 2)

# 保存
cv2.imwrite("rotated_rectangle_v2.png", img)
print("已生成旋转矩形测试图像: rotated_rectangle_v2.png")
cv-pipeline
bash
<cv-pipeline>
<stages>
<cv-stage class="org.openpnp.vision.pipeline.stages.ImageRead" name="read" enabled="true" file="D:\3rd\openpnp_prj\openpnp-official\openpnp-test-images\my_test\rotated_rectangle_v2.png" color-space="Bgr" handle-as-captured="false"/>
<cv-stage class="org.openpnp.vision.pipeline.stages.ConvertColor" name="gray" enabled="true" conversion="Bgr2Gray"/>
<cv-stage class="org.openpnp.vision.pipeline.stages.DetectRectlinearSymmetry" name="detect" enabled="true" expected-angle="30.0" search-distance="50.0" search-angle="20.0" max-width="250.0" max-height="180.0" symmetric-left-right="true" symmetric-upper-lower="true" symmetric-function="FullSymmetry" asymmetric-function="OutlineSymmetryMasked" min-symmetry="10.0" sub-sampling="4" super-sampling="2" smoothing="5" gamma="2.5" threshold="128" min-feature-size="20.0" diagnostics="true" diagnostics-map="false" property-name=""/>
<cv-stage class="org.openpnp.vision.pipeline.stages.ImageRecall" name="recall" enabled="true" image-stage-name="read"/>
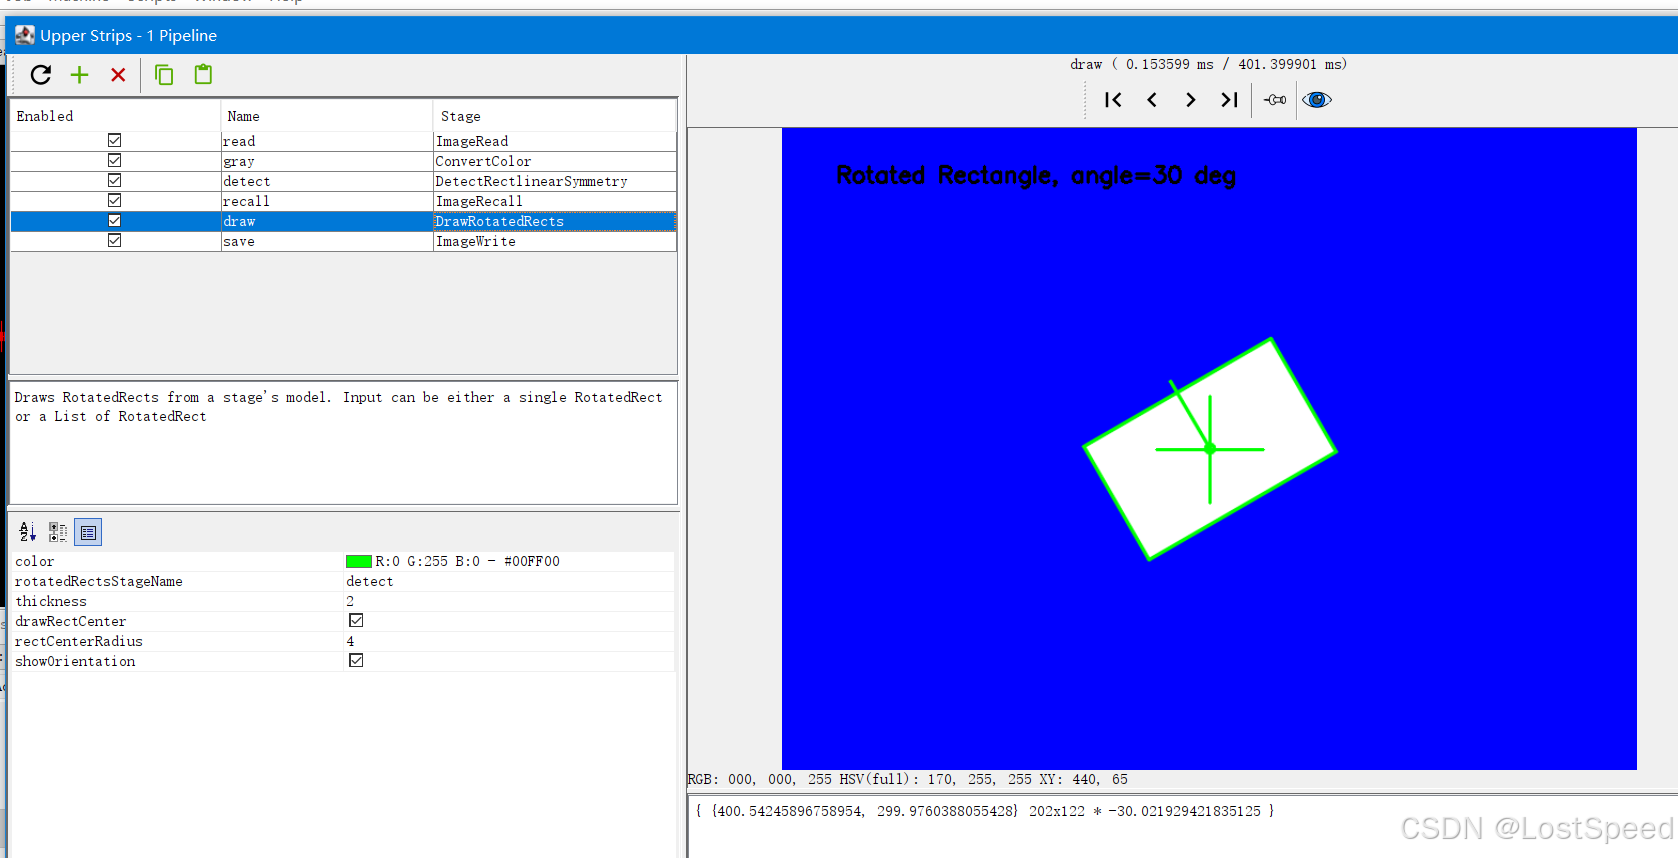
<cv-stage class="org.openpnp.vision.pipeline.stages.DrawRotatedRects" name="draw" enabled="true" rotated-rects-stage-name="detect" thickness="2" draw-rect-center="true" rect-center-radius="4" show-orientation="true">
<color r="0" g="255" b="0" a="255"/>
</cv-stage>
<cv-stage class="org.openpnp.vision.pipeline.stages.ImageWrite" name="save" enabled="true" file="output_rotated_rectangle.png"/>
</stages>
</cv-pipeline>效果