文章目录
org.openpnp.vision.pipeline.stages.DetectCircularSymmetry
功能
用于检测圆形对称性的一个阶段。它不要求圆形边缘完整或对比度极高,而是通过分析图像中圆形区域的径向对称性来定位圆心和直径。即使圆环存在缺口、部分遮挡或亮度不均,只要整体上具有圆对称性,就能被可靠检测。该 Stage 支持亚像素精度、局部搜索、多目标检测,并提供了对称性得分用于质量评估。
参数
| 参数 | 类型 | 默认值 | 说明 |
|---|---|---|---|
minDiameter |
int | 10 | 最小检测直径(像素)。小于此值的圆将被忽略。 |
maxDiameter |
int | 100 | 最大检测直径(像素)。大于此值的圆将被忽略。 |
maxDistance |
int | 100 | 搜索半径(像素)。以 (center.x, center.y) 为中心,在此半径的圆内搜索候选圆心。若 searchWidth 和 searchHeight 为 0,则搜索区域为 (2*maxDistance+1) x (2*maxDistance+1) 的正方形。 |
searchWidth |
int | 0 | 搜索矩形宽度(像素)。若 >0,则覆盖 maxDistance 的设定(此时搜索范围由该值决定)。0 表示自动设为 maxDistance*2。 |
searchHeight |
int | 0 | 搜索矩形高度(像素)。同理。 |
maxTargetCount |
int | 1 | 最多要检测的目标数量。若 >1,算法会返回多个圆形(按得分排序)。 |
minSymmetry |
double | 1.2 | 最小对称性得分阈值。得分 < 此值时视为无效。得分通常大于 1 表示存在对称性。增大该值可提高检测严格性。 |
corrSymmetry |
double | 0.0 | 多目标时的相关对称性阈值。设最佳得分为 S_max,则其他候选圆的得分必须 ≥ S_max × corrSymmetry 才会被保留。取值范围 0, 1。 |
subSampling |
int | 8 | 初始子采样步长。算法每隔 subSampling 个像素采样一次,以加速。后续会递归细化(步长逐步减小)。步长越大速度越快,但可能漏掉小尺寸圆。 |
superSampling |
int | 1 | 最终超采样因子,用于亚像素精度。superSampling=1 无亚像素;2 表示半像素精度;4 表示 1/4 像素,以此类推。精度越高速度越慢。 |
symmetryScore |
enum | OverallVarianceVsRingVarianceSum |
对称性评分模式。可选值: • OverallVarianceVsRingVarianceSum:最宽容,适合部分圆环或散乱圆点。 • RingAvgeragesVarianceVsRingVarianceSum:较严格,要求各环平均亮度一致。 • RingMedianVarianceVsRingVarianceSum:最严格,用中位数代替均值,抗异常值。 |
diagnostics |
boolean | false | 若为 true,在输出图像上绘制检测到的圆(绿色)和十字线,便于调试。 |
heatMap |
boolean | false | 若为 true,叠加对称性得分的彩色热力图(得分越高颜色越暖)。 |
propertyName |
string | "" | 动态参数覆盖的属性名前缀。例如设置 propertyName="myCircle",则可通过 pipeline.setProperty("myCircle.diameter", 50) 在运行时覆盖直径;也可覆盖 maxDistance、center 等。 |
outerMargin |
double | 0.2 | 仅当 propertyName 有效且运行时指定了直径 diameter 时使用。用于计算 maxDiameter = diameter × (1 + outerMargin)。 |
innerMargin |
double | 0.4 | 类似,用于计算 minDiameter = diameter × (1 - innerMargin)。 |
例子
generate_incomplete_circle.py
bash
# @fn generate_incomplete_circle.py
import cv2
import numpy as np

# 图像尺寸
width, height = 500, 500
img = np.ones((height, width, 3), dtype=np.uint8) * 128  # 灰色背景

# 定义圆心、半径、线宽
center = (width // 2, height // 2)
radius = 80
thickness = 8

# 1. 绘制一个完整的圆(用于对比)
cv2.circle(img, center, radius, (0, 0, 0), thickness)

# 2. 绘制一个缺了 120° 的圆弧(缺口在右下象限)
#   角度从 30° 到 150° 不画,其他角度画
# 方法:先画完整圆,再用背景色覆盖缺口部分(或直接用 ellipse 画弧)
# 简便方法:绘制圆弧(ellipse 函数可指定起始和终止角度)
# 注意 OpenCV 的 ellipse 角度从 0° 开始(右侧水平),顺时针为正
# 这里制造一个 90° 的缺口
start_angle = 60
end_angle = 180  # 缺口 120°
# 在缺口区域用背景色覆盖
mask = np.zeros((height, width), dtype=np.uint8)
cv2.ellipse(mask, center, (radius, radius), 0, start_angle, end_angle, 255, -1)
# 将缺口区域的圆线条擦除(用背景色)
img[mask == 255] = [128, 128, 128]

# 3. 添加一个更小的、只有半圆的圆形标记(用于测试多目标)
center2 = (width - 100, 100)
radius2 = 30
cv2.ellipse(img, center2, (radius2, radius2), 0, 0, 180, (0, 0, 0), thickness - 2)

# 可选:添加一些噪声点,测试鲁棒性
noise = np.random.randint(0, 30, (height, width, 3), dtype=np.uint8)
mask_noise = np.random.random((height, width)) < 0.02
img[mask_noise] = cv2.add(img[mask_noise], noise[mask_noise])

# 保存图像
output_path = "test_circular_symmetry.png"
cv2.imwrite(output_path, img)
print(f"测试图像已生成: {output_path}")
cv-pipeline
bash
<cv-pipeline>
<stages>
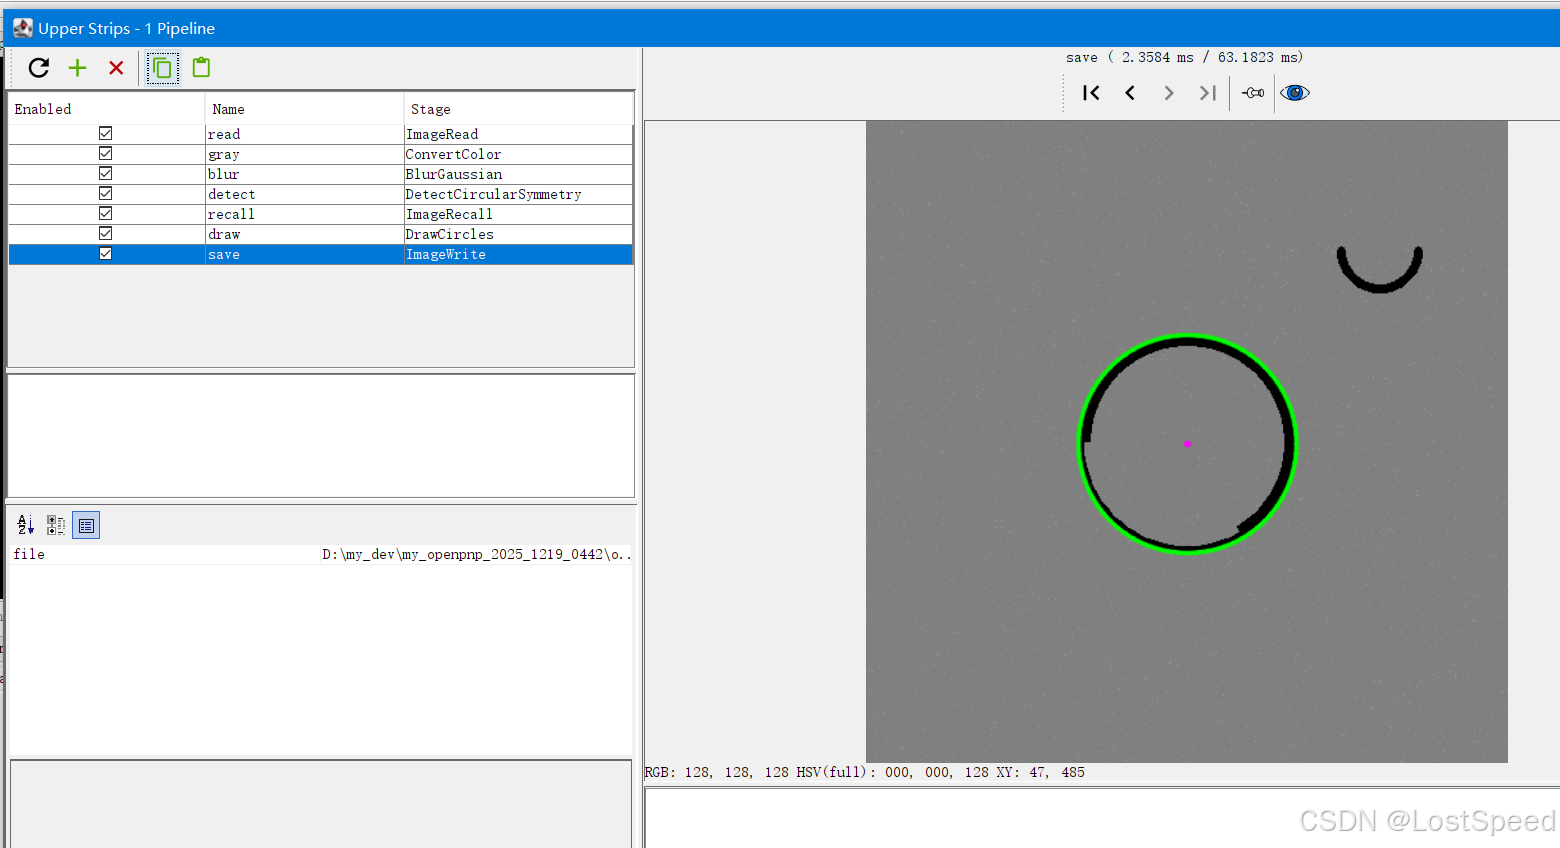
<cv-stage class="org.openpnp.vision.pipeline.stages.ImageRead" name="read" enabled="true" file="D:\3rd\openpnp_prj\openpnp-official\openpnp-test-images\my_test\test_circular_symmetry.png" color-space="Bgr" handle-as-captured="false"/>
<cv-stage class="org.openpnp.vision.pipeline.stages.ConvertColor" name="gray" enabled="true" conversion="Bgr2Gray"/>
<cv-stage class="org.openpnp.vision.pipeline.stages.BlurGaussian" name="blur" enabled="true" kernel-size="5" property-name="BlurGaussian"/>
<cv-stage class="org.openpnp.vision.pipeline.stages.DetectCircularSymmetry" name="detect" enabled="true" min-diameter="30" max-diameter="200" max-distance="100" search-width="0" search-height="0" max-target-count="2" min-symmetry="1.1" corr-symmetry="0.8" outer-margin="0.2" inner-margin="0.4" sub-sampling="4" super-sampling="2" symmetry-score="OverallVarianceVsRingVarianceSum" property-name="" diagnostics="true" heat-map="false"/>
<cv-stage class="org.openpnp.vision.pipeline.stages.ImageRecall" name="recall" enabled="true" image-stage-name="read"/>
<cv-stage class="org.openpnp.vision.pipeline.stages.DrawCircles" name="draw" enabled="true" circles-stage-name="detect" thickness="2">
<color r="0" g="255" b="0" a="255"/>
</cv-stage>
<cv-stage class="org.openpnp.vision.pipeline.stages.ImageWrite" name="save" enabled="true" file="output_detected_circles.png"/>
</stages>
</cv-pipeline>效果