作者:来自 Elastic Jeffrey Rengifo

探索六个向量搜索技巧,帮助你完全基于 Elasticsearch 构建现代 AI 搜索应用,并在每个架构决策点提供带有明确倾向性的设计理由。
使用 Search AI 的这个 自助式动手学习课程 亲自体验向量搜索。你现在就可以开始 免费云试用 ,或者在你的 本地机器 上试用 Elastic。
构建一个现代 AI 应用意味着需要将许多组件组合在一起:一个 嵌入模型 提供商、一个 向量 存储、一个混合 检索 层、一个 大型语言模型 (LLM)编排器,以及某种用于与这些组件交互的脚本。大多数教程都会展示如何分别连接这些组件。而本文将展示如何仅使用 Elasticsearch 构建所有这些组件。我选择 Elasticsearch 作为我的 向量数据库 ,因为它支持 混合搜索 和开箱即用的 量化 功能,因此你无需额外增加基础设施,就能同时获得语义理解、关键词精确匹配以及快速相似度搜索。在此过程中,本文还会解释为什么每一个架构决策都很重要。
我们将使用 Python 演示每个技巧,但这些技巧并不依赖于特定编程语言;你同样可以使用 Kibana Dev Tools Console 、 Kibana UI 或任何 Elasticsearch 客户端 来完成相同操作。
前提条件
-
Elasticsearch 9.3+ (Elastic Cloud Serverless 或自托管版本)。开始免费试用
-
具有 API Key 的 Kibana 访问权限,并且该 API Key 拥有 Analytics 的全部权限(Elastic Agent Builder 和 Elastic Workflows 所必需)
-
Python 3.9+
pip install elasticsearch python-dotenv requests
-
.env文件中的 环境变量:ELASTICSEARCH_URL=https://your-cluster-url
ELASTICSEARCH_API_KEY=your-api-key
KIBANA_URL=https://your-kibana-url
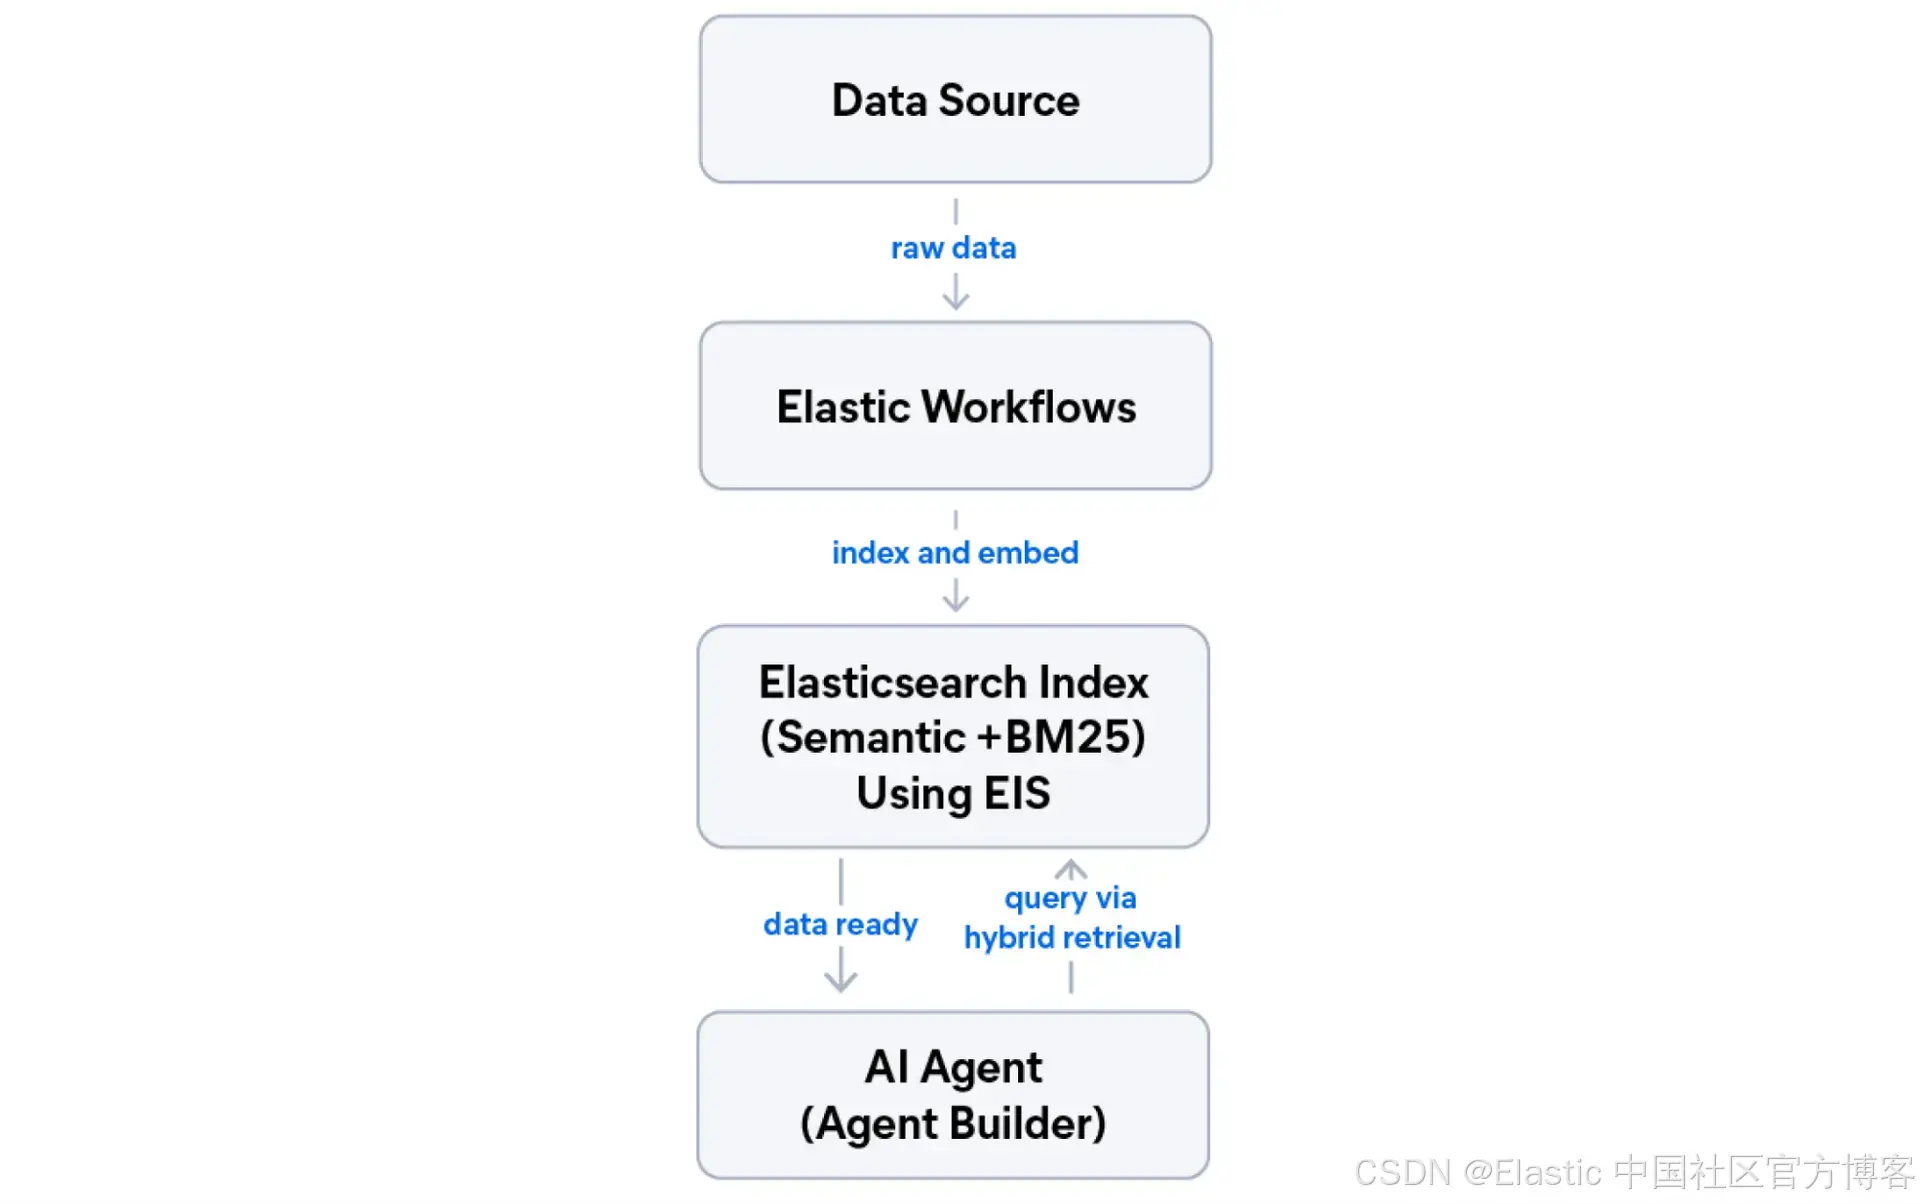
我们将构建什么
在本教程结束时,你将拥有一个运行在 Elastic 上的五层应用。如果你想跳过并直接运行代码,可以获取配套的 notebook。
-
托管推理:无需管理机器学习(ML)基础设施即可生成嵌入向量。
-
语义索引 :一个同时支持 BM25 和 语义搜索 的索引。
-
混合检索(倒数排序融合 RRF):结合词法搜索与语义搜索的最佳结果。
-
AI 代理:基于你的数据的自然语言交互接口。
-
自动化工作流:一个定时管道,用于抓取、索引并总结新内容。
Elastic 允许你在同一个部署中使用这五个层。
提示 1:使用托管推理,而不是外部嵌入 API
任何 向量搜索 项目中的第一个决策是在哪里生成嵌入向量。最直观的做法是直接调用外部 API(OpenAI、Cohere、Jina AI),但这意味着你需要额外管理一个独立的计费账户、API key 轮换、速率限制 监控,以及在每个要索引的 文档 上产生网络 延迟。
另一种选择是使用 Elastic Inference Service(EIS),这是一个内置在 Elasticsearch 中的托管 GPU 加速推理层。你只需要配置一次,嵌入向量就会在 Elastic 基础设施内部、在文档写入时自动生成。
在本教程中,我们将使用 jina-embeddings-v5-text,这是一个开箱即用、针对检索优化的高性能模型。
什么时候使用 EIS vs 外部 API
当你希望使用单一 Elastic 计费账户,并且组织内部没有在所有系统中统一模型标准时,使用 EIS。当你的团队已经在跨系统中选定了某个外部提供商的模型,并且需要在所有系统中保持嵌入一致性时,则使用外部 API。
es_client = Elasticsearch(ELASTICSEARCH_URL, api_key=ELASTIC_API_KEY)

# Jina Embeddings v5 comes with a preconfigured endpoint in EIS.
# No need to create a custom inference endpoint, just reference the preconfigured ID.
INFERENCE_ENDPOINT_ID = ".jina-embeddings-v5-text-small"
print(f"Using preconfigured inference endpoint: {INFERENCE_ENDPOINT_ID}")
推理 endpoint 现在已经准备就绪。当你将文档索引到使用 semantic_text 字段的字段时,Elasticsearch 会自动调用它。
提示 2:从一开始就设计支持混合搜索的索引
一个常见错误是:先为语义搜索设计索引,然后再尝试加入混合搜索。混合搜索需要同时支持语义检索和 BM25。如果在已有数百万文档之后再进行改造,就意味着必须全量重建索引。
正确的模式是在 mapping 阶段使用 copy_to。保留原始文本字段用于 BM25,同时将其内容自动复制到专门的 semantic_text 字段用于向量搜索。
INDEX_NAME = "tech-articles"

index_mappings = {
    "mappings": {
        "properties": {
            "title": {
                "type": "text",
                "copy_to": "semantic_field",
                "fields": {"keyword": {"type": "keyword"}},
            },
            "content": {"type": "text", "copy_to": "semantic_field"},
            "category": {"type": "keyword"},
            "published_date": {"type": "date"},
            "semantic_field": {
                "type": "semantic_text",
                "inference_id": INFERENCE_ENDPOINT_ID,
            },
        }
    }
}

if not es_client.indices.exists(index=INDEX_NAME):
    response = es_client.indices.create(index=INDEX_NAME, body=index_mappings)
    print(f"Created index: {INDEX_NAME}")
else:
    print(f"Index '{INDEX_NAME}' already exists, skipping creation")
关于这个 mapping,需要理解几点:
title是一个 text 字段,并带有一个 keyword 子字段,可用于 BM25 全文搜索 以及通过title.keyword进行 聚合 和过滤。content是一个标准的text字段,用于全文搜索。copy_to: "semantic_field"表示 Elasticsearch 会在 ingest(写入)时自动把title和content的内容复制到semantic_field中。你不需要在文档里手动发送semantic_field。- 带有
inference_id的semantic_text表示 Elasticsearch 会调用 EIS 端点,自动为semantic_field生成嵌入向量。
关于为什么使用 copy_to 而不是单独的语义字段,可以参考 Elasticsearch 关于 "尽可能少搜索字段" 的性能优化指南。
提示 3:使用批量操作实现可扩展的写入
在生产应用中,永远不要一次只索引一个文档。每一个 index 请求都是一次独立的 HTTP 调用。
Elasticsearch 提供了 bulk API 用于将多个索引操作打包成一次 HTTP 请求。你可以将它与 生成器函数 结合使用,从而避免把整个 数据集 加载到内存中。
from elasticsearch import helpers


def build_data(json_file, index_name):
    """Generator that yields documents for bulk indexing."""
    with open(json_file, "r") as f:
        data = json.load(f)

    for doc in data:
        yield {"_index": index_name, "_source": doc}


try:
    success, failed = helpers.bulk(
        es_client,
        build_data("dataset.json", INDEX_NAME),
    )
    print(f"{success} documents indexed successfully")

    if failed:
        print(f"Failed documents: {failed}")
except Exception as e:
    print(f"Error: {str(e)}")

# Verify document count
count = es_client.count(index=INDEX_NAME)
print(f"Total documents: {count.body['count']}")
生成器模式 vs 列表
在调用 helpers.bulk() 之前先把所有文档加载到一个列表里是可行的,但这样会一次性占用全部内存。生成器会按需产出文档,这意味着无论数据集大小如何,你的内存占用都保持恒定。
提示 4:使用混合搜索策略
Hybrid search 将 BM25(词法检索)和语义检索结合起来,同时获得两者的优势:既有词项匹配的精确性,也有 dense vector 搜索的上下文理解能力。由于你的索引已经设计为同时支持 BM25 和语义搜索,接下来的问题就是如何合并这两种排序结果列表。
Elasticsearch 提供了内置方法,通过其 retrievers framework 来组合语义与全文检索策略。在本文中,我们将讨论 RRF 和 linear combination,这两种用于融合语义与 BM25 结果的方法。它们采用不同方式合并结果,具体选择取决于你的数据以及你愿意投入多少调优成本。
倒数排名融合 - Reciprocal rank fusion
RRF 是 推荐 的混合搜索起点,因为它忽略原始分数,仅基于排名位置进行合并。一个在语义检索中排第 3、在 BM25 中排第 5 的文档,会根据这两个位置计算综合得分,而不是依赖原始分数。这使它对不同评分尺度不敏感,几乎不需要调参,并且开箱即用效果良好。其代价是:RRF 会丢失分数的绝对大小信息,也就是说,在某个检索器中明显更高分的文档不会因为"分数差距更大"而获得额外优势。
weighted RRF 也被 Elasticsearch 支持,用于在需要增强某一检索器权重时使用,而无需切换到基于分数的融合方式。
def hybrid_search_rrf(query: str, size: int = 3):
    """Hybrid search using RRF."""

    response = es_client.search(
        index=INDEX_NAME,
        body={
            "retriever": {
                "rrf": {
                    "retrievers": [
                        {
                            "standard": {
                                "query": {
                                    "multi_match": {
                                        "query": query,
                                        "fields": ["title^2", "content"],
                                    }
                                }
                            }
                        },
                        {
                            "standard": {
                                "query": {
                                    "match": {"semantic_field": {"query": query}}
                                }
                            }
                        },
                    ],
                    "rank_window_size": 50,
                    "rank_constant": 20,
                }
            },
            "size": size,
            "_source": ["title", "category"],
        },
    )

    return response
使用 jina-reranker-v3 进行重排序
RRF 很快且稳定,但它是按位置进行排序的,并且无法建模某个文档到底在多大程度上真正回答了问题。reranker(重排序模型)可以解决这个问题。它会取出 RRF 产生的前 N 个候选结果,并使用一个 cross-encoder(交叉编码器)模型 对其重新打分。该模型会同时读取 query 和每一篇文档,从语义层面而不是排名位置层面生成一个 relevance score(相关性分数)。
jina-reranker-v3 可以通过 EIS 使用,并采用 listwise reranking(列表式重排序)。它可以在一次推理调用中最多评估 64 篇文档,并利用跨文档上下文,因此它看到的是整个 **candidate set(候选集合)**的全局信息,而不是对每篇文档独立打分。
首先,创建 reranker 推理 endpoint:
RERANKER_INFERENCE_ID = "jina-reranker-v3-endpoint"

reranker_config = {
    "service": "elastic",
    "service_settings": {"model_id": "jina-reranker-v3"},
}

try:
    es_client.inference.put(
        inference_id=RERANKER_INFERENCE_ID,
        task_type="rerank",
        body=reranker_config,
    )

    print(f"Created reranker endpoint: {RERANKER_INFERENCE_ID}")
except Exception as e:
    if "already_exists" in str(e).lower():
        print(f"Reranker endpoint already exists: {RERANKER_INFERENCE_ID}")
    else:
        raise
然后将 RRF 检索器包裹在 text_similarity_reranker 内:
def hybrid_search_with_reranking(query: str, size: int = 3):
    """Hybrid search: RRF retrieval followed by Jina Reranker v3."""
    response = es_client.search(
        index=INDEX_NAME,
        body={
            "retriever": {
                "text_similarity_reranker": {
                    "retriever": {
                        "rrf": {
                            "retrievers": [
                                {
                                    "standard": {
                                        "query": {
                                            "multi_match": {
                                                "query": query,
                                                "fields": ["title^2", "content"],
                                            }
                                        }
                                    }
                                },
                                {
                                    "standard": {
                                        "query": {
                                            "match": {"semantic_field": {"query": query}}
                                        }
                                    }
                                },
                            ],
                            "rank_window_size": 50,
                            "rank_constant": 20,
                        }
                    },
                    "field": "semantic_field",
                    "inference_id": RERANKER_INFERENCE_ID,
                    "inference_text": query,
                    "rank_window_size": 25,
                }
            },
            "size": size,
            "_source": ["title", "category"],
        },
    )

    return response
RRF 承担了主要的计算工作;它通过排序融合高效地将数千个候选结果缩小到前 25 个。然后 reranker 会同时读取 query 和 document,并基于真实语义相关性对这 25 个结果重新排序。
提示 5:使用 Agent Builder 添加 AI 推理能力
Elastic Agent Builder 允许你快速创建基于 LLM 的代理,这些代理使用你的 Elasticsearch 数据作为信息源,并通过自然语言进行查询。与 LangChain 或 LlamaIndex 不同(它们需要你自行提供 LLM、管理 prompt,并配置检索流程),Agent Builder 是原生集成在 Kibana 中的:它内置 tracing,直接使用你现有的 Elasticsearch 索引,并支持 Elasticsearch Query Language (ES|QL),可在语义搜索之外进行精确数据访问。它还通过 MCP(Model Context Protocol)服务器或 agent-to-agent(A2A)服务器与外部系统通信。
本教程中的 agent 默认使用 Elastic Managed LLM,它在 Elastic Cloud 上可用,无需额外配置 API key 或 connector。
headers = {
    "kbn-xsrf": "true",
    "Authorization": f"ApiKey {ELASTIC_API_KEY}",
    "Content-Type": "application/json",
}

# Create a custom ES|QL tool that returns articles filtered by publish date.
# Custom tools expose a specific parameterized query the agent can invoke safely,
# without giving it free-form access to the entire cluster.
esql_tool_payload = {
    "id": "tech-articles-recent",
    "type": "esql",
    "description": (
        "Returns recent articles from the knowledge base filtered by publish date. "
        "Use this when the user asks about recent content, articles from a specific "
        "time period, or wants to browse by date."
    ),
    "tags": ["analytics", "tech-articles"],
    "configuration": {
        "query": (
            "FROM tech-articles "
            "| WHERE published_date >= ?startDate "
            "| KEEP title, category, published_date "
            "| SORT published_date DESC "
            "| LIMIT ?limit"
        ),
        "params": {
            "startDate": {
                "type": "date",
                "description": "Start date for filtering articles (ISO 8601, e.g. 2024-01-01)",
            },
            "limit": {
                "type": "integer",
                "description": "Maximum number of articles to return",
            },
        },
    },
}

response = requests.post(
    f"{KIBANA_URL}/api/agent_builder/tools",
    headers=headers,
    json=esql_tool_payload,
)

if response.status_code == 200:
    print(f"Created custom ES|QL tool: {esql_tool_payload['id']}")
else:
    print(f"Error creating tool: {response.text}")

agent_payload = {
    "id": "tech-articles-assistant",
    "name": "Tech Articles Assistant",
    "description": "An AI assistant that helps users find information about technology topics from our knowledge base.",
    "configuration": {
        # Uses Elastic Managed LLM by default. No connector_id needed.
        "tools": [
            {
                "tool_ids": [
                    "platform.core.search",
                    "platform.core.execute_esql",
                    "tech-articles-recent",
                ]
            }
        ],
        "instructions": f"""You are a helpful assistant that answers questions about technology topics.

Use the search tool to find relevant articles from the '{INDEX_NAME}' index.
Use the tech-articles-recent tool when the user asks about recent or time-filtered content.
When searching, prefer semantic search for natural language questions.
Always cite the article titles when providing information.
If you cannot find relevant information, say so clearly.""",
    },
}

response = requests.post(
    f"{KIBANA_URL}/api/agent_builder/agents",
    headers=headers,
    json=agent_payload,
    verify=True,
)

if response.status_code == 200:
    agent_data = response.json()
    agent_id = agent_data.get("id")
    print(f"Created agent: {agent_id}")
else:
    print(f"Error creating agent: {response.text}")
    agent_id = None
创建完成后,你可以通过编程方式与该 agent 进行对话:
def chat_with_agent(agent_id: str, message: str):
    """Send a message to the agent and get a response."""
    chat_payload = {"input": message, "agent_id": agent_id}

    response = requests.post(
        f"{KIBANA_URL}/api/agent_builder/converse",
        headers=headers,
        json=chat_payload,
        verify=True,
    )

    if response.status_code == 200:
        return response.json()
    else:
        return {"error": response.text, "status_code": response.status_code}


# Example conversation
if agent_id:
    result = chat_with_agent(
        agent_id, "What are the best practices for building RAG applications?"
    )
    print(json.dumps(result, indent=2))
该 agent 具有三种工具的访问权限:
-
platform.core.search:用于在你的索引上进行语义与关键词搜索。 -
platform.core.execute_esql:用于通过 ES|QL 执行临时分析查询。 -
tech-articles-recent:一个自定义 ES|QL 工具,包含预定义查询,用于按日期过滤浏览。
LLM 会根据问题自动决定使用哪个工具。自定义工具可以让你以安全方式暴露特定查询模式,供 agent 调用。
什么时候使用 Agent Builder vs LangChain / LlamaIndex
当你需要原生 Kibana 集成、内置执行追踪,以及无需自定义工具即可直接使用 ES|QL 时,使用 Agent Builder。当你需要连接 Elasticsearch 之外的多个数据源、使用 Agent Builder 尚未支持的模型提供商,或需要更复杂的 agent 架构(例如多 agent 或反思循环等)时,使用 LangChain 或 LlamaIndex。
提示 6:使用 Elastic Workflows 实现自动化
搜索管道通常遵循一个重复模式:从外部数据源获取新数据、索引它,然后触发某些操作。你可以使用外部工具实现这一点,但 Elastic Workflows 提供了一种在 Elasticsearch 内部运行的 YAML 替代方案。
Workflows 是一个技术预览功能,允许你使用声明式 YAML 定义多步骤自动化流程。它支持 HTTP 调用、Elasticsearch 操作、条件逻辑、循环,以及(在这里最相关的)在步骤中调用 AI agent。
注意: 截至 Elasticsearch 9.3,Workflows 仍处于技术预览阶段。API 和 YAML 语法未来可能会发生变化。要启用 Workflows UI,请前往 Kibana:Stack Management > Advanced Settings ,并将
workflows:ui:enabled设置为true。详细信息见 这里。
下面的 workflow 是一个 Hacker News 摘要流程:它从 Hacker News API 获取前 5 个热门故事,将每个故事索引到 tech-articles 索引(通过 EIS 自动生成 embedding),然后让 AI agent 总结这些文章的主题。
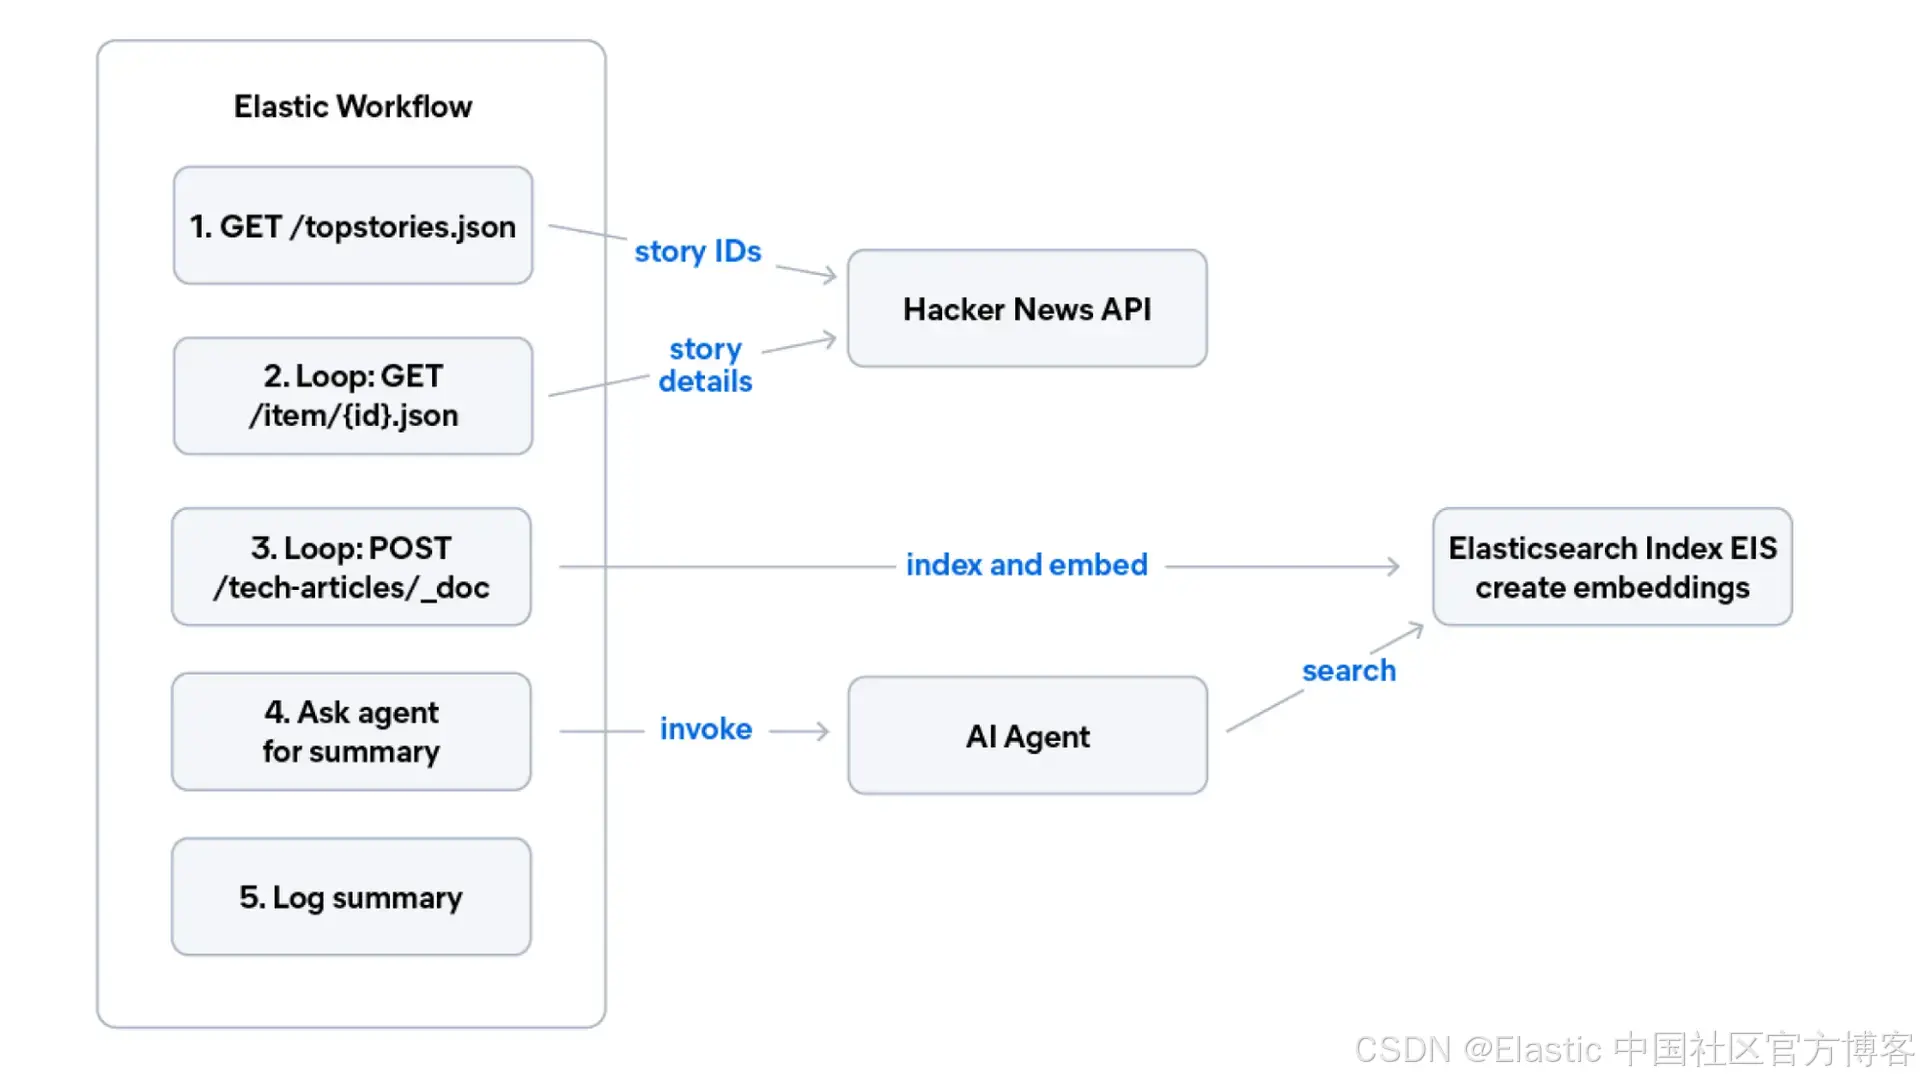
通过将 YAML 粘贴到 Kibana Workflows UI 中来创建此 workflow:
name: Hacker News Digest
description: >
  Fetches the latest top stories from the Hacker News public API, indexes them
  into Elasticsearch with semantic embeddings, then asks the AI agent to
  summarize the key themes from the freshly ingested content.
enabled: true
tags: ["ingestion", "hacker-news", "agent", "demo"]

consts:
  indexName: tech-articles
  hnApiBase: "https://hacker-news.firebaseio.com/v0"
  agentId: tech-articles-assistant

triggers:
  - type: manual   # change to "schedule" with a cron expression for automation

steps:
  # Step 1: Fetch top story IDs from Hacker News
  - name: fetch_top_stories
    type: http
    with:
      url: "{{ consts.hnApiBase }}/topstories.json"
      method: GET

  # Step 2: For each story ID, fetch details and index into Elasticsearch
  - name: process_stories
    type: foreach
    foreach: "${{ steps.fetch_top_stories.output.data | slice: 0, 5 }}"
    steps:
      - name: fetch_story_detail
        type: http
        with:
          url: "{{ consts.hnApiBase }}/item/{{ foreach.item }}.json"
          method: GET

      - name: index_story
        type: elasticsearch.request
        with:
          method: POST
          path: "/{{ consts.indexName }}/_doc"
          body:
            title: "{{ steps.fetch_story_detail.output.data.title }}"
            content: "{{ steps.fetch_story_detail.output.data.text | default: steps.fetch_story_detail.output.data.title }}"
            category: "hacker-news"
            url: "{{ steps.fetch_story_detail.output.data.url }}"

  # Step 3: Ask the agent to summarize the freshly indexed stories
  - name: ask_agent
    type: ai.agent
    with:
      agent_id: "{{ consts.agentId }}"
      message: "What are the main themes and topics from the latest Hacker News stories?"

  - name: log_summary
    type: console
    with:
      message: "${{ steps.ask_agent.output }}"
工作流中的 ai 步骤 会调用你在下一节中创建的 Agent Builder agent。这就是双向 agent-工作流模式 :Workflows 负责确定性任务(HTTP 调用、索引、循环),并将推理交给 agents;agents 负责开放性问题,并将结构化执行交给 workflows。
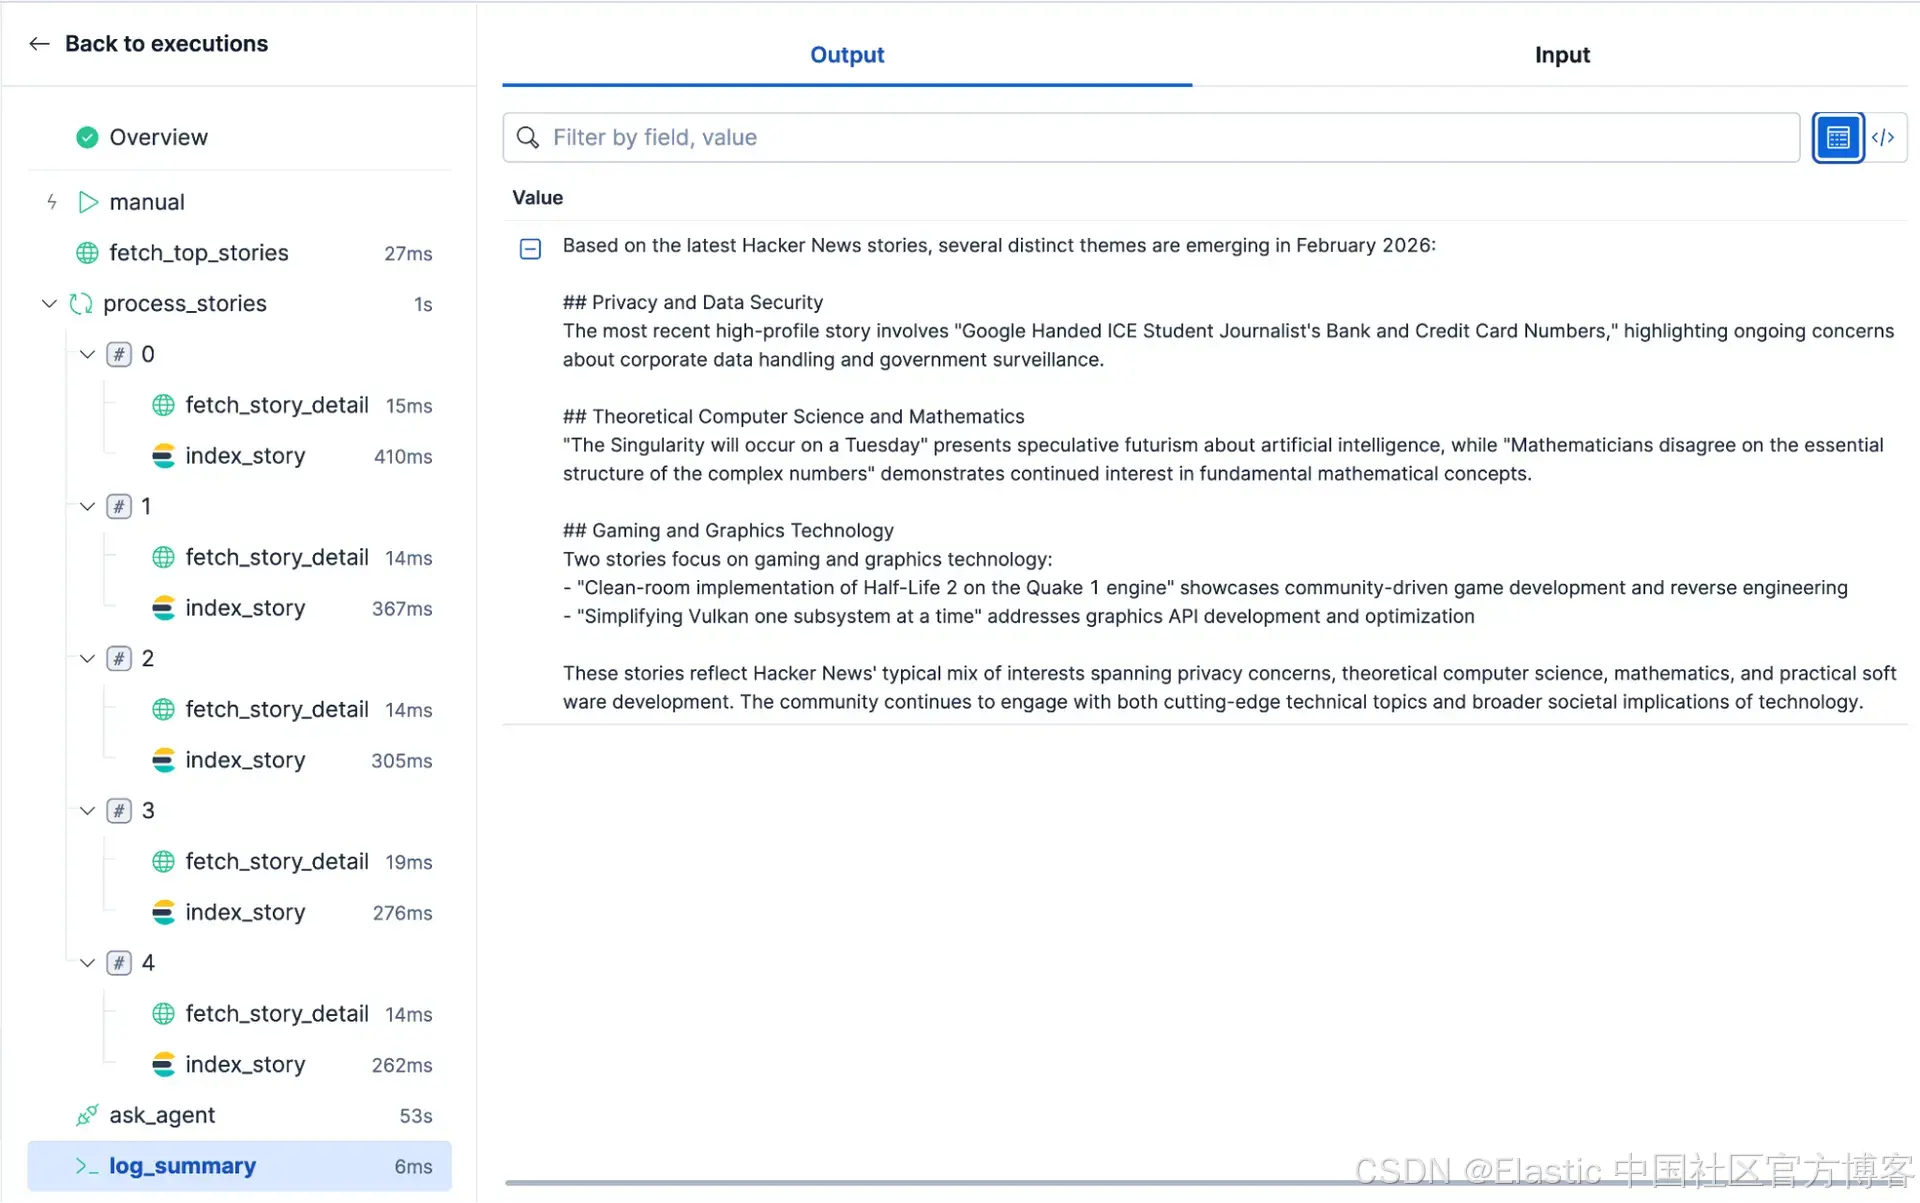
在这里你可以看到该 workflow 的最终结果:
结论
我们通过六个技巧完整讲解了如何构建一个现代 AI 搜索应用,并且完全基于 Elasticsearch 实现:从托管推理和支持混合搜索的索引设计,到可扩展的数据写入、基于 RRF 的混合检索,再到自动化工作流与 AI agent。这些实践组合在一起,你就可以在不依赖外部编排器、独立向量数据库或额外嵌入 API 账户的情况下,构建一个生产级 AI 搜索应用。
推荐阅读
-
深入了解 semantic text chunking index options 用于长文档的分块选项。
-
Weighted RRF 用于混合搜索相关性 fine-tuning。
-
Agent Builder GA announcement 获取完整功能概览。
-
jina-embeddings-v5-text models 于 2026 年 2 月刚刚发布。
原文:Vector search best practices for building a modern app - Elasticsearch Labs