第 1 讲 · 命令解析:pnpm dsh desktop 的第一步
系列 :我在Deepseek harness中增加了桌面版,将逐行代码解析我是怎么增加的,希望你也能创建属于自己的桌面版Agent
本讲目标 :从敲下
pnpm dsh desktop到parseDshArgs返回{ mode: 'profile', profile: 'desktop' },逐行看清命令是如何被解析、如何被路由到 desktop 特殊路径的。逐行文件 :
package.json(dsh script)→apps/cli/src/bin.ts(59 行,全行)→apps/cli/src/args.ts(209 行,关键段)
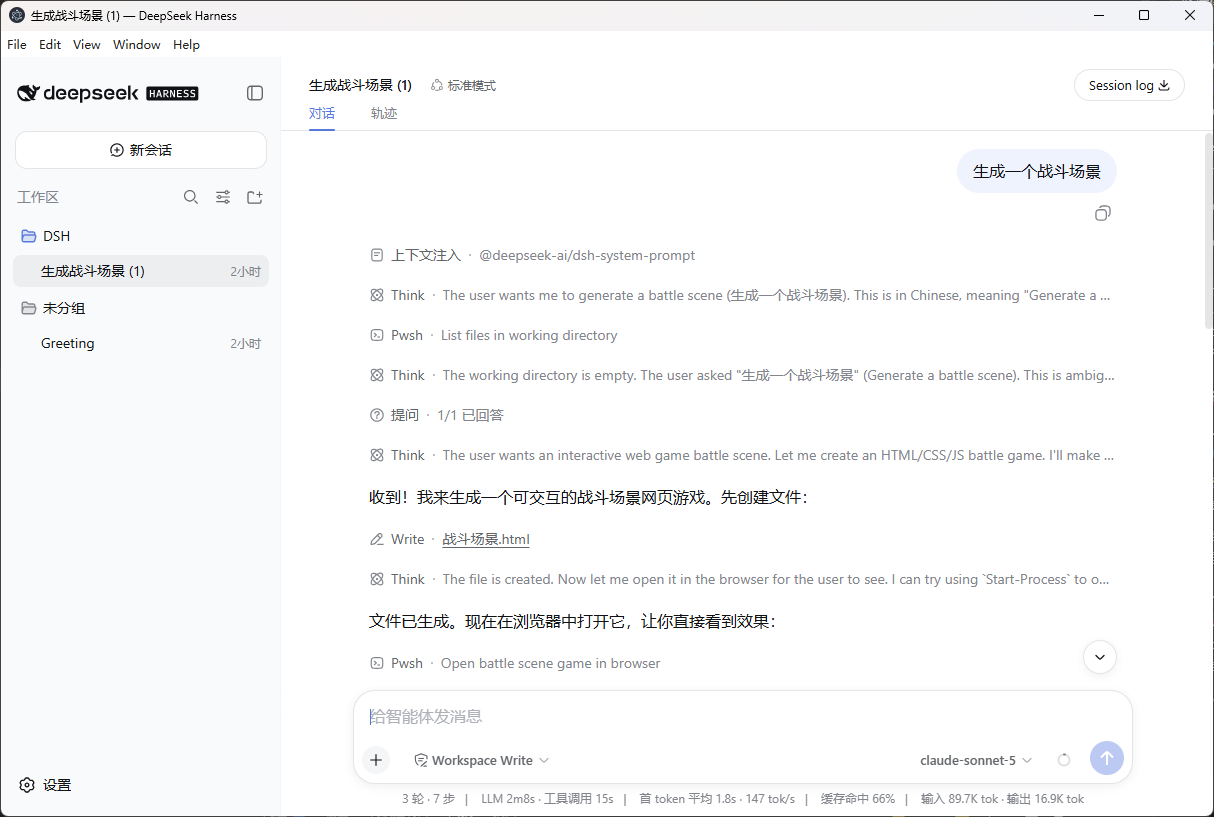
代码仓库 :https://github.com/tslcarmack/deepseek-harness-desktopDesktop App 运行效果图
🎯 本讲地图
你在终端输入                    实际发生
─────────────────────────────────────────────────────────────
pnpm dsh desktop    ──►   package.json 的 "dsh" script
                            └─► node --import tsx/esm apps/cli/src/bin.ts desktop
                                    └─► parseDshArgs(argv) → DshInvocation
                                            └─► mode: 'profile', profile: 'desktop'
                                                    └─► bin.ts switch → spawnDesktop()
📁 0. 起点:package.json 里的 "dsh" script
在仓库根目录 package.json(第 137 行附近):
json
"dsh": "node --import tsx/esm apps/cli/src/bin.ts",逐点拆解:
| 片段 | 含义 |
|---|---|
node |
用 Node.js 直接运行(非编译产物) |
--import tsx/esm |
Node 的 ESM loader 钩子:让 Node 能直接执行 .ts 源码,无需先 tsc 编译。这是"源码启动"的关键 ------所有 apps/cli/src/*.ts 都能被直接跑起来 |
apps/cli/src/bin.ts |
真正的 CLI 入口文件 |
desktop(命令参数) |
通过 pnpm 透传的参数,最终成为 process.argv 的一部分 |
💡 关键认知 :
pnpm dsh xxx本质 =node --import tsx/esm apps/cli/src/bin.ts xxx。之前启动 web 时pnpm dsh web也是同一入口,区别只在后面的子命令。这与直接跑构建产物node apps/cli/lib/bin.js是两条平行路径:源码路径(tsx)用于开发调试,构建路径(lib)用于发布。
📁 1. bin.ts 全行逐行(59 行)
文件:apps/cli/src/bin.ts
ts
1  #!/usr/bin/env node
 2  /**
 3   * dsh --- command-line entry. Dynamic imports per mode keep unrelated modes out
 4   * of each dispatch path; the adapter prints and exits for
 5   * `--help`/`--version`/a parse error, so only a valid mode reaches the switch.
 6   * @module @deepseek-ai/dsh/bin
 7   */
 8
 9  /* v8 ignore file -- built-bin acceptance exercises this self-executing dispatch. */
10
11  import { readFileSync } from 'node:fs'
12  import { fileURLToPath } from 'node:url'
13  import { loadLayeredEnv } from '@deepseek-ai/dsh-app-boot'
14  import { parseDshArgs } from './args.ts'
15
16  // Both the source tree (apps/cli/src) and the bundled bin (apps/cli/lib) sit
17  // one directory under apps/cli, so the checked-in manifest resolves with the
18  // same relative hop from either artifact.
19  /** This app's version, read from its checked-in package.json. */
20  function readVersion(): string {
21    const manifest = JSON.parse(
22      readFileSync(fileURLToPath(new URL('../package.json', import.meta.url)), 'utf8'),
23    ) as { version?: unknown }
24    return typeof manifest.version === 'string' ? manifest.version : '0.0.0'
25  }
26
27  const invocation = parseDshArgs(process.argv.slice(2), readVersion())
28
29  switch (invocation.mode) {
30    case 'profile': {
31      if (invocation.profile === 'desktop') {
32        const { spawnDesktop } = await import('./spawn-desktop.ts')
33        await spawnDesktop(invocation)
34        break
35      }
36      const { runProfile } = await import('./profile-boot.ts')
37      await runProfile({
38        environment: loadLayeredEnv('dsh'),
39        profile: invocation.profile,
40        patchFiles: invocation.patches,
41        args: invocation.args,
42      })
43      break
44    }
45    case 'plugin': {
46      const { runPlugin } = await import('./plugin.ts')
47      process.exit(runPlugin(invocation.profile, invocation.args))
48      break
49    }
50    case 'dump-config': {
51      const { runDumpConfig } = await import('./dump-config.ts')
52      runDumpConfig(invocation.profile, invocation.defaultOnly, invocation.patches)
53      break
54    }
55    default:
56      invocation satisfies never
57      throw new Error(`dsh: unhandled invocation mode ${JSON.stringify(invocation)}`)
58  }
逐段讲解
第 11-14 行 · 依赖导入
ts
import { readFileSync } from 'node:fs'
import { fileURLToPath } from 'node:url'
import { loadLayeredEnv } from '@deepseek-ai/dsh-app-boot'
import { parseDshArgs } from './args.ts'readFileSync/fileURLToPath:Node 内置,分别用于读文件、把 file URL 转成路径。loadLayeredEnv:来自@deepseek-ai/dsh-app-boot(packages/boot/app-boot),负责分层加载环境变量 (系统环境 →.env→ 显式覆盖)。./args.ts:注意带.ts后缀 ------这是仓库的 ESM 约定("type": "module"),tsx 加载器能直接解析。
第 20-25 行 · 读取版本号
ts
function readVersion(): string {
  const manifest = JSON.parse(
    readFileSync(fileURLToPath(new URL('../package.json', import.meta.url)), 'utf8'),
  ) as { version?: unknown }
  return typeof manifest.version === 'string' ? manifest.version : '0.0.0'
}
new URL('../package.json', import.meta.url):基于当前模块的 URL 定位apps/cli/package.json------注意注释里说的"src 和 lib 都位于 apps/cli 下一层",所以这条相对路径在源码与构建产物两种形态下都成立。这是双锚点设计(two-anchor)的体现。
第 27 行 · 解析命令(核心一行)
ts
const invocation = parseDshArgs(process.argv.slice(2), readVersion())process.argv.slice(2):去掉node和脚本路径后,剩余参数。对pnpm dsh desktop来说,这里就是['desktop']。- 返回的
invocation是判别联合(discriminated union) :ProfileInvocation | DumpConfigInvocation | PluginInvocation(见 args.ts 第 22-49 行)。
第 29-58 行 · 模式分发 switch
ts
switch (invocation.mode) {
  case 'profile': {
    if (invocation.profile === 'desktop') {
      const { spawnDesktop } = await import('./spawn-desktop.ts')
      await spawnDesktop(invocation)
      break
    }
...- 关键分叉点(第 31-35 行) :当 profile 是
desktop时,走特殊路径 ------await import('./spawn-desktop.ts')动态导入后调用spawnDesktop()。 - 为什么 desktop 特殊?因为 desktop 是 Electron 桌面应用:当前 Node 进程不直接 boot harness,而是 spawn 一个 Electron 进程,由 Electron 主进程来完成真正 boot(第 3 讲详解)。
- 其他 profile(web/headless/自定义)走第 36-43 行:动态导入
profile-boot.ts的runProfile(),当前进程直接 boot。 await import(...)动态导入:保证"无关模式不进内存"------跑 desktop 就不会加载 dump-config 的代码。- 第 55-57 行
invocation satisfies never:TypeScript 穷尽性检查,确保未来新增 mode 必须处理。
📁 2. args.ts 关键段逐行
文件:apps/cli/src/args.ts(209 行,这里只贴 desktop 相关关键段)
2.1 解析入口 parseDshArgs(第 114-147 行)
ts
114  export function parseDshArgs(argv: readonly string[], version: string): DshInvocation {
115    let resolved: DshInvocation | undefined
118    const program: Command = new Command()
119    program
120      .name('dsh')
121      .version(version, '-V, --version', 'output the version number')
122      .description('dsh: boot a DeepSeek Harness profile --- an ordered stack of plugin-bundle patch layers under your own overrides.')
124      .exitOverride()
128      .helpOption(false)
129      .allowUnknownOption()
130      .passThroughOptions()
131      .enablePositionalOptions()
132      .argument('[args...]', 'arguments for the booted profile\'s app (see: dsh --profile  --help)')
133      .option('--profile ', 'the profile under $DSH_HOME/profiles to boot')
134      .option('--patch ', 'extra patch-list overlay applied after the profile layer (repeatable)', collect)
135      .option('--dump-config', 'print the composed profile tree and exit')
136      .option('--dump-default-config', 'print the profile tree without its user layer or --patch overlays and exit')
137      .action((args: string[], options: BootOptions & { profile?: string }) => {
140        if (options.profile === undefined) {
141          if (args.some(argument => argument === '-h' || argument === '--help')) program.help()
142          program.error('error: --profile  is required')
143        }
144        const profile = options.profile
145        if (profile === '') program.error('error: --profile needs a name')
146        resolved = resolveBoot(program, profile, options, args)
147      })
逐点拆解(desktop 相关的设计意图):
| 配置项 | 作用 | 为什么重要 |
|---|---|---|
.exitOverride() |
不让 commander 直接 process.exit,而是抛 CommanderError |
由第 202-204 行 catch 后统一处理退出码 |
.helpOption(false) |
禁用默认 -h |
关键设计:-h 要留给 app 自己的 help(dsh desktop --help 打印的是 desktop app 的帮助) |
.allowUnknownOption() + .passThroughOptions() |
遇到不认识的选项不报错,直接透传 | 内层 app 参数可以原样穿过(如 dsh desktop --resume abc) |
.enablePositionalOptions() |
位置参数优先于选项 | 保证 [args...] 能捕获剩余参数 |
.option('--patch ', ..., collect) |
可重复的 --patch |
collect(第 62 行)是单值收集器,故意不用 variadic ,否则 --patch 会吞掉内层参数 |
2.2 desktop 子命令定义(第 173-186 行)
ts
173  const desktop = program.command('desktop').description('boot the desktop profile (alias of --profile desktop); spawns Electron')
174  desktop
175    .helpOption(false)
176    .allowUnknownOption()
177    .passThroughOptions()
178    .enablePositionalOptions()
179    .argument('[args...]', 'arguments for the desktop app (see: dsh desktop --help)')
180    .option('--patch ', 'extra patch-list overlay applied after the profile layer (repeatable)', collect)
181    .option('--dump-config', 'print the composed desktop-profile tree (with the user layer and any --patch) and exit')
182    .option('--dump-default-config', 'print the desktop profile\'s bundle layers (no user layer) and exit')
183    .action((args: string[], options: BootOptions) => {
184      rejectParentOptions('desktop')
185      resolved = resolveBoot(desktop, 'desktop', options, args)
186    })
逐点拆解:
- 第 173 行 :注册
desktop子命令,description 明确点出"spawns Electron"------这是与 web 最大的行为差异。 - 第 183-186 行 action :
rejectParentOptions('desktop')(第 150-156 行定义):拒绝父级命令携带--profile/--patch/--dump-*------防止dsh --profile web desktop这种歧义组合。resolveBoot(desktop, 'desktop', options, args):硬编码 profile 为'desktop',返回{ mode: 'profile', profile: 'desktop', ... }。
2.3 resolveBoot(第 85-105 行,已在上文贴出)
决策逻辑:
- 有
--patch但值为空 → 报错(第 87 行) - 无 dump 选项 → 返回
mode: 'profile'(真正启动) --dump-config/--dump-default-config互斥检查(第 91-93 行)- dump 模式不接受 app 参数(第 97-99 行)------因为 dump 不 boot,无法模拟 app 参数的效果
--dump-default-config不接受--patch(第 101-103 行)
🖼️ 第 1 讲依赖图
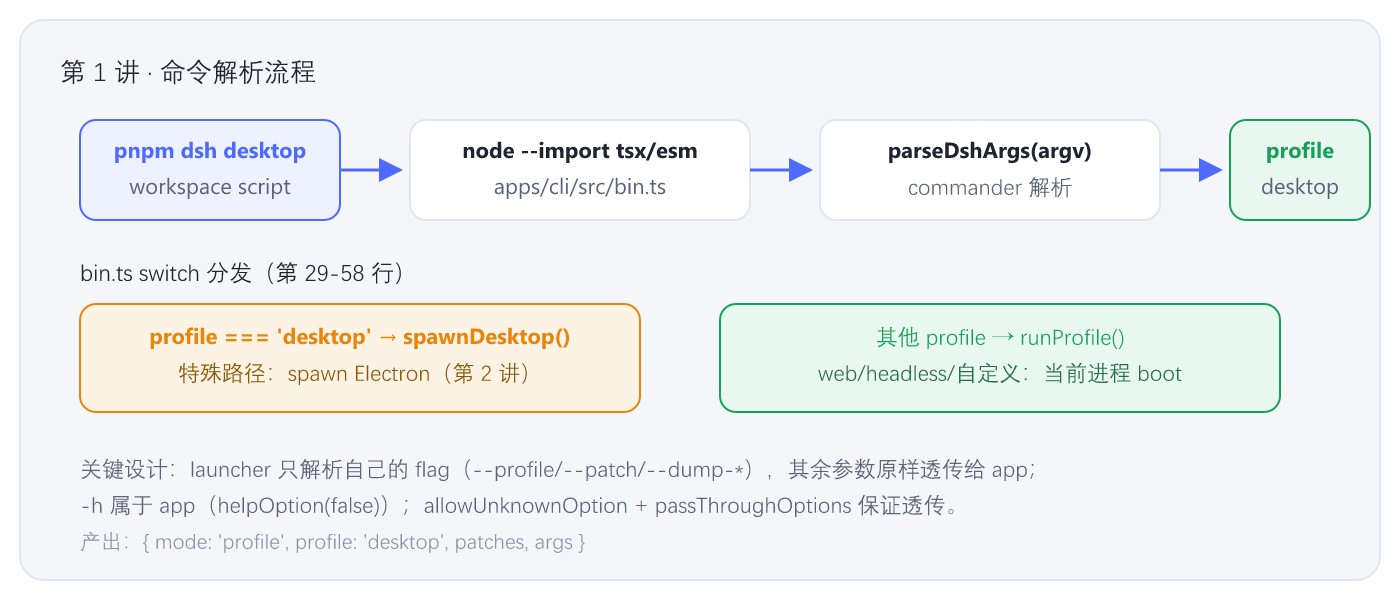
图 1-1 · 从命令到 invocation 的完整解析流程
⚙️ 机制小结
- 双锚点设计 :
bin.ts与args.ts的相对路径同时适用于源码(src)与构建(lib)两种形态,发布与开发共用一套逻辑。 - launcher 只管"壳" :解析器只认
--profile/--patch/--dump-*这几个属于 launcher 自己的 flag;其余参数原样透传 给 booted app,由 app 插件自己解析(dsh-cmdline)。 - desktop 是特殊分支 :
mode === 'profile'且profile === 'desktop'时,不走runProfile的常规路径,而是spawnDesktop()------当前进程只负责拉起 Electron 并等待退出。 - 动态导入按需加载 :每个 mode 的文件都是
await import(),保证无关代码不进内存。 - 判别联合 + 穷尽检查 :
DshInvocation是三种模式的 union,satisfies never保证新增模式必须显式处理。
🧪 动手验证
sh
# 1) 看 dsh 自身的帮助(注意:看不到 -h,因为 -h 属于 app)
cd D:\code\deepseek-harness
npx pnpm@11.7.0 dsh --help

# 2) 验证 desktop 是 --profile desktop 的别名(输出 Usage 首行即可证明)
npx pnpm@11.7.0 dsh desktop --help

# 3) 验证 dump 模式不接受参数
npx pnpm@11.7.0 dsh desktop --dump-config some-arg   # 应报错

# 4) 看 desktop profile 组合后的插件树(不启动 Electron,纯 Node 打印)
node apps/cli/lib/bin.js --profile desktop --dump-config | head -30
⚠️ 注意:真正执行
npx pnpm@11.7.0 dsh desktop会 spawn Electron,需要pnpm approve-builds+pnpm --filter @deepseek-ai/dsh-desktop rebuild安装 Electron 二进制(第 2 讲详解)。没有 Electron 时--dump-config仍可在纯 Node 下运行。
📚 深入指引
| 文件 | 作用 |
|---|---|
apps/cli/src/bin.ts |
入口分发(本讲已全行) |
apps/cli/src/args.ts |
Commander 解析(本讲已关键段) |
apps/cli/src/profile-boot.ts |
常规 profile 的 boot 流程(第 4 讲) |
apps/cli/src/spawn-desktop.ts |
desktop 特殊路径(第 2 讲全行) |
packages/boot/app-boot/ |
loadLayeredEnv 等启动工具的实现(第 4 讲) |
下一讲预告 :spawnDesktop() 内部到底做了什么------为什么 Electron 二进制找不到会给出三条不同的报错提示、tsx loader 是如何通过 NODE_OPTIONS 透传给 Electron 主进程的。