系列文章目录
- 【扩散模型(一)】中介绍了 Stable Diffusion 可以被理解为重建分支(reconstruction branch)和条件分支(condition branch)
- 【扩散模型(二)】IP-Adapter 从条件分支的视角,快速理解相关的可控生成研究
- 【扩散模型(三)】IP-Adapter 源码详解1-训练输入 介绍了训练代码中的 image prompt 的输入部分,即 img projection 模块。
- 【扩散模型(四)】IP-Adapter 源码详解2-训练核心(cross-attention)详细介绍 IP-Adapter 训练代码的核心部分,即插入 Unet 中的、针对 Image prompt 的 cross-attention 模块。
- 【扩散模型(五)】IP-Adapter 源码详解3-推理代码 详细介绍 IP-Adapter 推理过程代码。
- 本系列文章将介绍 SD3 源码的推理过程,包括文本处理部分(encode_prompt)、提供时间步的 Scheduler(FlowMatchEulerDiscreteScheduler)、代替 Unet 的主干网络 (SD3Transformer2DModel),而本文重点为文本 (caption/prompt) 处理部分。
文章目录
- 系列文章目录
- 前言
- 一、文本处理的整体流程
- [二、Text Encoder 1、2(CLIP)](#二、Text Encoder 1、2(CLIP))
-
- [1. 模型部分](#1. 模型部分)
- [2. 两个 Text Encoder 的输入和输出](#2. 两个 Text Encoder 的输入和输出)
- [三、Text Encoder 3(T5)](#三、Text Encoder 3(T5))
- 其他
前言
下图为《Scaling Rectified Flow Transformers for High-Resolution Image Synthesis》 (ICML 2024 )中的 SD3 架构图。

一、文本处理的整体流程
下面流程图只对正向提示词进行了梳理,负向提示词的流程并无差异。

本文分析的源代码为 diffusers 包中的 SD3 pipeline (位置在/path/to/diffusers/pipelines/stable_diffusion_3/pipeline_stable_diffusion_3.py),文本处理部分主要为 其中 __call__() 函数调用的 self.encode_prompt() 函数,主要涉及了 3 个 text encoder 以及对应的 3 个 tokenizer。
其输入输出如下:
python
 (
     prompt_embeds,
     negative_prompt_embeds,
     pooled_prompt_embeds,
     negative_pooled_prompt_embeds,
 ) = self.encode_prompt(
     prompt=prompt,
     prompt_2=prompt_2,
     prompt_3=prompt_3,
     negative_prompt=negative_prompt,
     negative_prompt_2=negative_prompt_2,
     negative_prompt_3=negative_prompt_3,
     do_classifier_free_guidance=self.do_classifier_free_guidance,
     prompt_embeds=prompt_embeds,
     negative_prompt_embeds=negative_prompt_embeds,
     pooled_prompt_embeds=pooled_prompt_embeds,
     negative_pooled_prompt_embeds=negative_pooled_prompt_embeds,
     device=device,
     clip_skip=self.clip_skip,
     num_images_per_prompt=num_images_per_prompt,
     max_sequence_length=max_sequence_length,
 )
输入:
- 其中 prompt 和 negative_prompt 为输入的字符串
- 其他的 prompt_2、 prompt_3、 negative_prompt_2、 negative_prompt_3、prompt_embeds、 negative_prompt_embeds、pooled_prompt_embeds、negative_pooled_prompt_embeds 均为 None
- do_classifier_free_guidance 一般都是 True
- max_sequence_length = 256
具体而言是在 encode_prompt 函数中,通过两次 _get_clip_prompt_embeds 和 _get_t5_prompt_embeds 来调用 3 个 Text Encoder。
python
prompt_embed, pooled_prompt_embed = self._get_clip_prompt_embeds(
    prompt=prompt,
    device=device,
    num_images_per_prompt=num_images_per_prompt,
    clip_skip=clip_skip,
    clip_model_index=0,
)
prompt_2_embed, pooled_prompt_2_embed = self._get_clip_prompt_embeds(
    prompt=prompt_2,
    device=device,
    num_images_per_prompt=num_images_per_prompt,
    clip_skip=clip_skip,
    clip_model_index=1,
)
clip_prompt_embeds = torch.cat([prompt_embed, prompt_2_embed], dim=-1)

t5_prompt_embed = self._get_t5_prompt_embeds(
    prompt=prompt_3,
    num_images_per_prompt=num_images_per_prompt,
    max_sequence_length=max_sequence_length,
    device=device,
)
二、Text Encoder 1、2(CLIP)
1. 模型部分
- 根据输入的 clip_tokenizers、clip_text_encoders 序号分别选择
text_encoder(CLIP L/14[1](#1)) 或者text_encoder_2(OpenCLIP bigG/14[2](#2))。 - 从下面初始化代码可以看出,二者
text_encoder和text_encoder_2采用的类一致,所以二者的区别主要是模型权重以及 config 不同。
python
...
def __init__(...
     text_encoder: CLIPTextModelWithProjection,
     tokenizer: CLIPTokenizer,
     text_encoder_2: CLIPTextModelWithProjection,
     tokenizer_2: CLIPTokenizer,
...

 def _get_clip_prompt_embeds(
     self,
     prompt: Union[str, List[str]],
     num_images_per_prompt: int = 1,
     device: Optional[torch.device] = None,
     clip_skip: Optional[int] = None,
     clip_model_index: int = 0,
 ):
     device = device or self._execution_device

     clip_tokenizers = [self.tokenizer, self.tokenizer_2]
     clip_text_encoders = [self.text_encoder, self.text_encoder_2]

     tokenizer = clip_tokenizers[clip_model_index]
     text_encoder = clip_text_encoders[clip_model_index]
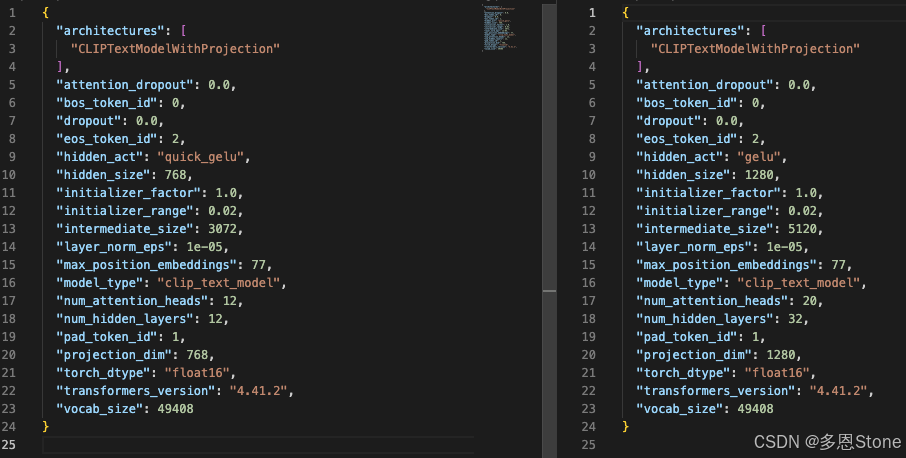
在下载的 SD3 模型权重文件中,/path/to/stable-diffusion-3-medium-diffusers 可以找到 text_encoder 和 text_encoder_2 子目录,对比其中的 config(下图中左边为 text_encoder ,右边为 text_encoder_2 ),可以知道二者更具体的不同之处:
- hidden_size 不同:768 vs 1280
- hidden_act: quick_gelu vs gelu
- intermediate_size 不同:3072 vs 5120
- "num_attention_heads" 和 "num_hidden_layers":12/12 vs 20/32
- projection_dim 不同:768 vs 1280
- 从以上 config 中,可以明显看出
text_encoder_2(OpenCLIP bigG/14) 确实更加 big。 - 两个 Text Encoder 最终的输出也和上文 "一、文本处理的整体流程 " 中的流程图一致,分别输出 [n, 77, 768 ] 和 [n, 77, 1280]。
- n 为推理时的 num_images_per_prompt,每个 prompt 的出图数量。

2. 两个 Text Encoder 的输入和输出
- 二者的输入是相同的
prompt,得到输出为不同的两对prompt_embed, pooled_prompt_embed;prompt_2_embed, pooled_prompt_2_embed。 - 其中,
- prompt_embed [n, 77, 768 ] 和 prompt_2_embed [n, 77, 1280]为主要的 prompt 特征,并在后续 cat 到一起,得到 clip_prompt_embeds [n, 77, 2048]。
- pooled_prompt_embed 和 pooled_prompt_2_embed 也一样 cat,
- 两种特质的区别:prompt_embed(prompt_2_embed)是更主要/细粒度的文本特征 、而 pooled_prompt_embed(pooled_prompt_2_embed)是更粗粒度的文本特征。
- 原文:However, as the
pooled text representationretains onlycoarse-grainedinformation about the text input [3](#3), the network also requires information from the sequence representation c t x t c_{txt} ctxt.
python
prompt_embed, pooled_prompt_embed = self._get_clip_prompt_embeds(
    prompt=prompt,
    device=device,
    num_images_per_prompt=num_images_per_prompt,
    clip_skip=clip_skip,
    clip_model_index=0,
)
prompt_2_embed, pooled_prompt_2_embed = self._get_clip_prompt_embeds(
    prompt=prompt_2,
    device=device,
    num_images_per_prompt=num_images_per_prompt,
    clip_skip=clip_skip,
    clip_model_index=1,
)
clip_prompt_embeds = torch.cat([prompt_embed, prompt_2_embed], dim=-1)
...
pooled_prompt_embeds = torch.cat([pooled_prompt_embed, pooled_prompt_2_embed], dim=-1)
三、Text Encoder 3(T5)
T5EncoderModel 的调用则更简洁一点,输入同样是 prompt,并且只有一个输出。
python
def __init__(...
	text_encoder_3: T5EncoderModel,
       tokenizer_3: T5TokenizerFast,
...

t5_prompt_embed = self._get_t5_prompt_embeds(
    prompt=prompt_3,
    num_images_per_prompt=num_images_per_prompt,
    max_sequence_length=max_sequence_length,
    device=device,
)

# 实际为 clip_prompt_embeds = torch.nn.functional.pad(
#    clip_prompt_embeds, (0, 4096-2048)
#),即在后面 2048 个维度上 pad 全 0.
clip_prompt_embeds = torch.nn.functional.pad(
    clip_prompt_embeds, (0, t5_prompt_embed.shape[-1] - clip_prompt_embeds.shape[-1])
)

# 在序列长度的维度(-2)上 cat 到一起,得到 77+256 = 333 的长度
prompt_embeds = torch.cat([clip_prompt_embeds, t5_prompt_embed], dim=-2)- 作用:增强对复杂文本的生成能力。
- 原文:T5 对于复杂的提示词很重要,例如涉及高度细节或拼写较长的文本(第2行和第3行)。然而,对于大多数提示,作者发现在推理时删除T5仍然可以获得具有竞争力的性能。

其他
强烈安利另外一位博主的文章:
-
Learning transferable visual models from natural language supervision, 2021. ↩︎
-
Reproducible scaling laws for contrastive language-image learning. In 2023 IEEE/CVF Conference on Computer Vision and Pattern Recognition (CVPR). IEEE, 2023. doi: 10.1109/cvpr52729.2023.00276. URL http://dx.doi.org/10.1109/CVPR52729.2 023.00276. ↩︎
-
Sdxl: Improving latent diffusion models for high-resolution image synthesis, 2023. ↩︎