简介
基于计算机视觉的表情识别系统,该系统能够从视频流中实时检测人脸,并识别出两种基本表情:大笑和微笑。实验通过分析人脸关键点来计算表情特征指标,从而判断表情类型。
原理
基于以下原理进行:
- 人脸检测 :使用dlib库的
get_frontal_face_detector函数检测视频中的人脸。 - 特征点预测 :使用dlib库的
shape_predictor函数预测人脸的68个关键点。 - 表情特征计算 :
- 嘴巴张开程度(MAR) :通过计算嘴巴周围特定点之间的欧几里得距离来衡量嘴巴的张开程度。
- 计算上下嘴唇的距离

- 计算嘴唇的长度

- 计算上下嘴唇的距离
- 嘴巴宽度与脸部宽度的比例(MJR) :通过比较嘴巴宽度和脸部宽度的比例来识别微笑表情。

- 嘴巴张开程度(MAR) :通过计算嘴巴周围特定点之间的欧几里得距离来衡量嘴巴的张开程度。
- 表情判断:根据计算出的特征指标,结合预设的阈值判断表情类型。
代码步骤:
1.导入必要的库:
python
import numpy as np
import cv2
from sklearn.metrics.pairwise import euclidean_distances
from PIL import Image, ImageDraw, ImageFont
import dlib2.定义MAR函数:
函数计算嘴巴张开的程度(MAR),通过计算嘴巴周围特定点之间的距离。
python
def MAR(shape):
    A = euclidean_distances(shape[50].reshape(1, 2), shape[58].reshape(1, 2))
    B = euclidean_distances(shape[51].reshape(1, 2), shape[57].reshape(1, 2))
    C = euclidean_distances(shape[52].reshape(1, 2), shape[56].reshape(1, 2))
    D = euclidean_distances(shape[48].reshape(1, 2), shape[54].reshape(1, 2))
return ((A + B + C) / 3) / D3.定义MJR函数:
函数计算嘴巴宽度与脸部宽度的比例(MJR),用于判断微笑的程度。
python
def MJR(shape):
    m = euclidean_distances(shape[48].reshape(1, 2), shape[54].reshape(1, 2))
    j = euclidean_distances(shape[3].reshape(1, 2), shape[13].reshape(1, 2))
return m / j4.定义cv2addchinese函数:
检查图像类型并转换:
python
def cv2addchinese(img, text, position, textColor=255, textSize=30):
    if isinstance(img, np.ndarray):
        if len(img.shape) == 2:  # 灰度图像
            img_pil = Image.fromarray(img)
        else:  # 彩色图像
            img_pil = Image.fromarray(cv2.cvtColor(img, cv2.COLOR_BGR2RGB))
    else:
        raise ValueError("img must be a numpy array")
创建了一个 ImageDraw 对象用于在PIL图像上绘制,加载了一个中文字体文件,在指定位置绘制文本。
python
    draw = ImageDraw.Draw(img_pil)
    fontstyle = ImageFont.truetype("simsun.ttc", textSize, encoding="utf-8")
    draw.text(position, text, font=fontstyle, fill=textColor)
将PIL图像转换回OpenCV图像,如果原图像是灰度图,直接转换即可;如果是彩色图,则需要从RGB色彩空间转换回BGR色彩空间。
python
    if len(img.shape) == 2:  # 灰度图像
        img_cv2 = np.array(img_pil, dtype=np.uint8)
    else:  # 彩色图像
        img_cv2 = cv2.cvtColor(np.array(img_pil), cv2.COLOR_RGB2BGR)
    return img_cv2
5.初始化人脸检测器和特征点预测器:
python
detector = dlib.get_frontal_face_detector()
predictor = dlib.shape_predictor("shape_predictor_68_face_landmarks.dat")
cap = cv2.VideoCapture('xiao.mp4')
6.读取视频帧并检测人脸:
python
while True:
    ret, image = cap.read()
    faces = detector(image, 0)
    for face in faces:
        #获取特征点
        shape = predictor(image, face)
        #将 predictor 返回的特征点横坐标与纵坐标转换为NumPy数组
        shape = np.array([[p.x, p.y] for p in shape.parts()])
7.计算表情指标并绘制结果:
根据MAR和MJR的值来判断表情类型
python
mar = MAR(shape)
mjr = MJR(shape)
result = '正常'
print("mar", mar, "\tmjr", mjr)
if mar > 0.5:
result = "大笑"
elif mjr > 0.45:
result = "微笑"
#计算嘴巴的凸包
mouth = cv2.convexHull(shape[48:61])
#在图像上添加表情文本
image = cv2addchinese(image, result, mouth[0,0])
#绘制嘴巴轮廓
cv2.drawContours(image, [mouth], -1, (0, 255, 0), 1)
cv2.imshow('frame', image)
key = cv2.waitKey(60)
if key == 27:
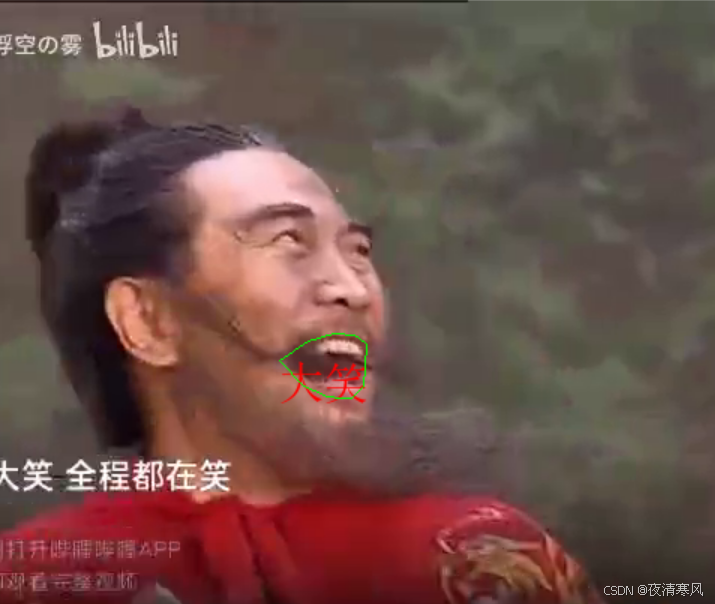
break运行结果
完整代码
python
import numpy as np
import cv2
from sklearn.metrics.pairwise import euclidean_distances
from PIL import Image, ImageDraw, ImageFont
import dlib


def MAR(shape):
    A = euclidean_distances(shape[50].reshape(1, 2), shape[58].reshape(1, 2))
    B = euclidean_distances(shape[51].reshape(1, 2), shape[57].reshape(1, 2))
    C = euclidean_distances(shape[52].reshape(1, 2), shape[56].reshape(1, 2))
    D = euclidean_distances(shape[48].reshape(1, 2), shape[54].reshape(1, 2))
    return ((A + B + C) / 3) / D


def MJR(shape):
    m = euclidean_distances(shape[48].reshape(1, 2), shape[54].reshape(1, 2))
    j = euclidean_distances(shape[3].reshape(1, 2), shape[13].reshape(1, 2))
    return m / j


def cv2addchinese(img, text, position, textColor=255, textSize=30):
    if isinstance(img, np.ndarray):
        if len(img.shape) == 2:  # 灰度图像
            img_pil = Image.fromarray(img)
        else:  # 彩色图像
            img_pil = Image.fromarray(cv2.cvtColor(img, cv2.COLOR_BGR2RGB))
    else:
        raise ValueError("img must be a numpy array")

    draw = ImageDraw.Draw(img_pil)
    fontstyle = ImageFont.truetype("simsun.ttc", textSize, encoding="utf-8")
    draw.text(position, text, font=fontstyle, fill=textColor)

    # 将PIL图像转换回OpenCV图像
    if len(img.shape) == 2:  # 灰度图像
        img_cv2 = np.array(img_pil, dtype=np.uint8)
    else:  # 彩色图像
        img_cv2 = cv2.cvtColor(np.array(img_pil), cv2.COLOR_RGB2BGR)

    return img_cv2


detector = dlib.get_frontal_face_detector()
predictor = dlib.shape_predictor("shape_predictor_68_face_landmarks.dat")
cap = cv2.VideoCapture('xiao.mp4')

while True:
    ret, image = cap.read()
    faces = detector(image, 0)
    for face in faces:
        shape = predictor(image, face)
        shape = np.array([[p.x, p.y] for p in shape.parts()])
        mar = MAR(shape)
        mjr = MJR(shape)
        result = '正常'
        print("mar", mar, "\tmjr", mjr)
        if mar > 0.5:
            result = "大笑"
        elif mjr > 0.45:
            result = "微笑"

        mouth = cv2.convexHull(shape[48:61])

        image = cv2addchinese(image, result, mouth[0,0])
        cv2.drawContours(image, [mouth], -1, (0, 255, 0), 1)
    cv2.imshow('frame', image)
    key = cv2.waitKey(60)
    if key == 27:
        break
改进方法:
- 提高特征点预测的稳定性:考虑使用更先进的特征点预测模型。
- 优化表情识别算法:使用深度学习模型来提高表情识别的准确性。
- 改进阈值设置:根据实际应用场景调整MAR和MJR的阈值,以提高识别准确率。
- 增强系统的鲁棒性:通过算法优化,提高系统在不同光照和表情变化下的鲁棒性。