Unity中的UI工具包(UI Toolkit)不但可以用于创建编辑器UI,同样可以来创建运行时UI。
关于Unity中的UI系统以及使用UI工具包创建编辑器UI可以参见:
本文将通过一个简单示例来介绍如何使用UI工具包来创建运行时UI。
一、创建UI Document(.uxml)
-
使用任意模板新建一个Unity项目。
-
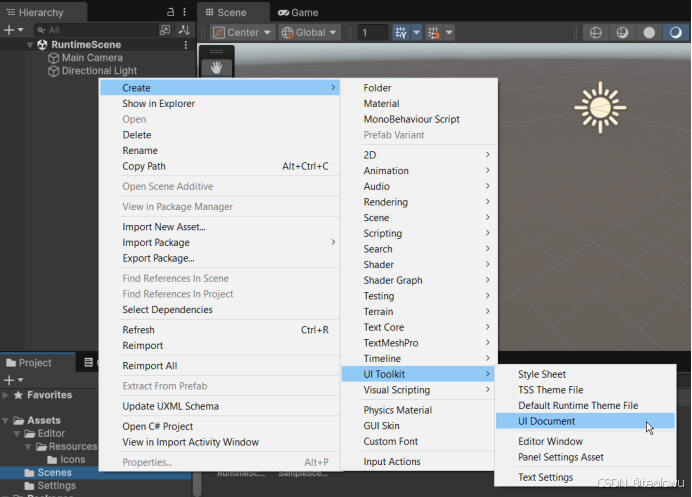
在Project 中,右键点击Scene ,选择Create > UI Toolkit > UI Document ,命名为SimpleRuntimeUI。
- 在Project 里,点击SimpleRuntimeUI 右侧箭头展开后,双击inlineStyle,在文本编辑器里打开。并将文件内容替换为下面代码。
|-----------------------------------------------------------------------------------------------------------------------------------------------------------------------------------------------------------------------------------------------------------------------------------------------------------------------------------------------------------------------------------------------------------------------------------------------------------------------------------------------------------------------------------------------------------------------------------------------------------------------------------------------------------------------------------------------------------|
| <ui:UXML xmlns:ui="UnityEngine.UIElements" xmlns:uie="UnityEditor.UIElements" xsi="http://www.w3.org/2001/XMLSchema-instance" engine="UnityEngine.UIElements" editor="UnityEditor.UIElements" noNamespaceSchemaLocation="../UIElementsSchema/UIElements.xsd" editor-extension-mode="False"> <ui:VisualElement style="flex-grow: 1;"> <ui:Label text="This is a Label" display-tooltip-when-elided="true"/> <ui:Button text="This is a Button" display-tooltip-when-elided="true" name="button"/> <ui:Toggle label="Display the counter?" name="toggle"/> <ui:TextField picking-mode="Ignore" label="Text Field" text="filler text" name="input-message" /> </ui:VisualElement> </ui:UXML> |
二、将UI Document与场景关联
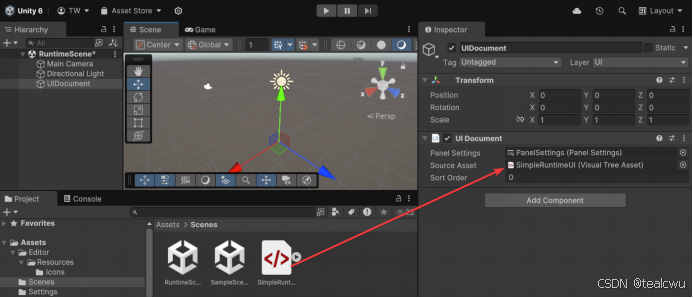
- 在场景中,选择菜单GameObject > UI Toolkit > UI Document ,新建一个对象。在Hierarchy中选择UIDocument,将Project 中的SimpleRuntimeUI.uxml 拖到Inspector 中的Source Asset中。
三、创建MonoBehaviour脚本
-
选择菜单Assets > Create > Scripting > Monobehaviour Script ,创建脚本并命名为SimpleRuntimeUI.cs。
-
双击SimpleRuntimeUI.cs,打开后将内容替换为下面代码。
|-------------------------------------------------------------------------------------------------------------------------------------------------------------------------------------------------------------------------------------------------------------------------------------------------------------------------------------------------------------------------------------------------------------------------------------------------------------------------------------------------------------------------------------------------------------------------------------------------------------------------------------------------------------------------------------------------------------------------------------------------------------------------------------------------------------------------------------------------------------------------------------------------------------------------------------------------------------------------------------------------------------------------------------------------------------------------------------------------------|
| using UnityEngine; using UnityEngine.UIElements; public class SimpleRuntimeUI : MonoBehaviour { private Button _button; private Toggle _toggle; private int _clickCount; //Add logic that interacts with the UI controls in the `OnEnable` methods private void OnEnable() { // The UXML is already instantiated by the UIDocument component var uiDocument = GetComponent<UIDocument>(); _button = uiDocument.rootVisualElement.Q("button") as Button; _toggle = uiDocument.rootVisualElement.Q("toggle") as Toggle; _button.RegisterCallback<ClickEvent>(PrintClickMessage); var _inputFields = uiDocument.rootVisualElement.Q("input-message"); _inputFields.RegisterCallback<ChangeEvent<string>>(InputMessage); } private void OnDisable() { _button.UnregisterCallback<ClickEvent>(PrintClickMessage); } private void PrintClickMessage(ClickEvent evt) { ++_clickCount; Debug.Log("{"button"} was clicked!" + (_toggle.value ? " Count: " + _clickCount : "")); } public static void InputMessage(ChangeEvent\
-
保存文件并返回Unity。在Hierarchy 中选择UIDocument,将Project 中的SimpleRuntimeUI拖到Inspector的空白处,给UIDocument添加脚本组件。
-
点击"运行",在Game窗口中就可以看到如下UI。点击Button,可以在控制台看到输出的消息。
