FreeBSD下安装Node.js
在FreeBSD下安装Node.js很方便,直接pkg安装即可。
使用pkg install安装npm
sudo pkg install npm-node22
Updating FreeBSD repository catalogue...
Fetching data.pkg: 100%    7 MiB   2.5MB/s    00:03
Processing entries: 100%
FreeBSD repository update completed. 35884 packages processed.
All repositories are up to date.
The following 3 package(s) will be affected (of 0 checked):

New packages to be INSTALLED:
        gmake: 4.4.1
        node22: 22.13.1
        npm-node22: 10.9.2

Number of packages to be installed: 3

The process will require 76 MiB more space.
16 MiB to be downloaded.
建立js服务器
创建服务器目录
javascript
mkdir jsserver
cd jsserver/
初始化项目
npm init -y输出:
npm init -y
Wrote to /home/skywalk/work/jsserver/package.json:

{
  "name": "jsserver",
  "version": "1.0.0",
  "main": "index.js",
  "scripts": {
    "test": "echo \"Error: no test specified\" && exit 1"
  },
  "keywords": [],
  "author": "",
  "license": "ISC",
  "description": ""
}
安装依赖库
您可以使用 Express.js 来快速构建 Web 服务器。安装 Express 和其他必要的库:
npm install express body-parser cors创建服务器代码server.js
在项目目录中创建一个名为 server.js 的文件,并添加以下代码:
javascript
// server.js
const express = require('express');
const bodyParser = require('body-parser');
const cors = require('cors');

const app = express();
const PORT = process.env.PORT || 3000;

// 中间件
app.use(cors());
app.use(bodyParser.json());

// 模拟 AI 响应
app.post('/api/chat', (req, res) => {
    const userInput = req.body.question;

    // 这里可以添加 AI 逻辑,当前只是返回一个固定的响应
    const response = `You asked: "${userInput}". This is a simulated response.`;

    res.json({ response });
});

// 启动服务器
app.listen(PORT, () => {
    console.log(`Server is running on http://localhost:${PORT}`);
});
创建 JavaScript 库puter.js
这个文件并不是必须放在当前服务器的,可以放在其它服务器或者测试index.html网页的相同目录。
这里为了代码管理方便,也同时在项目目录中创建一个名为 puter.js 的文件,并添加以下代码:
javascript
// puter.js
const puter = {
    ai: {
        chat: function(question) {
            return fetch('http://localhost:3000/api/chat', {
                method: 'POST',
                headers: {
                    'Content-Type': 'application/json'
                },
                body: JSON.stringify({ question })
            }).then(response => response.json());
        }
    },
    print: function(data) {
        console.log(data.response);
        alert(data.response); // 也可以用 alert 显示响应
    }
};

// 将 puter 对象暴露到全局
window.puter = puter;
启动服务
执行以下命令启动服务
node server.js
可以看到输出:Server is running on http://localhost:3000
服务器启动了。
创建前端 HTML 文件
这个文件并不是必须放在当前服务器的,可以放在其它服务器或者测试puter.js的相同目录。
这里为了代码管理方便,也同时在项目目录中创建一个名为 index.html 的文件,并添加以下代码:
javascript
<!DOCTYPE html>
<html>
<head>
    <meta charset="UTF-8">
    <meta name="viewport" content="width=device-width, initial-scale=1.0">
    <title>AI Chat Example</title>
    <script src="puter.js"></script>
</head>
<body>
    <script>
        puter.ai.chat(`你好! AI!`).then(data => puter.print(data));
    </script>
</body>
</html>
测试
先用curl测试服务器
javascript
curl -X POST http://localhost:3000/api/chat \
-H "Content-Type: application/json" \
-d '{
    "question": "你能告诉我今天的天气吗?"
}'
回复
javascript
{"response":"You asked: \"你能告诉我今天的天气吗?\". This is a simulated response."}证明js服务器是ok的。
整体测试
在同一目录放置index.html和puter.js文件,然后用浏览器直接打开这个index.html文件,会显示弹出信息:
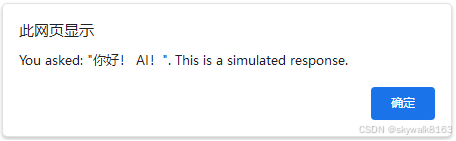
证明index.html文件里的puter.js这个js脚本起作用了。 可以看到index.html文件中是没有写http://localhost:3000/api/chat 这个地址的,它调用了puter.js文件,并使用了这句话puter.ai.chat(`你好! AI!`).then(data => puter.print(data)); 来调用了puter.ai.chat的程序。
恭喜测试通过!
以后我们就可以搭建一台自己的js服务器来架设AI服务啦!
进一步思考api秘钥问题
在使用 puter.js 或任何前端 JavaScript 代码调用 OpenAI 的 API 时,保护 API 密钥是非常重要的,因为将密钥直接嵌入到前端代码中会导致密钥暴露,可能被恶意用户滥用。以下是一些保护 API 密钥的最佳实践:
1. 使用后端代理
最安全的方法是通过后端服务器来代理请求。可以创建一个后端 API,前端代码只与这个后端 API 交互,而后端 API 再与 OpenAI 的 API 进行通信。这样,API 密钥只存储在后端,不会暴露给前端。
2. 使用环境变量
在后端代码中,使用环境变量来存储 API 密钥,而不是硬编码在代码中。可以使用 .env 文件和 dotenv 包来加载环境变量。
3. 限制 API 密钥的权限
例如,设置 IP 白名单或限制请求的速率,以减少潜在的滥用风险。
比如puter官方的js AI库,就是限定它的公有云服务器可以调用,用户自己搭建的私有服务器不可以调用。