一、引言
在目标检测任务中,边界框(Bounding Box)的坐标表示与转换是核心基础操作。本文将演示如何:
-
实现边界框的两种表示形式(角点坐标 vs 中心坐标)之间的转换
-
使用Matplotlib在图像上可视化边界框
-
验证坐标转换的正确性
二、环境准备
python
import torch
from d2l import torch as d2l-
PyTorch 1.12+
-
d2l 0.17.0+
-
Matplotlib 3.5+
三、代码实现与解析
1. 图像加载与显示
python
d2l.set_figsize()  # 设置画布大小
img = d2l.plt.imread('./data/catdog.jpg')  # 读取图像
d2l.plt.imshow(img)  # 显示图像
2. 坐标转换函数
角点坐标 → 中心坐标
python
def box_corner_to_center(boxes):
    x1, y1, x2, y2 = boxes[:,0], boxes[:,1], boxes[:,2], boxes[:,3]
    cx = (x1 + x2) / 2  # 中心x坐标
    cy = (y1 + y2) / 2  # 中心y坐标
    w = x2 - x1         # 宽度
    h = y2 - y1         # 高度
    return torch.stack((cx, cy, w, h), axis=-1)
中心坐标 → 角点坐标
python
def box_center_to_corner(boxes):
    cx, cy, w, h = boxes[:,0], boxes[:,1], boxes[:,2], boxes[:,3]
    x1 = cx - w/2  # 左上角x
    y1 = cy - h/2  # 左上角y
    x2 = cx + w/2  # 右下角x
    y2 = cy + h/2  # 右下角y
    return torch.stack((x1, y1, x2, y2), axis=-1)
3. 转换验证
python
dog_bbox = [10.0, 50.0, 80.0, 110.0]  # 狗的边界框(左上x,左上y,右下x,右下y)
cat_bbox = [90.0, 40.0, 160.0, 110.0] # 猫的边界框
boxes = torch.tensor([dog_bbox, cat_bbox])

# 验证转换的正确性
print(box_center_to_corner(box_corner_to_center(boxes)) == boxes)输出结果:
bash
tensor([[True, True, True, True],
        [True, True, True, True]])
4. 边界框可视化
python
def bbox_to_rect(bbox, color):
    return d2l.plt.Rectangle(
        xy=(bbox[0], bbox[1]),  # 左上角坐标
        width=bbox[2]-bbox[0],  # 宽度
        height=bbox[3]-bbox[1], # 高度
        fill=False, edgecolor=color, linewidth=2)

fig = d2l.plt.imshow(img)
fig.axes.add_patch(bbox_to_rect(dog_bbox, 'blue'))  # 添加蓝色狗框
fig.axes.add_patch(bbox_to_rect(cat_bbox, 'red')) # 添加红色猫框可视化效果:
-
X轴范围:0-150
-
Y轴范围:0-125
-
蓝色矩形框标注狗的位置
-
红色矩形框标注猫的位置
四、完整代码
python
import torch
from d2l import torch as d2l

# 设置画布并加载图像
d2l.set_figsize()
img = d2l.plt.imread('./data/catdog.jpg')
d2l.plt.imshow(img)

# 坐标转换函数
def box_corner_to_center(boxes):
    x1, y1, x2, y2 = boxes[:,0], boxes[:,1], boxes[:,2], boxes[:,3]
    cx, cy = (x1+x2)/2, (y1+y2)/2
    w, h = x2-x1, y2-y1
    return torch.stack((cx, cy, w, h), axis=-1)

def box_center_to_corner(boxes):
    cx, cy, w, h = boxes[:,0], boxes[:,1], boxes[:,2], boxes[:,3]
    x1, y1 = cx-w/2, cy-h/2
    x2, y2 = cx+w/2, cy+h/2
    return torch.stack((x1, y1, x2, y2), axis=-1)

# 定义边界框并验证转换
dog_bbox, cat_bbox = [10.0,50.0,80.0,110.0], [90.0,40.0,160.0,110.0]
boxes = torch.tensor([dog_bbox, cat_bbox])
print(box_center_to_corner(box_corner_to_center(boxes)) == boxes)

# 可视化边界框
def bbox_to_rect(bbox, color):
    return d2l.plt.Rectangle((bbox[0], bbox[1]), bbox[2]-bbox[0],
                            bbox[3]-bbox[1], fill=False,
                            edgecolor=color, linewidth=2)

fig = d2l.plt.imshow(img)
fig.axes.add_patch(bbox_to_rect(dog_bbox, 'blue'))
fig.axes.add_patch(bbox_to_rect(cat_bbox, 'red'))
五、关键点解析
-
坐标表示形式:
-
角点表示:(左上x, 左上y, 右下x, 右下y)
-
中心表示:(中心x, 中心y, 宽度, 高度)
-
-
转换验证:
- 通过两次转换后与原值对比,全True结果证明转换正确性
-
可视化技巧:
-
使用Matplotlib的Rectangle对象创建边界框
-
通过add_patch方法将图形元素添加到坐标轴
-
六、总结
本文实现了目标检测中边界框的坐标转换与可视化,验证了:
-
两种坐标表示形式的等价性
-
边界框在图像上的准确定位
-
转换函数的正确性
该技术可应用于目标检测数据预处理、结果可视化等场景。读者可以尝试修改边界框坐标,观察不同位置的可视化效果。
实际运行效果示意图 :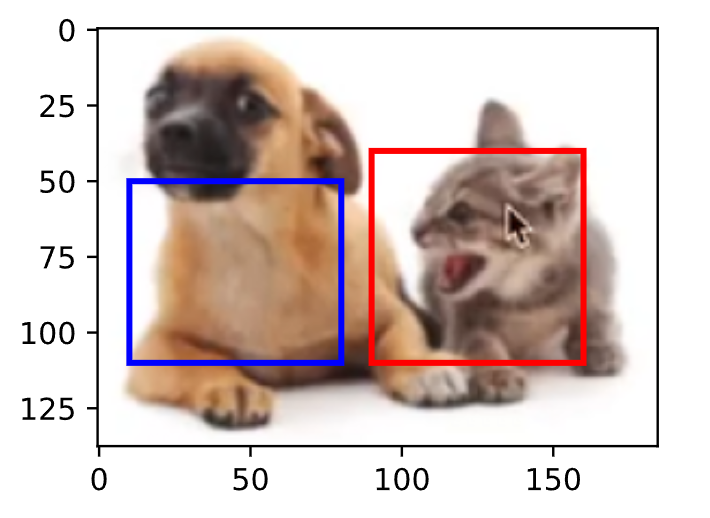
(注:需自行准备包含猫狗的图像,保存为./data/catdog.jpg)