系列文章目录
目录
[一、✨ 亮点](#一、✨ 亮点)
[1.1 🏆 模型动物园](#1.1 🏆 模型动物园)
[1.2 🛠️ 代码库特性](#1.2 🛠️ 代码库特性)
[二、🚀 快速入门](#二、🚀 快速入门)
[2.1 📦 安装](#2.1 📦 安装)
[2.2 💻 基本用法](#2.2 💻 基本用法)
[2.3 🗂️ 模型卡片](#2.3 🗂️ 模型卡片)
[2.4 使用示例](#2.4 使用示例)
前言
本文提出Depth Anything 3(DA3)模型,该模型可从任意视觉输入中预测空间一致的几何结构,无论是否已知摄像机姿态。在追求最小化建模的过程中,DA3揭示了两个关键洞见:
- 💎 单纯的Transformer模型(如基础DINO编码器)即可作为骨干网络,无需专门架构设计;
- ✨ 统一的深度光线表示消除了复杂多任务学习的需求;
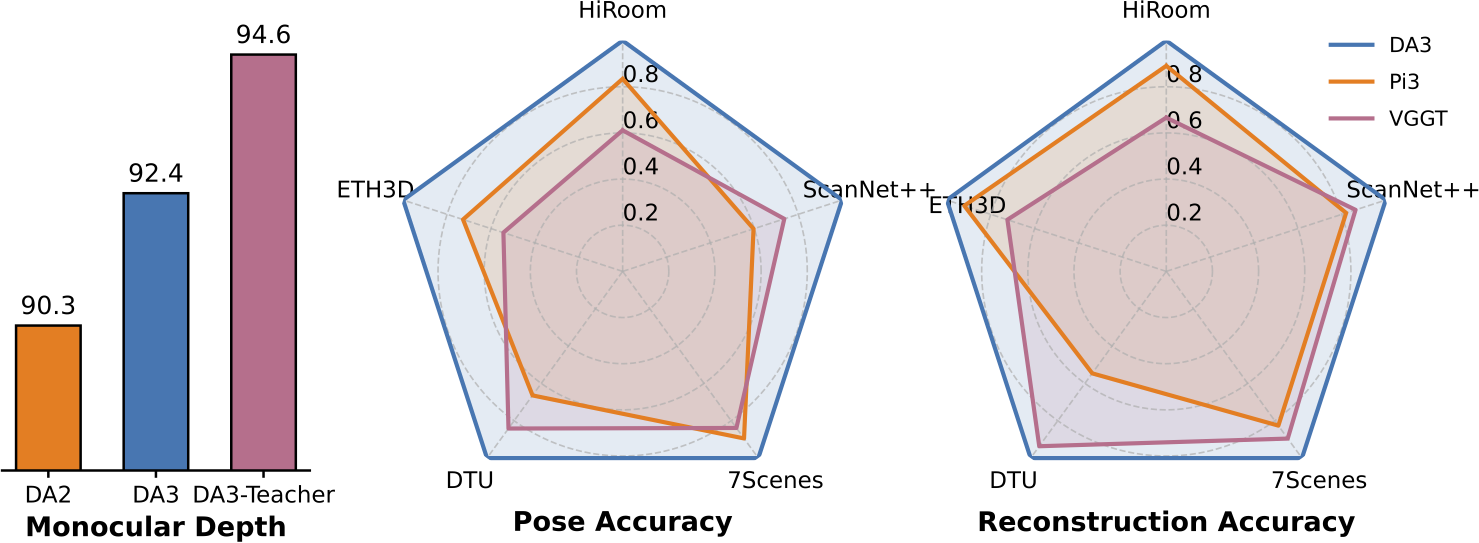
🏆 在单目深度估计中,DA3显著超越DA2;在多视角深度估计与姿态估计中,其表现优于VGGT模型。所有模型均仅基于公开学术数据集训练。
一、✨ 亮点
1.1 🏆 模型动物园
我们发布三系列模型,各针对视觉几何学的特定应用场景。
- 🌟 DA3 主系列(DA3-Giant、DA3-Large、DA3-Base、DA3-Small)
这些旗舰基础模型采用统一的深度光线表示进行训练。通过调整输入配置,单一模型可执行广泛任务:- 🌊 单目深度估计:从单张RGB图像预测深度图。
- 🌊 多视角深度估计:基于多帧图像生成一致性深度图,实现高质量融合。
- 🎯 姿态约束深度估计:当输入相机姿态时,可获得卓越的深度一致性。
- 📷 摄像机姿态估计:基于单张或多张图像推算外参与内参。
- 🟡 3D高斯估计:直接预测三维高斯分布,实现高保真新视角合成。
- 📐 DA3度量系列(DA3Metric-Large)专为单目环境下的度量级深度估计优化,适用于真实世界尺度场景。
- 🔍 DA3 单目系列(DA3Mono-Large)专为高质量相对单目深度估计设计。不同于视差模型(如Depth Anything 2),其直接预测深度,实现更优的几何精度。
🔗 基于上述可用模型,我们开发了嵌套系列(DA3Nested-Giant-Large)。该系列将全视角巨型模型与公制模型结合,可在真实世界公制尺度下重建视觉几何结构。
1.2 🛠️ 代码库特性
我们的代码库旨在成为兼具实用性和研究价值的强大工具包,兼顾实际应用与未来研究需求。
- 🎨 互动式网页界面与展示库:通过基于Gradio的易用网页界面可视化模型输出结果并进行对比分析。
- ⚡ 灵活命令行界面(CLI):支持批量处理与自定义工作流集成的强大可编程命令行工具。
- 💾 多格式导出:支持glb、npz、深度图像、ply、3DGS视频等多种格式保存结果,实现与其他工具的无缝衔接。
- 🔧可扩展模块化设计:代码库采用模块化架构,便于未来研究及新模型/功能的集成。
二、🚀 快速入门
2.1 📦 安装
bash
pip install -e . # Basic
pip install -e ".[gs]" # Gaussians Estimation and Rendering
pip install -e ".[app]" # Gradio, python>=3.10
pip install -e ".[all]" # ALL有关详细的模型信息,请参阅下方的模型卡片部分。
2.2 💻 基本用法
python
import glob, os, torch
from depth_anything_3.api import DepthAnything3
device = torch.device("cuda")
model = DepthAnything3.from_pretrained("depth-anything/DA3NESTED-GIANT-LARGE")
model = model.to(device=device)
example_path = "assets/examples/SOH"
images = sorted(glob.glob(os.path.join(example_path, "*.png")))
prediction = model.inference(
    images,
)
# prediction.processed_images : [N, H, W, 3] uint8   array
print(prediction.processed_images.shape)
# prediction.depth            : [N, H, W]    float32 array
print(prediction.depth.shape)
# prediction.conf             : [N, H, W]    float32 array
print(prediction.conf.shape)
# prediction.extrinsics       : [N, 3, 4]    float32 array # opencv w2c or colmap format
print(prediction.extrinsics.shape)
# prediction.intrinsics       : [N, 3, 3]    float32 array
print(prediction.intrinsics.shape)
python
export MODEL_DIR=depth-anything/DA3NESTED-GIANT-LARGE
# This can be a Hugging Face repository or a local directory
# If you encounter network issues, consider using the following mirror: export HF_ENDPOINT=https://hf-mirror.com
# Alternatively, you can download the model directly from Hugging Face
export GALLERY_DIR=workspace/gallery
mkdir -p $GALLERY_DIR

# CLI auto mode with backend reuse
da3 backend --model-dir ${MODEL_DIR} --gallery-dir ${GALLERY_DIR} # Cache model to gpu
da3 auto assets/examples/SOH \
    --export-format glb \
    --export-dir ${GALLERY_DIR}/TEST_BACKEND/SOH \
    --use-backend

# CLI video processing with feature visualization
da3 video assets/examples/robot_unitree.mp4 \
    --fps 15 \
    --use-backend \
    --export-dir ${GALLERY_DIR}/TEST_BACKEND/robo \
    --export-format glb-feat_vis \
    --feat-vis-fps 15 \
    --process-res-method lower_bound_resize \
    --export-feat "11,21,31"

# CLI auto mode without backend reuse
da3 auto assets/examples/SOH \
    --export-format glb \
    --export-dir ${GALLERY_DIR}/TEST_CLI/SOH \
    --model-dir ${MODEL_DIR}
模型架构定义在DepthAnything3Net中,并通过位于src/depth_anything_3/configs目录下的YAML配置文件进行指定。输入与输出处理由DepthAnything3负责。若需定制模型架构,只需创建新配置文件(例如路径/to/new/config),格式如下:
bash
__object__:
  path: depth_anything_3.model.da3
  name: DepthAnything3Net
  args: as_params

net:
  __object__:
    path: depth_anything_3.model.dinov2.dinov2
    name: DinoV2
    args: as_params

  name: vitb
  out_layers: [5, 7, 9, 11]
  alt_start: 4
  qknorm_start: 4
  rope_start: 4
  cat_token: True

head:
  __object__:
    path: depth_anything_3.model.dualdpt
    name: DualDPT
    args: as_params

  dim_in: &head_dim_in 1536
  output_dim: 2
  features: &head_features 128
  out_channels: &head_out_channels [96, 192, 384, 768]
然后,可使用以下代码片段创建模型。
python
from depth_anything_3.cfg import create_object, load_config

Model = create_object(load_config("path/to/new/config"))
2.3 🗂️ 模型卡片
通常情况下,您会发现DA3-LARGE能达到与VGGT相当的效果。
| 🗃️ Model Name | 📏 Params | 📊 Rel. Depth | 📷 Pose Est. | 🧭 Pose Cond. | 🎨 GS | 📐 Met. Depth | ☁️ Sky Seg | 📄 License |
|---|---|---|---|---|---|---|---|---|
| Nested | ||||||||
| DA3NESTED-GIANT-LARGE | 1.40B | ✅ | ✅ | ✅ | ✅ | ✅ | ✅ | CC BY-NC 4.0 |
| Any-view Model | ||||||||
| DA3-GIANT | 1.15B | ✅ | ✅ | ✅ | ✅ | CC BY-NC 4.0 | ||
| DA3-LARGE | 0.35B | ✅ | ✅ | ✅ | CC BY-NC 4.0 | |||
| DA3-BASE | 0.12B | ✅ | ✅ | ✅ | Apache 2.0 | |||
| DA3-SMALL | 0.08B | ✅ | ✅ | ✅ | Apache 2.0 | |||
| Monocular Metric Depth | ||||||||
| DA3METRIC-LARGE | 0.35B | ✅ | ✅ | ✅ | Apache 2.0 | |||
| Monocular Depth | ||||||||
| DA3MONO-LARGE | 0.35B | ✅ | ✅ | Apache 2.0 |
2.4 使用示例
本笔记本演示如何使用Depth Anything 3进行摄像机姿态和深度估计。
python
import os
import numpy as np
import matplotlib.pyplot as plt
from PIL import Image
import torch
from depth_anything_3.api import DepthAnything3
from depth_anything_3.utils.visualize import visualize_depth
device = torch.device("cuda" if torch.cuda.is_available() else "cpu")
model = DepthAnything3.from_pretrained("depth-anything/DA3NESTED-GIANT-LARGE")
model = model.to(device)
model.eval()
print(f"Model loaded on {device}")
python
# Load sample images and run inference
image_paths = [
    "assets/examples/SOH/000.png",
    "assets/examples/SOH/010.png"
]

# Run inference
prediction = model.inference(
    image=image_paths,
    process_res=504,
    process_res_method="upper_bound_resize",
    export_dir=None,
    export_format="glb"
)
print(f"Depth shape: {prediction.depth.shape}")
print(f"Extrinsics: {prediction.extrinsics.shape if prediction.extrinsics is not None else 'None'}")
print(f"Intrinsics: {prediction.intrinsics.shape if prediction.intrinsics is not None else 'None'}")
python
# Visualize input images and depth maps
n_images = prediction.depth.shape[0]

fig, axes = plt.subplots(2, n_images, figsize=(12, 6))

if n_images == 1:
    axes = axes.reshape(2, 1)

for i in range(n_images):
    # Show original image
    if prediction.processed_images is not None:
        axes[0, i].imshow(prediction.processed_images[i])
    axes[0, i].set_title(f"Input {i+1}")
    axes[0, i].axis('off')

    # Show depth map
    depth_vis = visualize_depth(prediction.depth[i], cmap="Spectral")
    axes[1, i].imshow(depth_vis)
    axes[1, i].set_title(f"Depth {i+1}")
    axes[1, i].axis('off')

plt.tight_layout()
plt.show()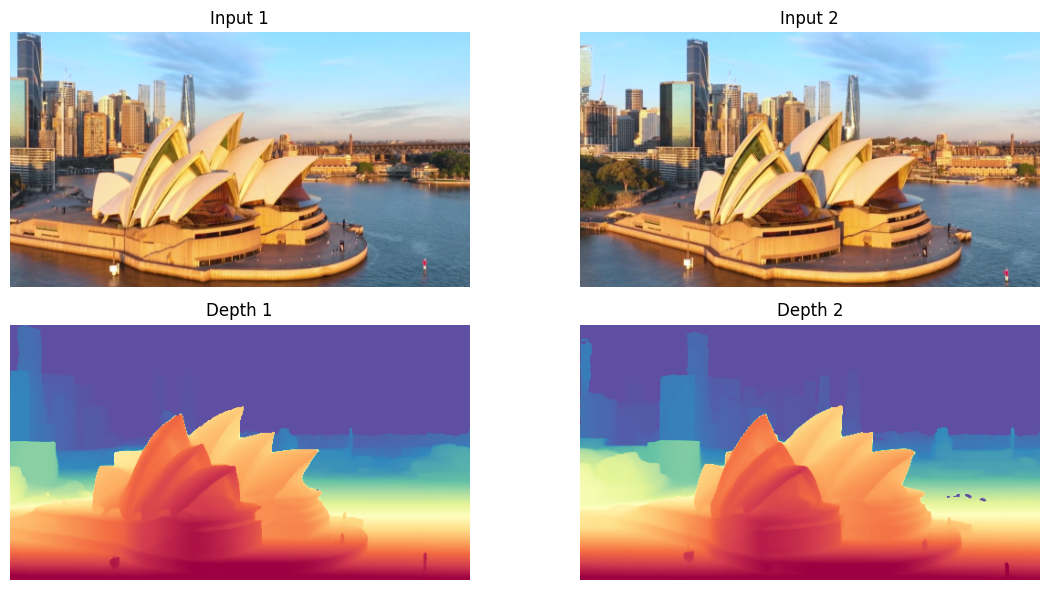
@article{depthanything3,
title={Depth Anything 3: Recovering the visual space from any views},
author={Haotong Lin and Sili Chen and Jun Hao Liew and Donny Y. Chen and Zhenyu Li and Guang Shi and Jiashi Feng and Bingyi Kang},
journal={arXiv preprint arXiv:2511.10647},
year={2025}
}