BootLoader(Uboot)介绍
- [一. BootLoader(Uboot)介绍](#一. BootLoader(Uboot)介绍)
-
- [1. 概念](#1. 概念)
- [2. Bootloader 的启动流程](#2. Bootloader 的启动流程)
- [3. Bootloader的种类](#3. Bootloader的种类)
- [4. U-Boot的介绍](#4. U-Boot的介绍)
-
- [4.1. 概念](#4.1. 概念)
- [4.2. 特点](#4.2. 特点)
- [4.3. U-Boot 的常用命令](#4.3. U-Boot 的常用命令)
- [二. ubuntu中安装tftp服务](#二. ubuntu中安装tftp服务)
-
- [1. 安装tftp服务器](#1. 安装tftp服务器)
- [2. 测试tftp服务器:](#2. 测试tftp服务器:)
- [3. 将内核镜像拷贝到tftp的工作目录](#3. 将内核镜像拷贝到tftp的工作目录)
-
- [3.1. 将tftp的工作目录设置为samba的共享目录](#3.1. 将tftp的工作目录设置为samba的共享目录)
- [3.2. 在window中访问samba共享](#3.2. 在window中访问samba共享)
- [3.3. 将内核镜像和设备树文件拷贝到共享目录](#3.3. 将内核镜像和设备树文件拷贝到共享目录)
- [三. ubuntu中安装nfs服务](#三. ubuntu中安装nfs服务)
-
- [1. 将文件系统拷贝到`/opt`](#1. 将文件系统拷贝到
/opt) -
- [1.1. 将`/opt`目录设置为samba的共享目录](#1.1. 将
/opt目录设置为samba的共享目录) - [1.2. 在window中访问samba共享](#1.2. 在window中访问samba共享)
- [1.3. 将文件系统拷贝到共享目录](#1.3. 将文件系统拷贝到共享目录)
- [1.4. 解压上面的文件系统](#1.4. 解压上面的文件系统)
- [1.1. 将`/opt`目录设置为samba的共享目录](#1.1. 将
- [2. 安装nfs服务](#2. 安装nfs服务)
- [3. 配置nfs](#3. 配置nfs)
- [4. 测试nfs服务器](#4. 测试nfs服务器)
-
- [4.1. 进入用户家目录,创建挂载点](#4.1. 进入用户家目录,创建挂载点)
- [4.2. 将nfs设置的文件系统挂载到mnt目录(挂载点)](#4.2. 将nfs设置的文件系统挂载到mnt目录(挂载点))
- [1. 将文件系统拷贝到`/opt`](#1. 将文件系统拷贝到
- [四. 在开发板中配置uboot参数](#四. 在开发板中配置uboot参数)
-
- [1. 连接好开发板和电脑](#1. 连接好开发板和电脑)
- [2. 配置uboot参数](#2. 配置uboot参数)
- [3. 重启开发板,观察结果](#3. 重启开发板,观察结果)
- [五. 在开发板中运行C程序](#五. 在开发板中运行C程序)
-
- [1. 安装交叉编译器](#1. 安装交叉编译器)
- [2. 编译C程序](#2. 编译C程序)
- [3. 将编译好的 程序在开发板中运行](#3. 将编译好的 程序在开发板中运行)
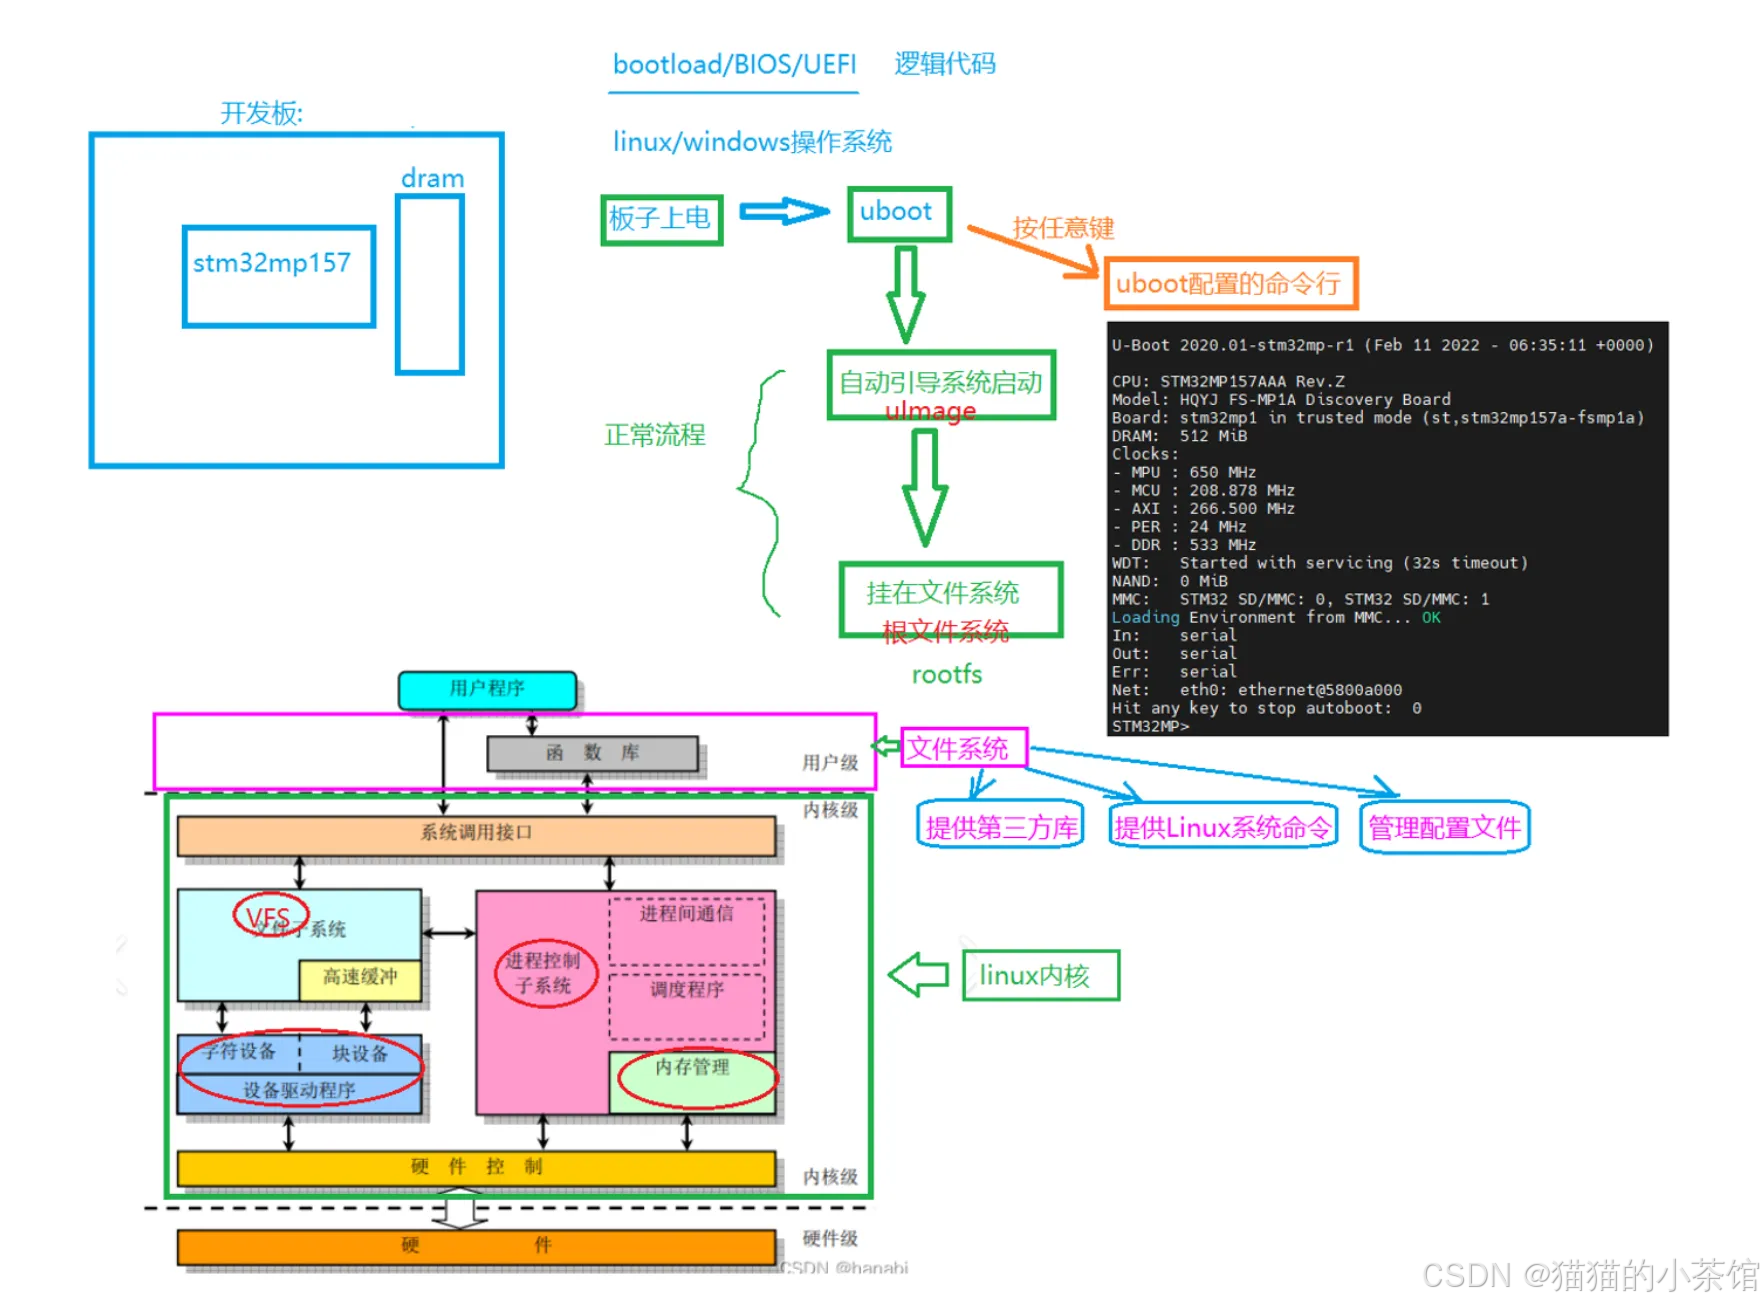
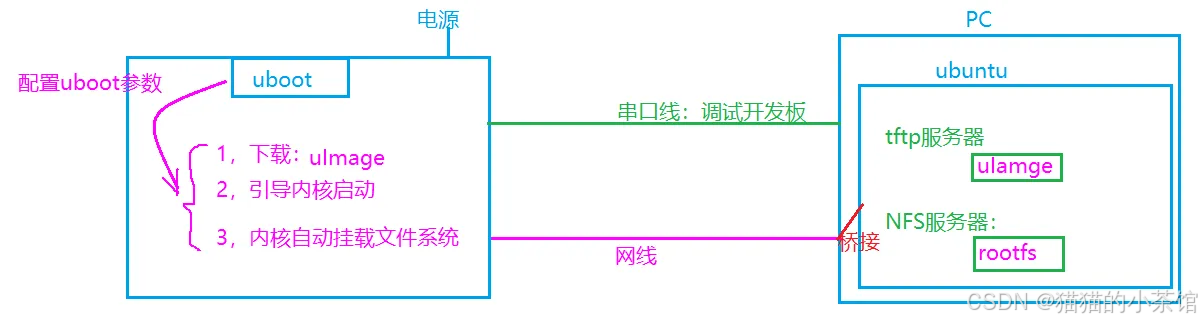
uboot 启动过程:
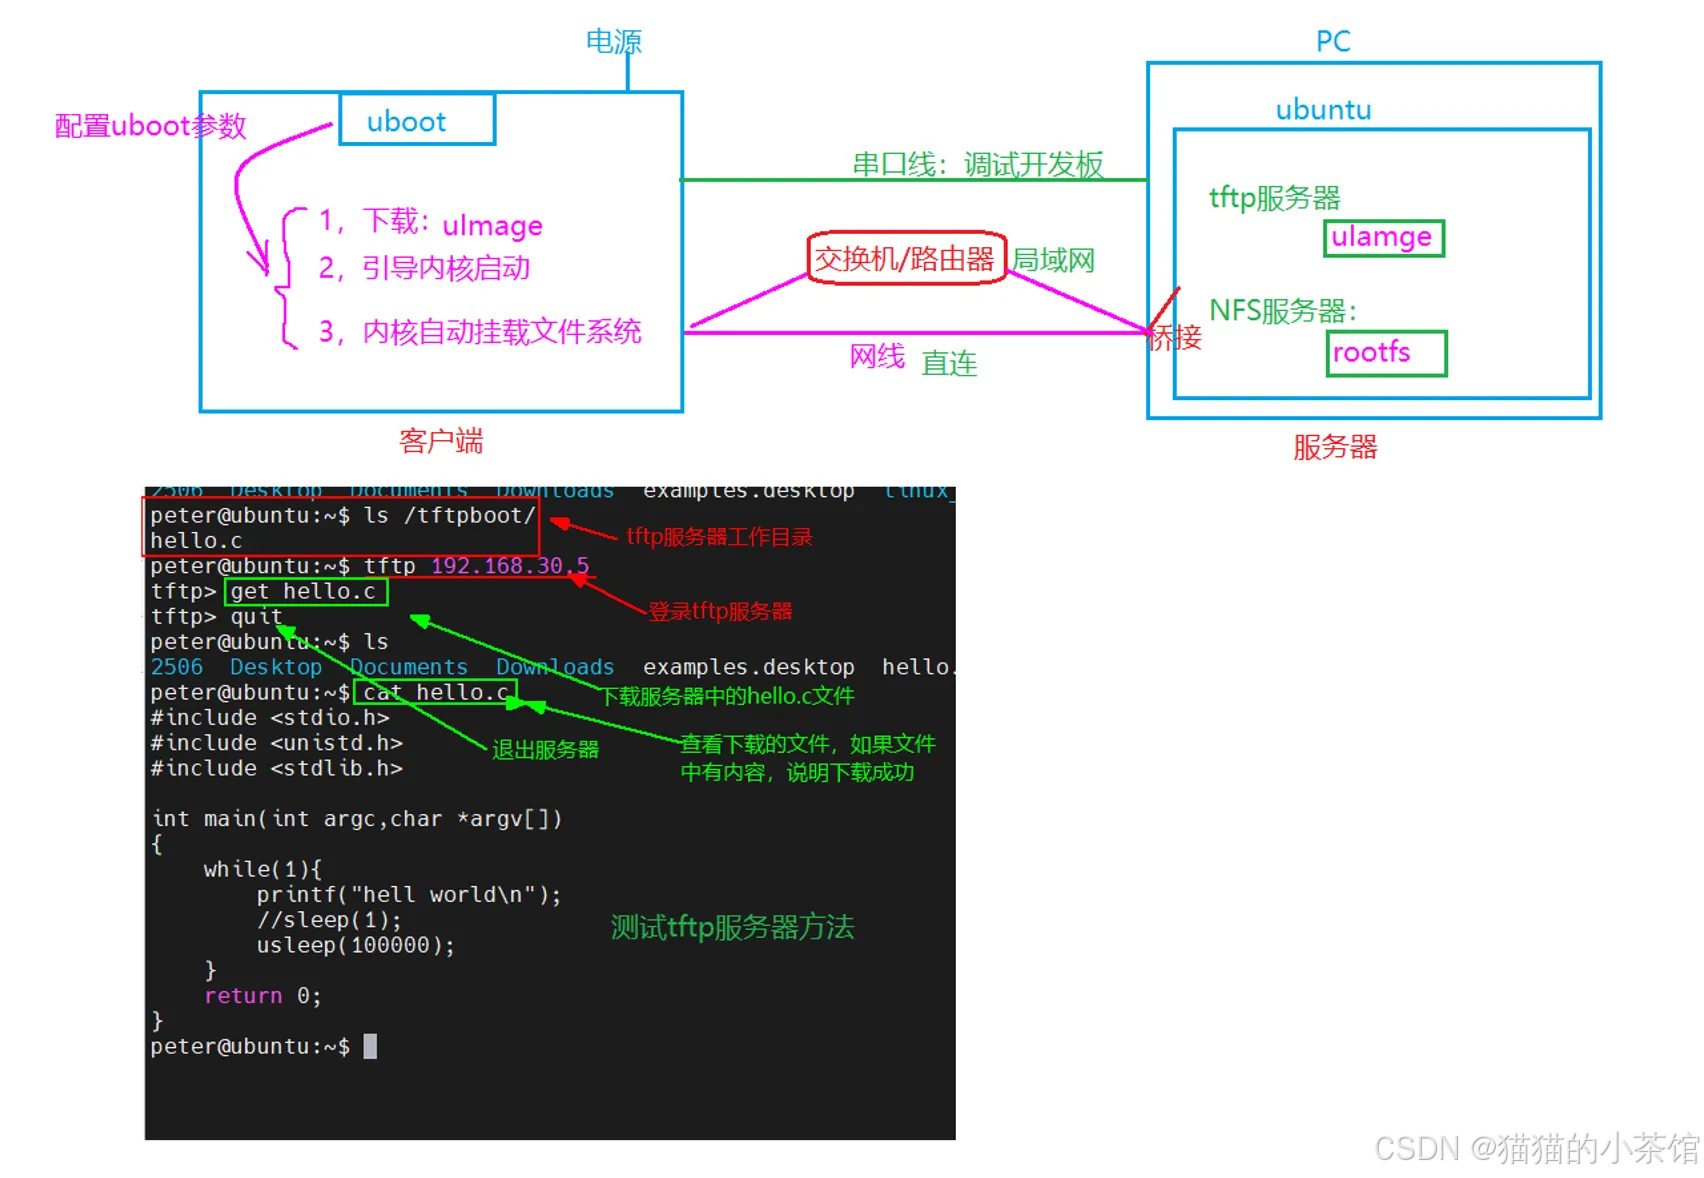
搭建环境:
一. BootLoader(Uboot)介绍
1. 概念
简单地说,Bootloader 就是在操作系统内核运行之前运行的一段程序,它类似于 PC 机中的 BIOS
程序。通过这段程序,可以完成硬件设备的初始化,并建立内存空间的映射图的功能,从而将系统的软硬件环境带到一个合适的状态,为最终调用系统内核做好准备。
通常,Bootloader 是严重地依赖于硬件实现的,特别是在嵌入式中。因此,在嵌入式世界里建立一个通用的 Bootloader 几乎是不可能的。尽管如此,仍然可以对 Bootloader 归纳出一些通用的概念来指导用户特定的 Bootloader 设计与实现。
2. Bootloader 的启动流程
bash
Bootloader 的启动流程一般分为两个阶段:stage1 和 stage2,下面分别对这两个阶段进行讲解:
(1)Bootloader 的 stage1
在 stage1 中 Bootloader 主要完成以下工作。
• 基本的硬件初始化,包括屏蔽所有的中断、设置 CPU 的速度和时钟频率、RAM 初始化、初始化 LED、关闭 CPU 内部指令和数据 cache 灯。
• 为加载 stage2 准备 RAM 空间,通常为了获得更快的执行速度,通常把 stage2 加载到RAM 空间中来执行,因此必须为加载 Bootloader 的 stage2 准备好一段可用的 RAM 空间范围。
• 拷贝 stage2 到 RAM 中,在这里要确定两点:①stage2 的可执行映像在固态存储设备的存放起始地址和终止地址;②RAM 空间的起始地址。
• 设置堆栈指针 sp,这是为执行 stage2 的 C 语言代码做好准备。

(2)Bootloader 的 stage2
在 stage2 中 Bootloader 主要完成以下工作。
• 用汇编语言跳转到 main 入口函数由于 stage2 的代码通常用 C 语言来实现,目的是实现更复杂的功能和取得更好的代码可读性和可移植性。但是与普通 C 语言应用程序不同的是,在编译和链接 Bootloader 这样的程序时,不能使用 glibc 库中的任何支持函数。
• 初始化本阶段要使用到的硬件设备,包括初始化串口、初始化计时器等。在初始化这些设备之前、可以输出一些打印信息。
• 检测系统的内存映射,所谓内存映射就是指在整个 4GB 物理地址空间中有指出哪些地址范围被分配用来寻址系统的 RAM 单元。
• 加载内核映像和根文件系统映像,这里包括规划内存占用的布局和从 Flash 上拷贝数据。
• 设置内核的启动参数。
3. Bootloader的种类
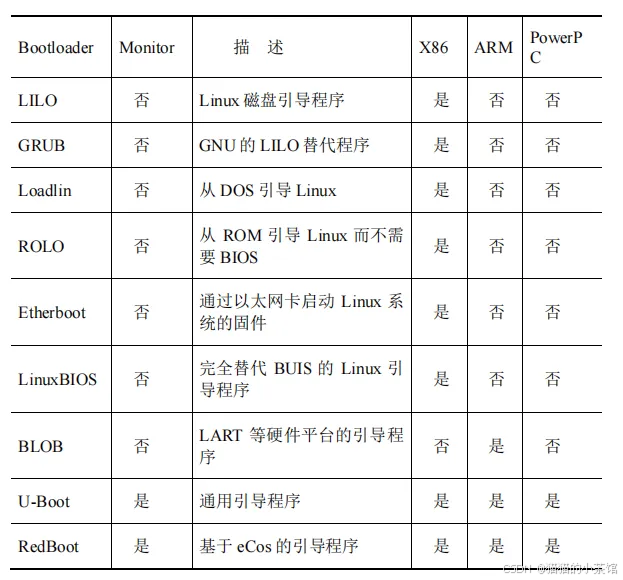
首先区分一下"Bootloader"和"Monitor"的概念。严格来说,"Bootloader"只是引导设备并且执行主程序的固件;而"Monitor"还提供了更多的命令行接口,可以进行调试、读写内存、烧写 Flash、配置环境变量等。"Monitor"在嵌入式系统开发过程中可以提供很好的调试功能,开发完成以后,就完全设置成了一个"Bootloader"。所以,习惯上大家把它们统称为 Bootloader。
4. U-Boot的介绍
4.1. 概念
U-Boot(UniversalBootloader),是遵循 GPL 条款的开放源码项目。它是从 FADSROM、8xxROM、PPCBOOT 逐步发展演化而来。其源码目录、编译形式与 Linux 内核很相似,事实上,不少 U-Boot 源码就是相应的 Linux 内核源程序的简化,尤其是一些设备的驱动程序,这从 U-Boot 源码的注释中能体现这一点。
4.2. 特点
bash
U-Boot 的特点如下:
	• 开放源码;
	• 支持多种嵌入式操作系统内核,如 Linux、NetBSD、VxWorks、QNX、RTEMS、
ARTOS、LynxOS;
	• 支持多个处理器系列,如 PowerPC、ARM、x86、MIPS、XScale;
	• 较高的可靠性和稳定性;
	• 高度灵活的功能设置,适合 U-Boot 调试,操作系统不同引导要求,产品发布等;
	• 丰富的设备驱动源码,如串口、以太网、SDRAM、FLASH、LCD、NVRAM、
	EEPROM、RTC、键盘等;
	• 较为丰富的开发调试文档与强大的网络技术支持。
4.3. U-Boot 的常用命令
U-Boot 上电启动后,按任意键可以退出自动启动状态,进入命令行。

bash
在命令行提示符下,可以输入 U-Boot 的命令并执行。U-Boot 可以支持几十个常用命令,
通过这些命令,可以对开发板进行调试,可以引导 Linux 内核,还可以擦写 Flash 完成系统
部署等功能。掌握这些命令的使用,才能够顺利地进行嵌入式系统的开发。

STM32MP> help
?         - alias for 'help'
base      - print or set address offset
bdinfo    - print Board Info structure
blkcache  - block cache diagnostics and control
bmp       - manipulate BMP image data
bootcount - bootcount
bootefi   - Boots an EFI payload from memory
bootm     - boot application image from memory
bootp     - boot image via network using BOOTP/TFTP protocol
bootstage - Boot stage command
bootz     - boot Linux zImage image from memory
chpart    - change active partition
clk       - CLK sub-system
cls       - clear screen
cmp       - memory compare
coninfo   - print console devices and information
cp        - memory copy
crc32     - checksum calculation
date      - get/set/reset date & time
dcache    - enable or disable data cache
dfu       - Device Firmware Upgrade
dhcp      - boot image via network using DHCP/TFTP protocol
dm        - Driver model low level access
dtimg     - manipulate dtb/dtbo Android image
echo      - echo args to console
editenv   - edit environment variable
env       - environment handling commands
erase     - erase FLASH memory
eraseenv  - erase environment variables from persistent storage
exit      - exit script
ext2load  - load binary file from a Ext2 filesystem
ext2ls    - list files in a directory (default /)
ext4load  - load binary file from a Ext4 filesystem
ext4ls    - list files in a directory (default /)
ext4size  - determine a file's size
ext4write - create a file in the root directory
false     - do nothing, unsuccessfully
fastboot  - run as a fastboot usb or udp device
fatinfo   - print information about filesystem
fatload   - load binary file from a dos filesystem
fatls     - list files in a directory (default /)
fatsize   - determine a file's size
fdt       - flattened device tree utility commands
flinfo    - print FLASH memory information
fstype    - Look up a filesystem type
fuse      - Fuse sub-system
go        - start application at address 'addr'
gpio      - query and control gpio pins
gpt       - GUID Partition Table
help      - print command description/usage
i2c       - I2C sub-system
icache    - enable or disable instruction cache
itest     - return true/false on integer compare
lcdputs   - print string on video framebuffer
led       - manage LEDs
ln        - Create a symbolic link
load      - load binary file from a filesystem
loadb     - load binary file over serial line (kermit mode)
loads     - load S-Record file over serial line
loadx     - load binary file over serial line (xmodem mode)
loady     - load binary file over serial line (ymodem mode)
loop      - infinite loop on address range
ls        - list files in a directory (default /)
md        - memory display
mdio      - MDIO utility commands
meminfo   - display memory information
mii       - MII utility commands
mm        - memory modify (auto-incrementing address)
mmc       - MMC sub system
mmcinfo   - display MMC info
mtd       - MTD utils
mtdparts  - define flash/nand partitions
mtest     - simple RAM read/write test
mw        - memory write (fill)
nand      - NAND sub-system
nboot     - boot from NAND device
nfs       - boot image via network using NFS protocol
nm        - memory modify (constant address)
part      - disk partition related commands
ping      - send ICMP ECHO_REQUEST to network host
pinmux    - show pin-controller muxing
pmic      - PMIC sub-system
poweroff  - Perform POWEROFF of the device
printenv  - print environment variables
protect   - enable or disable FLASH write protection
pxe       - commands to get and boot from pxe files
random    - fill memory with random pattern
regulator - uclass operations
reset     - Perform RESET of the CPU
rproc     - Control operation of remote processors in an SoC
run       - run commands in an environment variable
save      - save file to a filesystem
saveenv   - save environment variables to persistent storage
setcurs   - set cursor position within screen
setenv    - set environment variables
setexpr   - set environment variable as the result of eval expression
sf        - SPI flash sub-system
showvar   - print local hushshell variables
size      - determine a file's size
sleep     - delay execution for some time
source    - run script from memory
sspi      - SPI utility command
stboard   - read/write board reference in OTP
stm32key  - Fuse ST Hash key
stm32prog - <link> <dev> [<addr>] [<size>]
start communication with tools STM32Cubeprogrammer on <link> with Flashlayout at <addr>
sysboot   - command to get and boot from syslinux files
test      - minimal test like /bin/sh
tftpboot  - boot image via network using TFTP protocol
time      - run commands and summarize execution time
timer     - access the system timer
true      - do nothing, successfully
ubi       - ubi commands
ubifsload - load file from an UBIFS filesystem
ubifsls   - list files in a directory
ubifsmount- mount UBIFS volume
ubifsumount- unmount UBIFS volume
ums       - Use the UMS [USB Mass Storage]
usb       - USB sub-system
usbboot   - boot from USB device
version   - print monitor, compiler and linker version
STM32MP>
二. ubuntu中安装tftp服务
1. 安装tftp服务器
参考:ubuntu18.04服务配置_v2.pdf 链接:https://advdownload.advantech.com.cn/productfile/Downloadfile4/1-27UG6JF/WISE-710_CN_Ubuntu 18.04_ User Manual_v2.0.pdf
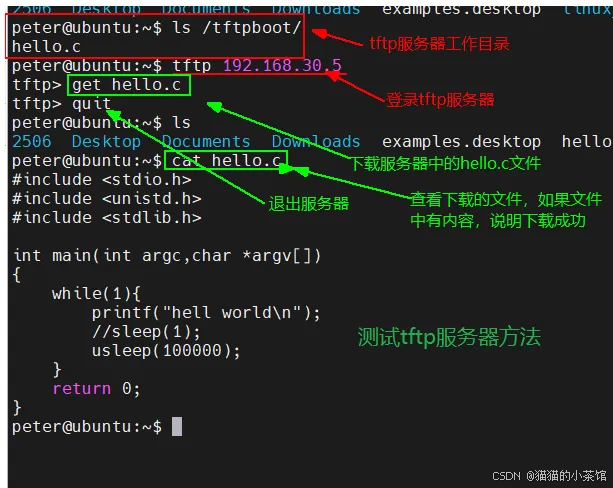
2. 测试tftp服务器:
3. 将内核镜像拷贝到tftp的工作目录
3.1. 将tftp的工作目录设置为samba的共享目录
bash
1》打开samba的配置文件
   sudo vim /etc/samba/smb.conf

2》在文件末尾添加下面内容:
   [tftpboot]
   path = /tftpboot
   browseable = yes
   public = yes
   available = yes
   writable = yes
3》退出,重启samba服务
   sudo /etc/init.d/smbd restart
3.2. 在window中访问samba共享
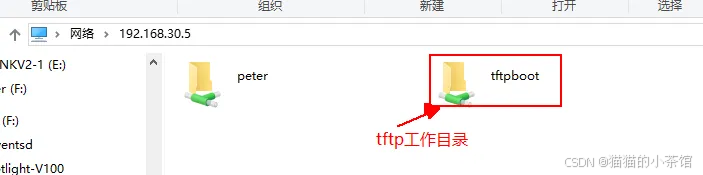
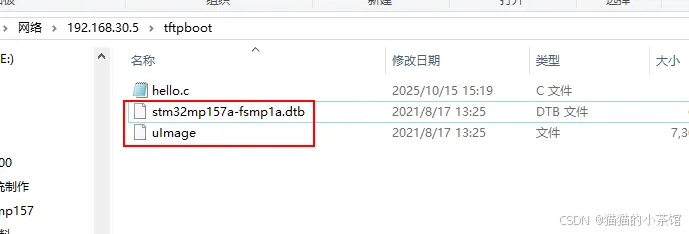
3.3. 将内核镜像和设备树文件拷贝到共享目录
三. ubuntu中安装nfs服务
1. 将文件系统拷贝到/opt
1.1. 将/opt目录设置为samba的共享目录
bash
1》打开samba的配置文件
   sudo vim /etc/samba/smb.conf

2》在文件末尾添加下面内容:
   [opt]
   path = /opt
   browseable = yes
   public = yes
   available = yes
   writable = yes
3》退出,重启samba服务
   sudo /etc/init.d/smbd restart
1.2. 在window中访问samba共享

1.3. 将文件系统拷贝到共享目录
bash
在ubuntu中修改/opt目录的权限:
	sudo chmod 777 /opt
拷贝文件系统到/opt中,如下图: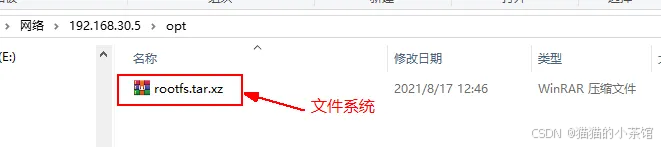
1.4. 解压上面的文件系统
bash
进入/opt目录
	cd  /opt
解压文件系统:
	tar -xvf rootfs.tar.xz
进入解压后的文件系统中,执行pwd,打印出文件系统的路径
peter@ubuntu:/opt$ cd rootfs/
peter@ubuntu:/opt/rootfs$ pwd
/opt/rootfs
2. 安装nfs服务
bash
参考:ubuntu18.04服务配置_v2.pdf ,如下:
sudo apt-get install nfs-kernel-server
3. 配置nfs
bash
1》打开配置文件
	sudo vim /etc/exports
2》在文件末尾添加下面一行
	/opt/rootfs  *(rw,sync,no_root_squash,no_subtree_check)

	保存,并退出
3》使能 NFS V2 版本,设置nfs的兼容v2版本
	打开文件:sudo vim /etc/default/nfs-kernel-server
	在文件末尾添加下面一行:
	RPCNFSDOPTS="--nfs-version 2,3,4 --debug --syslog"

	保存,并退出
4>重启nfs服务
	sudo /etc/init.d/nfs-kernel-server restart
4. 测试nfs服务器
4.1. 进入用户家目录,创建挂载点
bash
cd
mkdir mnt
4.2. 将nfs设置的文件系统挂载到mnt目录(挂载点)
bash
执行下面的挂载命令:
sudo mount 192.168.30.5:/opt/rootfs ./mnt

查看挂载点mnt,如果mnt中能够看到文件系统中的文件,说明挂载成功,否则失败
peter@ubuntu:~$ ls mnt/
bin  dev  etc  lib  linuxrc  mnt  proc  root  sbin  sys  tmp  usr  var
四. 在开发板中配置uboot参数
1. 连接好开发板和电脑
2. 配置uboot参数
bash
打开开发板电源,3秒倒计时结束前按回车,进入uboot命令行: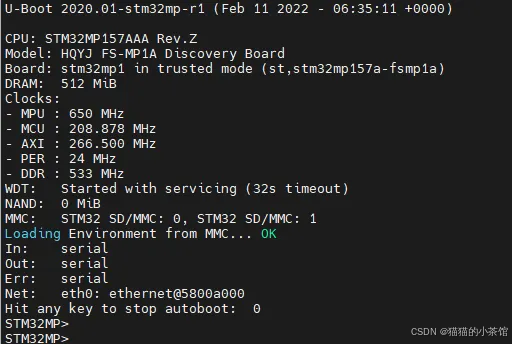
bash
STM32MP> setenv serverip 192.168.30.73      //ubuntu的ip
STM32MP> setenv ipaddr 192.168.30.133       //开发板的ip
STM32MP> setenv gatewayip 192.168.30.1
STM32MP> setenv bootcmd tftp 0xc2000000 uImage\;tftp 0xc1000000 stm32mp157a-fsmp1a.dtb \;bootm 0xc2000000 - 0xc1000000
STM32MP> setenv bootargs root=/dev/nfs nfsroot=192.168.30.73:/opt/rootfs ip=192.168.30.133 rootwait rw earlyprintk console=ttySTM0,115200 init=/linuxrc
STM32MP> saveenv
3. 重启开发板,观察结果
bash
[    3.348600] stm32_rtc 5c004000.rtc: setting system clock to 2000-01-02T07:23:40 UTC (946797820)
[    3.357684] stm32-dwmac 5800a000.ethernet eth0: PHY [stmmac-0:00] driver [Generic PHY]
[    3.375199] dwmac4: Master AXI performs any burst length
[    3.379113] stm32-dwmac 5800a000.ethernet eth0: No Safety Features support found
[    3.386534] stm32-dwmac 5800a000.ethernet eth0: IEEE 1588-2008 Advanced Timestamp supported
[    3.395198] stm32-dwmac 5800a000.ethernet eth0: registered PTP clock
[    3.401247] stm32-dwmac 5800a000.ethernet eth0: configuring for phy/rgmii-id link mode
[    6.568082] stm32-dwmac 5800a000.ethernet eth0: Link is Up - 100Mbps/Full - flow control rx/tx
[    6.616289] IP-Config: Guessing netmask 255.255.255.0
[    6.619873] IP-Config: Complete:
[    6.623101]      device=eth0, hwaddr=00:80:e1:42:60:17, ipaddr=192.168.30.7, mask=255.255.255.0, gw=255.255.255.255
[    6.633621]      host=192.168.30.7, domain=, nis-domain=(none)
[    6.639542]      bootserver=255.255.255.255, rootserver=192.168.30.5, rootpath=
[    6.647958] ALSA device list:
[    6.649645]   #0: STM32MP1-FSMP1A
[   11.684794] VFS: Mounted root (nfs filesystem) on device 0:17.
[   11.764482] devtmpfs: mounted
[   11.768391] Freeing unused kernel memory: 1024K
[   11.806704] Run /linuxrc as init process
/etc/init.d/rcS: line 6: can't create /proc/sys/kernel/hotplug: nonexistent directory
[root@fsmp1a ]# ls
bin      etc      linuxrc  proc     sbin     tmp      var
dev      lib      mnt      root     sys      usr
[root@fsmp1a ]# [   36.966374] reg11: disabling
[   36.967807] reg18: disabling

[root@fsmp1a ]# ls
bin      etc      linuxrc  proc     sbin     tmp      var
dev      lib      mnt      root     sys      usr
五. 在开发板中运行C程序
1. 安装交叉编译器
bash
1》在ubuntu中创建相关目录
mkdir mp157
cd mp157/
mkdir driver kernel  tool

2》将交叉编译器安装包拷贝到tool目录中
	peter@ubuntu:~/mp157/tool$ ls
	en.SDK-x86_64-stm32mp1-openstlinux-5.4-dunfell-mp1-20-06-24.tar.xz
3》解压安装包
	tar -xvf en.SDK-x86_64-stm32mp1-openstlinux-5.4-dunfell-mp1-20-06-24.tar.xz
4》创建安装的目录
	mkdir /opt/sdk
5》进入解压交叉编译器目录
	cd stm32mp1-openstlinux-5.4-dunfell-mp1-20-06-24/sdk/
6》运行安装程序
	./st-image-weston-openstlinux-weston-stm32mp1-x86_64-toolchain-3.1-openstlinux-5.4-dunfell-mp1-20-06-24.sh
	按回车,开始安装
    ST OpenSTLinux - Weston - (A Yocto Project Based Distro) SDK installer version 3.1-openstlinux-5.4-dunfell-mp1-20-06-24
===========================================================================================================
Enter target directory for SDK (default: /opt/st/stm32mp1/3.1-openstlinux-5.4-dunfell-mp1-20-06-24): /opt/sdk     //指定安装目录
You are about to install the SDK to "/opt/sdk". Proceed [Y/n]? y      //确定
Extracting SDK....................................................................................................................................................................................................................................................done
Setting it up...done
SDK has been successfully set up and is ready to be used.
Each time you wish to use the SDK in a new shell session, you need to source the environment setup script e.g.
 $ . /opt/sdk/environment-setup-cortexa7t2hf-neon-vfpv4-ostl-linux-gnueabi


7》查看交叉编译器的版本信息
	peter@ubuntu:~$ $CC --version
    arm-ostl-linux-gnueabi-gcc (GCC) 9.3.0
    Copyright (C) 2019 Free Software Foundation, Inc.
    This is free software; see the source for copying conditions.  There is NO
    warranty; not even for MERCHANTABILITY or FITNESS FOR A PARTICULAR PURPOSE.
2. 编译C程序
bash
$CC hello.c -o hello3. 将编译好的 程序在开发板中运行
bash
拷贝到开发板的文件系统中
cp hello /opt/rootfs
在开发板的系统中运行:
[root@fsmp1a ]# ./hello
hell world
hell world
hell world
hell world
hell world
hell world
hell world
hell world
hell world
hell world
hell world
以上,欢迎有从事同行业的电子信息工程、互联网通信、嵌入式开发的朋友共同探讨与提问,我可以提供实战演示或模板库。希望内容能够对你产生帮助!