文章目录
-
- [openpnp - Smoothieware - LPC17xx-DFU-Bootloader - 固件调试环境搭建](#openpnp - Smoothieware - LPC17xx-DFU-Bootloader - 固件调试环境搭建)
- 概述
- 笔记
- 启动的脚本(start_eclipsecpp_with_msys2_arm_gcc_and_make.bat)中,要有arm-gcc工具链
- 更改openocd用到的硬件调试器
- 拷贝JLink.cfg为自己的配置文件
-
- [my-jlink-swd.cfg v0](#my-jlink-swd.cfg v0)
- [my-jlink-swd.cfg v1](#my-jlink-swd.cfg v1)
- 备注
- END
openpnp - Smoothieware - LPC17xx-DFU-Bootloader - 固件调试环境搭建
概述
接着笔记(Smoothieware - LPC17xx-DFU-Bootloader - study)做实验。
前面将硬件环境(openpnp - Smoothieware - MKS SGEN_L V1.0 + JLink-edu-mini 连接测试)搭好了。
现在搭建软件调试环境。
上次笔记(Smoothieware - LPC17xx-DFU-Bootloader - study),软件环境大致搭好了,但是那次实验是烧录bootloader, 并没有单步。
按照上次笔记留下的环境单步调试,有问题,修正一下。
笔记
启动的脚本(start_eclipsecpp_with_msys2_arm_gcc_and_make.bat)中,要有arm-gcc工具链
start_eclipsecpp_with_msys2_arm_gcc_and_make.bat启动的环境中,有arm-gcc工具链,否则eclipse不能正确编译工程。
但是单步调试时,eclipse报错,arm-none-eabi-gdb --version 执行失败。
查了一下, msys2环境中,咋没有arm-none-eabi-gdb呢?
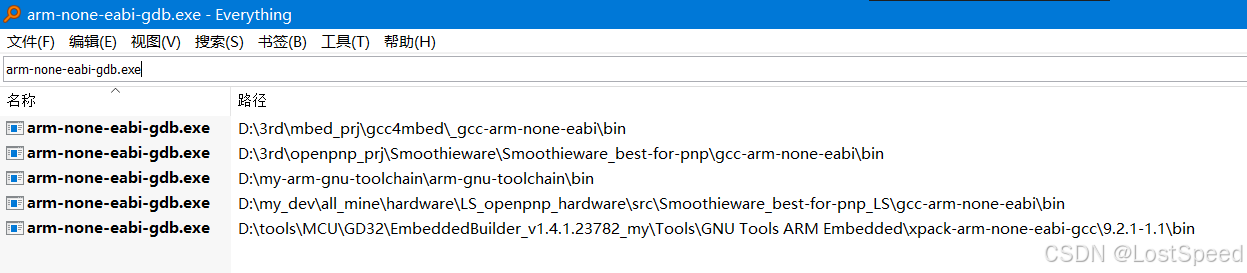

好奇怪,msys2中有arm-none-eabi-gcc.exe, 但是没有arm-none-eabi-gdb.exe. 这不都是一套东西么?
bash
D:\tools\eclipse>where arm-none-eabi-gcc
D:\my-arm-gnu-toolchain\arm-gnu-toolchain\bin\arm-none-eabi-gcc.exe
C:\msys64\mingw64\bin\arm-none-eabi-gcc.exe

D:\tools\eclipse>where arm-none-eabi-gdb
D:\my-arm-gnu-toolchain\arm-gnu-toolchain\bin\arm-none-eabi-gdb.exe

D:\tools\eclipse>
查了一下,arm-none-eabi-gdb在mysys2中要另外安装的,和arm-gcc不是一个包...
bash
chenx@ls3561 MINGW64 ~
$ pacman -Ss arm-none-eabi-gdb
mingw32/mingw-w64-i686-gdb-multiarch 16.3-1 (mingw-w64-i686-toolchain)
    GNU Debugger (supports all targets)
mingw64/mingw-w64-x86_64-gdb-multiarch 16.3-1 (mingw-w64-x86_64-toolchain) [installed]
    GNU Debugger (supports all targets)
ucrt64/mingw-w64-ucrt-x86_64-gdb-multiarch 16.3-1 (mingw-w64-ucrt-x86_64-toolchain)
    GNU Debugger (supports all targets)
clang64/mingw-w64-clang-x86_64-gdb-multiarch 16.3-1
    GNU Debugger (supports all targets)
确认mysys2中已经安装了arm-gdb的包,为啥where不到arm-none-eabi-gdb呢?
那无法再用mysys2来重新安装arm-none-eabi-gdb,只能用从arm官方下载的工具链。
改一下 start_eclipsecpp_with_msys2_arm_gcc_and_make.bat,将arm-gcc的官方工具链加到path中。
start_eclipsecpp_with_msys2_arm_gcc_and_make.bat
将mysys2环境放在arm-gcc官方工具链前面,保证编译时,和mysys2命令行的环境一致,调试时,mysys2中没有arm-gdb, 就用arm-gcc官方的。
bash
@echo off
rem @file start_eclipsecpp_with_arm_gcc_and_make.bat
rem @breif 通用的arm-gcc工具链,编译哪个工程都可以
rem C:\msys64\mingw64\bin 中有arm-none-eabi-*.exe 和 make.exe
rem C:\msys64\usr\bin 中 curl.exe

set path=D:\my-arm-gnu-toolchain\arm-gnu-toolchain;D:\my-arm-gnu-toolchain\arm-gnu-toolchain\bin;%path%
set path=C:\msys64\mingw64\bin;C:\msys64\usr\bin;%path%

rem D:\tools\eclipse\eclipse-embedcpp-2025-09-R-win32-x86_64\eclipse 中有 eclipse-cpp.exe
set path=D:\tools\eclipse\eclipse-embedcpp-2025-09-R-win32-x86_64\eclipse;%path%

start eclipse.exe
cmd /k "echo %~nx0 && title %~nx0"
启动bat, eclipse-cpp启动后,在bat命令行中验证一下路径优先级。
bash
start_eclipsecpp_with_msys2_arm_gcc_and_make.bat

D:\tools\eclipse>where arm-none-eabi-gcc
C:\msys64\mingw64\bin\arm-none-eabi-gcc.exe
D:\my-arm-gnu-toolchain\arm-gnu-toolchain\bin\arm-none-eabi-gcc.exe

D:\tools\eclipse>
可以了,可以保证eclipse-cpp和mysys2-mingw64命令行环境编译工程的效果相同。
更改openocd用到的硬件调试器
我这次实验,用的硬件调试器是JLink-edu-mini. 要在eclipse-cpp配置中,将openocd用到的调试器改为JLink.
bash
-f interface/jlink.cfg -f target/lpc17xx.cfg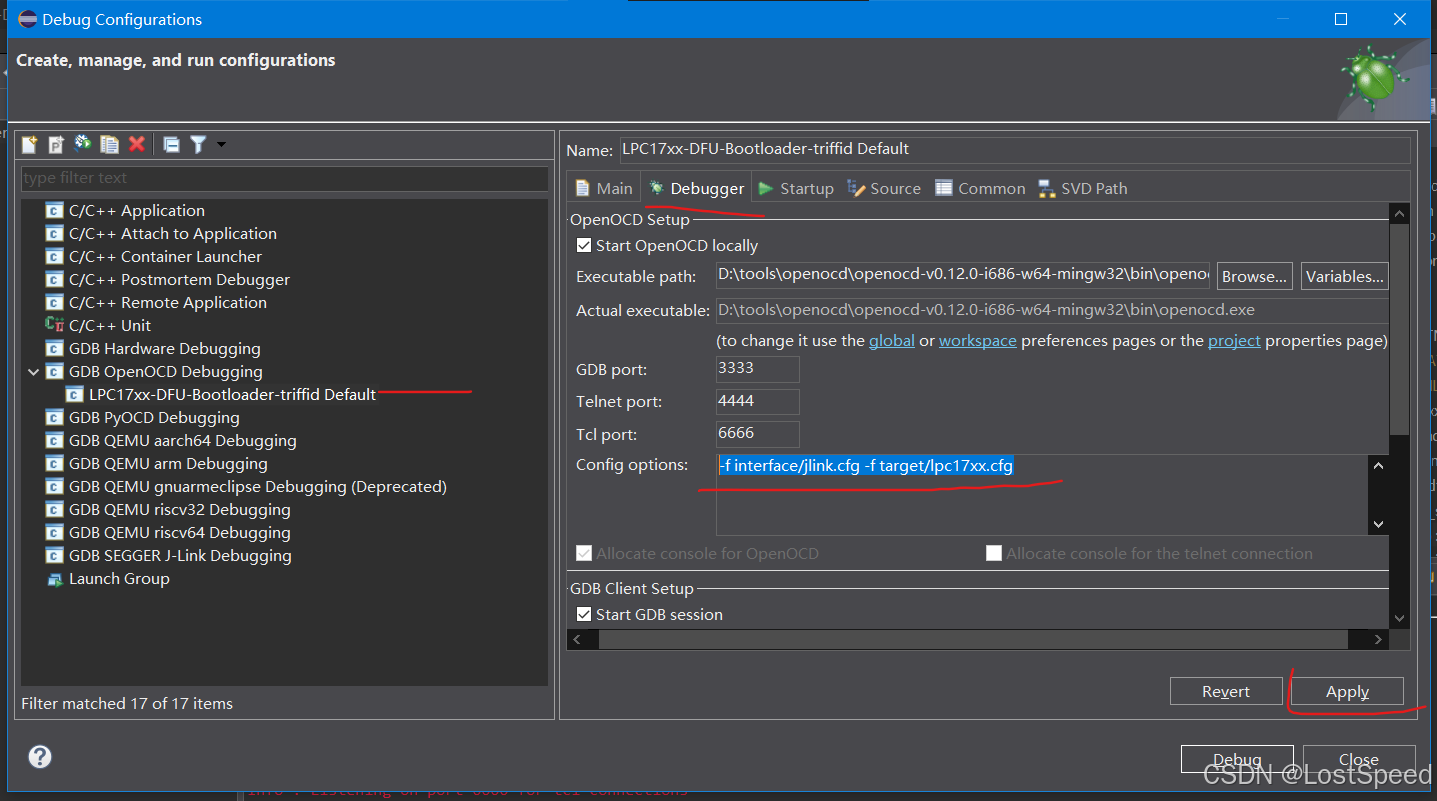
调试时,会显示LIBUSB_ERROR_NOT_FOUND失败信息。
查资料,说驱动不对。
需要将JLINK驱动换为普通USB驱动才行。
去(https://zadig.akeo.ie/)去下载zadig-2.9.exe, 以管理员身份运行。
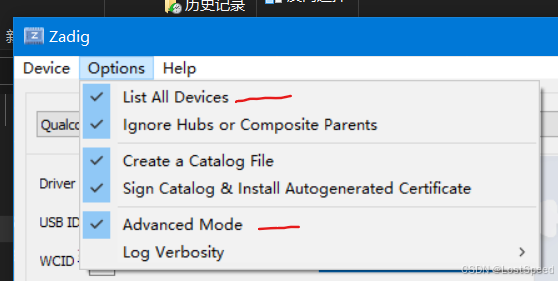

JLink驱动 ,原来是JLINK自己的,换成libusb-win32(v1.4.0.0)后,用openocd命令行测试,不好使。
换成WinUSB(V6.1.7600.16385)是好使的。
现在openocd可以连接调试器了,但是用JFLASH连接调试器失效了,说通过USB找不到调试器。
在重新使用JFLASH之前,需要将JLINK官方软件重新装一下,让JLINK使用自己的USB驱动才行。
拷贝JLink.cfg为自己的配置文件
JLink.cfg默认是用JTAG接口来调试的,板子是SWD接口。
配置文件在D:\tools\openocd\openocd-v0.12.0-i686-w64-mingw32\share\openocd\scripts\interface
拷贝JLink.cfg为my-jlink-swd.cfg, 增加SWD接口选择的命令
my-jlink-swd.cfg v0
bash
# SPDX-License-Identifier: GPL-2.0-or-later

#
# SEGGER J-Link
#
# http://www.segger.com/jlink.html
#

adapter driver jlink

# The serial number can be used to select a specific device in case more than
# one is connected to the host.
#
# Example: Select J-Link with serial number 123456789
#
# adapter serial 123456789

transport select swd
用openocd命令行临时测试
bash
openocd -f interface/my-jlink-swd.cfg -f target/lpc17xx.cfg测试成功,已经在监听端口了。

my-jlink-swd.cfg v1
在自己的配置文件中,除了指定SWD接口外,还可以指定通讯速率
用JFLASH测试过,4MHZ的通讯速率是可以的。
bash
# SPDX-License-Identifier: GPL-2.0-or-later

#
# SEGGER J-Link
#
# http://www.segger.com/jlink.html
#

adapter driver jlink

# The serial number can be used to select a specific device in case more than
# one is connected to the host.
#
# Example: Select J-Link with serial number 123456789
#
# adapter serial 123456789

# debug interface = SWD
transport select swd

# adapter speed = 4MHZ
adapter speed 4000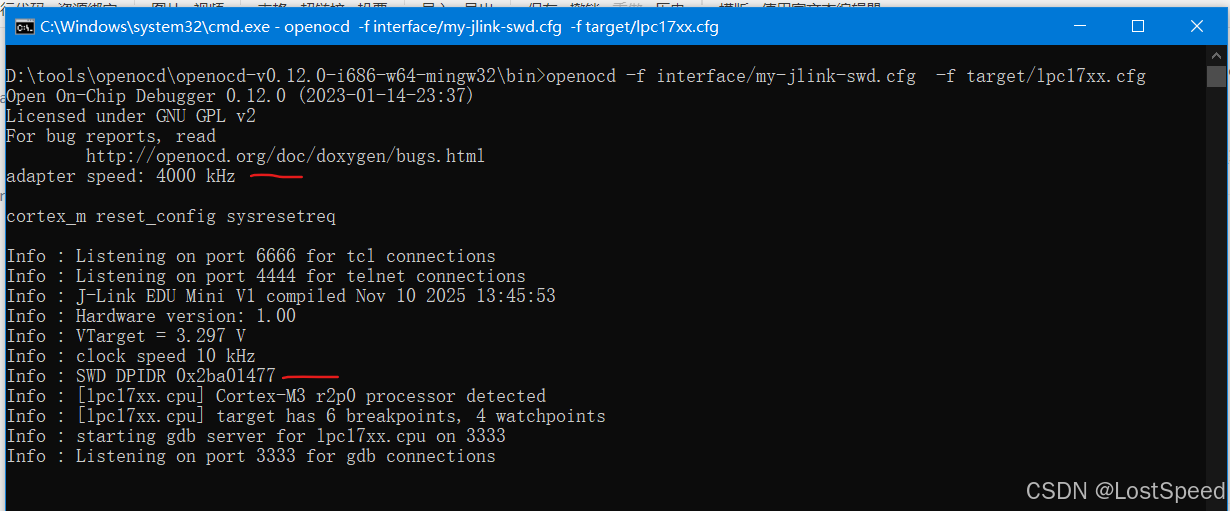
现在可以在eclipse-cpp中设置openocd参数,试试是否可以单步调试?
bash
-f interface/my-jlink-swd.cfg -f target/lpc17xx.cfg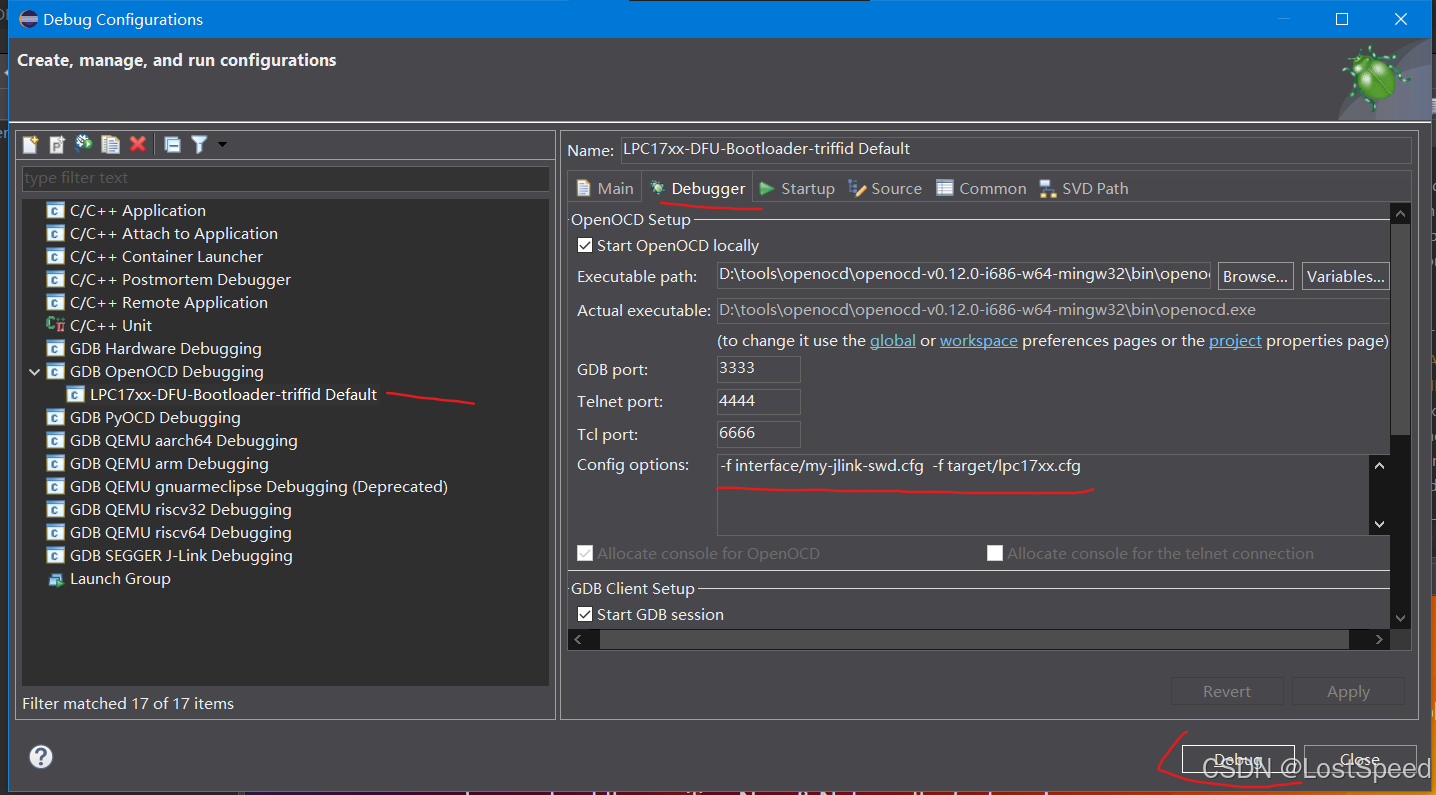
可以正常调试。
在能正常调试之前,有一些超时告警,不管了。
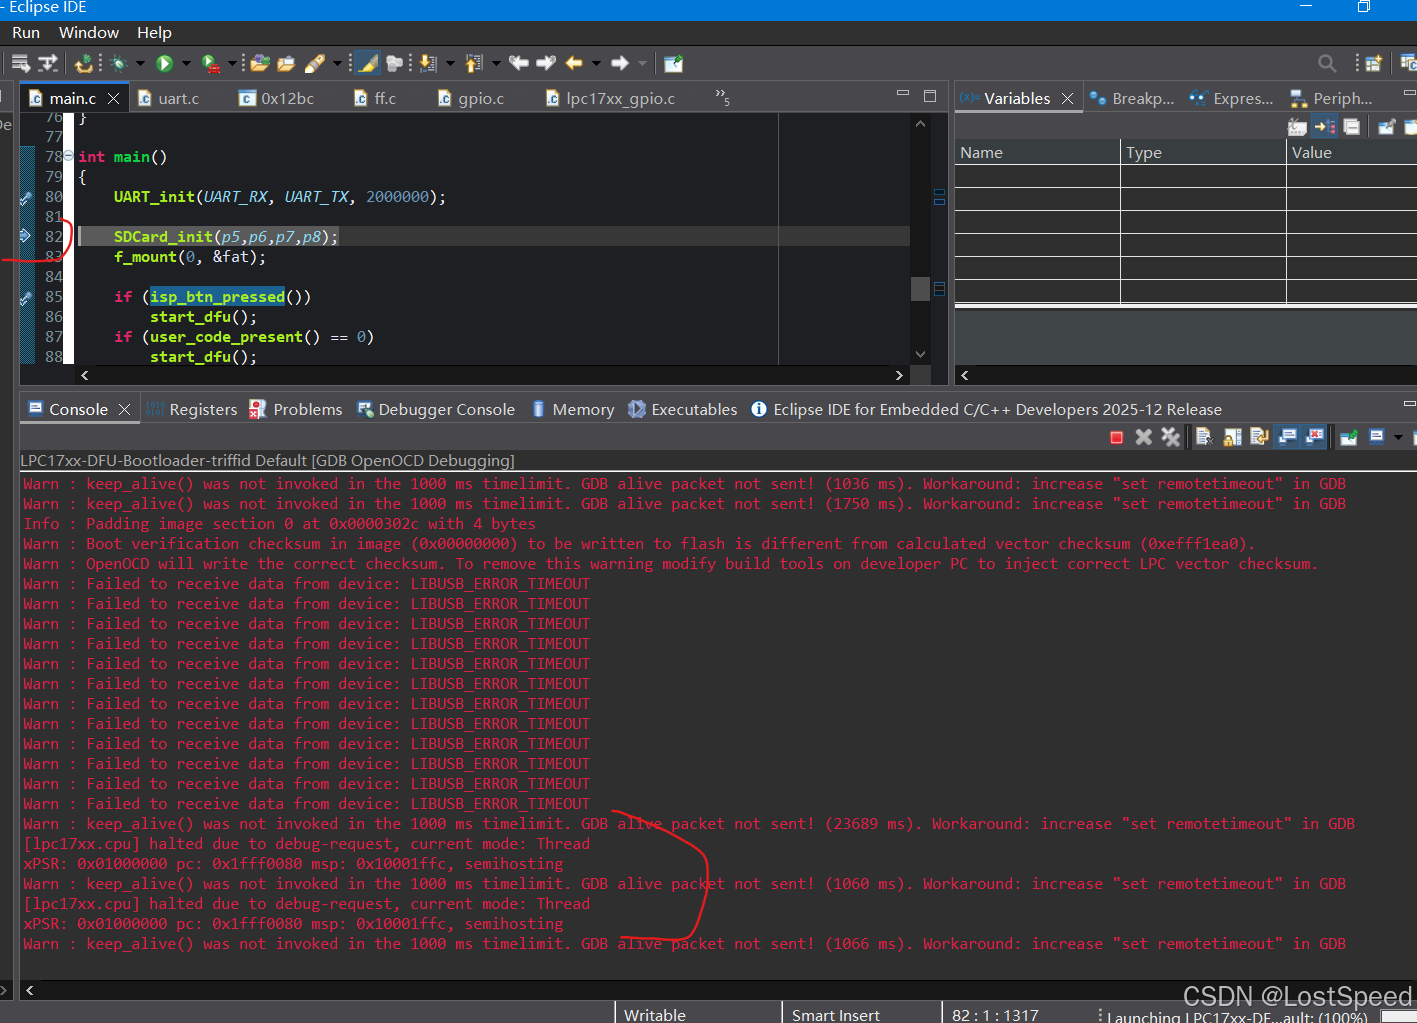
bash
Open On-Chip Debugger 0.12.0 (2023-01-14-23:37)
Licensed under GNU GPL v2
For bug reports, read
	http://openocd.org/doc/doxygen/bugs.html
adapter speed: 4000 kHz

cortex_m reset_config sysresetreq

Started by GNU MCU Eclipse
Info : Listening on port 6666 for tcl connections
Info : Listening on port 4444 for telnet connections
Info : J-Link EDU Mini V1 compiled Nov 10 2025 13:45:53
Info : Hardware version: 1.00
Info : VTarget = 3.298 V
Info : clock speed 10 kHz
Info : SWD DPIDR 0x2ba01477
Info : [lpc17xx.cpu] Cortex-M3 r2p0 processor detected
Info : [lpc17xx.cpu] target has 6 breakpoints, 4 watchpoints
Info : starting gdb server for lpc17xx.cpu on 3333
Info : Listening on port 3333 for gdb connections
Info : accepting 'gdb' connection on tcp/3333
Warn : keep_alive() was not invoked in the 1000 ms timelimit. GDB alive packet not sent! (1765 ms). Workaround: increase "set remotetimeout" in GDB
Warn : Prefer GDB command "target extended-remote :3333" instead of "target remote :3333"
[lpc17xx.cpu] halted due to debug-request, current mode: Thread
xPSR: 0x01000000 pc: 0x1fff0080 msp: 0x10001ffc
[lpc17xx.cpu] halted due to debug-request, current mode: Thread
xPSR: 0x01000000 pc: 0x1fff0080 msp: 0x10001ffc, semihosting
Warn : keep_alive() was not invoked in the 1000 ms timelimit. GDB alive packet not sent! (1036 ms). Workaround: increase "set remotetimeout" in GDB
Warn : keep_alive() was not invoked in the 1000 ms timelimit. GDB alive packet not sent! (1750 ms). Workaround: increase "set remotetimeout" in GDB
Info : Padding image section 0 at 0x0000302c with 4 bytes
Warn : Boot verification checksum in image (0x00000000) to be written to flash is different from calculated vector checksum (0xefff1ea0).
Warn : OpenOCD will write the correct checksum. To remove this warning modify build tools on developer PC to inject correct LPC vector checksum.
Warn : Failed to receive data from device: LIBUSB_ERROR_TIMEOUT
Warn : Failed to receive data from device: LIBUSB_ERROR_TIMEOUT
Warn : Failed to receive data from device: LIBUSB_ERROR_TIMEOUT
Warn : Failed to receive data from device: LIBUSB_ERROR_TIMEOUT
Warn : Failed to receive data from device: LIBUSB_ERROR_TIMEOUT
Warn : Failed to receive data from device: LIBUSB_ERROR_TIMEOUT
Warn : Failed to receive data from device: LIBUSB_ERROR_TIMEOUT
Warn : Failed to receive data from device: LIBUSB_ERROR_TIMEOUT
Warn : Failed to receive data from device: LIBUSB_ERROR_TIMEOUT
Warn : Failed to receive data from device: LIBUSB_ERROR_TIMEOUT
Warn : Failed to receive data from device: LIBUSB_ERROR_TIMEOUT
Warn : Failed to receive data from device: LIBUSB_ERROR_TIMEOUT
Warn : keep_alive() was not invoked in the 1000 ms timelimit. GDB alive packet not sent! (23689 ms). Workaround: increase "set remotetimeout" in GDB
[lpc17xx.cpu] halted due to debug-request, current mode: Thread
xPSR: 0x01000000 pc: 0x1fff0080 msp: 0x10001ffc, semihosting
Warn : keep_alive() was not invoked in the 1000 ms timelimit. GDB alive packet not sent! (1060 ms). Workaround: increase "set remotetimeout" in GDB
[lpc17xx.cpu] halted due to debug-request, current mode: Thread
xPSR: 0x01000000 pc: 0x1fff0080 msp: 0x10001ffc, semihosting
Warn : keep_alive() was not invoked in the 1000 ms timelimit. GDB alive packet not sent! (1066 ms). Workaround: increase "set remotetimeout" in GDB
备注
至此,固件单步调试的环境(MKS SGEN_L V1.0 + JLink-edu-mini + Smoothieware/LPC17xx-DFU-Bootloader)就能用了。