系列概述
临近本科毕业,考虑到未来读研的方向以及自己的兴趣方向,我选择的课题大致为"基于VLA结构的指令驱动式机械臂仿真系统的实现"。
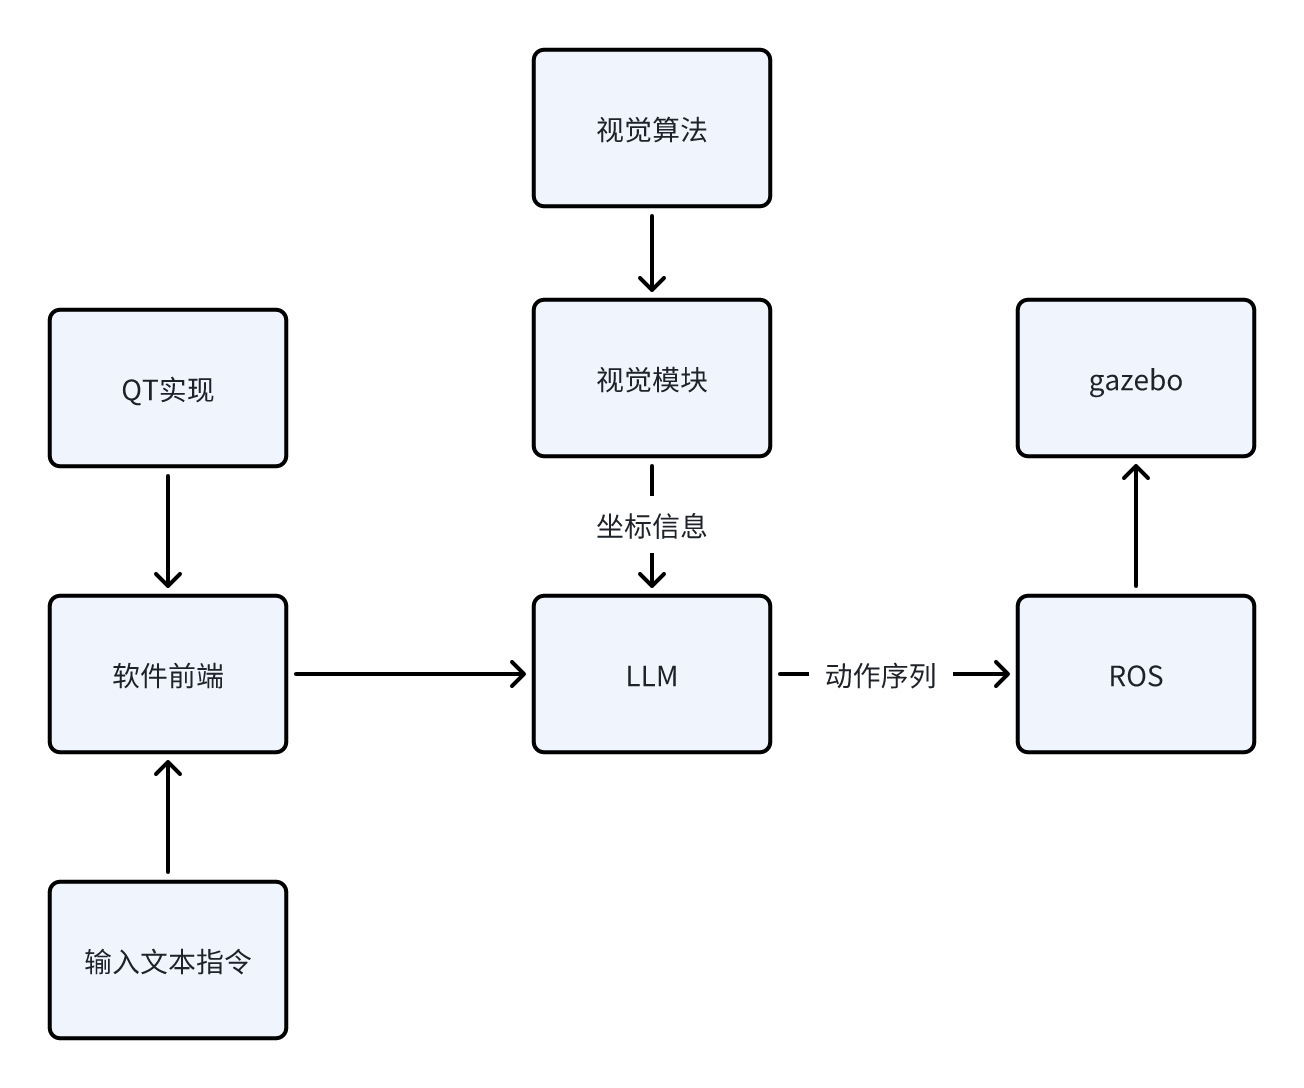
为什么说是VLA(Vision-Language-Action)"结构",因为就目前而言,我认为在目前剩下的几个月时间内从0实现一个正儿八经的VLA模型,所需要的时间、资金、模型资源的获取都是比较麻烦的。因此,我选择使用ROS1+LLM+视觉算法来实现一个"伪VLA"结构,就目前阶段(开题一个月)而言,我能给出的场景示意如下:
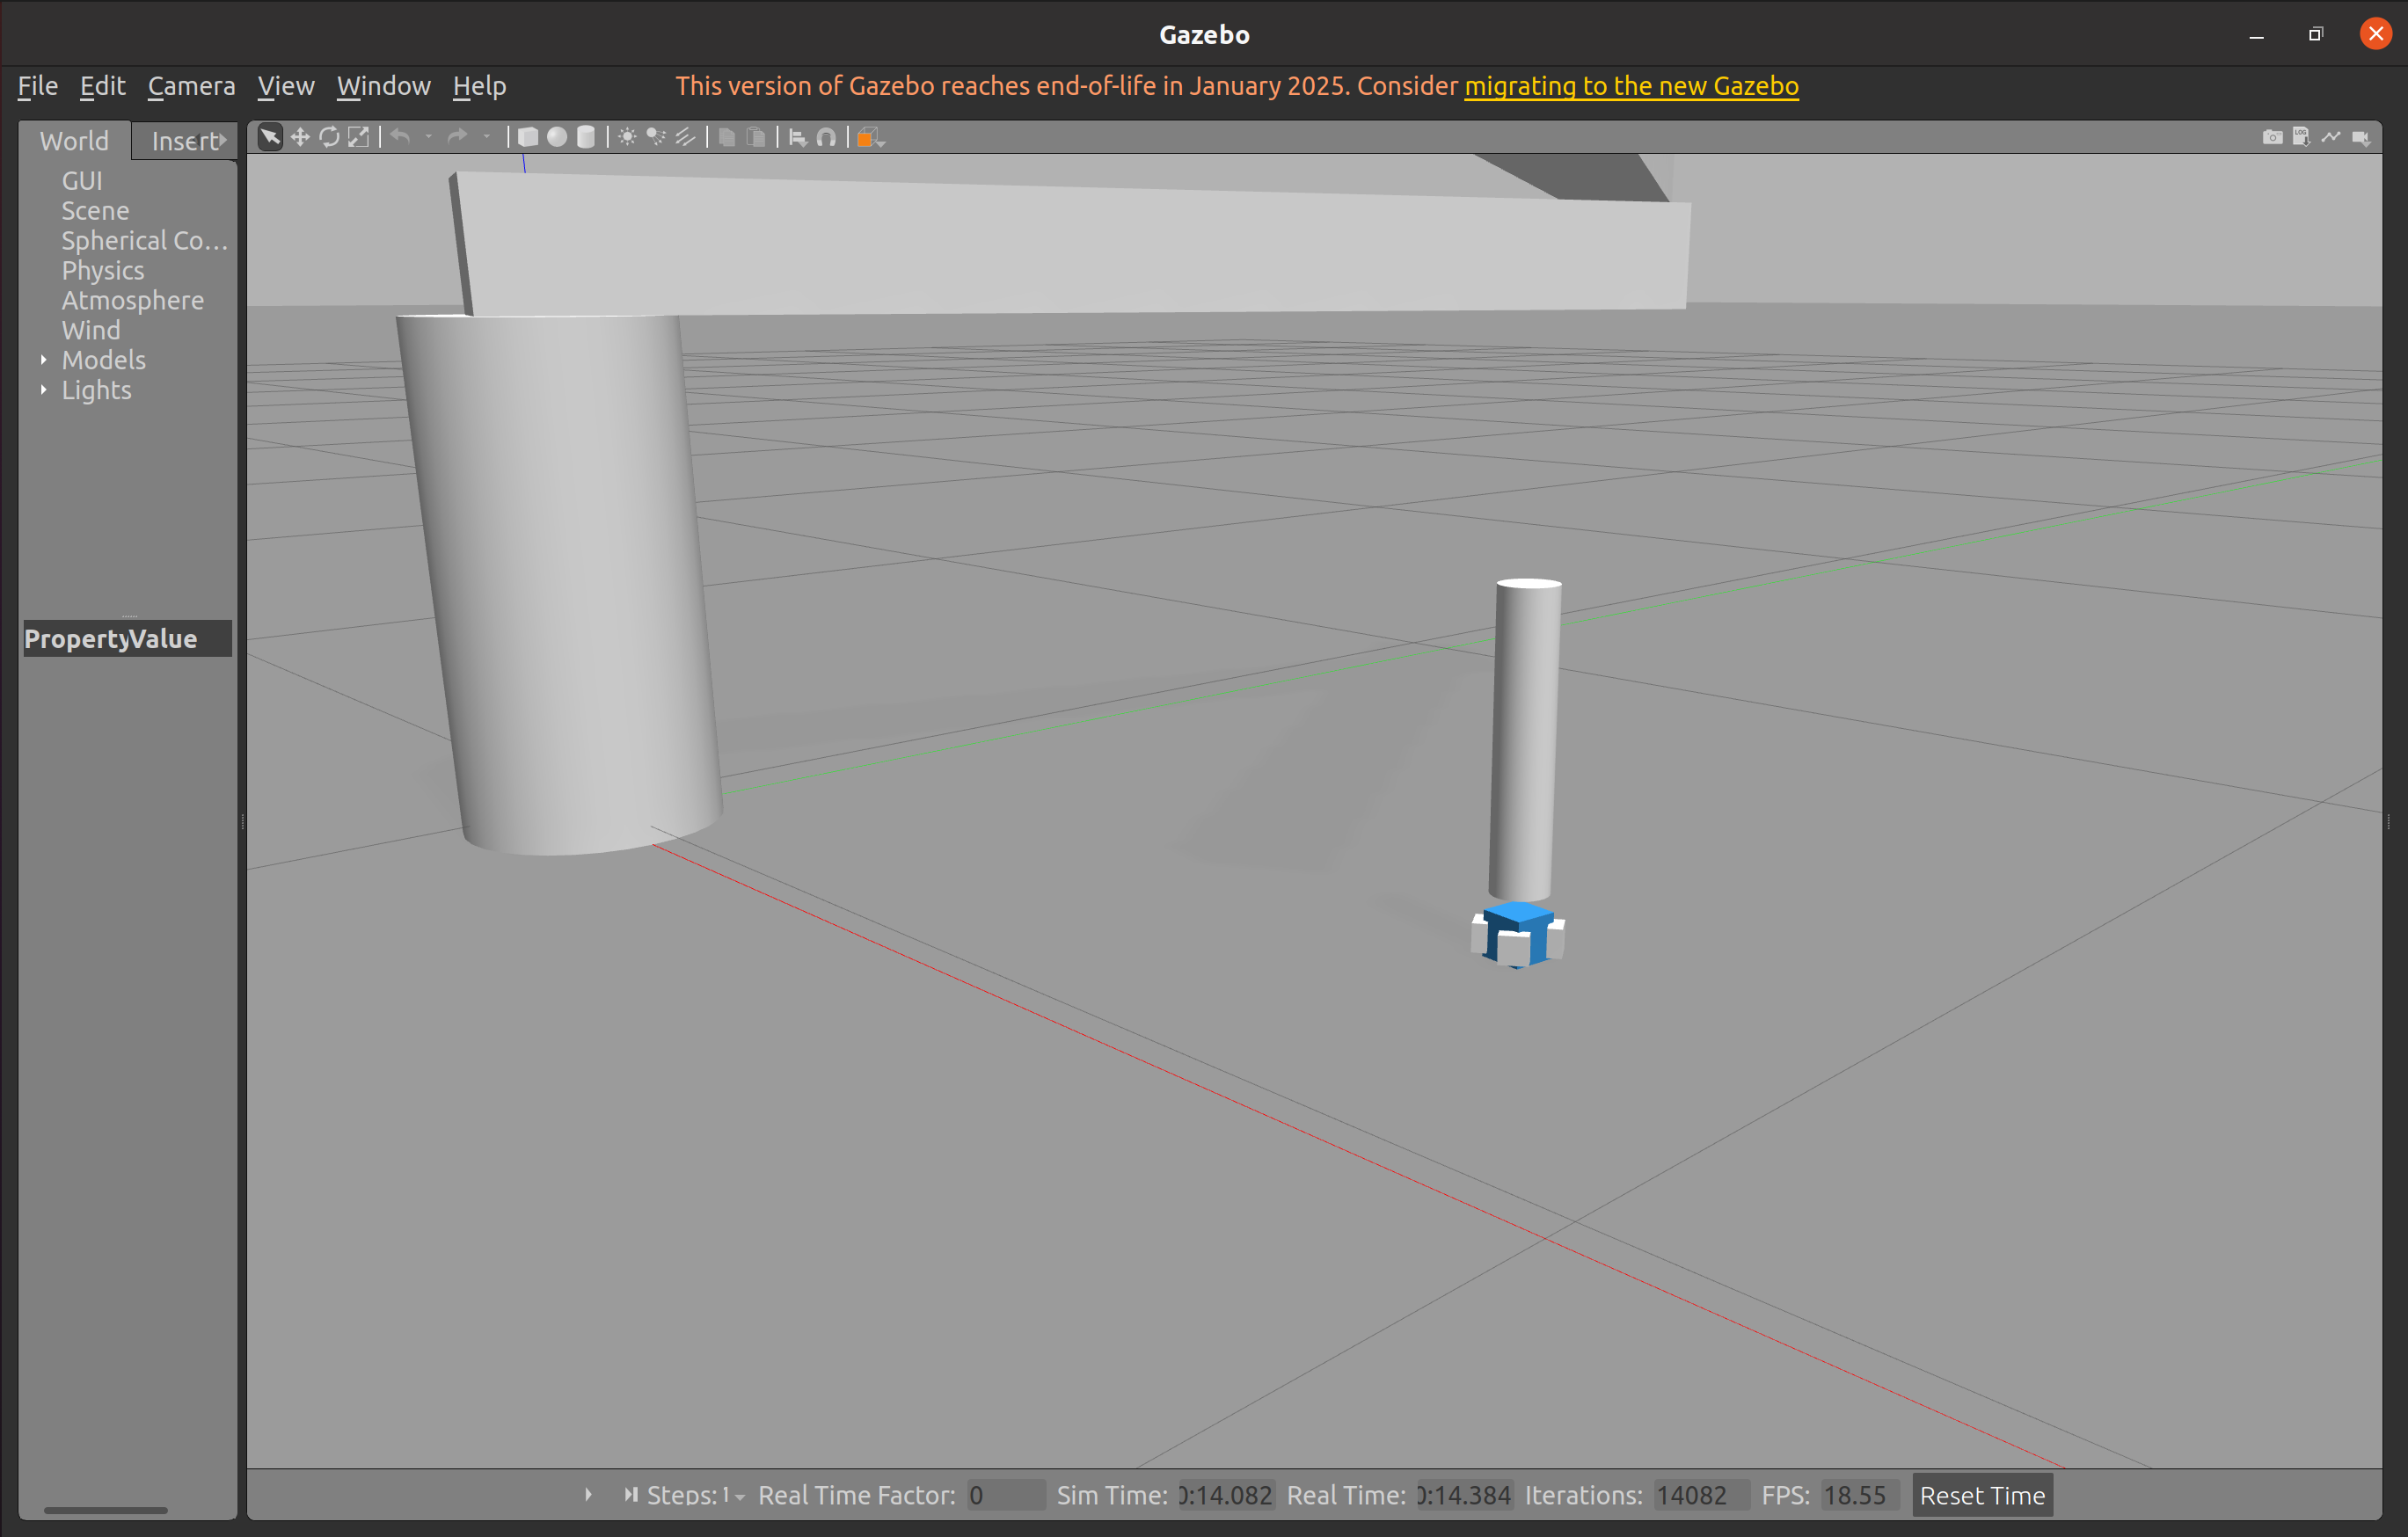
场景:指令输入"机械臂将蓝色方块夹起放到红色圆柱体上面",系统接收指令后,先通过视觉模块确定当前系统中各个物体的坐标,再通过开源大模型,结合已知坐标信息,通过预设的prompt生成动作序列,作为参数送入ROS1架构下的启动文件中,实现动作行为在gazebo下的仿真。
当前阶段我能给出粗糙的逻辑示意图如下:
接下来,我将给出目前阶段我所计划的步骤实现,之后该系列的博客都会依照下面的框架进行更新。由于我也是初次入门ROS以及深度学习相关的内容,所以本系列博客更多的充当学习笔记的作用,在书写过程中难免会出现错误以及天真的理论理解,还请各位指正。
我将该项目的实现分成下面几个步骤(每个步骤下的博客会一步一步地更新):
- 实现机械臂在ROS1+Gazebo环境下的控制、仿真。目标效果是给出任意坐标的方块,机械臂要能稳定的抓取,并放置到指定的坐标。
该步骤博客目录如下:
https://blog.csdn.net/m0_75114363/article/details/156164226?spm=1001.2014.3001.5501
https://blog.csdn.net/m0_75114363/article/details/156166592?spm=1001.2014.3001.5502
https://blog.csdn.net/m0_75114363/article/details/156426200?spm=1001.2014.3001.5501
-
加入视觉模块与算法。目标效果是在仿真环境下,对于随意放置的方块,视觉系统需要计算出其真实坐标给予机械臂控制模块,使得机械臂能够实现对其的抓取与放置。
-
加入视觉模块与算法。目标效果是在仿真环境下,对于随意放置的方块,视觉系统需要计算出其真实坐标给予机械臂控制模块,使得机械臂能够实现对其的抓取与放置。
该步骤博客目录如下:
- 加入LLM(本地部署或使用API)。目标效果是对于输入的任意文本指令,LLM能根据预设的prompt,结合视觉系统给予的信息,给予执行模块对应的动作序列,使得机械臂正确地实现输入的文本指令想达到的效果,实现V-L-A的完整交互。
该步骤博客目录如下:
- 实现整体系统的优化与完善,包括基于QT搭建软件前端、优化模型外观、加入更复杂的机械臂、实现更复杂的指令解析与运行。
该步骤博客目录如下:
我所使用的环境如下:
-
系统:Ubuntu20.04
-
ROS1:Noetic
项目地址:
https://github.com/Dukiyaaa/Cmd2Action_ROS1
此外,额外说明一下为什么这个项目会选择ROS1做框架而不是更现代的ROS2。其实我在初期也是用的ROS2的框架,但发现机械臂夹爪始终无法夹起物体,网上相关的机械臂开源资料基本都是基于ROS1的,加上ROS1提供了grasp_fix插件可防止物体掉落,所以最终我选择了ROS1做项目框架,同时也希望自己在后期能够在ROS2上成功迁移项目。
章节概述
本章内容,我完成的效果是给出任意坐标的方块,机械臂能稳定的抓取,并放置到指定的坐标。
对于该目标的实现,我将其分为以下几个部分:
-
物体夹取的实现--夹爪行为控制+grasp_fix插件
-
scara机械臂运动学逆解
1. 物体夹取的实现
对于物体夹取,我将从下面几个方面阐述:
-
基于ros_control实现机械臂体+夹爪的运动控制
-
加入grasp_fix插件帮助稳定夹取
1.1. 基于ros_control实现机械臂体+夹爪的运动控制
关于ros_control是什么,很多文章都有解释,我就不再细讲了,在我们的项目中,ros_control 充当了上层控制算法与底层仿真器之间的标准化接口。它为每个关节配置了位置控制器,使得我们的 Python 程序只需发布简单的目标位置(如 rotation1=1.57 弧度),ros_control 就会自动完成:位置跟踪、PID调节、力矩计算等复杂工作。这种设计让我们可以专注于高层逻辑(运动学、抓取策略),而不必关心底层的关节驱动细节。
1.1.1. 配置ros_control
我在下面三个文件中进行了相关的配置:
1.robot.ros_control.xacro
<?xml version="1.0"?>
<robot xmlns:xacro="http://www.ros.org/wiki/xacro">
    <!-- ROS1 Gazebo + ros_control 接口定义 -->
    <xacro:macro name="robot_ros_control">
        <!-- transmissions for ros_control -->
        <transmission name="rotation1_transmission">
            <type>transmission_interface/SimpleTransmission</type>
            <joint name="rotation1">
                <hardwareInterface>hardware_interface/PositionJointInterface</hardwareInterface>
            </joint>
            <actuator name="rotation1_motor">
                <hardwareInterface>hardware_interface/PositionJointInterface</hardwareInterface>
                <mechanicalReduction>1</mechanicalReduction>
            </actuator>
        </transmission>

        <transmission name="rotation2_transmission">
            <type>transmission_interface/SimpleTransmission</type>
            <joint name="rotation2">
                <hardwareInterface>hardware_interface/PositionJointInterface</hardwareInterface>
            </joint>
            <actuator name="rotation2_motor">
                <hardwareInterface>hardware_interface/PositionJointInterface</hardwareInterface>
                <mechanicalReduction>1</mechanicalReduction>
            </actuator>
        </transmission>

        <transmission name="gripper_transmission">
            <type>transmission_interface/SimpleTransmission</type>
            <joint name="gripper_joint">
                <hardwareInterface>hardware_interface/PositionJointInterface</hardwareInterface>
            </joint>
            <actuator name="gripper_motor">
                <hardwareInterface>hardware_interface/PositionJointInterface</hardwareInterface>
                <mechanicalReduction>1</mechanicalReduction>
            </actuator>
        </transmission>

        <transmission name="finger1_transmission">
            <type>transmission_interface/SimpleTransmission</type>
            <joint name="finger1_joint">
                <hardwareInterface>hardware_interface/PositionJointInterface</hardwareInterface>
            </joint>
            <actuator name="finger1_motor">
                <hardwareInterface>hardware_interface/PositionJointInterface</hardwareInterface>
                <mechanicalReduction>1</mechanicalReduction>
            </actuator>
        </transmission>

        <transmission name="finger2_transmission">
            <type>transmission_interface/SimpleTransmission</type>
            <joint name="finger2_joint">
                <hardwareInterface>hardware_interface/PositionJointInterface</hardwareInterface>
            </joint>
            <actuator name="finger2_motor">
                <hardwareInterface>hardware_interface/PositionJointInterface</hardwareInterface>
                <mechanicalReduction>1</mechanicalReduction>
            </actuator>
        </transmission>

        <transmission name="finger3_transmission">
            <type>transmission_interface/SimpleTransmission</type>
            <joint name="finger3_joint">
                <hardwareInterface>hardware_interface/PositionJointInterface</hardwareInterface>
            </joint>
            <actuator name="finger3_motor">
                <hardwareInterface>hardware_interface/PositionJointInterface</hardwareInterface>
                <mechanicalReduction>1</mechanicalReduction>
            </actuator>
        </transmission>

        <transmission name="finger4_transmission">
            <type>transmission_interface/SimpleTransmission</type>
            <joint name="finger4_joint">
                <hardwareInterface>hardware_interface/PositionJointInterface</hardwareInterface>
            </joint>
            <actuator name="finger4_motor">
                <hardwareInterface>hardware_interface/PositionJointInterface</hardwareInterface>
                <mechanicalReduction>1</mechanicalReduction>
            </actuator>
        </transmission>

        <gazebo>
            <plugin name="gazebo_ros_control" filename="libgazebo_ros_control.so"/>
        </gazebo>

        <!-- Grasp Fix Plugin for automatic gripper attachment -->
        <gazebo>
            <plugin name="gazebo_grasp_fix" filename="libgazebo_grasp_fix.so">
                <arm>
                    <arm_name>scara_arm</arm_name>
                    <palm_link>gripper_link</palm_link>
                    <gripper_link>finger1</gripper_link>
                    <gripper_link>finger2</gripper_link>
                    <gripper_link>finger3</gripper_link>
                    <gripper_link>finger4</gripper_link>
                </arm>
                <forces_angle_tolerance>100</forces_angle_tolerance>
                <update_rate>90</update_rate>
                <grip_count_threshold>8</grip_count_threshold>
                <max_grip_count>12</max_grip_count>
                <release_tolerance>0.001</release_tolerance>
                <disable_collisions_on_attach>true</disable_collisions_on_attach>
                <contact_topic>__default_topic__</contact_topic>
            </plugin>
        </gazebo>
    </xacro:macro>
</robot>
在这个文件中,我将两个旋转关节+一个平移关节+四个手指关节都配置成了位置控制,也就是说,我只需要发出"让xx关节到达某个位置"的指令,ros_control就会帮助我完成。
-
controllers.yaml
joint_state_controller:
type: joint_state_controller/JointStateController
publish_rate: 50rotation1_position_controller:
type: position_controllers/JointPositionController
joint: rotation1
pid: {p: 50.0, i: 0.0, d: 2.0}rotation2_position_controller:
type: position_controllers/JointPositionController
joint: rotation2
pid: {p: 50.0, i: 0.0, d: 2.0}gripper_position_controller:
type: position_controllers/JointPositionController
joint: gripper_joint
pid: {p: 50.0, i: 0.0, d: 2.0}finger1_position_controller:
type: position_controllers/JointPositionController
joint: finger1_joint
pid: {p: 30.0, i: 0.0, d: 1.0}finger2_position_controller:
type: position_controllers/JointPositionController
joint: finger2_joint
pid: {p: 30.0, i: 0.0, d: 1.0}finger3_position_controller:
type: position_controllers/JointPositionController
joint: finger3_joint
pid: {p: 30.0, i: 0.0, d: 1.0}finger4_position_controller:
type: position_controllers/JointPositionController
joint: finger4_joint
pid: {p: 30.0, i: 0.0, d: 1.0}
这是个配置文件,配置每个控制器的具体参数(控制器类型、PID 参数等),交给launch文件看
-
gazebo.launch
...
launch文件接受我们定义的ros_control配置并帮助启动ros_control相关的服务。
1.1.2. 使用ros_control来控制关节
我相关的控制代码在这个类里:
class ArmController:
    def __init__(self):
        """初始化控制器"""
        rospy.init_node('arm_controller', anonymous=True)

        # 创建各关节位置控制发布器
        self.rotation1_pub = rospy.Publisher(
            '/rotation1_position_controller/command',
            Float64,
            queue_size=10
        )
        self.rotation2_pub = rospy.Publisher(
            '/rotation2_position_controller/command',
            Float64,
            queue_size=10
        )
        self.gripper_pub = rospy.Publisher(
            '/gripper_position_controller/command',
            Float64,
            queue_size=10
        )

        # 创建夹爪四指控制发布器
        self.finger1_pub = rospy.Publisher(
            '/finger1_position_controller/command',
            Float64,
            queue_size=10
        )
        self.finger2_pub = rospy.Publisher(
            '/finger2_position_controller/command',
            Float64,
            queue_size=10
        )
        self.finger3_pub = rospy.Publisher(
            '/finger3_position_controller/command',
            Float64,
            queue_size=10
        )
        self.finger4_pub = rospy.Publisher(
            '/finger4_position_controller/command',
            Float64,
            queue_size=10
        )

        # Gazebo 方块生成工具
        self.box = BoxSpawner()

        # 当前关节状态
        self.current_joint_state = None
        rospy.Subscriber('/joint_states', JointState, self._joint_state_callback)

        rospy.loginfo('控制器已初始化')

        # 等待话题建立连接
        rospy.sleep(1.0)

    def _joint_state_callback(self, msg):
        """关节状态回调函数"""
        self.current_joint_state = msg

    def move_arm_simple(self, pos1, pos2, pos3, duration=3.0):
        """
        简单的手臂运动函数

        参数说明:
            pos1: rotation1 关节位置 (单位: 弧度 rad)
            pos2: rotation2 关节位置 (单位: 弧度 rad)
            pos3: gripper_joint 关节位置 (单位: 米 m)
            duration: 运动时间 (秒)
        """
        rospy.loginfo("发送命令: pos1=%.3f, pos2=%.3f, pos3=%.3f" % (pos1, pos2, pos3))

        # 发布目标位置
        self.rotation1_pub.publish(Float64(pos1))
        self.rotation2_pub.publish(Float64(pos2))
        self.gripper_pub.publish(Float64(pos3))

        # 等待运动完成
        rospy.sleep(duration)

    def control_gripper(self, finger1, finger2, finger3, finger4, is_close, duration=1.0):
        """
        控制夹爪

        参数说明:
            finger1: finger1_joint 位置 (0.0 ~ 0.02)
            finger2: finger2_joint 位置 (-0.02 ~ 0.0)
            finger3: finger3_joint 位置 (-0.02 ~ 0.0)
            finger4: finger4_joint 位置 (0.0 ~ 0.02)
            duration: 运动时间
        """
        rospy.loginfo("发送夹爪命令: [%.3f, %.3f, %.3f, %.3f]"
                     % (finger1, finger2, finger3, finger4))

        if is_close:
            self.finger1_pub.publish(Float64(finger1))
            rospy.sleep(0.5)
            self.finger2_pub.publish(Float64(finger2))
            rospy.sleep(0.5)
            self.finger3_pub.publish(Float64(finger3))
            rospy.sleep(0.5)
            self.finger4_pub.publish(Float64(finger4))
        else:
            self.finger1_pub.publish(Float64(finger1))
            self.finger2_pub.publish(Float64(finger2))
            self.finger3_pub.publish(Float64(finger3))
            self.finger4_pub.publish(Float64(finger4))
        rospy.sleep(duration)

    def open_gripper(self, duration=1.0):
        """打开夹爪"""
        rospy.loginfo("打开夹爪...")
        self.control_gripper(-0.02, 0.02, 0.02, -0.02, False, duration)

    def close_gripper(self, duration=1.0):
        """关闭夹爪"""
        rospy.loginfo("关闭夹爪...")
        self.control_gripper(0.02, -0.02, -0.02, 0.02, True, duration)
利用 ros_control 进行控制的核心是话题通信。在控制器启动后,ros_control 会自动为每个控制器创建命令话题(如 /rotation1_position_controller/command)。
我的 Python 节点通过创建 rospy.Publisher 连接到这些话题,每次调用 .publish(Float64(target_position)) 即可发送目标位置。ros_control 内部的 PID 控制器会:
- 接收目标:读取命令话题中的目标位置
- 误差计算:对比当前实际位置(从
/joint_states获取) - PID 调节:根据配置的 PID 参数计算所需力矩
- 执行动作:将力矩发送给 Gazebo 物理引擎,驱动关节运动
这种设计让上层应用无需关心底层的力矩控制、PID 调节等细节,只需发送期望的位置即可。同时,通过订阅 /joint_states 话题,可以实时获取关节的当前状态,实现闭环控制。
1.1.3. 夹爪行为分析
在1.1.2给出的代码中,我需要对夹爪相关的部分进行一点说明。
- 夹爪开闭对应的ros_control行为
可以看到这一部分:
    def control_gripper(self, finger1, finger2, finger3, finger4, is_close, duration=1.0):
        """
        控制夹爪

        参数说明:
            finger1: finger1_joint 位置 (0.0 ~ 0.02)
            finger2: finger2_joint 位置 (-0.02 ~ 0.0)
            finger3: finger3_joint 位置 (-0.02 ~ 0.0)
            finger4: finger4_joint 位置 (0.0 ~ 0.02)
            duration: 运动时间
        """
        rospy.loginfo("发送夹爪命令: [%.3f, %.3f, %.3f, %.3f]"
                     % (finger1, finger2, finger3, finger4))

        if is_close:
            self.finger1_pub.publish(Float64(finger1))
            rospy.sleep(0.5)
            self.finger2_pub.publish(Float64(finger2))
            rospy.sleep(0.5)
            self.finger3_pub.publish(Float64(finger3))
            rospy.sleep(0.5)
            self.finger4_pub.publish(Float64(finger4))
        else:
            self.finger1_pub.publish(Float64(finger1))
            self.finger2_pub.publish(Float64(finger2))
            self.finger3_pub.publish(Float64(finger3))
            self.finger4_pub.publish(Float64(finger4))
        rospy.sleep(duration)

    def open_gripper(self, duration=1.0):
        """打开夹爪"""
        rospy.loginfo("打开夹爪...")
        self.control_gripper(-0.02, 0.02, 0.02, -0.02, False, duration)

    def close_gripper(self, duration=1.0):
        """关闭夹爪"""
        rospy.loginfo("关闭夹爪...")
        self.control_gripper(0.02, -0.02, -0.02, 0.02, True, duration)
对于开闭夹爪,就是1,2,3,4号手指在各自平移方向上进行0.02的正负位移,之所以有正负,是因为urdf中定义的四个手指平移正方向不同。
在关闭夹爪时,可以其与打开夹爪不同,其四个手指之前存在运动时间间隙,原因如下:
我在测试时,曾发现在某些情况下,夹爪若同时闭合,有可能会刚好夹在方块的棱角上,这样建立不了足够的连接,对应的grasp_fix插件无法其作用,导致夹取失败。
所以,我在四个手指闭合时建立了先后关系,这样先闭合的手指可以先推一下方块,让其位置摆正,进而使剩余的手指可以成功夹取。
1.2. 加入grasp_fix插件帮助稳定夹取
在系列概述中,我曾提到,我最初采用的是ROS2环境,当时使用的位控制夹爪始终无法夹起方块(方块会从闭合的夹爪中间滑落)。对于这个问题,我查阅了部分资料和开源项目,暂时没有找到能针对scara机械臂解决的办法。因此只好将开发框架转为了ROS1,以便使用只适配于ROS1的grasp_fix插件。
grasp_fix相关的配置在这里:
robot.ros_control.xacro
        <gazebo>
            <plugin name="gazebo_grasp_fix" filename="libgazebo_grasp_fix.so">
                <arm>
                    <arm_name>scara_arm</arm_name>
                    <palm_link>gripper_link</palm_link>
                    <!-- 注意: finger链路实际名称为 finger1/finger2/finger3/finger4 -->
                    <gripper_link>finger1</gripper_link>
                    <gripper_link>finger2</gripper_link>
                    <gripper_link>finger3</gripper_link>
                    <gripper_link>finger4</gripper_link>
                </arm>
                <forces_angle_tolerance>100</forces_angle_tolerance>
                <update_rate>90</update_rate>
                <grip_count_threshold>8</grip_count_threshold>
                <max_grip_count>12</max_grip_count>
                <release_tolerance>0.001</release_tolerance>
                <disable_collisions_on_attach>true</disable_collisions_on_attach>
                <contact_topic>__default_topic__</contact_topic>
            </plugin>
        </gazebo>
该插件通过实时监测夹爪与物体之间的接触力,当检测到满足"抓取条件"(存在相对的接触力)且持续一定次数后,会自动将物体固定到夹爪的 gripper_link 上,避免物体因物理引擎误差或手指抖动而滑落。
配置中的关键参数包括:
- grip_count_threshold=8:连续检测 8 次抓取条件后才附着,避免误触发
- update_rate=90:每秒检查 90 次,响应速度快
- release_tolerance=0.001:容忍 1mm 的手指抖动,增强稳定性
- disable_collisions_on_attach=true:附着后禁用碰撞,消除抖动
从终端日志中可以看到 'Attaching' 和 'Detaching' 消息,证明插件正在正常工作,实现了稳定的抓取-搬运-释放循环。"
2. scara机械臂运动学正逆解
什么叫运动学正解(FK)?简单来说,就是给定机械臂各个关节的运动角/平移距离,其需要转动对应的角度或移动对应的距离。这个需求用ros_control就已经实现了。
什么是运动学逆解(IK)呢?可以想到,就是给定机械臂目标位置,其需要自己解算出各个关节需要转动的角度或平移的距离,以达到运动到此目标点的目的。
目前阶段(12.30),我的运动学逆解是自己手写实现的,但其实项目上更多使用的是moveit框架,其包含自带的运动学逆解以及运动规划等功能。目前我采用的scara机械臂构造较为简单,运动学逆解并不复杂,因此我暂时使用的是自己的逆运动学解算器,后期更换为更复杂的UR5或panda时,会使用moveit。
2.1. scara机械臂运动学逆解分析
在分析之前,需要先看这个视频了解dh参数、坐标选定:
https://www.bilibili.com/video/BV17L4y1w7HS/?spm_id_from=333.337.search-card.all.click
时间充足的话,可以看看林佩群老师的教程:
https://www.bilibili.com/video/BV1oa4y1v7TY/?spm_id_from=333.337.search-card.all.click
对于scara机械臂的逆解数学分析,可以看这篇博客,只用到了高中的三角函数知识:
https://zhuanlan.zhihu.com/p/643924552
2.2. 我的逆解实现
代码如下:
my_kinematics.py
from dataclasses import dataclass
import numpy as np

# dh表
@dataclass(frozen=True)
class SCARAParameters:
    # a参数,表示延x方向上z轴的偏距,实际可理解为杆长
    a0: float = 0.0
    a1: float = 1.0
    a2: float = 0.8
    # alpha参数,表示延x方向上z轴的偏角
    alpha0: float = 0.0
    alpha1: float = 0.0
    alpha2: float = 0.0
    # d参数,表示沿z轴方向上x轴的偏距
    d1: float = 0.4
    d2: float = 0.1
    d3_min: float = -0.5
    d3_max: float = 0.0
    # thta参数为关节角,下面为角度限制范围
    theta1_min: float = -np.pi * 2
    theta1_max: float = np.pi * 2
    theta2_min: float = -np.pi * 2
    theta2_max: float = np.pi * 2


P = SCARAParameters()


# 转换矩阵
def DHTransform(a: float, alpha: float, d: float, theta: float) -> np.ndarray:
    ct = np.cos(theta)
    st = np.sin(theta)
    ca = np.cos(alpha)
    sa = np.sin(alpha)

    # 改进型dh对应的变换矩阵
    T = np.array([
        [ct, -st, 0, a],
        [st * ca, ct * ca, -sa, -sa * d],
        [st * sa, ct * sa, ca, ca * d],
        [0, 0, 0, 1]
    ])

    return T


# 前向运动学,返回一个转换矩阵
# 三个参数的含义:关节1旋转角,关节2旋转角,关节3位移
def forward_kinematics(theta1: float, theta2: float, d3: float) -> np.ndarray:
    theta1, theta2, d3 = clamp_joint_values(theta1, theta2, d3)
    # a,alpha为i-1,d,theta为i
    T0_1 = DHTransform(P.a0, P.alpha0, P.d1, theta1)
    T1_2 = DHTransform(P.a1, P.alpha1, P.d2, theta2)
    T2_3 = DHTransform(P.a2, P.alpha2, d3, 0.0)

    # @为矩阵乘法符号
    T0_3 = T0_1 @ T1_2 @ T2_3
    return T0_3
    # 目前算出来的结果有如下现象
    # Xt = -Y实, Yt = X实,也就是说,算出来的结果为实际结果绕z轴旋转了90度,
    # 为什么会有这样的结果,是因为该urdf再初始化加载scara时,默认的朝向是向着-y轴的,也就是绕z轴旋转了90度的结果
    # 所以,要想让结果和pybullet中一致,需要将算出来的矩阵再绕z轴旋转-90度;或者说,在初始状态时,就把scara的朝向改为朝向x轴


# 加入范围限制
def clamp_joint_values(theta1: float, theta2: float, d3: float):
    """夹紧关节值到物理范围。返回 (theta1, theta2, d3_clamped)。"""
    t1 = min(max(theta1, P.theta1_min), P.theta1_max)
    t2 = min(max(theta2, P.theta2_min), P.theta2_max)
    d3c = min(max(d3, P.d3_min), P.d3_max)
    return t1, t2, d3c


# 逆运动学
def inverse_kinematics(x: float, y: float, z: float, elbow: str = "down"):
    # 由于坐标系问题,需要先做一下变换
    x, y = -y, x
    # 平面距离
    r2 = x * x + y * y
    r = np.sqrt(r2)

    # 可达性判定
    L1 = P.a1
    L2 = P.a2
    max_r = L1 + L2
    min_r = abs(L1 - L2)
    planar_ok = (min_r - 1e-9) <= r <= (max_r + 1e-9)

    # cos(theta2)
    cos_t2 = (r2 - L1 * L1 - L2 * L2) / (2.0 * L1 * L2)
    cos_t2 = max(min(cos_t2, 1.0), -1.0)
    base = np.arccos(cos_t2)
    theta2 = base if elbow == "up" else -base

    # theta1
    theta1 = np.arctan2(y, x) - np.arctan2(L2 * np.sin(theta2), L1 + L2 * np.cos(theta2))

    # d3
    d3_raw = z - (P.d1 + P.d2)
    vertical_ok = (P.d3_min - 1e-9) <= d3_raw <= (P.d3_max + 1e-9)

    # clamp
    theta1_c, theta2_c, d3_c = clamp_joint_values(theta1, theta2, d3_raw)
    reachable = planar_ok and vertical_ok
    return theta1_c, theta2_c, d3_c, reachable


if __name__ == "__main__":
    # 简单测试:目标点来自正向再求逆,看误差
    tests = [
        (0.5, 0.5, 0.4),
        (0.3, -1.2, 0.25),
        (1.5, 0.0, 0.2),
        (0.2, -0.5, 0.35),
        (0.3, 0.4, 0.3),
    ]
    for (x, y, z) in tests:
        th1, th2, d3, ok = inverse_kinematics(x, y, z, elbow="down")
        T = forward_kinematics(th1, th2, d3)
        fk_pos = (T[0, 3], T[1, 3], T[2, 3])
        err = np.linalg.norm(np.array(fk_pos) - np.array([x, y, z]))
        print(
            f"Target=({x:.3f},{y:.3f},{z:.3f}) -> IK (t1={th1:.3f}, t2={th2:.3f}, d3={d3:.3f}, reachable={ok}) | FK pos={tuple(fk_pos)} | err={err:.3e}")
需要着重注意的一点时,根据我的urdf,机械臂的初始朝向是-y方向,但IK计算时,是认为机械臂的朝向是+x,因此,对于传入的目标坐标,需要先做一个90度的坐标转换,也就是x, y = -y, x(逆时针转90度)。
2.3. 夹取-放置行为规划
我的代码如下:
my_scara_action.py
def pick_and_place(self, pick_pos, place_pos):
        pick_x, pick_y, pick_z = pick_pos
        place_x, place_y, place_z = place_pos

        origin_height = 0.5
        theta1_c, theta2_c, d3_c, reachable = inverse_kinematics(pick_x, pick_y, origin_height, elbow="down")
        if not reachable:
            rospy.logwarn("抓取位置不可达: (%.3f, %.3f, %.3f)" % (pick_x, pick_y, pick_z))
            return
        rospy.loginfo("前往抓取目标上方")
        self.move_arm_simple(theta1_c, theta2_c, d3_c, duration=3.0)
        # rospy.sleep(time_sleep)
        rospy.loginfo("下降夹爪")
        self.move_arm_simple(theta1_c, theta2_c, pick_z+0.195-origin_height, duration=3.0)
        rospy.loginfo("闭合夹爪")
        self.close_gripper(duration=3.0)
        rospy.sleep(time_sleep)
        rospy.loginfo("抬起")
        self.move_arm_simple(theta1_c, theta2_c, origin_height-pick_z+0.195, duration=3.0)

        rospy.loginfo("前往放置位置上方")
        theta1_c, theta2_c, d3_c, reachable = inverse_kinematics(place_x, place_y, origin_height, elbow="down")
        if not reachable:
            rospy.logwarn("放置位置不可达: (%.3f, %.3f, %.3f)" % (place_x, place_y, place_z))
            return
        self.move_arm_simple(theta1_c, theta2_c, d3_c, duration=3.0)
        # rospy.sleep(time_sleep)
        rospy.loginfo("下降夹爪")
        self.move_arm_simple(theta1_c, theta2_c, place_z+0.195-origin_height, duration=3.0)
        rospy.loginfo("打开夹爪")
        self.open_gripper(duration=3.0)
        # rospy.sleep(time_sleep)
        rospy.loginfo("抬起夹爪")
        self.move_arm_simple(theta1_c, theta2_c, origin_height-place_z+0.195, duration=3.0)
        rospy.loginfo("抓取放置任务完成")
根据info内容很好理解:
夹取时(pick):夹爪移动到物体正上方-夹爪下降到物体周围-闭合夹爪,等待稳定接触-提升夹爪
放置时(place):夹爪移动到目标点-夹爪下降-松开夹爪-提升夹爪,复位
总结
这篇文章讲了我的机械臂的ros_control驱动配置,为位置控制;并介绍了grasp_fix插件的使用、自己的IK实现,如有谬误还请指正。