欢迎访问我的GitHub
这里分类和汇总了欣宸的全部原创(含配套源码):https://github.com/zq2599/blog_demos
LangChain4j实战全系列链接
- 准备工作
- 极速开发体验
- 细说聊天API
- 集成到spring-boot
- 图像模型
- 聊天记忆,低级API版
- 聊天记忆,高级API版
- 响应流式传输
- 高级API(AI Services)实例的创建方式
- 结构化输出之一,用提示词指定输出格式
- 结构化输出之二,function call
- 结构化输出之三,json模式
本篇概览
- 本文是有关结构化输出的终篇,经过前面的文章咱们已经掌握了两种获取结构化输出方式,今天要学习的是第三种,如下图红框所示
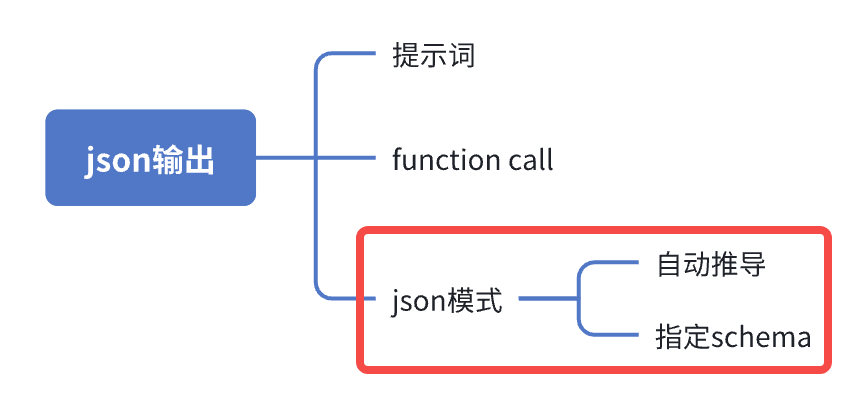
- 关于json模式,就是要求LLM返回JSON,咋一听,提示词要求返回JSON不也是返回JSON吗?两者重复了?
- 实际上两者是有区别的,这里整理一个表格来对比说明
| 特性 | 提示词要求返回json | json mode |
|---|---|---|
| 一句话总结 | 提示词硬逼 JSON | 官方JSON模式 |
| 格式保障 | 嘴炮,提示词说清楚要返回JSON | 协议级强制,100% 合法 JSON,提示词不提JSON返回 |
| System 指令冲突 | 用户消息或系统某句"请用自然语言"就能推翻 | 后端把 response_format={"type":"json_object"} 写死,任何提示都改不了 |
| 失败率 | 复杂场景下约 5-10% 出现尾缀、注释、缺括号 | 官方统计 <0.5% |
| token 开销 | 需额外写"只返回 JSON 不要解释"等废话 | 无需额外提示,相对省 token |
| 代码侧解析 | 得先 strip()、正则、try-catch 兜底 | 直接反序列化(LangChain4j执行) |
- 关于json模式差不多已经说清楚了,再来看下json模式的继续细分为,有两种:自动推导和指定schema的区别
- 指定schema很容易理解,就是开发者自己明确定义每一个字段,对字段做到完全掌控
- 而自动推导就有些不靠谱了,只要求LLM返回JSON,至于返回的内容如何转为业务代码定义的数据结构,则是由LangChain4j来完成的,期间大小写不敏感、驼峰和下划线互转,可见即便有了这个原则也无法保证能100%得到预期的数据结构(可能会抛MismatchedInputException异常)
- 现在关于json模式已经介绍得差不多了,接下来开始编码吧
源码下载(觉得作者啰嗦的,直接在这里下载)
- 如果您只想快速浏览完整源码,可以在GitHub下载代码直接运行,地址和链接信息如下表所示(https://github.com/zq2599/blog_demos):
| 名称 | 链接 | 备注 |
|---|---|---|
| 项目主页 | https://github.com/zq2599/blog_demos | 该项目在GitHub上的主页 |
| git仓库地址(https) | https://github.com/zq2599/blog_demos.git | 该项目源码的仓库地址,https协议 |
| git仓库地址(ssh) | git@github.com:zq2599/blog_demos.git | 该项目源码的仓库地址,ssh协议 |
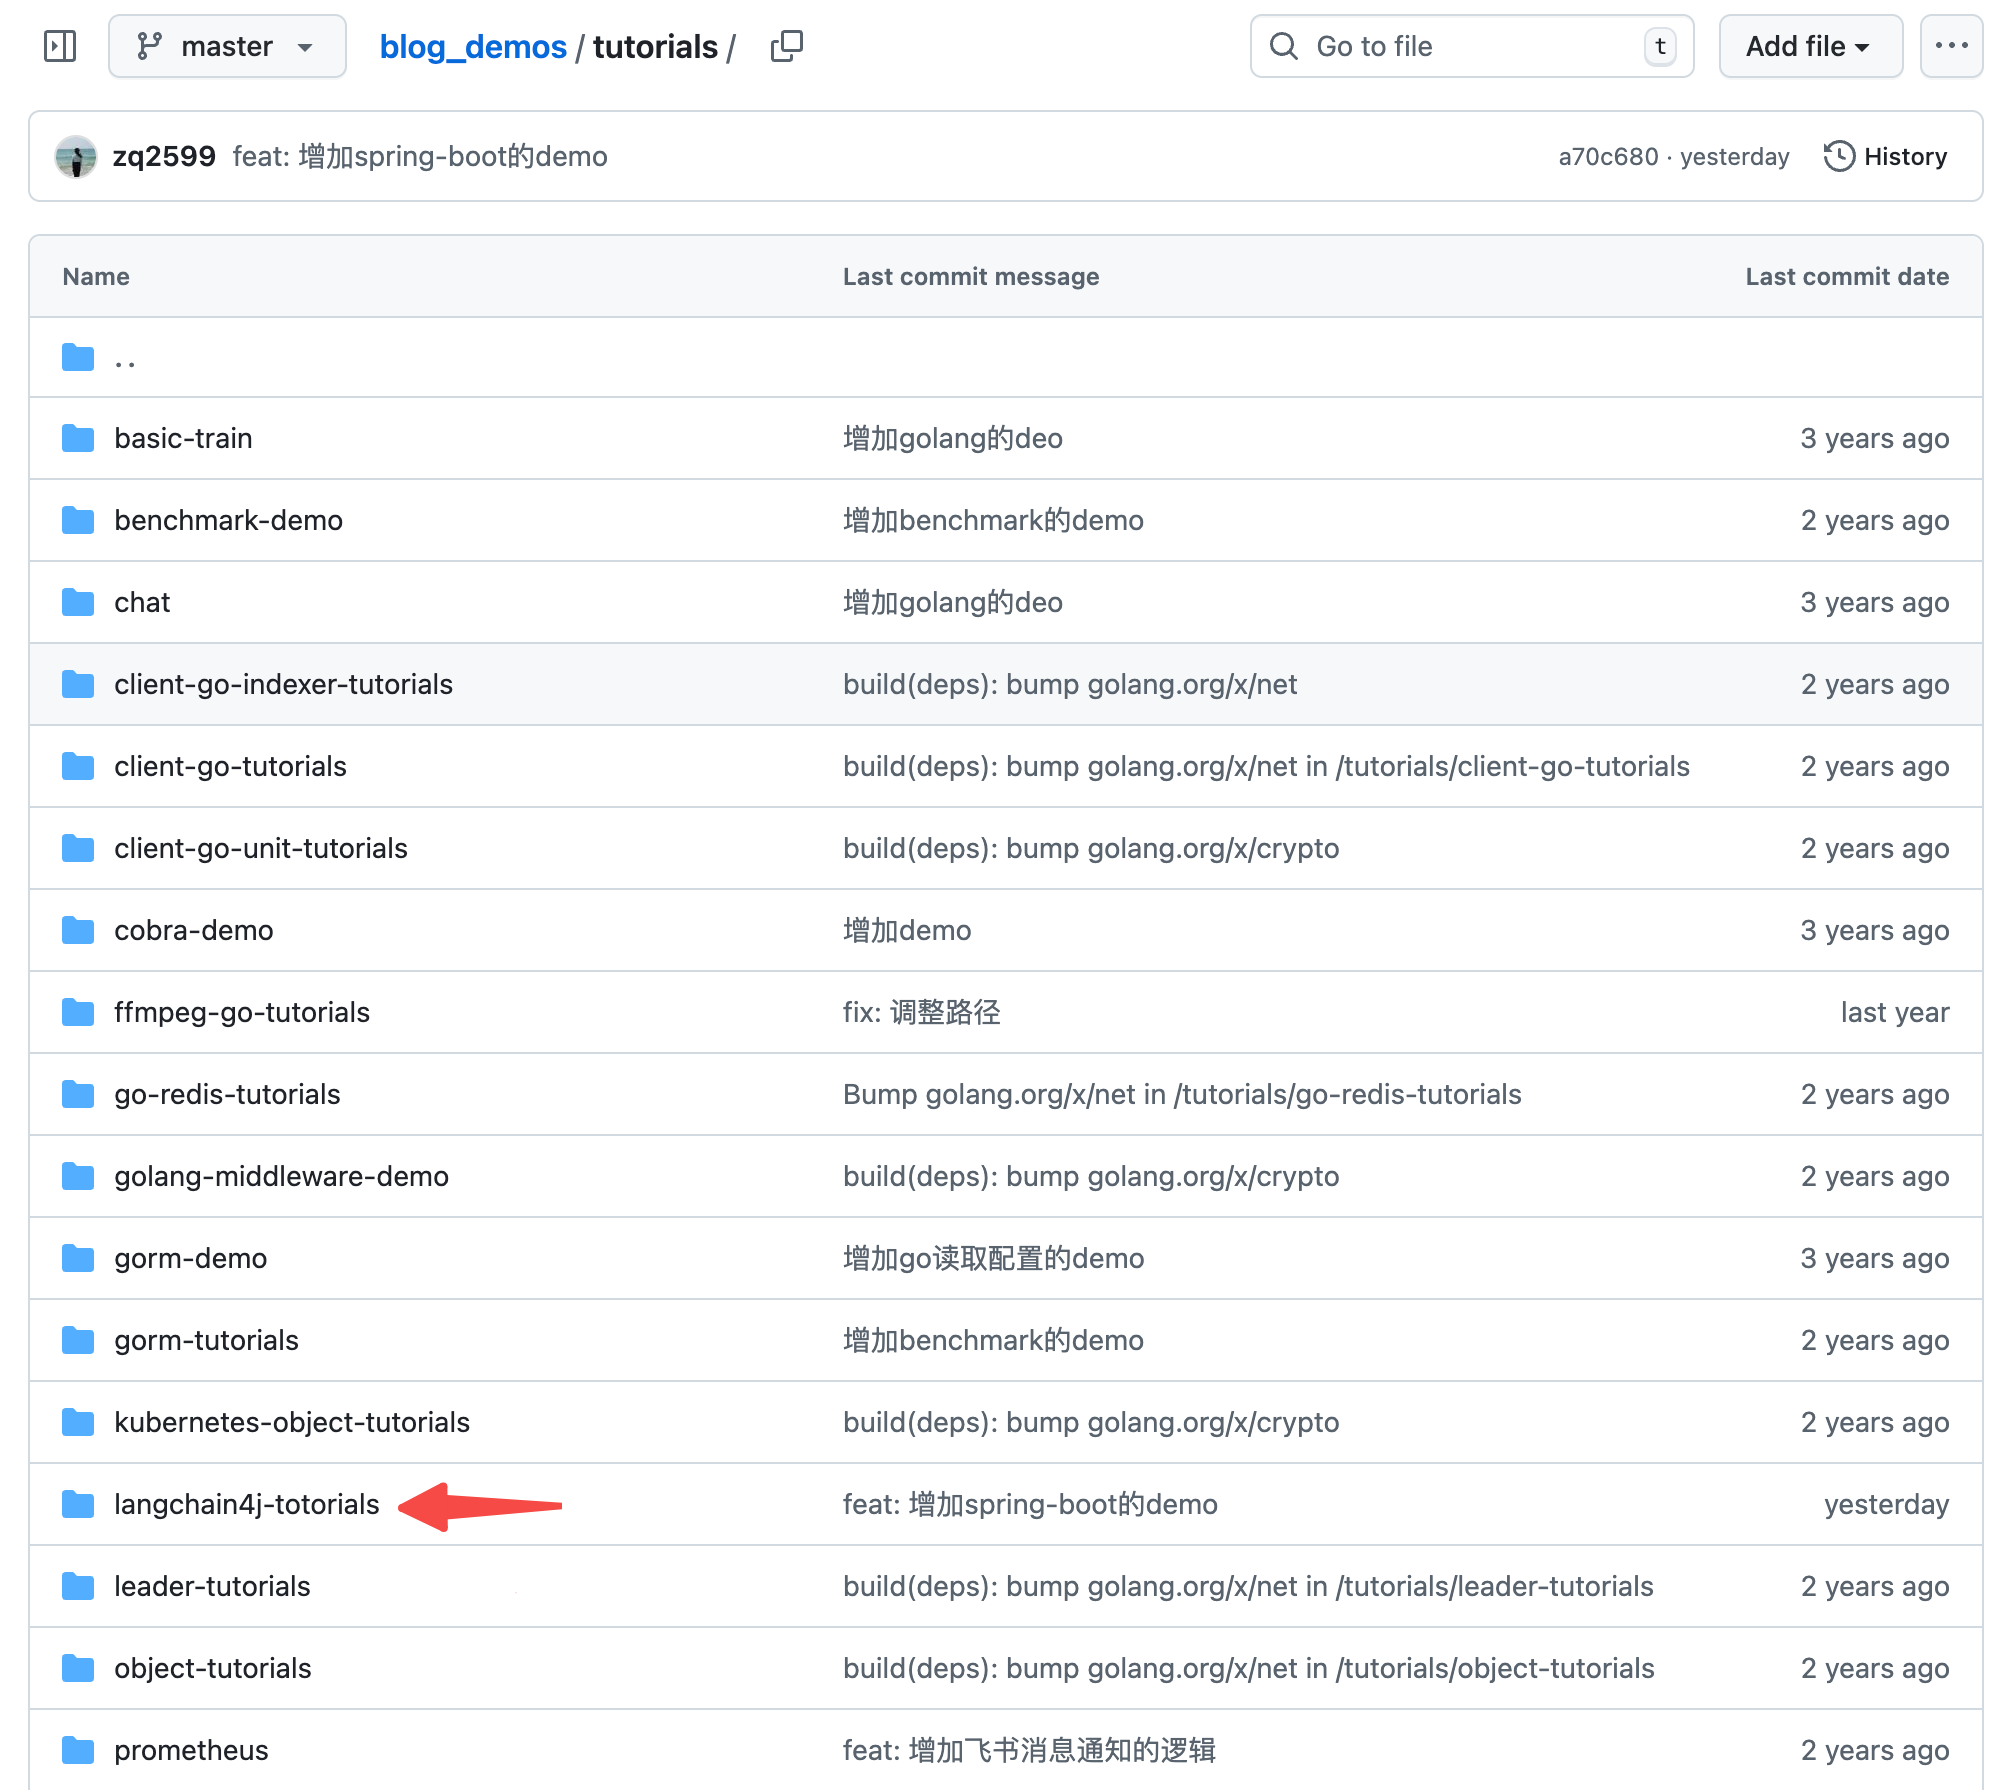
- 这个git项目中有多个文件夹,本篇的源码在langchain4j-tutorials文件夹下,如下图红色箭头所示:
编码:父工程调整
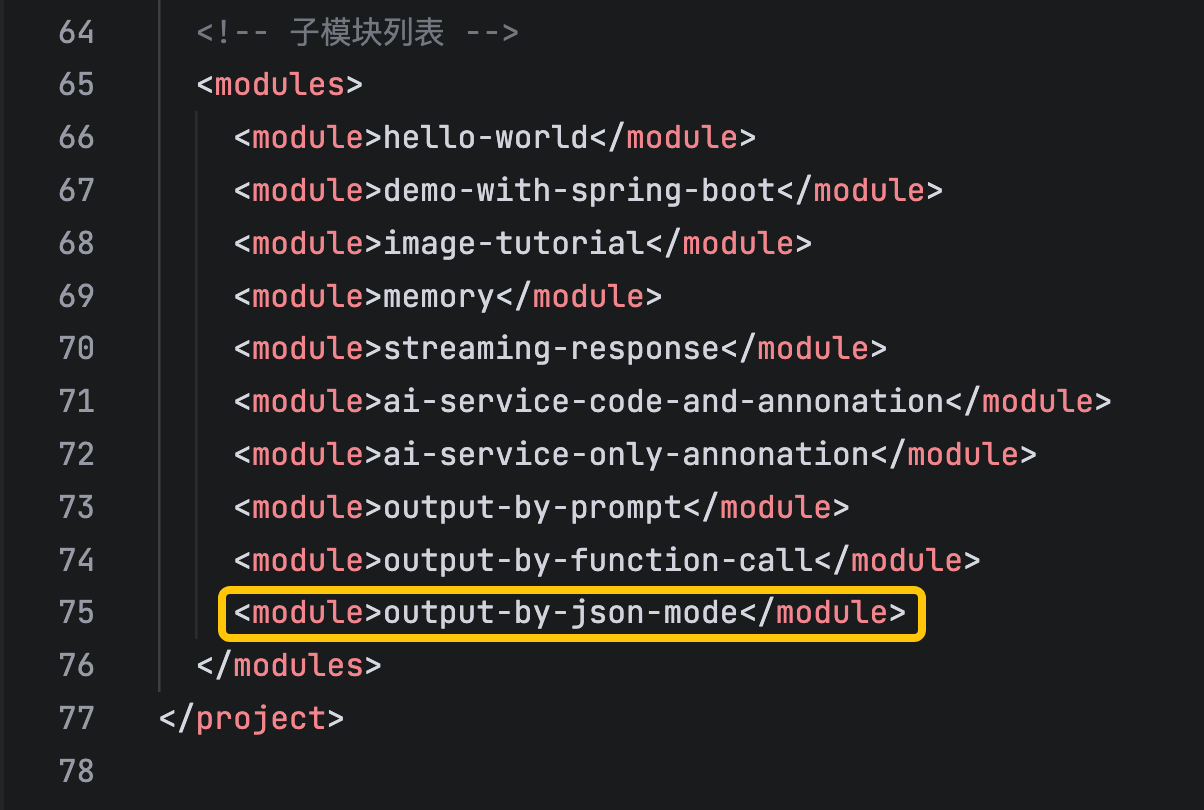
- 《准备工作》中创建了整个《LangChain4j实战》系列代码的父工程,本篇实战会在父工程下新建一个子工程,所以这里要对父工程的pom.xml做少量修改
- modules中增加一个子工程,如下图黄框所示
编码:新增子工程
- 新增名为output-by-function-call的子工程
- langchain4j-totorials目录下新增名为output-by-json-mode的文件夹
- output-by-json-mode文件夹下新增pom.xml,内容如下
xml
<?xml version="1.0" encoding="UTF-8"?>
<project xmlns="http://maven.apache.org/POM/4.0.0"
         xmlns:xsi="http://www.w3.org/2001/XMLSchema-instance"
         xsi:schemaLocation="http://maven.apache.org/POM/4.0.0 http://maven.apache.org/xsd/maven-4.0.0.xsd">
    <modelVersion>4.0.0</modelVersion>

    <parent>
        <groupId>com.bolingcavalry</groupId>
        <artifactId>langchain4j-totorials</artifactId>
        <version>1.0-SNAPSHOT</version>
    </parent>

    <artifactId>output-by-json-mode</artifactId>
    <packaging>jar</packaging>

    <dependencies>
        <!-- Lombok -->
        <dependency>
            <groupId>org.projectlombok</groupId>
            <artifactId>lombok</artifactId>
            <optional>true</optional>
        </dependency>

        <!-- Spring Boot Starter -->
        <dependency>
            <groupId>org.springframework.boot</groupId>
            <artifactId>spring-boot-starter</artifactId>
        </dependency>

        <!-- Spring Boot Web -->
        <dependency>
            <groupId>org.springframework.boot</groupId>
            <artifactId>spring-boot-starter-web</artifactId>
        </dependency>

        <!-- Spring Boot Test -->
        <dependency>
            <groupId>org.springframework.boot</groupId>
            <artifactId>spring-boot-starter-test</artifactId>
            <scope>test</scope>
        </dependency>

        <!-- JUnit Jupiter Engine -->
        <dependency>
            <groupId>org.junit.jupiter</groupId>
            <artifactId>junit-jupiter-engine</artifactId>
            <scope>test</scope>
        </dependency>

        <!-- Mockito Core -->
        <dependency>
            <groupId>org.mockito</groupId>
            <artifactId>mockito-core</artifactId>
            <scope>test</scope>
        </dependency>

        <!-- Mockito JUnit Jupiter -->
        <dependency>
            <groupId>org.mockito</groupId>
            <artifactId>mockito-junit-jupiter</artifactId>
            <scope>test</scope>
        </dependency>

        <!-- LangChain4j Core -->
        <dependency>
            <groupId>dev.langchain4j</groupId>
            <artifactId>langchain4j-core</artifactId>
        </dependency>

        <!-- LangChain4j OpenAI支持(用于通义千问的OpenAI兼容接口) -->
        <dependency>
            <groupId>dev.langchain4j</groupId>
            <artifactId>langchain4j-open-ai</artifactId>
        </dependency>

        <!-- 官方 langchain4j(包含 AiServices 等服务类) -->
        <dependency>
            <groupId>dev.langchain4j</groupId>
            <artifactId>langchain4j</artifactId>
        </dependency>

        <dependency>
            <groupId>dev.langchain4j</groupId>
            <artifactId>langchain4j-community-dashscope</artifactId>
        </dependency>

        <dependency>
            <groupId>dev.langchain4j</groupId>
            <artifactId>langchain4j-spring-boot-starter</artifactId>
        </dependency>

        <!-- 日志依赖由Spring Boot Starter自动管理,无需单独声明 -->
    </dependencies>

    <build>
        <plugins>
            <!-- Spring Boot Maven Plugin -->
            <plugin>
                <groupId>org.springframework.boot</groupId>
                <artifactId>spring-boot-maven-plugin</artifactId>
                <version>3.3.5</version>
                <executions>
                    <execution>
                        <goals>
                            <goal>repackage</goal>
                        </goals>
                    </execution>
                </executions>
            </plugin>
        </plugins>
    </build>

</project>- 在langchain4j-totorials/output-by-json-mode/src/main/resources新增配置文件application.properties,内容如下,主要是三个模型的配置信息,记得把your-api-key换成您自己的apikey
properties
# Spring Boot 应用配置
server.port=8080
server.servlet.context-path=/

# LangChain4j 使用OpenAI兼容模式配置通义千问模型
# 注意:请将your-api-key替换为您实际的通义千问API密钥
langchain4j.open-ai.chat-model.api-key=your-api-key
# 通义千问模型名称
langchain4j.open-ai.chat-model.model-name=qwen3-max
# 阿里云百炼OpenAI兼容接口地址
langchain4j.open-ai.chat-model.base-url=https://dashscope.aliyuncs.com/compatible-mode/v1

# 日志配置
logging.level.root=INFO
logging.level.com.bolingcavalry=DEBUG
logging.pattern.console=%d{HH:mm:ss.SSS} [%thread] %-5level %logger{36} - %msg%n
# 应用名称
spring.application.name=output-by-json-mode- 新增启动类,依旧平平无奇
java
package com.bolingcavalry;

import org.springframework.boot.SpringApplication;
import org.springframework.boot.autoconfigure.SpringBootApplication;

/**
 * Spring Boot应用程序的主类
 */
@SpringBootApplication
public class Application {

    public static void main(String[] args) {
        SpringApplication.run(Application.class, args);
    }
}- 定义一个对象HistoryEvent,这就是我们想从LLM返回得到的最终对象
java
package com.bolingcavalry.vo;

import java.util.List;

import lombok.Data;

@Data
public class HistoryEvent {
    private List<String> mainCharacters;
    private int year;
    private String description;
}- 增加一个自定义接口,本次的高级API会用到,simpleChat方法的返回值是HistoryEvent,这也就意味着LangChain4j会负责生成对象,而非返回字符串
java
package com.bolingcavalry.service;

import com.bolingcavalry.vo.HistoryEvent;

public interface Assistant {
    /**
     * 最简单的对话,只返回助手的回答,不包含任何额外信息
     *
     * @param userMessage 用户消息
     * @return 助手生成的回答
     */
    HistoryEvent simpleChat(String userMessage);
}- 基本代码就这些了,接下来会分别开发和体验json模式的两个细分种类:自动推导和指定schema
编码:自动推导
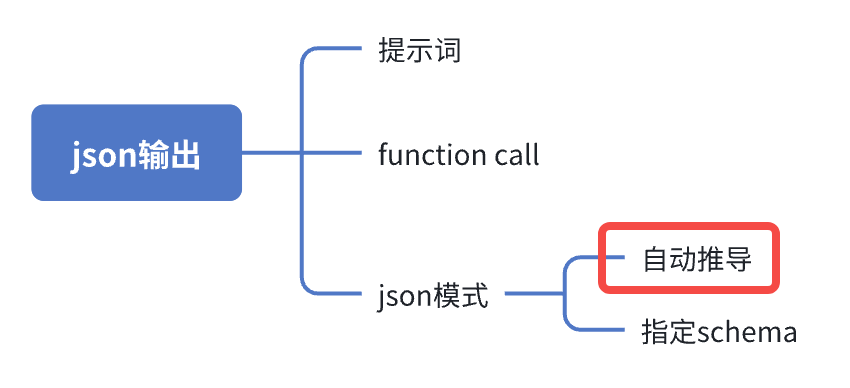
- 前面提到json模式细分为两种:自动推导和指定schema,接下来咱们先体验自动推导功能,如下图红框
- 增加配置类,注意modelFromObject方法,创建模型服务实例时调用responseFormat方法来指定json模式,然后就是用assistantWithModelFromObject方法创建高级AIP服务实例,该实例稍后会在服务类中用到
java
package com.bolingcavalry.config;

import java.util.List;

import org.springframework.beans.factory.annotation.Qualifier;
import org.springframework.beans.factory.annotation.Value;
import org.springframework.context.annotation.Bean;
import org.springframework.context.annotation.Configuration;

import com.bolingcavalry.service.Assistant;

import dev.langchain4j.model.chat.request.ResponseFormat;
import dev.langchain4j.model.chat.request.ResponseFormatType;
import dev.langchain4j.model.chat.request.json.JsonArraySchema;
import dev.langchain4j.model.chat.request.json.JsonIntegerSchema;
import dev.langchain4j.model.chat.request.json.JsonObjectSchema;
import dev.langchain4j.model.chat.request.json.JsonSchema;
import dev.langchain4j.model.chat.request.json.JsonStringSchema;
import dev.langchain4j.model.openai.OpenAiChatModel;
import dev.langchain4j.service.AiServices;

/**
 * LangChain4j配置类
 */
@Configuration
public class LangChain4jConfig {

        @Value("${langchain4j.open-ai.chat-model.api-key}")
        private String apiKey;

        @Value("${langchain4j.open-ai.chat-model.model-name:qwen-turbo}")
        private String modelName;

        @Value("${langchain4j.open-ai.chat-model.base-url}")
        private String baseUrl;

        @Bean("modelWithJSONFormat")
        public OpenAiChatModel modelFromObject() {
                return OpenAiChatModel.builder()
                                .apiKey(apiKey)
                                .modelName(modelName)
                                .baseUrl(baseUrl)
                                .responseFormat(ResponseFormat.JSON)
                                .build();
        }

        @Bean
        public Assistant assistantWithModelFromObject(@Qualifier("modelWithJSONFormat") OpenAiChatModel modelWithJSONFormat) {
                return AiServices.create(Assistant.class, modelWithJSONFormat);
        }
}- 服务类,chatByModelFromObject会调用高级API服务,结果是对象,这内部的操作由LangChain4j实现,开发者只要等着用对象即可,无需关注生产过程
java
package com.bolingcavalry.service;

import org.slf4j.Logger;
import org.slf4j.LoggerFactory;
import org.springframework.beans.factory.annotation.Autowired;
import org.springframework.stereotype.Service;

import com.bolingcavalry.vo.HistoryEvent;

/**
 * 通义千问服务类,用于与通义千问模型进行交互
 */
@Service
public class QwenService {

    private static final Logger logger = LoggerFactory.getLogger(QwenService.class);

    @Autowired
    private Assistant assistantWithModelFromObject;

    /**
     * 调用通义千问模型进行对话
     *
     * @param message 用户消息
     * @return AI回复
     */
    public HistoryEvent chatByModelFromObject(String message) {
        HistoryEvent rlt = assistantWithModelFromObject.simpleChat(message);
        logger.info("1. 收到响应对象: {}", rlt);
        return rlt;
    }
}- 最后是controller,实现一个http响应用于验证json模式到底管不管用,注意chat方法,明显是为自动推导和指定schema两种场景准备的,现在我们只处理isModelFromSchema等于false的情况,所以qwenService.chatByModelFromSchema这段代码暂时注释掉:
java
package com.bolingcavalry.controller;

import org.springframework.http.ResponseEntity;
import org.springframework.web.bind.annotation.PostMapping;
import org.springframework.web.bind.annotation.RequestBody;
import org.springframework.web.bind.annotation.RequestMapping;
import org.springframework.web.bind.annotation.RestController;

import com.bolingcavalry.service.QwenService;
import com.bolingcavalry.vo.HistoryEvent;

import lombok.Data;

/**
 * 通义千问控制器,处理与大模型交互的HTTP请求
 */
@RestController
@RequestMapping("/api/qwen")
public class QwenController {

    private final QwenService qwenService;

    /**
     * 构造函数,通过依赖注入获取QwenService实例
     *
     * @param qwenService QwenService实例
     */
    public QwenController(QwenService qwenService) {
        this.qwenService = qwenService;
    }

    /**
     * 提示词请求实体类
     */
    @Data
    static class PromptRequest {
        private String prompt;
        private int userId;
    }

    /**
     * 响应实体类
     */
    @Data
    static class Response {
        private HistoryEvent result;

        public Response(HistoryEvent result) {
            this.result = result;
        }
    }

    /**
     * 检查请求体是否有效
     *
     * @param request 包含提示词的请求体
     * @return 如果有效则返回null,否则返回包含错误信息的ResponseEntity
     */
    private ResponseEntity<Response> check(PromptRequest request) {
        if (request == null || request.getPrompt() == null || request.getPrompt().trim().isEmpty()) {
            HistoryEvent errRlt = new HistoryEvent();
            errRlt.setDescription("提示词不能为空");

            return ResponseEntity.badRequest().body(new Response(errRlt));
        }
        return null;
    }

    /**
     * 封装一个通用方法,根据isModelFromSchema参数调用不同的服务方法
     *
     * @param request
     * @param isModelFromSchema
     * @return
     */
    private ResponseEntity<Response> chat(PromptRequest request, boolean isModelFromSchema) {
        ResponseEntity<Response> checkRlt = check(request);
        if (checkRlt != null) {
            return checkRlt;
        }

        try {
            HistoryEvent historyEvent = null;
            if (isModelFromSchema) {
                // historyEvent = qwenService.chatByModelFromSchema(request.getPrompt());
            } else {
                historyEvent = qwenService.chatByModelFromObject(request.getPrompt());
            }

            return ResponseEntity.ok(new Response(historyEvent));
        } catch (Exception e) {
            HistoryEvent errRlt = new HistoryEvent();
            errRlt.setDescription("请求处理失败: " + e.getMessage());
            // 捕获异常并返回错误信息
            return ResponseEntity.status(500).body(new Response(errRlt));
        }
    }

    @PostMapping("/output/modelfromobject")
    public ResponseEntity<Response> modelfromobject(@RequestBody PromptRequest request) {
        return chat(request, false);
    }
}- 至此自动推导功能的代码就写完了,现在把工程运行起来试试,在output-by-json-mode目录下执行以下命令即可启动服务
bash
mvn spring-boot:run- 用vscode的 REST Client插件发起http请求,参数如下,和前文用提示词指定JSON不同,这里并没有要求LLM返回JSON格式
bash
###  用提示词实现json格式的输出
POST http://localhost:8080/api/qwen/output/modelfromobject
Content-Type: application/json
Accept: application/json

{
  "prompt": "介绍白江川之战"
}- 收到响应如下,可见LLM返回的字符串确实是JSON格式,并且每个字段都符合预期
bash
HTTP/1.1 200 OK
Content-Type: application/json
Transfer-Encoding: chunked
Date: Sun, 04 Jan 2026 11:03:05 GMT
Connection: close

{
  "result": {
    "mainCharacters": [
      "刘仁轨",
      "倭国将领",
      "百济残余势力"
    ],
    "year": 663,
    "description": "白江川之战(又称白村江之战)发生于公元663年,是唐朝与新罗联军对抗倭国(日本)和百济复国势力之间的一场重要海战。唐朝水军由刘仁轨率领,在白江口(今韩国锦江入海口)大败倭国与百济联军。此战彻底粉碎了百济复国的希望,确立了唐朝在朝鲜半岛的主导地位,也使倭国此后数百年不敢轻易介入朝鲜事务,对东亚政治格局产生深远影响。"
  }
}- QwenService类的chatByModelFromObject方法中会把assistantWithModelFromObject.simpleChat方法返回的实例通过日志打压出来,所以检查日志,如下,对象的信息被完整打印出来,确认反序列化成功
bash
19:03:05.506 [http-nio-8080-exec-1] INFO c.bolingcavalry.service.QwenService - 1. 收到响应对象: HistoryEvent(mainCharacters=[刘仁轨, 倭国将领, 百济残余势力], year=663, description=白江川之战(又称白村江之战)发生于公元663年,是唐朝与新罗联军对抗倭国(日本)和百济复国势力之间的一场重要海战。唐朝水军由刘仁轨率领,在白江口(今韩国锦江入海口)大败倭国与百济联军。此战彻底粉碎了百济复国的希望,确立了唐朝在朝鲜半岛的主导地位,也使倭国此后数百年不敢轻易介入朝鲜事务,对东亚政治格局产生深远影响。)- 可见自动推导是没有问题的,面对这种结构简单且低嵌套的数据结构可以准确的完成任务,接下来再看看如何通过指定schema来精确控制
编码:指定schema
- 指定schema的功能就在前面代码的基础上继续增加代码了
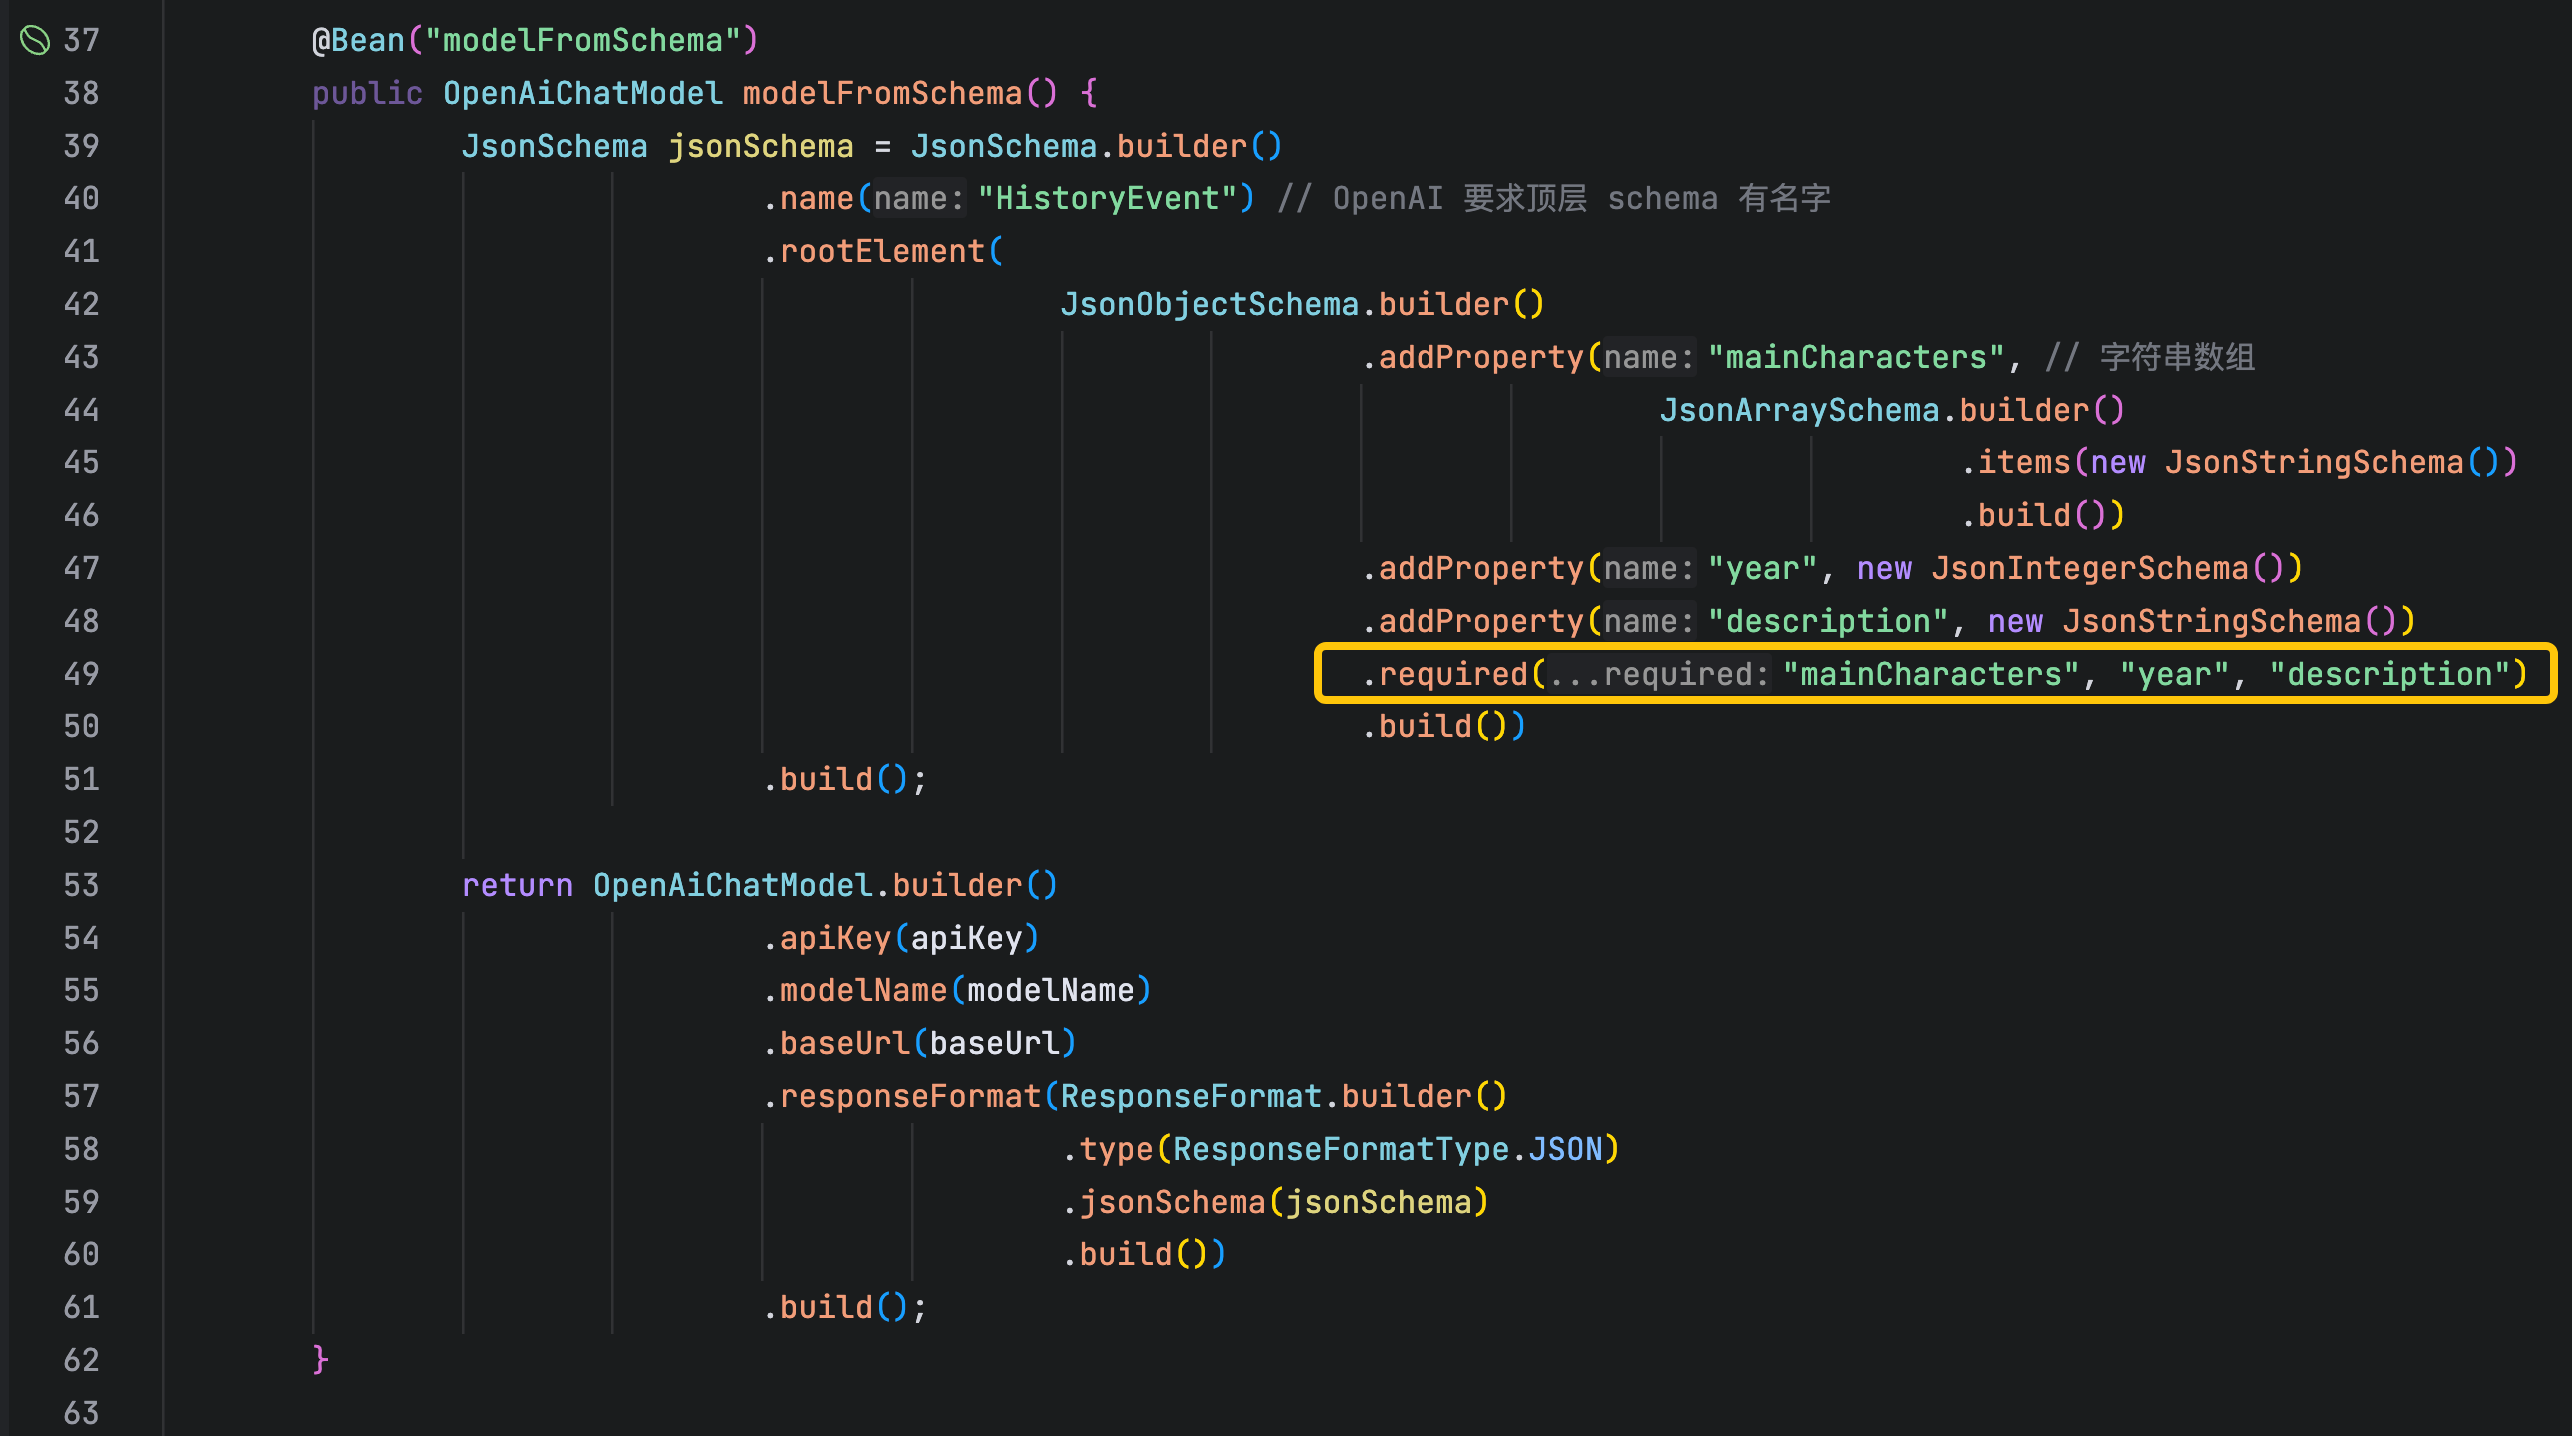
- 最重要的代码在配置类中:模型类的实例化,可见通过写代码指定了json中的每一个字段,注意responseFormat方法的入参,里面除了指定json字段,还要指定json模式(type(ResponseFormatType.JSON)):
java
        @Bean("modelFromSchema")
        public OpenAiChatModel modelFromSchema() {
                JsonSchema jsonSchema = JsonSchema.builder()
                                .name("HistoryEvent") // OpenAI 要求顶层 schema 有名字
                                .rootElement(
                                                JsonObjectSchema.builder()
                                                                .addProperty("mainCharacters", // 字符串数组
                                                                                JsonArraySchema.builder()
                                                                                                .items(new JsonStringSchema())
                                                                                                .build())
                                                                .addProperty("year", new JsonIntegerSchema())
                                                                .addProperty("description", new JsonStringSchema())
                                                                .required("mainCharacters", "year", "description")
                                                                .build())
                                .build();

                return OpenAiChatModel.builder()
                                .apiKey(apiKey)
                                .modelName(modelName)
                                .baseUrl(baseUrl)
                                .responseFormat(ResponseFormat.builder()
                                                .type(ResponseFormatType.JSON)
                                                .jsonSchema(jsonSchema)
                                                .build())
                                .build();
}- 还要在配置类中加上对应的高级API实例
java
        @Bean
        public Assistant assistantWithModelFromSchema(@Qualifier("modelFromSchema") OpenAiChatModel modelFromSchema) {
                return AiServices.create(Assistant.class, modelFromSchema);
}- 然后在服务类中增加高级API实例的使用
java
    @Autowired
    private Assistant assistantWithModelFromSchema;

    /**
     * 调用通义千问模型进行对话
     *
     * @param message 用户消息
     * @return AI回复
     */
    public HistoryEvent chatByModelFromSchema(String message) {
        HistoryEvent rlt = assistantWithModelFromSchema.simpleChat(message);
        logger.info("2. 收到响应对象: {}", rlt);
        return rlt;
}- 最后是controllerer中,chat方法前面就有了,只不过当时把isModelFromSchema等于true的代码注释掉了,现在去掉注释让其生效,然后再增加modelfromschema方法用于验证指定schema的功能
java
    private ResponseEntity<Response> chat(PromptRequest request, boolean isModelFromSchema) {
        ResponseEntity<Response> checkRlt = check(request);
        if (checkRlt != null) {
            return checkRlt;
        }

        try {
            HistoryEvent historyEvent = null;
            if (isModelFromSchema) {
                historyEvent = qwenService.chatByModelFromSchema(request.getPrompt());
            } else {
                historyEvent = qwenService.chatByModelFromObject(request.getPrompt());
            }

            return ResponseEntity.ok(new Response(historyEvent));
        } catch (Exception e) {
            HistoryEvent errRlt = new HistoryEvent();
            errRlt.setDescription("请求处理失败: " + e.getMessage());
            // 捕获异常并返回错误信息
            return ResponseEntity.status(500).body(new Response(errRlt));
        }
    }

    @PostMapping("/output/modelfromschema")
    public ResponseEntity<Response> modelfromschema(@RequestBody PromptRequest request) {
        return chat(request, true);
}- 代码写完了,执行mvn spring-boot:run运行起来再试试
- 用vscode的 REST Client插件发起http请求,参数如下,和前文用提示词指定JSON不同,这里并没有要求LLM返回JSON格式
bash
###  用提示词实现json格式的输出
POST http://localhost:8080/api/qwen/output/modelfromschema
Content-Type: application/json
Accept: application/json

{
  "prompt": "介绍六镇之乱"
}- 收到响应如下,可见LLM返回的字符串确实是JSON格式,并且每个字段都符合预期
bash
HTTP/1.1 200 OK
Content-Type: application/json
Transfer-Encoding: chunked
Date: Sun, 04 Jan 2026 13:16:57 GMT
Connection: close

{
  "result": {
    "mainCharacters": [
      "破六韩拔陵",
      "尔朱荣",
      "元渊",
      "贺拔岳"
    ],
    "year": 523,
    "description": "六镇之乱是北魏末年发生的一场大规模边镇军民叛乱。六镇指怀朔、武川、抚冥、柔玄、怀荒、沃野六个北方军事重镇,原为防御柔然而设。随着北魏迁都洛阳并推行汉化政策,六镇地位下降,军民待遇恶化,积怨日深。523年,沃野镇民破六韩拔陵率先起兵反魏,迅速引发其余五镇响应,史称'六镇之乱'。此乱严重动摇了北魏统治基础,最终导致北魏分裂为东魏与西魏。"
  }
}- QwenService类的chatByModelFromSchema方法中会把assistantWithModelFromSchema.simpleChat方法返回的实例通过日志打压出来,所以检查日志,如下,对象的信息被完整打印出来,确认反序列化成功
bash
21:16:57.032 [http-nio-8080-exec-4] INFO c.bolingcavalry.service.QwenService - 2. 收到响应对象: HistoryEvent(mainCharacters=[破六韩拔陵, 尔朱荣, 元渊, 贺拔岳], year=523, description=六镇之乱是北魏末年发生的一场大规模边镇军民叛乱。六镇指怀朔、武川、抚冥、柔玄、怀荒、沃野六个北方军事重镇,原为防御柔然而设。随着北魏迁都洛阳并推行汉化政策,六镇地位下降,军民待遇恶化,积怨日深。523年,沃野镇民破六韩拔陵率先起兵反魏,迅速引发其余五镇响应,史称'六镇之乱'。此乱严重动摇了北魏统治基础,最终导致北魏分裂为东魏与西魏。)-
可见指定schema可以更精确更灵活的控制返回内容
-
另外还有一处要注意的地方,就是指定schema的时候,需要调用required方法指定必须返回的字段,如果您的代码得到的数据结构中某系字段为空,记得检查一下是否有在required方法中指定该字段
-
至此,结构化输出设置的三篇实战就全部完成了,相信您已经可以按业务所需选择合适的方式来获取理想的数据结构,不需要再去面对一个字符串结果考虑怎么处理了