苍穹外卖1
一、准备工作
1、前端环境搭建
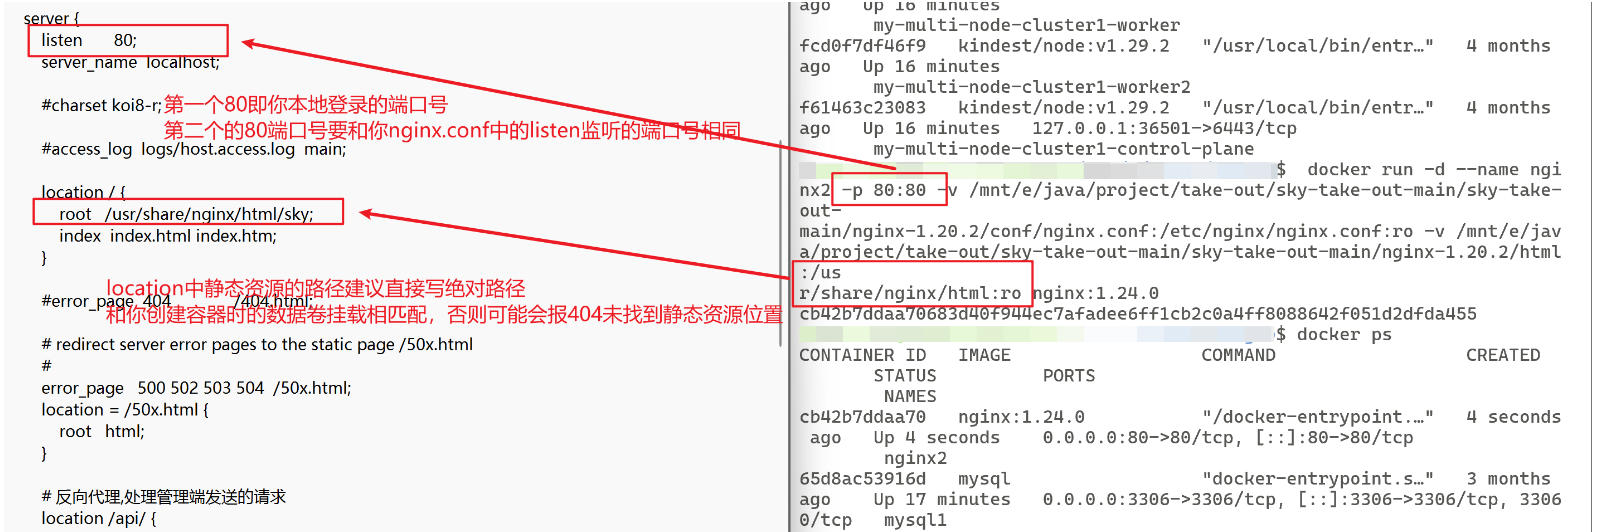
将提供的nginx的资料启动,或者如果是使用docker通过nginx的镜像进行容器搭建,就要注意好数据卷的挂载,找好本机中nginx,conf和前端展示页面html所在位置,将其和你要创建的容器的数据卷进行挂载
以下给出我的nginx容器的挂载案例:
bash
docker run -d --name nginx2 -p 80:80 -v /mnt/e/java/project/take-out/sky-take-out-main/sky-take-out-main/nginx-1.20.2/conf/nginx.conf:/etc/nginx/nginx.conf:ro -v /mnt/e/java/project/take-out/sky-take-out-main/sky-take-out-main/nginx-1.20.2/html:/usr/share/nginx/html:ro nginx:1.24.0参数说明
- -d
- 以"分离模式"(后台)运行容器。
- --name nginx2
- 将容器命名为
nginx2,方便后续管理(如启动/停止)。- -p 80:80
- 端口映射:将主机的
80端口映射到容器的80端口。- 访问方式:
http://localhost:8080→ 容器的 Nginx 服务。
注意此处是以后要访问的主机端口:容器监听端口(容器监听端口要和你nginx.conf文件中的listen相互匹配)
当然此处你也可以不使用8080作为你本机的映射访问端口,这个只要不是多个应用占用可自定义- -v /path/nginx.conf:/etc/nginx/nginx.conf:ro
- 挂载 Nginx 配置文件:
- 主机路径:
/mnt/e/java/project/.../nginx-1.20.2/conf/nginx.conf- 容器路径:
/etc/nginx/nginx.conf(覆盖默认配置):ro:以只读模式挂载,防止容器意外修改文件。- -v /path/html:/usr/share/nginx/html:ro
- 挂载静态资源目录:
- 主机路径:
/mnt/e/java/project/.../nginx-1.20.2/html- 容器路径:
/usr/share/nginx/html(Nginx 默认静态资源目录)
注意此处是要和你 nginx.conf 文件中的 location 的 root 相互匹配:ro:同上,只读挂载。- nginx:1.24.0
- 使用官方 Nginx 镜像的
1.24.0版本。
之后成功搭建好环境就可以通过访问localhost:80直接查看到初始设置的index.html登录页面:

2、后端环境搭建
后端环境的搭建主要是在对于后端代码的拉取,直接在你的开发工具中打开相应的代码即可,以及以后可能的版本控制(使用git进行版本的控制,详细的使用可在对应的git的markdown中找)
2.1、拉取后端初始代码
对于后端代码的拉取主要就是熟悉其各个板块之间的代码区块,熟悉项目的结构
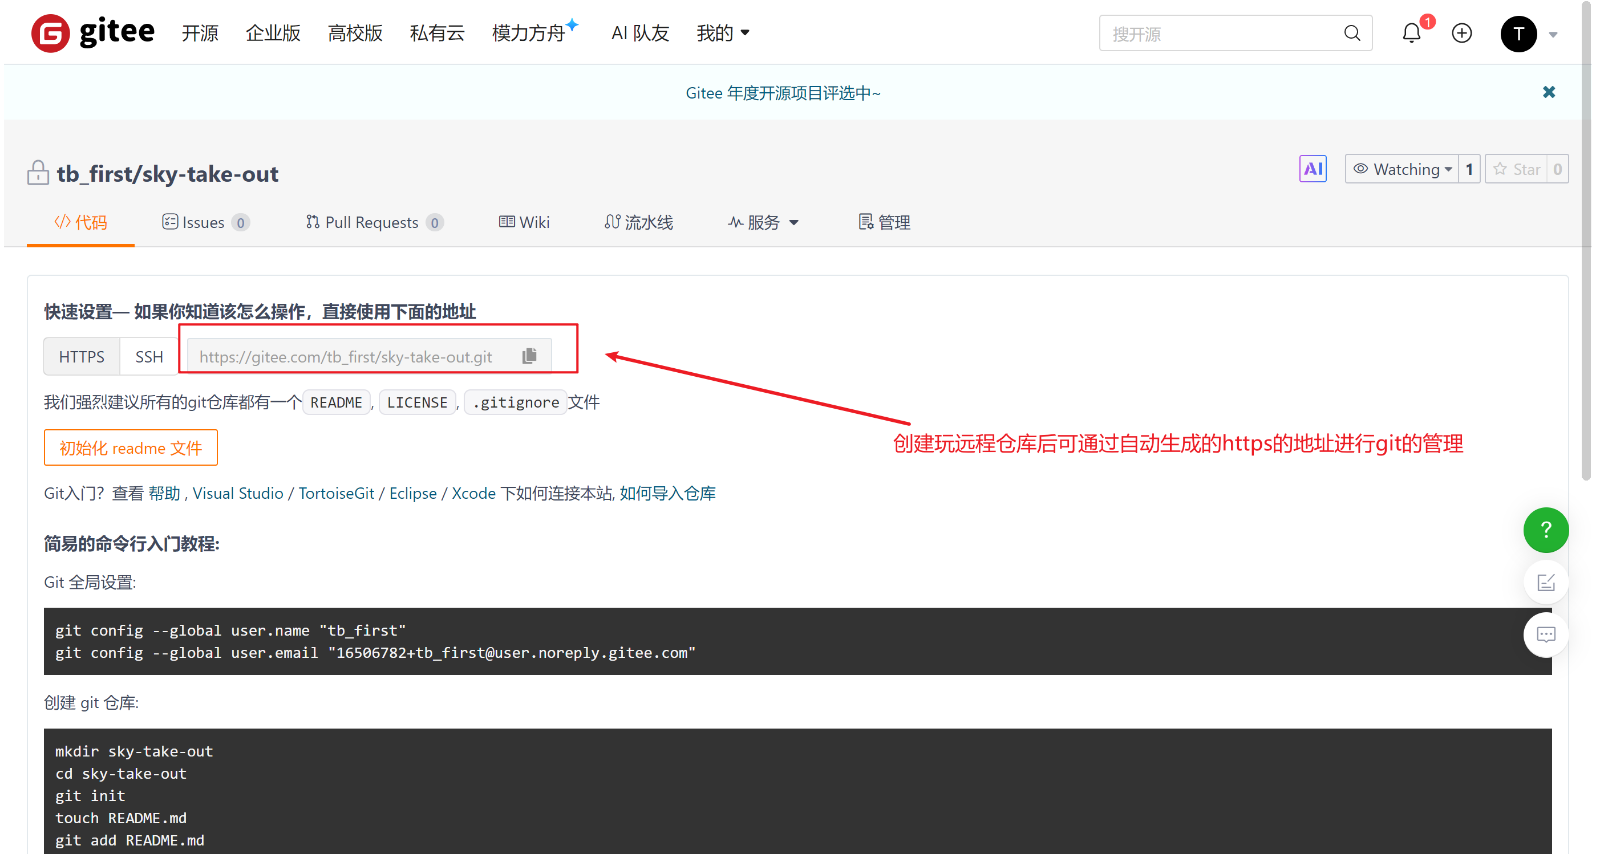
2.2、推送代码到仓库
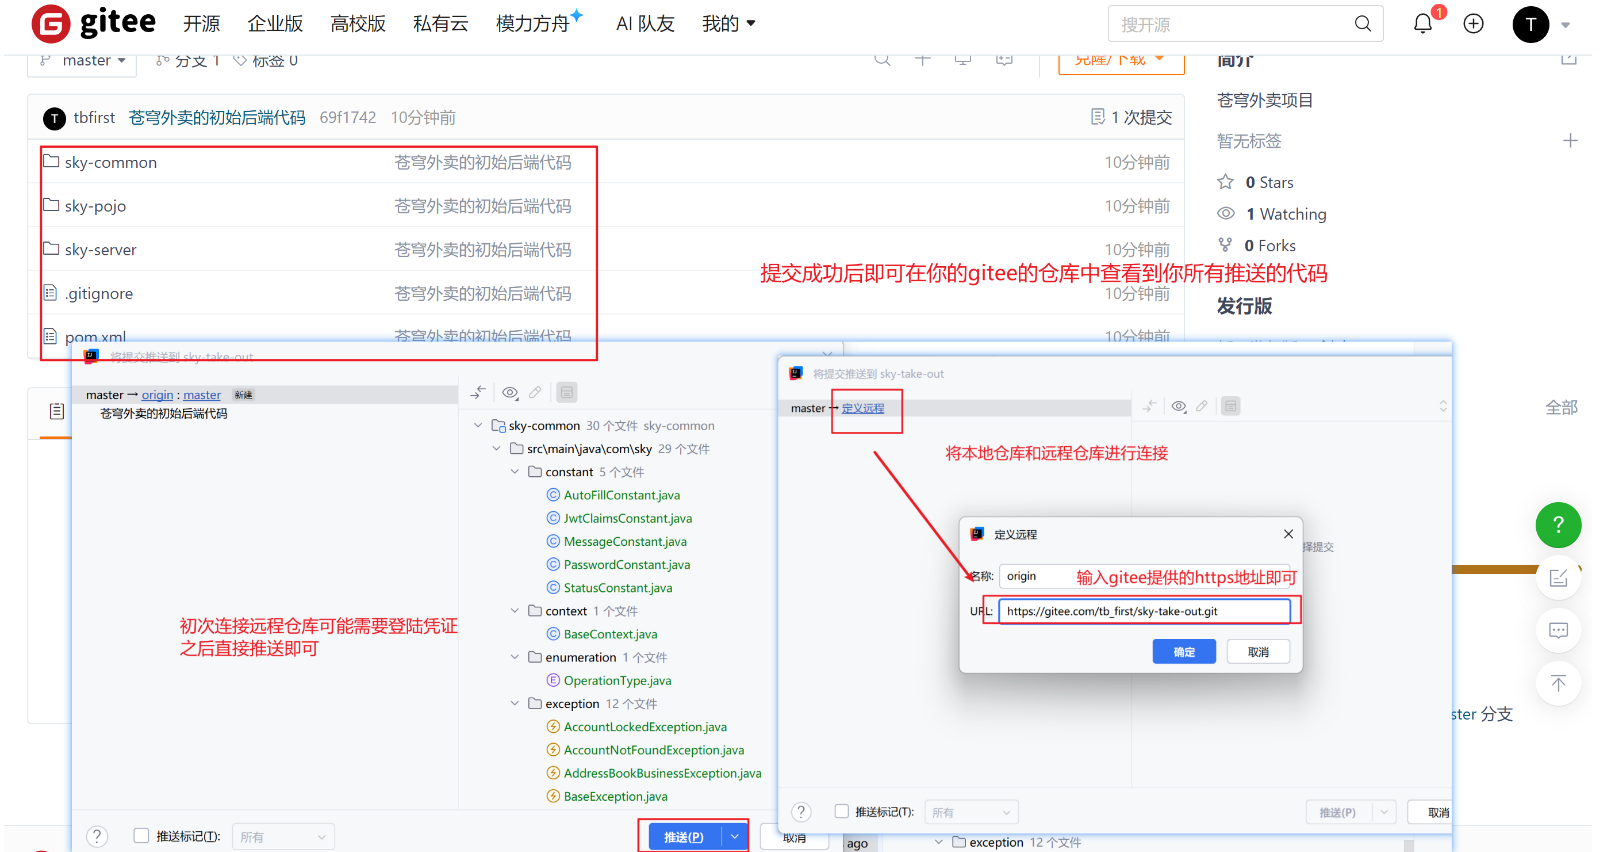
对于git版本控制主要就是通过创建本地仓库和远程仓库,之后将我们的代码文件推送到远程仓库进行保存和管理
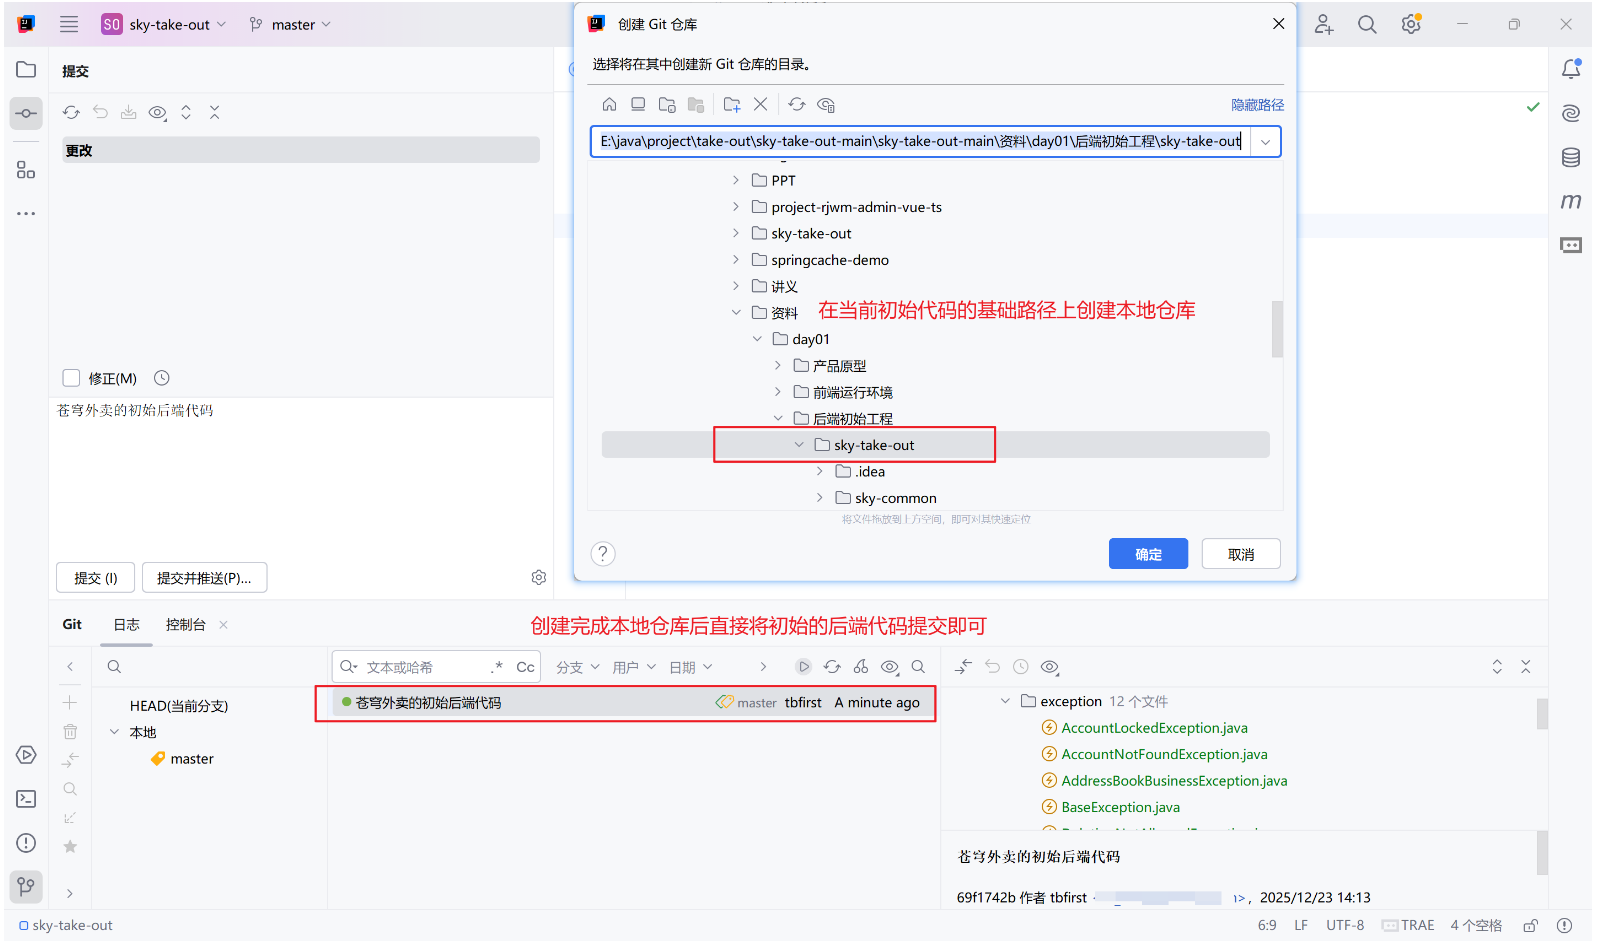
- 以初始的后端代码为基础路径创建本地仓库
- 将初始的后端代码提交到本地仓库
- 创建远程仓库
- 将本地仓库的代码推送到远程仓库
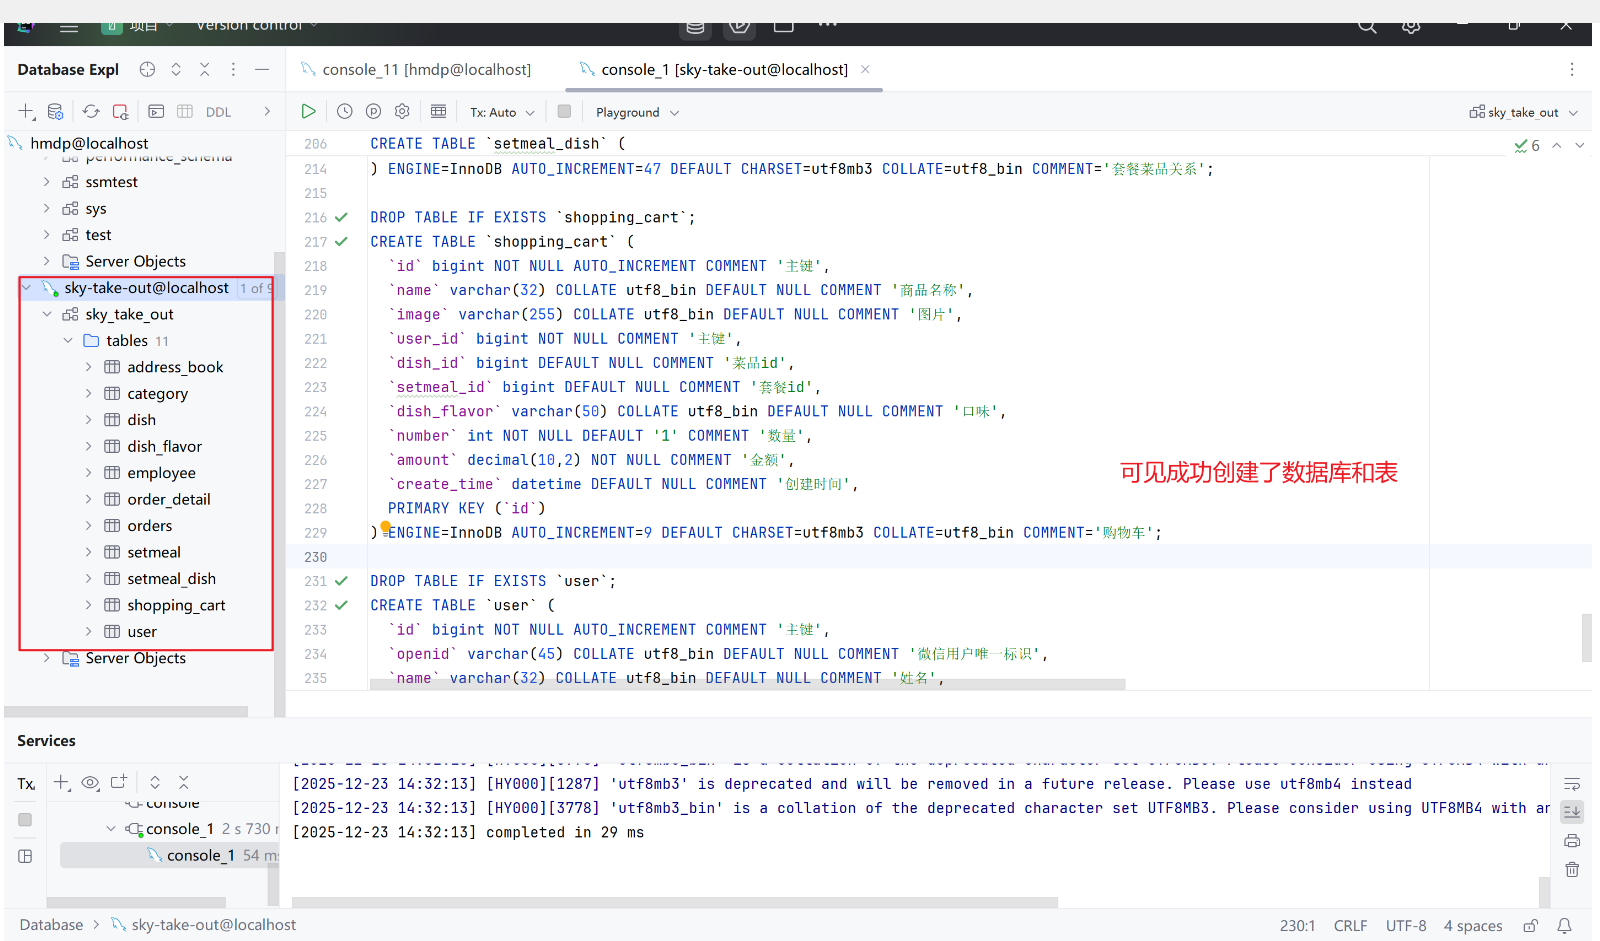
2.3、数据库的搭建
通过资料提供的数据库的创建脚本创建表即可,由于我的mysql也是通过docker进行容器搭建的,所以在创建表的前提是将你的mysql容器启动,之后就可以通过类似datagrip等图形化界面进行简化的管理和操作
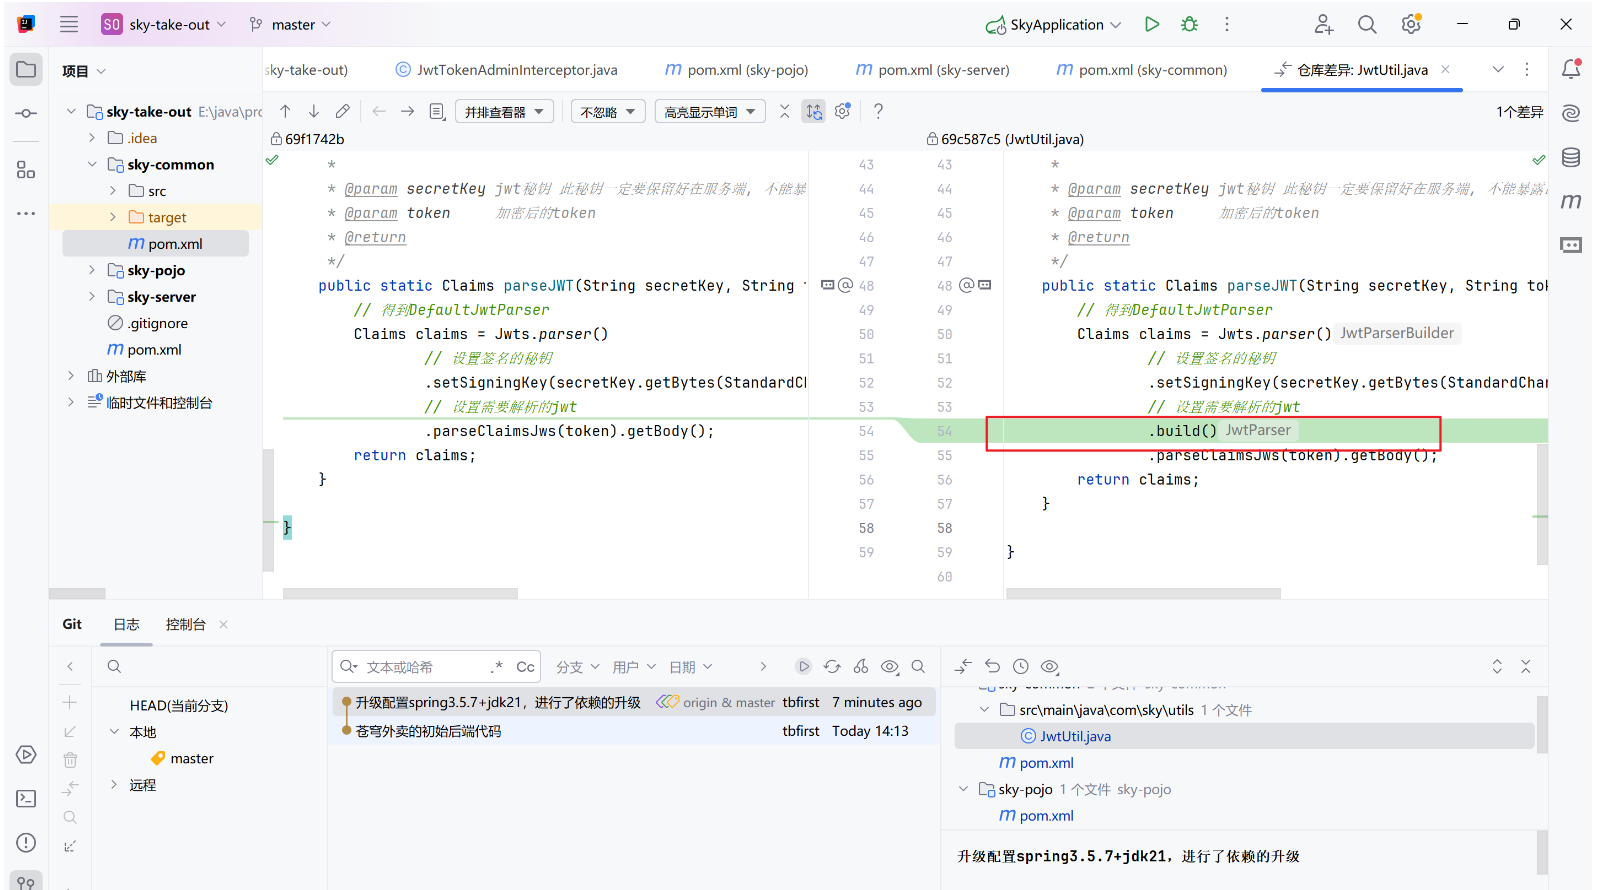
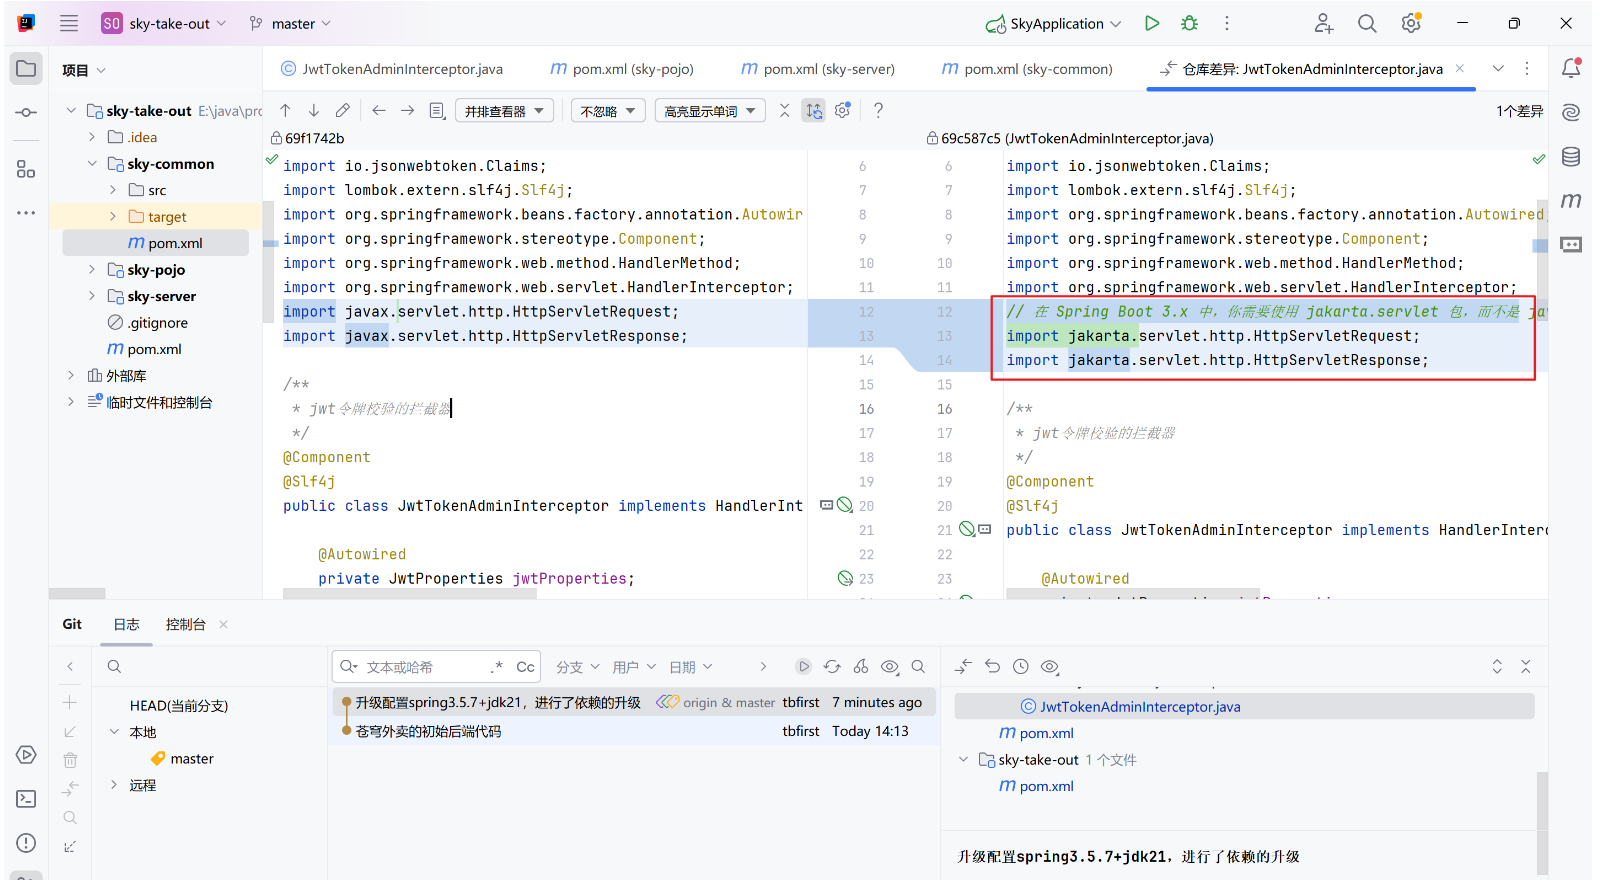
2.4、配置的升级
将原来的配置升级为springboot3.5.7+jdk21,将依赖中的版本升级并进行匹配,详见远程仓库的第二次提交
①、父项目sky-take-out
xml
<?xml version="1.0" encoding="UTF-8"?>
<project xmlns="http://maven.apache.org/POM/4.0.0"
         xmlns:xsi="http://www.w3.org/2001/XMLSchema-instance"
         xsi:schemaLocation="http://maven.apache.org/POM/4.0.0 http://maven.apache.org/xsd/maven-4.0.0.xsd">
    <modelVersion>4.0.0</modelVersion>
    <parent>
        <artifactId>spring-boot-starter-parent</artifactId>
        <groupId>org.springframework.boot</groupId>
        <!--   升级 spring boot的版本使其支持 jdk21     -->
        <version>3.5.7</version>
    </parent>
    <groupId>com.sky</groupId>
    <artifactId>sky-take-out</artifactId>
    <packaging>pom</packaging>
    <version>1.0-SNAPSHOT</version>
    <modules>
        <module>sky-common</module>
        <module>sky-pojo</module>
        <module>sky-server</module>
    </modules>
    <properties>
        <java.version>21</java.version>
        <maven.compiler.source>${java.version}</maven.compiler.source>
        <maven.compiler.target>${java.version}</maven.compiler.target>
    <!--   全面升级各个配置     -->
        <mysql.connector>8.0.33</mysql.connector>
        <websocket>3.5.7</websocket>
        <mybatis.spring>3.0.3</mybatis.spring>
        <lombok>1.18.30</lombok>
        <fastjson>2.0.48</fastjson>
        <commons.lang>2.6</commons.lang>
        <druid>1.2.21</druid>
        <pagehelper>2.1.0</pagehelper>
        <aliyun.sdk.oss>3.17.4</aliyun.sdk.oss>
        <knife4j>4.5.0</knife4j>
        <aspectj>1.9.20.1</aspectj>
        <jjwt>0.12.5</jjwt>
        <jakarta.jaxb.version>4.0.1</jakarta.jaxb.version>
        <poi>5.2.5</poi>
        <swagger2>3.0.0</swagger2>
        <servlet>4.0.1</servlet>
    </properties>
    <dependencyManagement>
        <dependencies>
            <dependency>
                <groupId>mysql</groupId>
                <artifactId>mysql-connector-java</artifactId>
                <version>${mysql.connector}</version> <!-- 选择合适的版本 -->
            </dependency>

            <!-- Spring Boot Starter Websocket -->
            <dependency>
                <groupId>org.springframework.boot</groupId>
                <artifactId>spring-boot-starter-websocket</artifactId>
                <version>${websocket}</version>
            </dependency>
            <dependency>
                <groupId>org.mybatis.spring.boot</groupId>
                <artifactId>mybatis-spring-boot-starter</artifactId>
                <version>${mybatis.spring}</version>
            </dependency>

            <dependency>
                <groupId>org.projectlombok</groupId>
                <artifactId>lombok</artifactId>
                <version>${lombok}</version>
            </dependency>

            <dependency>
                <groupId>com.alibaba</groupId>
                <artifactId>fastjson</artifactId>
                <version>${fastjson}</version>
            </dependency>

            <dependency>
                <groupId>commons-lang</groupId>
                <artifactId>commons-lang</artifactId>
                <version>${commons.lang}</version>
            </dependency>

            <dependency>
                <groupId>com.alibaba</groupId>
                <artifactId>druid-spring-boot-starter</artifactId>
                <version>${druid}</version>
            </dependency>

            <dependency>
                <groupId>com.github.pagehelper</groupId>
                <artifactId>pagehelper-spring-boot-starter</artifactId>
                <version>${pagehelper}</version>
            </dependency>

            <dependency>
                <groupId>com.github.xiaoymin</groupId>
                <artifactId>knife4j-openapi3-jakarta-spring-boot-starter</artifactId>
                <version>${knife4j}</version>
            </dependency>

            <dependency>
                <groupId>org.aspectj</groupId>
                <artifactId>aspectjrt</artifactId>
                <version>${aspectj}</version>
            </dependency>

            <dependency>
                <groupId>org.aspectj</groupId>
                <artifactId>aspectjweaver</artifactId>
                <version>${aspectj}</version>
            </dependency>

            <dependency>
                <groupId>io.jsonwebtoken</groupId>
                <artifactId>jjwt</artifactId>
                <version>${jjwt}</version>
            </dependency>

            <dependency>
                <groupId>com.aliyun.oss</groupId>
                <artifactId>aliyun-sdk-oss</artifactId>
                <version>${aliyun.sdk.oss}</version>
            </dependency>

            <!-- Jakarta JAXB (替代javax) -->
            <dependency>
                <groupId>jakarta.xml.bind</groupId>
                <artifactId>jakarta.xml.bind-api</artifactId>
                <version>${jakarta.jaxb.version}</version>
            </dependency>

            <!-- poi -->
            <dependency>
                <groupId>org.apache.poi</groupId>
                <artifactId>poi</artifactId>
                <version>${poi}</version>
            </dependency>
            <dependency>
                <groupId>org.apache.poi</groupId>
                <artifactId>poi-ooxml</artifactId>
                <version>${poi}</version>
            </dependency>

            <dependency>
                <groupId>javax.servlet</groupId>
                <artifactId>javax.servlet-api</artifactId>
                <version>${servlet}</version> <!-- 选择合适的版本 -->
                <scope>provided</scope> <!-- Servlet API 通常由容器提供 -->
            </dependency>
          <!--Spring Boot 3.x 官方推荐使用 SpringDoc OpenAPI(支持 OpenAPI 3.0),而不是 springfox(Swagger 2.x)。-->
            <!-- Swagger 2 -->
            <dependency>
                <groupId>io.springfox</groupId>
                <artifactId>springfox-swagger2</artifactId>
                <version>${swagger2}</version> <!-- 选择合适的版本 -->
            </dependency>
            <dependency>
                <groupId>io.springfox</groupId>
                <artifactId>springfox-swagger-ui</artifactId>
                <version>${swagger2}</version> <!-- 同上 -->
            </dependency>
            <!--微信支付-->
            <dependency>
                <groupId>com.github.wechatpay-apiv3</groupId>
                <artifactId>wechatpay-apache-httpclient</artifactId>
                <version>0.4.8</version>
            </dependency>
        </dependencies>
    </dependencyManagement>
</project>
②、子项目sky-pojo
xml
<?xml version="1.0" encoding="UTF-8"?>
<project xmlns="http://maven.apache.org/POM/4.0.0"
         xmlns:xsi="http://www.w3.org/2001/XMLSchema-instance"
         xsi:schemaLocation="http://maven.apache.org/POM/4.0.0 http://maven.apache.org/xsd/maven-4.0.0.xsd">
    <parent>
        <artifactId>sky-take-out</artifactId>
        <groupId>com.sky</groupId>
        <version>1.0-SNAPSHOT</version>
    </parent>
    <modelVersion>4.0.0</modelVersion>
    <artifactId>sky-pojo</artifactId>
    <dependencies>
        <!-- MySQL Connector -->
        <dependency>
            <groupId>mysql</groupId>
            <artifactId>mysql-connector-java</artifactId>
        </dependency>

        <!-- Spring Boot Starter Websocket -->
        <dependency>
            <groupId>org.springframework.boot</groupId>
            <artifactId>spring-boot-starter-websocket</artifactId>
        </dependency>
        <dependency>
            <groupId>org.projectlombok</groupId>
            <artifactId>lombok</artifactId>
        </dependency>
        <dependency>
            <groupId>com.fasterxml.jackson.core</groupId>
            <artifactId>jackson-databind</artifactId>
            <version>2.9.2</version>
        </dependency>
        <dependency>
            <groupId>com.github.xiaoymin</groupId>
            <artifactId>knife4j-openapi3-jakarta-spring-boot-starter</artifactId>
        </dependency>
        <dependency>
            <groupId>javax.servlet</groupId>
            <artifactId>javax.servlet-api</artifactId>
        </dependency>
      <!--Spring Boot 3.x 官方推荐使用 SpringDoc OpenAPI(支持 OpenAPI 3.0),而不是springfox(Swagger 2.x)。-->
        <!-- Swagger 2 -->
        <dependency>
            <groupId>io.springfox</groupId>
            <artifactId>springfox-swagger2</artifactId>
        </dependency>
        <dependency>
            <groupId>io.springfox</groupId>
            <artifactId>springfox-swagger-ui</artifactId>
        </dependency>
    </dependencies>
</project>
③、子项目sky-server
xml
<?xml version="1.0" encoding="UTF-8"?>
<project xmlns="http://maven.apache.org/POM/4.0.0"
         xmlns:xsi="http://www.w3.org/2001/XMLSchema-instance"
         xsi:schemaLocation="http://maven.apache.org/POM/4.0.0 http://maven.apache.org/xsd/maven-4.0.0.xsd">
    <parent>
        <artifactId>sky-take-out</artifactId>
        <groupId>com.sky</groupId>
        <version>1.0-SNAPSHOT</version>
    </parent>
    <modelVersion>4.0.0</modelVersion>
    <artifactId>sky-server</artifactId>
    <dependencies>
        <dependency>
            <groupId>com.sky</groupId>
            <artifactId>sky-common</artifactId>
            <version>1.0-SNAPSHOT</version>
        </dependency>

        <dependency>
            <groupId>com.sky</groupId>
            <artifactId>sky-pojo</artifactId>
            <version>1.0-SNAPSHOT</version>
        </dependency>

        <dependency>
            <groupId>org.springframework.boot</groupId>
            <artifactId>spring-boot-starter</artifactId>
        </dependency>

        <dependency>
            <groupId>org.springframework.boot</groupId>
            <artifactId>spring-boot-starter-test</artifactId>
            <scope>test</scope>
        </dependency>

        <dependency>
            <groupId>org.springframework.boot</groupId>
            <artifactId>spring-boot-starter-web</artifactId>
            <scope>compile</scope>
        </dependency>
        <!-- MySQL Connector -->
        <dependency>
            <groupId>mysql</groupId>
            <artifactId>mysql-connector-java</artifactId>
            <scope>runtime</scope>
        </dependency>

        <dependency>
            <groupId>org.mybatis.spring.boot</groupId>
            <artifactId>mybatis-spring-boot-starter</artifactId>
        </dependency>

        <dependency>
            <groupId>org.projectlombok</groupId>
            <artifactId>lombok</artifactId>
        </dependency>

        <dependency>
            <groupId>com.alibaba</groupId>
            <artifactId>fastjson</artifactId>
        </dependency>

        <dependency>
            <groupId>com.alibaba</groupId>
            <artifactId>druid-spring-boot-starter</artifactId>
        </dependency>

        <dependency>
            <groupId>com.github.pagehelper</groupId>
            <artifactId>pagehelper-spring-boot-starter</artifactId>
        </dependency>

        <dependency>
            <groupId>org.aspectj</groupId>
            <artifactId>aspectjrt</artifactId>
        </dependency>

        <dependency>
            <groupId>org.aspectj</groupId>
            <artifactId>aspectjweaver</artifactId>
        </dependency>

        <dependency>
            <groupId>com.github.xiaoymin</groupId>
        <!--     Knife4j 从 3.x 开始改名为 knife4j-openapi3-jakarta-spring-boot-starter       -->
            <artifactId>knife4j-openapi3-jakarta-spring-boot-starter</artifactId>
        </dependency>

        <dependency>
            <groupId>org.springframework.boot</groupId>
            <artifactId>spring-boot-starter-data-redis</artifactId>
        </dependency>

        <dependency>
            <groupId>org.springframework.boot</groupId>
            <artifactId>spring-boot-starter-cache</artifactId>
        </dependency>

        <dependency>
            <groupId>org.springframework.boot</groupId>
            <artifactId>spring-boot-starter-websocket</artifactId>
        </dependency>

        <dependency>
            <groupId>jakarta.xml.bind</groupId>
            <artifactId>jakarta.xml.bind-api</artifactId>
        </dependency>

        <!-- poi -->
        <dependency>
            <groupId>org.apache.poi</groupId>
            <artifactId>poi</artifactId>
        </dependency>
        <dependency>
            <groupId>org.apache.poi</groupId>
            <artifactId>poi-ooxml</artifactId>
        </dependency>
        <dependency>
            <groupId>javax.servlet</groupId>
            <artifactId>javax.servlet-api</artifactId>
        </dependency>
      <!--Spring Boot 3.x 官方推荐使用 SpringDoc OpenAPI(支持 OpenAPI 3.0),而不是 springfox(Swagger 2.x)。-->
        <!-- Swagger 2 -->
        <dependency>
            <groupId>io.springfox</groupId>
            <artifactId>springfox-swagger2</artifactId>
        </dependency>
        <dependency>
            <groupId>io.springfox</groupId>
            <artifactId>springfox-swagger-ui</artifactId>
        </dependency>
    </dependencies>

    <build>
        <plugins>
            <plugin>
                <groupId>org.springframework.boot</groupId>
                <artifactId>spring-boot-maven-plugin</artifactId>
            </plugin>
        </plugins>
    </build>

</project>
④、子项目sky-common
xml
<?xml version="1.0" encoding="UTF-8"?>
<project xmlns="http://maven.apache.org/POM/4.0.0"
         xmlns:xsi="http://www.w3.org/2001/XMLSchema-instance"
         xsi:schemaLocation="http://maven.apache.org/POM/4.0.0 http://maven.apache.org/xsd/maven-4.0.0.xsd">
    <parent>
        <artifactId>sky-take-out</artifactId>
        <groupId>com.sky</groupId>
        <version>1.0-SNAPSHOT</version>
    </parent>
    <modelVersion>4.0.0</modelVersion>
    <artifactId>sky-common</artifactId>
    <dependencies>
        <!-- MySQL Connector -->
        <dependency>
            <groupId>mysql</groupId>
            <artifactId>mysql-connector-java</artifactId>
        </dependency>

        <!-- Spring Boot Starter Websocket -->
        <dependency>
            <groupId>org.springframework.boot</groupId>
            <artifactId>spring-boot-starter-websocket</artifactId>
        </dependency>
        <dependency>
            <groupId>org.projectlombok</groupId>
            <artifactId>lombok</artifactId>
        </dependency>
        <dependency>
            <groupId>com.alibaba</groupId>
            <artifactId>fastjson</artifactId>
        </dependency>
        <dependency>
            <groupId>commons-lang</groupId>
            <artifactId>commons-lang</artifactId>
        </dependency>
        <dependency>
            <groupId>org.springframework.boot</groupId>
            <artifactId>spring-boot-starter-json</artifactId>
        </dependency>
        <dependency>
            <groupId>io.jsonwebtoken</groupId>
            <artifactId>jjwt</artifactId>
        </dependency>
        <!--支持配置属性类,yml文件中可以提示配置项-->
        <dependency>
            <groupId>org.springframework.boot</groupId>
            <artifactId>spring-boot-configuration-processor</artifactId>
            <optional>true</optional>
        </dependency>
        <dependency>
            <groupId>com.aliyun.oss</groupId>
            <artifactId>aliyun-sdk-oss</artifactId>
        </dependency>
        <dependency>
            <groupId>jakarta.xml.bind</groupId>
            <artifactId>jakarta.xml.bind-api</artifactId>
        </dependency>
        <dependency>
            <groupId>javax.servlet</groupId>
            <artifactId>javax.servlet-api</artifactId>
        </dependency>
        <!-- Swagger 2 -->
        <dependency>
            <groupId>io.springfox</groupId>
            <artifactId>springfox-swagger2</artifactId>
        </dependency>
        <dependency>
            <groupId>io.springfox</groupId>
            <artifactId>springfox-swagger-ui</artifactId>
        </dependency>
        <!--微信支付-->
        <dependency>
            <groupId>com.github.wechatpay-apiv3</groupId>
            <artifactId>wechatpay-apache-httpclient</artifactId>
        </dependency>
    </dependencies>
</project>
⑤、其余
2.5、前后端联调测试
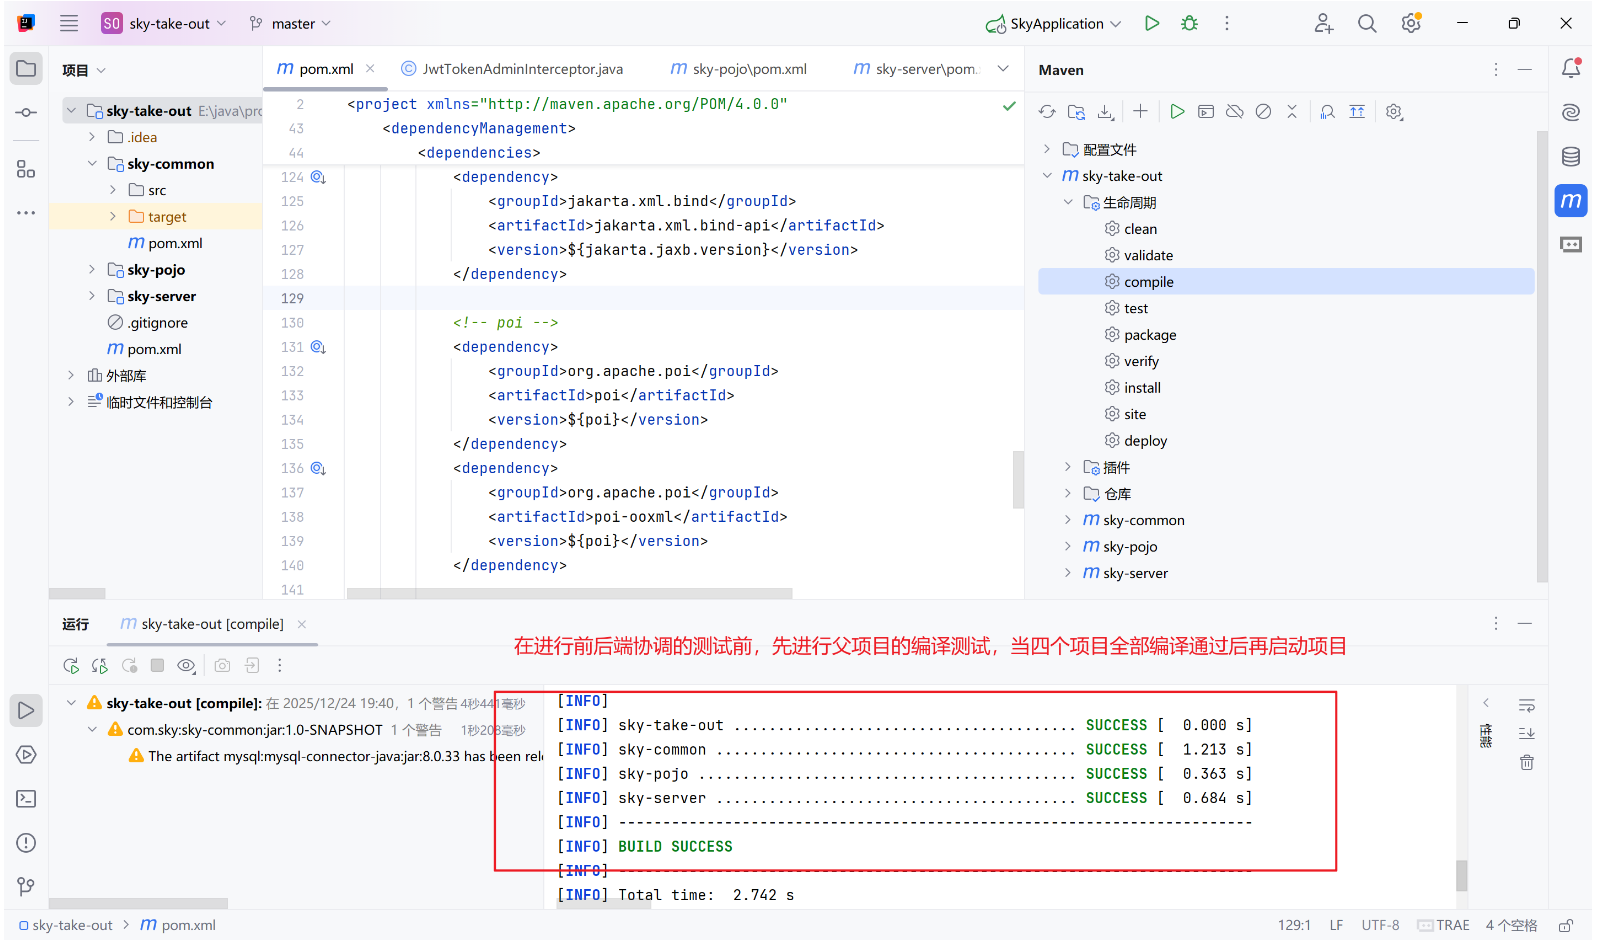
在启动项目之前,先进行项目的编译,确保编译通过
2.6、可能遇到的问题
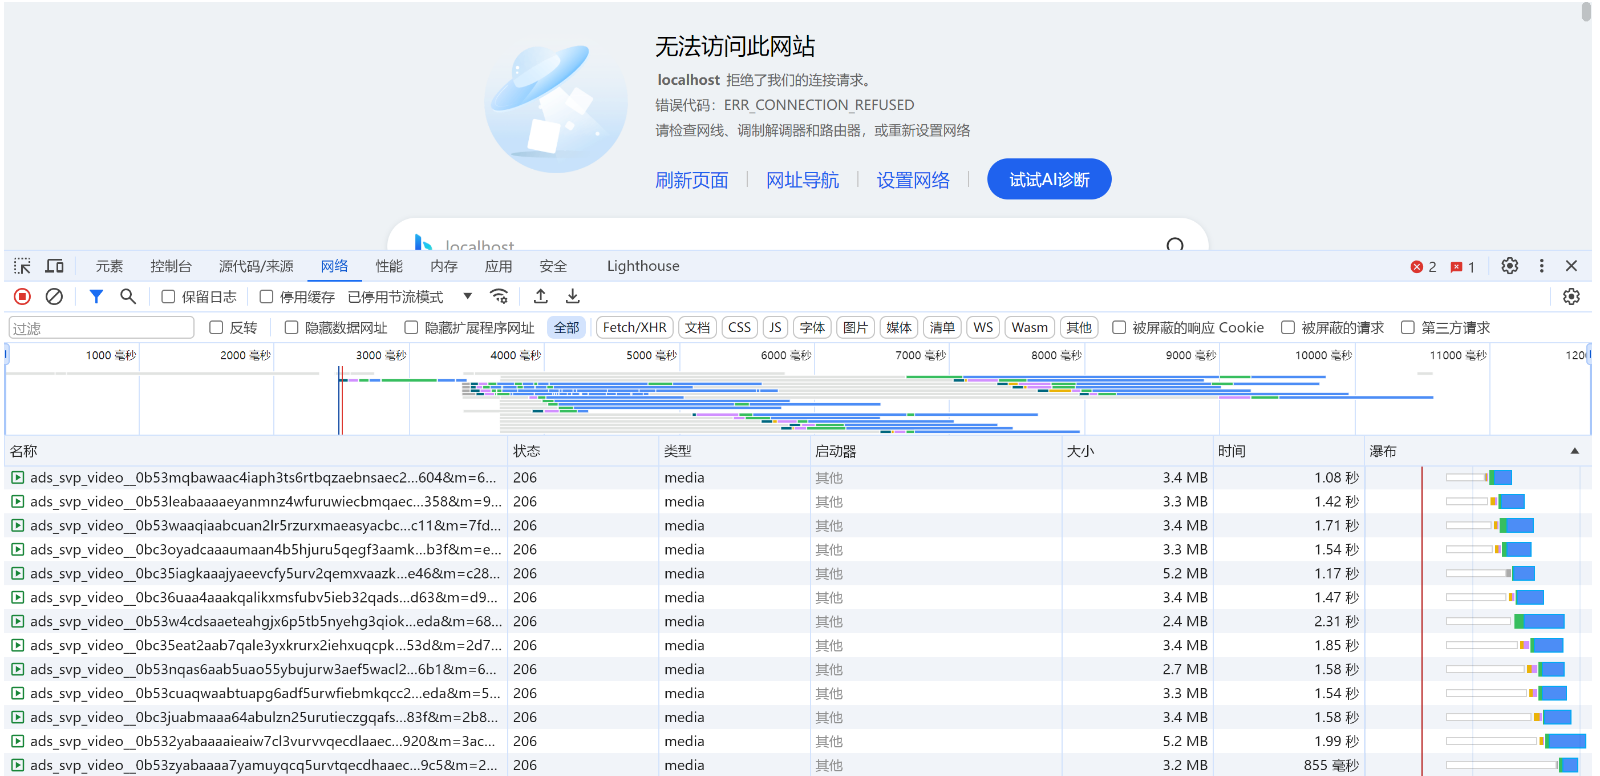
①、前端基础登录页面不出来
++错误信息类似:前端http://localhost/#/login无法加载,显示localhost拒绝访问++
简单来说就是你nginx的静态资源配置有问题,如果是使用docker创建nginx,要注意数据卷的挂载,建议直接和你nginx.conf中的路径相匹配,直接使用直角路径
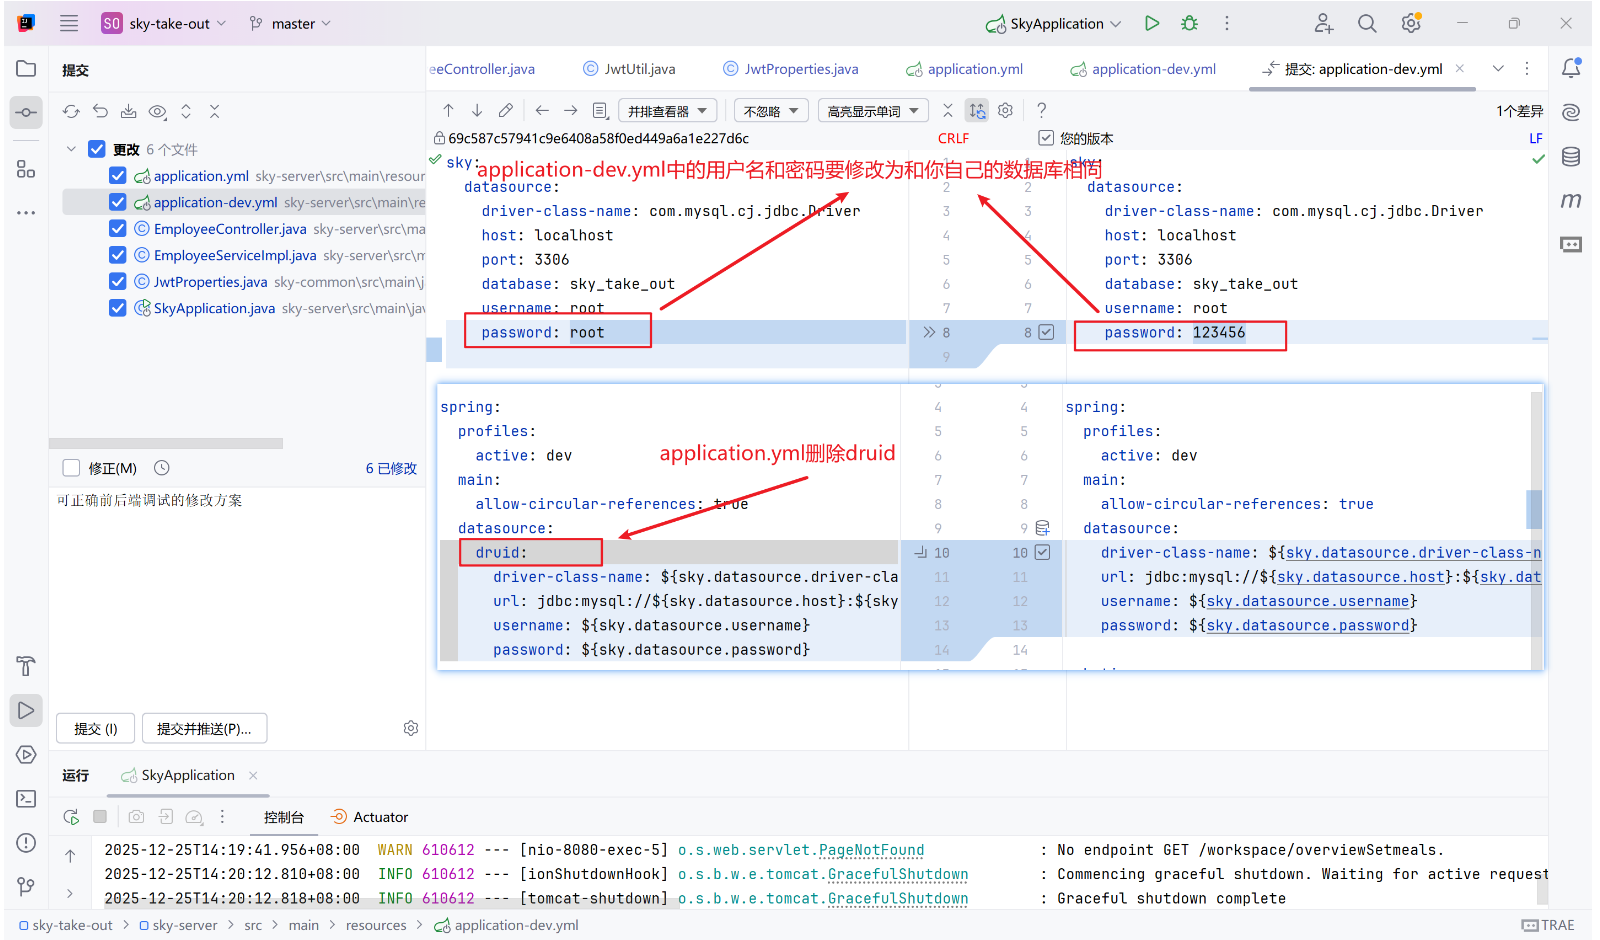
②、数据库匹配错误
++错误信息类似:Reason: Failed to determine a suitable driver class++
简单来说,就是提供的资料你需要修改application-dev.yml中的数据库的用户名和密码,要和你自己的相同,同时删除application.yml的druid
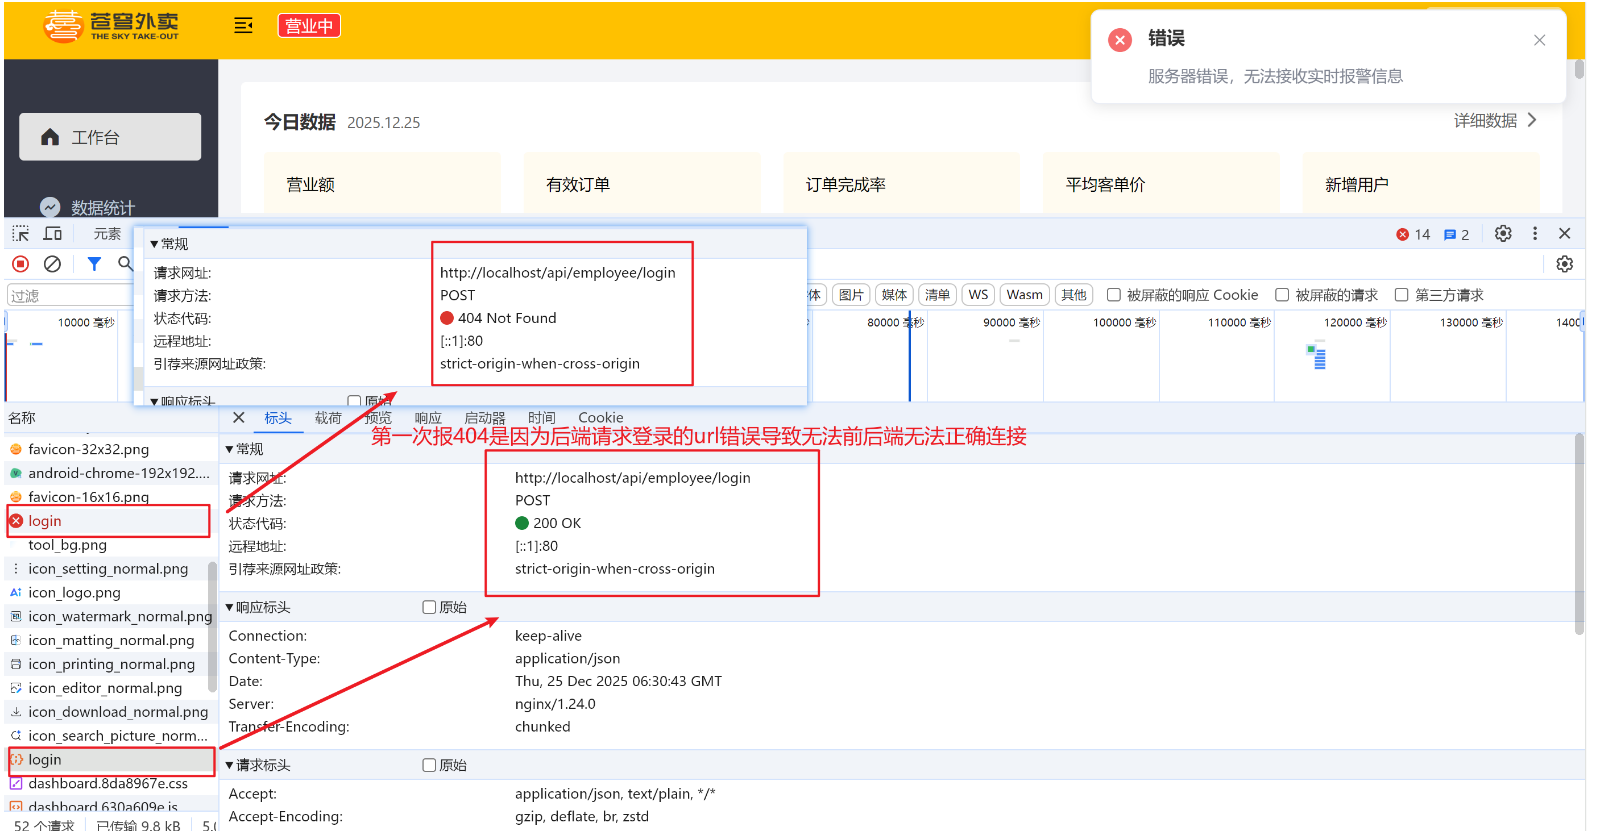
③、404错误
++错误信息类似:在开发者工具中可见,当后端可正确启动,前端http://localhost/#/login点击登录按钮后,直接报404错误++
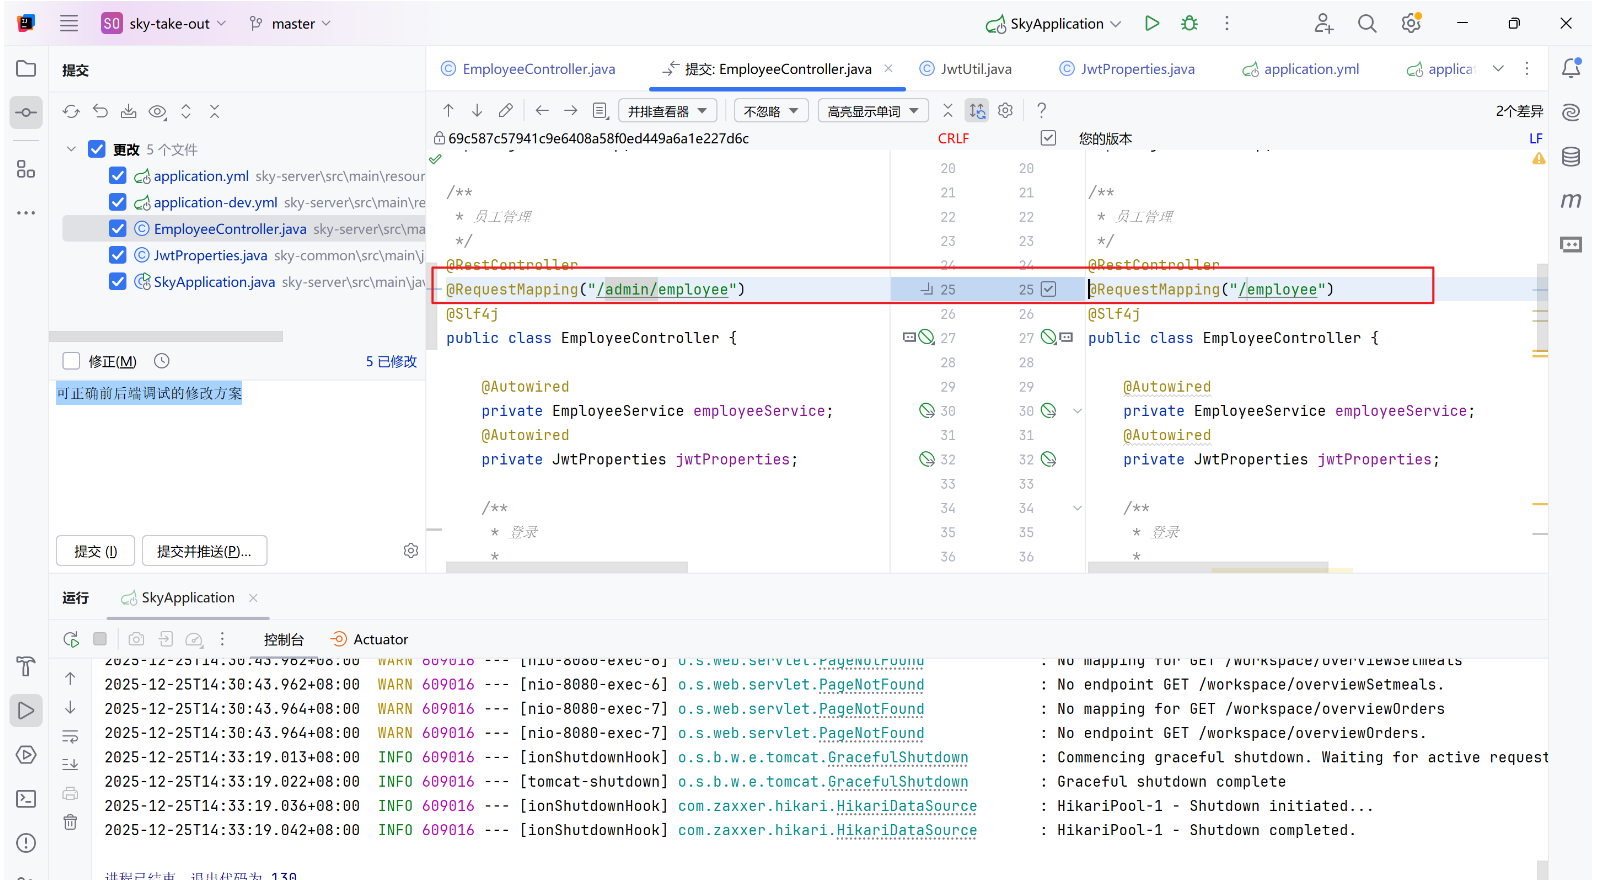
Ⅰ、controller层的url错误
简单来说就是资料给的controller层的@RequestMapping和我们的nginx配置冲突有问题,直接删去前面的/admin即可
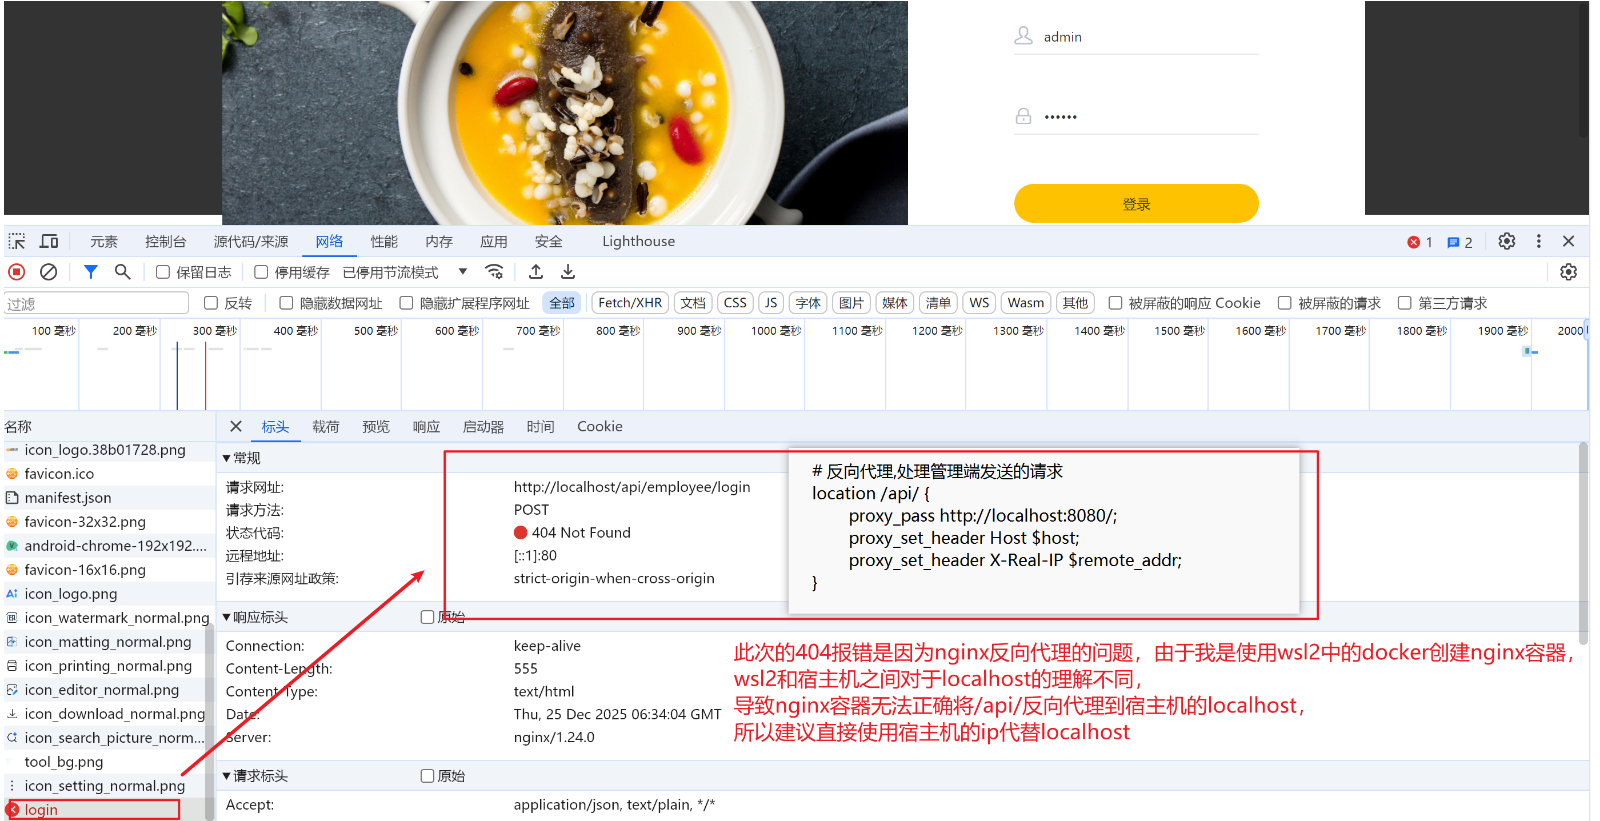
Ⅱ、反向代理的错误
这个错误只是针对类似我这样,使用wsl2中的docker进行nginx容器创建的用户
简单来说就是WSL2中指向错误(指向WSL自身),wsl2的localhost可能会指向虚拟机本身,宿主机的localhost指的是本机,二者可能会出现指向不同,导致最终反向代理的路径不同,建议直接写宿主机的ip
bash
cat /etc/resolv.conf | grep nameserver | awk '{print $2}'
# 可能输出以下公共 DNS或者直接就是你的宿主机ip
# 8.8.8.8
# 8.8.4.4
# 114.114.114.114
ip route | grep default | awk '{print $3}'
# 可能输出类似以下的宿主机ip
# 172.xx.xxx.1
将nginx.conf文件中的反向代理中的localhost修改为刚刚输出的宿主机ip即可
④、500错误
++错误信息类似:在开发者工具中可见,当后端可正确启动,前端http://localhost/#/login点击登录按钮后,一直转,阻塞了一段时间直接报500错误++
简单来说你现在已经成功将nginx反向代理到了后端,可以直接在你的编译器中查看到可能的错误日志输出
可能原因如下:
- 数据库连接失败
- 空指针异常
- JWT配置错误
- 防火墙未关
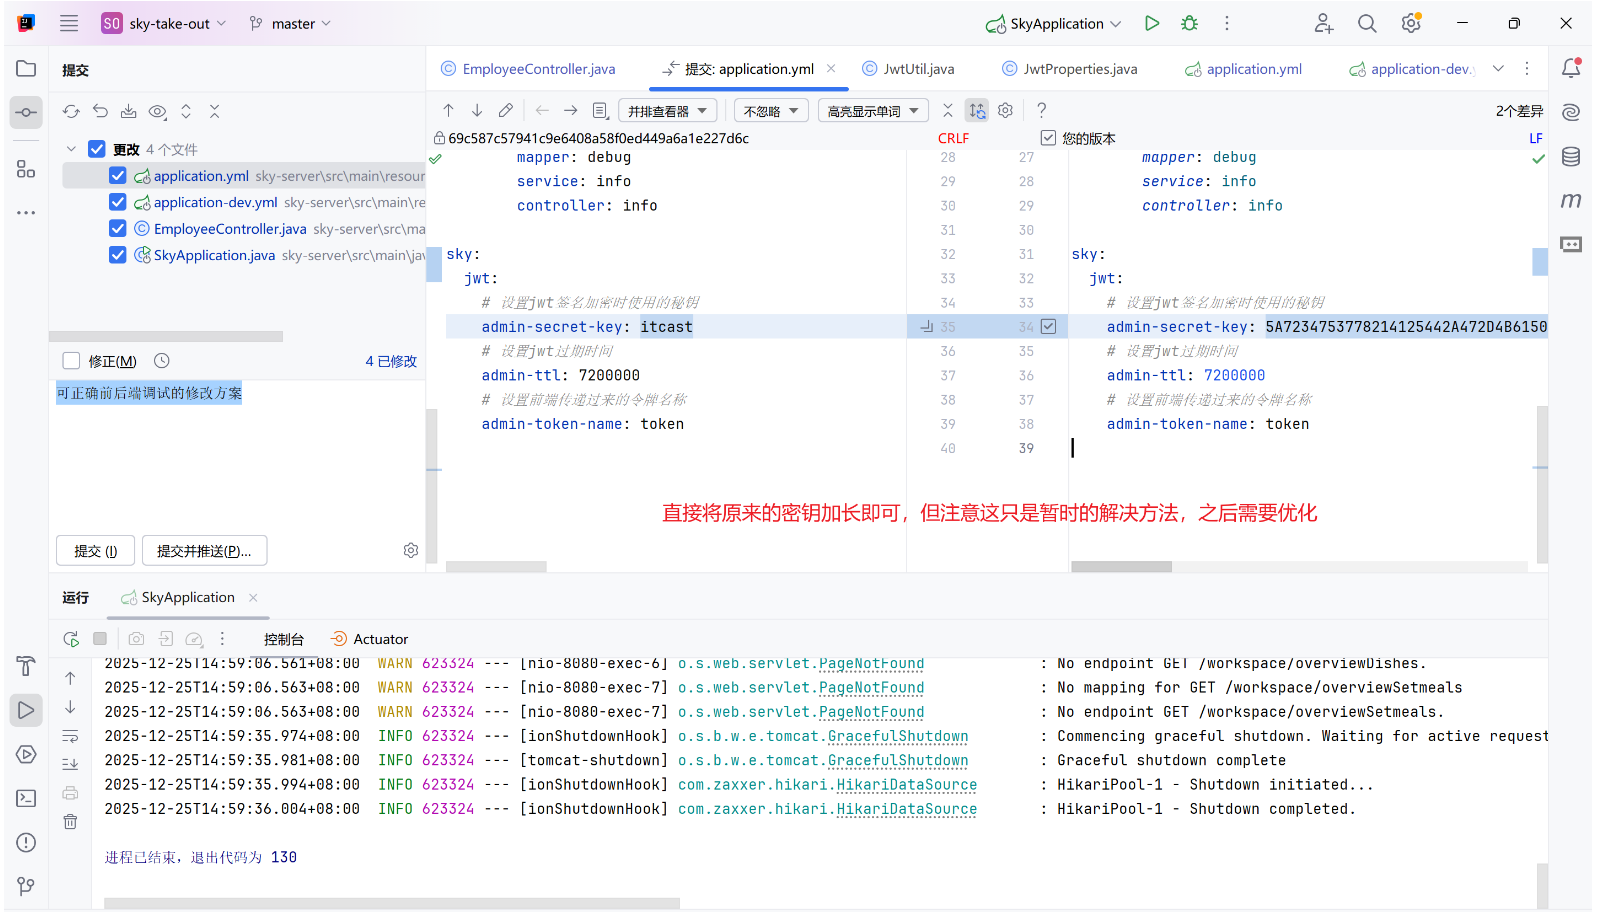
Ⅰ、JWT配置
简单来说就是资料提供的JWT太简单了,JWT签名密钥强度不足,加强一下就可以了,以下给出一个临时的解决方法
- 当前配置的JWT密钥长度只有48位(6个字符)
- HS256算法要求密钥长度至少256位(32个字符)
Ⅱ、防火墙
bash
# PowerShell 管理员身份运行
# 开防火墙
Set-NetFirewallProfile -Profile Public,Private -Enabled True
# 关防火墙
Set-NetFirewallProfile -Profile Public,Private -Enabled False
最终就可以正确进入工作台了
3、完善登录功能
3.1、加密
当前登录后得到的用户信息包括明文版的密码,但是我们需要对其进行加密处理,这里我们选择使用md5加密算法,该算法可将一个明文加密为密文,该过程是不可逆的,即无法通过密文再重新获取到明文,只可比对两个密文来判断是否相等
java
password = DigestUtils.md5DigestAsHex(password.getBytes());
// 直接使用DigestUtils包自带的md5加密即可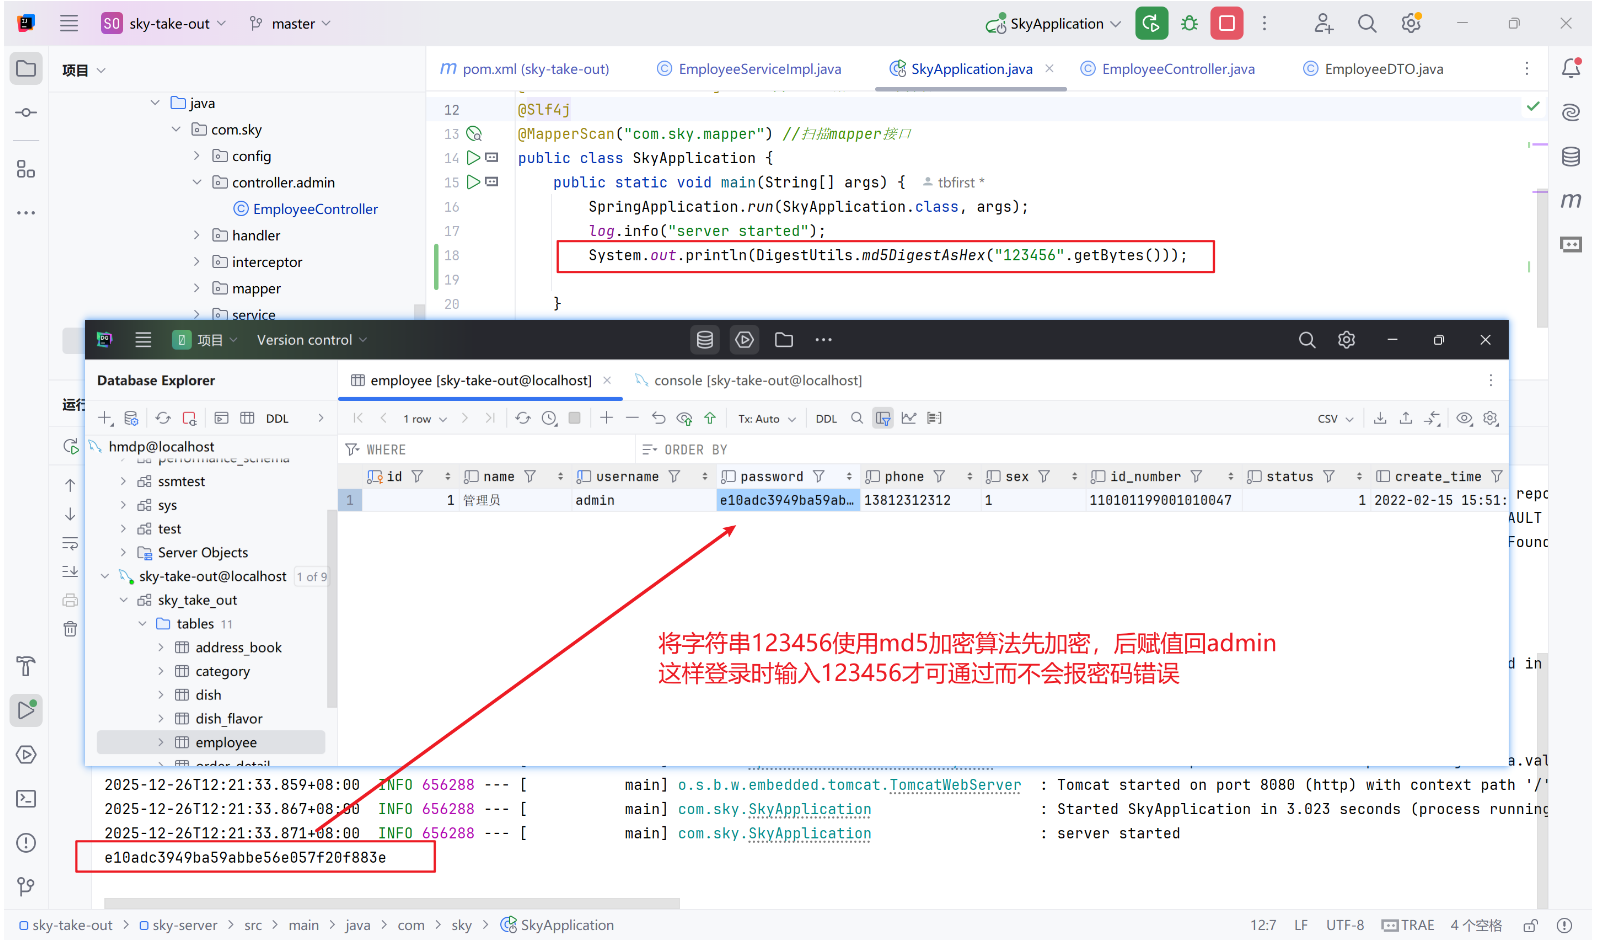
3.2、接口管理
在yapi中新建项目,并且导入资料中的json文件即可
3.3、swagger使用
更准确一点应该是使用knife4j(集成了swagger的一个增强框架)
①、配置依赖
yaml
<dependency>
    <groupId>com.github.xiaoymin</groupId>
    <artifactId>knife4j-openapi3-jakarta-spring-boot-starter</artifactId>
    <version>4.4.0</version>		# 具体版本具体看
</dependency
②、添加相关配置
③、静态资源映射
本质是重写 Spring 提供的 WebMvcConfigurationSupport 类中的 addResourceHandlers 方法
java
protected void addResourceHandlers(ResourceHandlerRegistry registry) {
    registry.addResourceHandler("/doc.html").addResourceLocations("classpath:/META-INF/resources/");
    registry.addResourceHandler("/webjars/**").addResourceLocations("classpath:/META-INF/resources/webjars/");
}
理论上来说由于我升级了配置,使用的是spring boot3.5.7+jdk21,Spring Boot 3.x 官方推荐使用 SpringDoc OpenAPI(支持 OpenAPI 3.0),而不是springfox(Swagger 2.x)。但是由于那样要将代码中的大量使用了swagger2的方法进行修改,所以最终我并没有完全实现文档的建立
更加具体的knife4j的使用可见笔记SSM4
4、补充:postman的使用
①、路径参数(Path Variable)
场景 :URL 中的动态变量(如 /users/{id})。Postman 设置:
-
在 URL 输入框中直接替换变量值:
PUT http://localhost:8080/shop/123 # {id} 替换为 123
-
或用 双花括号
{``{variable}}配合环境变量(高级用法)。
②、Query 参数(Query Parameters)
场景 :URL 中 ? 后的键值对(如 ?name=John&age=20)。Postman 设置:
- 点击 Params 选项卡。
- 在表格中添加键值对,Postman 会自动拼接到 URL:
- Key :
name→ Value :John - Key :
age→ Value :20
- Key :
③、Body 数据(Request Body)
Ⅰ、JSON / XML / Text
场景 :用于 POST、PUT 请求的复杂数据(如 @RequestBody)。Postman 设置:
-
选择 Body 选项卡 → raw。
-
右侧下拉菜单选择格式(如
JSON)。 -
输入数据:
{
"name": "John",
"age": 25
}
Ⅱ、Form-Data
场景 :文件上传或表单提交(multipart/form-data)。Postman 设置:
- 选择 Body → form-data。
- 添加键值对或文件:
- Key :
avatar→ 选择File类型 → 上传文件 - Key :
description→ 输入文本
- Key :
Ⅲ、x-www-form-urlencoded
场景 :传统表单提交(如 application/x-www-form-urlencoded)。Postman 设置:
- 选择 Body → x-www-form-urlencoded。
- 添加键值对(类似 Query 参数,但放在 Body 中)。
④、Headers 参数
场景 :自定义请求头(如 Authorization、Content-Type)。Postman 设置:
- 点击 Headers 选项卡。
- 添加键值对:
- Key :
Content-Type→ Value :application/json - Key :
Authorization→ Value :Bearer your_token
- Key :
二、day02学习
1、新增员工
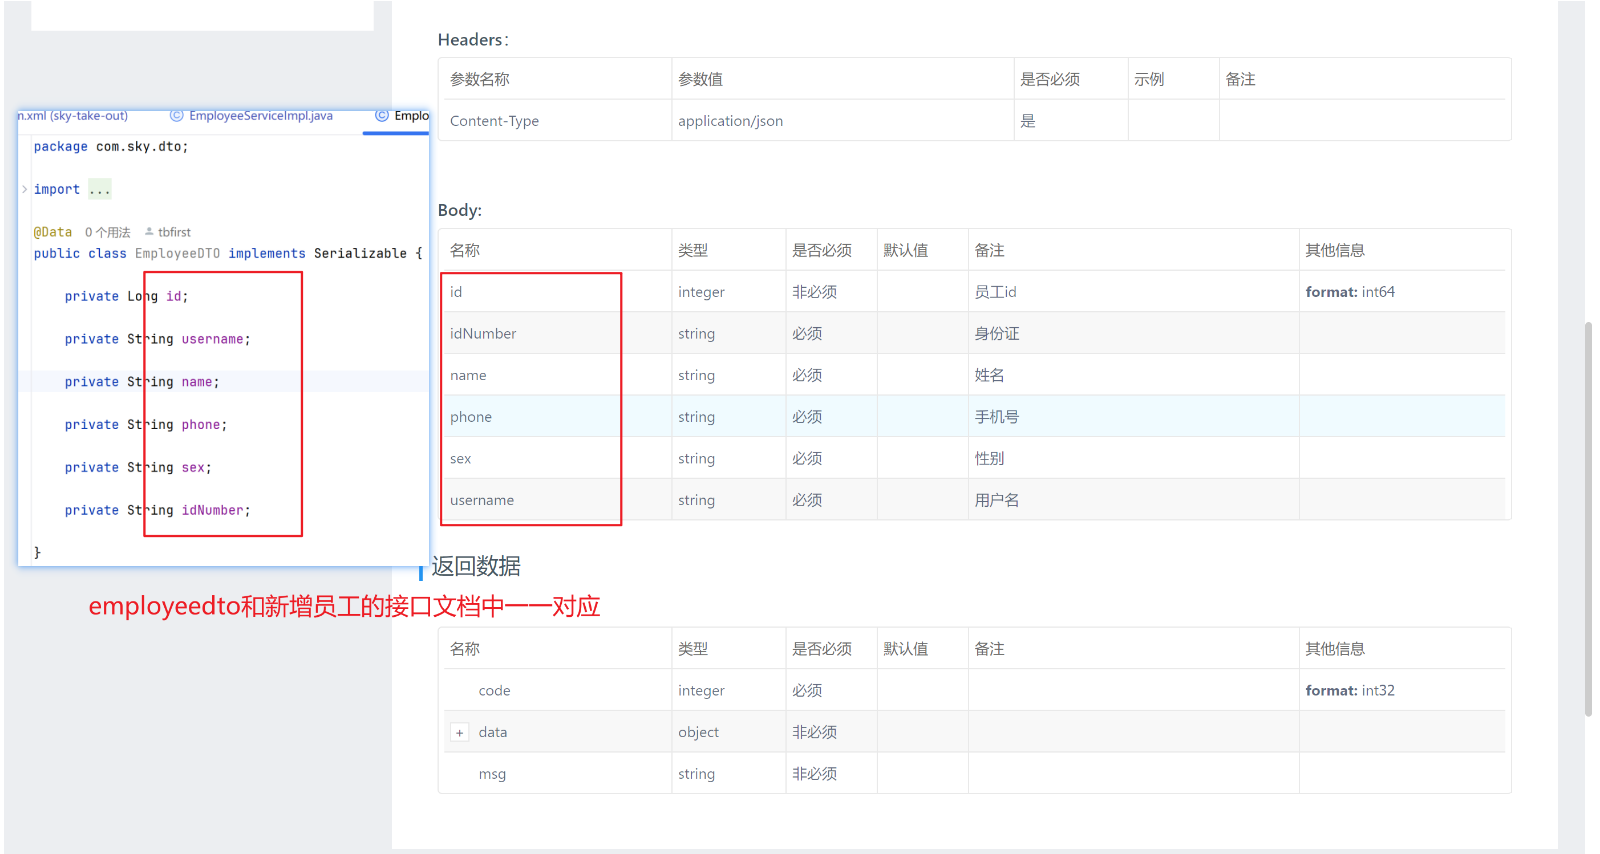
根据接口文档和需求设计,前端返回的是 json 格式的数据,我们需要设计一个 EmployeeDTO 封装原employee实体类,该dto对应新增员工的接口文档;后端返回的只需要code、data、msg,直接使用普通的 Result即可
1.1、Controller层
java
@PostMapping
// 由于前端返回的是 json 格式的数据,所以需要使用 @RequestBody 注解来接收
public Result save(@RequestBody EmployeeDTO employeeDTO) {
    employeeService.save(employeeDTO);
    return Result.success();
}
1.2、Service层
Service层包括接口+实现类
java
public interface EmployeeService {
    // 新增员工
    void save(EmployeeDTO employeeDTO);
}
java
// 实现新增员工
// 本质是将 DTO 对象封装回实体类,然后使用 mapper 持久层去进行数据库的新增
public void save(EmployeeDTO employeeDTO) {
    // 1、将 DTO 对象封装回实体类
    Employee employee = new Employee();
    // 相较于一个个将 DTO 中的属性赋值给实体类,使用 Spring 提供的 BeanUtils 工具包可以直接将 DTO 中的属性拷贝给实体类
    BeanUtils.copyProperties(employeeDTO, employee);
    // 其他的属性(实体类存在但是 DTO 中不存在的属性)需要手动设置
    // 使用定义好的常量类方便后续维护
    employee.setStatus(StatusConstant.ENABLE);
    employee.setPassword(DigestUtils.md5DigestAsHex(PasswordConstant.DEFAULT_PASSWORD.getBytes()));
    employee.setCreateTime(LocalDateTime.now());
    employee.setUpdateTime(LocalDateTime.now());
    // TODO 未来可根据登录用户的 id 进行设置完善
    employee.setCreateUser(1L);
    employee.setUpdateUser(1L);
    // 2、调用 mapper 持久层去进行数据库的新增
    employeeMapper.insert(employee);
}
1.3、Mapper层
java
@Mapper
public interface EmployeeMapper {
    // 新增员工,由于只是单句 SQL 语句故使用注解而不是 xml 文件映射(已开启驼峰命名)
    // id 由于是设置了自增,故无需传入
    @Insert("insert into employee(username, name, password, phone, sex, id_number, status, create_time, update_time, create_user, update_user)" +
            " values(#{username}, #{name}, #{password}, #{phone}, #{sex}, #{idNumber}, #{status}, #{createTime}, #{updateTime}, #{createUser}, #{updateUser})")
    void insert(Employee employee);
}
1.4、测试
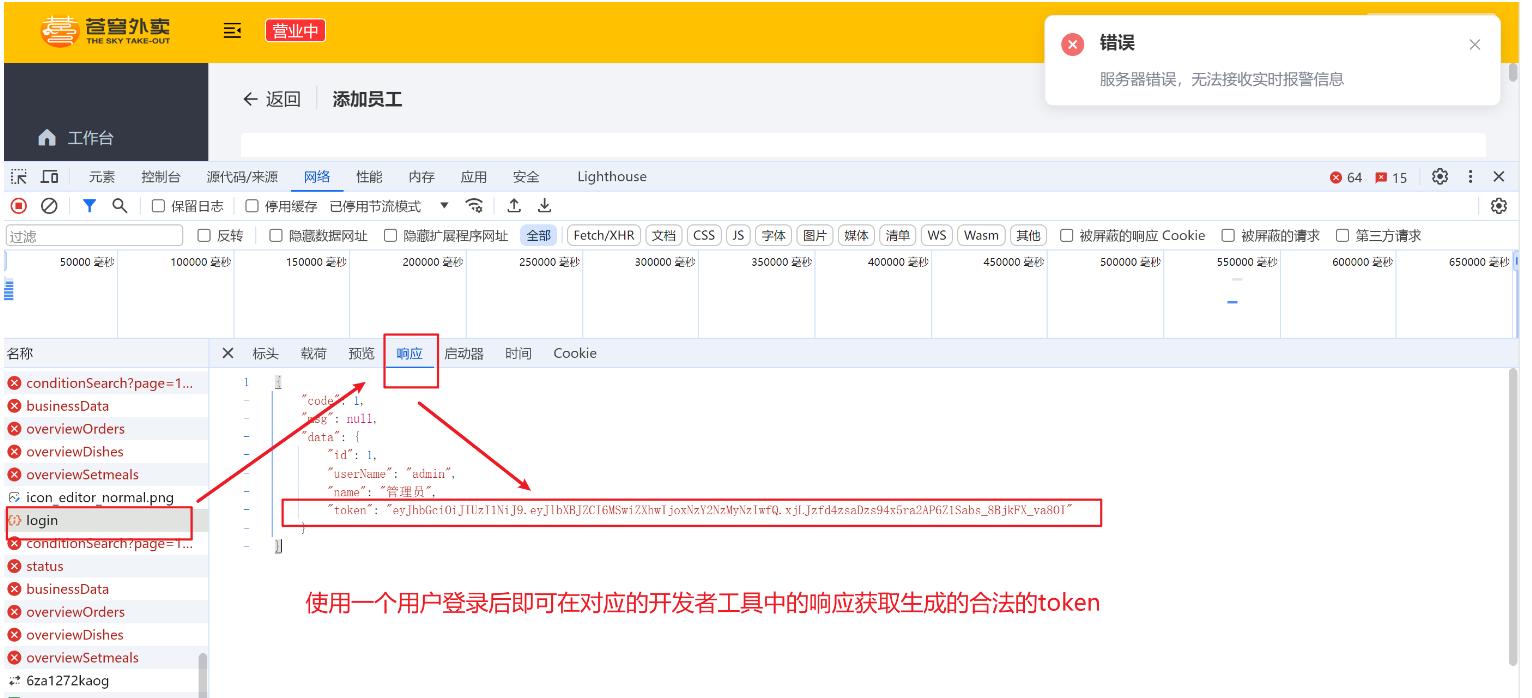
由于已经配置好了 JWT 的令牌拦截器,我们在每次增加员工的时候都会进行 JWT 的校验,所以我们需要先为每个请求携带合法的 JWT 令牌
随便使用一个用户登录后,在开发者工具中即可查看其带的token,之后每次的请求我们都需要携带这个合法的token
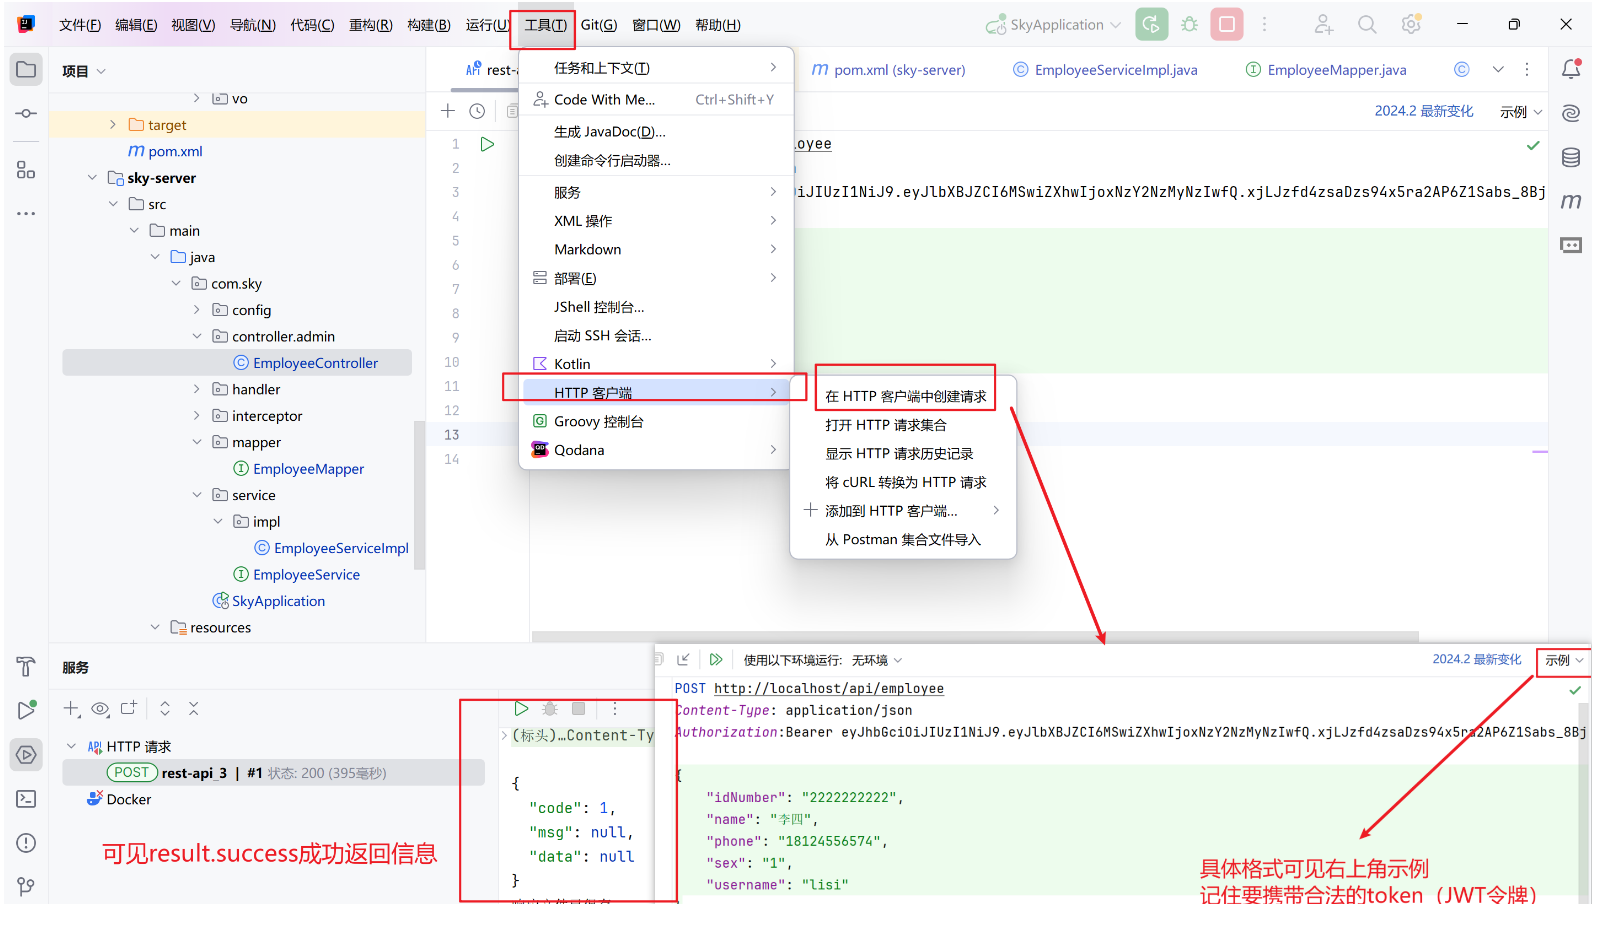
①、idea自带的http客户端请求
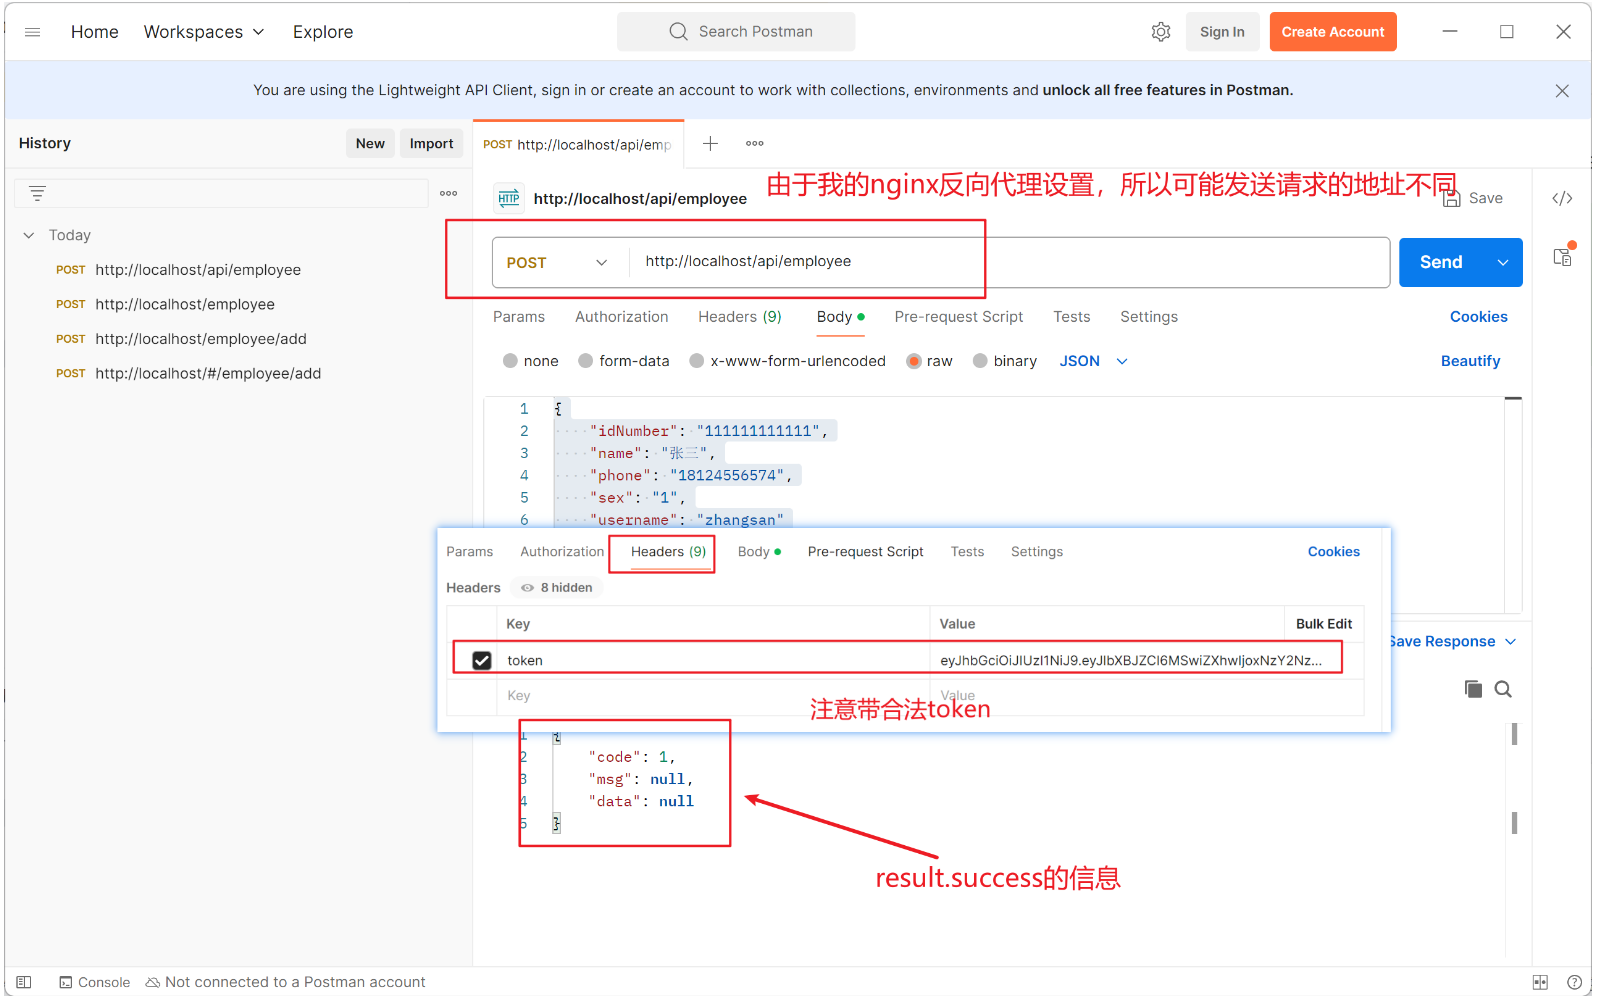
②、postman请求测试
注意携带的头信息Headers的Key必须是token,因为在appropriate.yml中配置了前端传递过来的令牌名称
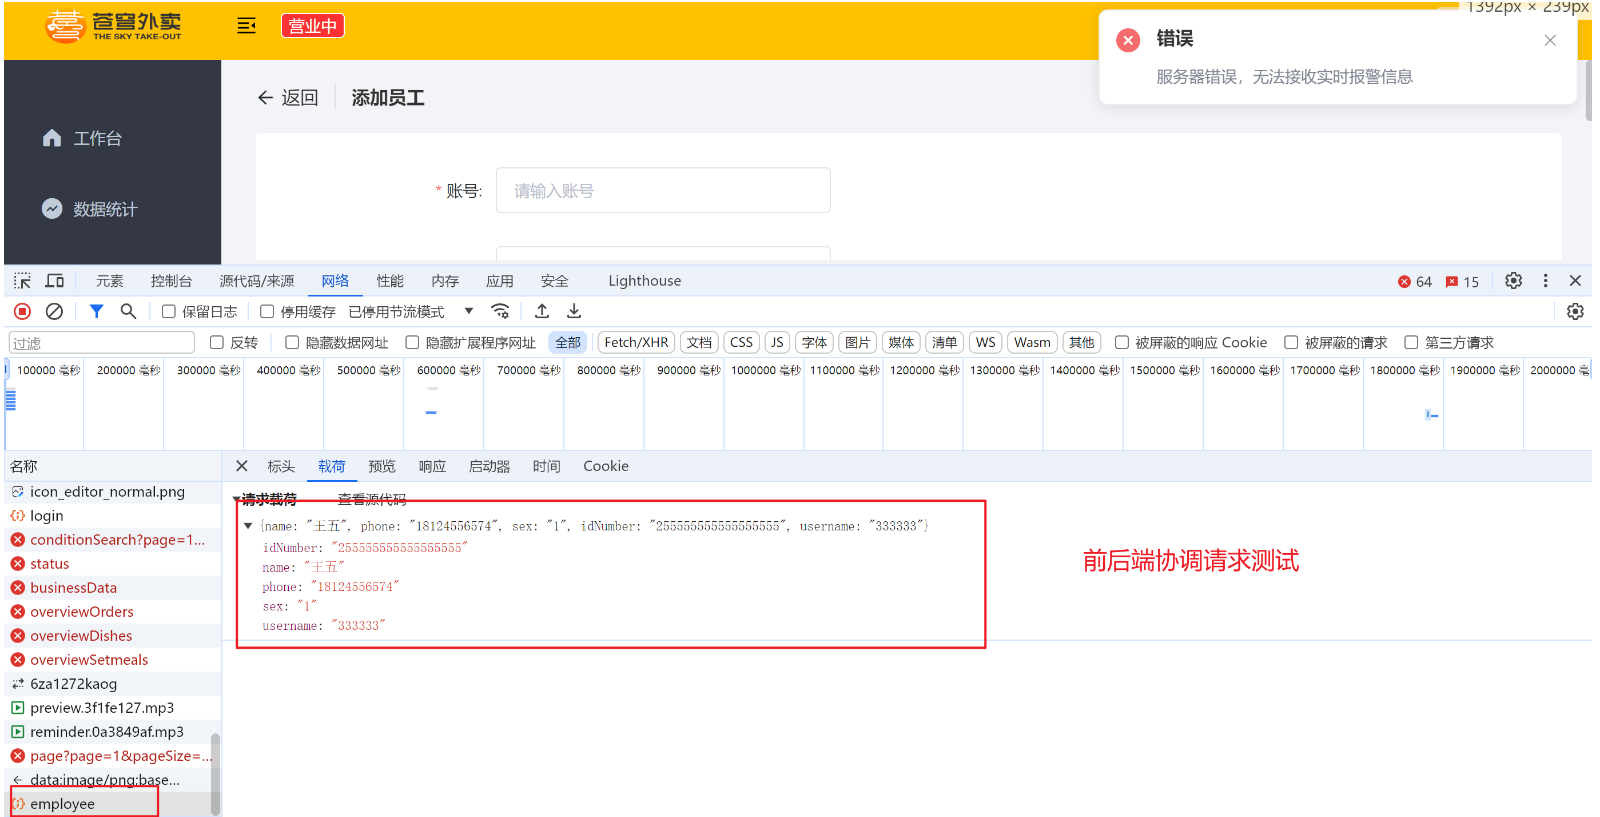
③、前后端联调测试
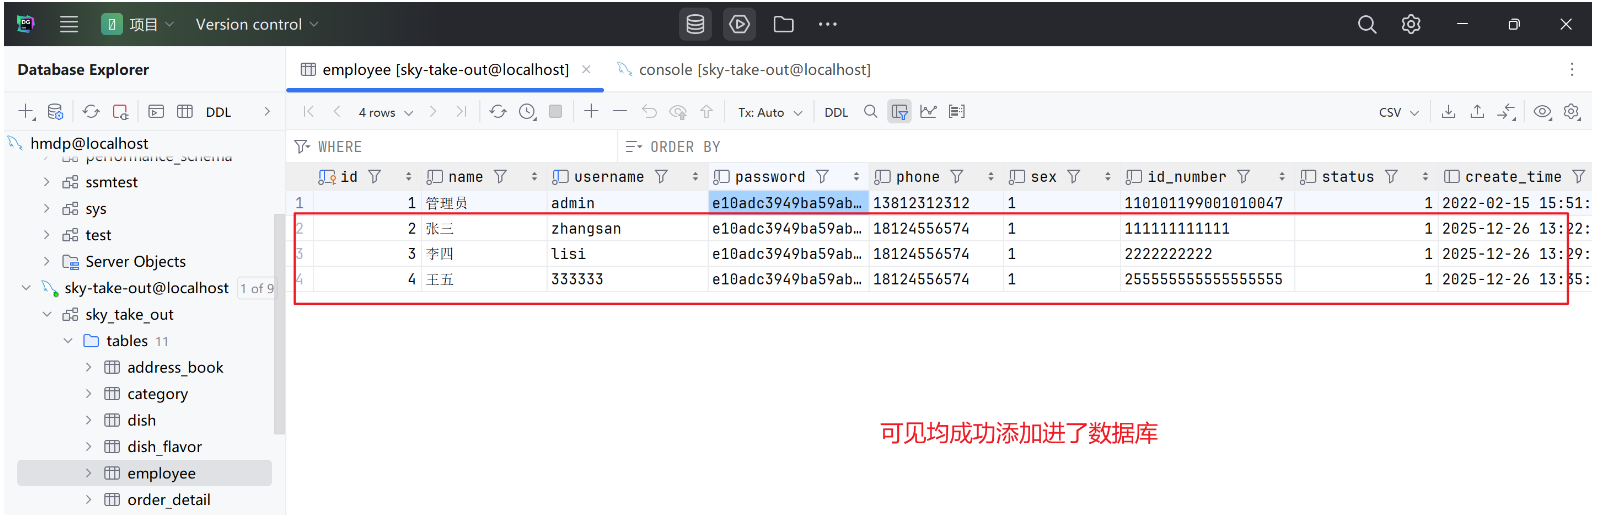
最终数据库的结果如图:
1.5、代码完善
①、处理已添加的员工
当添加的员工已存在则应该返回错误提示,可使用全局异常处理器进行处理
java
/**
 * 全局异常处理器,处理项目中抛出的业务异常
 */
@RestControllerAdvice
@Slf4j
public class GlobalExceptionHandler {
// 处理重复用户名异常
    @ExceptionHandler
    public Result exceptionHandler(SQLIntegrityConstraintViolationException ex){
        // 获取该异常的详细信息
        String message = ex.getMessage();
        if(message.contains("Duplicate entry")){
            // 动态获取用户名
            // 先根据空格分割,将异常信息转换为字符串数组
            String[] split = message.split(" ");
            // 其中用户名在数组的第2个元素,且用户名中可能包含单引号,故需要去掉单引号
            String username = split[2].replace("'","");
            // 使用常量类拼接错误信息,返回给前端
            return Result.error(username+ MessageConstant.ALREADY_EXIST);
        }
        return Result.error(MessageConstant.UNKNOWN_ERROR);
    }
}
②、动态获取登录用户的 id
即我们原来将 DTO 封装回实体类时,是直接对用户登录id进行设置赋值,这是不合理的,我们应该是通过添加用户时其设置的id进行动态赋值
需要补充一个知识点:ThreadLocal
ThreadLocal是 Java 提供的一个线程本地变量存储类,它允许每个线程拥有自己的独立变量副本,避免了多线程环境下的共享变量竞争问题。
ThreadLocal内部使用ThreadLocalMap(类似HashMap)存储数据,其中:
- Key :
ThreadLocal实例(弱引用,避免内存泄漏)。- Value :存储的值(强引用,需手动
remove清理)。一般我们使用 ThreadLocal 会先将其包装为一个工具类,其中包含set、get、remove方法
java// 创建 ThreadLocal private static final ThreadLocal<String> threadLocal = new ThreadLocal<>(); // 设置当前线程的局部变量 threadLocal.set("Hello, ThreadLocal!"); // 获取当前线程的局部变量 String value = threadLocal.get(); // "Hello, ThreadLocal!" // 移除局部变量(防止内存泄漏) threadLocal.remove();
注意:每次的http请求 tomcat 都会从线程池中初始化一个单独的空闲的线程进行使用
java
/**
 * jwt令牌校验的拦截器
 */
@Component
@Slf4j
public class JwtTokenAdminInterceptor implements HandlerInterceptor {

    @Autowired
    private JwtProperties jwtProperties;
    public boolean preHandle(HttpServletRequest request, HttpServletResponse response, Object handler) throws Exception {
        //判断当前拦截到的是Controller的方法还是其他资源
        if (!(handler instanceof HandlerMethod)) {
            //当前拦截到的不是动态方法,直接放行
            return true;
        }
        //1、从请求头中获取令牌
        String token = request.getHeader(jwtProperties.getAdminTokenName());
        //2、校验令牌
        try {
            log.info("jwt校验:{}", token);
            Claims claims = JwtUtil.parseJWT(jwtProperties.getAdminSecretKey(), token);
            Long empId = Long.valueOf(claims.get(JwtClaimsConstant.EMP_ID).toString());
            // 在进行 JWT 令牌校验时会获取到当前员工的 id,将其存储到 ThreadLocal 中,后续可以在 Controller/Service 中直接获取
            // 由于我们已将 ThreadLocal 封装为工具类 BaseContext,因此可以直接调用其静态方法 setCurrentId 来存储当前员工的 id
            BaseContext.setCurrentId(empId);
            log.info("当前员工id:", empId);
            //3、通过,放行
            return true;
        } catch (Exception ex) {
            //4、不通过,响应401状态码
            response.setStatus(401);
            return false;
        }
    }
}
java
@Service
public class EmployeeServiceImpl implements EmployeeService {
@Autowired
private EmployeeMapper employeeMapper;
// 实现新增员工
// 本质是将 DTO 对象封装回实体类,然后使用 mapper 持久层去进行数据库的新增
public void save(EmployeeDTO employeeDTO) {
// 1、将 DTO 对象封装回实体类
Employee employee = new Employee();
// 相较于一个个将 DTO 中的属性赋值给实体类,使用 Spring 提供的 BeanUtils 工具包可以直接将 DTO 中的属性拷贝给实体类
BeanUtils.copyProperties(employeeDTO, employee);
// 其他的属性(实体类存在但是 DTO 中不存在的属性)需要手动设置
// 使用定义好的常量类方便后续维护
employee.setStatus(StatusConstant.ENABLE);
employee.setPassword(DigestUtils.md5DigestAsHex(PasswordConstant.DEFAULT_PASSWORD.getBytes()));
employee.setCreateTime(LocalDateTime.now());
employee.setUpdateTime(LocalDateTime.now());
// 在 JWT 令牌校验时已将当前登录用户的 id 存储到 ThreadLocal 中,因此可以直接从 ThreadLocal 中获取
// 通过 ThreadLocal 封装的工具类获取当前登录用户的 id
Long currentId = BaseContext.getCurrentId();
employee.setCreateUser(currentId);
employee.setUpdateUser(currentId);
// 2、调用 mapper 持久层去进行数据库的新增
employeeMapper.insert(employee);
}
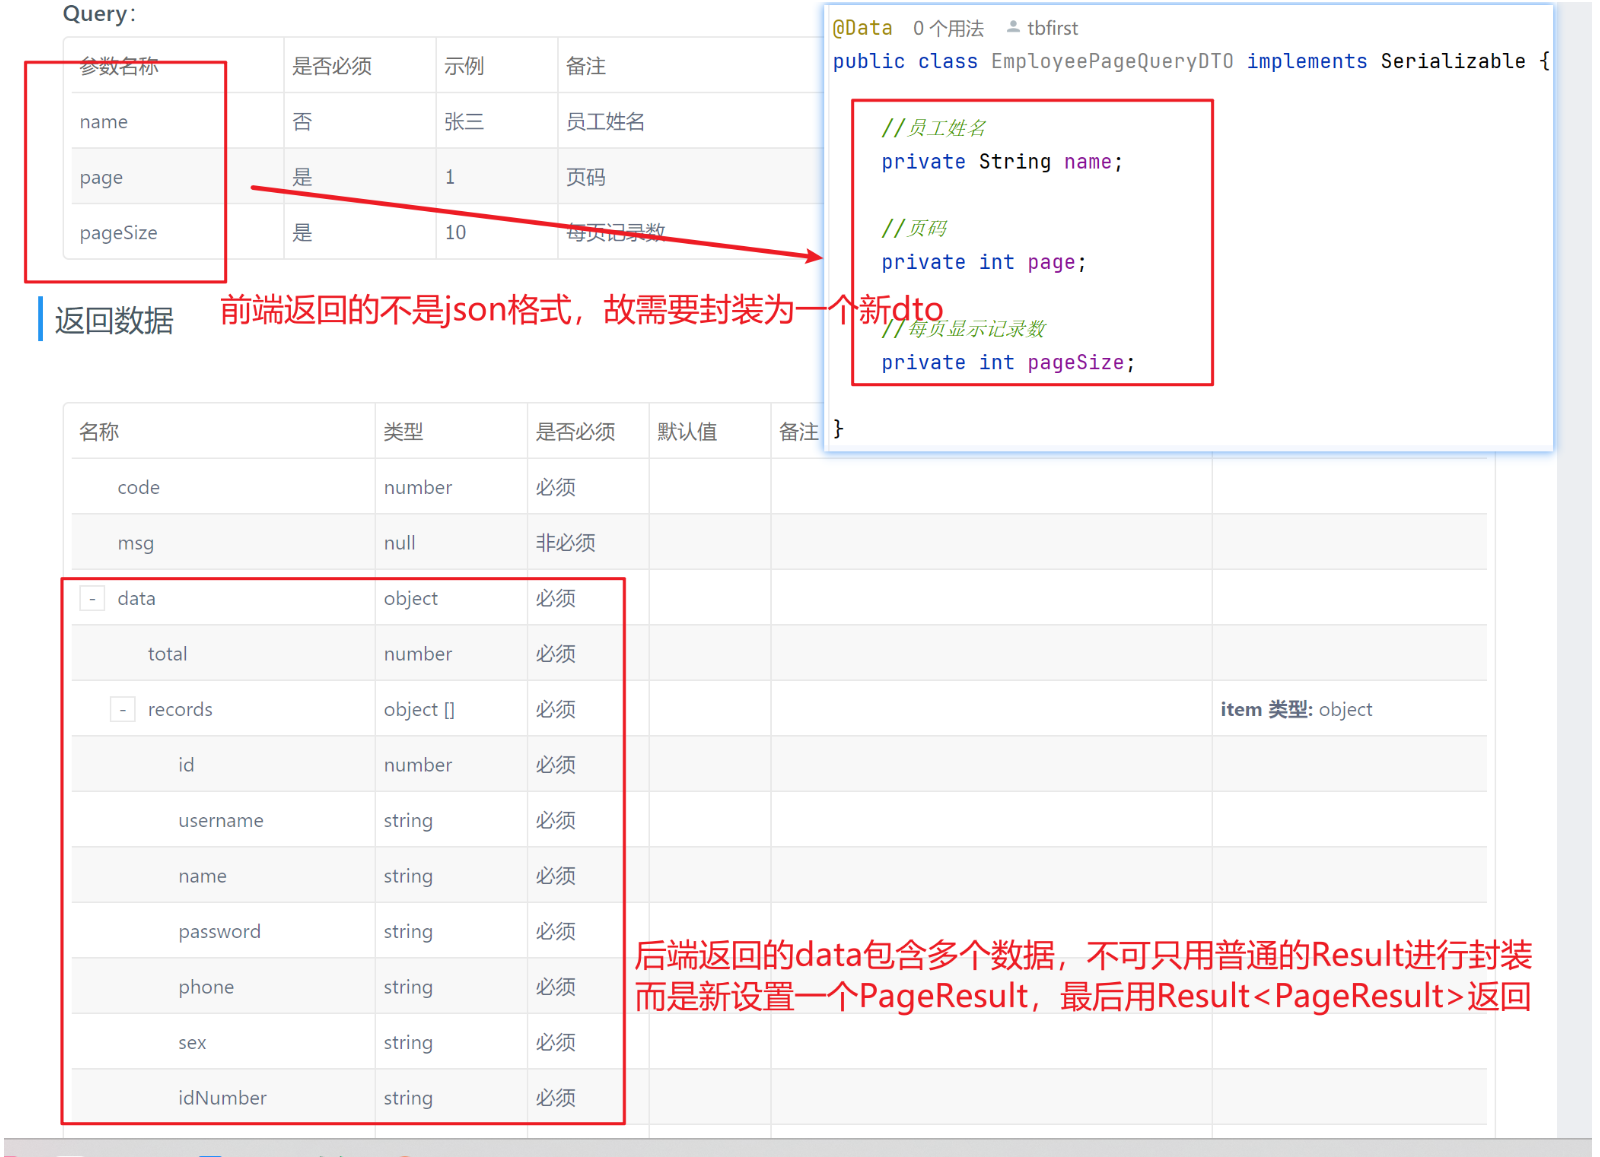
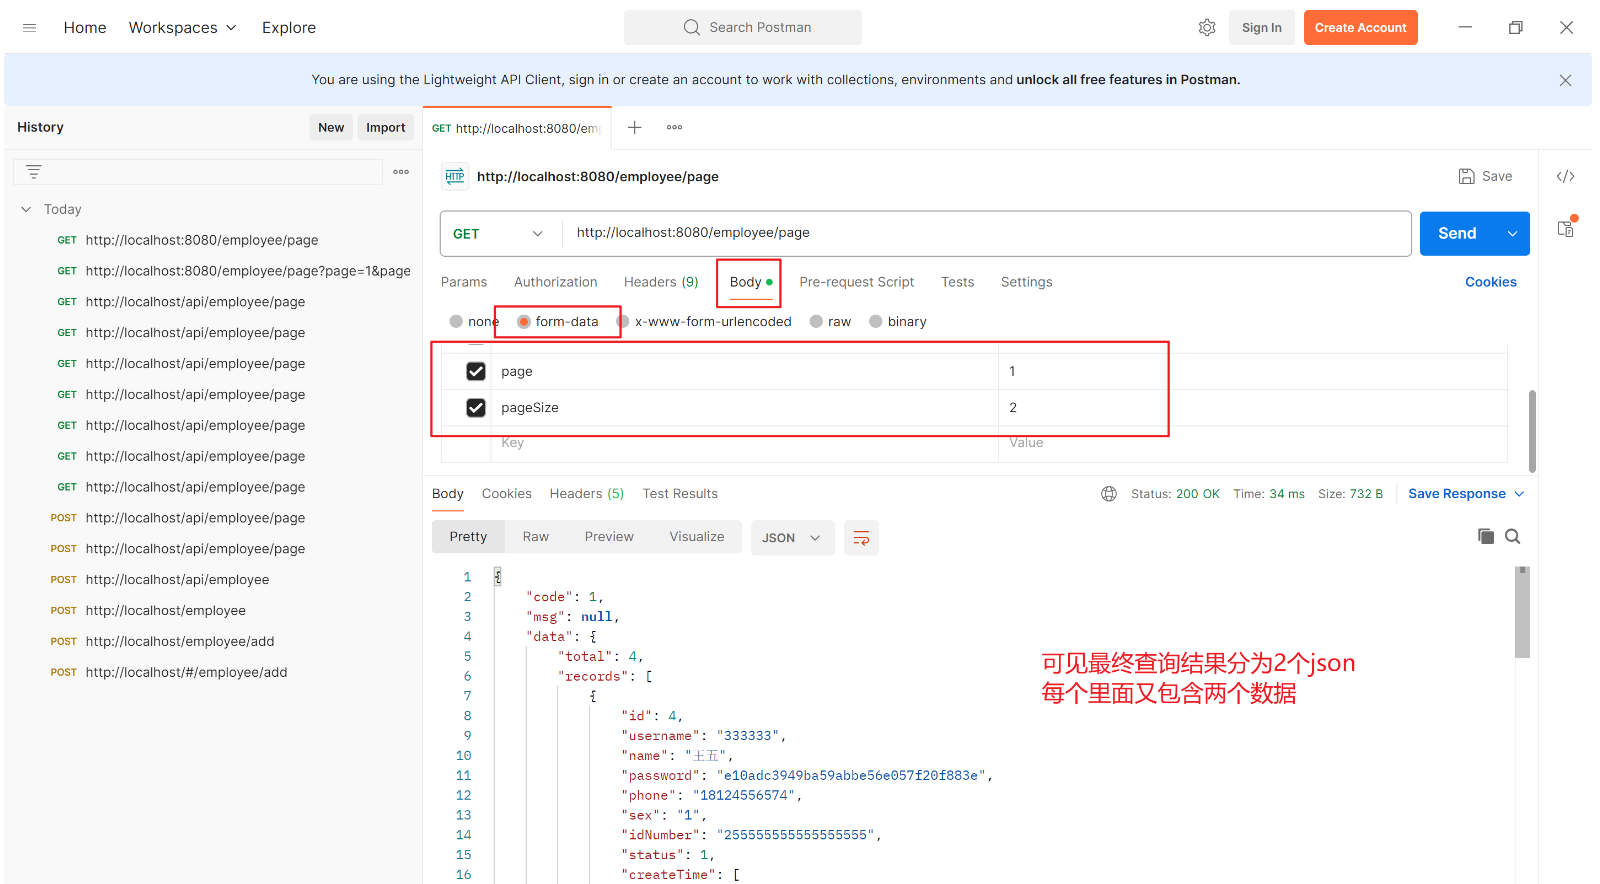
}2、员工的分页查询
根据接口文档和需求设计,前端返回的不是 json 格式的数据,而是多个 query 参数,故需要封装一个EmployeePageQueryDTO 进行包装;后端返回给前端的是code、msg、data,其中data包含多个参数,故需要额外封装一个 PageResult,最终使用 Result< PageResult >返回
2.1、Controller层
java
@RestController
// 由于 nginx 的反向代理配置,已将初始路径设置为:http://localhost/api/
@RequestMapping("/employee")        // 则该路径对应的就是 http://localhost/api/employee
@Slf4j
public class EmployeeController {

    @Autowired
    private EmployeeService employeeService;
    @Autowired
    private JwtProperties jwtProperties;
    @GetMapping("/page")
    // 由于前端返回的不是 json 格式的数据,所以不需要使用 @RequestBody 注解来接收
    public Result<PageResult> page(EmployeePageQueryDTO employeePageQueryDTO) {
        PageResult pageResult = employeeService.pageQuery(employeePageQueryDTO);
        return Result.success(pageResult);
    }
}
2.2、Service层
Service层包括接口+实现类
java
public interface EmployeeService {
    // 分页查询员工
    PageResult pageQuery(EmployeePageQueryDTO employeePageQueryDTO);
}
java
@Slf4j
@Service
public class EmployeeServiceImpl implements EmployeeService {

    @Autowired
    private EmployeeMapper employeeMapper;
    // 实现分页查询员工
    // 本质是使用 PageHelper 工具类进行追加 limit 子句,之后去 mapper 持久层实现部分分页查询
    // 最后将查询结果封装回 PageResult 对象返回
    public PageResult pageQuery(EmployeePageQueryDTO employeePageQueryDTO) {
        // 1、使用 PageHelper 工具类进行分页查询
        // 第一个参数为当前页码,第二个参数为每页显示记录数
        PageHelper.startPage(employeePageQueryDTO.getPage(), employeePageQueryDTO.getPageSize());
        // 2、调用 mapper 持久层去进行数据库的查询
        // 注意必须返回的是 Page<Employee> 类型,而不是 List<Employee> 类型,这是使用 PageHelper 工具类的要求
        // 因为 PageHelper 工具类会自动将查询结果封装为 Page<Employee> 类型
        Page<Employee> page = employeeMapper.mypageQuery(employeePageQueryDTO);
        // 3、将 page 分页查询结果包装为 PageResult 类型
        long total = page.getTotal();
        List<Employee> employeeList = page.getResult();
        // 4、返回 PageResult 类型的分页查询结果
        return new PageResult(total, employeeList);
    }
}
2.3、Mapper层
java
@Mapper
public interface EmployeeMapper {
// 分页查询员工,由于使用了 PageHelper 插件,所以返回的是 Page 类型
    // 且 SQL 较复杂,采用 xml 文件映射
    Page<Employee> mypageQuery(EmployeePageQueryDTO employeePageQueryDTO);
}
xml
<?xml version="1.0" encoding="UTF-8" ?>
<!DOCTYPE mapper PUBLIC "-//mybatis.org//DTD Mapper 3.0//EN"
        "http://mybatis.org/dtd/mybatis-3-mapper.dtd" >
<mapper namespace="com.sky.mapper.EmployeeMapper">
    <select id="mypageQuery" resultType="com.sky.entity.Employee">
        select * from employee
        <where>
            <if test="name != null and name != ''">
                and name like concat('%', #{name}, '%')     -- 使用模糊匹配
                 -- 注意不需要再额外写分页相关的代码,PageHelper 工具类会自动追加 limit 子句
            </if>
        </where>
        order by id desc
    </select>
</mapper>
2.4、测试
由于我们的令牌在appropriate.yml中是有设置有效时长的,即超过设置的时间会过期,当在查询时报错401就是因为令牌过期,我们需要重新登录来获得新的有效的令牌
①、postman请求测试
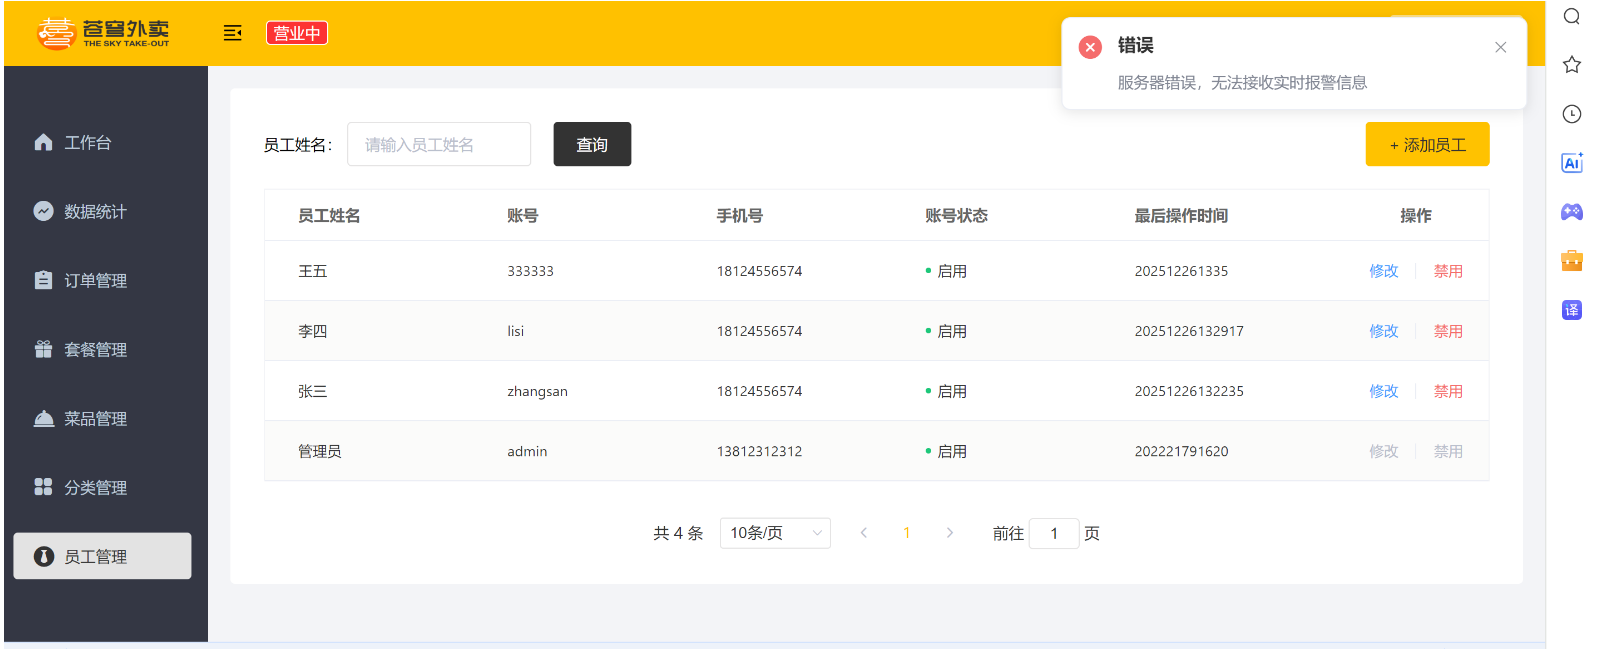
②、前后端联调测试
2.5、代码完善
①、日期格式修改
由于最终生成的时间是一连串的,不符合我们期待的格式,所以需要将类似20241011121422的日期转换为类似2024-10-11 12:14:22
Ⅰ、@JsonFormat注解
该注解只对加了注解的有效,要转换就要加一个注解,较麻烦
java
@Data
@Builder
@NoArgsConstructor
@AllArgsConstructor
public class Employee implements Serializable {
    private static final long serialVersionUID = 1L;
    private Long id;
    private String username;
    private String name;
    private String password;
    private String phone;
    private String sex;
    private String idNumber;
    private Integer status;
    //@JsonFormat(pattern = "yyyy-MM-dd HH:mm:ss")
    private LocalDateTime createTime;
    //@JsonFormat(pattern = "yyyy-MM-dd HH:mm:ss")
    private LocalDateTime updateTime;
    private Long createUser;
    private Long updateUser;

}
Ⅱ、扩展消息转换器
注意额外的代码我隐藏了没有复制
java
/**
* 配置类,注册web层相关组件
*/
@Configuration
@Slf4j
public class WebMvcConfiguration extends WebMvcConfigurationSupport {
@Autowired
private JwtTokenAdminInterceptor jwtTokenAdminInterceptor;
// 扩展消息转换器,只需要重写 extendMessageConverters 方法
// 主要用作将后端返回的数据转换
@Override
protected void extendMessageConverters(List<HttpMessageConverter<?>> converters) {
// 创建一个新的消息转换器
MappingJackson2HttpMessageConverter converter = new MappingJackson2HttpMessageConverter();
// 设置对象转换器,用于将 Java 对象转换为 JSON 格式
converter.setObjectMapper(new JacksonObjectMapper());
// 将新的消息转换器添加到转换器列表的开头(索引为0)
converters.add(0, converter);
}
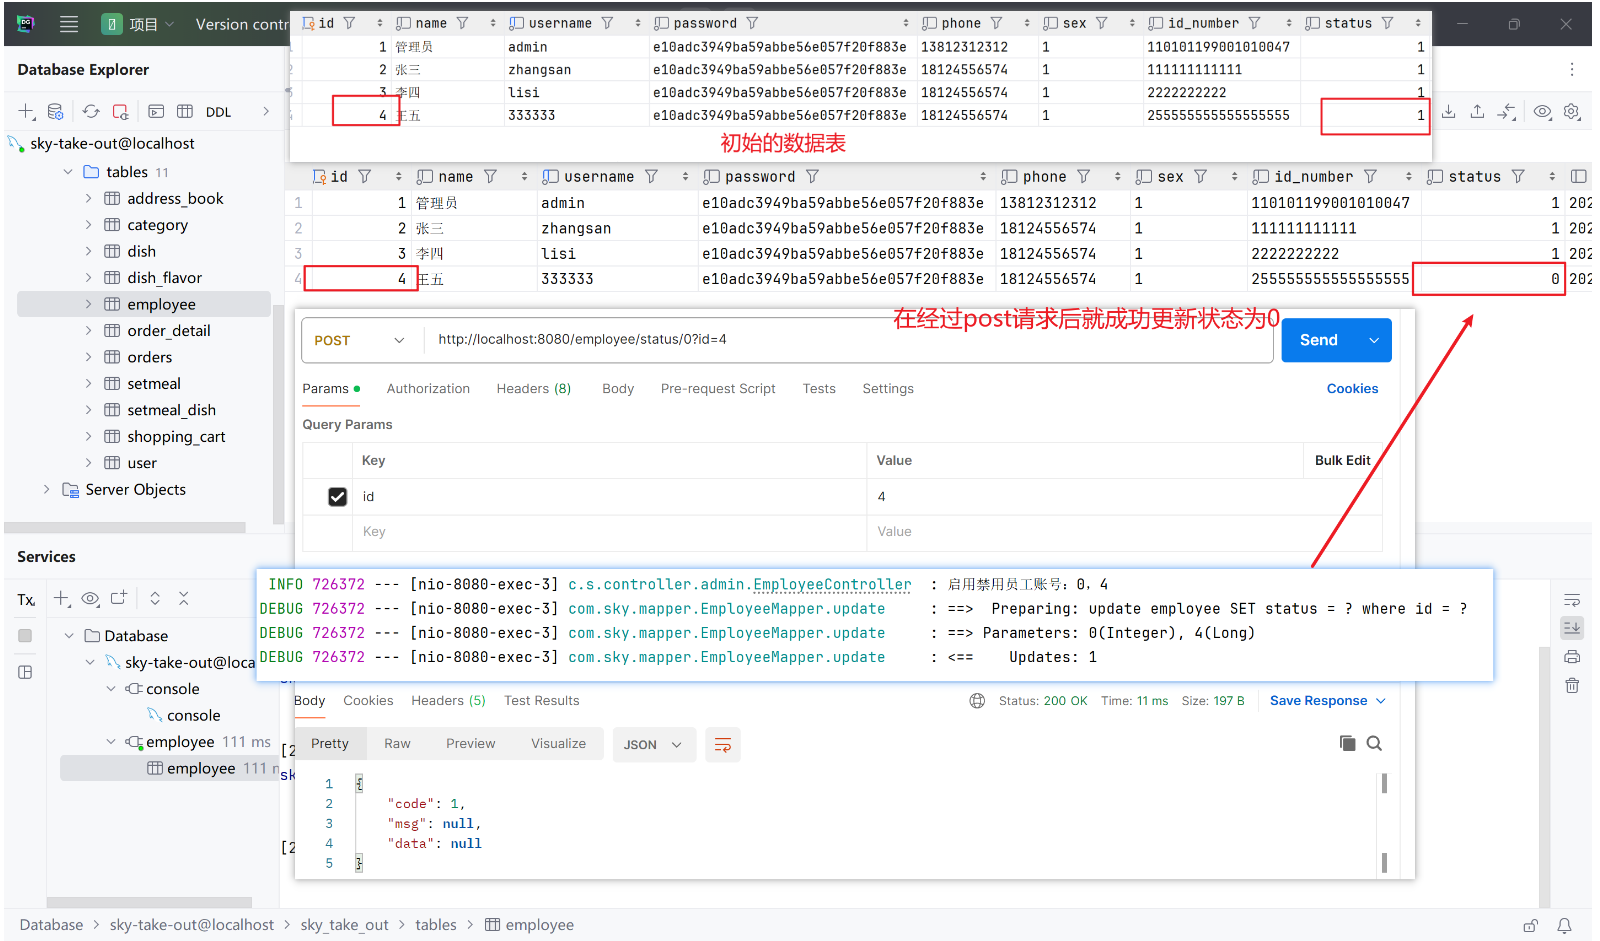
}3、启用禁用员工
3.1、Controller层
java
/**
 * 员工管理
 */
@RestController
// 由于 nginx 的反向代理配置,已将初始路径设置为:http://localhost/api/ 或者也可以设置为 http://localhost:8080/
@RequestMapping("/employee")        // 则该路径对应的就是 http://localhost/api/employee 或者也可以设置为 http://localhost:8080/employee
@Slf4j
public class EmployeeController {

    @Autowired
    private EmployeeService employeeService;
    @Autowired
    private JwtProperties jwtProperties;
    @PostMapping("/status/{status}")
    // 启用禁用员工账号,由于该方法不是查询类型,即返回的数据中的 data 不需要包含其他额外信息,故 Result 不需要额外泛型
    // 请求路径中包含 status 参数,故需要使用 @PathVariable 注解来接收
    // 如果 PostMapping 中的参数和方法中的参数名不一致,则 @PathVariable 注解中需要特地指定--@PathVariable("status") Integer status
    public Result startOrStop(@PathVariable("status") Integer status,Long id) {
        // 上面的 id 默认是 @RequestParam 注解,即从请求参数中获取,设置的时候放在 Param 中
        // 而 status 是从请求路径中获取
        // 当然也可将 id 和 status 一起设置为一个对象,然后使用 @RequestBody 注解来接收,这样在请求体中设置即可
        employeeService.startOrStop(status, id);
        return Result.success();
    }
}
3.2、Service层
Service层包括接口+实现类
java
public interface EmployeeService {
    // 启用禁用员工账号
    void startOrStop(Integer status, Long id);
}
java
@Slf4j
@Service
public class EmployeeServiceImpl implements EmployeeService {

    @Autowired
    private EmployeeMapper employeeMapper;
    // 实现启用禁用员工账号
    // 本质是根据 id 去数据库中修改员工的 status 属性
    public void startOrStop(Integer status, Long id) {
        // 第一种方法是直接赋值
//        Employee employee = new Employee();
//        employee.setId(id);
//        employee.setStatus(status);
        // 第二种方法是通过 Builder 构造器进行赋值(注意 Employee 实体类中要有 @Builder 注解)
        Employee employee = Employee.builder()
                .id(id)
                .status(status)
                .build();
        // 构造好 employee 对象后,调用 mapper 持久层去进行数据库的更新
        employeeMapper.update(employee);
    }
}
3.3、Mapper层
注意其他和该部分无关的代码已隐藏
java
@Mapper
public interface EmployeeMapper {
    // 启用禁用员工账号
    // 本质是根据 id 去数据库中修改员工的 status 属性
    void update(Employee employee);
}
xml
<?xml version="1.0" encoding="UTF-8" ?>
<!DOCTYPE mapper PUBLIC "-//mybatis.org//DTD Mapper 3.0//EN"
        "http://mybatis.org/dtd/mybatis-3-mapper.dtd" >
<mapper namespace="com.sky.mapper.EmployeeMapper">

        <!-- 启用禁用员工账号 -->
        <update id="update" parameterType="com.sky.entity.Employee">
            update employee
            <set>
                <if test="name != null">
                    name = #{name},
                </if>
                <if test="username != null">
                    username = #{username},
                </if>
                <if test="password != null">
                    password = #{password},
                </if>
                <if test="phone != null">
                    phone = #{phone},
                </if>
                <if test="sex != null">
                    sex = #{sex},
                </if>
                <if test="idNumber != null">
                    id_number = #{idNumber},
                </if>
                <if test="updateTime != null">
                    update_time = #{updateTime},
                </if>
                <if test="updateUser != null">
                    update_user = #{updateUser},
                </if>
                <if test="status != null">
                    status = #{status},
                </if>
            </set>
            where id = #{id}
        </update>
</mapper>
3.4、测试及结果
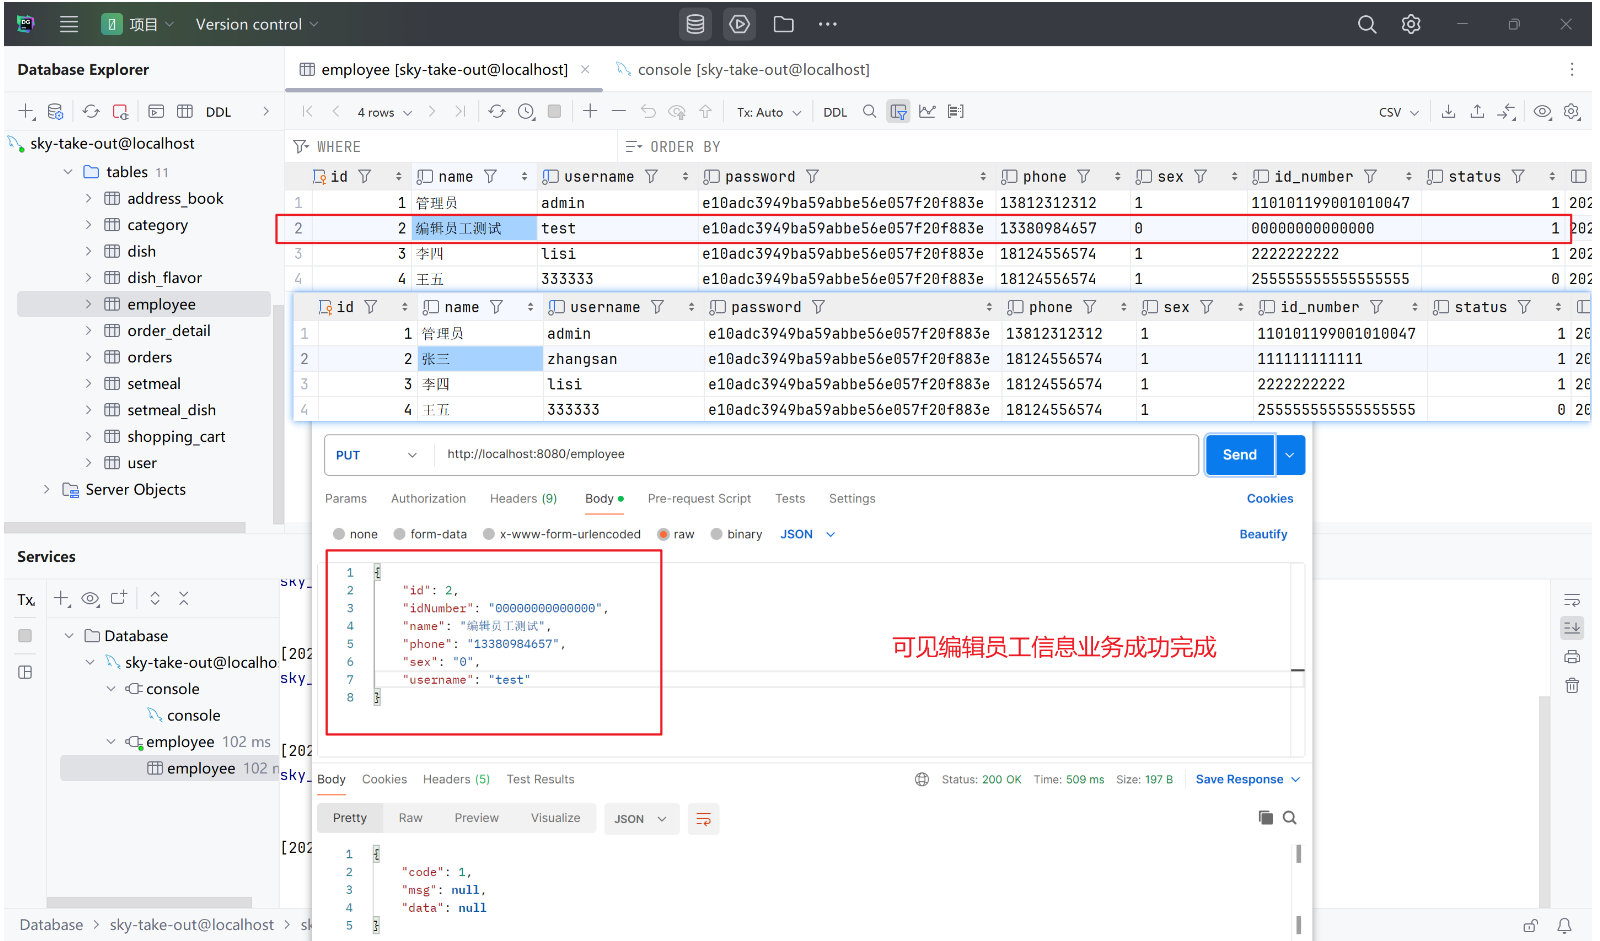
4、编辑员工
该业务包含两个功能,先要根据id查询到员工,之后才可以对查询到的员工进行编辑操作
4.1、Controller层
java
/**
 * 员工管理
 */
@RestController
// 由于 nginx 的反向代理配置,已将初始路径设置为:http://localhost/api/ 或者也可以设置为 http://localhost:8080/
@RequestMapping("/employee")        // 则该路径对应的就是 http://localhost/api/employee 或者也可以设置为 http://localhost:8080/employee
@Slf4j
public class EmployeeController {

    @Autowired
    private EmployeeService employeeService;
    @Autowired
    private JwtProperties jwtProperties;
    @GetMapping("{id}")
    // 根据 id 查询员工详情,由于该方法是查询类型,即返回的数据中的 data 包含了其他额外信息,故 Result 需要额外泛型
    // 请求路径中包含 id 参数,故需要使用 @PathVariable 注解来接收
    public Result<Employee> getById(@PathVariable Long id) {
        Employee employee = employeeService.getById(id);
        return Result.success(employee);
    }

    @PutMapping
    // 编辑员工信息,在经过上面的根据 id 查询员工后,对该员工进行编辑信息
    // 请求参数中包含员工的部分信息(即多个参数),故需要使用一个对象进行包装
    public Result update(@RequestBody EmployeeDTO employeeDTO) {
        employeeService.update(employeeDTO);
        return Result.success();
    }
}
4.2、Service层
Service层包括接口+实现类
java
public interface EmployeeService {
    // 根据 id 查询员工详情
    Employee getById(Long id);
     // 更新员工信息
    void update(EmployeeDTO employeeDTO);
}
java
@Slf4j
@Service
public class EmployeeServiceImpl implements EmployeeService {

    @Autowired
    private EmployeeMapper employeeMapper;
    // 实现根据 id 查询员工详情
    // 本质是根据 id 去数据库中查询员工的详细信息
    public Employee getById(Long id) {
        // 调用 mapper 持久层去进行数据库的查询
        return employeeMapper.selectById(id);
        // 当然也可将返回的 Employee 实体类对象的密码等隐私信息再做一层加密返回,这里不做实现
    }

    // 实现更新员工信息
    // 本质是根据通过 id 查询到的员工去数据库中修改该员工的资料
    // 由于在完成启用禁用员工业务时已将 update 的动态更新在 mapper 中实现,因此这里无需再实现
    // 需注意动态更新传进去的是 Employee 实体类对象,而不是 EmployeeDTO 对象,故需要进行拷贝转换
    public void update(EmployeeDTO employeeDTO) {
        // 1、将 DTO 对象封装回实体类
        Employee employee = new Employee();
        // 相较于一个个将 DTO 中的属性赋值给实体类,使用 Spring 提供的 BeanUtils 工具包可以直接将 DTO 中的属性拷贝给实体类
        BeanUtils.copyProperties(employeeDTO, employee);
        // 其他的属性(实体类存在但是 DTO 中不存在的属性)需要手动设置
        // 使用定义好的常量类方便后续维护
        employee.setStatus(StatusConstant.ENABLE);
        employee.setPassword(DigestUtils.md5DigestAsHex(PasswordConstant.DEFAULT_PASSWORD.getBytes()));
        employee.setCreateTime(LocalDateTime.now());
        employee.setUpdateTime(LocalDateTime.now());
        // 在 JWT 令牌校验时已将当前登录用户的 id 存储到 ThreadLocal 中,因此可以直接从 ThreadLocal 中获取
        // 通过 ThreadLocal 封装的工具类获取当前登录用户的 id
        Long currentId = BaseContext.getCurrentId();
        employee.setCreateUser(currentId);
        employee.setUpdateUser(currentId);
        // 2、调用 mapper 持久层完成的动态更新去进行操作
        employeeMapper.update(employee);
    }
}
4.3、Mapper层
注意其他和该部分无关的代码已隐藏
动态更新代码和在进行启用禁用员工业务时已经完成
java
@Mapper
public interface EmployeeMapper {
    // 启用禁用员工账号,本质是根据 id 去数据库中修改员工的 status 属性
    // 编辑员工信息,本质是根据 id 去数据库中修改员工的其他属性
    void update(Employee employee);

     // 根据 id 查询员工详情
     // 本质是根据 id 去数据库中查询员工的详细信息
     @Select("select * from employee where id = #{id}")
     Employee selectById(Long id);
}
4.4、测试及结果
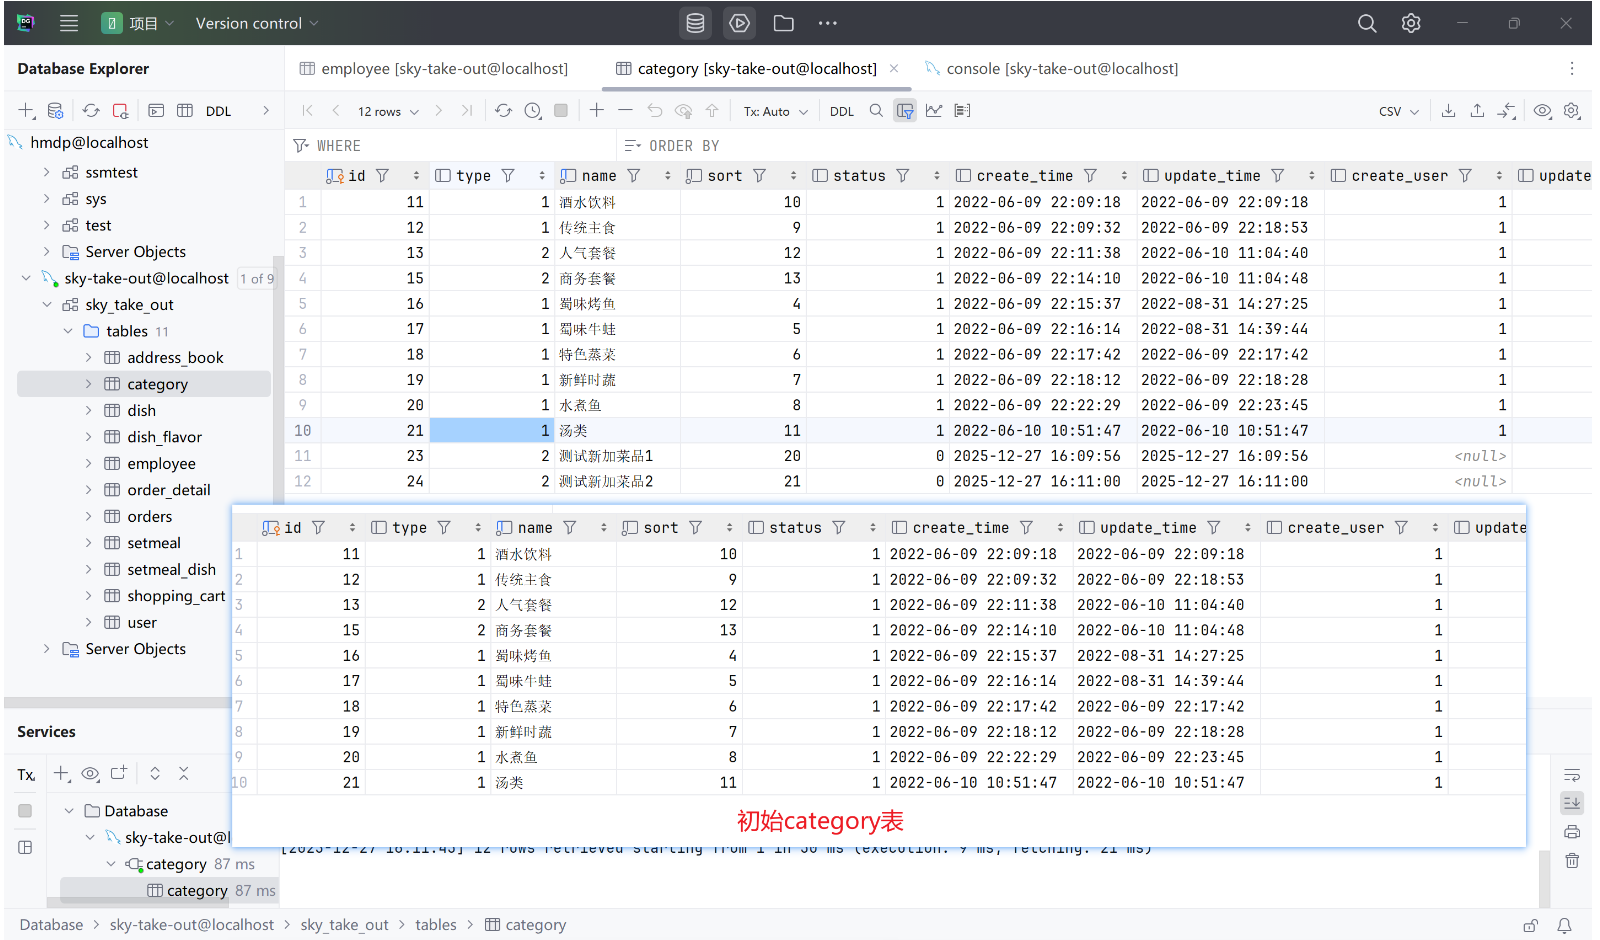
5、导入分类模块功能
该部分可通过资料导入,也可自己手写后对比
4.1、Controller层
java
package com.sky.controller.admin;
import com.sky.dto.CategoryDTO;
import com.sky.dto.CategoryPageQueryDTO;
import com.sky.entity.Category;
import com.sky.result.PageResult;
import com.sky.result.Result;
import com.sky.service.CategoryService;
import lombok.extern.slf4j.Slf4j;
import org.springframework.beans.factory.annotation.Autowired;
import org.springframework.web.bind.annotation.*;
import java.util.List;
// 分类管理
@RestController
@RequestMapping("/category")
@Slf4j
public class CategoryController {
@Autowired
private CategoryService categoryService;
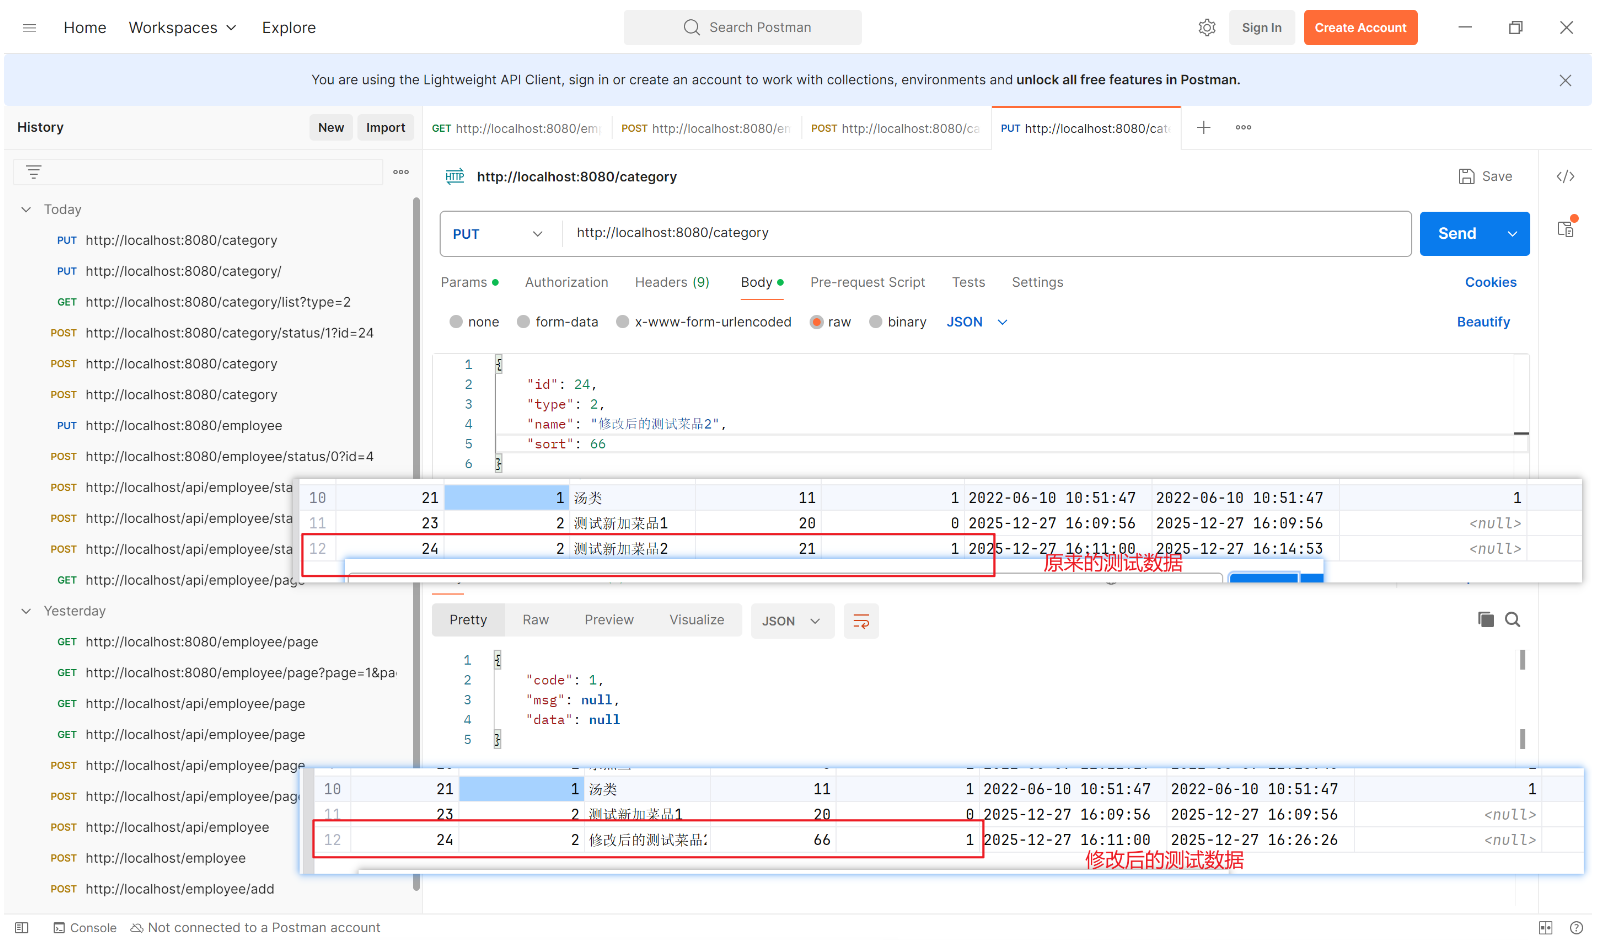
@PutMapping
// 修改分类
// 根据接口文档可见请求参数为 json 格式的 id、type、name、sort,将这些封装为 CategoryDTO 对象
public Result update(@RequestBody CategoryDTO categoryDTO) {
categoryService.update(categoryDTO);
return Result.success();
}
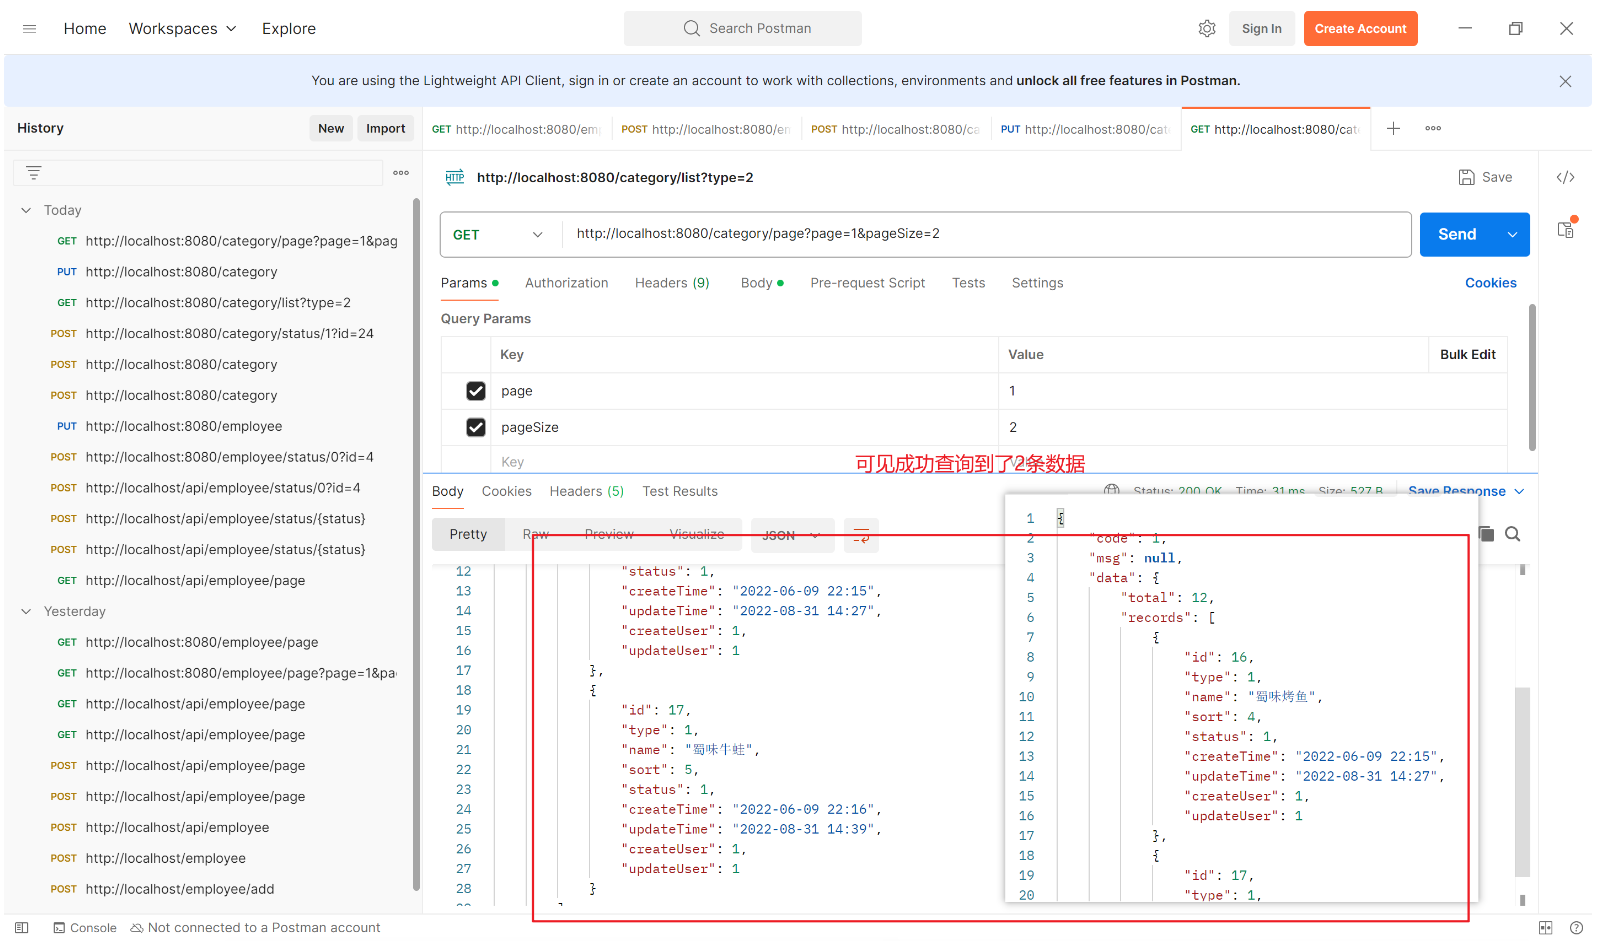
@GetMapping("/page")
// 分类分页查询
// 查询类型的大多返回查询结果,需要使用泛型封装
// 根据接口文档可见请求参数为 name、page、pageSize、type,将这些封装为 CategoryPageQueryDTO 对象
public Result<PageResult> page(CategoryPageQueryDTO categoryPageQueryDTO) {
PageResult pageResult = categoryService.page(categoryPageQueryDTO);
return Result.success(pageResult);
}
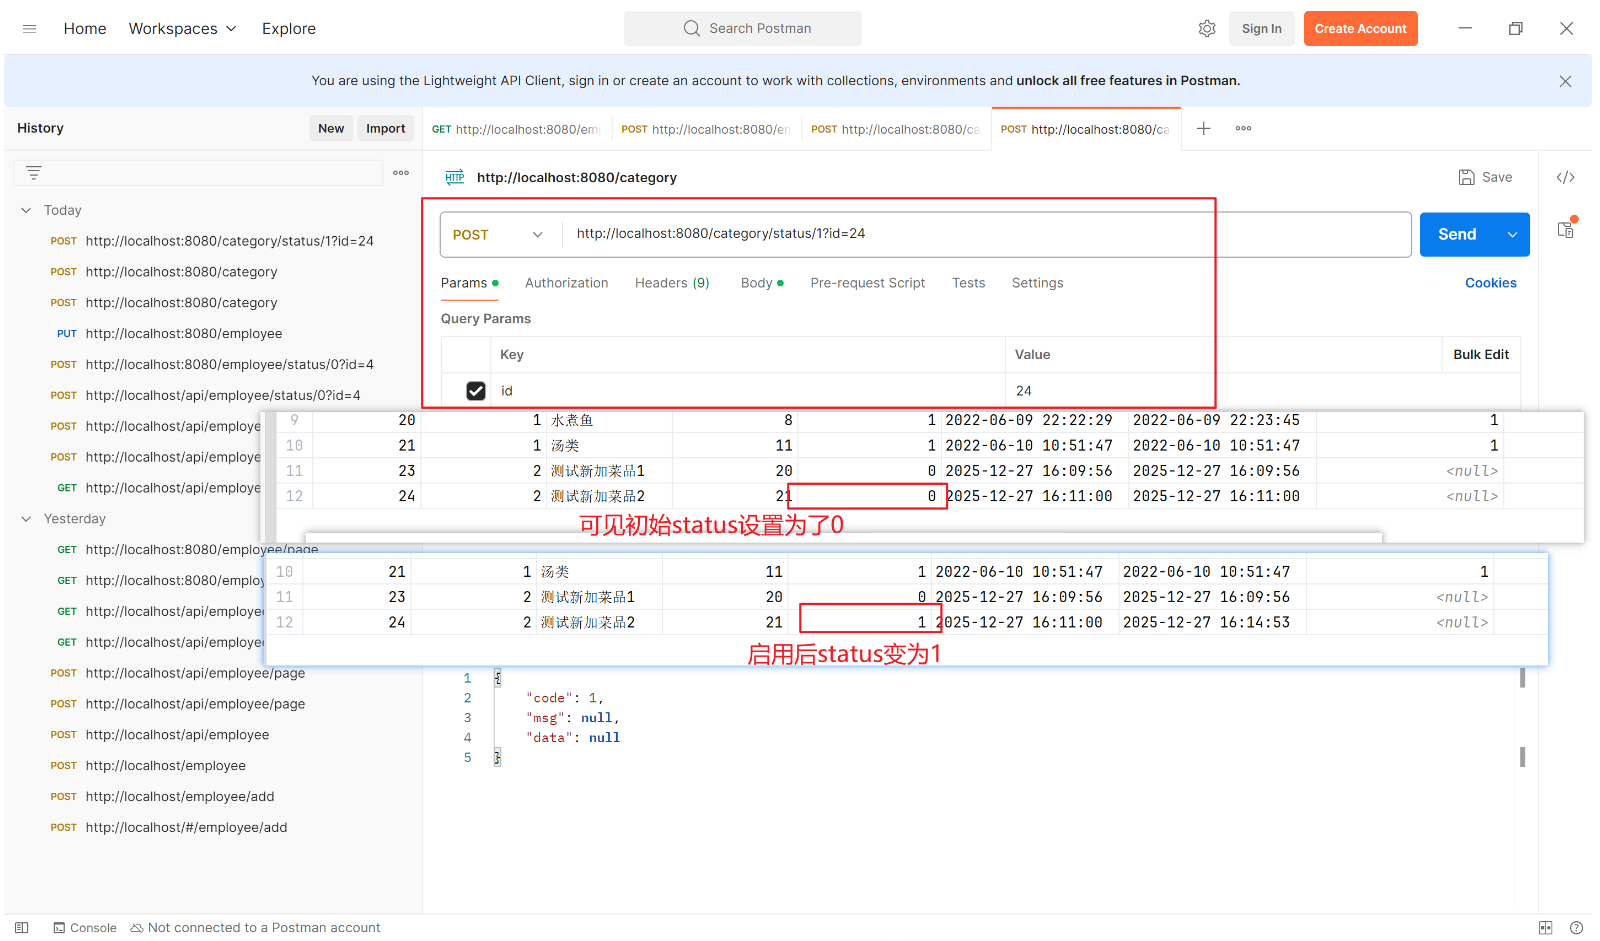
@PostMapping("/status/{status}")
// 启用禁用分类
// 根据接口文档可见路径参数为 status,请求参数为 id
// 如果 PostMapping 中的参数和方法中的参数名不一致,则 @PathVariable 注解中需要特地指定--@PathVariable("status") Integer status
public Result<String> updateStatus(@PathVariable Integer status, Long id) {
categoryService.startOrStop(status, id);
return Result.success();
}
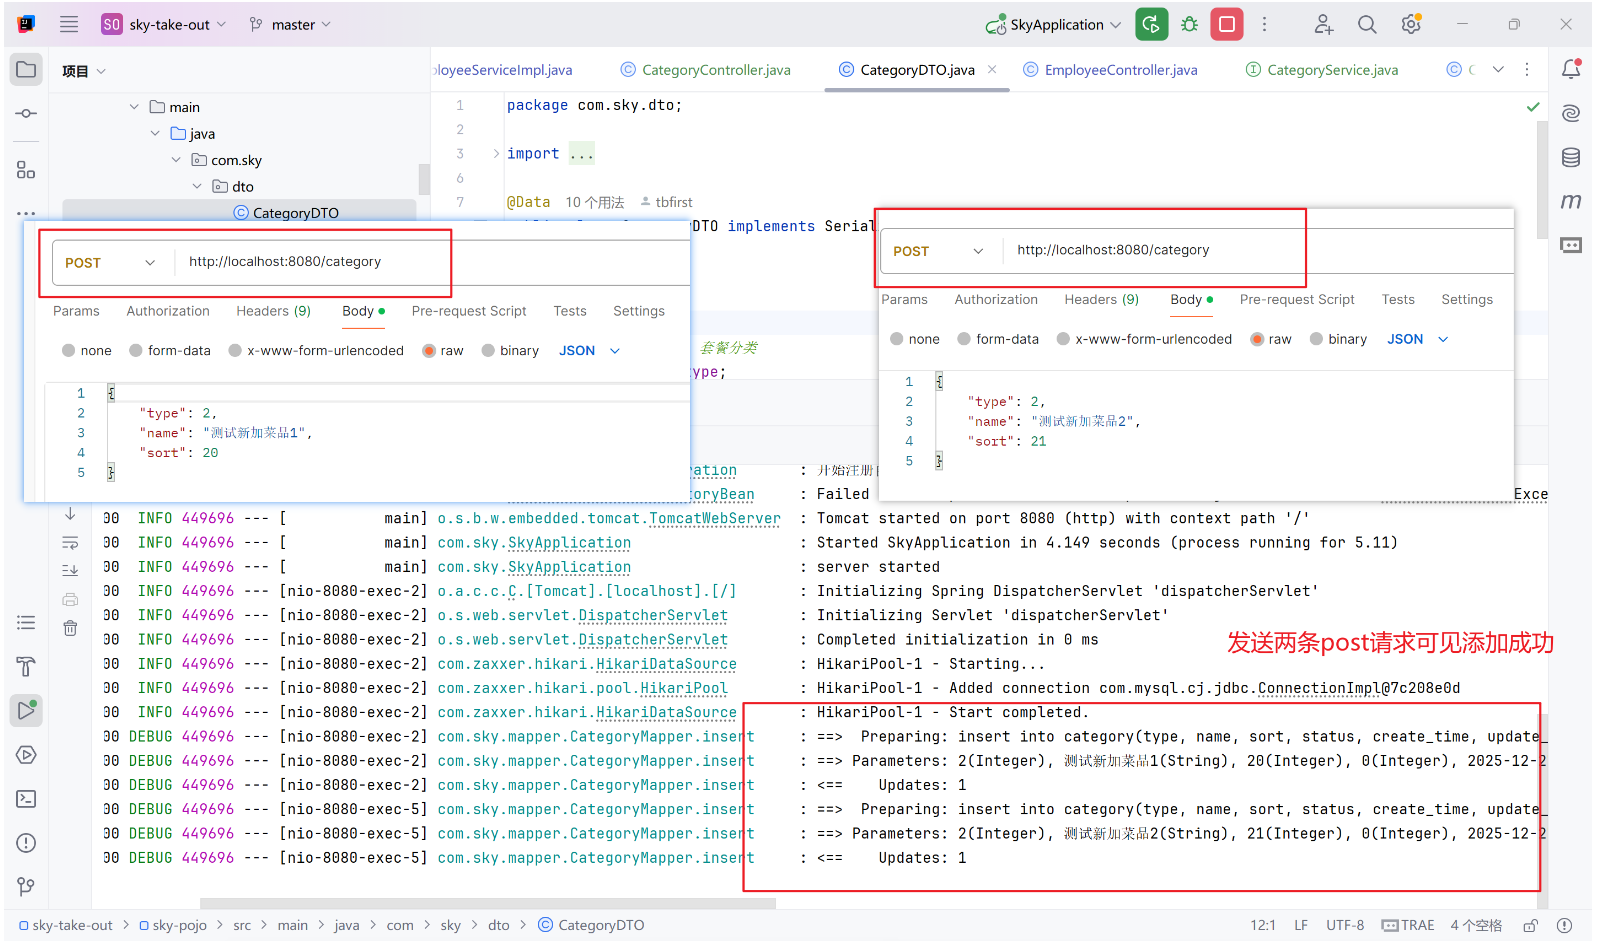
@PostMapping
// 新增分类
// 新增分类时需要返回新增的分类 id,因此需要在 Result 中添加泛型 String
public Result<String> insert(@RequestBody CategoryDTO categoryDTO) {
categoryService.save(categoryDTO);
return Result.success();
}
@DeleteMapping
// 根据 id 删除分类
// 根据接口文档可见请求参数为 id,默认是 @RequestParam(可写可不写)
public Result<String> delete(@RequestParam Long id) {
categoryService.deleteById(id);
return Result.success();
}
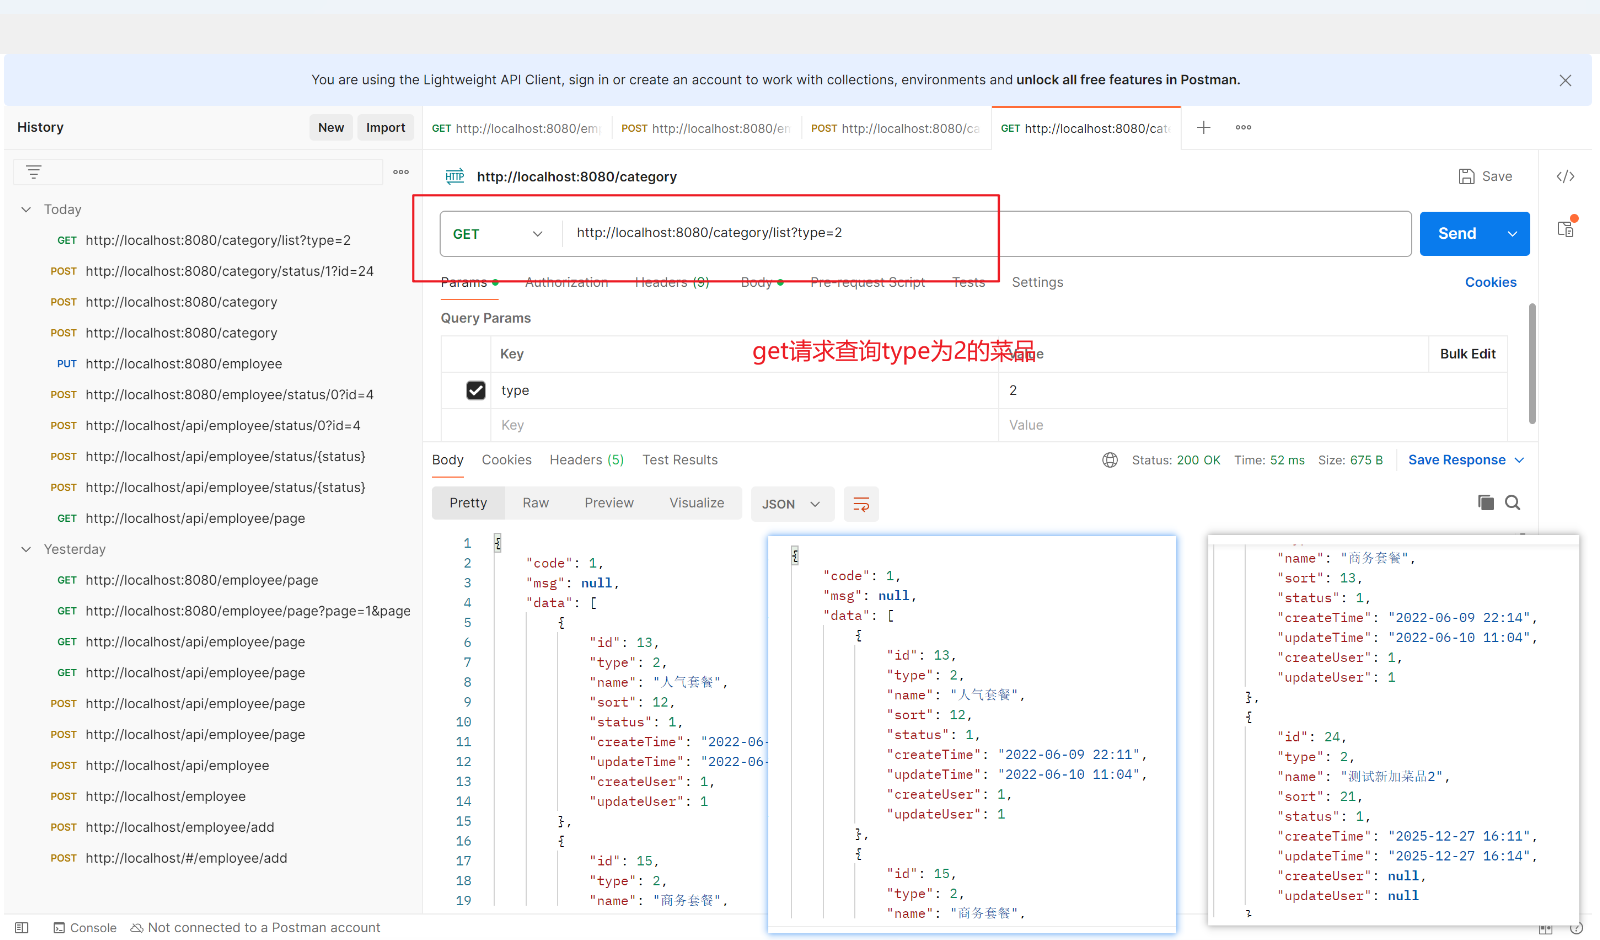
@GetMapping("/list")
// 根据类型查询分类列表
// 由于是查询操作会返回数据,所以返回值为要带泛型 List<Category>
// 根据接口文档可见请求参数为 type,默认是 @RequestParam(可写可不写)
public Result<List<Category>> list(@RequestParam Integer type) {
List<Category> categoryList = categoryService.list(type);
return Result.success(categoryList);
}
}4.2、Service层
Service层包括接口+实现类
java
package com.sky.service;

import com.sky.dto.CategoryDTO;
import com.sky.dto.CategoryPageQueryDTO;
import com.sky.entity.Category;
import com.sky.result.PageResult;

import java.util.List;

public interface CategoryService {
    // 修改分类
    void update(CategoryDTO categoryDTO);

    // 分类分页查询
    PageResult page(CategoryPageQueryDTO categoryPageQueryDTO);

    // 启用禁用分类
    void startOrStop(Integer status, Long id);

    // 新增分类
    void save(CategoryDTO categoryDTO);

    // 根据 id 删除分类
    void deleteById(Long id);

    // 根据类型查询分类列表
    List<Category> list(Integer type);
}
java
package com.sky.service.impl;

import com.github.pagehelper.Page;
import com.github.pagehelper.PageHelper;
import com.sky.constant.MessageConstant;
import com.sky.constant.StatusConstant;
import com.sky.context.BaseContext;
import com.sky.dto.CategoryDTO;
import com.sky.dto.CategoryPageQueryDTO;
import com.sky.entity.Category;
import com.sky.exception.DeletionNotAllowedException;
import com.sky.mapper.CategoryMapper;
import com.sky.mapper.DishMapper;
import com.sky.mapper.SetmealMapper;
import com.sky.result.PageResult;
import com.sky.service.CategoryService;
import org.springframework.beans.BeanUtils;
import org.springframework.beans.factory.annotation.Autowired;
import org.springframework.stereotype.Service;

import java.time.LocalDateTime;
import java.util.List;

@Service
public class CategoryServiceImpl implements CategoryService {
    @Autowired
    private CategoryMapper categoryMapper;
    @Autowired
    private SetmealMapper setmealMapper;
    @Autowired
    private DishMapper dishMapper;
    // 修改分类
    @Override
    public void update(CategoryDTO categoryDTO) {
        // 1、将 CategoryDTO 转换为 Category 类型
        // 可先拷贝再将 entity 中存在但 DTO 中不存在的字段进行单独设置
        Category category = new Category();
        BeanUtils.copyProperties(categoryDTO, category);
        // 由于 DTO 中可进行修改的只有 id、type、name、sort字段,其他字段都不能进行修改
        // 所以在转换为 Category 类型时,其他字段仍然为创建时候的默认值
        // 对分类做了修改,那么可以更新对应的更新时间、修改人
        category.setUpdateTime(LocalDateTime.now());
        category.setUpdateUser(BaseContext.getCurrentId());
        // 2、调用 mapper 持久层去进行数据库的更新
        categoryMapper.update(category);
    }

    // 分类分页查询
    @Override
    public PageResult page(CategoryPageQueryDTO categoryPageQueryDTO) {
        // 1、使用 PageHelper 工具类进行分页查询
        // 第一个参数为当前页码,第二个参数为每页显示记录数
        PageHelper.startPage(categoryPageQueryDTO.getPage(), categoryPageQueryDTO.getPageSize());
        // 2、调用 mapper 持久层去进行数据库的查询
        // 注意必须返回的是 Page<CategoryDTO> 类型,而不是 List<CategoryDTO> 类型,这是使用 PageHelper 工具类的要求
        // 因为 PageHelper 工具类会自动将查询结果封装为 Page<CategoryDTO> 类型
        Page<Category> page = categoryMapper.mypageQuery(categoryPageQueryDTO);
        // 3、将 page 分页查询结果包装为 PageResult 类型
        long total = page.getTotal();
        List<Category> categoryList = page.getResult();
        // 4、返回 PageResult 类型的分页查询结果
        return new PageResult(total, categoryList);
    }

    // 启用禁用分类
    // 可直接使用修改分类中的动态更新,将 status 字段更新为传入的 status 值
    // 需注意 update 方法传入的是 CategoryDTO 类型(未设置 status), Category 类型才有 status 字段
    // 所以我们可以创建一个 Category 对象,将 id 和 status 字段设置为传入的参数值
    @Override
    public void startOrStop(Integer status, Long id) {
        // 1、创建 Category 对象,将 id 和 status 字段设置为传入的参数值
        // 方法一,直接通过 set 方法赋值
//        Category category = new Category();
//        category.setId(id);
//        category.setStatus(status);
//        category.setUpdateTime(LocalDateTime.now());
//        category.setUpdateUser(BaseContext.getCurrentId());
        // 方法二,使用 Builder 模式创建 Category 对象
        Category category = Category.builder()
                .id(id)
                .status(status)
                .updateTime(LocalDateTime.now())
                .updateUser(BaseContext.getCurrentId())
                .build();
        // 3、调用 mapper 持久层去进行数据库的更新
        categoryMapper.update(category);
    }

    // 新增分类
    @Override
    public void save(CategoryDTO categoryDTO) {
        // 1、将 CategoryDTO 转换为 Category 类型
        // 可先拷贝再将 entity 中存在但 DTO 中不存在的字段进行单独设置
        Category category = new Category();
        BeanUtils.copyProperties(categoryDTO, category);
        // Category 中有 CategoryDTO 中不存在的字段,需要手动设置
        // 分类默认状态为禁用(使用常量便于后续维护)
        category.setStatus(StatusConstant.DISABLE);
        // 设置创建时间、更新时间、创建人、修改人
        category.setCreateTime(LocalDateTime.now());
        category.setUpdateTime(LocalDateTime.now());
        // 创建人和修改人设置为当前登录用户的 id
        category.setCreateUser(BaseContext.getCurrentId());
        category.setUpdateUser(BaseContext.getCurrentId());
        // 2、调用 mapper 持久层去进行数据库的更新
        categoryMapper.insert(category);
    }

    // 根据 id 删除分类
    @Override
    public void deleteById(Long id) {
        //查询当前分类是否关联了菜品,如果关联了就抛出业务异常
        Integer count = dishMapper.countByCategoryId(id);
        if(count > 0){
            //当前分类下有菜品,不能删除
            throw new DeletionNotAllowedException(MessageConstant.CATEGORY_BE_RELATED_BY_DISH);
        }

        //查询当前分类是否关联了套餐,如果关联了就抛出业务异常
        count = setmealMapper.countByCategoryId(id);
        if(count > 0){
            //当前分类下有菜品,不能删除
            throw new DeletionNotAllowedException(MessageConstant.CATEGORY_BE_RELATED_BY_SETMEAL);
        }
        // 调用 mapper 持久层去进行数据库的删除
        categoryMapper.deleteById(id);
    }

    // 根据类型查询分类列表
    @Override
    public List<Category> list(Integer type) {
        // 调用 mapper 持久层去进行数据库的查询
        return categoryMapper.list(type);
    }
}
4.3、Mapper层
java
package com.sky.mapper;

import com.github.pagehelper.Page;
import com.sky.dto.CategoryDTO;
import com.sky.dto.CategoryPageQueryDTO;
import com.sky.entity.Category;
import com.sky.result.PageResult;
import org.apache.ibatis.annotations.Delete;
import org.apache.ibatis.annotations.Insert;
import org.apache.ibatis.annotations.Mapper;
import org.apache.ibatis.annotations.Select;

import java.util.List;
@Mapper
public interface CategoryMapper {
    // 修改分类,直接使用动态更新
    // 启用禁用分类,直接使用动态更新,将 status 字段更新为传入的 status 值
    void update(Category category);

    // 分类分页查询
    // 分页查询分类,由于使用了 PageHelper 插件,所以返回的是 Page 类型
    // 且 SQL 较复杂,采用 xml 文件映射
    Page<Category> mypageQuery(CategoryPageQueryDTO categoryPageQueryDTO);

    // 新增分类
    // 新增分类,由于只是单句 SQL 语句故使用注解而不是 xml 文件映射(已开启驼峰命名)
    // id 由于是设置了自增,故无需传入
    @Insert("insert into category(type, name, sort, status, create_time, update_time, create_user, update_user)" +
            " values(#{type}, #{name}, #{sort}, #{status}, #{createTime}, #{updateTime}, #{createUser}, #{updateUser})")
    void insert(Category category);

    // 根据 id 删除分类
    @Delete("delete from category where id = #{id}")
    void deleteById(Long id);

    // 根据类型查询分类列表
    List<Category> list(Integer type);
}
java
package com.sky.mapper;

import org.apache.ibatis.annotations.Mapper;
import org.apache.ibatis.annotations.Select;

@Mapper
public interface DishMapper {
    // 根据分类id查询菜品数量
    @Select("select count(id) from dish where category_id = #{categoryId}")
    Integer countByCategoryId(Long categoryId);
}
java
package com.sky.mapper;

import org.apache.ibatis.annotations.Mapper;
import org.apache.ibatis.annotations.Select;

@Mapper
public interface SetmealMapper {
    // 根据分类id查询套餐数量
    @Select("select count(id) from setmeal where category_id = #{categoryId}")
    Integer countByCategoryId(Long id);
}
xml
<?xml version="1.0" encoding="UTF-8" ?>
<!DOCTYPE mapper PUBLIC "-//mybatis.org//DTD Mapper 3.0//EN"
        "http://mybatis.org/dtd/mybatis-3-mapper.dtd" >
<mapper namespace="com.sky.mapper.CategoryMapper">
    <!-- 动态更新分类 -->
    <update id="update" parameterType="com.sky.entity.Category">
        update category
        <set>
            <if test="id != null">id = #{id},</if>
            <if test="type != null">type = #{type},</if>
            <if test="name != null">name = #{name},</if>
            <if test="sort != null">sort = #{sort},</if>
            <if test="status != null">status = #{status},</if>
            <if test="createTime != null">create_time = #{createTime},</if>
            <if test="updateTime != null">update_time = #{updateTime},</if>
            <if test="createUser != null">create_user = #{createUser},</if>
            <if test="updateUser != null">update_user = #{updateUser},</if>
        </set>
        where id = #{id}
    </update>
        <!-- 分页查询分类 -->
    <select id="mypageQuery" parameterType="com.sky.dto.CategoryPageQueryDTO" resultType="com.sky.entity.Category">
        select * from category
        <where>
            <if test="name != null and name != ''"> and name like concat('%',#{name},'%') </if>
            <if test="type != null"> and type = #{type} </if>
        </where>
        order by sort asc , create_time desc
    </select>

    <!--    根据类型查询分类列表    -->
    <!--    注意此处没有写 Category 的全路径,是因为在appropriate.yml中设置了,所以可以直接写 Category    -->
    <select id="list" parameterType="Integer" resultType="Category">
        select * from category where status = 1
        <if test="type != null"> and type = #{type} </if>
        order by sort asc,create_time desc
    </select>
</mapper>
4.4、测试及结果