ComfyUI + SVD 系列(一):Ubuntu 24 + RTX 4090D 环境安装与启动验证
1. 写在前面
最近准备做一个 "输入一张图片,输出一段短视频" 的最小验证。
一开始其实纠结过两条路线:
- SDXL + AnimateDiff
- ComfyUI + SVD(Stable Video Diffusion)
如果目标是:
先快速完成"单图生成短视频"的最小闭环验证
那么实际体验下来,我更建议先走:
ComfyUI + SVD
原因很简单:
- 路线更贴合"图片生成视频"
- 最小工作流更清晰
- 更适合后续导出 workflow JSON,做 Python / API 调用
这篇文章先不讲完整视频生成细节,重点只做一件事:
把 ComfyUI 运行起来,并准备好 SVD 图片生视频环境
下一篇再继续写:
- 如何搭最小 SVD 工作流
- 如何从一张图生成 24 帧
- 如何合成 mp4
- 如何导出 API JSON 给 Python 调用
本文不画一堆框架图。
很多文章一上来就是大段概念、流程图、架构图,本来就不懂,结果看完更懵。
这一篇只做一件事情:
把图片生视频环境跑起来,并且能复现。
2. 本文目标
本文完成以下事情:
- 安装并运行 ComfyUI
- 安装必要插件
- 下载 SVD 模型
- 确认模型被正确识别
- 启动 ComfyUI 服务
- 进入前端界面,确认环境可用于图片生视频
也就是说,这一篇主要解决的是:
环境搭好、界面能开、模型能识别
而不是直接讲完整工作流。
3. 基础环境
我的实际环境如下:
- Ubuntu 24
- Python 3.10
- RTX 4090D 24G
- Conda 环境:
aq_py310
4. Python 环境准备
建议先准备一个独立的 Conda 环境,避免和系统 Python 或其他项目互相污染。
bash
conda create -n aq_py310 python=3.10 -y
conda activate aq_py310
可以顺手验证一下 Python 版本:
bash
python --version5. ComfyUI 安装
5.1 ComfyUI 仓库
text
https://github.com/Comfy-Org/ComfyUI.git5.2 下载 ComfyUI
bash
cd /work/animateDiff
git clone https://github.com/Comfy-Org/ComfyUI.git
cd ComfyUI
5.3 切换到验证版本
bash
git checkout e6be419a30f666f5428eb0f7ae0918b6ea9bdac4也可以用下面命令确认版本:
bash
git rev-parse HEAD输出应类似:
text
e6be419a30f666f5428eb0f7ae0918b6ea9bdac4
5.4 安装 ComfyUI 依赖
这一步很关键,很多文章会漏掉。
bash
python -m pip install -r requirements.txt如果网络较慢,也可以用国内源:
bash
python -m pip install -r requirements.txt -i https://mirrors.aliyun.com/pypi/simple/6. 插件安装
本次实验所需的插件如下:
text
(base) root@ubuntu-Rack-Server:/work/animateDiff/ComfyUI/custom_nodes#
(base) root@ubuntu-Rack-Server:/work/animateDiff/ComfyUI/custom_nodes# ll
total 36
drwxr-xr-x  6 root root 4096 Apr 11 23:30 ./
drwxr-xr-x 27 root root 4096 Apr 12 19:25 ../
drwxr-xr-x 11 root root 4096 Apr 11 23:30 ComfyUI-AnimateDiff-Evolved/
drwxr-xr-x 14 root root 4096 Apr 11 23:29 ComfyUI-Manager/
drwxr-xr-x 10 root root 4096 Apr 11 23:30 ComfyUI-VideoHelperSuite/
-rw-r--r--  1 root root 5151 Apr 10 23:29 example_node.py.example
drwxr-xr-x  2 root root 4096 Apr 11 23:30 __pycache__/
-rw-r--r--  1 root root 1220 Apr 10 23:29 websocket_image_save.py
(base) root@ubuntu-Rack-Server:/work/animateDiff/ComfyUI/custom_nodes# 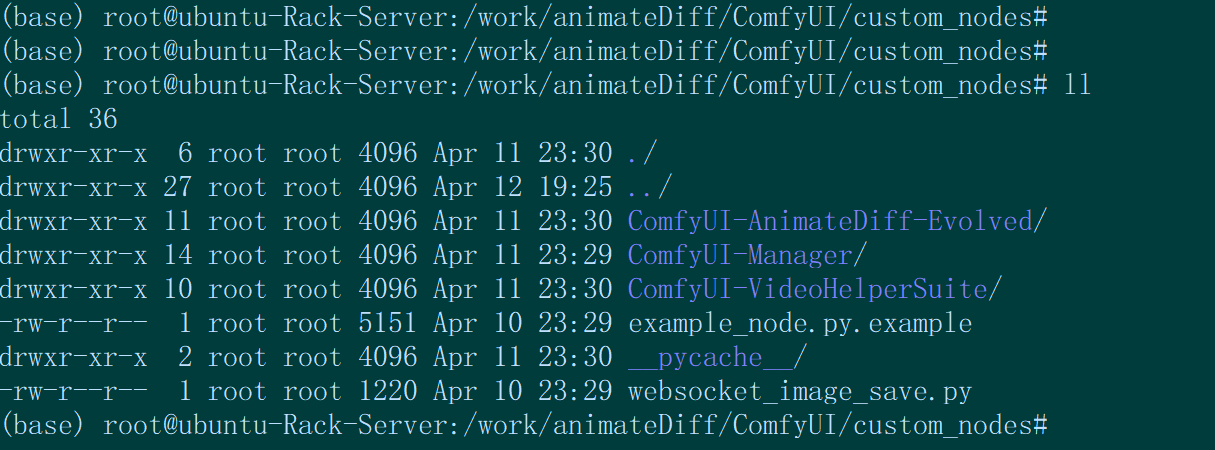
6.1 ComfyUI-AnimateDiff-Evolved
仓库:
text
https://github.com/Kosinkadink/ComfyUI-AnimateDiff-Evolved.git下载并切换版本:
bash
cd /work/animateDiff/ComfyUI/custom_nodes
git clone https://github.com/Kosinkadink/ComfyUI-AnimateDiff-Evolved.git
cd ComfyUI-AnimateDiff-Evolved
git checkout d8d163cd90b1111f6227495e3467633676fbb346
安装插件依赖:
bash
python -m pip install -r requirements.txt如果需要国内源:
bash
python -m pip install -r requirements.txt -i https://mirrors.aliyun.com/pypi/simple/说明:
本文最终走的是 SVD 图片生视频路线 ,严格来说不依赖 AnimateDiff。
但如果本地已经装了这个插件,也不冲突,可以保留。

6.2 ComfyUI-Manager
建议安装,方便管理插件和排查问题。
bash
cd /work/animateDiff/ComfyUI/custom_nodes
git clone https://github.com/ltdrdata/ComfyUI-Manager.git
版本信息:
bash
(base) root@ubuntu-Rack-Server:/work/animateDiff/ComfyUI/custom_nodes/ComfyUI-Manager# git rev-parse HEAD
bbafbb1290f000c5241137d23b3887e6d087036d
6.3 ComfyUI-VideoHelperSuite
如果后面想直接导出视频,这个插件很有用。
bash
cd /work/animateDiff/ComfyUI/custom_nodes
git clone https://github.com/Kosinkadink/ComfyUI-VideoHelperSuite.git
版本信息如下:
text
(base) root@ubuntu-Rack-Server:/work/animateDiff/ComfyUI/custom_nodes# cd ComfyUI-VideoHelperSuite
(base) root@ubuntu-Rack-Server:/work/animateDiff/ComfyUI/custom_nodes/ComfyUI-VideoHelperSuite# ll
total 104
drwxr-xr-x 10 root root  4096 Apr 11 23:30 ./
drwxr-xr-x  6 root root  4096 Apr 11 23:30 ../
drwxr-xr-x  8 root root  4096 Apr 11 23:33 .git/
drwxr-xr-x  3 root root  4096 Apr 11 16:15 .github/
-rw-r--r--  1 root root  3101 Apr 11 16:15 .gitignore
-rwxr-xr-x  1 root root   398 Apr 11 16:15 __init__.py*
-rw-r--r--  1 root root 35149 Apr 11 16:15 LICENSE
drwxr-xr-x  2 root root  4096 Apr 11 23:30 __pycache__/
-rw-r--r--  1 root root   425 Apr 11 16:15 pyproject.toml
-rw-r--r--  1 root root  8877 Apr 11 16:15 README.md
-rw-r--r--  1 root root    29 Apr 11 16:15 requirements.txt
drwxr-xr-x  3 root root  4096 Apr 11 16:15 testframework/
drwxr-xr-x  2 root root  4096 Apr 11 16:15 tests/
drwxr-xr-x  2 root root  4096 Apr 11 16:15 video_formats/
drwxr-xr-x  3 root root  4096 Apr 11 23:30 videohelpersuite/
drwxr-xr-x  3 root root  4096 Apr 11 16:15 web/
(base) root@ubuntu-Rack-Server:/work/animateDiff/ComfyUI/custom_nodes/ComfyUI-VideoHelperSuite# sync
(base) root@ubuntu-Rack-Server:/work/animateDiff/ComfyUI/custom_nodes/ComfyUI-VideoHelperSuite# git rev-parse HEAD
2984ec4c4b93292421888f38db74a5e8802a8ff8
建议顺手把它自己的依赖也装一下:
bashcd /work/animateDiff/ComfyUI/custom_nodes/ComfyUI-VideoHelperSuite python -m pip install -r requirements.txt如果网络较慢,也可以使用国内源。
7. 系统依赖安装
7.1 安装 ffmpeg
后面无论是用插件导视频,还是自己把 PNG 序列合成 mp4,ffmpeg 都很有用。
bash
sudo apt update
sudo apt install -y ffmpeg
验证:
bash
ffmpeg -version8. 为什么要单独下载 SVD 模型
很多人一开始容易混淆:
- 我已经装了 SDXL
- 我已经能文生图 / 图生图
- 那是不是已经能做图片生视频了?
答案是:
不是。
因为图片生视频需要专门的视频模型。
这里我选择的是:
svd_xt.safetensors
这是 SVD(Stable Video Diffusion)路线里比较常见、也比较适合最小验证的模型。
在当前工作流里,ImageOnlyCheckpointLoader 节点实际加载的就是这个模型 。
9. 下载 SVD 模型
模型仓库:
text
stabilityai/stable-video-diffusion-img2vid-xt我使用 Python 脚本下载,代码如下:
python
from huggingface_hub import hf_hub_download
import os
repo_id = "stabilityai/stable-video-diffusion-img2vid-xt"
filename = "svd_xt.safetensors"
local_dir = "/work/models"
os.makedirs(local_dir, exist_ok=True)
print("Start downloading SVD XT model...")
path = hf_hub_download(
repo_id=repo_id,
filename=filename,
local_dir=local_dir,
endpoint="https://hf-mirror.com",
)
print("Download finished.")
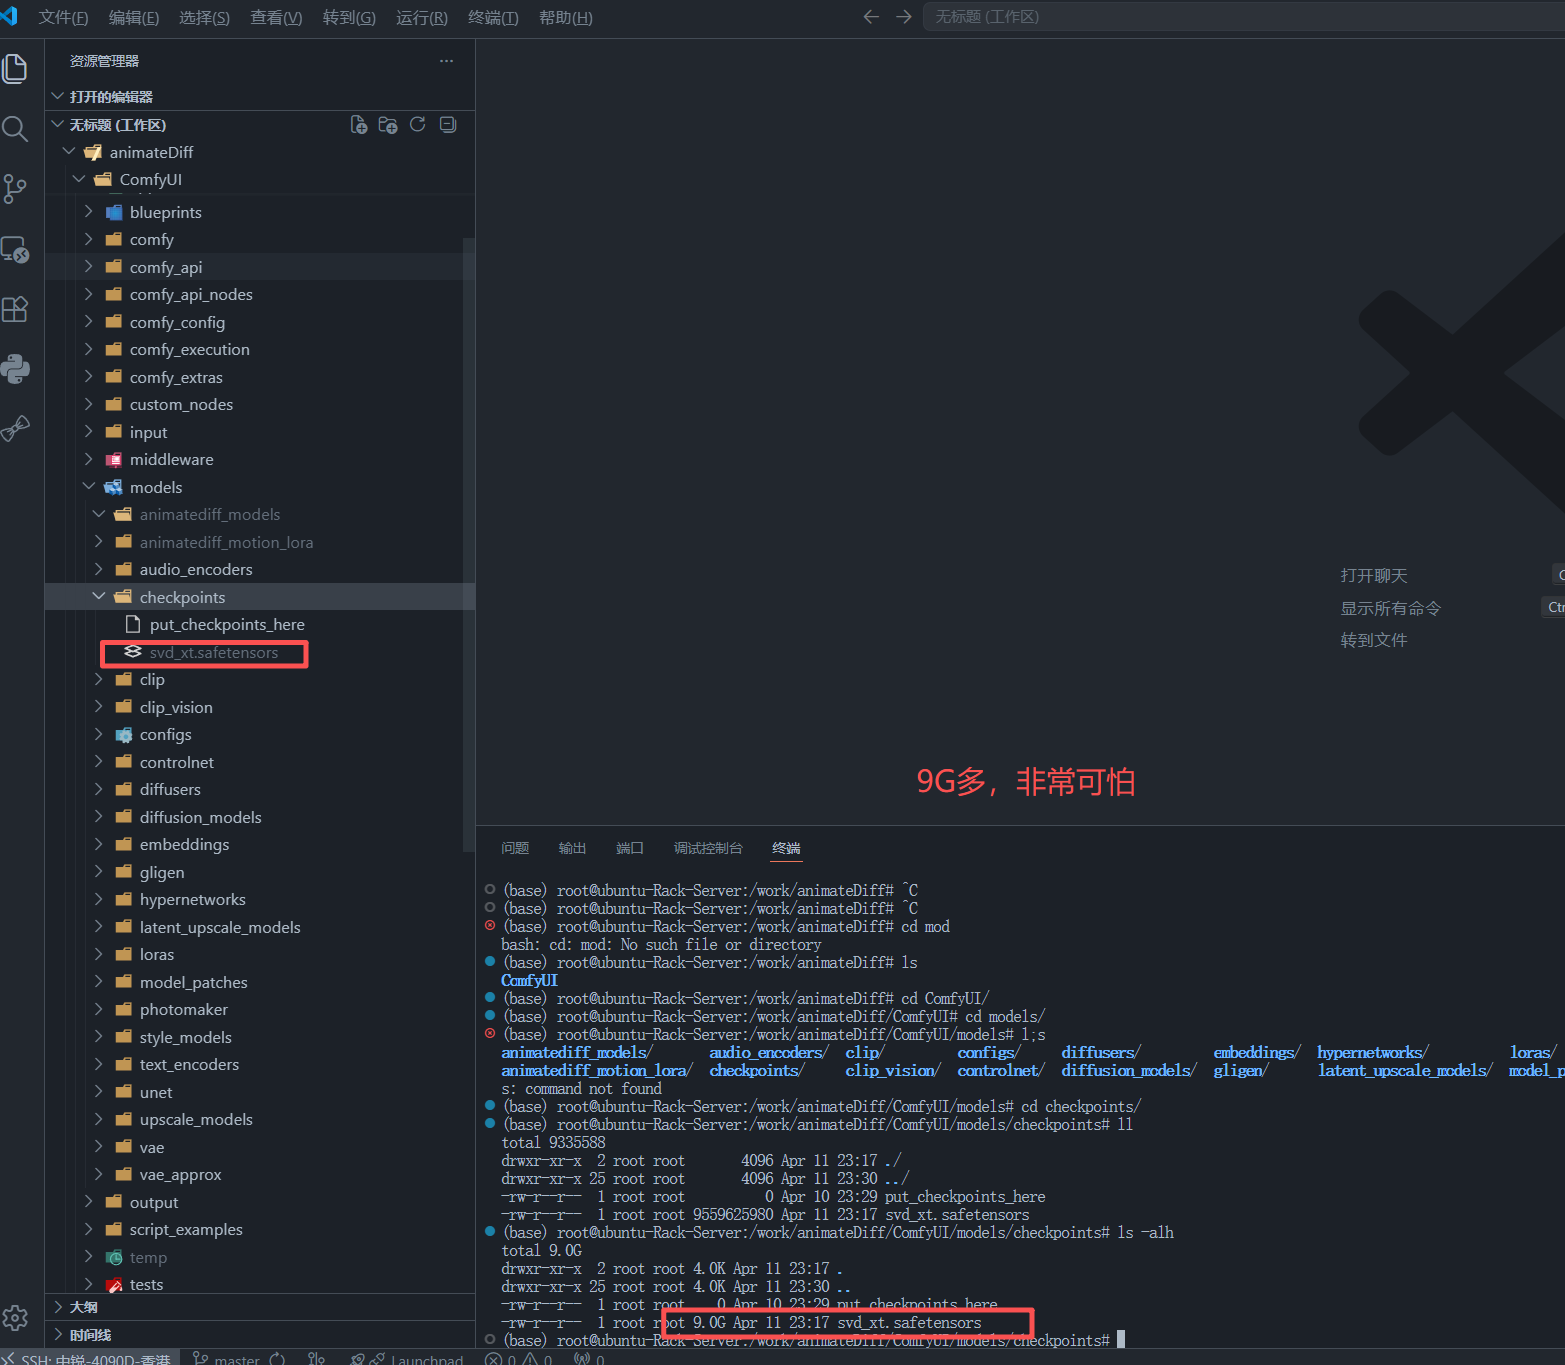
print("Saved to:", path)下载后模型大小大约 9G 多。
9.1 模型下载后的截图
10. 模型和目录准备
10.1 创建目录
bash
mkdir -p /work/animateDiff/ComfyUI/models/checkpoints
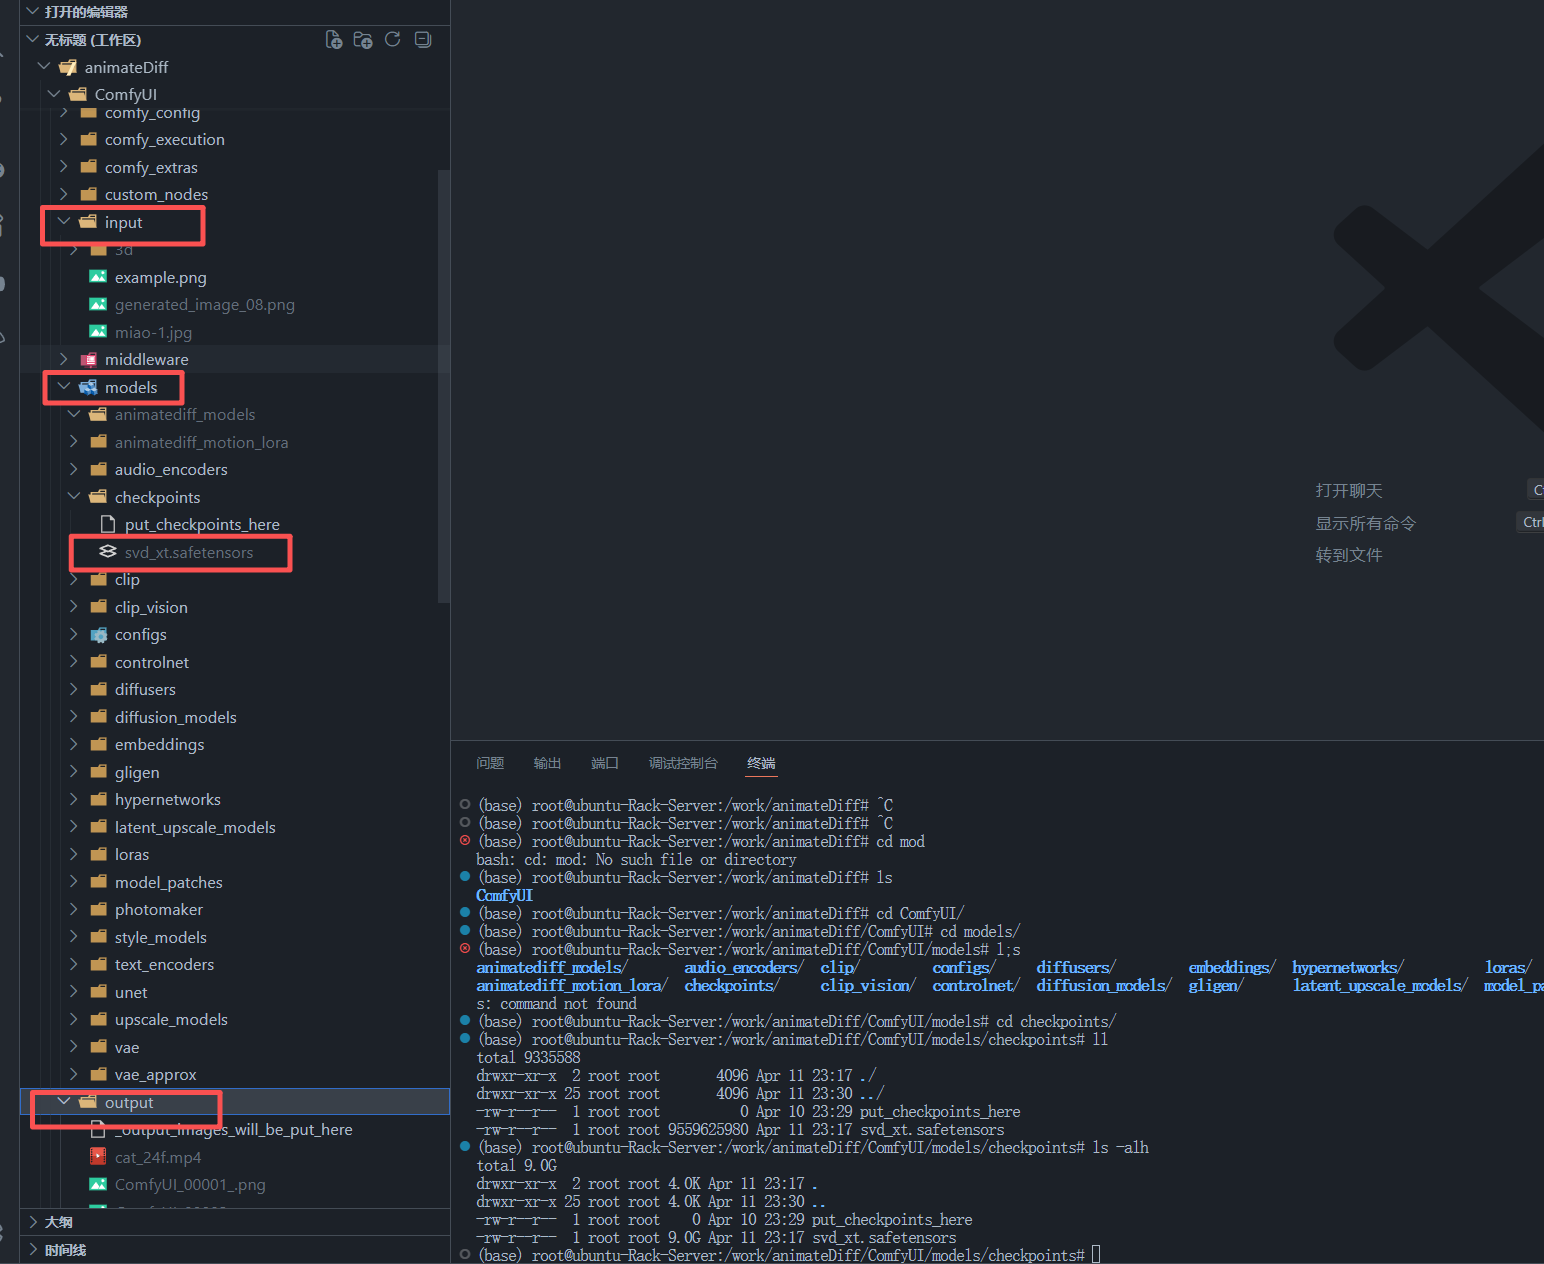
mkdir -p /work/animateDiff/ComfyUI/input
mkdir -p /work/animateDiff/ComfyUI/output10.2 放置 SVD 模型
建议把模型放到:
bash
/work/animateDiff/ComfyUI/models/checkpoints/svd_xt.safetensors这样后续在 ImageOnlyCheckpointLoader 节点里就可以直接看到它 。
10.3 准备输入图片
把测试图片放到:
bash
/work/animateDiff/ComfyUI/input/例如:
bash
cp /你的图片路径/generated_image_08.png /work/animateDiff/ComfyUI/input/在当前工作流里,LoadImage 节点实际加载的图片名是:
text
generated_image_08.png这一点在前端工作流和 API 工作流里都能看到 。
11. 为什么启动 ComfyUI 时要指定 GPU
我机器上是多卡环境,而且还有其他服务(比如 Ollama)在占用显卡。
一开始如果直接运行 ComfyUI,很容易遇到:
- 显存不够
- SVD 推理时 OOM
- 明明是 4090D 24G,却提示显存不足
最后排查下来,本质原因是:
ComfyUI 和其他进程抢了同一张卡
因此更稳的做法是:
启动时直接指定空闲 GPU
例如我这里固定到 GPU 2:
bash
CUDA_VISIBLE_DEVICES=2 python main.py --listen 127.0.0.1 --port 8188这样 ComfyUI 只会看到这张卡,避免和其他进程争抢显存。
12. 运行 ComfyUI
进入 ComfyUI 根目录后执行:
bash
cd /work/animateDiff/ComfyUI
conda activate aq_py310
CUDA_VISIBLE_DEVICES=2 python main.py --listen 127.0.0.1 --port 8188
13. 启动日志示例
我的实际启动日志如下:
log
(aq_py310) root@ubuntu-Rack-Server:/work/animateDiff/ComfyUI# CUDA_VISIBLE_DEVICES=2 python main.py --listen 127.0.0.1 --port 8188
comfy-aimdo failed to load: /root/miniconda3/envs/aq_py310/lib/python3.10/site-packages/comfy_aimdo/aimdo.so: cannot open shared object file: No such file or directory
NOTE: comfy-aimdo is currently only support for Nvidia GPUs
[START] Security scan
[ComfyUI-Manager] Using `uv` as Python module for pip operations.
Using Python 3.10.20 environment at: /root/miniconda3/envs/aq_py310
[DONE] Security scan
## ComfyUI-Manager: installing dependencies done.
** ComfyUI startup time: 2026-04-12 19:23:51.086
** Platform: Linux
** Python version: 3.10.20 (main, Mar 11 2026, 17:41:27) [GCC 14.3.0]
** Python executable: /root/miniconda3/envs/aq_py310/bin/python
** ComfyUI Path: /work/animateDiff/ComfyUI
** ComfyUI Base Folder Path: /work/animateDiff/ComfyUI
** User directory: /work/animateDiff/ComfyUI/user
** ComfyUI-Manager config path: /work/animateDiff/ComfyUI/user/__manager/config.ini
** Log path: /work/animateDiff/ComfyUI/user/comfyui.log
Using Python 3.10.20 environment at: /root/miniconda3/envs/aq_py310
Using Python 3.10.20 environment at: /root/miniconda3/envs/aq_py310
Prestartup times for custom nodes:
   1.7 seconds: /work/animateDiff/ComfyUI/custom_nodes/ComfyUI-Manager
Found comfy_kitchen backend cuda: {'available': True, 'disabled': False, 'unavailable_reason': None, 'capabilities': ['apply_rope', 'apply_rope1', 'dequantize_nvfp4', 'dequantize_per_tensor_fp8', 'quantize_mxfp8', 'quantize_nvfp4', 'quantize_per_tensor_fp8', 'scaled_mm_nvfp4']}
Found comfy_kitchen backend eager: {'available': True, 'disabled': False, 'unavailable_reason': None, 'capabilities': ['apply_rope', 'apply_rope1', 'dequantize_mxfp8', 'dequantize_nvfp4', 'dequantize_per_tensor_fp8', 'quantize_mxfp8', 'quantize_nvfp4', 'quantize_per_tensor_fp8', 'scaled_mm_mxfp8', 'scaled_mm_nvfp4']}
Found comfy_kitchen backend triton: {'available': True, 'disabled': True, 'unavailable_reason': None, 'capabilities': ['apply_rope', 'apply_rope1', 'dequantize_nvfp4', 'dequantize_per_tensor_fp8', 'quantize_mxfp8', 'quantize_nvfp4', 'quantize_per_tensor_fp8']}
Checkpoint files will always be loaded safely.
Total VRAM 24081 MB, total RAM 514833 MB
pytorch version: 2.11.0+cu130
Set vram state to: NORMAL_VRAM
Device: cuda:0 NVIDIA GeForce RTX 4090 D : cudaMallocAsync
Using async weight offloading with 2 streams
Enabled pinned memory 463349.0
14. 如何判断 ComfyUI 是否启动成功
如果启动成功,你会看到类似信息:
- Python 环境信息
- CUDA 设备信息
- VRAM / RAM 信息
- ComfyUI 监听端口信息
并且浏览器可以访问:
text
http://127.0.0.1:8188如果你是远程机器,建议通过 SSH 隧道访问,而不是直接暴露公网端口。
例如本地执行:
bash
ssh -L 8188:127.0.0.1:8188 user@your_server然后浏览器打开:
text
http://127.0.0.1:818814.1 启动成功后的界面
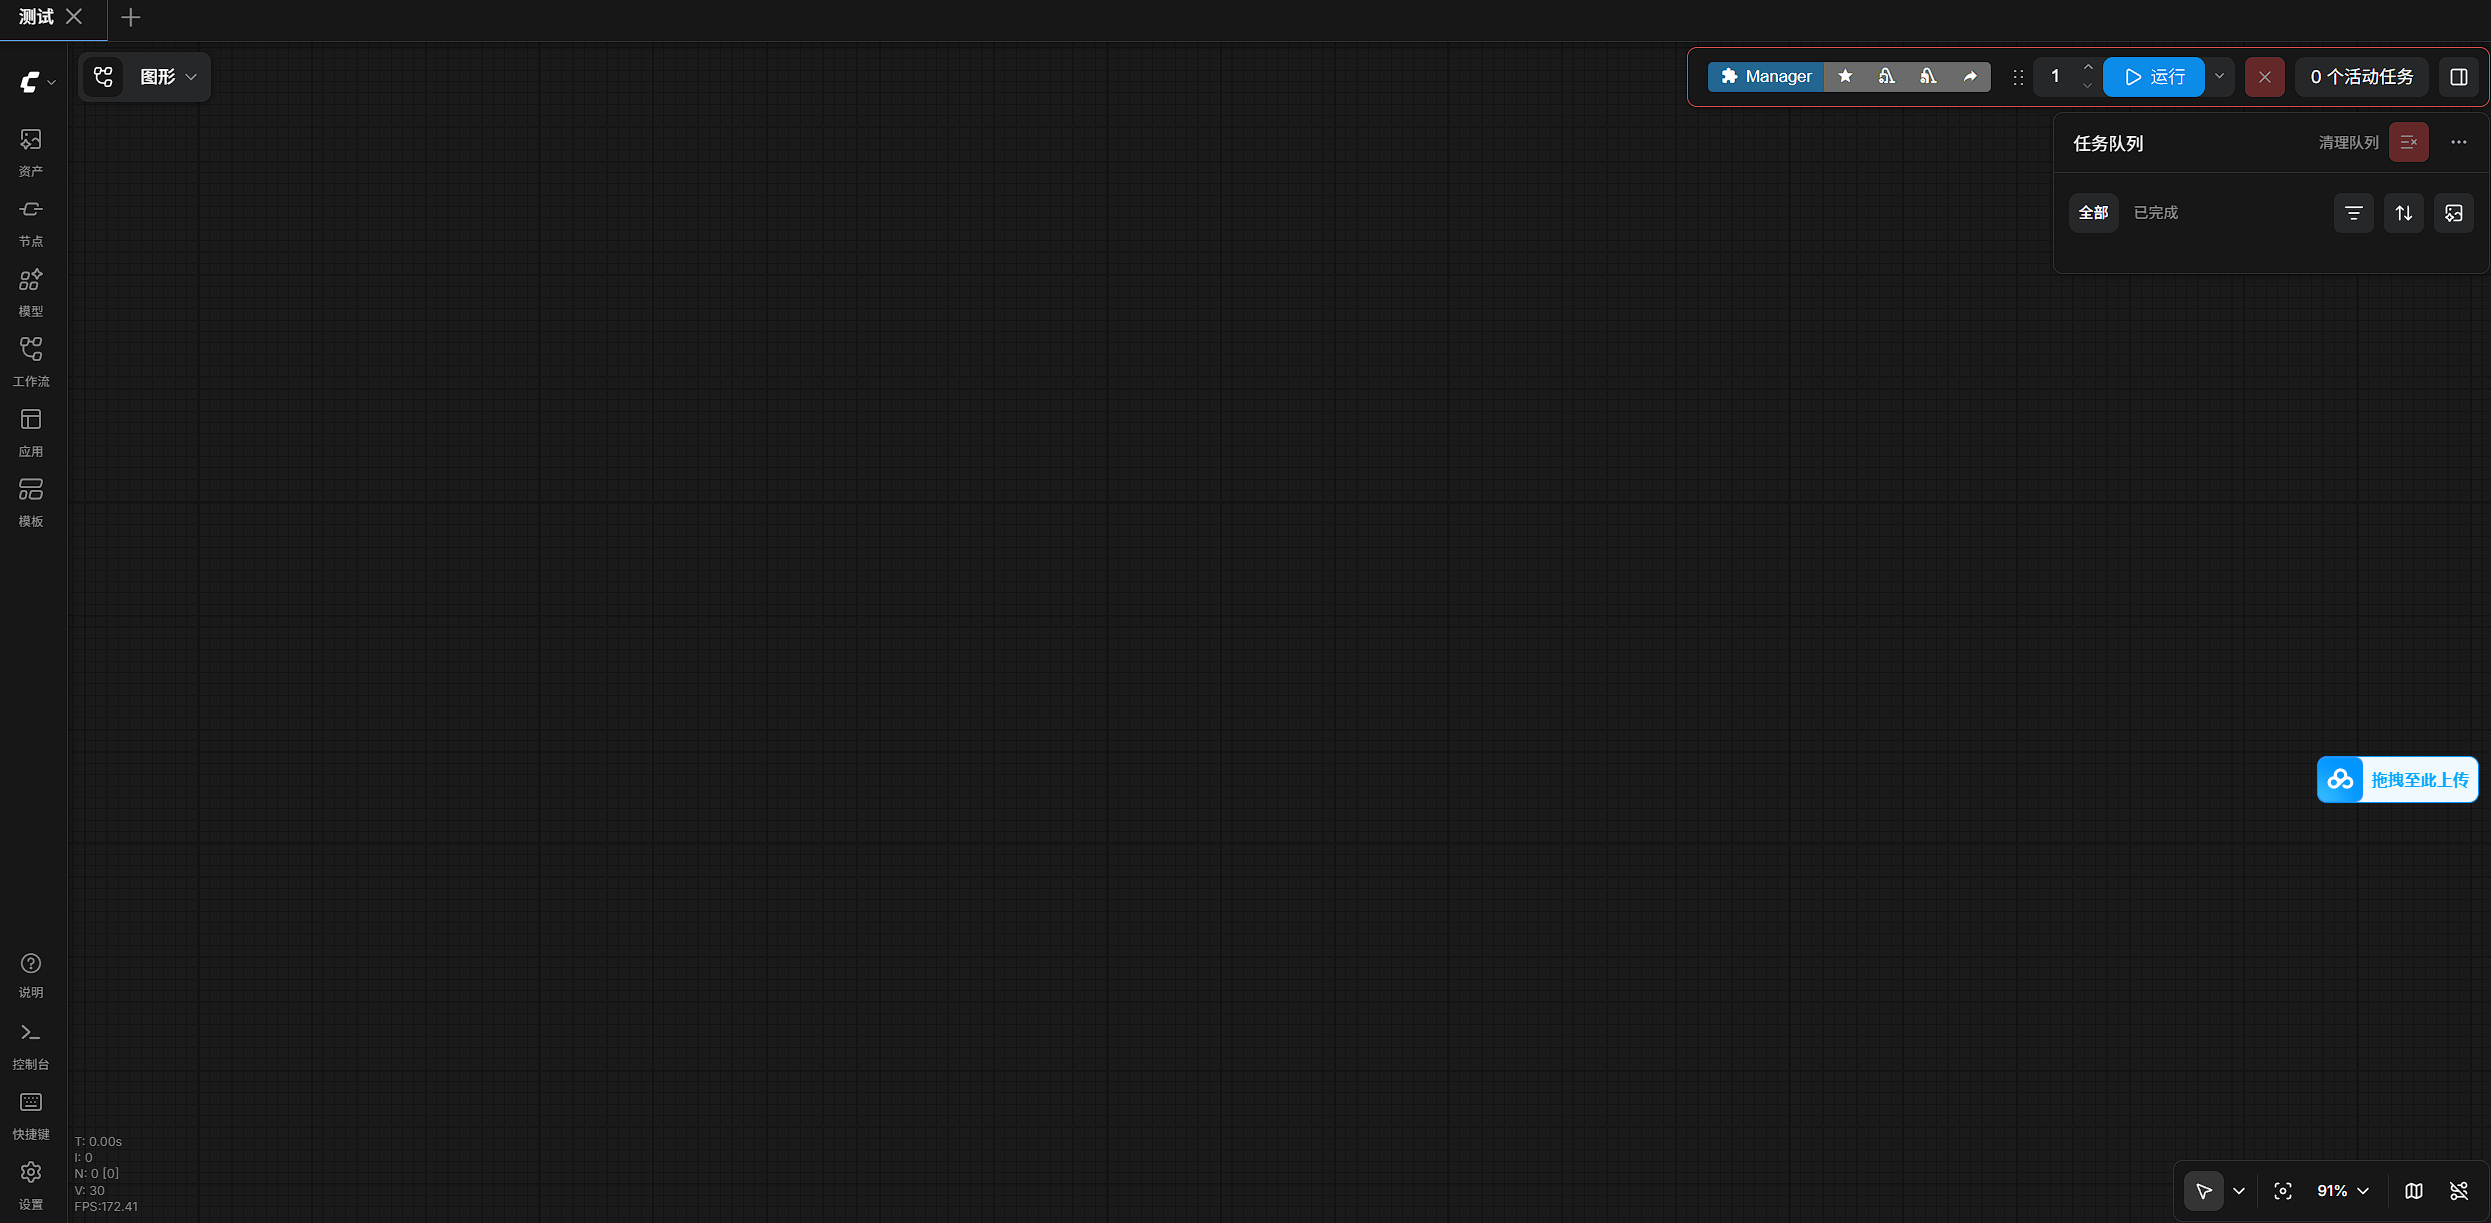
15. 启动后先做什么
界面打开后,不要急着乱拖节点。
第一件事是确认:
SVD 模型能不能被识别
你需要找一个节点:
15.1 ImageOnlyCheckpointLoader
如果这个节点的模型下拉框里能看到:
text
svd_xt.safetensors说明模型位置基本没问题。
在当前保存的工作流里,这个节点实际加载的也正是 svd_xt.safetensors 。
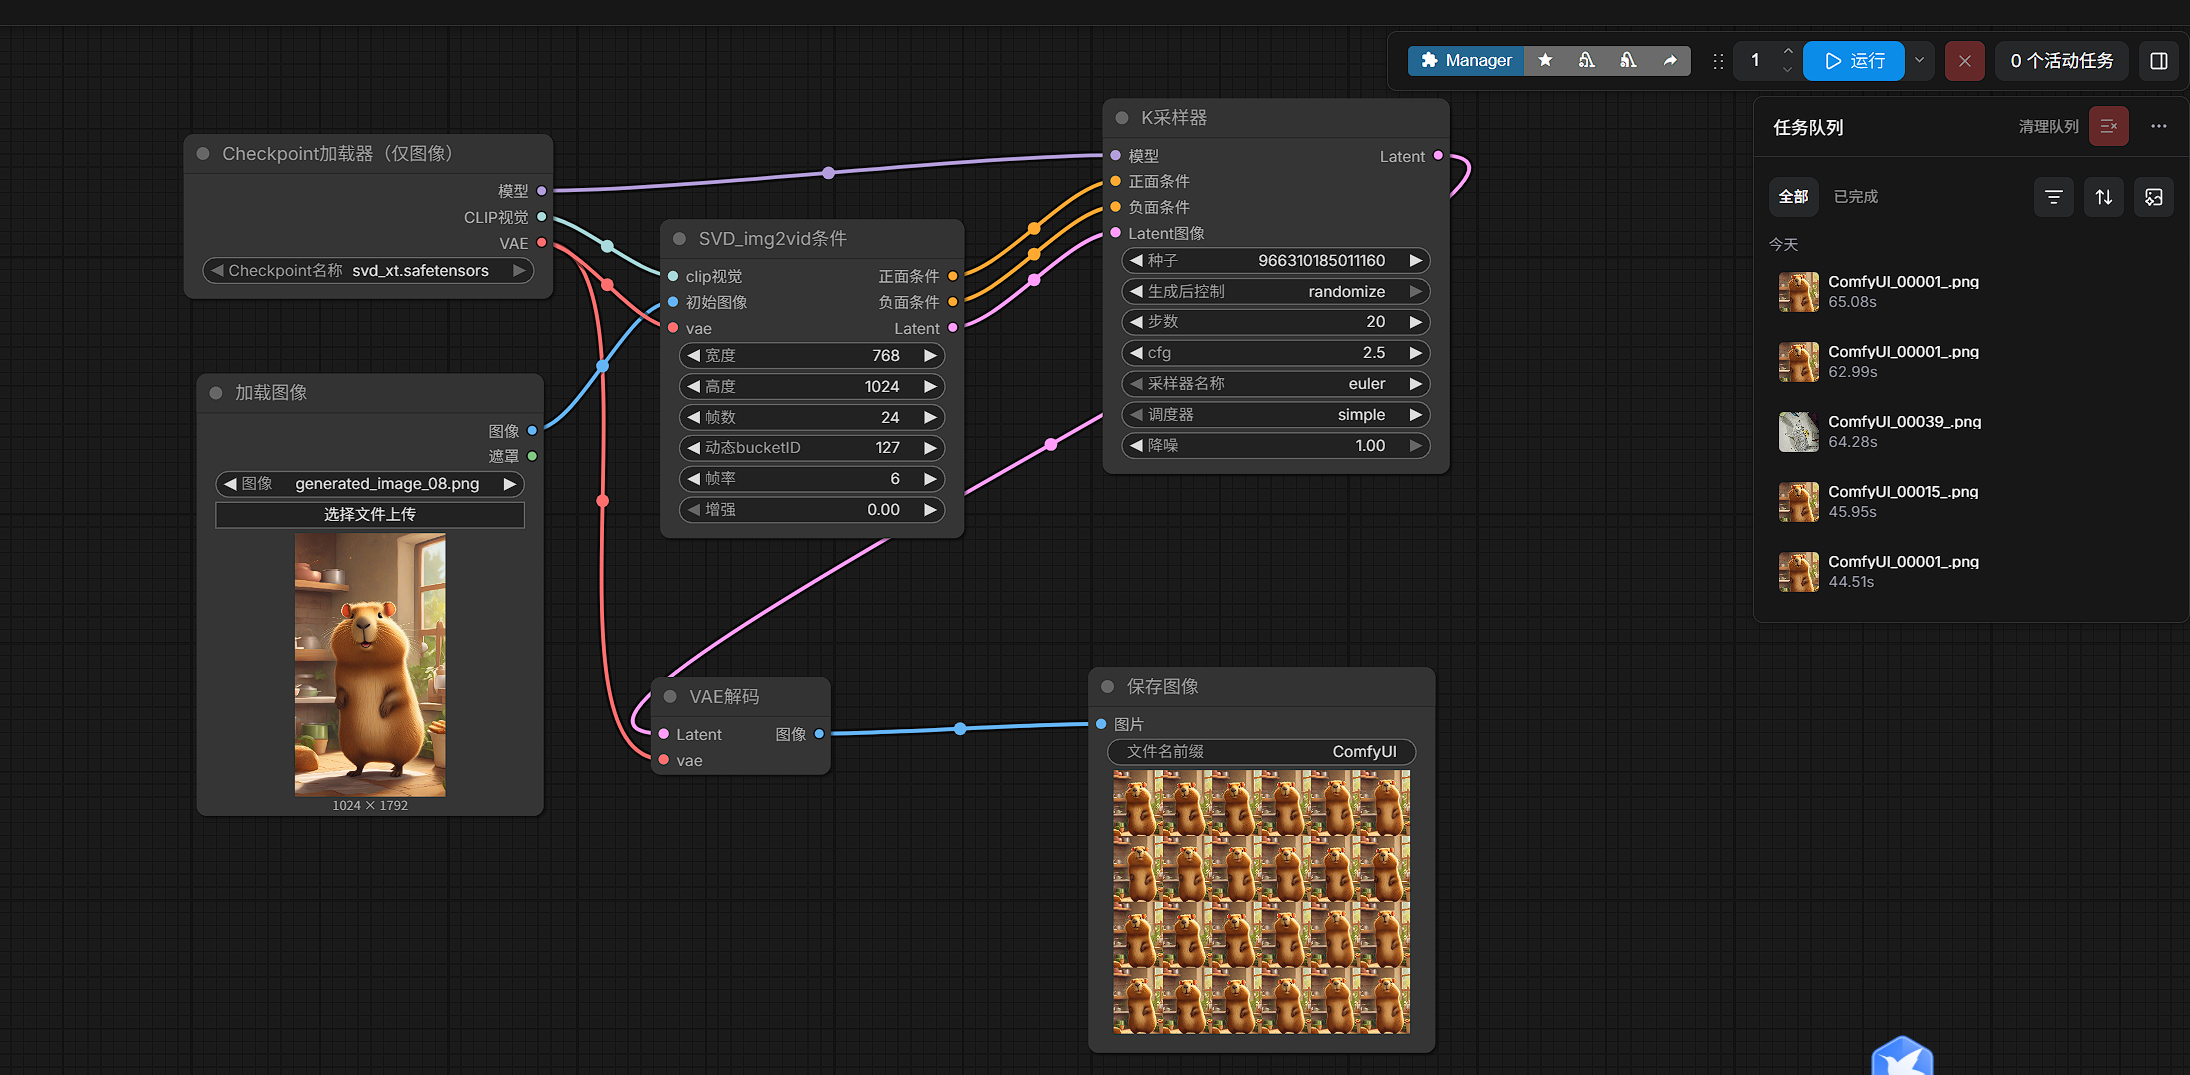
16. 最小 SVD 工作流会用到哪些节点
这篇先不展开完整操作,但先列一下后面会用到的最小节点集合。
在当前工作流里,核心节点包括:
LoadImageImageOnlyCheckpointLoaderSVD_img2vid_ConditioningKSamplerVAEDecodeSaveImage
其中:
SVD_img2vid_Conditioning用来构造图生视频条件KSampler负责采样VAEDecode -> SaveImage负责把结果输出成图片帧
18. 常见问题:为什么 24G 显卡还会 OOM?
这个坑我实际踩过,值得单独写一下。
表面上看:
- 4090D 24G
- 跑个 576x1024 / 768x1024 的 SVD
- 理论上不该轻易 OOM
但如果你的同一张卡上还有其他进程,比如:
- Ollama
- 其他推理服务
- 旧的 Python 任务
那 ComfyUI 实际能用的显存就会大幅减少。
所以这里的经验是:
多卡机器一定要固定 ComfyUI 使用一张空闲卡
例如:
bash
CUDA_VISIBLE_DEVICES=2 python main.py --listen 127.0.0.1 --port 8188这比后面反复调参数更有效。
19. 安装命令汇总
如果你只想快速照着执行,可以直接参考下面这组命令:
bash
# 1) 创建环境
conda create -n aq_py310 python=3.10 -y
conda activate aq_py310

# 2) 下载 ComfyUI
cd /work/animateDiff
git clone https://github.com/Comfy-Org/ComfyUI.git
cd ComfyUI
git checkout e6be419a30f666f5428eb0f7ae0918b6ea9bdac4

# 3) 安装 ComfyUI 依赖
python -m pip install -r requirements.txt -i https://mirrors.aliyun.com/pypi/simple/

# 4) 安装 AnimateDiff 插件(可选)
cd /work/animateDiff/ComfyUI/custom_nodes
git clone https://github.com/Kosinkadink/ComfyUI-AnimateDiff-Evolved.git
cd ComfyUI-AnimateDiff-Evolved
git checkout d8d163cd90b1111f6227495e3467633676fbb346
python -m pip install -r requirements.txt -i https://mirrors.aliyun.com/pypi/simple/

# 5) 安装 Manager(建议)
cd /work/animateDiff/ComfyUI/custom_nodes
git clone https://github.com/ltdrdata/ComfyUI-Manager.git

# 6) 安装 VideoHelperSuite(建议)
cd /work/animateDiff/ComfyUI/custom_nodes
git clone https://github.com/Kosinkadink/ComfyUI-VideoHelperSuite.git
cd ComfyUI-VideoHelperSuite
python -m pip install -r requirements.txt -i https://mirrors.aliyun.com/pypi/simple/

# 7) 安装 ffmpeg
sudo apt update
sudo apt install -y ffmpeg

# 8) 创建目录
mkdir -p /work/animateDiff/ComfyUI/models/checkpoints
mkdir -p /work/animateDiff/ComfyUI/input
mkdir -p /work/animateDiff/ComfyUI/output

# 9) 启动 ComfyUI(固定到 GPU 2)
cd /work/animateDiff/ComfyUI
conda activate aq_py310
CUDA_VISIBLE_DEVICES=2 python main.py --listen 127.0.0.1 --port 8188
20. 本文小结
这篇文章完成了 ComfyUI + SVD 图片生视频环境的准备工作,包括:
- 确认基础环境
- 安装 ComfyUI
- 安装插件和依赖
- 准备 SVD 模型
- 指定 GPU 启动 ComfyUI
- 确认模型可被识别
- 梳理后续最小工作流需要的节点
如果你现在已经做到:
- ComfyUI 能打开
ImageOnlyCheckpointLoader能识别svd_xt.safetensors- 输入图可以正常加载
那么就说明:
图片生视频的环境部分已经准备完成。