目录
[Qwen2-VL 的特性](#Qwen2-VL 的特性)
[🍭3.5搭建gradio 界面](#🍭3.5搭建gradio 界面)
💖💖1.屋顶材质分析的实际意义
大模型作为多模态AI模型,能够通过图像识别技术解析屋顶材质类型(如瓦片、金属、等),并结合地理、气候、建筑历史等数据关联分析。例如,在高温多雨地区识别出的坡屋顶瓦片材质,可能与防排水需求相关;而寒冷地区的平顶沥青材质可能指向保温需求。
- 建筑维护与改造
通过识别材质老化、破损或功能性不足(如隔热效率低),为维修或节能改造提供数据支持。 - 城市规划与文化遗产保护
历史建筑屋顶材质的分析有助于制定保护策略,现代城市中太阳能屋顶的分布可评估可再生能源推广效果。 - 灾害风险评估
不同材质对台风、冰雹等灾害的耐受性差异,可辅助制定区域防灾预案。
🍌🍌2.实现效果
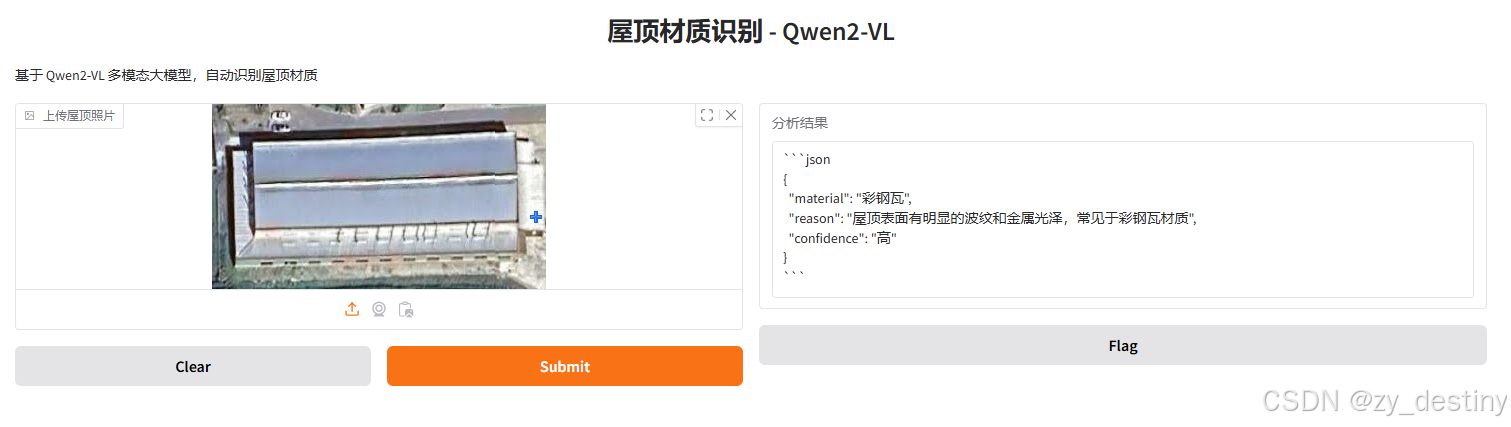
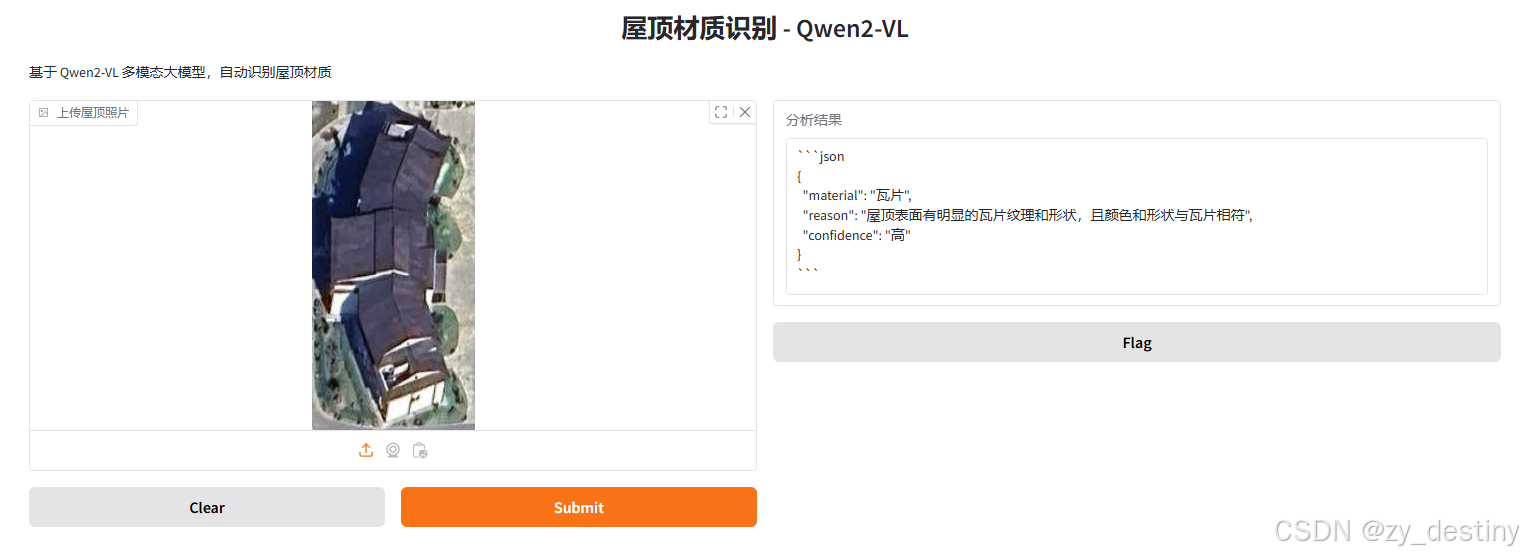
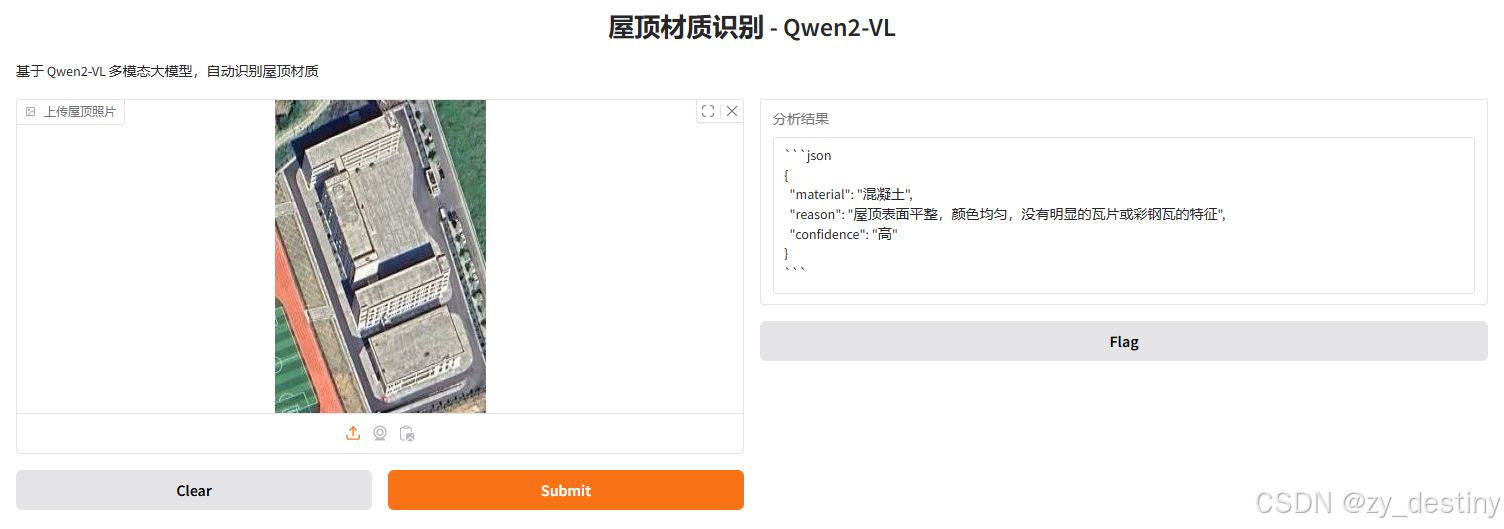
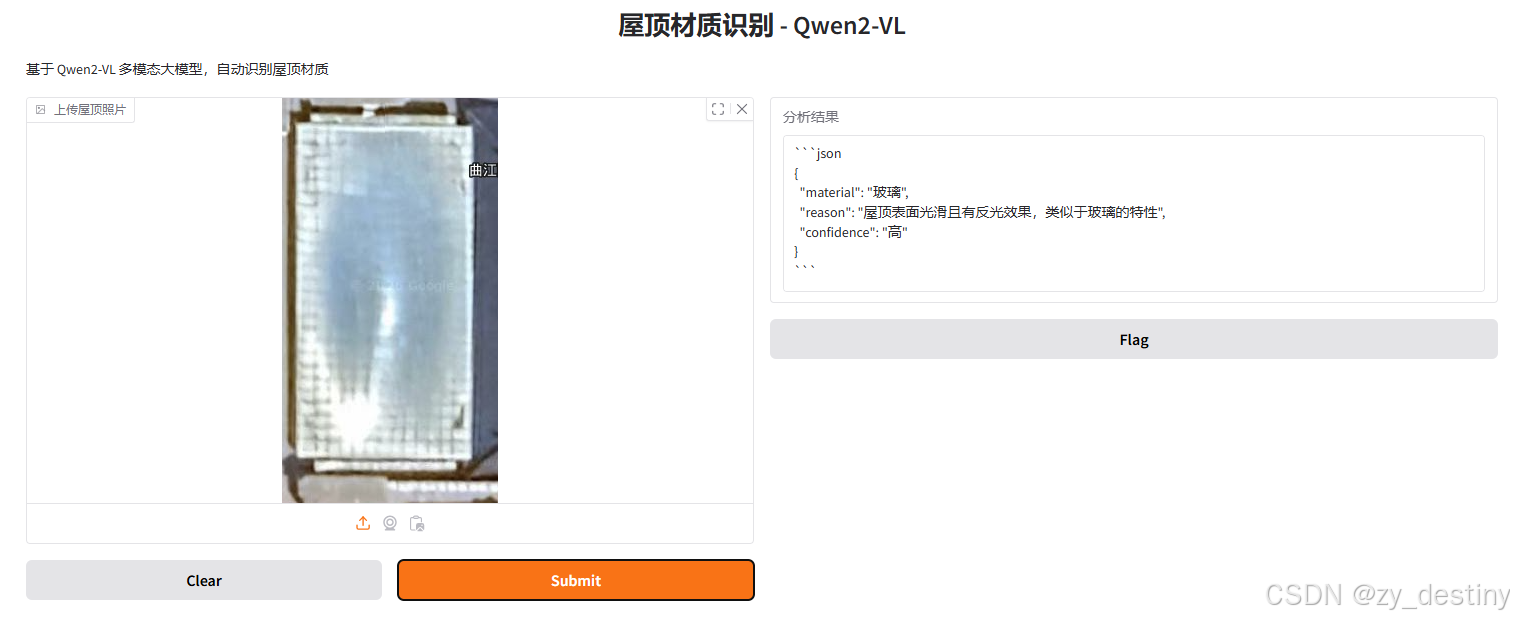
实现路径:Gradio 界面+QWen2大模型+python(Qwen2-VL-7B-Instruct)
🔔🔔3.操作步骤
🍭3.1定义message
bash
    messages = [
        {
            "role": "user",
            "content": [
                {"type": "image", "image": image},
                {"type": "text", "text": """请分析这张图片中的屋顶材质。
判断属于以下哪一类:混凝土、彩钢瓦、瓦片、玻璃、其他。
请按JSON格式输出:{"material": "材质名称", "reason": "判断理由", "confidence": "高/中/低"}"""}
            ]
        }
    ]
🍭3.2下载模型
考虑到硬件限制,我这边选择体量较小的Qwen/Qwen2-VL-7B-Instruct模型,可以直接从国内的魔塔社区下载,类似于huggingface,下载速度快且不用科学上网。
Qwen2-VL 的特性
主要增强功能:
-
对各种分辨率和比例图像的理解达到当时的最先进水平:Qwen2-VL 在视觉理解基准测试中达到了最先进的性能,包括 MathVista、DocVQA、RealWorldQA、MTVQA 等。
-
能够理解 20 分钟以上的视频:Qwen2-VL 可以理解超过 20 分钟的视频,用于高质量的基于视频的问题回答、对话、内容创建等。
-
可以操作您的手机、机器人等的代理:凭借复杂的推理和决策能力,Qwen2-VL 可以与智能手机、机器人等设备集成,根据视觉环境和文本指令进行自动操作。
-
多语言支持:为了服务全球用户,除了英语和中文之外,Qwen2-VL 现在还支持图像中文本的不同语言理解,包括大多数欧洲语言、日语、韩语、阿拉伯语、越南语等。
模型架构更新:
- 朴素动态分辨率:与之前不同,Qwen2-VL 可以处理任意图像分辨率,将它们映射为动态数量的视觉标记,提供更加类似人类的视觉处理体验。
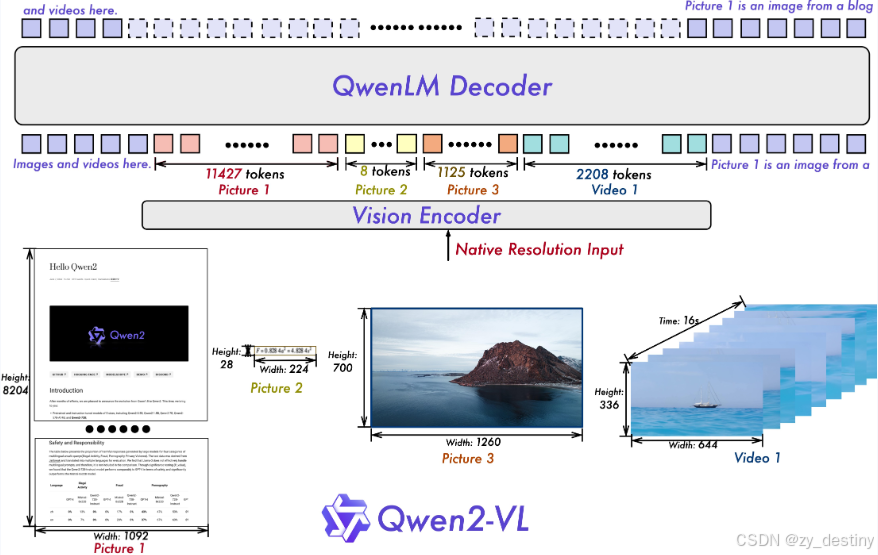
- 多模态旋转位置嵌入(M-ROPE):将位置嵌入分解成多个部分,以捕捉一维文本、二维视觉和三维视频的位置信息,增强其多模态处理能力。

🍭3.3依赖包安装
qwen提供了一个工具包,帮助用户处理各种类型的视觉输入。这包括 base64、URL 和交错的图像和视频。您可以使用以下命令进行安装:
bash
pip install qwen-vl-utils🍭3.4代码使用
python
from modelscope import Qwen2VLForConditionalGeneration, AutoTokenizer, AutoProcessor
from qwen_vl_utils import process_vision_info

# default: Load the model on the available device(s)
model = Qwen2VLForConditionalGeneration.from_pretrained(
    "Qwen/Qwen2-VL-7B-Instruct", torch_dtype="auto", device_map="auto"
)

# We recommend enabling flash_attention_2 for better acceleration and memory saving, especially in multi-image and video scenarios.
# model = Qwen2VLForConditionalGeneration.from_pretrained(
#     "Qwen/Qwen2-VL-7B-Instruct",
#     torch_dtype=torch.bfloat16,
#     attn_implementation="flash_attention_2",
#     device_map="auto",
# )

# default processer
processor = AutoProcessor.from_pretrained("Qwen/Qwen2-VL-7B-Instruct")

# The default range for the number of visual tokens per image in the model is 4-16384. You can set min_pixels and max_pixels according to your needs, such as a token count range of 256-1280, to balance speed and memory usage.
# min_pixels = 256*28*28
# max_pixels = 1280*28*28
# processor = AutoProcessor.from_pretrained("Qwen/Qwen2-VL-7B-Instruct", min_pixels=min_pixels, max_pixels=max_pixels)

messages = [
    {
        "role": "user",
        "content": [
            {
                "type": "image",
                "image": "https://qianwen-res.oss-cn-beijing.aliyuncs.com/Qwen-VL/assets/demo.jpeg",
            },
            {"type": "text", "text": "Describe this image."},
        ],
    }
]

# Preparation for inference
text = processor.apply_chat_template(
    messages, tokenize=False, add_generation_prompt=True
)
image_inputs, video_inputs = process_vision_info(messages)
inputs = processor(
    text=[text],
    images=image_inputs,
    videos=video_inputs,
    padding=True,
    return_tensors="pt",
)
inputs = inputs.to("cuda")

# Inference: Generation of the output
generated_ids = model.generate(**inputs, max_new_tokens=128)
generated_ids_trimmed = [
    out_ids[len(in_ids) :] for in_ids, out_ids in zip(inputs.input_ids, generated_ids)
]
output_text = processor.batch_decode(
    generated_ids_trimmed, skip_special_tokens=True, clean_up_tokenization_spaces=False
)
print(output_text)
也可以选择普通torch环境,不用qwen_vl_utils库,比如:
bash
from PIL import Image
import requests
import torch
from torchvision import io
from typing import Dict
from modelscope import Qwen2VLForConditionalGeneration, AutoTokenizer, AutoProcessor

# Load the model in half-precision on the available device(s)
model = Qwen2VLForConditionalGeneration.from_pretrained(
    "Qwen/Qwen2-VL-7B-Instruct", torch_dtype="auto", device_map="auto"
)
processor = AutoProcessor.from_pretrained("Qwen/Qwen2-VL-7B-Instruct")

# Image
url = "https://qianwen-res.oss-cn-beijing.aliyuncs.com/Qwen-VL/assets/demo.jpeg"
image = Image.open(requests.get(url, stream=True).raw)

conversation = [
    {
        "role": "user",
        "content": [
            {
                "type": "image",
            },
            {"type": "text", "text": "Describe this image."},
        ],
    }
]


# Preprocess the inputs
text_prompt = processor.apply_chat_template(conversation, add_generation_prompt=True)
# Excepted output: '<|im_start|>system\nYou are a helpful assistant.<|im_end|>\n<|im_start|>user\n<|vision_start|><|image_pad|><|vision_end|>Describe this image.<|im_end|>\n<|im_start|>assistant\n'

inputs = processor(
    text=[text_prompt], images=[image], padding=True, return_tensors="pt"
)
inputs = inputs.to("cuda")

# Inference: Generation of the output
output_ids = model.generate(**inputs, max_new_tokens=128)
generated_ids = [
    output_ids[len(input_ids) :]
    for input_ids, output_ids in zip(inputs.input_ids, output_ids)
]
output_text = processor.batch_decode(
    generated_ids, skip_special_tokens=True, clean_up_tokenization_spaces=True
)
print(output_text)
🍭3.5搭建gradio 界面
python
import gradio as gr
demo = gr.Interface(
    fn=analyze_roof,
    inputs=gr.Image(type="filepath", label="上传屋顶照片"),
    outputs=gr.Textbox(label="分析结果"),
    title="屋顶材质识别 - Qwen2-VL",
    description="基于 Qwen2-VL 多模态大模型,自动识别屋顶材质"
)
🍉🍉4.注意事项
对于输入图像,qwen支持本地文件、base64 和 URL。对于视频,目前仅支持本地文件。
bash
# You can directly insert a local file path, a URL, or a base64-encoded image into the position where you want in the text.
## Local file path
messages = [
    {
        "role": "user",
        "content": [
            {"type": "image", "image": "file:///path/to/your/image.jpg"},
            {"type": "text", "text": "Describe this image."},
        ],
    }
]
## Image URL
messages = [
    {
        "role": "user",
        "content": [
            {"type": "image", "image": "http://path/to/your/image.jpg"},
            {"type": "text", "text": "Describe this image."},
        ],
    }
]
## Base64 encoded image
messages = [
    {
        "role": "user",
        "content": [
            {"type": "image", "image": "data:image;base64,/9j/..."},
            {"type": "text", "text": "Describe this image."},
        ],
    }
]
图像分辨率以提高性能
该模型支持广泛的分辨率输入。默认情况下,它使用原始分辨率作为输入,但更高的分辨率可以通过增加计算量来提高性能。用户可以设置最小和最大像素数以实现满足其需求的最佳配置,例如将token计数范围设为256-1280之间,以此平衡速度与内存使用。
bash
min_pixels = 256 * 28 * 28
max_pixels = 1280 * 28 * 28
processor = AutoProcessor.from_pretrained(
    "Qwen/Qwen2-VL-7B-Instruct", min_pixels=min_pixels, max_pixels=max_pixels
)
此外,我们提供了两种方法来精细控制输入到模型中的图像大小:
-
定义
min_pixels和max_pixels:图像将被调整大小以保持其在min_pixels和max_pixels范围内的纵横比。 -
指定确切尺寸:直接设置
resized_height和resized_width。这些值会被四舍五入到最接近的28的倍数。
bash
# min_pixels and max_pixels
messages = [
    {
        "role": "user",
        "content": [
            {
                "type": "image",
                "image": "file:///path/to/your/image.jpg",
                "resized_height": 280,
                "resized_width": 420,
            },
            {"type": "text", "text": "Describe this image."},
        ],
    }
]
# resized_height and resized_width
messages = [
    {
        "role": "user",
        "content": [
            {
                "type": "image",
                "image": "file:///path/to/your/image.jpg",
                "min_pixels": 50176,
                "max_pixels": 50176,
            },
            {"type": "text", "text": "Describe this image."},
        ],
    }
]
整理不易,欢迎一键三连!!!
送你们一条美丽的--分割线--
🌷🌷🍀🍀🌾🌾🍓🍓🍂🍂🙋🙋🐸🐸🙋🙋💖💖🍌🍌🔔🔔🍉🍉🍭🍭🍋🍋🍇🍇🏆🏆📸📸⛵⛵⭐⭐🍎🍎👍👍🌷