
文章目录
-
- [一、关于 Decord](#一、关于 Decord)
- 二、安装
- 三、用法
- 四、深度学习框架的桥梁:
一、关于 Decord
一款高效的深度学习视频加载器,具有超级容易消化的智能洗牌功能
- github : https://github.com/dmlc/decord
Decord是Record的一个反向过程,它提供了方便的视频切片方法,该方法基于硬件加速视频解码器上的一个薄封装器。
- FFMPEG/LibAV(完成)
- Nvidia编解码器(完成)
- 英特尔编解码器
Decord旨在处理尴尬的视频洗牌体验,以提供类似于深度学习的随机图像加载器的流畅体验。
Decord还可以从视频和音频文件中解码音频。人们可以将视频和音频切片在一起以获得同步结果;因此为视频和音频解码提供一站式解决方案。
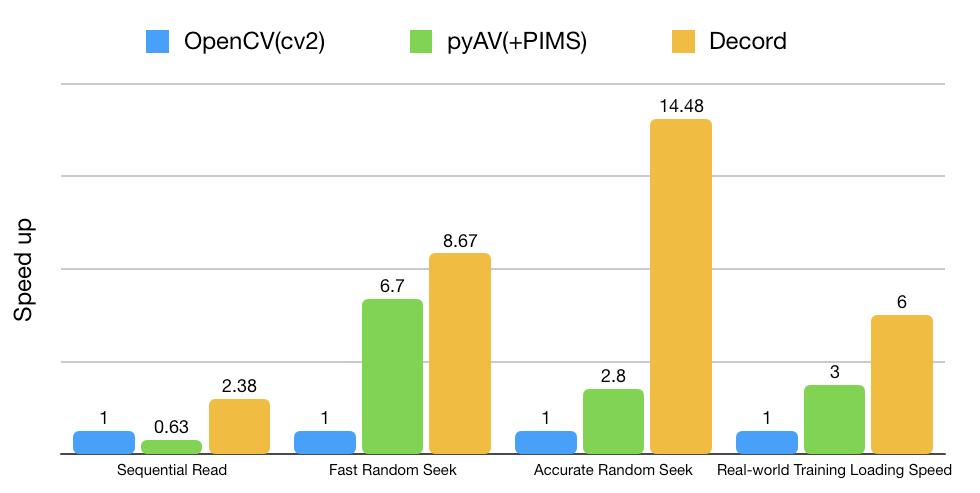
初步基准
Decord擅长处理随机访问模式,这在神经网络训练中很常见。
二、安装
1、通过pip安装
简单的使用
shell
pip install decord支持的平台:
- Linux
- Mac OS>=10.12, python>=3.5
- Windows
请注意,现在PYPI仅提供CPU版本。请从源代码构建以启用GPU加速器。
2、从源代码安装
2.1 Linux
安装用于构建共享库的系统包,对于Debian/Ubuntu用户,运行:
# official PPA comes with ffmpeg 2.8, which lacks tons of features, we use ffmpeg 4.0 here
sudo add-apt-repository ppa:jonathonf/ffmpeg-4 # for ubuntu20.04 official PPA is already version 4.2, you may skip this step
sudo apt-get update
sudo apt-get install -y build-essential python3-dev python3-setuptools make cmake
sudo apt-get install -y ffmpeg libavcodec-dev libavfilter-dev libavformat-dev libavutil-dev
# note: make sure you have cmake 3.8 or later, you can install from cmake official website if it's too old
递归克隆repo(重要)
shell
git clone --recursive https://github.com/dmlc/decord在源根目录中构建共享库:
shell
cd decord
mkdir build && cd build
cmake .. -DUSE_CUDA=0 -DCMAKE_BUILD_TYPE=Release
make您可以指定-DUSE_CUDA=ON或-DUSE_CUDA=/path/to/cuda或-DUSE_CUDA=ON -DCMAKE_CUDA_COMPILER=/path/to/cuda/nvcc以启用NVDEC硬件加速解码:
cmake .. -DUSE_CUDA=ON -DCMAKE_BUILD_TYPE=Release请注意,如果您遇到libnvcuvid.so的问题(例如,参见#102),可能是由于libnvcuvid.so的链接丢失,您可以手动找到它(ldconfig -p | grep libnvcuvid)并将库链接到CUDA_TOOLKIT_ROOT_DIR\lib64以允许decord顺利检测并链接正确的库。
要指定自定义FFMPEG库路径,请使用'-DFFMPEG_DIR=/path/to/ffmpeg"。
安装python绑定:
shell
cd ../python
# option 1: add python path to $PYTHONPATH, you will need to install numpy separately
pwd=$PWD
echo "PYTHONPATH=$PYTHONPATH:$pwd" >> ~/.bashrc
source ~/.bashrc
# option 2: install with setuptools
python3 setup.py install --user
2.2 macOS
macOS上的安装类似于Linux。但是macOS用户需要先安装clang、GNU Make、cmake等构建工具。
clang和GNU Make等工具打包在macOS的命令行工具中。要安装:
xcode-select --install要安装其他需要的包,如cmake,我们建议首先安装Homebrew,它是macOS的流行包管理器。详细说明可以在其主页上找到。
安装Homebrew后,通过以下方式安装cmake和ffmpeg:
shell
brew install cmake ffmpeg
# note: make sure you have cmake 3.8 or later, you can install from cmake official website if it's too old
递归克隆repo(重要)
shell
git clone --recursive https://github.com/dmlc/decord然后转到根目录构建共享库:
shell
cd decord
mkdir build && cd build
cmake .. -DCMAKE_BUILD_TYPE=Release
make
安装python绑定:
shell
cd ../python
# option 1: add python path to $PYTHONPATH, you will need to install numpy separately
pwd=$PWD
echo "PYTHONPATH=$PYTHONPATH:$pwd" >> ~/.bash_profile
source ~/.bash_profile

# option 2: install with setuptools
python3 setup.py install --user
2.3 Windows
对于windows,您将需要CMake和Visual Studio进行C++编译。
- 首先安装
git、cmake、ffmpeg和python,可以使用Chocolatey管理类似Linux/Mac OS的包。 - 第二,安装
Visual Studio 2017 Community,这我需要一些时间。
依赖项准备就绪后,打开命令行提示符:
shell
cd your-workspace
git clone --recursive https://github.com/dmlc/decord
cd decord
mkdir build
cd build
cmake -DCMAKE_CXX_FLAGS="/DDECORD_EXPORTS" -DCMAKE_CONFIGURATION_TYPES="Release" -G "Visual Studio 15 2017 Win64" ..
# open `decord.sln` and build project
三、用法
Decord为引导提供了最小的API集。您还可以查看jupyter笔记本示例。
1、VideoReader
VideoReader用于直接从视频文件中访问帧。
python
from decord import VideoReader
from decord import cpu, gpu

vr = VideoReader('examples/flipping_a_pancake.mkv', ctx=cpu(0))

# a file like object works as well, for in-memory decoding
with open('examples/flipping_a_pancake.mkv', 'rb') as f:
  vr = VideoReader(f, ctx=cpu(0))
print('video frames:', len(vr))

# 1. the simplest way is to directly access frames
for i in range(len(vr)):
    # the video reader will handle seeking and skipping in the most efficient manner
    frame = vr[i]
    print(frame.shape)

# To get multiple frames at once, use get_batch
# this is the efficient way to obtain a long list of frames
frames = vr.get_batch([1, 3, 5, 7, 9])
print(frames.shape)
# (5, 240, 320, 3)

# duplicate frame indices will be accepted and handled internally to avoid duplicate decoding
frames2 = vr.get_batch([1, 2, 3, 2, 3, 4, 3, 4, 5]).asnumpy()
print(frames2.shape)
# (9, 240, 320, 3)

# 2. you can do cv2 style reading as well
# skip 100 frames
vr.skip_frames(100)

# seek to start
vr.seek(0)
batch = vr.next()
print('frame shape:', batch.shape)
print('numpy frames:', batch.asnumpy())
2、VideoLoader
VideoLoader专为训练具有大量视频文件的深度学习模型而设计。它提供智能视频洗牌技术,以提供高随机访问性能(我们知道在视频中寻找是超级慢和冗余的)。优化隐藏在用户不可见的C++代码中。
python
from decord import VideoLoader
from decord import cpu, gpu

vl = VideoLoader(['1.mp4', '2.avi', '3.mpeg'], ctx=[cpu(0)], shape=(2, 320, 240, 3), interval=1, skip=5, shuffle=1)
print('Total batches:', len(vl))

for batch in vl:
    print(batch[0].shape)
Shuffling 视频可能很棘手,因此我们提供各种模式:
shell
shuffle = -1  # smart shuffle mode, based on video properties, (not implemented yet)
shuffle = 0  # all sequential, no seeking, following initial filename order
shuffle = 1  # random filename order, no random access for each video, very efficient
shuffle = 2  # random order
shuffle = 3  # random frame access in each video only
3、AudioReader
AudioReader用于直接从视频(如果有音轨)和音频文件中访问样本。
python
from decord import AudioReader
from decord import cpu, gpu

# You can specify the desired sample rate and channel layout
# For channels there are two options: default to the original layout or mono
ar = AudioReader('example.mp3', ctx=cpu(0), sample_rate=44100, mono=False)
print('Shape of audio samples: ', ar.shape())
# To access the audio samples
print('The first sample: ', ar[0])
print('The first five samples: ', ar[0:5])
print('Get a batch of samples: ', ar.get_batch([1,3,5]))
4、AVReader
AVReader是AudioReader和VideoReader的包装器。它使您能够同时切片视频和音频。
python
from decord import AVReader
from decord import cpu, gpu

av = AVReader('example.mov', ctx=cpu(0))
# To access both the video frames and corresponding audio samples
audio, video = av[0:20]
# Each element in audio will be a batch of samples corresponding to a frame of video
print('Frame #: ', len(audio))
print('Shape of the audio samples of the first frame: ', audio[0].shape)
print('Shape of the first frame: ', video.asnumpy()[0].shape)
# Similarly, to get a batch
audio2, video2 = av.get_batch([1,3,5])
四、深度学习框架的桥梁:
有一个从decord到流行的深度学习框架的桥梁对于训练/推理很重要
- Apache MXNet(完成)
- Pytorch(完成)
- TensorFlow(完成)
将桥接器用于深度学习框架很简单,例如,可以将默认张量输出设置为mxnet.ndarray:
python
import decord
vr = decord.VideoReader('examples/flipping_a_pancake.mkv')
print('native output:', type(vr[0]), vr[0].shape)
# native output: <class 'decord.ndarray.NDArray'>, (240, 426, 3)
# you only need to set the output type once
decord.bridge.set_bridge('mxnet')
print(type(vr[0], vr[0].shape))
# <class 'mxnet.ndarray.ndarray.NDArray'> (240, 426, 3)
# or pytorch and tensorflow(>=2.2.0)
decord.bridge.set_bridge('torch')
decord.bridge.set_bridge('tensorflow')
# or back to decord native format
decord.bridge.set_bridge('native')
2025-01-07(二)