1. 引言
随着人工智能技术的飞速发展,大语言模型(Large Language Models, LLMs)已经成为当前AI领域最引人注目的技术突破。从GPT系列、LLaMA到国内的文心一言、通义千问等,这些模型展现了强大的语言理解和生成能力,正在改变各行各业的工作方式。
然而,通用大模型在面对特定行业或企业场景时,往往需要进一步优化和调整,以更好地满足业务需求。这就涉及到大模型微调、提示词工程、多模态应用以及企业级解决方案等一系列关键技术。本文将深入探讨这些技术,并结合代码示例、图表和应用案例,为读者提供全面的技术指南。
1.1 大语言模型的发展现状
大语言模型的发展经历了从预训练到微调、从单一模态到多模态、从通用到专业化的演进过程。近年来,模型规模不断扩大,能力持续增强,应用场景也日益丰富。
1.2 企业级应用的重要性
在企业环境中,大模型不仅需要具备强大的技术能力,还需要满足安全性、可靠性、可扩展性和成本效益等多重要求。因此,构建企业级大模型解决方案已成为企业数字化转型的关键环节。
1.3 文章结构概述
本文将首先介绍大模型微调技术,包括基本概念、实现方法和最佳实践;然后探讨提示词工程的核心原理和技巧;接着分析多模态大模型的应用和发展;最后,详细阐述企业级解决方案的设计与实施。通过理论结合实践的方式,帮助读者全面掌握大模型应用的关键技术。
2. 大模型微调技术
2.1 微调的基本概念和原理
大模型微调(Fine-tuning)是指在预训练模型的基础上,使用特定领域或任务的数据进行进一步训练,使模型能够更好地适应特定场景或任务的过程。微调的原理是通过调整模型的参数,使其在特定任务上的性能得到提升。
微调的优势在于:
- 降低训练成本:相比从头训练,微调需要的计算资源显著减少
- 提高模型性能:针对特定任务优化的模型通常表现更好
- 快速适应新场景:能够快速将通用模型应用于特定领域
2.2 全参数微调与参数高效微调
2.2.1 全参数微调(Full Fine-tuning)
全参数微调是指微调过程中更新模型的所有参数。这种方法通常能获得最佳性能,但计算成本高,需要大量GPU资源。
import torch
from transformers import AutoModelForCausalLM, AutoTokenizer, TrainingArguments, Trainer

# 加载预训练模型和分词器
model_name = "gpt2-medium"
model = AutoModelForCausalLM.from_pretrained(model_name)
tokenizer = AutoTokenizer.from_pretrained(model_name)

# 准备数据集
train_dataset = [...]  # 自定义训练数据集

# 设置训练参数
training_args = TrainingArguments(
    output_dir="./results",
    num_train_epochs=3,
    per_device_train_batch_size=4,
    save_steps=10_000,
    save_total_limit=2,
    logging_dir='./logs',
    logging_steps=500,
)

# 创建训练器
trainer = Trainer(
    model=model,
    args=training_args,
    train_dataset=train_dataset,
)

# 开始微调
trainer.train()
2.2.2 参数高效微调(Parameter-Efficient Fine-Tuning, PEFT)
参数高效微调技术通过只更新模型的一小部分参数,大幅降低微调的计算成本。常见的PEFT方法包括:
- LoRA (Low-Rank Adaptation):将权重更新分解为低秩矩阵
- Prefix Tuning:优化输入的前缀表示
- P-Tuning v2:可提示的提示调优
- Adapter Tuning:在模型层之间添加小型适配器
以下是LoRA微调的代码示例:
from peft import LoraConfig, get_peft_model, TaskType

# 配置LoRA参数
lora_config = LoraConfig(
    r=8,  # 低秩矩阵的维度
    lora_alpha=32,  # 缩放因子
    target_modules=["q_proj", "v_proj"],  # 应用LoRA的层
    lora_dropout=0.05,
    bias="none",
    task_type=TaskType.CAUSAL_LM
)

# 应用LoRA配置
peft_model = get_peft_model(model, lora_config)

# 打印可训练参数
peft_model.print_trainable_parameters()
2.3 微调的数据准备和评估
2.3.1 数据准备
高质量的数据是微调成功的关键。数据准备包括数据收集、清洗、标注和格式化等步骤。
import pandas as pd
from sklearn.model_selection import train_test_split

# 加载数据
data = pd.read_csv("custom_dataset.csv")

# 数据清洗
data = data.dropna()
data = data[data['text'].str.len() > 10]  # 过滤掉过短的文本

# 数据划分
train_data, val_data = train_test_split(data, test_size=0.2, random_state=42)

# 保存处理后的数据
train_data.to_csv("train_data.csv", index=False)
val_data.to_csv("val_data.csv", index=False)
2.3.2 模型评估
微调完成后,需要对模型进行评估,以确保其在特定任务上的性能。
import numpy as np
from sklearn.metrics import accuracy_score, precision_recall_fscore_support

def compute_metrics(eval_pred):
    logits, labels = eval_pred
    predictions = np.argmax(logits, axis=-1)

    # 计算各项指标
    accuracy = accuracy_score(labels, predictions)
    precision, recall, f1, _ = precision_recall_fscore_support(
        labels, predictions, average='weighted'
    )

    return {
        "accuracy": accuracy,
        "precision": precision,
        "recall": recall,
        "f1": f1,
    }
2.4 微调的挑战和解决方案
2.4.1 挑战
- 过拟合:模型在训练集上表现良好,但在测试集上表现不佳
- 灾难性遗忘:微调后模型在原始任务上的性能下降
- 计算资源限制:全参数微调需要大量计算资源
- 数据质量:标注数据的质量和数量有限
2.4.2 解决方案
-
正则化技术:使用Dropout、权重衰减等防止过拟合
-
持续学习:设计训练策略,避免灾难性遗忘
-
参数高效微调:使用LoRA等PEFT方法减少计算需求
-
数据增强:通过同义词替换、回译等技术扩充数据集
使用正则化的训练参数
training_args = TrainingArguments(
output_dir="./results",
num_train_epochs=3,
per_device_train_batch_size=4,
save_steps=10_000,
save_total_limit=2,
logging_dir='./logs',
logging_steps=500,
# 添加正则化参数
weight_decay=0.01,
# 添加早停策略
load_best_model_at_end=True,
metric_for_best_model="f1",
greater_is_better=True,
evaluation_strategy="epoch",
)
3. 提示词工程
3.1 提示词设计的基本原则
提示词工程(Prompt Engineering)是通过精心设计输入提示,引导大模型生成更符合期望输出的技术。有效的提示词设计应遵循以下原则:
- 明确性:清晰表达任务需求和期望输出格式
- 简洁性:避免冗余信息,突出关键内容
- 上下文丰富:提供足够的背景信息
- 结构化:使用模板或结构化格式组织提示词
3.2 提示词结构设计
3.2.1 基本提示词结构
角色: [明确模型应扮演的角色]
任务: [清晰描述需要完成的任务]
背景: [提供相关的背景信息]
要求: [列出具体的要求和限制]
示例: [提供输入输出的示例]
输出格式: [指定输出的格式和结构]
3.2.2 代码示例
def create_prompt(role, task, context, requirements, examples=None, output_format=None):
    prompt = f"角色: {role}\n"
    prompt += f"任务: {task}\n"
    prompt += f"背景: {context}\n"
    prompt += f"要求: {requirements}\n"

    if examples:
        prompt += "示例:\n"
        for example in examples:
            prompt += f"输入: {example['input']}\n"
            prompt += f"输出: {example['output']}\n"

    if output_format:
        prompt += f"输出格式: {output_format}\n"

    return prompt

# 使用示例
role = "专业客服代表"
task = "回答客户关于产品使用的问题"
context = "客户购买了我们的智能手表,但无法连接手机"
requirements = "提供简洁明了的解答,避免使用技术术语"
examples = [
    {
        "input": "我的智能手表无法连接手机",
        "output": "请确保您的手机蓝牙已开启,然后在手表设置中选择'添加设备'并按照提示操作。"
    }
]
output_format = "以句子形式回答,不超过50个字"

prompt = create_prompt(role, task, context, requirements, examples, output_format)
print(prompt)
3.3 少样本提示和思维链
3.3.1 少样本提示(Few-shot Prompting)
少样本提示通过提供几个示例,帮助模型理解任务模式,从而提高输出质量。
few_shot_prompt = """
以下是一些将英文翻译成中文的示例:

英文: Hello, how are you?
中文: 你好,你好吗?

英文: What is the weather like today?
中文: 今天天气怎么样?

英文: I would like to order a pizza.
中文: 我想点一个披萨。

英文: The meeting has been postponed to next Monday.
中文:
"""

# 调用模型生成翻译结果
response = model.generate(few_shot_prompt)
print(response)  # 输出: 会议已推迟到下周一。
3.3.2 思维链(Chain-of-Thought, CoT)
思维链提示通过引导模型逐步思考复杂问题,提高推理能力。
cot_prompt = """
让我们一步步解决以下数学问题:

问题: 一个商店有15个苹果,第一天卖出了5个,第二天又买进了8个,第三天卖出了7个。商店现在有多少个苹果?

第一步:计算第一天卖出后的苹果数量
15 - 5 = 10个

第二步:计算第二天买进后的苹果数量
10 + 8 = 18个

第三步:计算第三天卖出后的苹果数量
18 - 7 = 11个

所以,商店现在有11个苹果。

问题: 一个班级有30名学生,其中12名是男生,剩下的都是女生。如果女生中有3/4戴眼镜,那么有多少女生戴眼镜?

让我们一步步解决这个问题:
"""

response = model.generate(cot_prompt)
print(response)
3.4 提示词优化技巧
3.4.1 提示词迭代优化
提示词优化是一个迭代过程,需要不断测试和改进。
def prompt_optimization_loop(initial_prompt, test_cases, evaluation_criteria, max_iterations=5):
    current_prompt = initial_prompt
    best_prompt = initial_prompt
    best_score = 0

    for i in range(max_iterations):
        # 测试当前提示词
        scores = []
        for test_case in test_cases:
            response = model.generate(current_prompt + test_case["input"])
            score = evaluate_response(response, test_case["expected"], evaluation_criteria)
            scores.append(score)

        avg_score = sum(scores) / len(scores)

        # 更新最佳提示词
        if avg_score > best_score:
            best_score = avg_score
            best_prompt = current_prompt

        # 根据评估结果调整提示词
        current_prompt = adjust_prompt(current_prompt, scores, test_cases)

        print(f"迭代 {i+1}: 平均得分 {avg_score:.2f}")

    return best_prompt

# 示例使用
initial_prompt = "请将以下文本翻译成英文:"
test_cases = [
    {"input": "今天天气真好", "expected": "The weather is really nice today"},
    {"input": "我喜欢读书", "expected": "I like reading books"}
]
evaluation_criteria = ["准确性", "流畅性", "语法正确性"]

best_prompt = prompt_optimization_loop(initial_prompt, test_cases, evaluation_criteria)
print(f"优化后的提示词: {best_prompt}")
3.4.2 自动提示词优化工具
可以使用自动化的工具来帮助优化提示词。
from auto_prompt_optimizer import AutoPromptOptimizer

# 创建自动提示词优化器
optimizer = AutoPromptOptimizer(
    model=model,
    evaluation_metric="bleu",
    search_algorithm="grid_search",
    max_iterations=10
)

# 定义搜索空间
prompt_template = "请将以下{language}文本翻译成{target_language}:{text}"
search_space = {
    "language": ["中文", "英文"],
    "target_language": ["英文", "中文"],
    "text": ["示例文本1", "示例文本2"]
}

# 运行优化
best_prompt, best_score = optimizer.optimize(prompt_template, search_space)
print(f"最佳提示词: {best_prompt}")
print(f"最佳得分: {best_score}")
4. 多模态大模型应用
4.1 多模态基础概念
多模态大模型是指能够同时处理和理解多种类型数据(如文本、图像、音频、视频等)的人工智能模型。与单模态模型相比,多模态模型能够更好地模拟人类的感知和理解能力,提供更丰富的交互体验。
多模态融合技术主要包括:
- 早期融合(Early Fusion):在输入层将不同模态的信息结合
- 晚期融合(Late Fusion):在输出层整合不同模态的结果
- 中间融合(Intermediate Fusion):在模型的中间层进行信息交互
4.2 视觉-语言模型
视觉-语言模型(Vision-Language Models, VLMs)是多模态模型中最常见的一类,能够同时理解和生成视觉和语言信息。代表性的模型包括CLIP、Flamingo、BLIP等。
4.2.1 CLIP模型示例
import torch
import clip
from PIL import Image

# 加载CLIP模型和预处理
device = "cuda" if torch.cuda.is_available() else "cpu"
model, preprocess = clip.load("ViT-B/32", device=device)

# 准备图像和文本
image = preprocess(Image.open("example.jpg")).unsqueeze(0).to(device)
text = clip.tokenize(["一张猫的照片", "一张狗的照片", "一张汽车的照片"]).to(device)

# 计算图像和文本的相似度
with torch.no_grad():
    logits_per_image, logits_per_text = model(image, text)
    probs = logits_per_image.softmax(dim=1)

# 打印结果
print("Label probs:", probs)
4.2.2 BLIP模型示例
from transformers import BlipProcessor, BlipForConditionalGeneration
import torch

# 加载BLIP模型和处理器
processor = BlipProcessor.from_pretrained("Salesforce/blip-image-captioning-base")
model = BlipForConditionalGeneration.from_pretrained("Salesforce/blip-image-captioning-base")

# 加载并预处理图像
image = Image.open("example.jpg")
inputs = processor(image, return_tensors="pt")

# 生成图像描述
with torch.no_grad():
    outputs = model.generate(**inputs)

# 解码并打印结果
caption = processor.decode(outputs[0], skip_special_tokens=True)
print(f"图像描述: {caption}")
4.3 多模态融合技术
多模态融合是多模态模型的核心技术,以下是几种常见的融合方法:
4.3.1 注意力机制融合
import torch
import torch.nn as nn
import torch.nn.functional as F

class MultimodalAttentionFusion(nn.Module):
    def __init__(self, text_dim, image_dim, fusion_dim):
        super(MultimodalAttentionFusion, self).__init__()
        self.text_proj = nn.Linear(text_dim, fusion_dim)
        self.image_proj = nn.Linear(image_dim, fusion_dim)
        self.attention = nn.MultiheadAttention(fusion_dim, num_heads=8)

    def forward(self, text_features, image_features):
        # 投影到相同维度
        text_proj = self.text_proj(text_features)
        image_proj = self.image_proj(image_features)

        # 使用注意力机制融合
        fused_features, _ = self.attention(
            text_proj.unsqueeze(0), image_proj.unsqueeze(0), image_proj.unsqueeze(0)
        )

        return fused_features.squeeze(0)

# 使用示例
fusion_layer = MultimodalAttentionFusion(text_dim=768, image_dim=2048, fusion_dim=1024)
text_features = torch.randn(10, 768)  # 假设文本特征维度为768
image_features = torch.randn(10, 2048)  # 假设图像特征维度为2048

fused_features = fusion_layer(text_features, image_features)
print(f"融合后特征维度: {fused_features.shape}")
4.3.2 跨模态Transformer
class CrossModalTransformer(nn.Module):
    def __init__(self, d_model, nhead, num_layers):
        super(CrossModalTransformer, self).__init__()
        self.encoder_layer = nn.TransformerEncoderLayer(
            d_model=d_model, nhead=nhead, dim_feedforward=2048, dropout=0.1
        )
        self.transformer_encoder = nn.TransformerEncoder(self.encoder_layer, num_layers=num_layers)

    def forward(self, text_features, image_features):
        # 合并文本和图像特征
        combined_features = torch.cat([text_features, image_features], dim=1)

        # 添加位置编码
        position_encoding = self.positional_encoding(combined_features.shape[1], combined_features.shape[2])
        combined_features = combined_features + position_encoding

        # 通过Transformer编码器
        output = self.transformer_encoder(combined_features)

        return output

    def positional_encoding(self, seq_len, d_model):
        position = torch.arange(seq_len, dtype=torch.float).unsqueeze(1)
        div_term = torch.exp(torch.arange(0, d_model, 2).float() *
                            (-math.log(10000.0) / d_model))
        pe = torch.zeros(seq_len, d_model)
        pe[:, 0::2] = torch.sin(position * div_term)
        pe[:, 1::2] = torch.cos(position * div_term)
        return pe.to(next(self.parameters()).device)

# 使用示例
transformer = CrossModalTransformer(d_model=1024, nhead=8, num_layers=6)
text_features = torch.randn(10, 5, 1024)  # batch_size=10, seq_len=5, d_model=1024
image_features = torch.randn(10, 20, 1024)  # batch_size=10, seq_len=20, d_model=1024

output = transformer(text_features, image_features)
print(f"Transformer输出维度: {output.shape}")
4.4 应用场景和案例
多模态大模型在众多领域有广泛应用,以下介绍几个典型应用场景:
4.4.1 视觉问答(Visual Question Answering, VQA)
from transformers import ViltProcessor, ViltForQuestionAnswering
import torch

# 加载VILt模型和处理器
processor = ViltProcessor.from_pretrained("dandelin/vilt-b32-finetuned-vqa")
model = ViltForQuestionAnswering.from_pretrained("dandelin/vilt-b32-finetuned-vqa")

# 准备输入
image = Image.open("example.jpg")
text = "这张图片里有什么动物?"

# 预处理输入
inputs = processor(image, text, return_tensors="pt")

# 模型推理
with torch.no_grad():
    outputs = model(**inputs)

# 获取答案
idx = outputs.logits.argmax(-1).item()
answer = model.config.id2label[idx]
print(f"问题: {text}")
print(f"答案: {answer}")
4.4.2 图像描述生成(Image Captioning)
from transformers import AutoProcessor, AutoModelForCausalLM
import torch

# 加BLIP-2模型
model_name = "Salesforce/blip2-opt-2.7b"
processor = AutoProcessor.from_pretrained(model_name)
model = AutoModelForCausalLM.from_pretrained(model_name, torch_dtype=torch.float16)

# 加载图像
image = Image.open("example.jpg")

# 生成描述
inputs = processor(image, return_tensors="pt").to(torch.float16, "cuda")
generated_ids = model.generate(**inputs)
generated_text = processor.batch_decode(generated_ids, skip_special_tokens=True)[0].strip()

print(f"图像描述: {generated_text}")
4.4.3 多模态搜索
def multimodal_search(query, image_path, text_corpus, top_k=5):
    """
    多模态搜索函数

    参数:
        query: 搜索查询文本
        image_path: 搜索图像路径
        text_corpus: 文本语料库
        top_k: 返回最相关的结果数量

    返回:
        最相关的文本和图像
    """
    # 加载CLIP模型
    model, preprocess = clip.load("ViT-B/32", device=device)

    # 处理查询图像
    query_image = preprocess(Image.open(image_path)).unsqueeze(0).to(device)

    # 处理查询文本
    query_text = clip.tokenize([query]).to(device)

    # 处理文本语料库
    text_tokens = clip.tokenize(text_corpus).to(device)

    # 计算特征
    with torch.no_grad():
        image_features = model.encode_image(query_image)
        text_features = model.encode_text(text_tokens)
        query_features = model.encode_text(query_text)

        # 计算相似度
        image_similarity = (image_features @ query_features.T).softmax(dim=-1)
        text_similarity = (text_features @ query_features.T).softmax(dim=-1)

    # 获取最相关的结果
    top_image_indices = image_similarity.argsort(descending=True)[0][:top_k]
    top_text_indices = text_similarity.argsort(descending=True)[0][:top_k]

    return {
        "top_images": [(text_corpus[i], text_similarity[0][i].item()) for i in top_text_indices],
        "top_texts": [(text_corpus[i], text_similarity[0][i].item()) for i in top_text_indices]
    }

# 使用示例
query = "海滩日落"
image_path = "query_image.jpg"
text_corpus = [
    "美丽的日落时分,天空被染成了金黄色",
    "平静的海面反射着夕阳的光芒",
    "人们在沙滩上散步,享受这宁静的时刻",
    "城市的高楼大厦在夕阳下显得格外壮观",
    "森林中的小径被夕阳照亮"
]

results = multimodal_search(query, image_path, text_corpus)
print("最相关的文本:")
for text, score in results["top_texts"]:
    print(f"{text} (相似度: {score:.4f})")
5. 企业级解决方案
5.1 企业级大模型架构设计
企业级大模型解决方案需要考虑多个方面,包括架构设计、安全性、可扩展性等。以下是一个典型的企业级大模型架构:
5.1.1 分层架构设计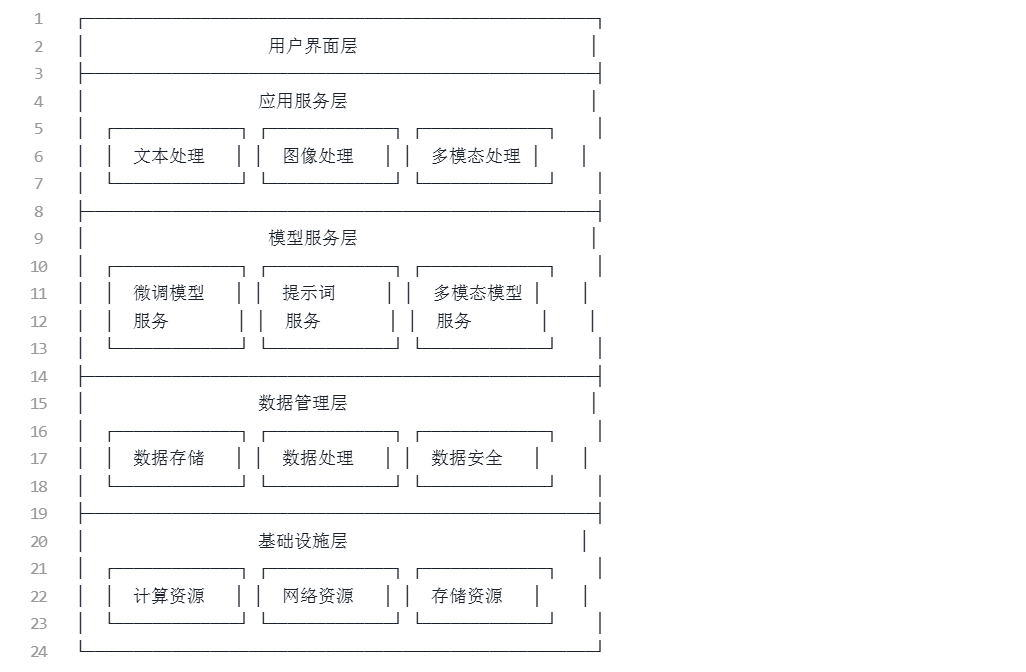
5.1.2 微服务架构实现
from fastapi import FastAPI, HTTPException
from pydantic import BaseModel
from typing import List, Optional
import torch
from transformers import AutoModelForCausalLM, AutoTokenizer

# 初始化FastAPI应用
app = FastAPI(title="企业级大模型服务", version="1.0.0")

# 加载模型
model_name = "gpt2-medium"
model = AutoModelForCausalLM.from_pretrained(model_name)
tokenizer = AutoTokenizer.from_pretrained(model_name)

# 定义请求和响应模型
class TextGenerationRequest(BaseModel):
    text: str
    max_length: Optional[int] = 100
    temperature: Optional[float] = 1.0
    top_p: Optional[float] = 0.9
    top_k: Optional[int] = 50

class TextGenerationResponse(BaseModel):
    generated_text: str
    input_length: int
    output_length: int

class ModelHealth(BaseModel):
    status: str
    model_name: str
    device: str
    memory_usage: float

@app.get("/health", response_model=ModelHealth)
async def health_check():
    """检查模型健康状态"""
    memory_allocated = torch.cuda.memory_allocated() / (1024 ** 2) if torch.cuda.is_available() else 0
    return ModelHealth(
        status="healthy",
        model_name=model_name,
        device=str(model.device),
        memory_usage=memory_allocated
    )

@app.post("/generate", response_model=TextGenerationResponse)
async def generate_text(request: TextGenerationRequest):
    """生成文本"""
    try:
        # 编码输入文本
        inputs = tokenizer(request.text, return_tensors="pt")

        # 生成文本
        with torch.no_grad():
            outputs = model.generate(
                inputs.input_ids,
                max_length=request.max_length,
                temperature=request.temperature,
                top_p=request.top_p,
                top_k=request.top_k,
                num_return_sequences=1,
                pad_token_id=tokenizer.eos_token_id
            )

        # 解码生成的文本
        generated_text = tokenizer.decode(outputs[0], skip_special_tokens=True)

        return TextGenerationResponse(
            generated_text=generated_text,
            input_length=len(inputs.input_ids[0]),
            output_length=len(outputs[0])
        )
    except Exception as e:
        raise HTTPException(status_code=500, detail=str(e))

@app.post("/batch-generate")
async def batch_generate_text(requests: List[TextGenerationRequest]):
    """批量生成文本"""
    results = []
    for req in requests:
        result = await generate_text(req)
        results.append(result)
    return results

if __name__ == "__main__":
    import uvicorn
    uvicorn.run(app, host="0.0.0.0", port=8000)
5.2 安全与隐私保护
企业级应用中,安全和隐私保护是至关重要的。以下是实现安全与隐私保护的几个关键方面:
5.2.1 数据脱敏与匿名化
import re
from typing import List

class DataAnonymizer:
    def __init__(self):
        # 定义敏感信息模式
        self.patterns = {
            'phone': r'\b\d{3}[-.]?\d{3}[-.]?\d{4}\b',
            'email': r'\b[A-Za-z0-9._%+-]+@[A-Za-z0-9.-]+\.[A-Z|a-z]{2,}\b',
            'ssn': r'\b\d{3}-\d{2}-\d{4}\b',
            'credit_card': r'\b\d{4}[- ]?\d{4}[- ]?\d{4}[- ]?\d{4}\b',
            'id_card': r'\b\d{17}[\dXx]\b'
        }

        # 替换文本
        self.replacements = {
            'phone': '[PHONE]',
            'email': '[EMAIL]',
            'ssn': '[SSN]',
            'credit_card': '[CREDIT_CARD]',
            'id_card': '[ID_CARD]'
        }

    def anonymize(self, text: str) -> str:
        """匿名化文本中的敏感信息"""
        for pattern_type, pattern in self.patterns.items():
            text = re.sub(pattern, self.replacements[pattern_type], text)
        return text

    def batch_anonymize(self, texts: List[str]) -> List[str]:
        """批量匿名化文本"""
        return [self.anonymize(text) for text in texts]

# 使用示例
anonymizer = DataAnonymizer()
sensitive_text = "我的电话是123-456-7890,邮箱是example@test.com,信用卡号是4111-1111-1111-1111。"
anonymized_text = anonymizer.anonymize(sensitive_text)
print(f"原始文本: {sensitive_text}")
print(f"匿名化后: {anonymized_text}")
5.2.2 访问控制与权限管理
from functools import wraps
from typing import Dict, List, Optional
from fastapi import HTTPException, Depends, status
from fastapi.security import HTTPBearer, HTTPAuthorizationCredentials
import jwt
from datetime import datetime, timedelta

# 初始化Bearer令牌认证
security = HTTPBearer()

class AccessControl:
    def __init__(self):
        # 定义角色权限
        self.role_permissions = {
            'admin': ['read', 'write', 'delete', 'manage_users'],
            'editor': ['read', 'write'],
            'viewer': ['read']
        }

        # 模拟用户数据库
        self.users = {
            "user1": {
                "username": "admin",
                "password": "admin123",
                "role": "admin",
                "permissions": self.role_permissions['admin']
            },
            "user2": {
                "username": "editor",
                "password": "editor123",
                "role": "editor",
                "permissions": self.role_permissions['editor']
            },
            "user3": {
                "username": "viewer",
                "password": "viewer123",
                "role": "viewer",
                "permissions": self.role_permissions['viewer']
            }
        }

        # JWT配置
        self.secret_key = "your-secret-key"
        self.algorithm = "HS256"
        self.access_token_expire_minutes = 30

    def create_access_token(self, data: dict, expires_delta: Optional[timedelta] = None):
        """创建访问令牌"""
        to_encode = data.copy()
        if expires_delta:
            expire = datetime.utcnow() + expires_delta
        else:
            expire = datetime.utcnow() + timedelta(minutes=15)
        to_encode.update({"exp": expire})
        encoded_jwt = jwt.encode(to_encode, self.secret_key, algorithm=self.algorithm)
        return encoded_jwt

    def verify_token(self, credentials: HTTPAuthorizationCredentials = Depends(security)):
        """验证令牌"""
        try:
            payload = jwt.decode(credentials.credentials, self.secret_key, algorithms=[self.algorithm])
            username: str = payload.get("sub")
            if username is None:
                raise HTTPException(
                    status_code=status.HTTP_401_UNAUTHORIZED,
                    detail="Could not validate credentials",
                    headers={"WWW-Authenticate": "Bearer"},
                )
            return username
        except jwt.PyJWTError:
            raise HTTPException(
                status_code=status.HTTP_401_UNAUTHORIZED,
                detail="Could not validate credentials",
                headers={"WWW-Authenticate": "Bearer"},
            )

    def check_permission(self, required_permission: str):
        """检查权限装饰器"""
        def decorator(func):
            @wraps(func)
            async def wrapper(*args, **kwargs):
                # 获取当前用户
                current_user = kwargs.get('current_user')
                if not current_user:
                    raise HTTPException(
                        status_code=status.HTTP_401_UNAUTHORIZED,
                        detail="Authentication required"
                    )

                # 检查权限
                if required_permission not in self.users[current_user]['permissions']:
                    raise HTTPException(
                        status_code=status.HTTP_403_FORBIDDEN,
                        detail=f"Not enough permissions. Required: {required_permission}"
                    )

                return await func(*args, **kwargs)
            return wrapper
        return decorator

# 使用示例
access_control = AccessControl()

@app.post("/login")
async def login(username: str, password: str):
    """用户登录"""
    user = None
    for user_id, user_info in access_control.users.items():
        if user_info['username'] == username and user_info['password'] == password:
            user = user_info
            break

    if not user:
        raise HTTPException(
            status_code=status.HTTP_401_UNAUTHORIZED,
            detail="Incorrect username or password",
            headers={"WWW-Authenticate": "Bearer"},
        )

    access_token_expires = timedelta(minutes=access_control.access_token_expire_minutes)
    access_token = access_control.create_access_token(
        data={"sub": user_id}, expires_delta=access_token_expires
    )
    return {"access_token": access_token, "token_type": "bearer"}

@app.get("/protected-resource")
@access_control.check_permission("read")
async def protected_resource(current_user: str = Depends(access_control.verify_token)):
    """需要读取权限的资源"""
    return {"message": "This is a protected resource", "user": current_user}
5.3 部署与扩展策略
企业级应用需要考虑如何高效部署和扩展,以满足业务需求。