目录
[1. 前期准备与兼容性检查](#1. 前期准备与兼容性检查)
[1.1 检查 GPU 兼容性](#1.1 检查 GPU 兼容性)
[1.2 安装 NVIDIA 显卡驱动](#1.2 安装 NVIDIA 显卡驱动)
[1.2.1 安装步骤](#1.2.1 安装步骤)
[1.2.2 安装结果验证](#1.2.2 安装结果验证)
[1.3 安装 CUDA Toolkit (可选)](#1.3 安装 CUDA Toolkit (可选))
[1.3.1 安装步骤](#1.3.1 安装步骤)
[1.3.2 安装结果验证](#1.3.2 安装结果验证)
[1.4 安装 Anaconda (可选但推荐)](#1.4 安装 Anaconda (可选但推荐))
[1.4.1 安装步骤](#1.4.1 安装步骤)
[1.4.2 安装结果验证](#1.4.2 安装结果验证)
[2. 安装 PyTorch GPU 版本](#2. 安装 PyTorch GPU 版本)
[2.1 创建并激活虚拟环境](#2.1 创建并激活虚拟环境)
[2.2 使用 pip 安装 PyTorch (推荐)](#2.2 使用 pip 安装 PyTorch (推荐))
[2.3 使用 Conda 安装 (替代方案)](#2.3 使用 Conda 安装 (替代方案))
[3 PyTorch GPU 版本安装结果验证](#3 PyTorch GPU 版本安装结果验证)
[4 在 IDE 中使用环境(以 PyCharm 为例)](#4 在 IDE 中使用环境(以 PyCharm 为例))
[5 性能测试](#5 性能测试)
1. 前期准备与兼容性检查
在开始安装之前,充分的准备工作是成功的关键。首先你需要确认你的硬件和系统环境是否满足要求。
1.1 检查 GPU 兼容性
PyTorch GPU 版本需要 NVIDIA 显卡并支持 CUDA。可以通过以下步骤检查:
- 打开"设备管理器"(Windows)或使用终端命令(Linux/macOS)查看显卡型号。
- 访问 NVIDIA 官网查看你的显卡是否在 CUDA 支持的 GPU 列表中(CUDA GPU Compute Capability | NVIDIA Developer)。常见的消费级显卡如 GTX 10xx系列、RTX 20/30/40系列通常都支持。
1.2 安装 NVIDIA 显卡驱动
1.2.1 安装步骤
一般的电脑都已经安装了NVIDIA 显卡驱动,通过cmd指令"nvidia-smi"可以查看显卡信息和驱动版本。如果输入以后显示"nvidia不是内部指令",则说明NVIDIA 显卡驱动未安装。
如果驱动未安装或版本过旧,你需要更新或安装最新的 NVIDIA 驱动程序:
- 访问nvidia.com/en-us/drivers/。
- 选择你的显卡型号和操作系统,下载并安装最新的驱动。
- 安装完成后,重启电脑。
1.2.2 安装结果验证
验证驱动安装:打开命令提示符(Windows),输入 nvidia-smi。如果安装成功,你将看到显卡信息、驱动版本以及支持的 最高 CUDA 版本。记下这个 CUDA 版本,后续需要安装与之兼容的 CUDA Toolkit。
1.3 安装 CUDA Toolkit (可选)
PyTorch 通常已内置所需的 CUDA 运行时库和 cuDNN,因此通常无需单独手动安装 CUDA Toolkit 和 cuDNN。仅在以下情况考虑手动安装:
- 你需要自己编译 CUDA/C++ 扩展。
- 显卡驱动版本过低,且你不想升级驱动(此时通常优先升级驱动)。
1.3.1 安装步骤
如果你确定需要手动安装 CUDA Toolkit:
- 访问 CUDA Toolkit Archive | NVIDIA Developer。
- 选择 CUDA 版本:选择与你的驱动兼容且 PyTorch 官方支持的版本(例如 PyTorch 2.5.1 支持 CUDA 11.8, 12.1, 12.4 等)。
- 下载并运行安装程序。在 Windows 上,建议选择 自定义安装,并确保勾选了 "CUDA Runtime" 和 "CUDA Development" 等核心组件。强烈建议勾选"添加到系统环境变量"的选项。
- 安装完成后,再次重启电脑以确保环境变量生效。
1.3.2 安装结果验证
验证 CUDA 安装:打开新的命令提示符或终端,输入:
python
nvcc --version如果正确输出了 CUDA 编译器的版本信息,说明安装成功。
1.4 安装 Anaconda (可选但推荐)
1.4.1 安装步骤
Anaconda 能帮助你高效管理 Python 环境和包依赖,避免版本冲突。可以通过Conda为每一个项目创建独立的虚拟环境。
1.从 Download Anaconda Distribution | Anaconda下载并安装适合你操作系统的 Anaconda 或更轻量的 Miniconda。
2.安装完成后,你可以使用 Anaconda Prompt (Windows) 来执行后续操作。
1.4.2 安装结果验证
安装完成以后,输入cmd指令来确认是否安装成功:
conda --version如果安装成功,则会显示conda的版本号。
2. 安装 PyTorch GPU 版本
完成所有准备工作后,现在可以开始安装 PyTorch 了。
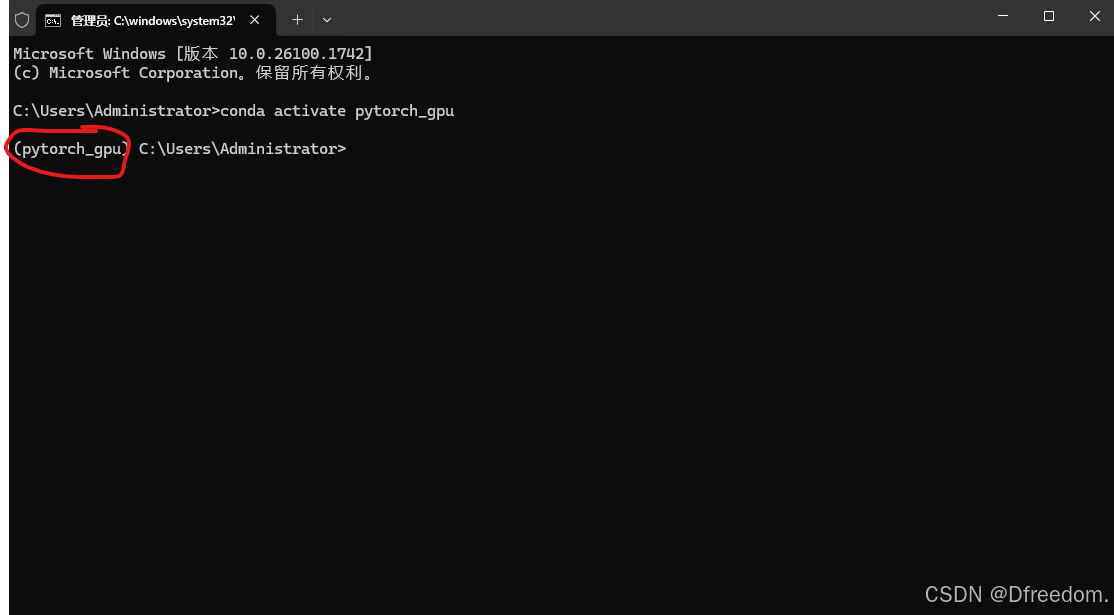
2.1 创建并激活虚拟环境
使用 Conda 创建一个独立的虚拟环境是个好习惯,可以避免项目间的包版本冲突。
# 创建一个名为 pytorch_gpu 的环境,并指定 Python 版本(如3.11)
conda create -n pytorch_gpu python=3.11

# 激活该环境
conda activate pytorch_gpu
激活以后的效果:
2.2 使用 pip 安装 PyTorch (推荐)
这是最常用和官方推荐的方法。你需要根据 nvidia-smi显示的 CUDA 版本,在Get Started获取正确的安装命令。
国内用户加速技巧:为了提升下载速度,你可以使用国内镜像源(如清华源)。但请注意,镜像站可能无法同步所有最新版本的PyTorch,若安装失败可切换回官方源。
2.3 使用 Conda 安装 (替代方案)
你也可以使用 Conda 进行安装,它能自动处理一些依赖关系。同样需要根据你的 CUDA 版本选择命令。
# 例如,安装支持 CUDA 12.1 的版本
conda install pytorch torchvision torchaudio pytorch-cuda=12.1 -c pytorch -c nvidia注意:使用 Conda 安装时,即使系统已安装全局 CUDA,Conda 也可能会在虚拟环境中重新安装一套 CUDA 相关库,可能会占用更多磁盘空间。
3 PyTorch GPU 版本安装结果验证
安装完成后,必须验证 PyTorch 是否能正确识别并使用你的 GPU。
在激活的 Conda 虚拟环境中,运行 Python 并输入以下代码:
python
import torch

# 打印 PyTorch 版本
print(f"PyTorch version: {torch.__version__}")

# 检查 CUDA 是否可用,期望返回 True
print(f"CUDA available: {torch.cuda.is_available()}")

# 如果 CUDA 可用,打印显卡信息
if torch.cuda.is_available():
    print(f"Number of GPUs: {torch.cuda.device_count()}")
    print(f"Current GPU: {torch.cuda.current_device()}")
    print(f"GPU name: {torch.cuda.get_device_name(0)}")
    print(f"CUDA version: {torch.version.cuda}")  # 查看 PyTorch 构建时使用的 CUDA 版本
预期输出:
如果一切正常,torch.cuda.is_available()将返回 True,并会显示你的显卡型号。
4 在 IDE 中使用环境(以 PyCharm 为例)
安装成功后,你可以在喜欢的 IDE 中使用配置好的环境。
- 打开 PyCharm 并创建新项目或打开现有项目。
- 进入
File>Settings>Project: [你的项目名]>Python Interpreter。 - 点击齿轮图标,选择
Add Interpreter>Conda Environment。 - 选择
Existing environment,然后指向你的 Conda 环境所在路径(通常位于Anaconda3\envs\pytorch_gpu或类似位置),选择其中的python.exe文件。 - 点击
OK。现在你的项目就可以使用 GPU 版本的 PyTorch 了。
设置界面如下:

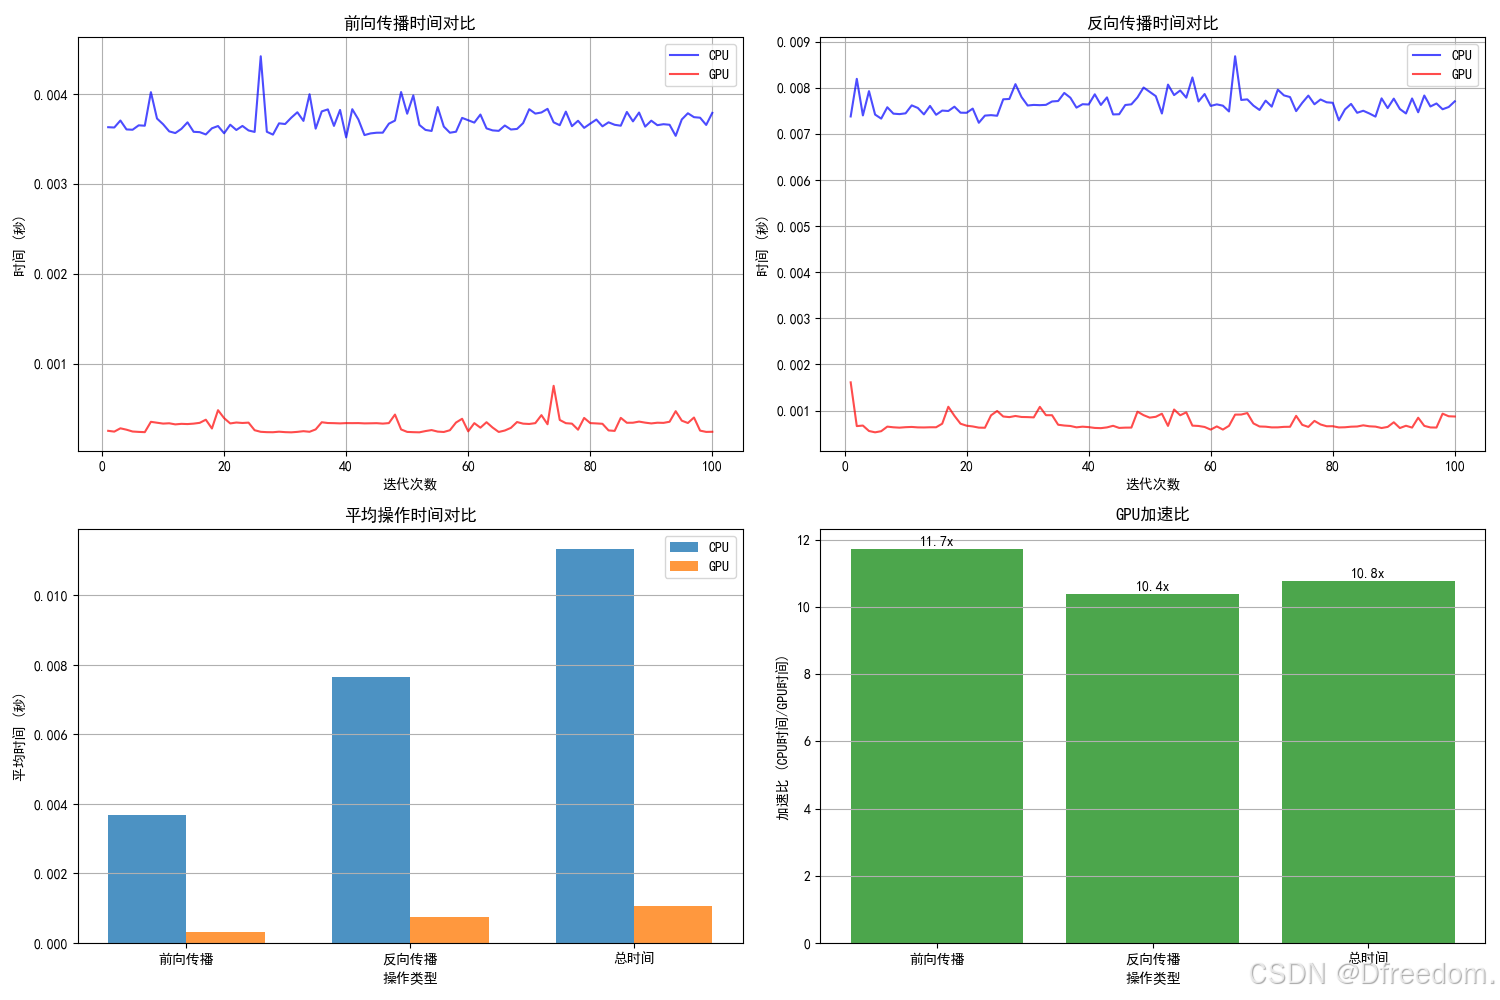
5 性能测试
通过下面这段代码可以直观感受一下CPU和GPU运行的速率差异。
python
import torch
import torch.nn as nn
import torch.optim as optim
import time
import matplotlib.pyplot as plt
import numpy as np
import matplotlib.pyplot as plt
plt.rcParams['font.sans-serif'] = ['SimHei']  # 设置为黑体(SimHei)或其他支持中文的字体,如 'Microsoft YaHei'(微软雅黑)
plt.rcParams['axes.unicode_minus'] = False  # 解决负号 '-' 显示为方块的问题

#---------------版本信息
# 检查 CUDA 是否可用(这是一个方法,需要括号)
print("CUDA available:", torch.cuda.is_available())
# 如果 CUDA 可用,进一步检查 cuDNN 信息
if torch.cuda.is_available():
    # 检查 cuDNN 是否启用(这是一个属性,不要括号)
    print("cuDNN enabled:", torch.backends.cudnn.enabled)
    # 获取 cuDNN 版本号(这是一个属性,不要括号)
    print("cuDNN version:", torch.backends.cudnn.version())
    # 打印当前 GPU 信息
    print(f"Number of GPUs: {torch.cuda.device_count()}")
    print(f"Current GPU: {torch.cuda.current_device()}")
    print(f"GPU name: {torch.cuda.get_device_name(0)}")
    print(f"CUDA version: {torch.version.cuda}")
print()

#----------GPU和CPU对比测试
# 设置随机种子以确保结果可重现
torch.manual_seed(42)
if torch.cuda.is_available():
    torch.cuda.manual_seed(42)

# 检查设备可用性
device_cpu = torch.device('cpu')
device_gpu = torch.device('cuda' if torch.cuda.is_available() else 'cpu')
print(f"可用设备: CPU, {device_gpu}")


# 定义一个中等复杂度的神经网络模型
class TestModel(nn.Module):
    def __init__(self, input_size=1000, hidden_size=2000, output_size=10):
        super(TestModel, self).__init__()
        self.fc1 = nn.Linear(input_size, hidden_size)
        self.relu1 = nn.ReLU()
        self.fc2 = nn.Linear(hidden_size, hidden_size)
        self.relu2 = nn.ReLU()
        self.fc3 = nn.Linear(hidden_size, hidden_size // 2)
        self.relu3 = nn.ReLU()
        self.fc4 = nn.Linear(hidden_size // 2, output_size)

    def forward(self, x):
        x = self.relu1(self.fc1(x))
        x = self.relu2(self.fc2(x))
        x = self.relu3(self.fc3(x))
        x = self.fc4(x)
        return x


# 创建模型实例
model_cpu = TestModel().to(device_cpu)
model_gpu = TestModel().to(device_gpu) if torch.cuda.is_available() else None

# 准备测试数据
batch_size = 128
input_size = 1000
num_classes = 10

# 创建输入数据和标签
x = torch.randn(batch_size, input_size)
y = torch.randint(0, num_classes, (batch_size,))

# 定义损失函数和优化器
criterion = nn.CrossEntropyLoss()


# 性能测试函数
def performance_test(model, device, x_data, y_data, num_iterations=100, num_warmup=10):
    """测试模型在指定设备上的性能"""
    # 将数据移动到对应设备
    x_device = x_data.to(device)
    y_device = y_data.to(device)

    # 创建设备专用的优化器
    optimizer = optim.SGD(model.parameters(), lr=0.01)

    # 预热阶段(让GPU完成初始化)
    print(f"正在进行 {num_warmup} 次预热迭代...")
    for _ in range(num_warmup):
        optimizer.zero_grad()
        outputs = model(x_device)
        loss = criterion(outputs, y_device)
        loss.backward()
        optimizer.step()

    if device.type == 'cuda':
        torch.cuda.synchronize()  # 等待所有CUDA操作完成

    # 正式计时阶段
    print(f"正在进行 {num_iterations} 次计时迭代...")
    forward_times = []
    backward_times = []
    total_times = []

    for _ in range(num_iterations):
        # 前向传播计时
        start_time = time.perf_counter()
        outputs = model(x_device)
        if device.type == 'cuda':
            torch.cuda.synchronize()
        forward_end = time.perf_counter()

        # 损失计算和反向传播计时
        loss = criterion(outputs, y_device)
        optimizer.zero_grad()
        loss.backward()
        optimizer.step()
        if device.type == 'cuda':
            torch.cuda.synchronize()
        backward_end = time.perf_counter()

        forward_times.append(forward_end - start_time)
        backward_times.append(backward_end - forward_end)
        total_times.append(backward_end - start_time)

    # 计算平均时间
    avg_forward = sum(forward_times) / num_iterations
    avg_backward = sum(backward_times) / num_iterations
    avg_total = sum(total_times) / num_iterations

    return avg_forward, avg_backward, avg_total, forward_times, backward_times


# 运行CPU测试
print("=" * 50)
print("开始在CPU上测试性能...")
cpu_forward, cpu_backward, cpu_total, cpu_fw_times, cpu_bw_times = performance_test(
    model_cpu, device_cpu, x, y, num_iterations=100, num_warmup=10
)

print(f"CPU平均前向时间: {cpu_forward:.6f}秒")
print(f"CPU平均反向时间: {cpu_backward:.6f}秒")
print(f"CPU平均总时间: {cpu_total:.6f}秒")

# 运行GPU测试(如果可用)
gpu_forward, gpu_backward, gpu_total = 0, 0, 0
gpu_fw_times, gpu_bw_times = [], []

if torch.cuda.is_available():
    print("=" * 50)
    print("开始在GPU上测试性能...")
    gpu_forward, gpu_backward, gpu_total, gpu_fw_times, gpu_bw_times = performance_test(
        model_gpu, device_gpu, x, y, num_iterations=100, num_warmup=10
    )

    print(f"GPU平均前向时间: {gpu_forward:.6f}秒")
    print(f"GPU平均反向时间: {gpu_backward:.6f}秒")
    print(f"GPU平均总时间: {gpu_total:.6f}秒")

    # 计算加速比
    speedup_forward = cpu_forward / gpu_forward
    speedup_backward = cpu_backward / gpu_backward
    speedup_total = cpu_total / gpu_total

    print("=" * 50)
    print("性能加速比 (CPU时间/GPU时间):")
    print(f"前向传播加速比: {speedup_forward:.2f}x")
    print(f"反向传播加速比: {speedup_backward:.2f}x")
    print(f"总加速比: {speedup_total:.2f}x")
else:
    print("GPU不可用,跳过GPU测试")

# 可视化结果
plt.figure(figsize=(15, 10))

# 前向传播时间对比
plt.subplot(2, 2, 1)
iterations = range(1, 101)
plt.plot(iterations, cpu_fw_times, 'b-', alpha=0.7, label='CPU')
if torch.cuda.is_available():
    plt.plot(iterations, gpu_fw_times, 'r-', alpha=0.7, label='GPU')
plt.xlabel('迭代次数')
plt.ylabel('时间 (秒)')
plt.title('前向传播时间对比')
plt.legend()
plt.grid(True)

# 反向传播时间对比
plt.subplot(2, 2, 2)
plt.plot(iterations, cpu_bw_times, 'b-', alpha=0.7, label='CPU')
if torch.cuda.is_available():
    plt.plot(iterations, gpu_bw_times, 'r-', alpha=0.7, label='GPU')
plt.xlabel('迭代次数')
plt.ylabel('时间 (秒)')
plt.title('反向传播时间对比')
plt.legend()
plt.grid(True)

# 平均时间柱状图
plt.subplot(2, 2, 3)
categories = ['前向传播', '反向传播', '总时间']
cpu_times = [cpu_forward, cpu_backward, cpu_total]
if torch.cuda.is_available():
    gpu_times = [gpu_forward, gpu_backward, gpu_total]

x_pos = np.arange(len(categories))
width = 0.35

plt.bar(x_pos - width / 2, cpu_times, width, label='CPU', alpha=0.8)
if torch.cuda.is_available():
    plt.bar(x_pos + width / 2, gpu_times, width, label='GPU', alpha=0.8)
plt.xlabel('操作类型')
plt.ylabel('平均时间 (秒)')
plt.title('平均操作时间对比')
plt.xticks(x_pos, categories)
plt.legend()
plt.grid(True, axis='y')

# 加速比图表(如果GPU可用)
if torch.cuda.is_available():
    plt.subplot(2, 2, 4)
    speedups = [speedup_forward, speedup_backward, speedup_total]
    plt.bar(categories, speedups, color='green', alpha=0.7)
    plt.xlabel('操作类型')
    plt.ylabel('加速比 (CPU时间/GPU时间)')
    plt.title('GPU加速比')
    for i, v in enumerate(speedups):
        plt.text(i, v + 0.1, f'{v:.1f}x', ha='center')
    plt.grid(True, axis='y')

plt.tight_layout()
plt.savefig('cpu_gpu_performance_comparison.png', dpi=300, bbox_inches='tight')
plt.show()

# 输出详细统计信息
print("=" * 50)
print("详细统计信息:")
print(f"CPU前向传播时间: 平均={cpu_forward:.6f}s, 最小={min(cpu_fw_times):.6f}s, 最大={max(cpu_fw_times):.6f}s")
print(f"CPU反向传播时间: 平均={cpu_backward:.6f}s, 最小={min(cpu_bw_times):.6f}s, 最大={max(cpu_bw_times):.6f}s")

if torch.cuda.is_available():
    print(f"GPU前向传播时间: 平均={gpu_forward:.6f}s, 最小={min(gpu_fw_times):.6f}s, 最大={max(gpu_fw_times):.6f}s")
    print(f"GPU反向传播时间: 平均={gpu_backward:.6f}s, 最小={min(gpu_bw_times):.6f}s, 最大={max(gpu_bw_times):.6f}s")

    # 输出GPU信息
    print(f"GPU设备名称: {torch.cuda.get_device_name(0)}")
    print(f"GPU内存分配: {torch.cuda.memory_allocated(0) / 1024 ** 2:.2f} MB")
    print(f"GPU缓存内存: {torch.cuda.memory_reserved(0) / 1024 ** 2:.2f} MB")
运行结果如下: