系列文章目录
目录
[1.1 先决条件](#1.1 先决条件)
[2.1 基本用法](#2.1 基本用法)
[3.1 使用SAM 3进行图像分割](#3.1 使用SAM 3进行图像分割)
[3.1.1 构建模型](#3.1.1 构建模型)
[3.1.2 文本提示](#3.1.2 文本提示)
[3.1.3 视觉提示:单个边界框](#3.1.3 视觉提示:单个边界框)
[3.1.4 视觉提示:多框提示(含正框与负框)](#3.1.4 视觉提示:多框提示(含正框与负框))
[四、基于SAM 3的视频分割与跟踪](#四、基于SAM 3的视频分割与跟踪)
[4.1 设置](#4.1 设置)
[4.1.1 推理与可视化工具](#4.1.1 推理与可视化工具)
[4.2 加载示例视频](#4.2 加载示例视频)
[4.3 在此视频上开启推理会话](#4.3 在此视频上开启推理会话)
[4.4 基于视频的文本可提示概念分割](#4.4 基于视频的文本可提示概念分割)
[4.5 移除对象](#4.5 移除对象)
[4.6 通过点位提示添加新对象](#4.6 通过点位提示添加新对象)
[4.7 通过点提示优化现有对象的分割效果](#4.7 通过点提示优化现有对象的分割效果)
[4.8 关闭会话](#4.8 关闭会话)
[4.9 清理](#4.9 清理)
[五、SAM 3 图像批量推理模块](#五、SAM 3 图像批量推理模块)
[5.1 实用工具](#5.1 实用工具)
[5.1.1 绘制功能](#5.1.1 绘制功能)
[5.1.2 批处理](#5.1.2 批处理)
[5.2 加载](#5.2 加载)
[5.3 推理过程](#5.3 推理过程)
[5.4 绘图](#5.4 绘图)
[六、SAM 3 代理](#六、SAM 3 代理)
[6.1 环境设置](#6.1 环境设置)
[6.2 构建SAM3模型](#6.2 构建SAM3模型)
[6.3 LLM 配置](#6.3 LLM 配置)
[6.3.1 设置 vLLM 服务器](#6.3.1 设置 vLLM 服务器)
[6.4 运行SAM3代理推理](#6.4 运行SAM3代理推理)
前言
SAM 3 是一款用于图像和视频可提示分割的统一基础模型。它能够通过文本或视觉提示(如点、框和遮罩)实现物体的检测、分割与追踪。相较于前代模型SAM 2,SAM 3新增了通过简短文本短语或示例对开放词汇概念进行全量分割的能力。与现有研究不同,该模型能处理规模庞大的开放词汇提示集。在包含27万个独特概念的新型SA-CO基准测试中,其表现达到人类水平的75%-80%,该基准涵盖的概念数量是现有基准的50余倍。
该存储库提供了使用Meta Segment Anything Model 3(SAM 3)进行推理和微调的代码、训练模型检查点的下载链接,以及展示模型使用方法的示例笔记本。
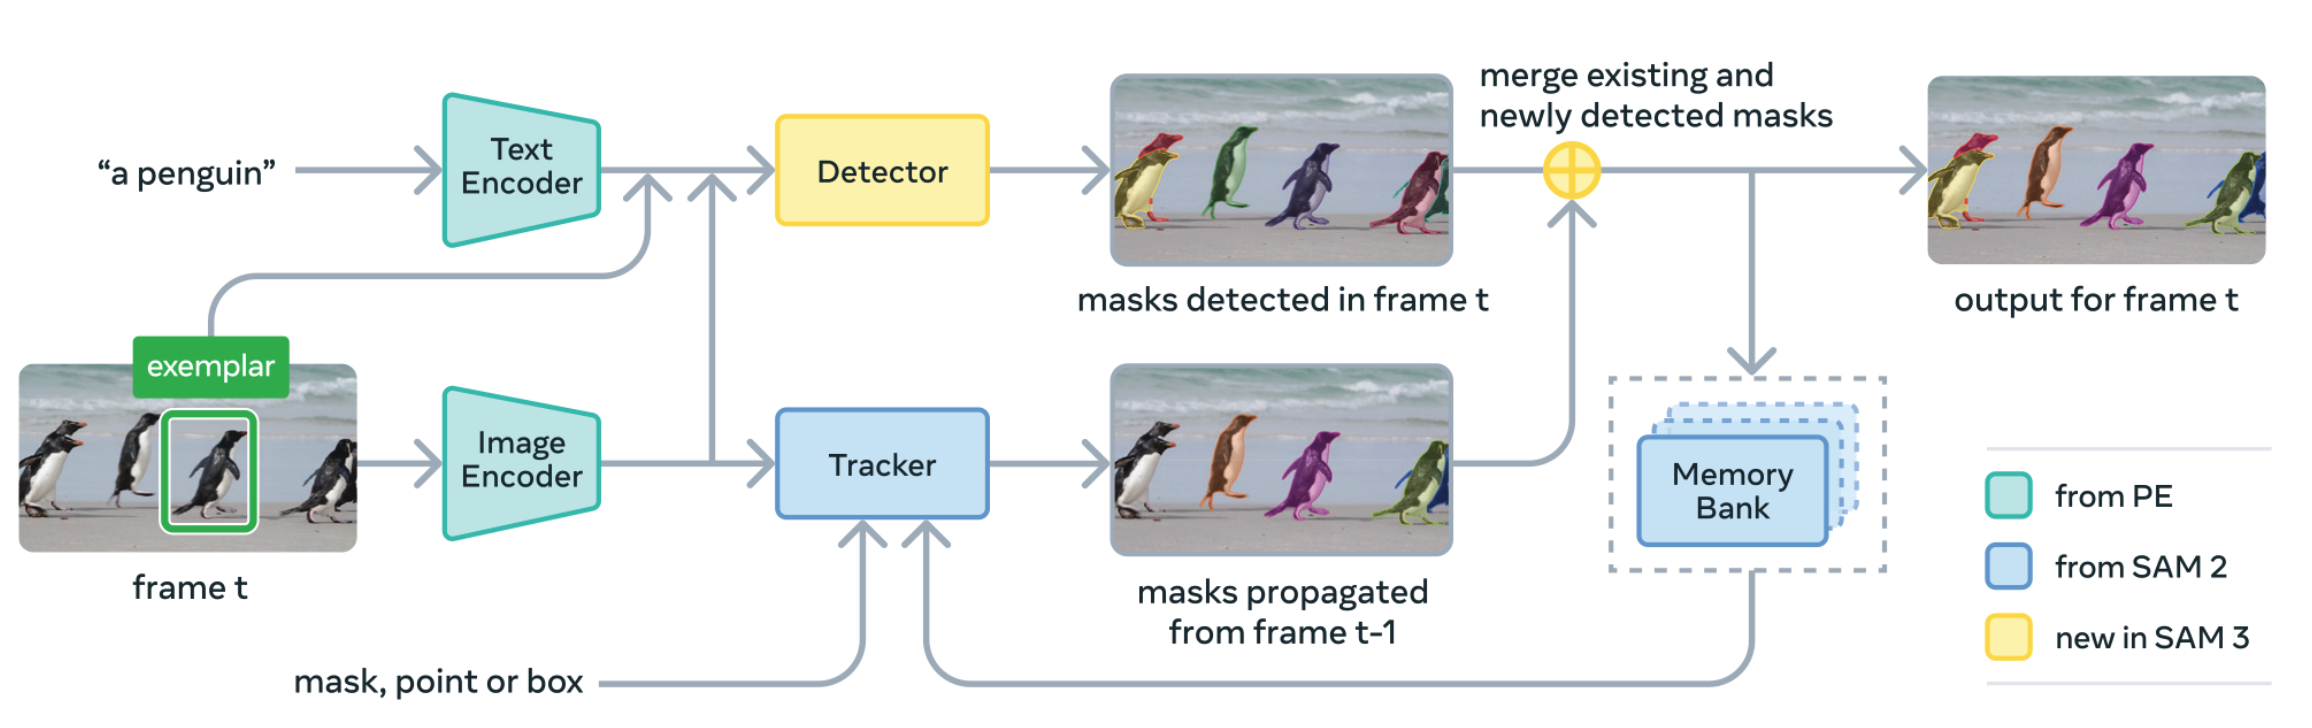
这项突破得益于创新的数据引擎,该引擎已自动标注了超过400万个独特概念,创建了迄今为止规模最大的高质量开放词汇分割数据集。此外,SAM 3引入了全新模型架构:通过引入存在标记增强了对近义文本提示的区分能力(例如"身穿白衣的球员"与"身穿红衣的球员"),并采用解耦式检测器-追踪器设计,有效降低任务干扰并实现数据规模下的高效扩展。
一、安装
1.1 先决条件
- Python 3.12 或更高版本
- PyTorch 2.7 或更高版本
- 支持 CUDA 12.6 或更高版本的 CUDA 兼容 GPU
-
创建新的 Conda 环境:
bashconda create -n sam3 python=3.12 conda deactivate conda activate sam3 -
安装支持CUDA的PyTorch:
bashpip install torch==2.7.0 torchvision torchaudio --index-url https://download.pytorch.org/whl/cu126pip install torch==2.7.0 torchvision torchaudio --index-url https://download.pytorch.org/whl/cu126 -
克隆仓库并安装包:
bashgit clone https://github.com/facebookresearch/sam3.git cd sam3 pip install -e . -
安装额外的依赖项,例如笔记本或开发环境:
bash# For running example notebooks pip install -e ".[notebooks]" # For development pip install -e ".[train,dev]"
二、入门指南
⚠️ 使用 SAM 3 之前,请先向 SAM 3 Hugging Face 仓库申请访问权限。申请通过后,您需要完成身份验证才能下载检查点。请按以下步骤操作(例如:生成访问令牌后执行 hf auth login 命令)。
2.1 基本用法
python
import torch
#################################### For Image ####################################
from PIL import Image
from sam3.model_builder import build_sam3_image_model
from sam3.model.sam3_image_processor import Sam3Processor
# Load the model
model = build_sam3_image_model()
processor = Sam3Processor(model)
# Load an image
image = Image.open("<YOUR_IMAGE_PATH.jpg>")
inference_state = processor.set_image(image)
# Prompt the model with text
output = processor.set_text_prompt(state=inference_state, prompt="<YOUR_TEXT_PROMPT>")

# Get the masks, bounding boxes, and scores
masks, boxes, scores = output["masks"], output["boxes"], output["scores"]

#################################### For Video ####################################

from sam3.model_builder import build_sam3_video_predictor

video_predictor = build_sam3_video_predictor()
video_path = "<YOUR_VIDEO_PATH>" # a JPEG folder or an MP4 video file
# Start a session
response = video_predictor.handle_request(
    request=dict(
        type="start_session",
        resource_path=video_path,
    )
)
response = video_predictor.handle_request(
    request=dict(
        type="add_prompt",
        session_id=response["session_id"],
        frame_index=0, # Arbitrary frame index
        text="<YOUR_TEXT_PROMPT>",
    )
)
output = response["outputs"]
三、示例
3.1 使用SAM 3进行图像分割
本笔记本演示如何使用SAM 3通过文本或视觉提示进行图像分割,涵盖以下功能:
- 文本提示:使用自然语言描述分割对象(例如"人"、"脸")
- 框提示:使用边界框作为示例视觉提示
python
using_colab = False
python
if using_colab:
    import torch
    import torchvision
    print("PyTorch version:", torch.__version__)
    print("Torchvision version:", torchvision.__version__)
    print("CUDA is available:", torch.cuda.is_available())
    import sys
    !{sys.executable} -m pip install opencv-python matplotlib scikit-learn
    !{sys.executable} -m pip install 'git+https://github.com/facebookresearch/sam3.git'
python
import os

import matplotlib.pyplot as plt
import numpy as np

import sam3
from PIL import Image
from sam3 import build_sam3_image_model
from sam3.model.box_ops import box_xywh_to_cxcywh
from sam3.model.sam3_image_processor import Sam3Processor
from sam3.visualization_utils import draw_box_on_image, normalize_bbox, plot_results

sam3_root = os.path.join(os.path.dirname(sam3.__file__), "..")
python
import torch

# turn on tfloat32 for Ampere GPUs
# https://pytorch.org/docs/stable/notes/cuda.html#tensorfloat-32-tf32-on-ampere-devices
torch.backends.cuda.matmul.allow_tf32 = True
torch.backends.cudnn.allow_tf32 = True

# use bfloat16 for the entire notebook
torch.autocast("cuda", dtype=torch.bfloat16).__enter__()
3.1.1 构建模型
python
bpe_path = f"{sam3_root}/assets/bpe_simple_vocab_16e6.txt.gz"
model = build_sam3_image_model(bpe_path=bpe_path)
python
image_path = f"{sam3_root}/assets/images/test_image.jpg"
image = Image.open(image_path)
width, height = image.size
processor = Sam3Processor(model, confidence_threshold=0.5)
inference_state = processor.set_image(image)
3.1.2 文本提示
python
processor.reset_all_prompts(inference_state)
inference_state = processor.set_text_prompt(state=inference_state, prompt="shoe")

img0 = Image.open(image_path)
plot_results(img0, inference_state)found 12 object(s)
3.1.3 视觉提示:单个边界框
python
# Here the box is in  (x,y,w,h) format, where (x,y) is the top left corner.
box_input_xywh = torch.tensor([480.0, 290.0, 110.0, 360.0]).view(-1, 4)
box_input_cxcywh = box_xywh_to_cxcywh(box_input_xywh)

norm_box_cxcywh = normalize_bbox(box_input_cxcywh, width, height).flatten().tolist()
print("Normalized box input:", norm_box_cxcywh)

processor.reset_all_prompts(inference_state)
inference_state = processor.add_geometric_prompt(
    state=inference_state, box=norm_box_cxcywh, label=True
)

img0 = Image.open(image_path)
image_with_box = draw_box_on_image(img0, box_input_xywh.flatten().tolist())
plt.imshow(image_with_box)
plt.axis("off")  # Hide the axis
plt.show()Normalized box input: [0.41796875, 0.6527777910232544, 0.0859375, 0.5]
python
plot_results(img0, inference_state)found 6 object(s)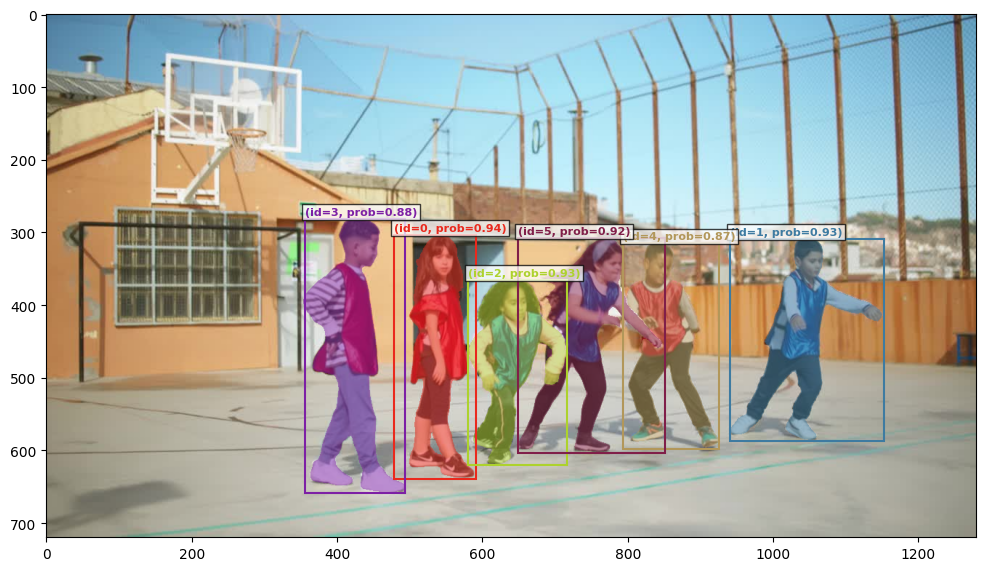
3.1.4 视觉提示:多框提示(含正框与负框)
python
box_input_xywh = [[480.0, 290.0, 110.0, 360.0], [370.0, 280.0, 115.0, 375.0]]
box_input_cxcywh = box_xywh_to_cxcywh(torch.tensor(box_input_xywh).view(-1,4))
norm_boxes_cxcywh = normalize_bbox(box_input_cxcywh, width, height).tolist()

box_labels = [True, False]

processor.reset_all_prompts(inference_state)

for box, label in zip(norm_boxes_cxcywh, box_labels):
    inference_state = processor.add_geometric_prompt(
        state=inference_state, box=box, label=label
    )

img0 = Image.open(image_path)
image_with_box = img0
for i in range(len(box_input_xywh)):
    if box_labels[i] == 1:
        color = (0, 255, 0)
    else:
        color = (255, 0, 0)
    image_with_box = draw_box_on_image(image_with_box, box_input_xywh[i], color)
plt.imshow(image_with_box)
plt.axis("off")  # Hide the axis
plt.show()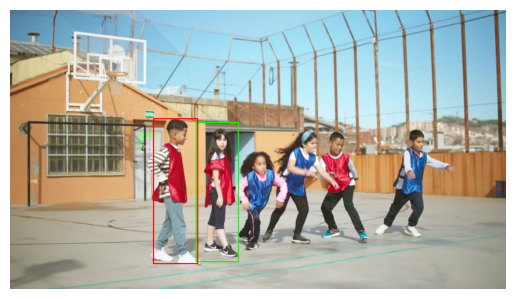
python
plot_results(img0, inference_state)found 5 object(s)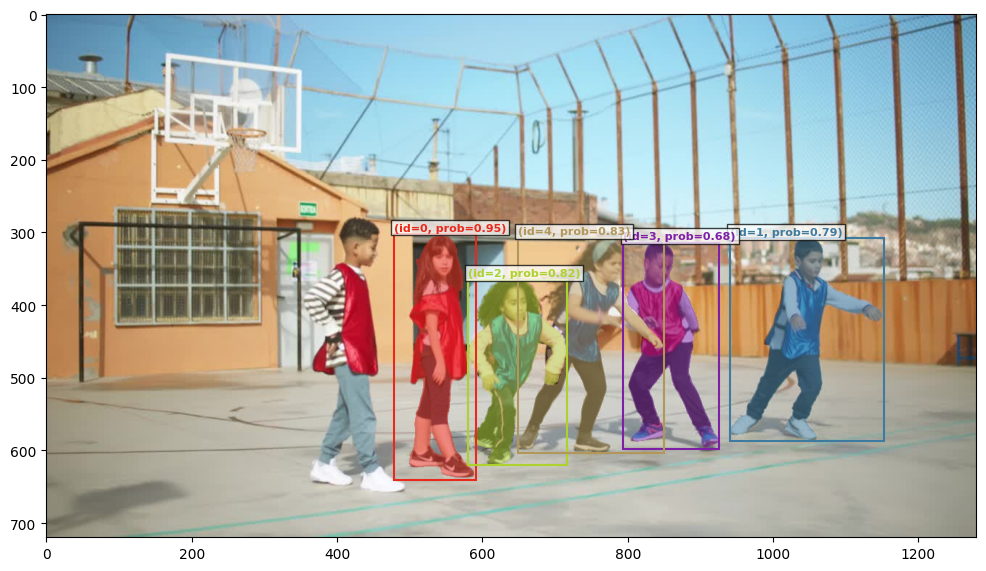
四、基于SAM 3的视频分割与跟踪
本笔记本演示如何使用 SAM 3 进行交互式视频分割与密集跟踪,涵盖以下功能:
- 文本提示:通过自然语言描述分割对象(例如"人"、"鞋子")
- 点提示:添加正/负点击点进行对象分割与精化
本指南中,"分割"或"掩膜"指模型对单帧中对象的预测结果,而"掩膜集"则指覆盖整个视频的时空掩膜。
python
using_colab = False
python
if using_colab:
    import torch
    import torchvision
    print("PyTorch version:", torch.__version__)
    print("Torchvision version:", torchvision.__version__)
    print("CUDA is available:", torch.cuda.is_available())
    import sys
    !{sys.executable} -m pip install opencv-python matplotlib scikit-learn
    !{sys.executable} -m pip install 'git+https://github.com/facebookresearch/sam3.git'
python
!nvidia-smi4.1 设置
在此示例中,我们允许在单个GPU或多个GPU上运行推理。
python
import os
import sam3
import torch

sam3_root = os.path.join(os.path.dirname(sam3.__file__), "..")

# use all available GPUs on the machine
gpus_to_use = range(torch.cuda.device_count())
# # use only a single GPU
# gpus_to_use = [torch.cuda.current_device()]
python
from sam3.model_builder import build_sam3_video_predictor

predictor = build_sam3_video_predictor(gpus_to_use=gpus_to_use)
4.1.1 推理与可视化工具
python
import glob
import os

import cv2
import matplotlib.pyplot as plt
import numpy as np
from PIL import Image
from sam3.visualization_utils import (
    load_frame,
    prepare_masks_for_visualization,
    visualize_formatted_frame_output,
)

# font size for axes titles
plt.rcParams["axes.titlesize"] = 12
plt.rcParams["figure.titlesize"] = 12


def propagate_in_video(predictor, session_id):
    # we will just propagate from frame 0 to the end of the video
    outputs_per_frame = {}
    for response in predictor.handle_stream_request(
        request=dict(
            type="propagate_in_video",
            session_id=session_id,
        )
    ):
        outputs_per_frame[response["frame_index"]] = response["outputs"]

    return outputs_per_frame


def abs_to_rel_coords(coords, IMG_WIDTH, IMG_HEIGHT, coord_type="point"):
    """Convert absolute coordinates to relative coordinates (0-1 range)

    Args:
        coords: List of coordinates
        coord_type: 'point' for [x, y] or 'box' for [x, y, w, h]
    """
    if coord_type == "point":
        return [[x / IMG_WIDTH, y / IMG_HEIGHT] for x, y in coords]
    elif coord_type == "box":
        return [
            [x / IMG_WIDTH, y / IMG_HEIGHT, w / IMG_WIDTH, h / IMG_HEIGHT]
            for x, y, w, h in coords
        ]
    else:
        raise ValueError(f"Unknown coord_type: {coord_type}")
4.2 加载示例视频
我们假设视频以JPEG帧列表形式存储(文件名格式为<frame_index>.jpg),或以MP4视频格式存储。
注意:可使用ffmpeg(https://ffmpeg.org/)提取其JPEG帧,命令如下:
bash
ffmpeg -i <your_video>.mp4 -q:v 2 -start_number 0 <输出目录>/'%05d.jpg'其中 -q:v 生成高质量JPEG帧,-start_number 0 指示ffmpeg从00000.jpg开始生成JPEG文件。
python
# "video_path" needs to be either a JPEG folder or a MP4 video file
video_path = f"{sam3_root}/assets/videos/0001"
python
# load "video_frames_for_vis" for visualization purposes (they are not used by the model)
if isinstance(video_path, str) and video_path.endswith(".mp4"):
    cap = cv2.VideoCapture(video_path)
    video_frames_for_vis = []
    while True:
        ret, frame = cap.read()
        if not ret:
            break
        video_frames_for_vis.append(cv2.cvtColor(frame, cv2.COLOR_BGR2RGB))
    cap.release()
else:
    video_frames_for_vis = glob.glob(os.path.join(video_path, "*.jpg"))
    try:
        # integer sort instead of string sort (so that e.g. "2.jpg" is before "11.jpg")
        video_frames_for_vis.sort(
            key=lambda p: int(os.path.splitext(os.path.basename(p))[0])
        )
    except ValueError:
        # fallback to lexicographic sort if the format is not "<frame_index>.jpg"
        print(
            f'frame names are not in "<frame_index>.jpg" format: {video_frames_for_vis[:5]=}, '
            f"falling back to lexicographic sort."
        )
        video_frames_for_vis.sort()
4.3 在此视频上开启推理会话
SAM 3 需要状态化推理来实现交互式视频分割,因此我们需要在此视频上初始化推理会话。
初始化过程中,它会加载所有视频帧并将像素存储在会话状态中。
python
response = predictor.handle_request(
    request=dict(
        type="start_session",
        resource_path=video_path,
    )
)
session_id = response["session_id"]
4.4 基于视频的文本可提示概念分割
使用SAM 3,您可以通过自然语言描述物体,模型将自动检测并追踪视频中所有该物体的实例。
在下面的示例中,我们在帧 0 添加文本提示并将其传播至整个视频。此处使用文本提示"person"检测视频中所有人物。SAM 3 将自动识别多人实例并为每个实例分配唯一对象 ID。
请注意首次调用可能因缓冲区初始化而较慢。测量速度时可重新运行下方所有单元格。
python
# note: in case you already ran one text prompt and now want to switch to another text prompt
# it's required to reset the session first (otherwise the results would be wrong)
_ = predictor.handle_request(
    request=dict(
        type="reset_session",
        session_id=session_id,
    )
)
python
prompt_text_str = "person"
frame_idx = 0  # add a text prompt on frame 0
response = predictor.handle_request(
    request=dict(
        type="add_prompt",
        session_id=session_id,
        frame_index=frame_idx,
        text=prompt_text_str,
    )
)
out = response["outputs"]

plt.close("all")
visualize_formatted_frame_output(
    frame_idx,
    video_frames_for_vis,
    outputs_list=[prepare_masks_for_visualization({frame_idx: out})],
    titles=["SAM 3 Dense Tracking outputs"],
    figsize=(6, 4),
)
python
# now we propagate the outputs from frame 0 to the end of the video and collect all outputs
outputs_per_frame = propagate_in_video(predictor, session_id)

# finally, we reformat the outputs for visualization and plot the outputs every 60 frames
outputs_per_frame = prepare_masks_for_visualization(outputs_per_frame)

vis_frame_stride = 60
plt.close("all")
for frame_idx in range(0, len(outputs_per_frame), vis_frame_stride):
    visualize_formatted_frame_output(
        frame_idx,
        video_frames_for_vis,
        outputs_list=[outputs_per_frame],
        titles=["SAM 3 Dense Tracking outputs"],
        figsize=(6, 4),
    )
4.5 移除对象
我们可以使用对象的ID来移除单个对象。
例如,让我们移除对象2(即前排的舞者)。
python
# we pick id 2, which is the dancer in the front
obj_id = 2
response = predictor.handle_request(
    request=dict(
        type="remove_object",
        session_id=session_id,
        obj_id=obj_id,
    )
)
python
# now we propagate the outputs from frame 0 to the end of the video and collect all outputs
outputs_per_frame = propagate_in_video(predictor, session_id)

# finally, we reformat the outputs for visualization and plot the outputs every 60 frames
outputs_per_frame = prepare_masks_for_visualization(outputs_per_frame)

vis_frame_stride = 60
plt.close("all")
for frame_idx in range(0, len(outputs_per_frame), vis_frame_stride):
    visualize_formatted_frame_output(
        frame_idx,
        video_frames_for_vis,
        outputs_list=[outputs_per_frame],
        titles=["SAM 3 Dense Tracking outputs"],
        figsize=(6, 4),
    )
4.6 通过点位提示添加新对象
我们可通过点位提示添加新对象。
假设我们改变了主意,现在想将前面那位舞者(在上一步骤中刚移除的)重新添加回来。此时可使用交互式点击将其重新添加。
python
sample_img = Image.fromarray(load_frame(video_frames_for_vis[0]))

IMG_WIDTH, IMG_HEIGHT = sample_img.size
python
# let's add back the dancer via point prompts.
# we will use a single positive click to add the dancer back.

frame_idx = 0
obj_id = 2
points_abs = np.array(
    [
        [760, 550],  # positive click
    ]
)
# positive clicks have label 1, while negative clicks have label 0
labels = np.array([1])
python
# convert points and labels to tensors; also convert to relative coordinates
points_tensor = torch.tensor(
    abs_to_rel_coords(points_abs, IMG_WIDTH, IMG_HEIGHT, coord_type="point"),
    dtype=torch.float32,
)
points_labels_tensor = torch.tensor(labels, dtype=torch.int32)

response = predictor.handle_request(
    request=dict(
        type="add_prompt",
        session_id=session_id,
        frame_index=frame_idx,
        points=points_tensor,
        point_labels=points_labels_tensor,
        obj_id=obj_id,
    )
)
out = response["outputs"]

plt.close("all")
visualize_formatted_frame_output(
    frame_idx,
    video_frames_for_vis,
    outputs_list=[prepare_masks_for_visualization({frame_idx: out})],
    titles=["SAM 3 Dense Tracking outputs"],
    figsize=(6, 4),
    points_list=[points_abs],
    points_labels_list=[labels],
)
python
# now we propagate the outputs from frame 0 to the end of the video and collect all outputs
outputs_per_frame = propagate_in_video(predictor, session_id)

# finally, we reformat the outputs for visualization and plot the outputs every 60 frames
outputs_per_frame = prepare_masks_for_visualization(outputs_per_frame)

vis_frame_stride = 60
plt.close("all")
for frame_idx in range(0, len(outputs_per_frame), vis_frame_stride):
    visualize_formatted_frame_output(
        frame_idx,
        video_frames_for_vis,
        outputs_list=[outputs_per_frame],
        titles=["SAM 3 Dense Tracking outputs"],
        figsize=(6, 4),
    )
4.7 通过点提示优化现有对象的分割效果
我们还可以通过点提示来优化现有对象的分割掩膜。
假设我们(再次)改变了主意------对于对象ID 2(即上一步刚重新添加的前排舞者),现在我们只想分割她的T恤而非全身。只需通过几次正负点击即可调整分割蒙版。
python
# For the dancer in the front, suppose now we only want to segment her T-shirt instead of her whole body
# we will use 2 positive clicks and 2 negative clicks to select her shirt.

frame_idx = 0
obj_id = 2
points_abs = np.array(
    [
        [740, 450],  # positive click
        [760, 630],  # negative click
        [840, 640],  # negative click
        [760, 550],  # positive click
    ]
)
# positive clicks have label 1, while negative clicks have label 0
labels = np.array([1, 0, 0, 1])
python
# convert points and labels to tensors; also convert to relative coordinates
points_tensor = torch.tensor(
    abs_to_rel_coords(points_abs, IMG_WIDTH, IMG_HEIGHT, coord_type="point"),
    dtype=torch.float32,
)
points_labels_tensor = torch.tensor(labels, dtype=torch.int32)

response = predictor.handle_request(
    request=dict(
        type="add_prompt",
        session_id=session_id,
        frame_index=frame_idx,
        points=points_tensor,
        point_labels=points_labels_tensor,
        obj_id=obj_id,
    )
)
out = response["outputs"]

plt.close("all")
visualize_formatted_frame_output(
    frame_idx,
    video_frames_for_vis,
    outputs_list=[prepare_masks_for_visualization({frame_idx: out})],
    titles=["SAM 3 Dense Tracking outputs"],
    figsize=(6, 4),
    points_list=[points_abs],
    points_labels_list=[labels],
)
python
# now we propagate the outputs from frame 0 to the end of the video and collect all outputs
outputs_per_frame = propagate_in_video(predictor, session_id)

# finally, we reformat the outputs for visualization and plot the outputs every 60 frames
outputs_per_frame = prepare_masks_for_visualization(outputs_per_frame)

vis_frame_stride = 60
plt.close("all")
for frame_idx in range(0, len(outputs_per_frame), vis_frame_stride):
    visualize_formatted_frame_output(
        frame_idx,
        video_frames_for_vis,
        outputs_list=[outputs_per_frame],
        titles=["SAM 3 Dense Tracking outputs"],
        figsize=(6, 4),
    )
4.8 关闭会话
每个会话都与单个视频相关联。推理完成后,我们可以关闭该会话以释放其资源。
(随后,您可以在另一个视频上启动新会话。)
python
# finally, close the inference session to free its GPU resources
# (you may start a new session on another video)
_ = predictor.handle_request(
    request=dict(
        type="close_session",
        session_id=session_id,
    )
)
4.9 清理
在完成所有推理后,我们可以关闭预测器以释放多GPU进程组。
python
# after all inference is done, we can shutdown the predictor
# to free up the multi-GPU process group
predictor.shutdown()
五、SAM 3 图像批量推理模块
python
using_colab = False
python
if using_colab:
    import torch
    import torchvision
    print("PyTorch version:", torch.__version__)
    print("Torchvision version:", torchvision.__version__)
    print("CUDA is available:", torch.cuda.is_available())
    import sys
    !{sys.executable} -m pip install opencv-python matplotlib scikit-learn
    !{sys.executable} -m pip install 'git+https://github.com/facebookresearch/sam3.git'
python
from PIL import Image
import requests
from io import BytesIO
import sam3
from sam3.train.data.collator import collate_fn_api as collate
from sam3.model.utils.misc import copy_data_to_device
import os
sam3_root = os.path.join(os.path.dirname(sam3.__file__), "..")
python
import torch
# turn on tfloat32 for Ampere GPUs
# https://pytorch.org/docs/stable/notes/cuda.html#tensorfloat-32-tf32-on-ampere-devices
torch.backends.cuda.matmul.allow_tf32 = True
torch.backends.cudnn.allow_tf32 = True

# use bfloat16 for the entire notebook. If your card doesn't support it, try float16 instead
torch.autocast("cuda", dtype=torch.bfloat16).__enter__()

# inference mode for the whole notebook. Disable if you need gradients
torch.inference_mode().__enter__()
5.1 实用工具
5.1.1 绘制功能
本节提供基础工具,用于在图像上绘制蒙版和边界蒙版
python
import sys

sys.path.append(f"{sam3_root}/examples")

from sam3.visualization_utils import plot_results
5.1.2 批处理
本节包含若干用于创建数据点的实用函数。这些函数虽为可选项,但能很好地说明数据点的创建方式。
python
from sam3.train.data.sam3_image_dataset import InferenceMetadata, FindQueryLoaded, Image as SAMImage, Datapoint
from typing import List

GLOBAL_COUNTER = 1
def create_empty_datapoint():
    """ A datapoint is a single image on which we can apply several queries at once. """
    return Datapoint(find_queries=[], images=[])

def set_image(datapoint, pil_image):
    """ Add the image to be processed to the datapoint """
    w,h = pil_image.size
    datapoint.images = [SAMImage(data=pil_image, objects=[], size=[h,w])]

def add_text_prompt(datapoint, text_query):
    """ Add a text query to the datapoint """

    global GLOBAL_COUNTER
    # in this function, we require that the image is already set.
    # that's because we'll get its size to figure out what dimension to resize masks and boxes
    # In practice you're free to set any size you want, just edit the rest of the function
    assert len(datapoint.images) == 1, "please set the image first"

    w, h = datapoint.images[0].size
    datapoint.find_queries.append(
        FindQueryLoaded(
            query_text=text_query,
            image_id=0,
            object_ids_output=[], # unused for inference
            is_exhaustive=True, # unused for inference
            query_processing_order=0,
            inference_metadata=InferenceMetadata(
                coco_image_id=GLOBAL_COUNTER,
                original_image_id=GLOBAL_COUNTER,
                original_category_id=1,
                original_size=[w, h],
                object_id=0,
                frame_index=0,
            )
        )
    )
    GLOBAL_COUNTER += 1
    return GLOBAL_COUNTER - 1

def add_visual_prompt(datapoint, boxes:List[List[float]], labels:List[bool], text_prompt="visual"):
    """ Add a visual query to the datapoint.
    The bboxes are expected in XYXY format (top left and bottom right corners)
    For each bbox, we expect a label (true or false). The model tries to find boxes that ressemble the positive ones while avoiding the negative ones
    We can also give a text_prompt as an additional hint. It's not mandatory, leave it to "visual" if you want the model to solely rely on the boxes.

    Note that the model expects the prompt to be consistent. If the text reads "elephant" but the provided boxe points to a dog, the results will be undefined.
    """

    global GLOBAL_COUNTER
    # in this function, we require that the image is already set.
    # that's because we'll get its size to figure out what dimension to resize masks and boxes
    # In practice you're free to set any size you want, just edit the rest of the function
    assert len(datapoint.images) == 1, "please set the image first"
    assert len(boxes) > 0, "please provide at least one box"
    assert len(boxes) == len(labels), f"Expecting one label per box. Found {len(boxes)} boxes but {len(labels)} labels"
    for b in boxes:
        assert len(b) == 4, f"Boxes must have 4 coordinates, found {len(b)}"

    labels = torch.tensor(labels, dtype=torch.bool).view(-1)
    if not labels.any().item() and text_prompt=="visual":
        print("Warning: you provided no positive box, nor any text prompt. The prompt is ambiguous and the results will be undefined")
    w, h = datapoint.images[0].size
    datapoint.find_queries.append(
        FindQueryLoaded(
            query_text=text_prompt,
            image_id=0,
            object_ids_output=[], # unused for inference
            is_exhaustive=True, # unused for inference
            query_processing_order=0,
            input_bbox=torch.tensor(boxes, dtype=torch.float).view(-1,4),
            input_bbox_label=labels,
            inference_metadata=InferenceMetadata(
                coco_image_id=GLOBAL_COUNTER,
                original_image_id=GLOBAL_COUNTER,
                original_category_id=1,
                original_size=[w, h],
                object_id=0,
                frame_index=0,
            )
        )
    )
    GLOBAL_COUNTER += 1
    return GLOBAL_COUNTER - 1
5.2 加载
首先加载我们的模型
python
from sam3 import build_sam3_image_model

bpe_path = f"{sam3_root}/assets/bpe_simple_vocab_16e6.txt.gz"
model = build_sam3_image_model(bpe_path=bpe_path)
然后我们的验证转换
python
from sam3.train.transforms.basic_for_api import ComposeAPI, RandomResizeAPI, ToTensorAPI, NormalizeAPI

from sam3.model.position_encoding import PositionEmbeddingSine
transform = ComposeAPI(
    transforms=[
        RandomResizeAPI(sizes=1008, max_size=1008, square=True, consistent_transform=False),
        ToTensorAPI(),
        NormalizeAPI(mean=[0.5, 0.5, 0.5], std=[0.5, 0.5, 0.5]),
    ]
)
最后是我们的后处理器
python
from sam3.eval.postprocessors import PostProcessImage
postprocessor = PostProcessImage(
    max_dets_per_img=-1,       # if this number is positive, the processor will return topk. For this demo we instead limit by confidence, see below
    iou_type="segm",           # we want masks
    use_original_sizes_box=True,   # our boxes should be resized to the image size
    use_original_sizes_mask=True,   # our masks should be resized to the image size
    convert_mask_to_rle=False, # the postprocessor supports efficient conversion to RLE format. In this demo we prefer the binary format for easy plotting
    detection_threshold=0.5,   # Only return confident detections
    to_cpu=False,
)
5.3 推理过程
推理时,我们按以下步骤进行:
- 使用上述函数逐个创建数据点。每次查询都会生成唯一ID,该ID将在后处理阶段用于检索结果
- 每个数据点必须按预处理转换规则进行转换(基本操作包括缩放至1008x1008像素、归一化)
- 随后将所有数据点整合为批次,转发至模型进行处理
python
# Image 1, we'll use two text prompts

img1 = Image.open(BytesIO(requests.get("http://images.cocodataset.org/val2017/000000077595.jpg").content))
datapoint1 = create_empty_datapoint()
set_image(datapoint1, img1)
id1 = add_text_prompt(datapoint1, "cat")
id2 = add_text_prompt(datapoint1, "laptop")

datapoint1 = transform(datapoint1)
python
# Image 2, one text prompt, some visual prompt
img2 = Image.open(BytesIO(requests.get("http://images.cocodataset.org/val2017/000000136466.jpg").content))

# img2 = Image.open(f"{sam3_root}/assets/images/test_image.jpg")
datapoint2 = create_empty_datapoint()
set_image(datapoint2, img2)
id3 = add_text_prompt(datapoint2, "pot")
# we trying to find the dials on the oven. Let's give a positive box
id4 = add_visual_prompt(datapoint2, boxes=[[ 59, 144,  76, 163]], labels=[True])
# Let's also get the oven start/stop button
id5 = add_visual_prompt(datapoint2, boxes=[[ 59, 144,  76, 163],[ 87, 148, 104, 159]], labels=[True, True])
# Next, let's try to find the pot handles. With the text prompt "handle" (vague on purpose), the model also finds the oven's handles
# We could make the text query more precise (try it!) but for this example, we instead want to leverage a negative prompt
# First, let's see what happens with just the text prompt
id6 = add_text_prompt(datapoint2, "handle")
# now the same but adding the negative prompt
id7 = add_visual_prompt(datapoint2, boxes=[[ 40, 183, 318, 204]], labels=[False], text_prompt="handle")

datapoint2 = transform(datapoint2)
python
# Collate then move to cuda
batch = collate([datapoint1, datapoint2], dict_key="dummy")["dummy"]
batch = copy_data_to_device(batch, torch.device("cuda"), non_blocking=True)
python
# Forward. Note that the first forward will be very slow due to compilation
output = model(batch)
python
processed_results = postprocessor.process_results(output, batch.find_metadatas)5.4 绘图
python
plot_results(img1, processed_results[id1])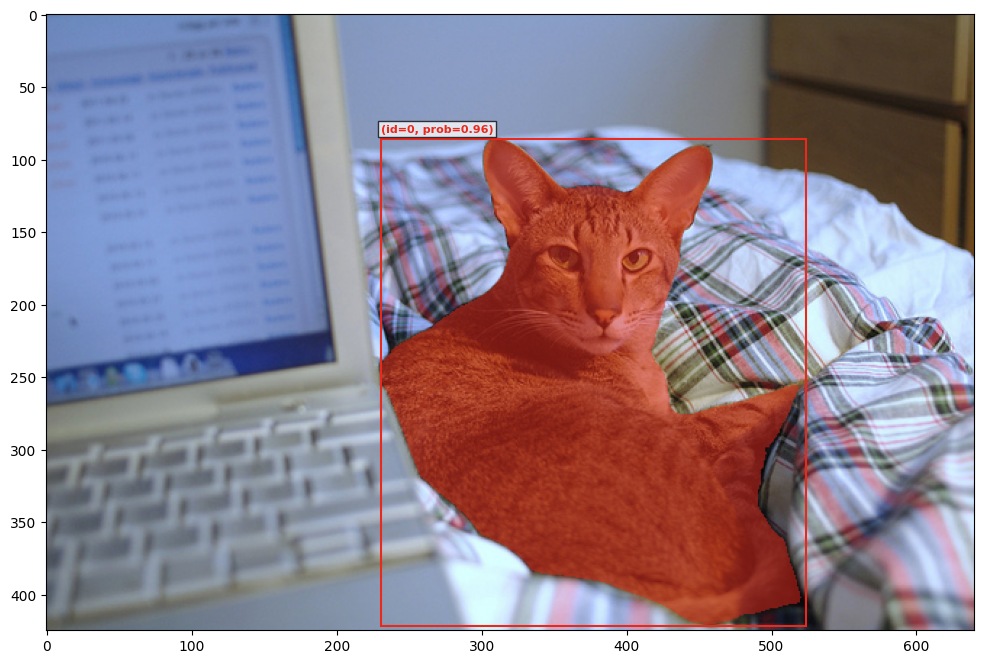
python
plot_results(img1, processed_results[id2])
python
# this is the prompt "pot"
plot_results(img2, processed_results[id3])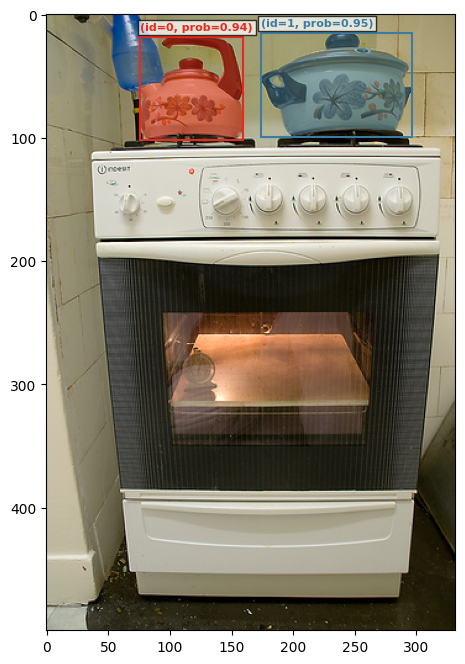
python
# This is the result of the visual prompt. We prompted for the left-most dial, the model correctly found all of them.
plot_results(img2, processed_results[id4])found 6 object(s)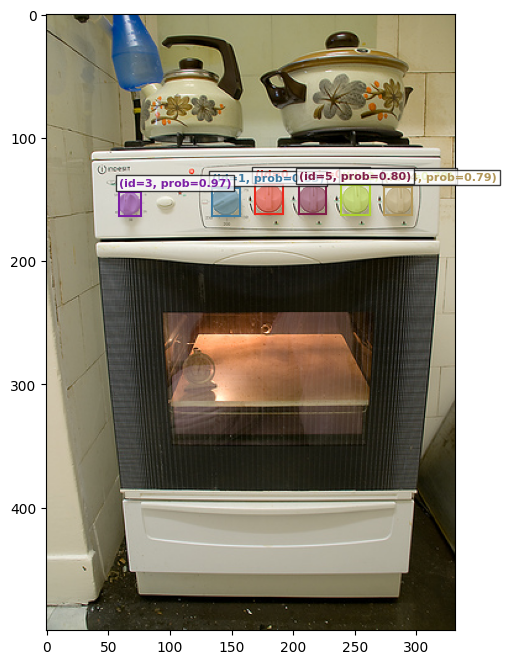
python
# This is the same as above, but we also added a prompt for the on/off switch
plot_results(img2, processed_results[id5])found 7 object(s)
python
# this is the prompt "handle". Notice the oven handles that we want to remove
plot_results(img2, processed_results[id6])found 5 object(s)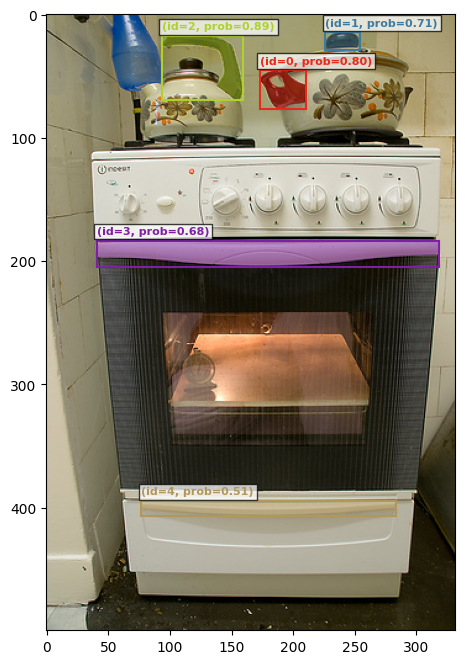
python
# This time we added the negative prompt for the oven handle and the unwanted boxes are gone
plot_results(img2, processed_results[id7])found 3 object(s)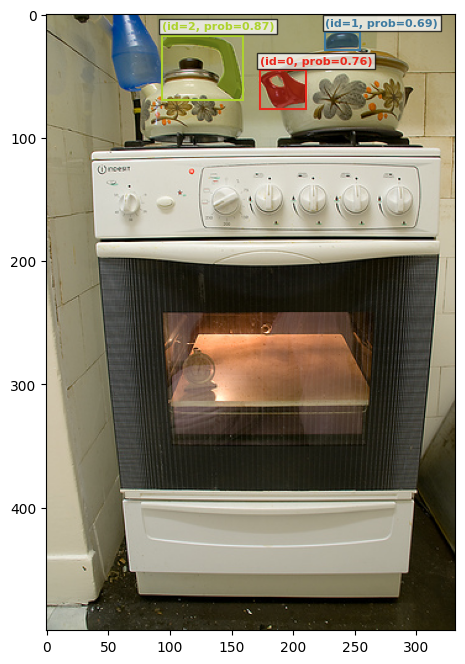
六、SAM 3 代理
本笔记本展示了一个示例,说明多语言大型语言模型如何将 SAM 3 作为工具(即"SAM 3 代理")来分割更复杂的文本查询,例如"最左侧穿着蓝色背心的小孩"。
6.1 环境设置
首先根据仓库中的安装说明在您的环境中安装 sam3。
python
import torch
# turn on tfloat32 for Ampere GPUs
# https://pytorch.org/docs/stable/notes/cuda.html#tensorfloat-32-tf32-on-ampere-devices
torch.backends.cuda.matmul.allow_tf32 = True
torch.backends.cudnn.allow_tf32 = True

# use bfloat16 for the entire notebook. If your card doesn't support it, try float16 instead
torch.autocast("cuda", dtype=torch.bfloat16).__enter__()

# inference mode for the whole notebook. Disable if you need gradients
torch.inference_mode().__enter__()
python
import os

SAM3_ROOT = os.path.dirname(os.getcwd())
os.chdir(SAM3_ROOT)

# setup GPU to use -  A single GPU is good with the purpose of this demo
os.environ["CUDA_VISIBLE_DEVICES"] = "0"
_ = os.system("nvidia-smi")
6.2 构建SAM3模型
python
import sam3
from sam3 import build_sam3_image_model
from sam3.model.sam3_image_processor import Sam3Processor

sam3_root = os.path.join(os.path.dirname(sam3.__file__), "..")
bpe_path = f"{sam3_root}/assets/bpe_simple_vocab_16e6.txt.gz"
model = build_sam3_image_model(bpe_path=bpe_path)
processor = Sam3Processor(model, confidence_threshold=0.5)
6.3 LLM 配置
配置要使用的 MLLM,它可以是您从本地机器启动的 vLLM 提供的模型,也可以是通过外部 API 提供的模型。若需使用 vLLM 模型,我们下方也提供了操作指南。
python
LLM_CONFIGS = {
    # vLLM-served models
    "qwen3_vl_8b_thinking": {
        "provider": "vllm",
        "model": "Qwen/Qwen3-VL-8B-Thinking",
    },
    # models served via external APIs
    # add your own
}

model = "qwen3_vl_8b_thinking"
LLM_API_KEY = "DUMMY_API_KEY"

llm_config = LLM_CONFIGS[model]
llm_config["api_key"] = LLM_API_KEY
llm_config["name"] = model

# setup API endpoint
if llm_config["provider"] == "vllm":
    LLM_SERVER_URL = "http://0.0.0.0:8001/v1"  # replace this with your vLLM server address as needed
else:
    LLM_SERVER_URL = llm_config["base_url"]
6.3.1 设置 vLLM 服务器
仅当您使用由 vLLM 提供的模型时才需要此步骤,若通过 Gemini 或 GPT 等 API 调用 LLM,请跳过此步骤。
-
安装vLLM(需创建独立于SAM 3的conda环境以避免依赖冲突)
bashconda create -n vllm python=3.12 pip install vllm --extra-index-url https://download.pytorch.org/whl/cu128 -
在本笔记本所在机器上启动vLLM服务器
bash# qwen 3 VL 8B thinking vllm serve Qwen/Qwen3-VL-8B-Thinking --tensor-parallel-size 4 --allowed-local-media-path / --enforce-eager --port 8001
6.4 运行SAM3代理推理
python
from functools import partial
from IPython.display import display, Image
from sam3.agent.client_llm import send_generate_request as send_generate_request_orig
from sam3.agent.client_sam3 import call_sam_service as call_sam_service_orig
from sam3.agent.inference import run_single_image_inference
python
# prepare input args and run single image inference
image = "assets/images/test_image.jpg"
prompt = "the leftmost child wearing blue vest"
image = os.path.abspath(image)
send_generate_request = partial(send_generate_request_orig, server_url=LLM_SERVER_URL, model=llm_config["model"], api_key=llm_config["api_key"])
call_sam_service = partial(call_sam_service_orig, sam3_processor=processor)
output_image_path = run_single_image_inference(
    image, prompt, llm_config, send_generate_request, call_sam_service,
    debug=True, output_dir="agent_output"
)

# display output
if output_image_path is not None:
    display(Image(filename=output_image_path))