创建工作区及Git本地仓库
版本仓库是进行版本控制的目录文件。要对文件进行版本控制,必须先创建仓库
创建空目录并初始化Git仓库
Shell
# 创建空目录(工作区)并进入
[HY@VM-24-13-centos ~]$ mkdir gitcode
[HY@VM-24-13-centos ~]$ cd gitcode

# 初始化Git仓库
[HY@VM-24-13-centos gitcode]$ git init
Initialized empty Git repository in /home/HY/gitcode/.git/

# 验证创建结果
[HY@VM-24-13-centos gitcode]$ ls -la
total 12
drwxrwxr-x  3 HY HY 4096 Nov  1 20:10 .
drwx------ 14 HY HY 4096 Nov  1 20:09 ..
drwxrwxr-x  7 HY HY 4096 Nov  1 20:10 .git
生成的
.git目录是Git用来跟踪管理仓库的核心,切勿手动修改其中的文件,否则可能破坏Git仓库。
Git仓库目录结构
Shell
[HY@VM-24-13-centos gitcode]$ tree .git/
.git/
|-- branches
|-- config                     # 仓库配置
|-- description                # 仓库描述
|-- HEAD                       # 指向当前分支
|-- hooks                      # 钩子脚本
|   |-- applypatch-msg.sample
|   |-- commit-msg.sample
|   |-- post-update.sample
|   |-- pre-applypatch.sample
|   |-- pre-commit.sample
|   |-- prepare-commit-msg.sample
|   |-- pre-push.sample
|   |-- pre-rebase.sample
|   `-- update.sample
|-- info
|   `-- exclude                # 排除模式
|-- objects                    # 对象数据库
|   |-- info
|   `-- pack
`-- refs                       # 引用
    |-- heads                  # 分支引用
    `-- tags                   # 标签引用
配置Git
安装Git后首要任务是设置用户信息,这对版本追踪至关重要。且每次提交都会记录作者信息,这在团队协作中尤为重要。
配置用户信息
Shell
# 配置用户名和邮箱
[HY@VM-24-13-centos gitcode]$ git config user.name "Your Name" [--global]
[HY@VM-24-13-centos gitcode]$ git config user.email "email@example.com" [--global]

# 查看配置
[HY@VM-24-13-centos gitcode]$ git config -l
core.repositoryformatversion=0
core.filemode=true
core.bare=false
core.logallrefupdates=true
user.name=Your Name
user.email=email@example.com

# 删除配置
[HY@VM-24-13-centos gitcode]$ git config --unset user.name [--global]
[HY@VM-24-13-centos gitcode]$ git config --unset user.email [--global]

# 把 Your Name 改成你的昵称
# 把 email@example.com 改成邮箱的格式,只要格式正确即可。
配置说明:
-
--global:全局配置,影响所有仓库 -
无
--global:仅影响当前仓库 -
重置配置时需使用与设置时相同的参数
注意 :使用了
--global的配置也需要用--global重置
认识工作区、暂存区、版本库
理解这三个核心概念是掌握 Git 工作流程的关键,它们清晰地划分了代码从编写到永久保存的完整路径,让你能够精准控制每个修改的提交时机和内容。
核心概念解析
-
工作区(worksapce) :实际编辑代码和存放文件的目录(如
gitcode) -
暂存区(stage/index) :临时存储文件改动内容的区域(位于
.git/index) -
版本库(repository) :Git的项目记忆系统(
.git目录)-
对象库(objects):存储每个版本具体修改内容的地方
-
目录库(master) :存储着各个版本的地址(用指针
HEAD维护)
-
注意 :虽然暂存区 也在
./git目录(版本库)下,但版本库不包括暂存区
关系图解
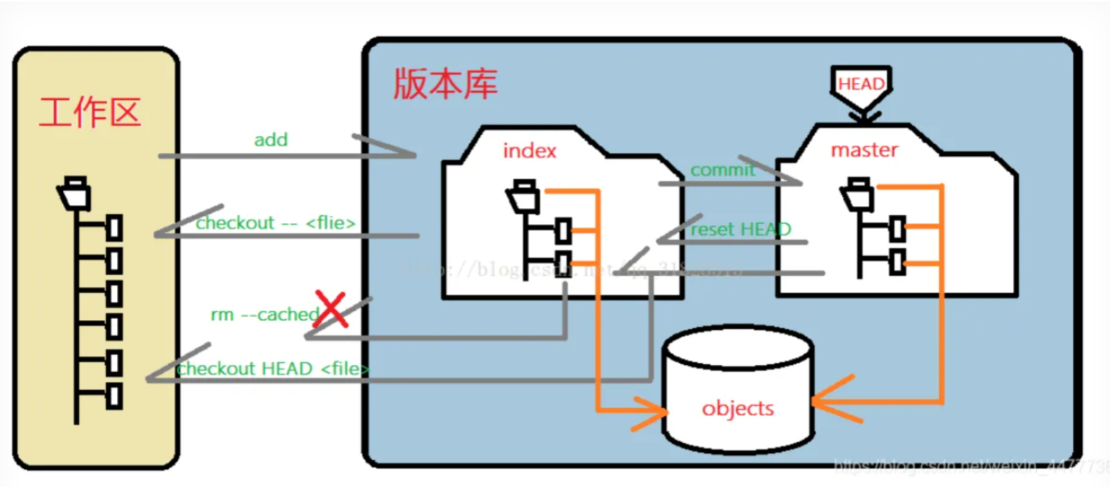
关键理解
-
新建文件只是在工作区,需通过
git add和git commit才能纳入版本库管理 -
暂存区作为中间层,允许选择性提交
-
版本库永久存储着所有版本修改的内容
文件添加操作
要将工作区中的文件添加进git仓库.git中,但又不能手动添加进去,这样会损坏.git仓库
添加文件
先用git add将文件添加到暂存区,再用git commit将暂存区内容提交到版本库
Shell
# 1. 在工作区创建文件
[HY@VM-24-13-centos gitcode]$ touch ReadMe
[HY@VM-24-13-centos gitcode]$ vim ReadMe
[HY@VM-24-13-centos gitcode]$ cat ReadMe
Hello Git!

# 2. 将文件添加到暂存区(跟踪文件)
[HY@VM-24-13-centos gitcode]$ git add ReadMe

# 3. 将暂存区内容提交到版本库
[HY@VM-24-13-centos gitcode]$ git commit -m "add first file"
[master (root-commit) 27d4010] add first file
 1 file changed, 1 insertion(+)
 create mode 100644 ReadMe
状态说明
-
1 file changed:一个文件被改动 -
1 insertion(+):新增一行内容
注意:
git commit后面的-m选项,要跟上描述本次提交的 message,由用户自己完成,这部分内容绝不能省略,并要好好描述,是用来记录你的提交细节,是给我们人看的。
批量添加文件
实际运用中肯定不可能只要提交一个文件,这里我们就来看看如何批量提交文件
Shell
# 1. 创建多个文件
[HY@VM-24-13-centos gitcode]$ touch file1 file2 file3

# 2. 批量添加到暂存区
[HY@VM-24-13-centos gitcode]$ git add file1 file2 file3

# 3. 一次性提交所有暂存文件
[HY@VM-24-13-centos gitcode]$ git commit -m "add 3 files"
[master 43640f2] add 3 files
 3 files changed, 0 insertions(+), 0 deletions(-)
 create mode 100644 file1
 create mode 100644 file2
 create mode 100644 file3
常用添加命令
-
添加指定目录到暂存区(包括子目录):
git add [dir] -
添加当前目录所有改动到暂存区:
git add . -
提交暂存区指定文件:
git commit [file1] [file2] ... -m "message"
查看提交历史
Shell
# 详细日志格式
[HY@VM-24-13-centos gitcode]$ git log
commit 43640f20a8b68187a7c45866e2ab9d7b4997ae38
Author: HY <1357924680@qq.com>
Date:   Sun Nov 2 11:51:34 2025 +0800

    add 3 files

commit 27d4010aac70dce62d87fbdbcf1835db3afa60a1
Author: HY <1357924680@qq.com>
Date:   Sun Nov 2 11:41:32 2025 +0800

add first file如果嫌输出信息太多,看得眼花缭乱的,可以试试加上--pretty=oneline参数:
Shell
# 简单日志格式
[HY@VM-24-13-centos gitcode]$ git log --pretty=oneline
43640f20a8b68187a7c45866e2ab9d7b4997ae38 add 3 files
27d4010aac70dce62d87fbdbcf1835db3afa60a1 add first file
注意 :
27d4...a60a1是每次提交的commit id(版本号),是一个由SHA-1算法生成的40位16进制数,具有全局唯一性(你看到的commit id和我的肯定不一样,以你自己的为准)
Git 仓库结构解析
先来看看我们.git的目录结构:
Shell
[HY@VM-24-13-centos gitcode]$ tree .git/
.git/
|-- branches
|-- COMMIT_EDITMSG
|-- config
|-- description
|-- HEAD
|-- hooks
|   |-- applypatch-msg.sample
|   |-- commit-msg.sample
|   |-- post-update.sample
|   |-- pre-applypatch.sample
|   |-- pre-commit.sample
|   |-- prepare-commit-msg.sample
|   |-- pre-push.sample
|   |-- pre-rebase.sample
|   `-- update.sample
|-- index
|-- info
|   `-- exclude
|-- logs
|   |-- HEAD
|   `-- refs
|       `-- heads
|           `-- master
|-- objects
|   |-- 27
|   |   `-- d4010aac70dce62d87fbdbcf1835db3afa60a1
|   |-- 43
|   |   `-- 640f20a8b68187a7c45866e2ab9d7b4997ae38
|   |-- 5e
|   |   `-- 3bf5a08ffdd465bb436e95cc4e7b33fc52a803
|   |-- 60
|   |   `-- f16aba56c32a266bcb801c72c7ca3ab9a497bb
|   |-- 8e
|   |   `-- 550cbe72ee809d48d5f81e365344f912a805de
|   |-- e6
|   |   `-- 9de29bb2d1d6434b8b29ae775ad8c2e48c5391
|   |-- info
|   `-- pack
`-- refs
    |-- heads
    |   `-- master
    `-- tags

18 directories, 24 files
关键组件说明
-
index - 暂存区,
git add后内容存储于此 -
HEAD - 指向当前分支的指针
可以简单地将
HEAD理解为书签,它标记着你当前正在阅读的章节(版本)
Shell
[HY@VM-24-13-centos gitcode]$ cat .git/HEAD
ref: refs/heads/master- refs/heads/master - 存储 master 分支中最新的 commit id
Shell
[HY@VM-24-13-centos gitcode]$ cat .git/refs/heads/master
43640f20a8b68187a7c45866e2ab9d7b4997ae38- objects - Git 对象库,存储所有版本对象
Shell
[HY@VM-24-13-centos gitcode]$ ls -l .git/objects/
total 32
drwxrwxr-x 2 HY HY 4096 Nov  2 11:41 27
drwxrwxr-x 2 HY HY 4096 Nov  2 11:51 43
drwxrwxr-x 2 HY HY 4096 Nov 2 11:41 5e查找object时要将commit id分成两部分,其前2位是文件夹名称,后38位是文件名称。
找到这个文件之后,一般不能直接看到里面是什么,该类文件是经过(安全哈希算法)加密过的文件,好在我们可以使用git cat-file命令来查看版本库对象的内容:
Shell
# 这就是我们最近⼀次的提交!

# 这是我们对ReadMe做的修改!!被git记录了下来!!
其中,还有一行,我们使用同样的方法查看结果:
核心概念总结
-
index - 暂存区,
git add更新该区域 -
master - 存储指向 object 中不同版本的 commit id
-
HEAD - 指向当前分支(如 master)的指针,通过 HEAD 访问当前版本
-
objects - 包含 Git 维护的所有修改历史对象
案例说明
这里我们再展示一种添加文件的场景,能加深对上述内容的理解
Shell
# 创建两个文件
[HY@VM-24-13-centos gitcode]$ touch file4
[HY@VM-24-13-centos gitcode]$ git add file4
[HY@VM-24-13-centos gitcode]$ touch file5

# 提交更改
[HY@VM-24-13-centos gitcode]$ git commit -m "add file"
[master 5d5deed] add file
 1 file changed, 0 insertions(+), 0 deletions(-)
 create mode 100644 file4
结果分析
输出显示 1 file changed,为什么不是两个文件?
原因分析
-
git add仅将 file4 添加到暂存区,file5 仍停留在工作区,未被 Git 跟踪 -
git commit只提交暂存区中的内容
解决方案
Shell
# 将 file5 添加到暂存区并提交
[HY@VM-24-13-centos gitcode]$ git add file5
[HY@VM-24-13-centos gitcode]$ git commit -m "add file5"
文件修改操作
Git 相比其他版本控制系统设计更加优秀,其核心在于 Git 跟踪并管理的是修改,而非文件本身。
理解"修改"的概念
在 Git 中,"修改"是一个广义的概念,包括但不限于:
-
新增一行代码
-
删除一行代码
-
更改某些字符
-
同时进行删除和添加操作
-
创建新文件
所有这些操作都被 Git 视为"修改"并进行跟踪。
查看文件状态
当我们对文件进行修改后,可以使用 git status 命令查看仓库状态:
Shell
[HY@VM-24-13-centos gitcode]$ vim file1
[HY@VM-24-13-centos gitcode]$ git status
# On branch master
# Changes not staged for commit:
#   (use "git add <file>..." to update what will be committed)
#   (use "git checkout -- <file>..." to discard changes in working directory)
#
#	modified:   file1
#
no changes added to commit (use "git add" and/or "git commit -a")
状态说明:
-
modified: file1:文件file1已被修改 -
Changes not staged for commit:修改尚未添加到暂存区 -
no changes added to commit:没有可提交的更改
查看具体修改内容
使用 git diff [file] 命令查看文件的详细修改内容:
Shell
diff --git a/file1 b/file1
index fd36d9c..6c5d14e 100644
--- a/file1
+++ b/file1
@@ -0,0 +1,4 @@
+Hello World!!!
+Hello Linux!!!
+Hello Git!!!
命令说明:
-
git diff [file]:显示暂存区和工作区文件的差异 -
git diff HEAD -- [file]:查看版本库和工作区文件的区别 -
显示格式采用 Unix 通用的 diff 格式
提交修改
确认修改内容后,将修改提交到仓库:
Shell
# 1. 添加到暂存区
[HY@VM-24-13-centos gitcode]$ git add file1
[HY@VM-24-13-centos gitcode]$ git status
# On branch master
# Changes to be committed:
#   (use "git reset HEAD <file>..." to unstage)
#
#	modified:   file1

# 2. 提交到版本库
[HY@VM-24-13-centos gitcode]$ git commit -m "modify file1"
[master a5353b8] modify file1
 1 files changed, 2 insertions(+), 1 deletions(-)

# 3. 确认提交状态
[HY@VM-24-13-centos gitcode]$ git status
On branch master
nothing to commit, working tree clean
流程说明:
-
git add:将修改加入暂存区 -
git commit:将暂存区内容提交到版本库 -
git status:确认工作树状态(working tree clean)
文件版本管理
我们提到过,Git能够管理文件的历史版本,这是版本控制器的重要能力。如果在开发过程中发现之前的工作存在问题,需要回到某个特定的历史版本重新开始,这时就需要使用版本回退功能。
git reset 命令
Shell
git reset [--soft | --mixed | --hard] [HEAD]参数说明
-
--mixed(默认参数)-
只将暂存区回退为指定版本
-
工作区文件保持不变
-
使用时可以省略该参数
-
-
--soft-
只将目录库回退为指定版本,而不改变暂存区和工作区
-
注意 :只是把
HEAD指向更早的版本,目录库的内容没被修改,回退前的版本仍然存在
-
-
--hard-
将工作区 、暂存区、目录库都回退到指定版本
-
警告:工作区未提交的代码/文件将永久丢失,使用前务必确认
-
HEAD说明
可以使用以下三种方式指定退回的版本:
-
绝对版本号:直接使用完整的commit id(或唯一前缀)
- 例如:
a1b2c3d
- 例如:
-
相对版本号(使用
^) :每个^表示向父提交回溯一步-
HEAD^表示上一个版本 -
HEAD^^表示上上个版本 -
以此类推......
-
-
相对版本号(使用
~):后面的数字表示回溯的步数-
HEAD~0表示当前版本 -
HEAD~1表示上一个版本 -
HEAD~2表示上上个版本 -
以此类推......
-
为了方便表述,方便测试回退功能,我们先做一些准备工作:更新三个版本的ReadMe,并分别进行3次提交,如下所示
Shell
# 第一次修改提交
[HY@VM-24-13-centos gitcode]$ vim ReadMe
[HY@VM-24-13-centos gitcode]$ cat ReadMe
version1

[HY@VM-24-13-centos gitcode]$ git add ReadMe
[HY@VM-24-13-centos gitcode]$ git commit -m "version1"
[master 98fc5c7] version1
 1 file changed, 1 insertion(+), 8 deletions(-)


# 第二次修改提交
[HY@VM-24-13-centos gitcode]$ vim ReadMe
[HY@VM-24-13-centos gitcode]$ cat ReadMe
version2

[HY@VM-24-13-centos gitcode]$ git add ReadMe
[HY@VM-24-13-centos gitcode]$ git commit -m "version2"
[master 98fc5c7] version2
 1 file changed, 1 insertion(+), 8 deletions(-)


# 第三次修改提交
[HY@VM-24-13-centos gitcode]$ vim ReadMe
[HY@VM-24-13-centos gitcode]$ cat ReadMe
version3

[HY@VM-24-13-centos gitcode]$ git add ReadMe
[HY@VM-24-13-centos gitcode]$ git commit -m "version3"
[master 98fc5c7] version3
 1 file changed, 1 insertion(+), 8 deletions(-)


# 查看历史提交记录
[HY@VM-24-13-centos gitcode]$ git log --pretty=oneline
3bee03c09bbd43384f28d8d121278b58f1348e20 version3
df74a14b2dbed97e1ed07fa5c167c77504d2fd77 version2
98fc5c717e42451204996605e3cca02943ebb312 version1
......
现在,如果我们在提交完version3后,发现version3编写错误,想回退到version2,重新基于version2开始编写。由于我们在这里希望的是将工作区的内容也回退到version2版本,所以需要用到--hard参数,示例如下
Shell
[HY@VM-24-13-centos gitcode]$ git reset --hard df74a14b2dbed97e1ed07fa5c167c77504d2fd77
HEAD is now at df74a14 version2
我们惊奇的发现,此时ReadMe文件的内容,已经回退到version2了,当前,我们再次用git log查看一下提交日志,发现HEAD指向了version2,如下所示
Shell
[HY@VM-24-13-centos gitcode]$ git log --pretty=oneline
df74a14b2dbed97e1ed07fa5c167c77504d2fd77 version2
98fc5c717e42451204996605e3cca02943ebb312 version1
......
到这里一般回退功能就演示完了,但现在如果我后悔了,想再回退到version3怎么班?我们可以继续使用git reset 命令,回退到version3版本,但我们必须要那道version3的commit id去指定回退的版本。
但我们看到了git log 并不能打印出version3的commit id,运气好的话我们可以从终端上去找找之前的记录,运气不好的话commit id就已经被我们搞丢了。
Git还提供了一个git reflog 命令能补救一下,该命令用来记录本地的每一次命令。
Shell
[HY@VM-24-13-centos gitcode]$ git reflog
df74a14 HEAD@{0}: reset: moving to df74a14b2dbed97e1ed07fa5c167c77504d2fd77
3bee03c HEAD@{1}: commit: version3
df74a14 HEAD@{2}: commit: version2
98fc5c7 HEAD@{3}: commit: version1
......
这样,你就可以很方便的找到你的所有操作记录了,但但 3 的 d95c13f 这个是啥东西?这个是 vesion3的commit id的部分。没错,Git版本回退的时候,也可以使用部分commit id本。示例如下:
Shell
# 回退到v3
[HY@VM-24-13-centos gitcode]$ git reset --hard 3bee03c
HEAD is now at 3bee03c version3

# 查看log
[HY@VM-24-13-centos gitcode]$ git log --pretty=oneline
3bee03c09bbd43384f28d8d121278b58f1348e20 version3
df74a14b2dbed97e1ed07fa5c167c77504d2fd77 version2
98fc5c717e42451204996605e3cca02943ebb312 version1
......
可往往是理想很丰满,现实很骨感。再实际开发中,由于长时间的开发了,导致commit id 早就找不到了,可突然某一天,我又想回退到version3,那该如何操作呢?貌似现在不可能了......
值得说的是,Git的版本回退速度非常快,因为在内部有一个指向当前分支(此处是master)的HEAD指针,refs/heads/master ⽂件⾥保存当前 master 分支的最新 在回退版本的时候,Git仅仅是给 commit id 。当我们 refs/heads/master 中存储一个特定的version,可以简单理解 成如下示意图:

撤销修改操作
如果我们在我们的工作区写了很长时间代码,越写越写不下去,觉得自己写的实在是垃圾,想恢复到上一个版本。
场景一:未add的修改(工作区修改)
你当然可以直接删除你目前工作区新增的代码,像这样:(不推荐,容易出错)
Shell
# 向ReadMe中新增一行代码
[HY@VM-24-13-centos gitcode]$ git status
# On branch master
nothing to commit, working directory clean


[HY@VM-24-13-centos gitcode]$ vim ReadMe
[HY@VM-24-13-centos gitcode]$ cat ReadMe
version3
This piece of code is like shit # 新增代码
[HY@VM-24-13-centos gitcode]$ git status
# On branch master
# Changes not staged for commit:
#   (use "git add <file>..." to update what will be committed)
#   (use "git checkout -- <file>..." to discard changes in working directory)
#
#	modified:   ReadMe
#
no changes added to commit (use "git add" and/or "git commit -a")

# 直接删除新增代码
[HY@VM-24-13-centos gitcode]$ vim ReadMe
[HY@VM-24-13-centos gitcode]$ cat ReadMe
version3
[HY@VM-24-13-centos gitcode]$ git status
# On branch master
nothing to commit, working directory clean
⾟亏我们⼯作效率不⾼,才写了⼀行代码就发现不⾏了,要是你写了3天,⼀直都没有提交,该怎么删 掉呢?你自己都忘了⾃⼰新增过哪些,有同学说,我可以 git diff xxx ⼀下,看看差别在删啊, 那你肯定⼜要花3天时间删代码了,并且很⼤的概率还会改出bug。⼀周过去了,你怎么向你的⽼板交代呢?
Git 其实还为我们提供了更好的⽅式,我们可以使用git checkout -- [file]命令让⼯作区的文件回到最近⼀次add或commit时的状态。要注意git checkout -- [file]命令中的--很重要,切记不要省略,⼀旦省略,该命令就变为其他意思了,后⾯我们再说。⽰例如下:
Shell
# 向ReadMe中新增⼀⾏代码
[HY@VM-24-13-centos gitcode]$ vim ReadMe
[HY@VM-24-13-centos gitcode]$ cat ReadMe
version3
This piece of code is like shit # 新增代码

# 恢复到上⼀次 add 或 commit
[HY@VM-24-13-centos gitcode]$ git checkout -- ReadMe
[HY@VM-24-13-centos gitcode]$ cat ReadMe
version3
场景二:已add,未commit(暂存区修改)
add后还是保存到了暂存区呢?怎么撤销呢?
Shell
# 向ReadMe中新增⼀⾏代码
[HY@VM-24-13-centos gitcode]$ vim ReadMe
[HY@VM-24-13-centos gitcode]$ cat ReadMe
version3
This piece of code is like shit # 新增代码

# add 存入暂存区
[HY@VM-24-13-centos gitcode]$ git add ReadMe
[HY@VM-24-13-centos gitcode]$ git status
# On branch master
# Changes to be committed:
#   (use "git reset HEAD <file>..." to unstage)
#
# modified: ReadMe让我们来回忆⼀下学过的git reset回退命令,该命令如果使⽤--mixed参数,可以将暂存区 的内容退回为指定的版本内容,但⼯作区文件保持不变。那我们就可以回退下暂存区的内容了!!! 示例如下:
Shell
 # --mixed 是默认参数,使⽤时可以省略
 [HY@VM-24-13-centos gitcode]$ git reset HEAD ReadMe
Unstaged changes after reset:
M ReadMe⽤git status查看⼀下,发现现在暂存区是⼲净的,⼯作区有修改。
Shell
[HY@VM-24-13-centos gitcode]$ git status
# On branch master
# Changes not staged for commit:
#   (use "git add <file>..." to update what will be committed)
#   (use "git checkout -- <file>..." to discard changes in working directory)
#
#	modified:   ReadMe
#
no changes added to commit (use "git add" and/or "git commit -a")
还记得如何丢弃工作区的修改吗?
Shell
[HY@VM-24-13-centos gitcode]$ git checkout -- ReadMe
[HY@VM-24-13-centos gitcode]$ git status
# On branch master
nothing to commit, working directory clean

[HY@VM-24-13-centos gitcode]$ cat ReadMe
version3
场景三:已add + commit(版本库修改)
Shell
# 向ReadMe中新增⼀⾏代码
[HY@VM-24-13-centos gitcode]$ vim ReadMe
[HY@VM-24-13-centos gitcode]$ cat ReadMe
version3
This piece of code is like shit # 新增代码

# 提交
[HY@VM-24-13-centos gitcode]$ git add ReadMe
[HY@VM-24-13-centos gitcode]$ git commit -m "test quash"
[master 3f40efc] test quash
 1 file changed, 1 insertion(+)

# 回退
[HY@VM-24-13-centos gitcode]$ git reset --hard HEAD^
HEAD is now at 3bee03c version3
[HY@VM-24-13-centos gitcode]$ cat ReadMe
version3注意:仅适用于未推送到远程仓库的情况!一旦你推送到远程版本库,你就真的惨了......
文件删除管理
在Git中,删除也是也是一个修改操作,我们实战一下,如果要删除file5文件,怎么搞呢?如果你这样做了
Shell
[HY@VM-24-13-centos gitcode]$ ls
file1  file2  file3  file4  file5  ReadMe
[HY@VM-24-13-centos gitcode]$ rm file5但这样直接删除是没有用的,反而徒增烦恼,git status命令会立刻告诉你哪些文件被删除了:
Shell
[HY@VM-24-13-centos gitcode]$ git status
# On branch master
# Changes not staged for commit:
#   (use "git add/rm <file>..." to update what will be committed)
#   (use "git checkout -- <file>..." to discard changes in working directory)
#
#	deleted:    file5
#
no changes added to commit (use "git add" and/or "git commit -a")
此时,工作区和版本库就不一致了,要删文件,目前除了要删工作区的文件,还要清除版本库的文件。
一般走到这里,有两种可能:
-
不小心删错了
-
确实要从版本库中删除该文件
对于第一种情况,很明显误删,需要使用git来进行恢复,很简单,我们刚学过(删除也是修改)
Shell
[HY@VM-24-13-centos gitcode]$ git checkout -- file5
[HY@VM-24-13-centos gitcode]$ ls
file1 file2 file3 file4 file5 ReadMe对于第二种情况,很明显是没有删完,我们只删除了工作区的文件。这时就要用git rm将文件从暂存区和工作区中删除,并且commit
Shell
[HY@VM-24-13-centos gitcode]$ git rm file5
rm 'file5'
[HY@VM-24-13-centos gitcode]$ git status
# On branch master
# Changes to be committed:
#   (use "git reset HEAD <file>..." to unstage)
#
#	deleted:    file5
#
[HY@VM-24-13-centos gitcode]$ git commit -m "deleted file5"
[master a4bfe09] deleted file5
 1 file changed, 0 insertions(+), 0 deletions(-)
 delete mode 100644 file5
[HY@VM-24-13-centos gitcode]$ git status
# On branch master
nothing to commit, working directory clean
现在,文件就从版本库中被删除了。