系列文章目录
- 【3D AICG 系列-1】Trellis v1 和 Trellis v2 的区别和改进
- 【3D AICG 系列-2】Trellis 2 的O-voxel (上) Shape: Flexible Dual Grid
- 【3D AICG 系列-3】Trellis 2 的O-voxel (下) Material: Volumetric Surface Attributes
- 【3D AICG 系列-4】Trellis 2 的Shape SLAT Flow Matching DiT 训练流程
- 【3D AICG 系列-5】Trellis 2 的 Pipeline 推理流程的各个中间结果和形状
- 【3D AICG 系列-6】OmniPart 训练流程梳理
- 【3D AICG 系列-7】PartUV 代码流程深度解析
- 【3D AICG 系列-8】PartUV 流程图详解
文章目录
- 系列文章目录
- [TRELLIS.2 推理流程详解](#TRELLIS.2 推理流程详解)
-
- 一、图像到3D生成(Image-to-3D)Pipeline
-
- 整体流程概览
- 详细步骤
-
- [1. 图像预处理 (`preprocess_image`)](#1. 图像预处理 (
preprocess_image)) - [2. 图像特征提取 (`get_cond`)](#2. 图像特征提取 (
get_cond)) - [3. 稀疏结构采样 (`sample_sparse_structure`)](#3. 稀疏结构采样 (
sample_sparse_structure)) - [4. 形状SLat采样 (`sample_shape_slat` 或 `sample_shape_slat_cascade`)](#4. 形状SLat采样 (
sample_shape_slat或sample_shape_slat_cascade)) - [5. 纹理SLat采样 (`sample_tex_slat`)](#5. 纹理SLat采样 (
sample_tex_slat)) - [6. 解码为Mesh (`decode_latent`)](#6. 解码为Mesh (
decode_latent))
- [1. 图像预处理 (`preprocess_image`)](#1. 图像预处理 (
- Pipeline类型
- 完整调用流程
- 二、纹理生成(Texturing)Pipeline
-
- 整体流程概览
- 详细步骤
-
- [1. Mesh预处理 (`preprocess_mesh`)](#1. Mesh预处理 (
preprocess_mesh)) - [2. 图像预处理 (`preprocess_image`)](#2. 图像预处理 (
preprocess_image)) - [3. Mesh编码为Shape SLat (`encode_shape_slat`)](#3. Mesh编码为Shape SLat (
encode_shape_slat)) - [4. 纹理SLat采样 (`sample_tex_slat`)](#4. 纹理SLat采样 (
sample_tex_slat)) - [5. 解码纹理 (`decode_tex_slat`)](#5. 解码纹理 (
decode_tex_slat)) - [6. 后处理为带纹理的Mesh (`postprocess_mesh`)](#6. 后处理为带纹理的Mesh (
postprocess_mesh))
- [1. Mesh预处理 (`preprocess_mesh`)](#1. Mesh预处理 (
- 完整调用流程
- 三、输出格式说明
- 四、关键代码文件索引
TRELLIS.2 推理流程详解
一、图像到3D生成(Image-to-3D)Pipeline
整体流程概览
输入图像 → 图像预处理 → 图像特征提取 → 稀疏结构采样 → 形状SLat采样(cascade的话走两次,第二次只用其中的 coords) → 纹理SLat采样 → 解码 → 带纹理的Mesh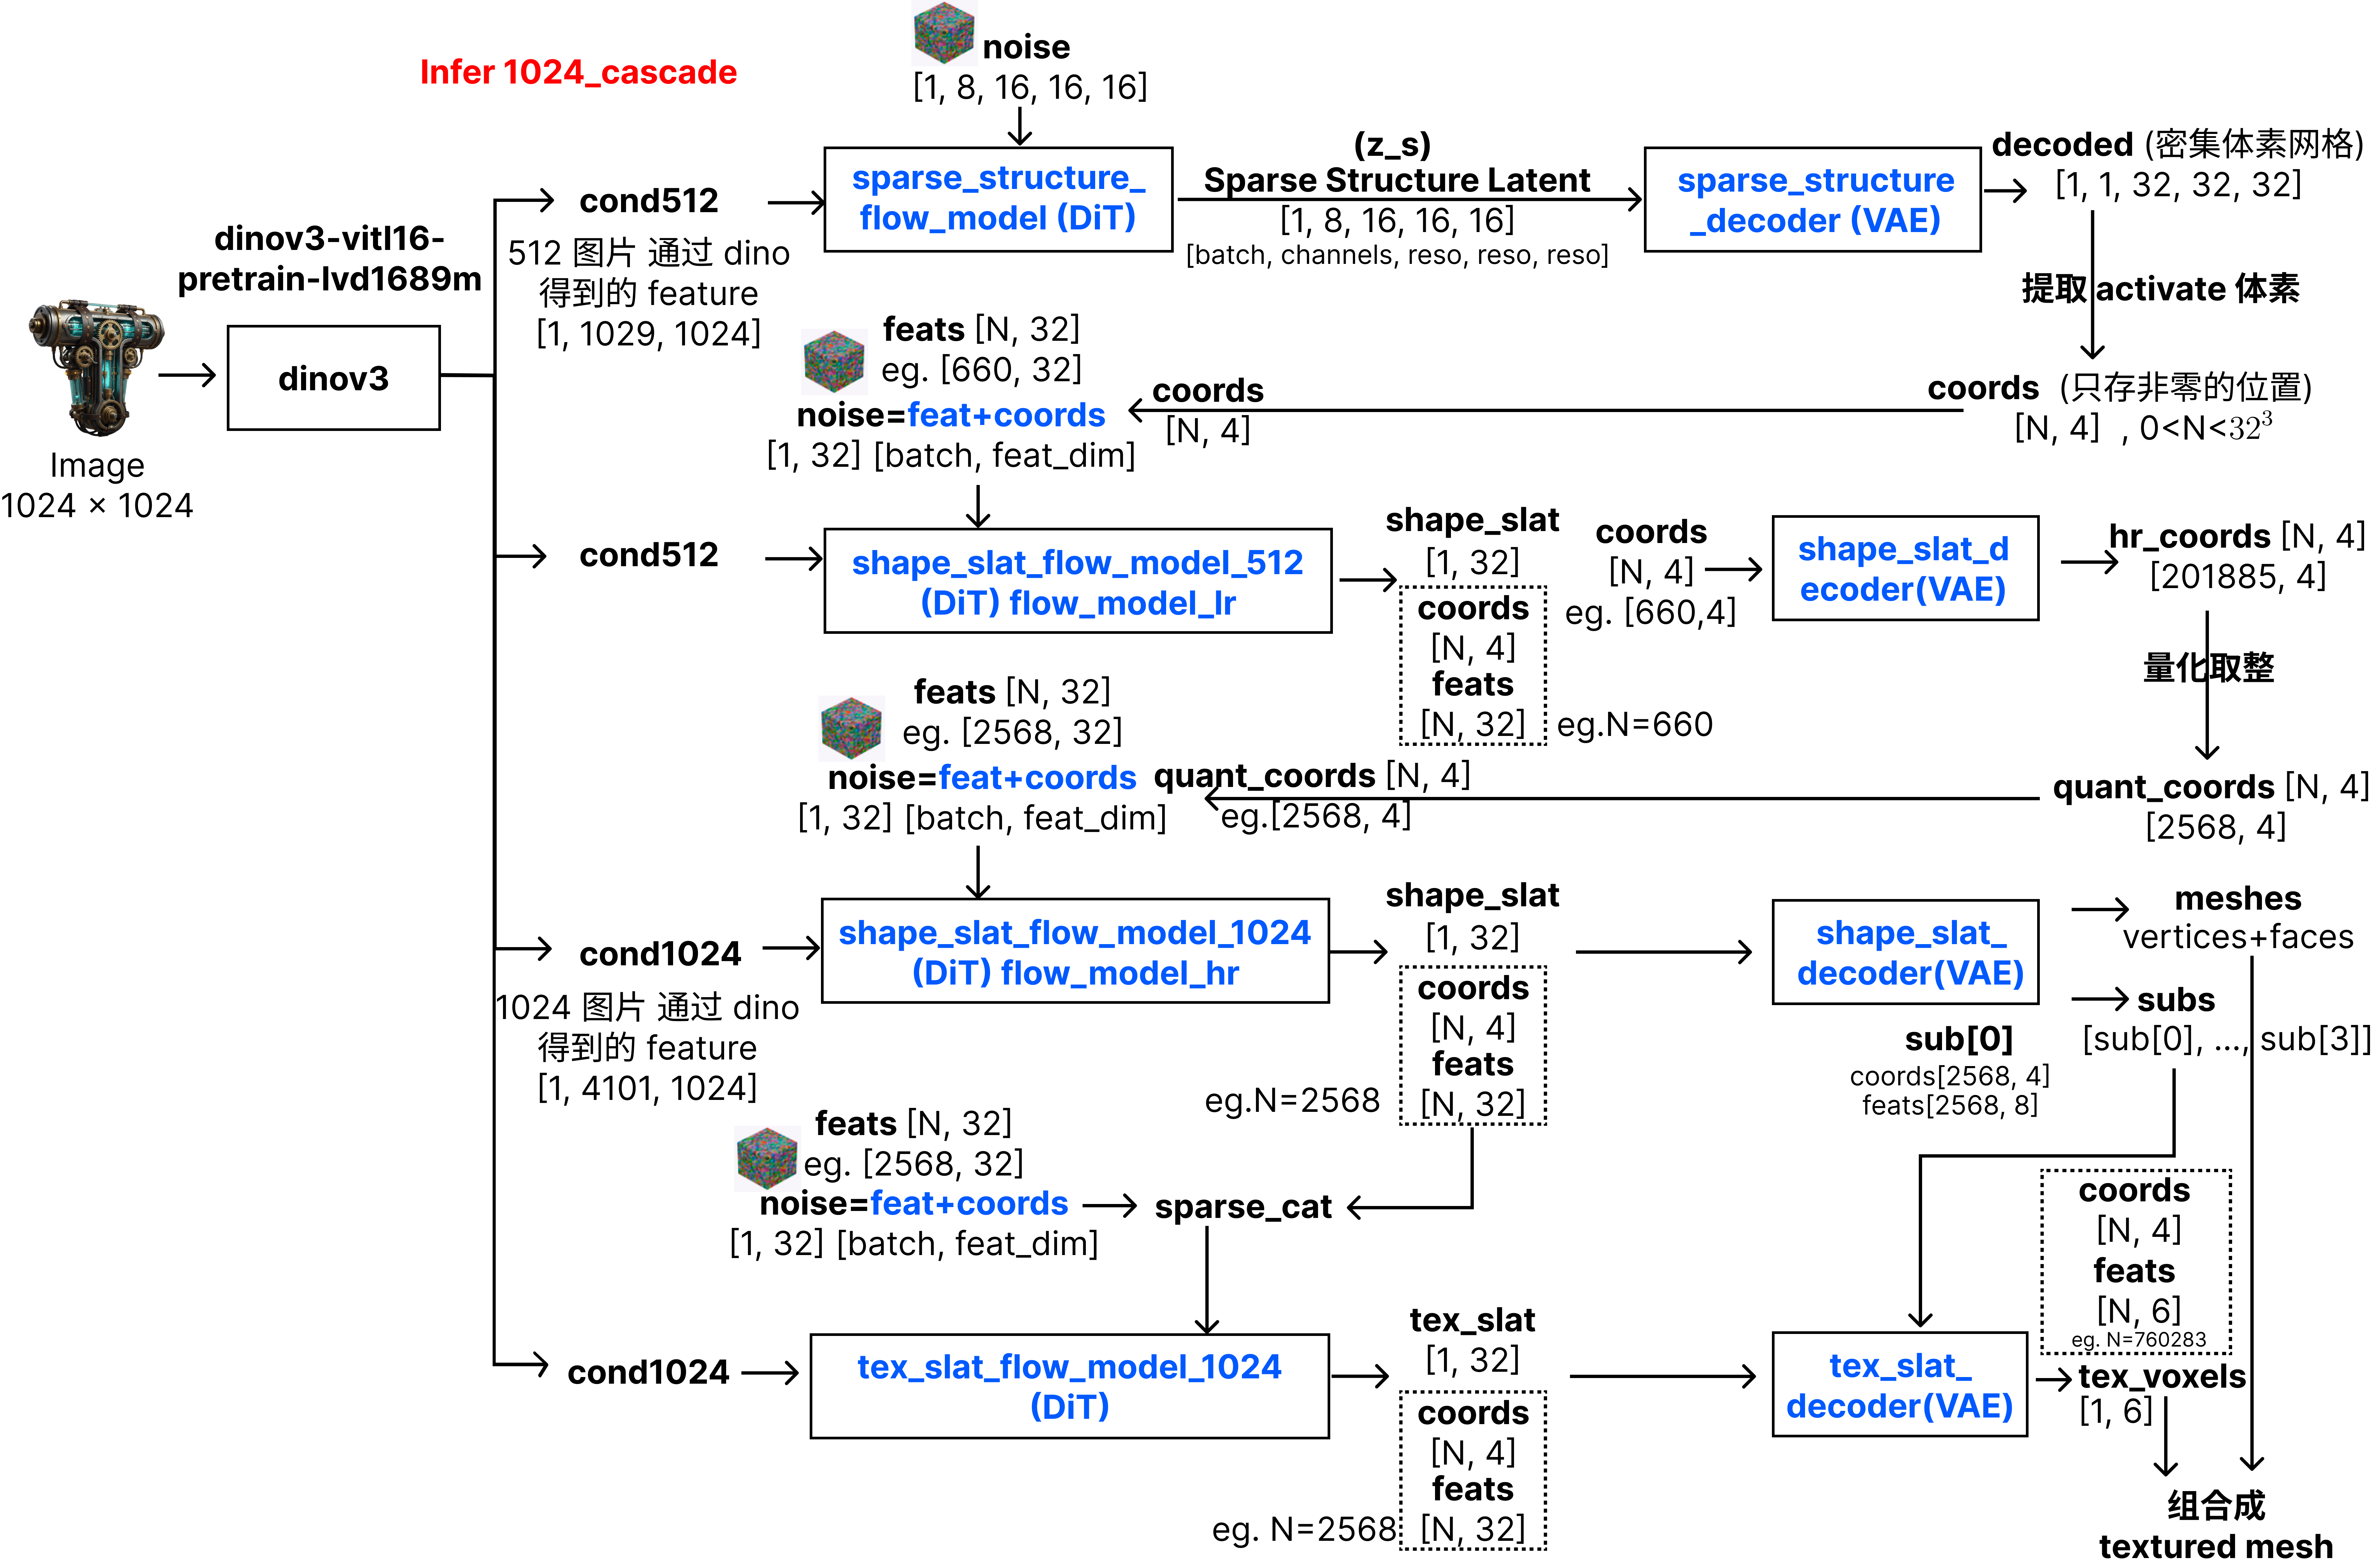
详细步骤
1. 图像预处理 (preprocess_image)
代码位置 :trellis2/pipelines/trellis2_image_to_3d.py:127-162
功能:
- 检查图像是否有alpha通道,如果有则直接使用
- 如果没有alpha通道,使用
rembg_model(BiRefNet)去除背景 - 根据alpha通道计算边界框并裁剪
- 将图像缩放到合适大小(最大边不超过1024px)
输出:预处理后的RGBA图像
2. 图像特征提取 (get_cond)
代码位置 :trellis2/pipelines/trellis2_image_to_3d.py:164-186
功能:
- 使用
image_cond_model(图像条件模型)提取图像特征 - 生成条件特征
cond和负条件特征neg_cond(用于Classifier-Free Guidance)
输出 :条件特征字典 {'cond': tensor, 'neg_cond': tensor}
3. 稀疏结构采样 (sample_sparse_structure)
代码位置 :trellis2/pipelines/trellis2_image_to_3d.py:188-235
功能:
- 使用
sparse_structure_flow_model在低分辨率(32³或64³)的密集体素空间中采样 - 通过
sparse_structure_decoder解码得到稀疏结构的二进制掩码 - 提取有体素的坐标
coords
模型:
sparse_structure_flow_model:Flow Matching模型,生成稀疏结构的潜在表示sparse_structure_decoder:解码器,将潜在表示解码为稀疏体素掩码
输出 :稀疏体素的坐标 coords N, 4 (batch_idx, x, y, z)
4. 形状SLat采样 (sample_shape_slat 或 sample_shape_slat_cascade)
代码位置:
- 单阶段:
trellis2/pipelines/trellis2_image_to_3d.py:237-275 - 级联:
trellis2/pipelines/trellis2_image_to_3d.py:277-364
功能:
- 在稀疏坐标上采样形状的结构化潜在表示
- 级联模式 (1024_cascade, 1536_cascade):
- 先在512分辨率下采样低分辨率形状SLat
- 使用
shape_slat_decoder.upsample上采样到高分辨率 - 在高分辨率下再次采样精炼形状SLat
- 单阶段模式 (512, 1024):
- 直接在目标分辨率下采样
模型:
shape_slat_flow_model_512:512分辨率的形状Flow模型shape_slat_flow_model_1024:1024分辨率的形状Flow模型shape_slat_decoder:形状解码器(也用于上采样)
输出 :形状SLat SparseTensor,包含形状的几何信息
5. 纹理SLat采样 (sample_tex_slat)
代码位置 :trellis2/pipelines/trellis2_image_to_3d.py:391-432
功能:
- 以形状SLat为条件,采样纹理的结构化潜在表示
- 将形状SLat归一化后作为条件特征的一部分
- 使用Flow Matching在纹理潜在空间中采样
模型:
tex_slat_flow_model_512:512分辨率的纹理Flow模型tex_slat_flow_model_1024:1024分辨率的纹理Flow模型
输出 :纹理SLat SparseTensor,包含PBR材质信息
6. 解码为Mesh (decode_latent)
代码位置 :trellis2/pipelines/trellis2_image_to_3d.py:455-486
功能:
- 使用
shape_slat_decoder将形状SLat解码为Mesh(顶点、面) - 使用
tex_slat_decoder将纹理SLat解码为PBR体素属性 - 将两者组合成
MeshWithVoxel对象
模型:
shape_slat_decoder:形状解码器,输出Meshtex_slat_decoder:纹理解码器,输出PBR属性体素
输出 :MeshWithVoxel对象,包含:
vertices:顶点坐标faces:面索引coords:体素坐标attrs:PBR属性(Base Color, Metallic, Roughness, Alpha)voxel_size:体素大小layout:属性布局
Pipeline类型
根据目标分辨率,有4种pipeline类型:
512:单阶段512³生成1024:单阶段1024³生成1024_cascade:级联生成,512→10241536_cascade:级联生成,512→1536
完整调用流程
代码位置 :trellis2/pipelines/trellis2_image_to_3d.py:488-595
python
# 1. 预处理图像
image = pipeline.preprocess_image(image)

# 2. 提取条件特征
cond_512 = pipeline.get_cond([image], 512)
cond_1024 = pipeline.get_cond([image], 1024)  # 如果需要

# 3. 采样稀疏结构
coords = pipeline.sample_sparse_structure(cond_512, ss_res, num_samples)

# 4. 采样形状SLat(根据pipeline类型选择)
shape_slat = pipeline.sample_shape_slat(...)  # 或 sample_shape_slat_cascade

# 5. 采样纹理SLat
tex_slat = pipeline.sample_tex_slat(cond, flow_model, shape_slat)

# 6. 解码为Mesh
mesh = pipeline.decode_latent(shape_slat, tex_slat, resolution)
最终输出 :MeshWithVoxel对象,可以直接导出为GLB格式
二、纹理生成(Texturing)Pipeline
整体流程概览
输入Mesh + 输入图像 → Mesh预处理 → 图像预处理 → Mesh编码为Shape SLat → 纹理SLat采样 → 解码纹理 → 后处理 → 带纹理的Mesh详细步骤
1. Mesh预处理 (preprocess_mesh)
代码位置 :trellis2/pipelines/trellis2_texturing.py:106-120
功能:
- 将Mesh归一化到-0.5, 0.5范围
- 调整坐标系(交换Y和Z轴)
输出:预处理后的Mesh
2. 图像预处理 (preprocess_image)
代码位置 :trellis2/pipelines/trellis2_texturing.py:122-157
功能:与Image-to-3D的预处理相同
3. Mesh编码为Shape SLat (encode_shape_slat)
代码位置 :trellis2/pipelines/trellis2_texturing.py:183-222
功能:
- 使用
o_voxel.convert.mesh_to_flexible_dual_grid将Mesh转换为O-Voxel表示 - 使用
shape_slat_encoder将O-Voxel编码为形状SLat
模型:
shape_slat_encoder:形状编码器,将Mesh编码为形状SLat
输出 :形状SLat SparseTensor
4. 纹理SLat采样 (sample_tex_slat)
代码位置 :trellis2/pipelines/trellis2_texturing.py:224-265
功能:与Image-to-3D中的纹理采样相同,以形状SLat为条件
5. 解码纹理 (decode_tex_slat)
代码位置 :trellis2/pipelines/trellis2_texturing.py:267-285
功能:
- 使用
tex_slat_decoder将纹理SLat解码为PBR体素属性
输出 :PBR属性体素 SparseTensor
6. 后处理为带纹理的Mesh (postprocess_mesh)
代码位置 :trellis2/pipelines/trellis2_texturing.py:287-371
功能:
- 使用CuMesh进行UV展开(如果没有UV)
- 使用nvdiffrast进行光栅化,将3D体素属性映射到2D纹理贴图
- 使用flex_gemm进行3D网格采样,从体素中提取属性
- 使用OpenCV进行纹理修复(inpaint)
- 创建PBR材质并应用到Mesh
输出 :带PBR纹理的trimesh.Trimesh对象
完整调用流程
代码位置 :trellis2/pipelines/trellis2_texturing.py:374-408
python
# 1. 预处理
image = pipeline.preprocess_image(image)
mesh = pipeline.preprocess_mesh(mesh)

# 2. 提取条件特征
cond = pipeline.get_cond([image], resolution)

# 3. 编码Mesh为形状SLat
shape_slat = pipeline.encode_shape_slat(mesh, resolution)

# 4. 采样纹理SLat
tex_slat = pipeline.sample_tex_slat(cond, tex_model, shape_slat)

# 5. 解码纹理
pbr_voxel = pipeline.decode_tex_slat(tex_slat)

# 6. 后处理为带纹理的Mesh
textured_mesh = pipeline.postprocess_mesh(mesh, pbr_voxel, resolution, texture_size)最终输出:带PBR纹理的Mesh,可以直接导出为GLB格式
三、输出格式说明
MeshWithVoxel
代码位置 :trellis2/representations/voxel/voxel_model.py
属性:
vertices:顶点坐标 N, 3faces:面索引 M, 3coords:体素坐标 K, 3attrs:PBR属性 K, 6attrs[:, 0:3]:Base Color (RGB)attrs[:, 3:4]:Metallicattrs[:, 4:5]:Roughnessattrs[:, 5:6]:Alpha
voxel_size:体素大小layout:属性布局字典
导出为GLB
使用o_voxel.postprocess.to_glb将MeshWithVoxel转换为GLB格式:
python
glb = o_voxel.postprocess.to_glb(
    vertices=mesh.vertices,
    faces=mesh.faces,
    attr_volume=mesh.attrs,
    coords=mesh.coords,
    attr_layout=mesh.layout,
    voxel_size=mesh.voxel_size,
    aabb=[[-0.5, -0.5, -0.5], [0.5, 0.5, 0.5]],
    decimation_target=1000000,  # 目标面数
    texture_size=4096,  # 纹理大小
    remesh=True,
    remesh_band=1,
    remesh_project=0,
    verbose=True
)
glb.export("sample.glb", extension_webp=True)
四、关键代码文件索引
Pipeline文件
trellis2/pipelines/trellis2_image_to_3d.py:图像到3D生成Pipelinetrellis2/pipelines/trellis2_texturing.py:纹理生成Pipelinetrellis2/pipelines/base.py:Pipeline基类
示例文件
example.py:图像到3D生成示例example_texturing.py:纹理生成示例app.py:Web演示(图像到3D)app_texturing.py:Web演示(纹理生成)
模型文件
trellis2/models/sparse_structure_flow.py:稀疏结构Flow模型trellis2/models/structured_latent_flow.py:结构化潜在空间Flow模型trellis2/models/sparse_structure_vae.py:稀疏结构VAEtrellis2/models/sc_vaes/:结构化潜在空间VAE
采样器
trellis2/pipelines/samplers/:各种采样器实现