🎬 LTX-Video 2.3 实战:用图片生成视频,消费级显卡也能跑的开源 I2V 模型
文章目录
- [🎬 LTX-Video 2.3 实战:用图片生成视频,消费级显卡也能跑的开源 I2V 模型](#🎬 LTX-Video 2.3 实战:用图片生成视频,消费级显卡也能跑的开源 I2V 模型)
-
- [🗺️ 先说清楚:LTX-Video 系列是什么](#🗺️ 先说清楚:LTX-Video 系列是什么)
- [🔧 安装和环境准备](#🔧 安装和环境准备)
-
- 显存要求
- [方法一:ComfyUI 安装(最推荐,图形界面)](#方法一:ComfyUI 安装(最推荐,图形界面))
- [方法二:Python 代码直接运行](#方法二:Python 代码直接运行)
- [🖼️ 核心实战:Image-to-Video(I2V)](#🖼️ 核心实战:Image-to-Video(I2V))
-
- [ComfyUI 工作流(推荐新手)](#ComfyUI 工作流(推荐新手))
- [Python 代码实现 I2V](#Python 代码实现 I2V)
- [批量生成(测试不同 Prompt)](#批量生成(测试不同 Prompt))
- [🎯 提示词工程:让 I2V 结果更可控](#🎯 提示词工程:让 I2V 结果更可控)
-
- [LTX-2.3 提示词结构公式](#LTX-2.3 提示词结构公式)
- 负向提示词(通用)
- [⚡ 进阶:First Frame + Last Frame 双帧控制](#⚡ 进阶:First Frame + Last Frame 双帧控制)
- [🔝 分辨率升级:配合 RTX Video Super Resolution](#🔝 分辨率升级:配合 RTX Video Super Resolution)
- [📊 LTX-2.3 vs 同期竞品](#📊 LTX-2.3 vs 同期竞品)
- [❌ 常见问题速解](#❌ 常见问题速解)
-
- [问题 1:生成视频有 Ken Burns 效应(不自然的缩放/平移)](#问题 1:生成视频有 Ken Burns 效应(不自然的缩放/平移))
- [问题 2:CUDA OOM(显存不足)](#问题 2:CUDA OOM(显存不足))
- [问题 3:运动幅度太小(视频几乎静止)](#问题 3:运动幅度太小(视频几乎静止))
- [问题 4:人物面部变形/手部扭曲](#问题 4:人物面部变形/手部扭曲)
- [🎁 速查总结](#🎁 速查总结)
- [📣 最后](#📣 最后)
写在前面(2026.04) :LTX-Video 2.3(简称 LTX-2.3)是 Lightricks 在 2026 年 3 月发布的最新开源视频生成模型,22B 参数,基于 DiT 架构,最大亮点是 Image-to-Video(I2V)能力的大幅提升------相比上一代,Ken Burns 伪影明显减少,人物运动更自然,提示词理解更精准。更重要的是:消费级显卡(12GB VRAM 起步)就能跑,完全本地,完全开源,MIT 协议。这篇带你从安装到出片,把整个 I2V 工作流跑通。
🗺️ 先说清楚:LTX-Video 系列是什么
LTX-Video 家族(Lightricks 出品)
│
├── LTX-Video(2024.11 首发)
│   └── 2B 参数,首个 DiT 架构开源视频模型,比实时更快
│
├── LTXV-13B(2025.05)
│   └── 13B 参数,首次突破 60 秒视频生成
│
├── LTX-2(2025.10)
│   └── 22B 参数,原生 4K,首个同时生成同步音视频的开源模型
│   └── 2026.01 全量开源(权重 + 训练代码)
│
└── LTX-2.3(2026.03)  ← 本文主角
    ├── 重建 VAE:更锐利的纹理/发丝/边缘细节
    ├── 4× 更大的文字连接器:复杂 Prompt 理解大幅提升
    ├── I2V 大升级:Ken Burns 伪影显著减少
    ├── 新 Vocoder:音频质量更清晰
    └── 配套桌面编辑器,支持消费级硬件完全本地运行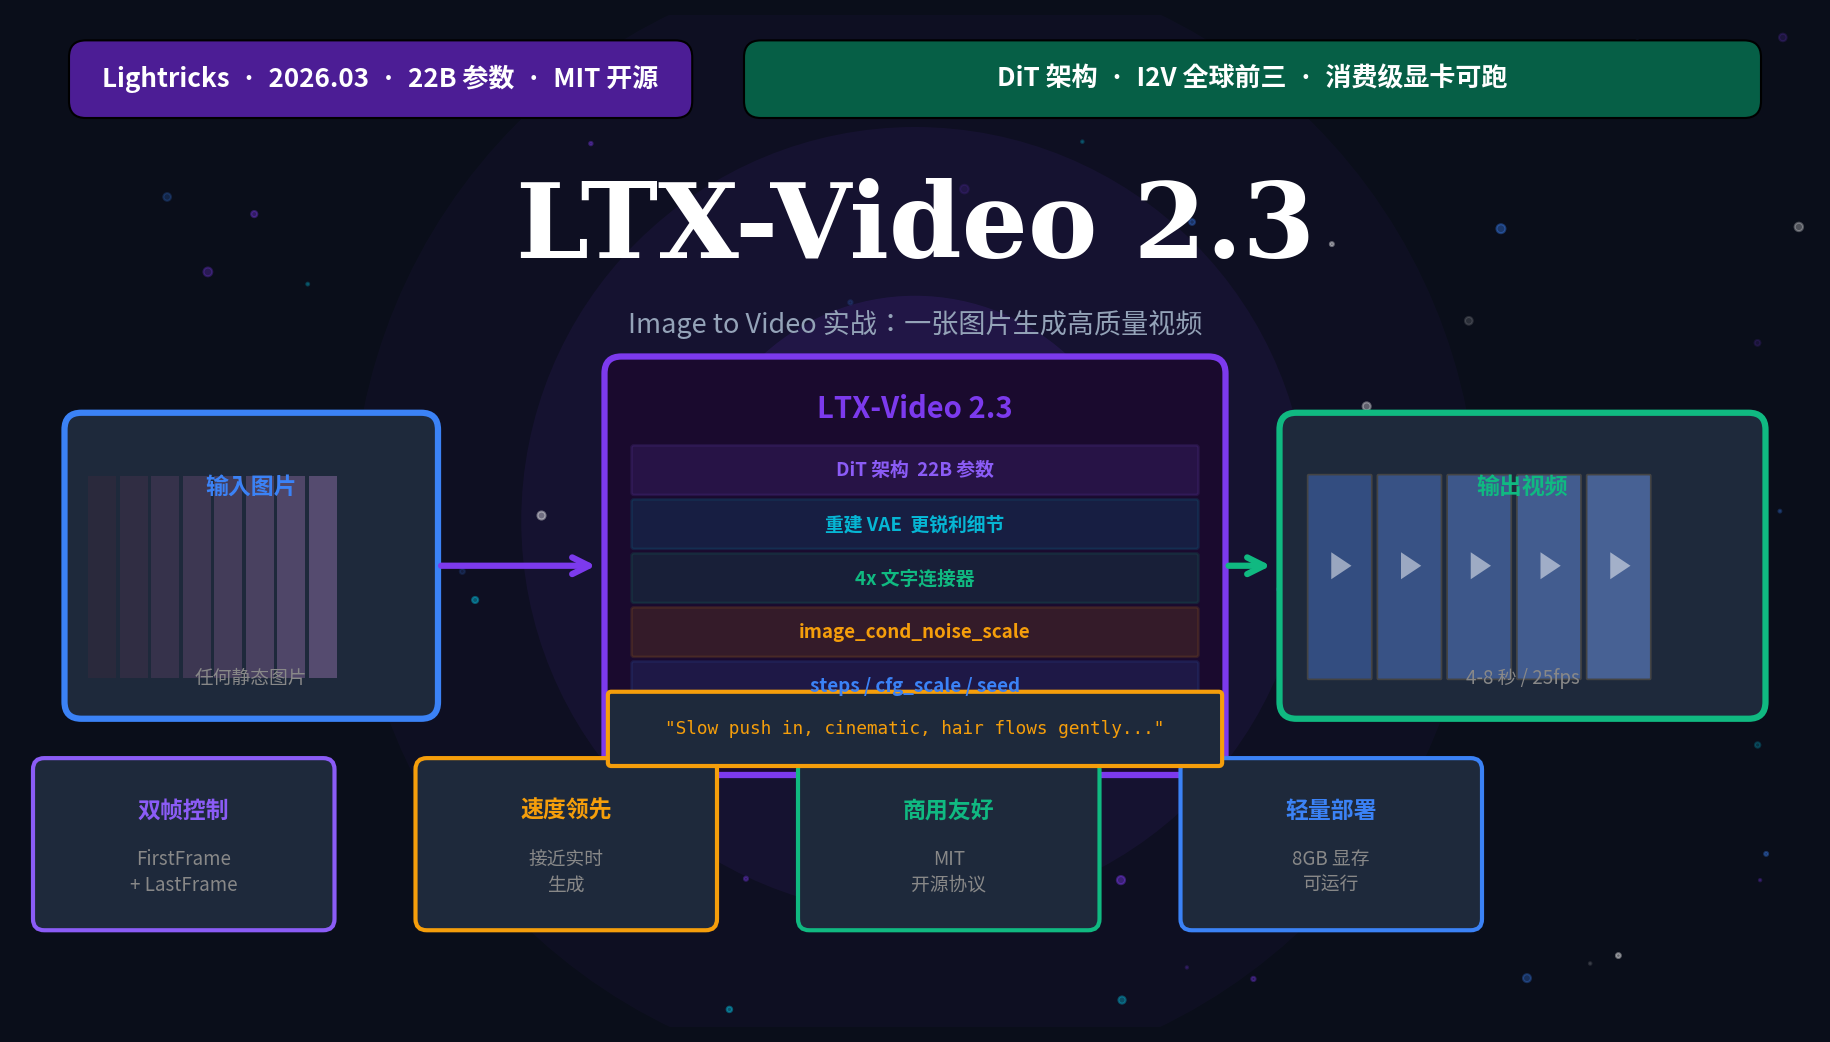
LTX-2.3 在 Artificial Analysis 基准测试中 I2V 能力排名前三(仅次于 Kling 3.5 和 Veo 3.1),是目前排名最高的开源视频模型。
🔧 安装和环境准备
显存要求
| 模式 | 最低 VRAM | 推荐 VRAM |
|---|---|---|
| 13B 开发版(最佳质量) | 24 GB | 40 GB+ |
| 13B 蒸馏版(平衡) | 16 GB | 24 GB |
| 2B 蒸馏版(快速迭代) | 8 GB | 12 GB |
| FP8 量化版 | 12 GB | 16 GB |
消费级显卡推荐:RTX 3090/4090(24GB)跑 13B 蒸馏版完全没问题;RTX 3060/4070(12GB)用 FP8 版。
方法一:ComfyUI 安装(最推荐,图形界面)
bash
# 1. 安装 ComfyUI(如果还没装)
git clone https://github.com/comfyanonymous/ComfyUI
cd ComfyUI
pip install -r requirements.txt

# 2. 安装 ComfyUI-Manager(插件管理器)
cd custom_nodes
git clone https://github.com/ltdrdata/ComfyUI-Manager

# 3. 安装 LTX-Video 节点包
# 方式A:在 ComfyUI Manager 里搜索 "LTX-Video" 一键安装
# 方式B:手动安装
git clone https://github.com/Lightricks/ComfyUI-LTXVideo
cd ComfyUI-LTXVideo
pip install -r requirements.txt

# 4. 下载模型权重(选一个)
# HuggingFace 下载(推荐,先设国内镜像)
export HF_ENDPOINT=https://hf-mirror.com

# 13B 蒸馏版(推荐,消费卡最佳选择)
huggingface-cli download Lightricks/LTX-Video-2.3 \
  --include "ltx-video-2b-v0.9.6-distilled.safetensors" \
  --local-dir ./ComfyUI/models/checkpoints/

# 2B 版本(8GB 显卡专用)
huggingface-cli download Lightricks/LTX-Video \
  --include "ltx-video-2b-v0.9.5.safetensors" \
  --local-dir ./ComfyUI/models/checkpoints/
方法二:Python 代码直接运行
bash
# 安装依赖
pip install torch torchvision --index-url https://download.pytorch.org/whl/cu128
pip install diffusers transformers accelerate
pip install imageio imageio-ffmpeg

# 下载并运行
git clone https://github.com/Lightricks/LTX-Video
cd LTX-Video
pip install -e .
🖼️ 核心实战:Image-to-Video(I2V)
ComfyUI 工作流(推荐新手)
LTX-2.3 在 ComfyUI 模板浏览器里内置了官方工作流,搜索"LTX"即可找到。
基础 I2V 节点配置:
[Load Image] ──→ [LTX Image Encode] ──→┐
                                        ├──→ [LTX Video] ──→ [Video Combine]
[CLIP Text Encode (Prompt)] ───────────→┘
[CLIP Text Encode (Neg Prompt)] ────────→关键参数说明:
| 参数 | 推荐值 | 说明 |
|---|---|---|
| num_frames | 97 | 帧数(25fps 约 4 秒,建议 49/73/97/121) |
| fps | 25 | 帧率(25 或 30) |
| width × height | 768×512 | 基础分辨率(显存够可以 1216×704) |
| steps | 25 | 去噪步数(蒸馏版用 8,开发版用 25-50) |
| cfg_scale | 3.5 | 提示词引导强度(I2V 用 3-4,T2V 用 3.5-5) |
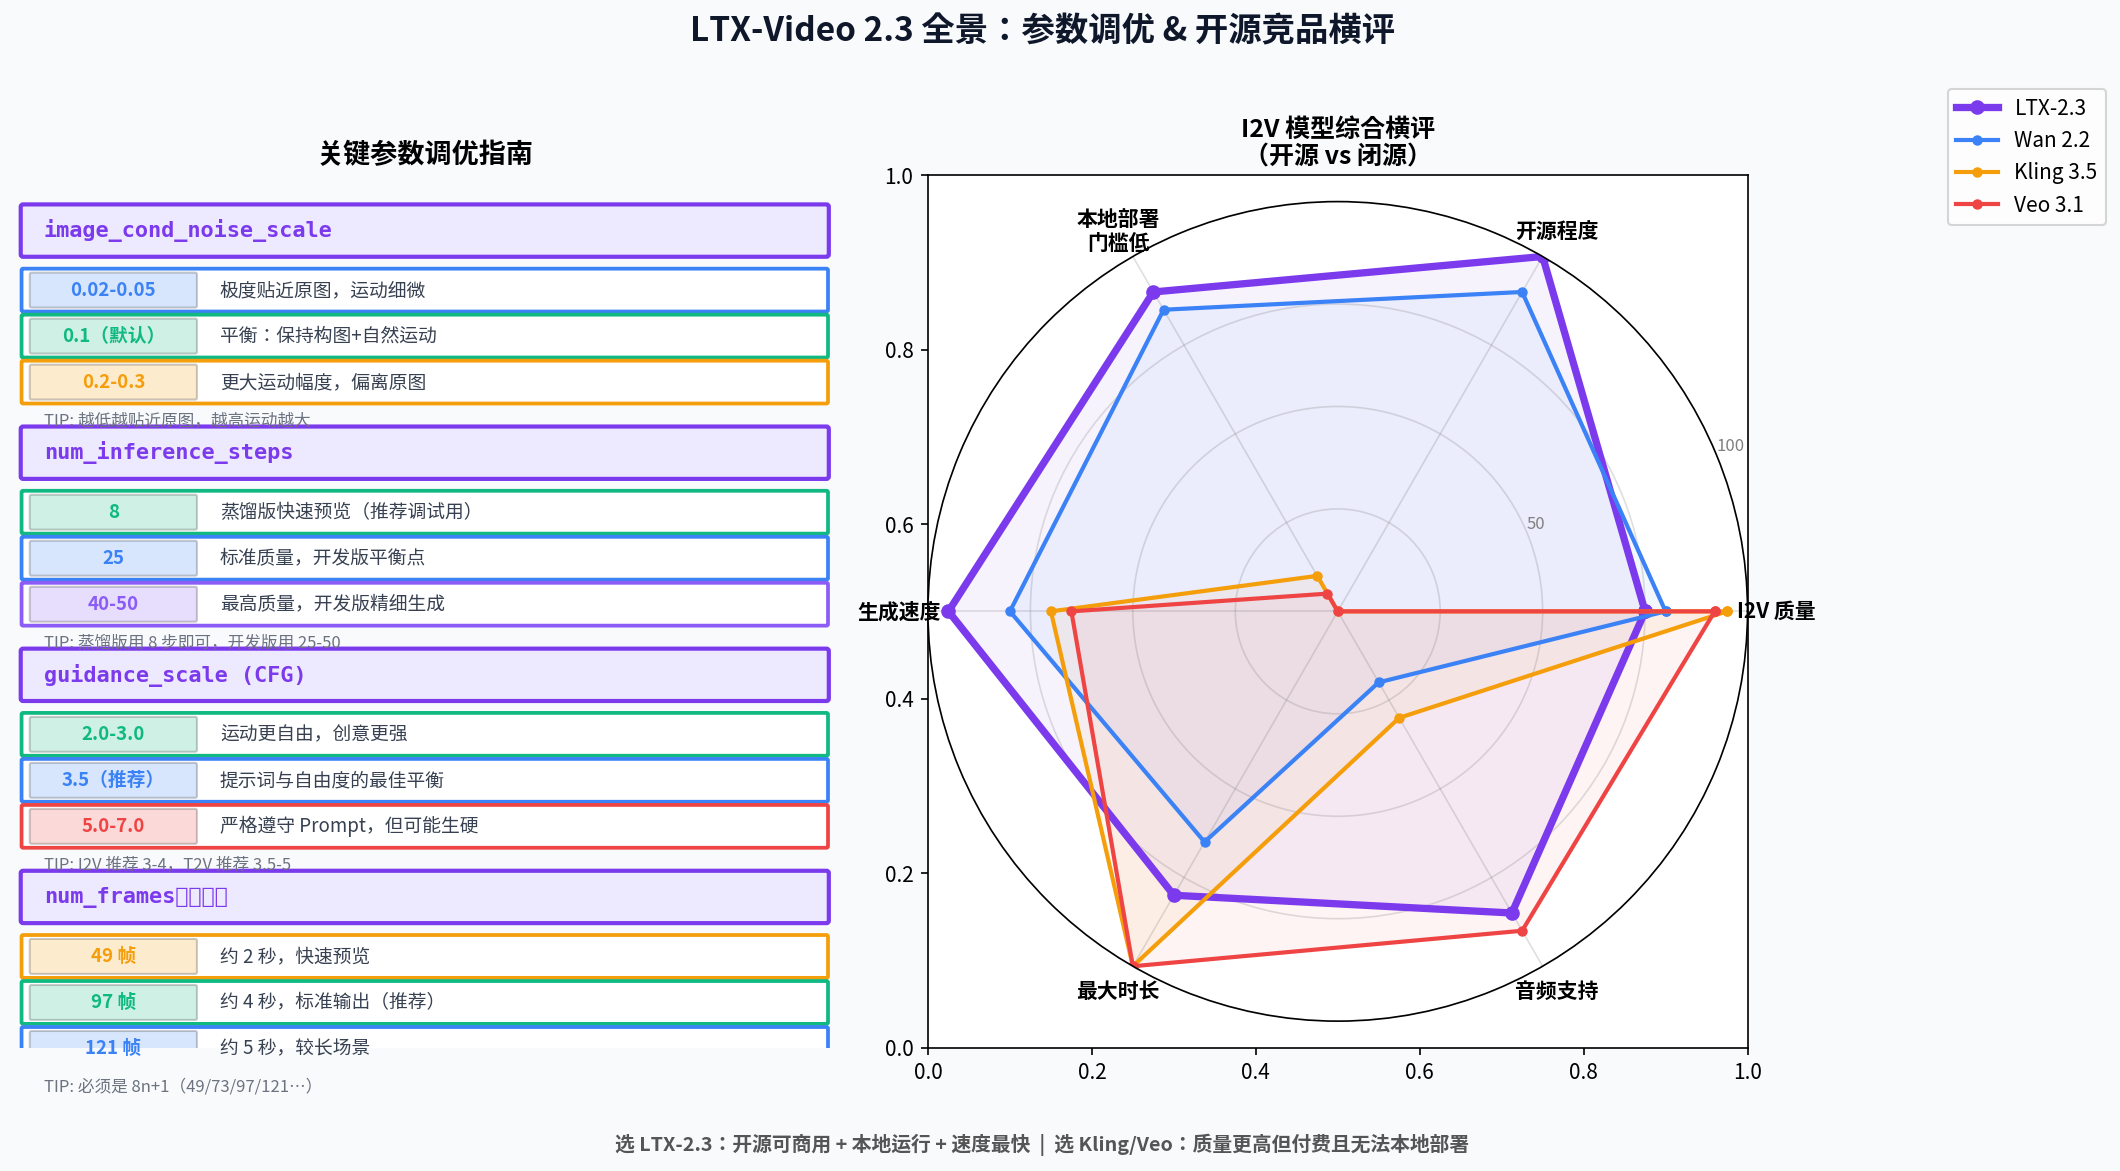
| image_cond_noise | 0.1 | 图像条件噪声(越低越贴近原图,越高运动越大) |
| seed | 随机 | 固定 seed 可复现结果 |
Python 代码实现 I2V
python
import torch
from PIL import Image
from diffusers import LTXImageToVideoPipeline
from diffusers.utils import export_to_video
import numpy as np

# ── 加载模型 ──
pipe = LTXImageToVideoPipeline.from_pretrained(
    "Lightricks/LTX-Video-2.3",
    torch_dtype=torch.bfloat16,
)
pipe.to("cuda")

# 显存优化(12GB 显卡必须加)
pipe.enable_model_cpu_offload()
# pipe.enable_sequential_cpu_offload()  # 更激进的省显存,但慢

# ── 准备输入图片 ──
image = Image.open("./my_image.jpg").convert("RGB")

# 调整到推荐尺寸(宽高都要是 32 的倍数)
image = image.resize((768, 512))

# ── 编写提示词 ──
# 重要技巧:先描述镜头运动,再描述场景内容
prompt = (
    "Slow push in, "                              # 镜头运动在前
    "cinematic, "                                  # 画面风格
    "golden hour sunlight, "                       # 光照描述
    "the woman turns her head slightly to the left, " # 主体动作
    "hair flows gently in the breeze, "           # 细节动作
    "shallow depth of field, "                    # 景深
    "4K, high detail"                             # 质量词
)

negative_prompt = (
    "worst quality, inconsistent motion, "
    "blurry, jittery, distorted, "
    "low resolution, static, no movement"
)

# ── 生成视频 ──
generator = torch.Generator(device="cuda").manual_seed(42)

output = pipe(
    image=image,
    prompt=prompt,
    negative_prompt=negative_prompt,
    height=512,
    width=768,
    num_frames=97,          # 约 4 秒(25fps)
    num_inference_steps=25,  # 蒸馏版用 8,开发版用 25-50
    guidance_scale=3.5,
    image_cond_noise_scale=0.1,  # 越低越贴近原图
    generator=generator,
).frames[0]

# ── 导出视频 ──
export_to_video(output, "output.mp4", fps=25)
print("视频已生成:output.mp4")
批量生成(测试不同 Prompt)
python
import torch
from PIL import Image
from diffusers import LTXImageToVideoPipeline
from diffusers.utils import export_to_video

pipe = LTXImageToVideoPipeline.from_pretrained(
    "Lightricks/LTX-Video-2.3",
    torch_dtype=torch.bfloat16,
).to("cuda")
pipe.enable_model_cpu_offload()

image = Image.open("./test_image.jpg").convert("RGB").resize((768, 512))

# 测试多个 Prompt 变体
prompts = [
    "Slow push in, cinematic, the subject remains still, subtle ambient motion",
    "Camera orbits slowly to the right, dramatic lighting, cinematic quality",
    "Gentle zoom out, peaceful scene, soft natural light, 4K quality",
]

for i, prompt in enumerate(prompts):
    output = pipe(
        image=image,
        prompt=prompt,
        negative_prompt="worst quality, blurry, jittery, distorted",
        height=512, width=768,
        num_frames=49,
        num_inference_steps=8,  # 蒸馏版快速预览用 8 步
        guidance_scale=3.5,
        generator=torch.Generator("cuda").manual_seed(42),
    ).frames[0]

    export_to_video(output, f"output_v{i+1}.mp4", fps=25)
    print(f"变体 {i+1} 已生成")
🎯 提示词工程:让 I2V 结果更可控
LTX-2.3 提示词结构公式
根据官方文档和大量实测,最有效的提示词结构:
[镜头运动] + [画面风格] + [光照] + [主体动作] + [细节] + [质量词]镜头运动词(最重要,放最前面):
推镜:  slow push in / slow dolly in / gentle zoom in
拉镜:  slow pull out / camera pulls back / zoom out
横移:  camera pans left/right / lateral camera move
环绕:  camera orbits clockwise / 360 degree rotation
手持:  handheld camera shake / documentary style
固定:  static camera / locked-off shot / tripod shot
俯拍:  aerial view / bird's eye view / top-down
跟随:  tracking shot / follow cam
常用场景 Prompt 模板:
python
# 人像 I2V
portrait_prompt = (
    "Slow push in, "
    "portrait photography style, "
    "soft studio lighting, "
    "subject turns head slightly, "
    "subtle eye movement, "
    "hair flows gently, "
    "shallow depth of field, "
    "cinematic, 4K"
)

# 风景 I2V
landscape_prompt = (
    "Gentle forward drift, "
    "cinematic landscape photography, "
    "golden hour lighting, "
    "clouds move slowly across the sky, "
    "grass sways in the breeze, "
    "4K, ultra high detail"
)

# 产品展示 I2V
product_prompt = (
    "Slow orbit camera moving left to right, "
    "luxury product photography, "
    "studio lighting with soft shadows, "
    "product stays centered and sharp, "
    "subtle specular highlight passes across surface, "
    "clean white background, "
    "commercial quality, 4K"
)

# 建筑 I2V
architecture_prompt = (
    "Slow aerial push in, "
    "architectural photography, "
    "morning light with long shadows, "
    "clouds drift overhead, "
    "people walk in the plaza below, "
    "cinematic color grading, 4K"
)
负向提示词(通用)
python
negative_prompt = (
    "worst quality, low quality, "
    "blurry, out of focus, "
    "jittery, shaky, unstable, "
    "distorted, morphing, melting, "
    "inconsistent motion, "
    "static, no movement, "
    "artifacts, noise, grain"
)
⚡ 进阶:First Frame + Last Frame 双帧控制
LTX-2.3 支持同时指定首帧和尾帧来生成视频------这是精确控制运镜的最强方式,也是 NVIDIA 官方工作流的核心。
python
from diffusers import LTXImageToVideoPipeline
from diffusers.utils import export_to_video, load_image
import torch

pipe = LTXImageToVideoPipeline.from_pretrained(
    "Lightricks/LTX-Video-2.3",
    torch_dtype=torch.bfloat16,
).to("cuda")
pipe.enable_model_cpu_offload()

# 首帧:场景起点
first_frame = load_image("./scene_start.jpg").resize((768, 512))

# 尾帧:场景终点(决定了镜头最终落脚的位置和状态)
last_frame = load_image("./scene_end.jpg").resize((768, 512))

# 提示词描述两帧之间的过渡运动
prompt = (
    "Camera slowly pushes forward and slightly right, "
    "smooth cinematic movement, "
    "natural lighting transition from day to golden hour, "
    "high quality, 4K"
)

output = pipe(
    image=first_frame,
    last_image=last_frame,      # 指定尾帧!
    prompt=prompt,
    negative_prompt="worst quality, blurry, jittery",
    height=512, width=768,
    num_frames=97,
    num_inference_steps=25,
    guidance_scale=3.5,
    generator=torch.Generator("cuda").manual_seed(0),
).frames[0]

export_to_video(output, "firstlast_output.mp4", fps=25)双帧控制的典型应用场景:
电商产品展示:首帧(正面)→ 尾帧(45度侧面),生成产品展示旋转
建筑漫游:首帧(远景)→ 尾帧(入口近景),生成推进镜头
人物进场:首帧(空场景)→ 尾帧(人物已在画面中)
🔝 分辨率升级:配合 RTX Video Super Resolution
LTX-2.3 生成的视频可以用 NVIDIA 的 RTX Video Super Resolution 节点在 ComfyUI 里做 4K 升频。
python
# ComfyUI 工作流节点链:
# [LTX Video] → [Video Decode] → [RTX Video Super Resolution] → [Video Encode]

# Python 方式(使用 Real-ESRGAN 升频)
from PIL import Image
import numpy as np

def upscale_frames(frames, scale=2):
    """使用 Real-ESRGAN 对视频帧升频"""
    from basicsr.archs.rrdbnet_arch import RRDBNet
    from realesrgan import RealESRGANer

    model = RRDBNet(num_in_ch=3, num_out_ch=3, num_feat=64,
                   num_block=23, num_grow_ch=32, scale=scale)
    upsampler = RealESRGANer(
        scale=scale,
        model_path='RealESRGAN_x2plus.pth',
        model=model,
        tile=512,
        tile_pad=10,
    )

    upscaled = []
    for frame in frames:
        img = np.array(frame)
        output, _ = upsampler.enhance(img, outscale=scale)
        upscaled.append(Image.fromarray(output))
    return upscaled
📊 LTX-2.3 vs 同期竞品
| 维度 | LTX-2.3 | Wan 2.2 | Kling 3.5 | Veo 3.1 |
|---|---|---|---|---|
| 是否开源 | ✅ MIT | ✅ 开源 | ❌ 闭源 | ❌ 闭源 |
| I2V 排名 | Top 3 🥉 | Top 5 | Top 1 🥇 | Top 2 🥈 |
| 本地部署 | ✅ 消费卡可跑 | ✅ | ❌ | ❌ |
| 双帧控制 | ✅ | ✅ | ✅ | ❌ |
| 同步音频 | ✅ | ❌ | ❌ | ✅ |
| 最小 VRAM | 8 GB | 8 GB | N/A | N/A |
| 最大时长 | 60s | 30s | 3min | 8min |
| 许可证 | MIT | Apache-2.0 | 商用收费 | 商用收费 |
选 LTX-2.3 的理由:开源可商用 + 消费级显卡可跑 + 速度快(接近实时)+ 双帧控制。选 Kling/Veo 的理由:质量更高(特别是人物面部和复杂运动),但需要付费且无法本地部署。
❌ 常见问题速解
问题 1:生成视频有 Ken Burns 效应(不自然的缩放/平移)
LTX-2.3 已大幅改善,但如果还出现:
python
# 解决1:降低 image_cond_noise_scale
image_cond_noise_scale=0.05  # 从默认 0.1 降到 0.05,更贴近原图

# 解决2:在提示词里明确说"static camera"或"locked-off shot"
prompt = "Static camera, no zoom, no pan, " + your_prompt

# 解决3:在 ComfyUI 里开启 Color Correction 节点(补偿颜色偏移)
问题 2:CUDA OOM(显存不足)
python
# 方法1:开启 CPU offload
pipe.enable_model_cpu_offload()

# 方法2:更激进的 sequential offload(更慢但省显存)
pipe.enable_sequential_cpu_offload()

# 方法3:降低分辨率和帧数
height=512, width=384    # 比默认 768×512 更小
num_frames=49            # 比默认 97 更少

# 方法4:用 FP8 量化版本
pipe = LTXImageToVideoPipeline.from_pretrained(
    "Lightricks/LTX-Video-2.3",
    torch_dtype=torch.float8_e4m3fn,  # FP8 量化
)
问题 3:运动幅度太小(视频几乎静止)
python
# 解决1:增大 image_cond_noise_scale
image_cond_noise_scale=0.2  # 越大运动越明显(默认 0.1)

# 解决2:在提示词里明确运动
"Large camera movement, dramatic motion, dynamic scene, "

# 解决3:提高 guidance_scale
guidance_scale=5.0   # 从默认 3.5 增大
问题 4:人物面部变形/手部扭曲
python
# 负向提示词加入
negative_prompt += ", deformed hands, distorted face, extra fingers, morphing"

# 提示词加入
prompt = "realistic human anatomy, natural hand pose, " + prompt

# 根本解法:换用 Kling 3.5(在人物细节上仍优于 LTX-2.3)
🎁 速查总结
| 任务 | 关键参数 |
|---|---|
| 快速预览(8GB 显卡) | 蒸馏版 + steps=8 + 512×384 + 49帧 |
| 标准质量(16GB 显卡) | 蒸馏版 + steps=25 + 768×512 + 97帧 |
| 高质量(24GB 显卡) | 开发版 + steps=40 + 1216×704 + 97帧 |
| 更贴近原图 | image_cond_noise_scale=0.05 |
| 更大运动幅度 | image_cond_noise_scale=0.2 |
| Prompt 结构 | 镜头运动 → 风格 → 光照 → 主体动作 → 质量词 |
| 精确控制镜头 | FirstFrame + LastFrame 双帧工作流 |
| HuggingFace 下载加速 | export HF_ENDPOINT=https://hf-mirror.com |
📣 最后
如果这篇帮你跑通了 LTX-2.3 的 I2V 工作流:
- 👍 点赞 让更多 AI 视频创作者看到
- ⭐ 收藏 参数速查表,生成时直接翻
- 💬 评论 参与投票,或者把你生成的效果截图分享出来
- 🔔 关注 持续更新 AI 视频生成实战,一个正在学 AI 的大学生 👨🎓
📖 参考资料:
- Wikipedia:LTX (AI Model) --- LTX-2.3 发布记录
- NVIDIA GeForce News:RTX AI Video Generation Guide(2026.03.17)
- AI FILMS Studio:LTX-2.3 Tutorial(2026.03)
- Miraflow AI:LTX 2.3 Explained(2026)
- Lightricks GitHub:LTX-Video 官方仓库 + ComfyUI 节点
- Civitai:VideoFlow LTX 2.3 I2V Workflow