课程代码
我用夸克网盘给你分享了
链接:https://pan.quark.cn/s/17a5c6fed190

实践内容
|-----------------|-------------------------------------------------|-------------------------------------------------------------------------------------------------------------------------------------|--------|------------|
| 11-云主机VMCI-CD实践 | 1. 准备基础环境 2. 制定发布规范 3. CI持续集成 4. CD持续部署 5. 版本回滚 | 01-基础环境准备 02-制定发布规范 03-分支开发模式 04-调试CI流水线 05-手动发布应用 06-CD流水线-下载制品 07-CD流水线-ansible发布 08-CD流水线-发布策略 09-1-CD流水线-回滚 10-2-CD流水线-Rollback | 必修 | 2022/11/13 |
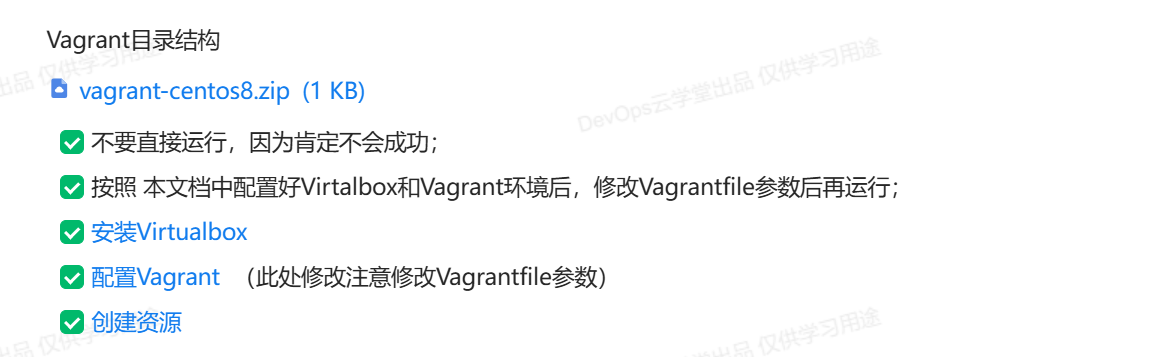
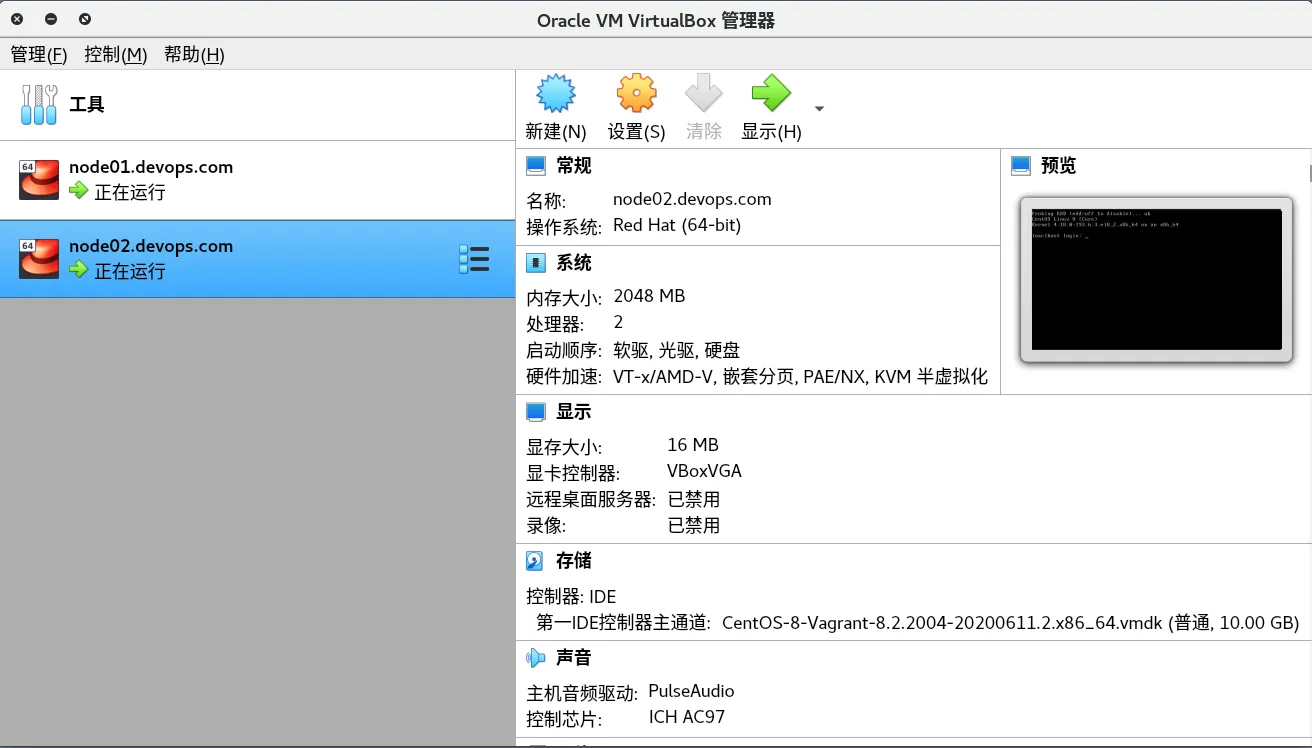
Vagrant+Virtualbox配置实验环境
目的: 创建两台虚拟机来做CD中的部署;
|-------------------|------|------------------|--------------|
| 主机名 | 配置 | IPV4地址 | 用户密码 |
| node01.devops.com | 2C2G | 192.168.1.121/24 | root/vagrant |
| node02.devops.com | 2C2G | 192.168.1.122/24 | root/vagrant |
bash
.
├── init-ssh.sh
├── Vagrantfile
└── yumrepos
    ├── Centos-OS.repo
    ├── epel-modular.repo
    ├── epel-next.repo
    ├── epel-next-testing.repo
    ├── epel.repo
    ├── epel-testing-modular.repo
    ├── epel-testing.repo
    ├── home:cabelo.repo
    ├── nginx.repo
    ├── postgresql96.repo
    ├── salt-py3-latest.repo
    ├── salt.repo
    └── virtualbox.repo
Virtualbox安装
/etc/yum.repos.d/virtualbox.repo
bash
[virtualbox]
name=Oracle Linux / RHEL / CentOS-$releasever / $basearch - VirtualBox
baseurl=http://download.virtualbox.org/virtualbox/rpm/el/$releasever/$basearch
enabled=1
gpgcheck=1
repo_gpgcheck=1
gpgkey=https://www.virtualbox.org/download/oracle_vbox.asc
install
bash
dnf -y install binutils kernel-devel kernel-headers libgomp make patch gcc glibc-headers glibc-devel dkms
dnf install -y VirtualBox-6.1
Vagrant配置
安装
bash
yum install -y yum-utils
yum-config-manager --add-repo https://rpm.releases.hashicorp.com/RHEL/hashicorp.repo
yum -y install vagrant
下载box
https://mirrors.ustc.edu.cn/centos-cloud/centos/8/vagrant
bash
wget https://mirrors.ustc.edu.cn/centos-cloud/centos/8/vagrant/x86_64/images/CentOS-8-Vagrant-8.2.2004-20200611.2.x86_64.vagrant-virtualbox.box编写Vagrantfile, 需要注意的内容:
- 桥接模式 网卡名称
vm.box_urlbox文件的路径
bash
# -*- mode: ruby -*-
# vi: set ft=ruby :

Vagrant.configure("2") do |config|
  config.vm.box = "centos8"

  config.vm.define "node01" do |config|
    config.vm.hostname = "node01.devops.com"
    config.vm.box_url  = "file://data/vagrant/CentOS-8-Vagrant-8.2.2004-20200611.2.x86_64.vagrant-virtualbox.box"
    config.vm.network "public_network", bridge: "wlp0s20f3",ip: "192.168.1.121"
    config.vm.provider "virtualbox" do |vb|
      vb.gui = false
      vb.memory = "2048"
      vb.cpus  = "2"
      vb.name = "node01.devops.com"
    end
  end

  config.vm.define "node02" do |config|
    config.vm.hostname = "node02.devops.com"
    config.vm.box_url  = "file://data/vagrant/CentOS-8-Vagrant-8.2.2004-20200611.2.x86_64.vagrant-virtualbox.box"
    config.vm.network "public_network", bridge: "wlp0s20f3",ip: "192.168.1.122"
    config.vm.provider "virtualbox" do |vb|
      vb.gui = false
      vb.memory = "2048"
      vb.cpus  = "2"
      vb.name = "node02.devops.com"
    end
  end

  # init install package
  config.vm.provision "shell", inline: <<-SHELL
    ## config yum
    rm -fr /etc/yum.repos.d/*.repo
    cp /vagrant/yumrepos/*.repo /etc/yum.repos.d/
    sh -x /vagrant/init-ssh.sh
  SHELL
end
Vagrantfile中需要两个配置
- 自定义yum源(自己整理的yum.repos内容,直接复制到机器中覆盖即可)
- 配置允许使用账号和密码SSH登入
bash
sed -ri '/^#PermitRootLogin/cPermitRootLogin yes' /etc/ssh/sshd_config
sed -ri '/^PasswordAuthentication/cPasswordAuthentication yes' /etc/ssh/sshd_config
systemctl restart sshd
Up 创建资源
bash
vagrant up
bash
[root@zeyang-nuc-service Vagrant]# vagrant up
Bringing machine 'node01' up with 'virtualbox' provider...
Bringing machine 'node02' up with 'virtualbox' provider...
==> node01: Importing base box 'centos8'...
==> node01: Matching MAC address for NAT networking...
==> node01: Setting the name of the VM: node01.devops.com
==> node01: Clearing any previously set network interfaces...
==> node01: Preparing network interfaces based on configuration...
    node01: Adapter 1: nat
    node01: Adapter 2: bridged
==> node01: Forwarding ports...
    node01: 22 (guest) => 2222 (host) (adapter 1)
==> node01: Running 'pre-boot' VM customizations...
==> node01: Booting VM...
==> node01: Waiting for machine to boot. This may take a few minutes...
    node01: SSH address: 127.0.0.1:2222
    node01: SSH username: vagrant
    node01: SSH auth method: private key
    node01:
    node01: Vagrant insecure key detected. Vagrant will automatically replace
    node01: this with a newly generated keypair for better security.
    node01:
    node01: Inserting generated public key within guest...
    node01: Removing insecure key from the guest if it's present...
    node01: Key inserted! Disconnecting and reconnecting using new SSH key...
==> node01: Machine booted and ready!
==> node01: Checking for guest additions in VM...
    node01: No guest additions were detected on the base box for this VM! Guest
    node01: additions are required for forwarded ports, shared folders, host only
    node01: networking, and more. If SSH fails on this machine, please install
    node01: the guest additions and repackage the box to continue.
    node01:
    node01: This is not an error message; everything may continue to work properly,
    node01: in which case you may ignore this message.
==> node01: Setting hostname...
==> node01: Configuring and enabling network interfaces...
==> node01: Rsyncing folder: /root/Vagrant/ => /vagrant
==> node01: Running provisioner: shell...
    node01: Running: inline script
    node01: + sed -ri '/^#PermitRootLogin/cPermitRootLogin yes' /etc/ssh/sshd_config
    node01: + sed -ri '/^PasswordAuthentication/cPasswordAuthentication yes' /etc/ssh/sshd_config
    node01: + systemctl restart sshd
==> node02: Importing base box 'centos8'...
==> node02: Matching MAC address for NAT networking...
==> node02: Setting the name of the VM: node02.devops.com
==> node02: Fixed port collision for 22 => 2222. Now on port 2200.
==> node02: Clearing any previously set network interfaces...
==> node02: Preparing network interfaces based on configuration...
    node02: Adapter 1: nat
    node02: Adapter 2: bridged
==> node02: Forwarding ports...
    node02: 22 (guest) => 2200 (host) (adapter 1)
==> node02: Running 'pre-boot' VM customizations...
==> node02: Booting VM...
==> node02: Waiting for machine to boot. This may take a few minutes...
    node02: SSH address: 127.0.0.1:2200
    node02: SSH username: vagrant
    node02: SSH auth method: private key
    node02:
    node02: Vagrant insecure key detected. Vagrant will automatically replace
    node02: this with a newly generated keypair for better security.
    node02:
    node02: Inserting generated public key within guest...
    node02: Removing insecure key from the guest if it's present...
    node02: Key inserted! Disconnecting and reconnecting using new SSH key...
==> node02: Machine booted and ready!
==> node02: Checking for guest additions in VM...
    node02: No guest additions were detected on the base box for this VM! Guest
    node02: additions are required for forwarded ports, shared folders, host only
    node02: networking, and more. If SSH fails on this machine, please install
    node02: the guest additions and repackage the box to continue.
    node02:
    node02: This is not an error message; everything may continue to work properly,
    node02: in which case you may ignore this message.
==> node02: Setting hostname...
==> node02: Configuring and enabling network interfaces...
==> node02: Rsyncing folder: /root/Vagrant/ => /vagrant
==> node02: Running provisioner: shell...
    node02: Running: inline script
    node02: + sed -ri '/^#PermitRootLogin/cPermitRootLogin yes' /etc/ssh/sshd_config
    node02: + sed -ri '/^PasswordAuthentication/cPasswordAuthentication yes' /etc/ssh/sshd_config
    node02: + systemctl restart sshd
效果
vagrant destroy
vagrant destroy --force
Terraform Provider 放弃
virtualbox的terraform provider许久不更新了,玩不起来。改用Vagrant
https://github.com/terra-farm/terraform-provider-virtualbox/issues/134
离线安装provider, 进入github仓库下载0.2.2-alpha.1 版本。
https://github.com/terra-farm/terraform-provider-virtualbox/releases
terraform本地缓存目录 /root/.terraform.d/terraform-plugin-cache/
bash
cd /root/.terraform.d/terraform-plugin-cache/registry.terraform.io/
mkdir -p terra-farm/virtualbox/0.2.2-alpha.1/linux_amd64/

wget https://github.com/terra-farm/terraform-provider-virtualbox/releases/download/v0.2.2-alpha.1/terraform-provider-virtualbox_0.2.2-alpha.1_linux_amd64.zip

unzip terraform-provider-virtualbox_0.2.2-alpha.1_linux_amd64.zip

rm -fr terraform-provider-virtualbox_0.2.2-alpha.1_linux_amd64.zip

tree /root/.terraform.d/terraform-plugin-cache/registry.terraform.io/terra-farm/
/root/.terraform.d/terraform-plugin-cache/registry.terraform.io/terra-farm/
└── virtualbox
    └── 0.2.2-alpha.1
        └── linux_amd64
            ├── CHANGELOG.md
            ├── LICENSE
            ├── README.md
            └── terraform-provider-virtualbox_v0.2.2-alpha.1
Init
bash
[root@zeyang-nuc-service virtualbox]# terraform init

Initializing the backend...

Initializing provider plugins...
- Finding terra-farm/virtualbox versions matching "0.2.2-alpha.1"...
- Using terra-farm/virtualbox v0.2.2-alpha.1 from the shared cache directory

Terraform has created a lock file .terraform.lock.hcl to record the provider
selections it made above. Include this file in your version control repository
so that Terraform can guarantee to make the same selections by default when
you run "terraform init" in the future.

Terraform has been successfully initialized!

You may now begin working with Terraform. Try running "terraform plan" to see
any changes that are required for your infrastructure. All Terraform commands
should now work.

If you ever set or change modules or backend configuration for Terraform,
rerun this command to reinitialize your working directory. If you forget, other
commands will detect it and remind you to do so if necessary.
一、项目规范与总体设计
二、实施中技术点参考
1. Nexus制品上传和下载
NexusAPI调试方法
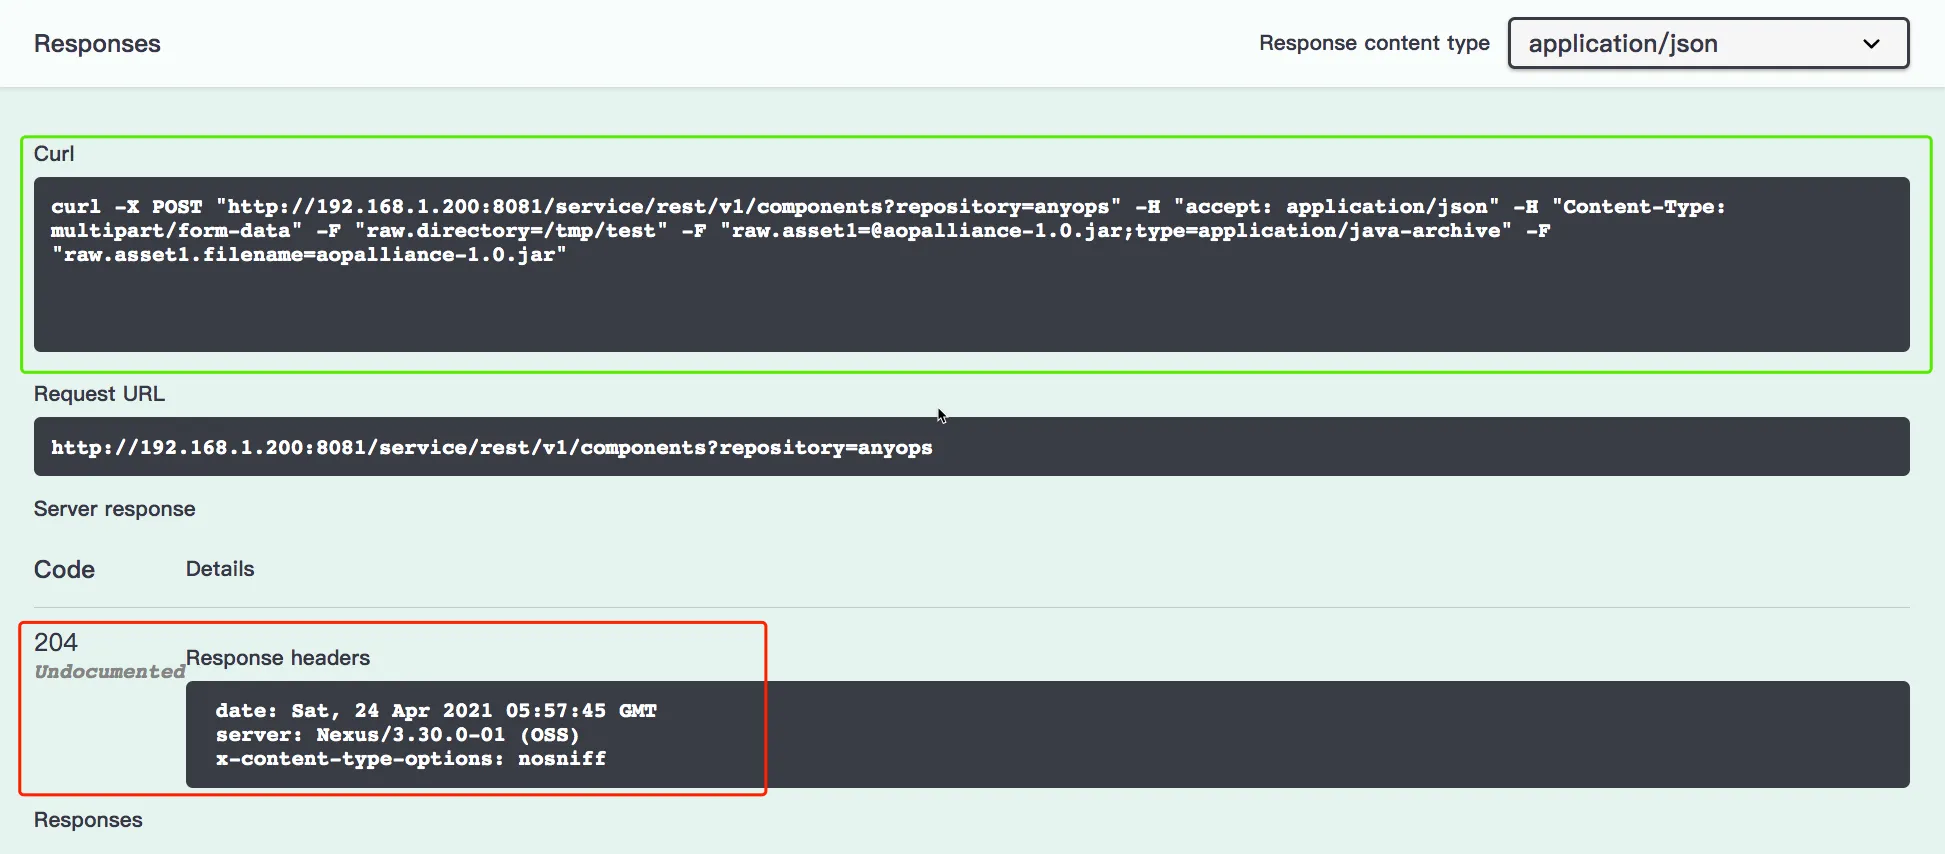
进入设置页面, 找到System > API , 即可进入API调试页面。
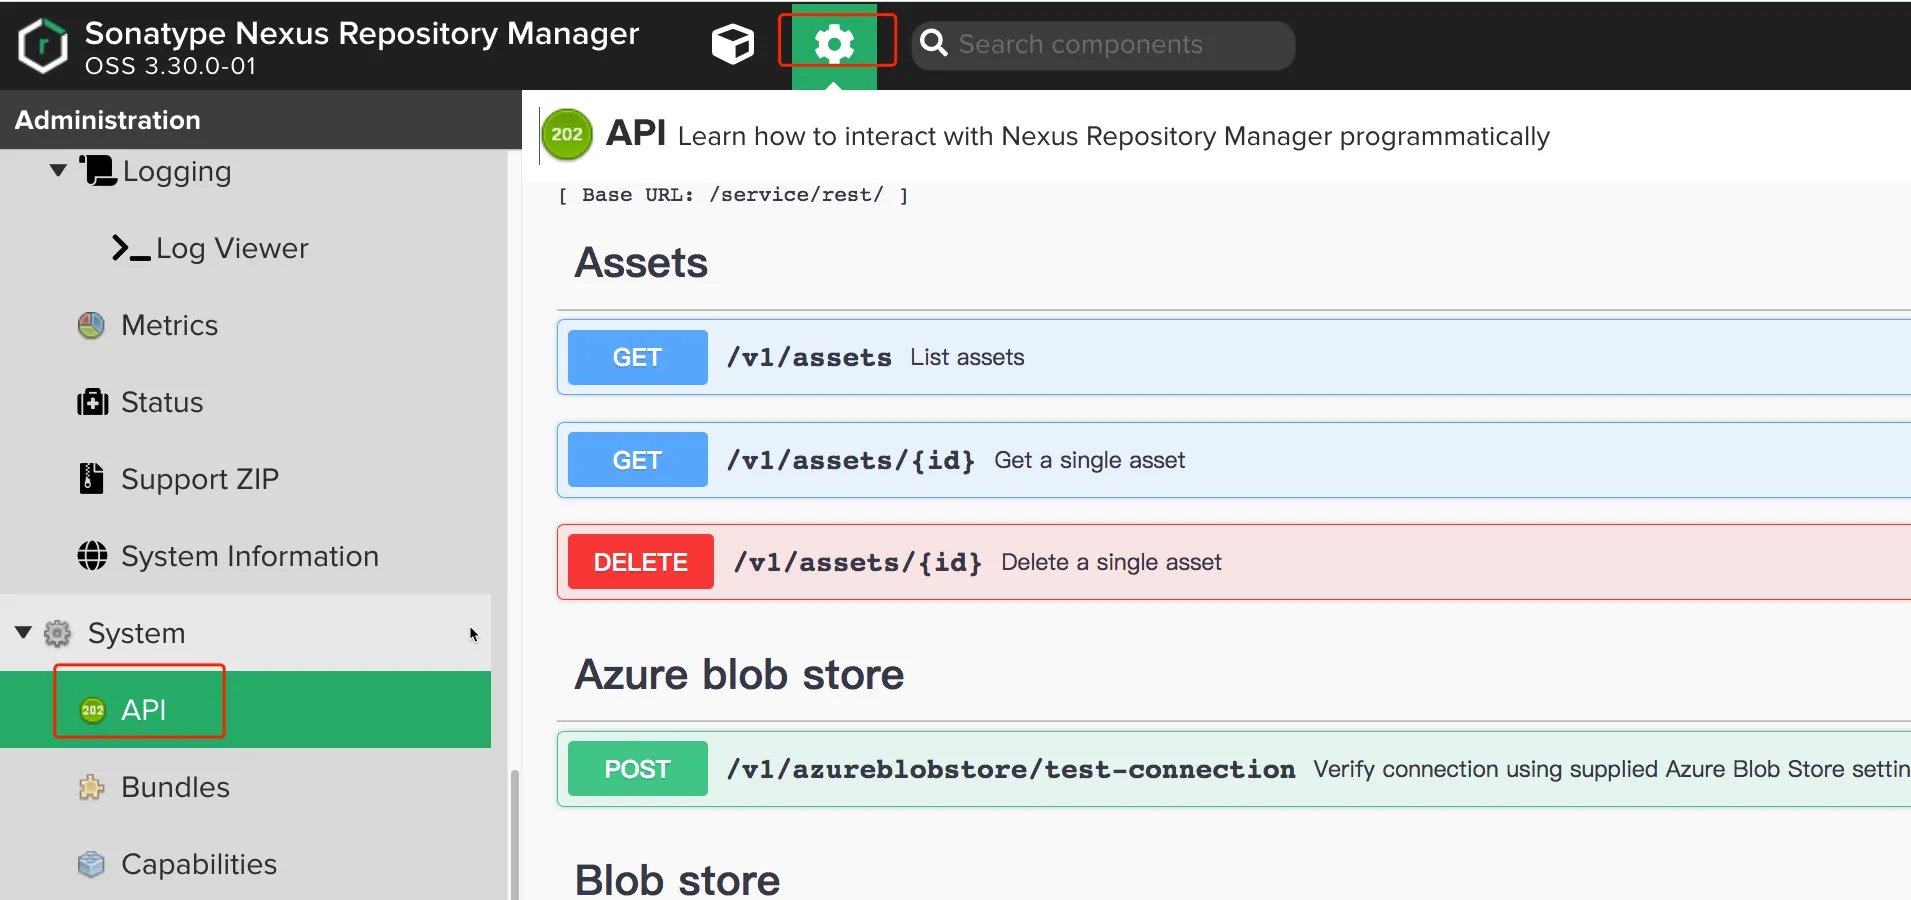
调试API /v1/components, 点击Try it out才能填写信息。
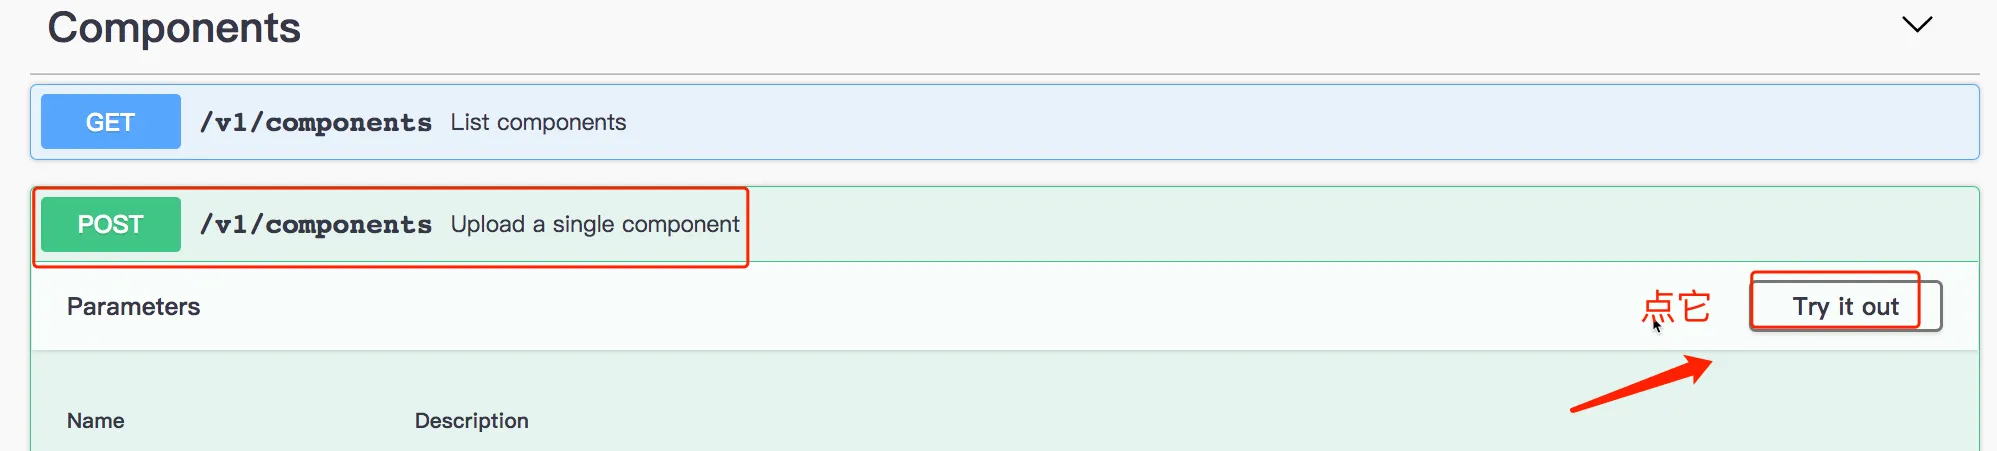
填写参数信息

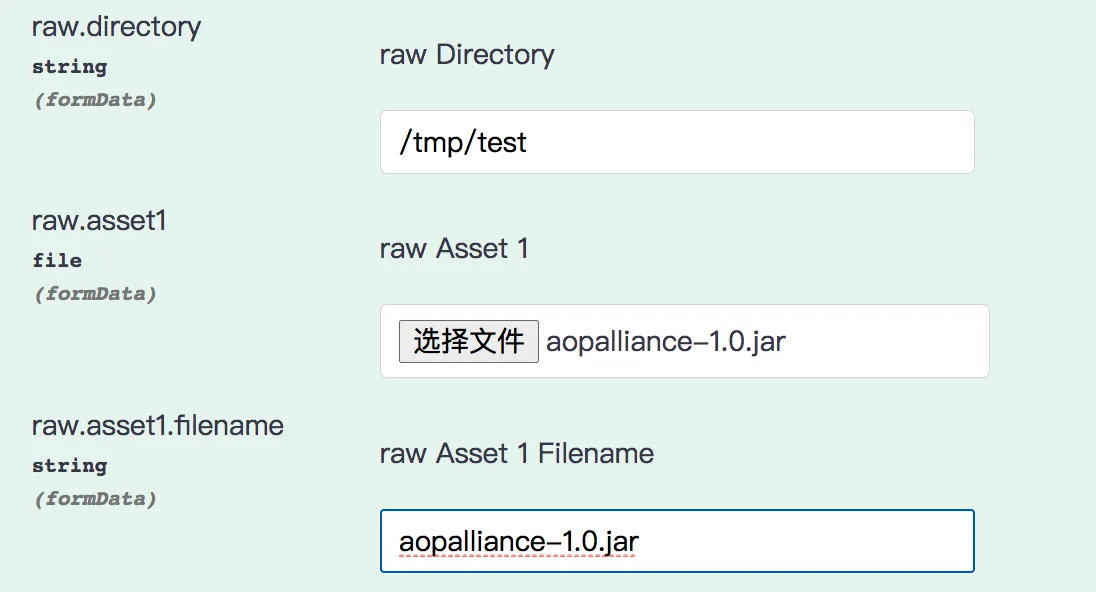
点击
执行操作, 204表示成功。 我们可以复用这里的CURL指令, 最后封装到Jenkins流水线当中。
上传制品
curl -u admin:admin123 如果Nexus开启了认证需要配置认证信息才能正常访问。
bash
##PNG
curl -X POST "http://192.168.1.200:8081/service/rest/v1/components?repository=myrepo" -H "accept: application/json" -H "Content-Type: multipart/form-data" -F "raw.directory=/tmp" -F "raw.asset1=@默认标题_自定义px_2020-10-01-0.png;type=image/png" -F "raw.asset1.filename=默认标题_自定义px_2020-10-01-0.png"


## tar.gz & ZIP
curl -X POST "http://192.168.1.200:8081/service/rest/v1/components?repository=myrepo" -H "accept: application/json" -H "Content-Type: multipart/form-data" -F "raw.directory=/tmp" -F "raw.asset1=@nexus-3.30.0-01-unix.tar.gz;type=application/x-gzip" -F "raw.asset1.filename=aaa.tar.gz"


curl -X POST "http://192.168.1.200:8081/service/rest/v1/components?repository=myrepo" -H "accept: application/json" -H "Content-Type: multipart/form-data" -F "raw.directory=/tmp" -F "raw.asset1=@waypoint_0.1.5_linux_amd64.zip;type=application/x-gzip" -F "raw.asset1.filename=waypoint_0.1.5_linux_amd64.zip"


## Jar file
curl -X POST "http://192.168.1.200:8081/service/rest/v1/components?repository=myrepo" -H "accept: application/json" -H "Content-Type: multipart/form-data" -F "raw.directory=/tmp" -F "raw.asset1=@aopalliance-1.0.jar;type=application/java-archive" -F "raw.asset1.filename=aopalliance-1.0.jar"
下载制品
cURL
bash
curl -u admin:admin123 http://192.168.1.200:8081/repository/anyops/com/anyops/a
nyops-devops-service/1.1.1/anyops-devops-service-1.1.1.jar -o anyops-devops-service-1.1.1.jar
Wget
bash
wget --http-user=admin --http-passwd=admin123 http://192.168.1.200:8081/repos
itory/anyops/com/anyops/anyops-devops-service/1.1.1/anyops-devops-service-1.1.1.jar
2. 前端后端项目发布
前端项目
- 复制静态文件到nginx站点目录,nginx -s reload
bash
## 进入Web服务器的站点目录下

## 下载包
[root@master html]# curl -u admin:admin123 http://192.168.1.200:8081/repository/anyops/com/anyops/anyops-devops-ui/1.1.1/anyops-devops-ui-1.1.1.tar.gz  -o anyops-devops-ui-1.1.1.tar.gz
  % Total    % Received % Xferd  Average Speed   Time    Time     Time  Current
                                 Dload  Upload   Total   Spent    Left  Speed
100  196k  100  196k    0     0  24.0M      0 --:--:-- --:--:-- --:--:-- 24.0M

## 解压包
[root@master html]# tar zxf anyops-devops-ui-1.1.1.tar.gz
[root@master html]# ls
anyops-devops-ui-1.1.1.tar.gz  index.html  static

## 触发nginx重载
[root@master html]# nginx -s reload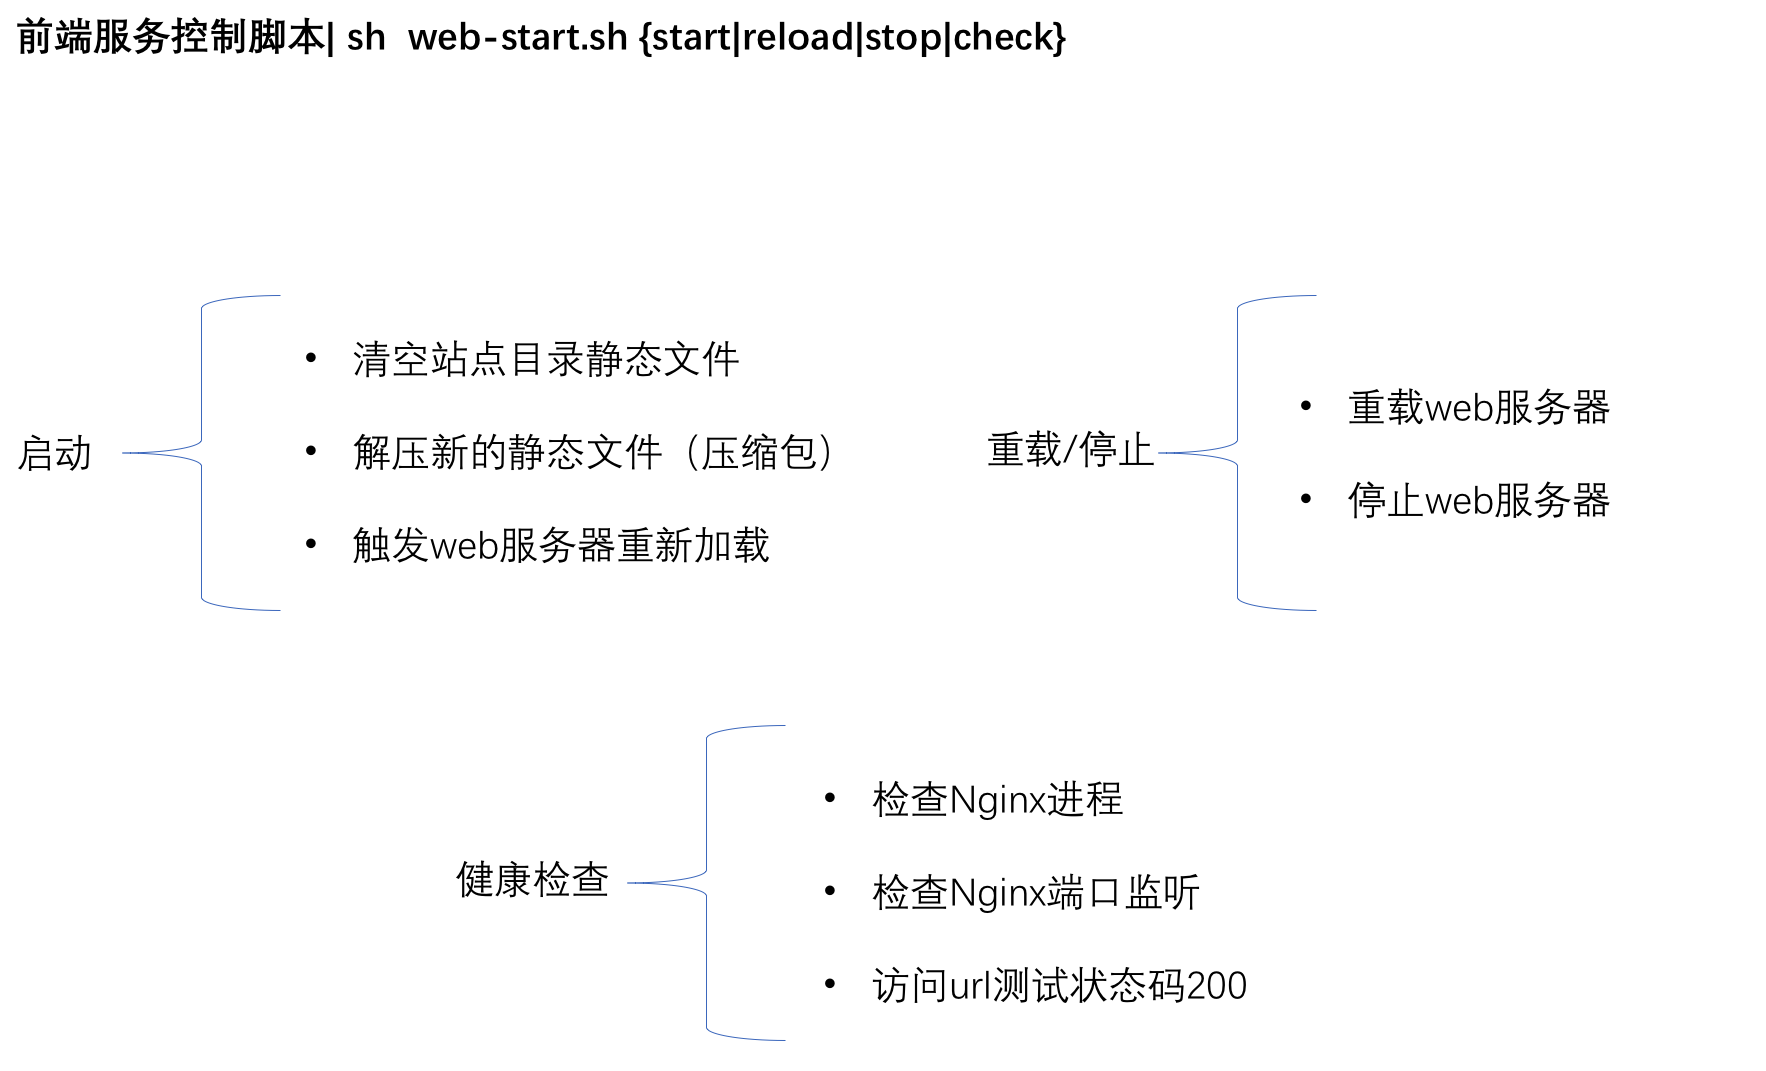
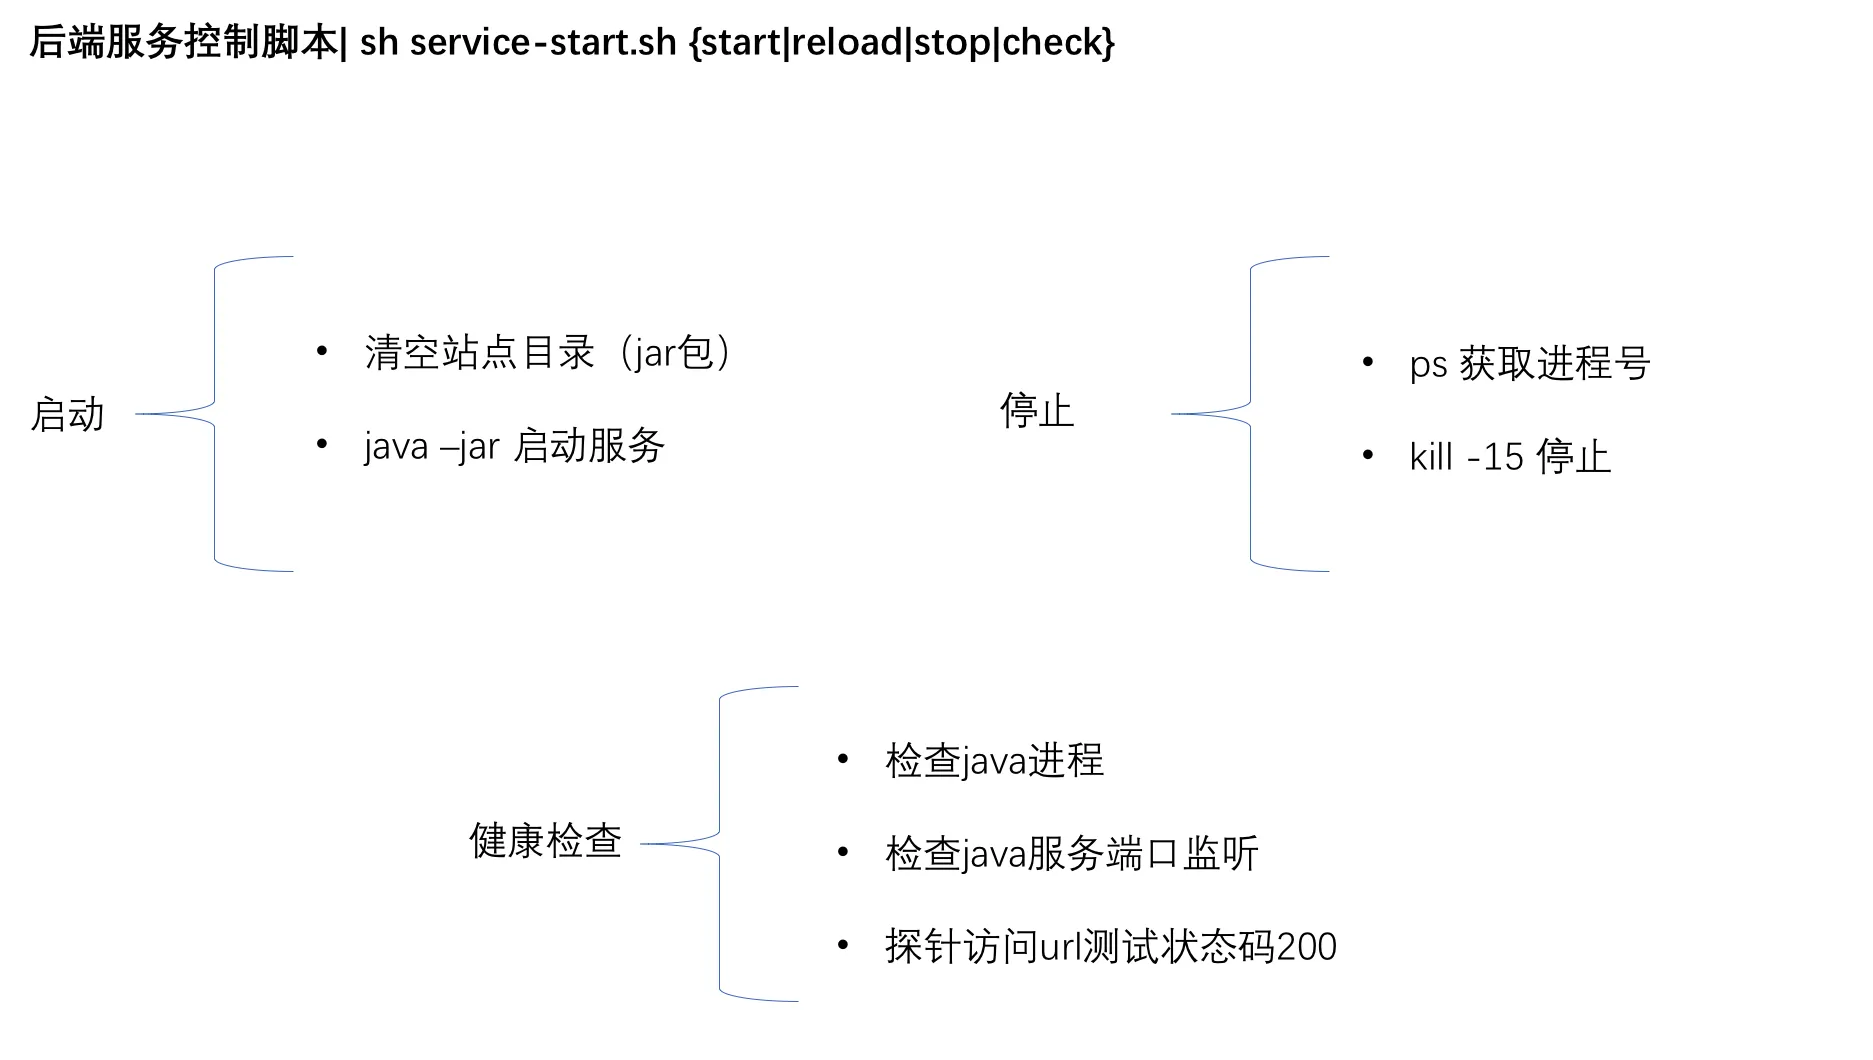
后端项目
- 复制jar包到目标目录, 使用nohup java -jar 启动服务。
- nohup java -jar app.jar >output 2>&1 &
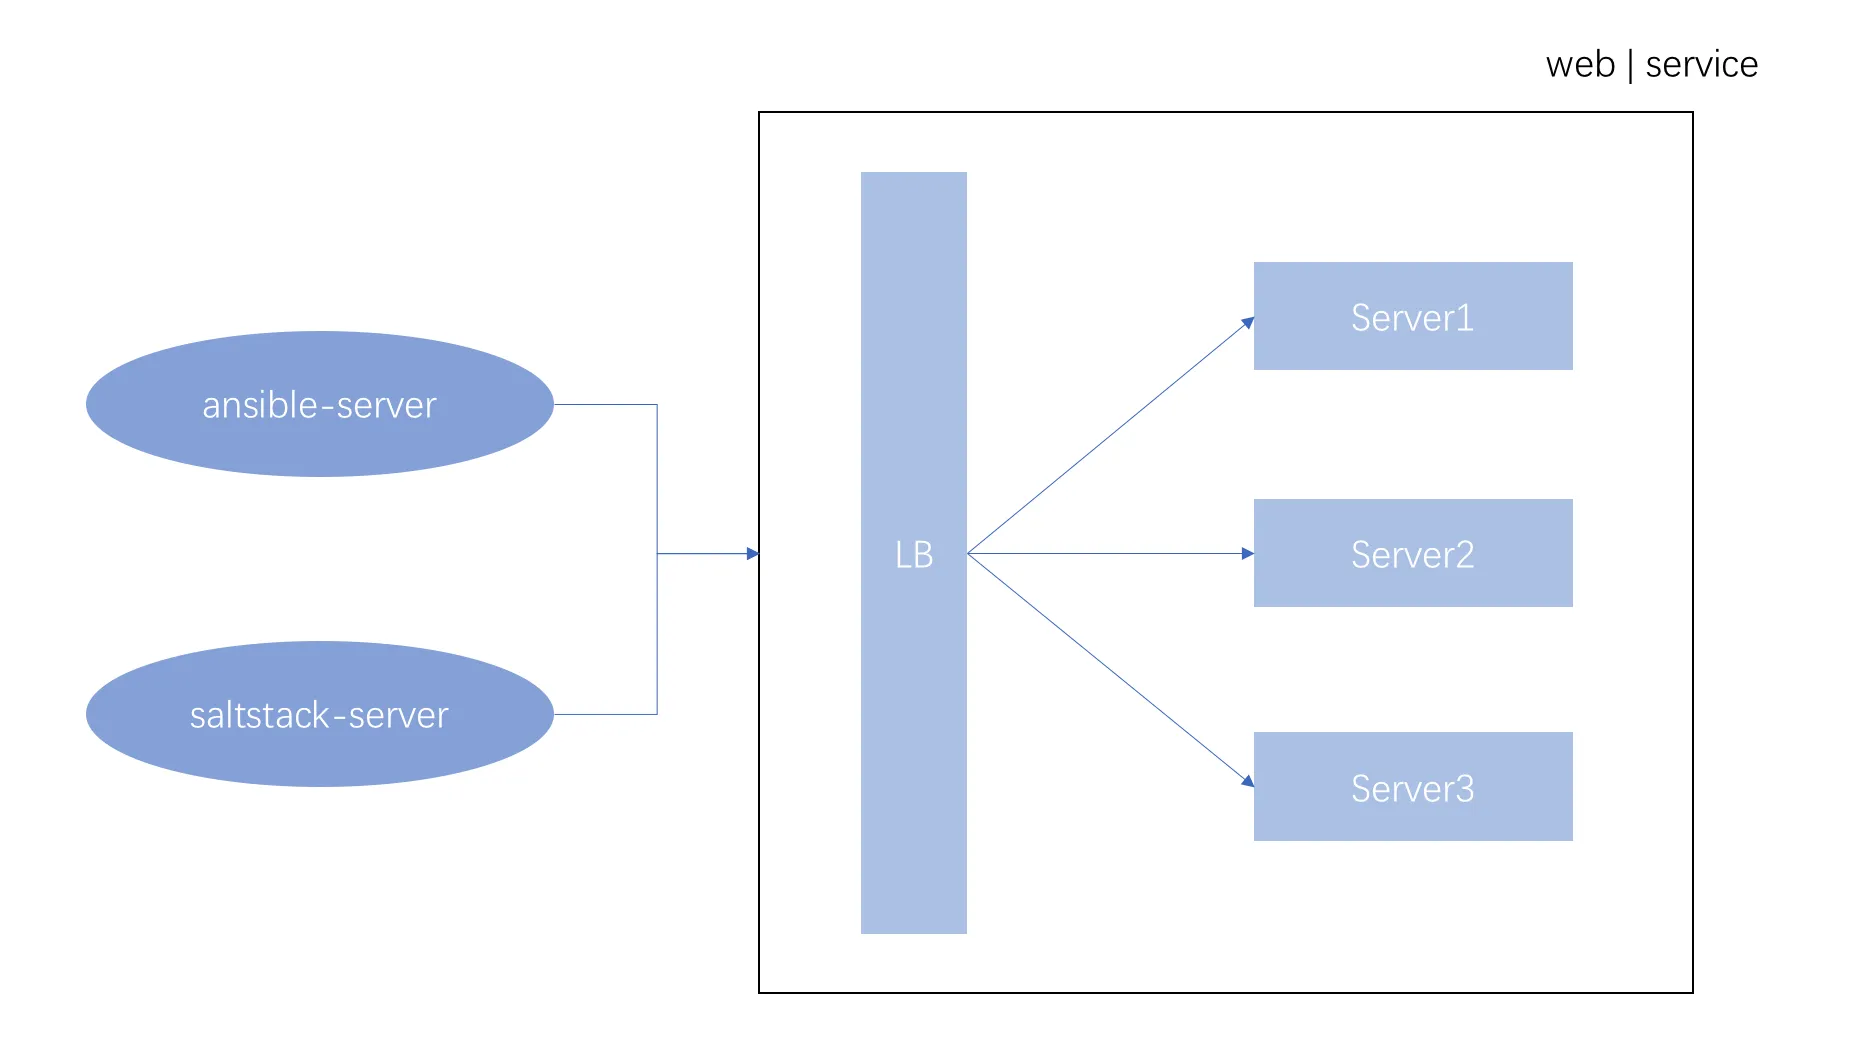
Ansible和SaltStack都是基于Python开发,Ansible只需要在一台普通的服务器上运行即可,不需要在客户端服务器上安装客户端。Ansible安装使用都很简单,而且基于上千个插件和模块,实现各种软件、平台、版本的管理,支持虚拟容器多层级的部署。
有时候会觉得Ansible比SaltStack执行效率慢,其实并不是软件本身的问题,而是由于SSH服务慢,可以通过优化SSH连接速度和使用Ansible加速模块提高效率。
3. Ansible工具应用
Ansible是一个IT自动化工具,简单易用。使用OpenSSH进行传输,可以配置系统,部署软件以及编排更高级的IT任务,例如持续部署。
官网:http://www.ansible.com/home
官网文档:http://docs.ansible.com/ansible/index.html
Github地址:https://github.com/ansible
安装环境
bash
## yum
yum --y install ansbile

## rpm
$ git clone git://github.com/ansible/ansible.git
$ cd ./ansible
$ make rpm
$ sudo rpm -Uvh ~/rpmbuild/ansible-*.noarch.rpm
Ansible如何管理主机呢?清单文件(Host Inventory)Ansible的配置文件,对主机进行分类,用来告诉ansible需要管理哪些主机。默认文件为: /etc/ansible/hosts
bash
## 定义主机
192.168.0.22
devops.server.com
jenkins.test.com


## 定义主机组
[webservers]
test.server.com
test2.server.com
命令与指令
检查主机连通性
bash
Ansible命令格式
ansible <hosts> [options]
检查ansible安装环境: ansible all -m ping -u root
执行命令: ansible all -a "/bin/echo hello world"
复制文件
bash
ansible webserver -m copy -a "src=/etc/passwd dest=/opt/passwd" yum安装软件
bash
ansible webserver -m yum -a "name=lrzsz"添加系统用户
bash
ansible webserver -m user -a "name=zhangsan password=123456"服务控制
bash
ansible webserver -m service -a "name=sshd state=started"4. SaltStack工具应用(扩展)
官方文档:https://docs.saltproject.io/en/latest/contents.html
SaltStack基于Python开发的一套C/S架构配置管理工具。使用SSL证书签发的方式进行认证管理。
可以对主机进行集中管理、文件发布、数据采集、软件包管理等配置管理操作。有利于运维人员提高工作效率,规范业务配置和操作。是常见的自动化运维利器。
Saltstack组成:
- Master是服务端,用于操作调度Minion。
- Minion是客户端,接收来自Master的指令并执行。
服务端口:
- 4505 Master和Minion的认证通信端口。(当客户端启动后,会主动向Master端注册)
- 4506 Master与Minion指令交互端口。
配置环境
一台salt-master, 多台salt-minion。
bash
sudo rpm --import https://repo.saltproject.io/py3/redhat/8/x86_64/latest/SALTSTACK-GPG-KEY.pub
curl -fsSL https://repo.saltproject.io/py3/redhat/8/x86_64/latest.repo | sudo tee /etc/yum.repos.d/salt.repo

yum install salt-master
yum install salt-minion


## master start

[root@zeyang-nuc-service yum.repos.d]# systemctl start salt-master
[root@zeyang-nuc-service yum.repos.d]# systemctl status salt-master
● salt-master.service - The Salt Master Server
   Loaded: loaded (/usr/lib/systemd/system/salt-master.service; disabled; vendor preset: disabled)
   Active: active (running) since Fri 2021-04-23 21:22:29 HKT; 5s ago
     Docs: man:salt-master(1)
           file:///usr/share/doc/salt/html/contents.html
           https://docs.saltstack.com/en/latest/contents.html
 Main PID: 169600 (salt-master)
    Tasks: 32 (limit: 203502)
   Memory: 252.0M
   CGroup: /system.slice/salt-master.service
           ├─169600 /usr/bin/python3.6 /usr/bin/salt-master
           ├─169614 /usr/bin/python3.6 /usr/bin/salt-master
           ├─169619 /usr/bin/python3.6 /usr/bin/salt-master
           ├─169622 /usr/bin/python3.6 /usr/bin/salt-master
           ├─169623 /usr/bin/python3.6 /usr/bin/salt-master
           ├─169624 /usr/bin/python3.6 /usr/bin/salt-master
           ├─169625 /usr/bin/python3.6 /usr/bin/salt-master
           ├─169632 /usr/bin/python3.6 /usr/bin/salt-master
           ├─169633 /usr/bin/python3.6 /usr/bin/salt-master
           ├─169634 /usr/bin/python3.6 /usr/bin/salt-master
           ├─169635 /usr/bin/python3.6 /usr/bin/salt-master
           ├─169636 /usr/bin/python3.6 /usr/bin/salt-master
           └─169637 /usr/bin/python3.6 /usr/bin/salt-master

Apr 23 21:22:28 zeyang-nuc-service systemd[1]: Starting The Salt Master Server...
Apr 23 21:22:29 zeyang-nuc-service systemd[1]: Started The Salt Master Server.
[root@zeyang-nuc-service yum.repos.d]# netstat -anlpt | grep 450
tcp        0      0 0.0.0.0:4505            0.0.0.0:*               LISTEN      169619/python3.6
tcp        0      0 0.0.0.0:4506            0.0.0.0:*               LISTEN      169625/python3.6
salt-minion
bash
[root@master ~]# vi /etc/salt/minion
master: 192.168.1.200

[root@master ~]# systemctl start salt-minion
[root@master ~]# systemctl status salt-minion
● salt-minion.service - The Salt Minion
   Loaded: loaded (/usr/lib/systemd/system/salt-minion.service; disabled; vendor preset: disabled)
   Active: active (running) since Fri 2021-04-23 09:38:59 EDT; 6s ago
     Docs: man:salt-minion(1)
           file:///usr/share/doc/salt/html/contents.html
           https://docs.saltstack.com/en/latest/contents.html
 Main PID: 33505 (salt-minion)
    Tasks: 8 (limit: 24986)
   Memory: 75.6M
   CGroup: /system.slice/salt-minion.service
           ├─33505 /usr/bin/python3.6 /usr/bin/salt-minion
           ├─33510 /usr/bin/python3.6 /usr/bin/salt-minion
           └─33514 /usr/bin/python3.6 /usr/bin/salt-minion

4月 23 09:38:58 master.zy.com systemd[1]: Starting The Salt Minion...
4月 23 09:38:59 master.zy.com systemd[1]: Started The Salt Minion.
4月 23 09:39:00 master.zy.com salt-minion[33505]: [ERROR   ] The Salt Master has cached the public key for t>
salt-master 认证minion
bash
[root@zeyang-nuc-service yum.repos.d]# salt-key -L
Accepted Keys:
zeyang-nuc-service
Denied Keys:
Unaccepted Keys:
master.zy.com
Rejected Keys:
[root@zeyang-nuc-service yum.repos.d]# salt-key -a master.zy.com
The following keys are going to be accepted:
Unaccepted Keys:
master.zy.com
Proceed? [n/Y] y
Key for minion master.zy.com accepted.
[root@zeyang-nuc-service yum.repos.d]# salt-key -L
Accepted Keys:
master.zy.com
zeyang-nuc-service
Denied Keys:
Unaccepted Keys:
Rejected Keys:
salt-api配置(扩展)
bash
useradd saltapi
passwd saltapi   ## 设置密码 123456


yum -y install salt-api

vi /etc/salt/master.d/api.conf
external_auth:
  pam:
    saltapi:
      - .*
      - '@wheel'
      - '@runner'

rest_cherrypy:
  port: 8000
  disable_ssl: true
  host: 0.0.0.0


systemctl restart salt-master
systemctl restart salt-api


## API(success)
[root@zeyang-nuc-service master.d]# curl -k http://127.0.0.1:8000/login -H "Accept: application/x-yaml" -d username='saltapi' -d password='123456' -d eauth='pam'
return:
- eauth: pam
  expire: 1619230016.3118818
  perms:
  - .*
  - '@wheel'
  - '@runner'
  start: 1619186816.3118815
  token: 01049ff981bc7dae25fdd27875e09afd6cd34989
  user: saltapi
操作指令
bash
## 模块使用
salt '*' sys.doc cmd.run

## 分发文件
salt-cp 'node01.zy.com' /etc/hosts /tmp/hosts
salt-cp -L "node01.zy.com,node02.zy.com" /etc/hosts /tmp/hosts

## 执行命令
salt '*' cmd.run "ls -l | awk '/foo/{print \\$2}'"
5. 应用发布与回滚策略
蓝绿发布
环境存在两个版本,蓝版本和绿版本同时存在,部署新版本然后进行测试,将流量切到新版本,最终实际运行的只有一个版本(蓝/绿)。好处是无需停机,并且发布风险较小。
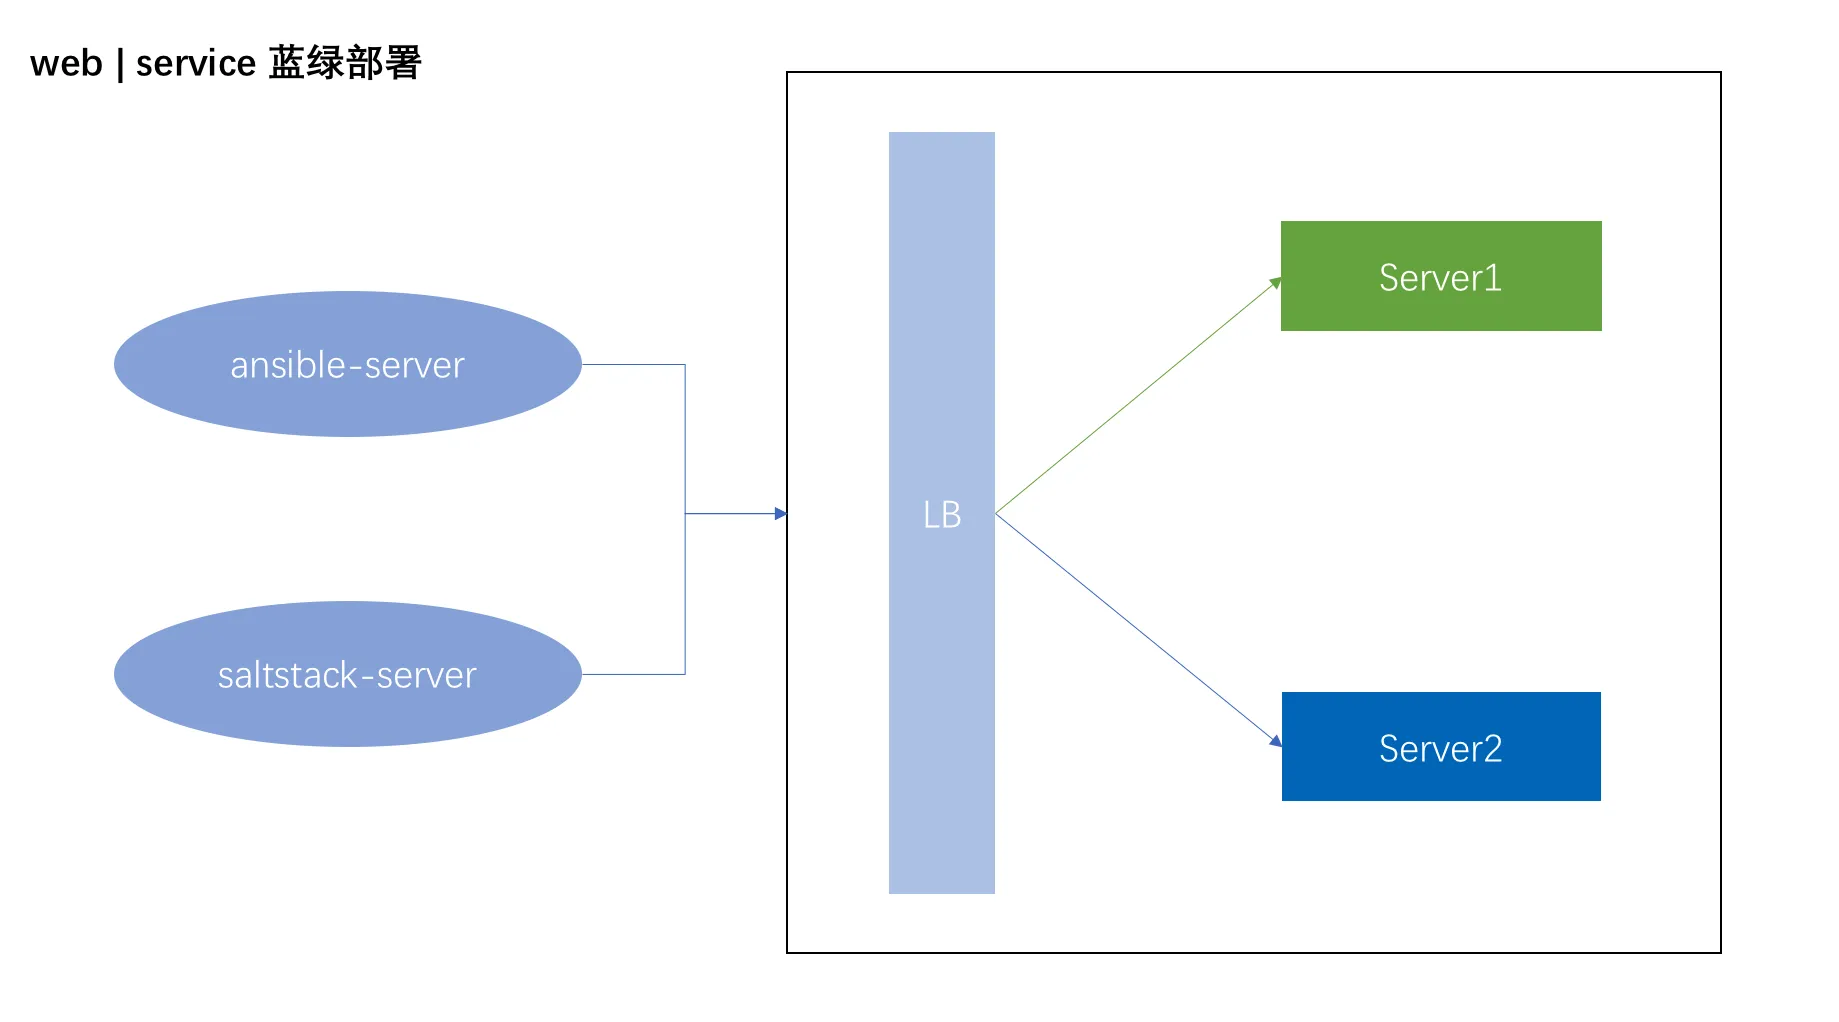
nginx upstream模块实现:
bash
upstream webservers {
    server 192.168.1.253:8099 weight=100;
    server 192.168.1.252:8099 down;
}

server {
      listen       8017;
      location / {
        proxy_pass http://webservers;
      }
}

nginx -s reload
灰度发布
将发行版发布到一部分用户或服务器的一种模式。这个想法是首先将更改部署到一小部分服务器,进行测试,然后将更改推广到其余服务器。一旦通过所有运行状况检查,当没有问题时,所有的客户将被路由到该应用程序的新版本,而旧版本将被删除。

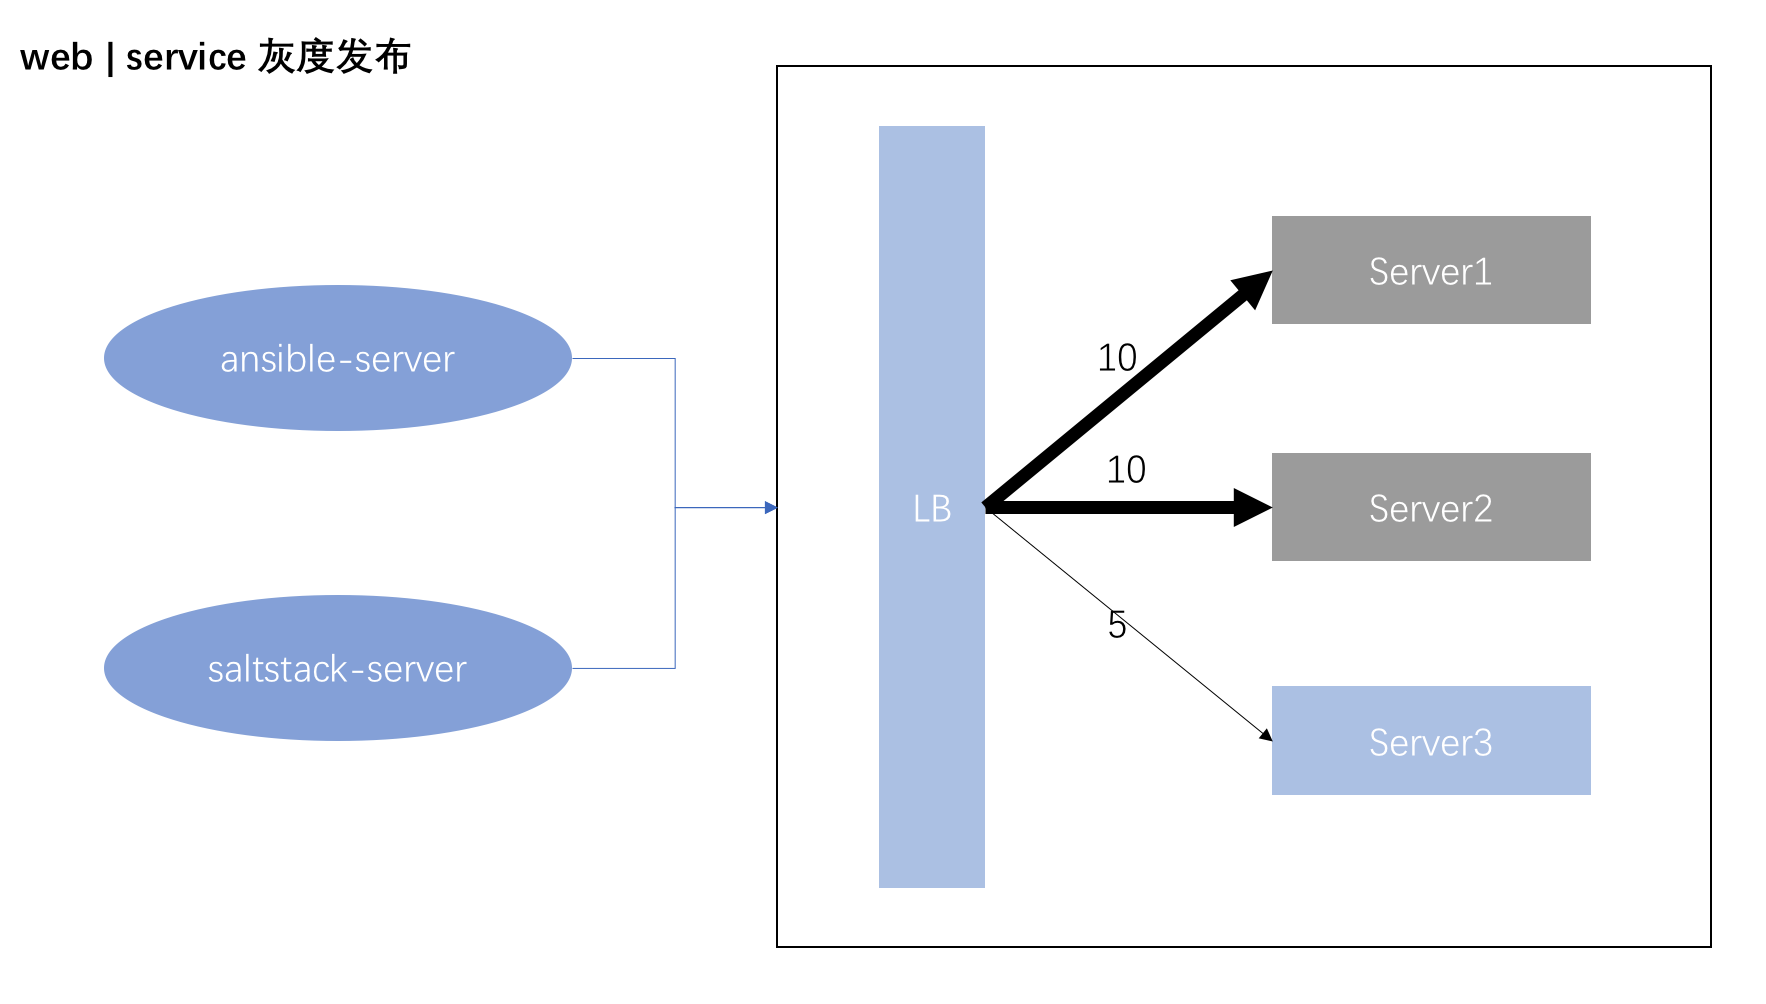
nginx 权重模拟:
bash
upstream webservers {
server 192.168.1.223:8099 weight=100;
server 192.168.1.222:8099 weight=100;
server 192.168.1.221:8099 weight=100;
}
server {
listen 8017;
location / {
proxy_pass http://webservers;
}
}
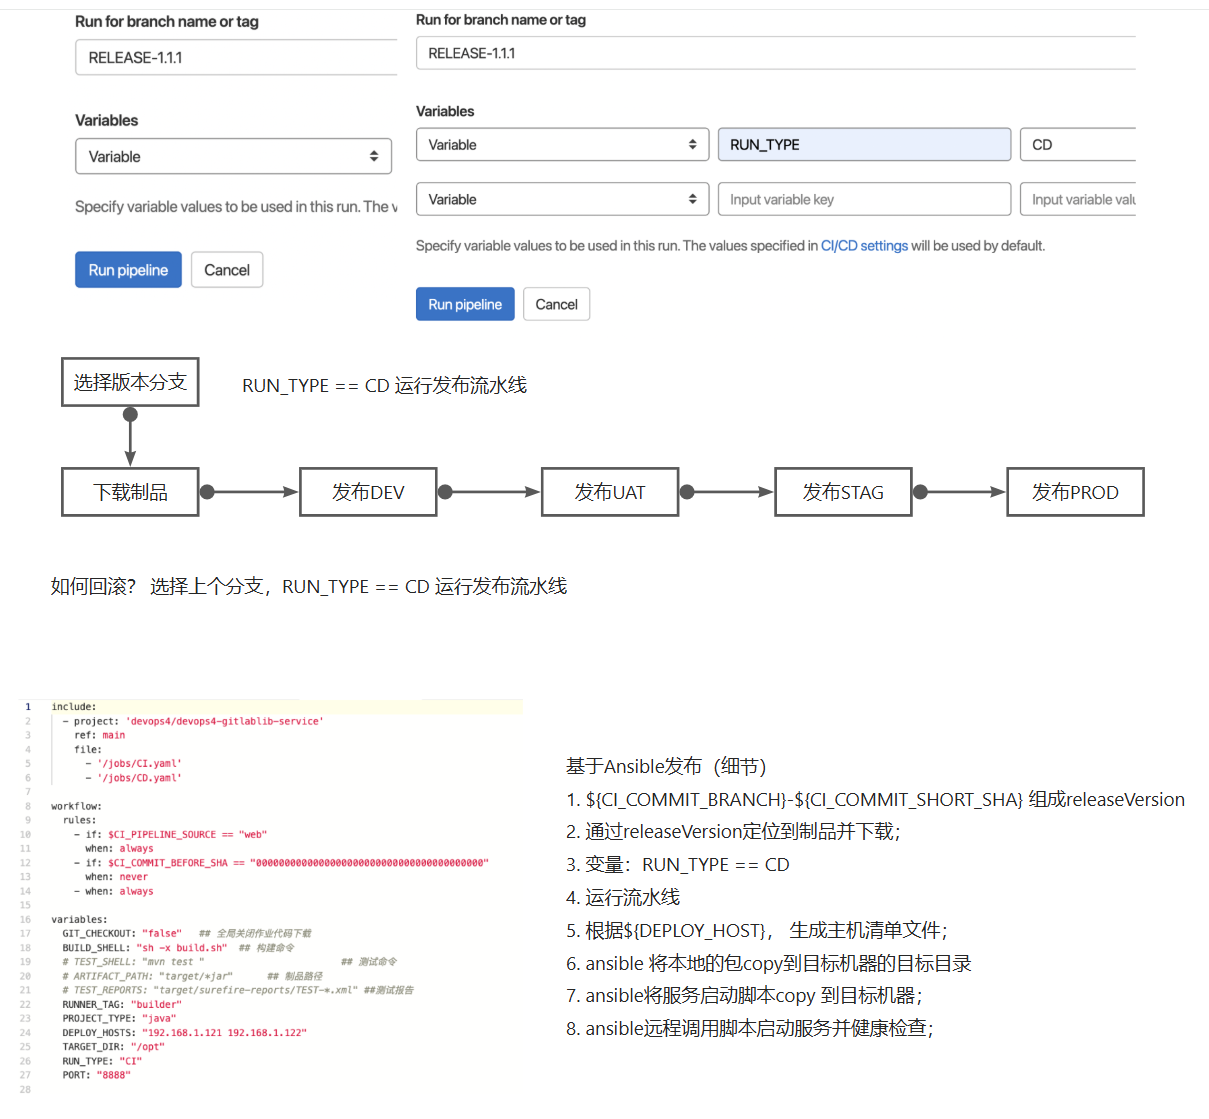
nginx -s reload版本回滚
- 版本一直升级,则无需回滚。
- 选择旧版本文件,进行发布。
三、Jenkins流水线
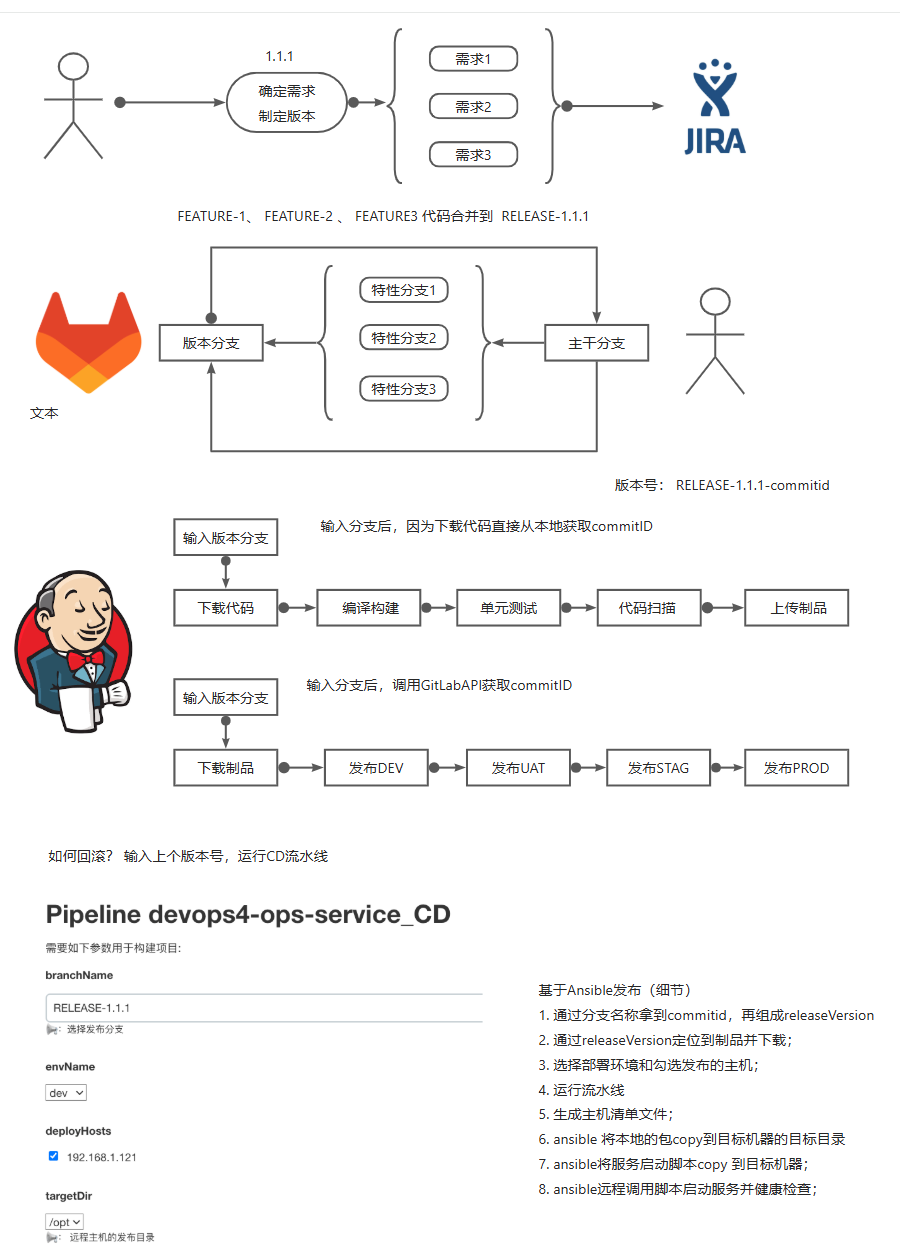
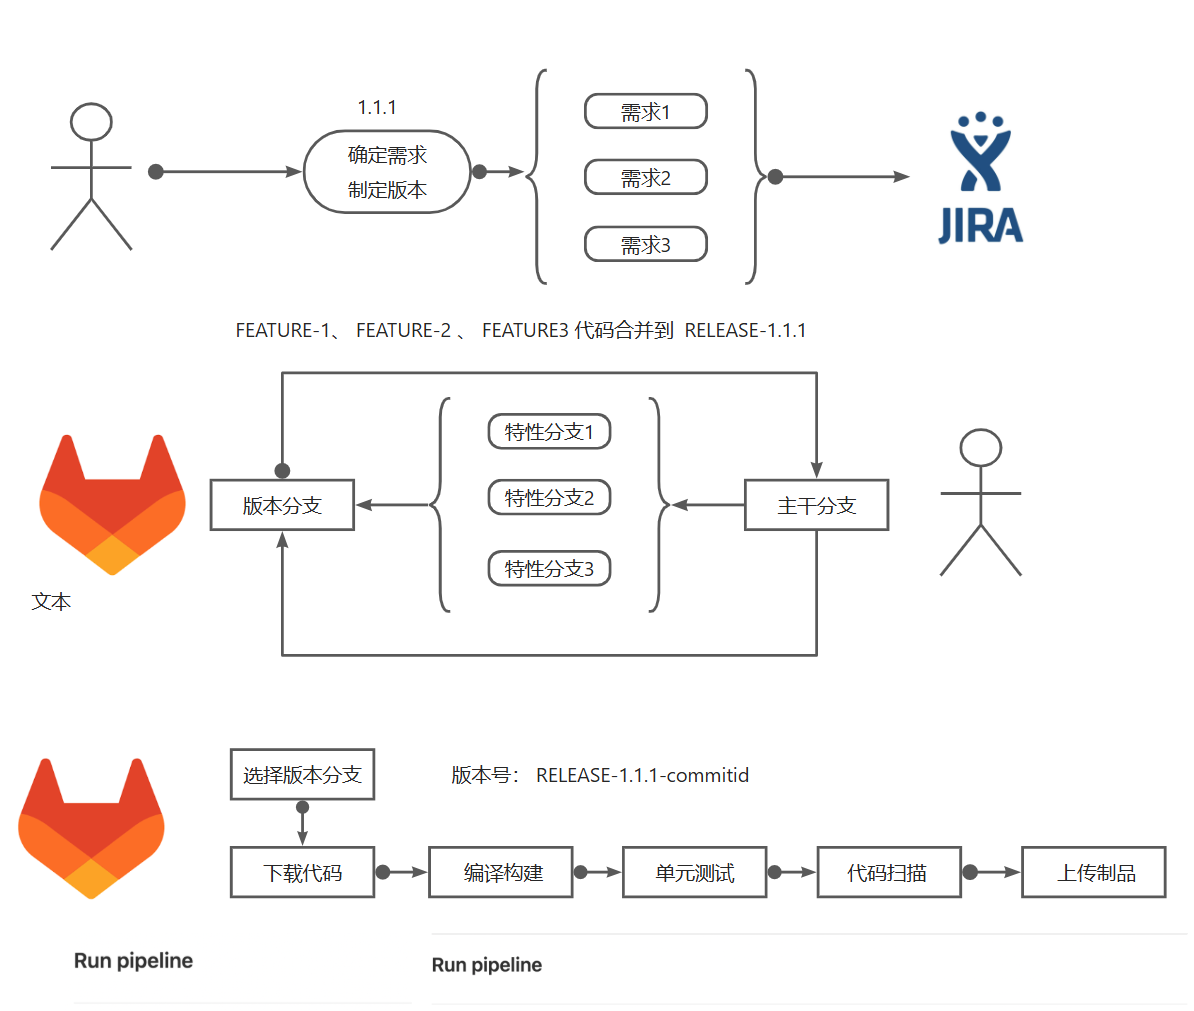
1. CI流水线的设计

此次项目我们使用了jenkins共享库来完成最佳实践。 jenkinsfile第一行就是要导入我们的共享库。@Library("mylib@main") _
我们在共享库中编写了一些特定的处理类: 在Jenkinsfile中导入这些类
bash
@Library("devops5") _
//Lib
def build = new org.devops.Build()
def myTool = new org.devops.Tools()
def sonar = new org.devops.Sonar()
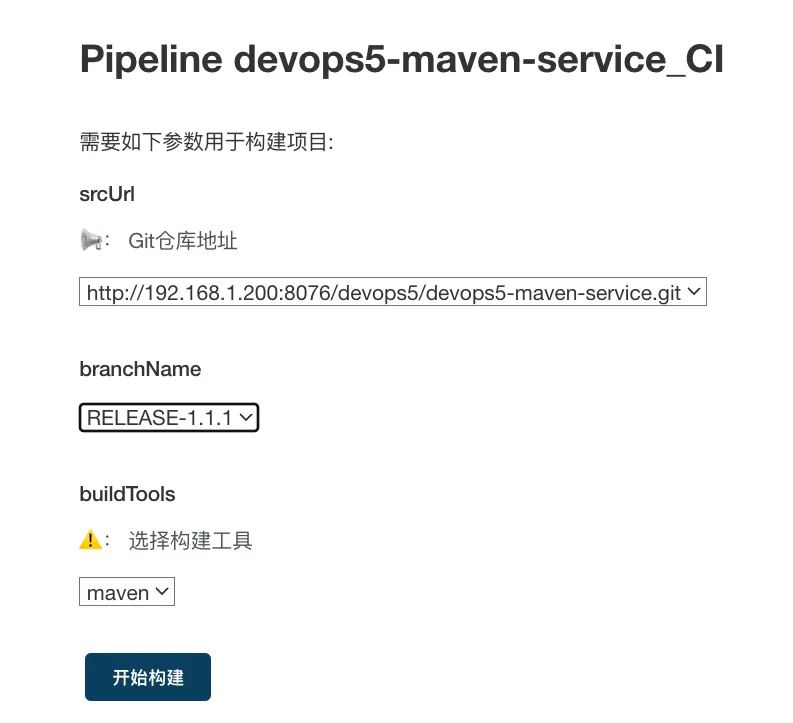
def art = new org.devops.Artifact() 有些参数需要用户在Jenkins页面构建前选择的:
- 用户需要在jenkins作业中配置好要构建的代码仓库的地址。(一般不需要改, 可以使用选项参数)
- 每次构建需要输入此代码库要构建的代码分支。 (字符串参数)
- 选择本次构建要使用的构建工具(选项参数maven、ant、gradle、npm)
流水线运行信息
此条流水线运行在标签为"build"的节点上, 跳过默认的checkout步骤。
bash
agent { label  "build" }
options {
    skipDefaultCheckout true
}
阶段与节点

下载代码
bash
stage("CheckOut"){
    steps{
        script{
            //下载代码
            currentBuild.description = "branch: ${env.branchName}"
            myTool.GetCode("${env.branchName}", "${env.srcUrl}")
        }
    }
}
构建代码
bash
stage("Build"){
    steps{
        script{
            // 构建阶段
            build.Build()
        }
    }
}
单元测试
bash
stage("UnitTest"){
    when {
        environment name: 'skipUnitTest' , value: 'false'
    }
    steps{
        script{
            // 单元测试
            build.UnitTest()
        }
    }
}
代码扫描
bash
stage("CodeScan"){
    steps{
        script{
            // 代码扫描
            env.commitID = myTool.GetCommitID()
            sonar.CodeScan()
        }
    }
}
上传制品
bash
stage("PushArtifacts"){
    steps{
        script{
            // 上传制品
            repoId ="devops5"
            buName = "${JOB_NAME}".split('/')[0]  // devops5
            appName = "${JOB_NAME}".split('_')[0].split('/')[-1] //devops5-maven-service
            appVersion = "${env.branchName}-${env.commitID[0..7]}"
            targetDir="${buName}/${appName}/${appVersion}"  //devops5/devops5-maven-service/xxx-xxx
            pkgPath = "target"

            // 通过pom文件获取包名称
            POM = readMavenPom file: 'pom.xml'
            env.artifactId = "${POM.artifactId}"
            env.packaging = "${POM.packaging}"
            env.groupId = "${POM.groupId}"
            env.art_version = "${POM.version}"
            pkgName = "${env.artifactId}-${env.art_version}.${env.packaging}"
            newPkgName = "${appName}-${appVersion}.${env.packaging}"

            sh " mv ${pkgPath}/${pkgName} ${pkgPath}/${newPkgName} "

            // push
            art.PushNexusArtifact(repoId, targetDir, pkgPath, newPkgName)
        }
    }
}
2. CD流水线的设计
此次CD实践项目我们使用了jenkins共享库来完成最佳实践。 jenkinsfile第一行就是要导入我们的共享库。@Library("mylib@main") _
我们在共享库中编写了一些特定的处理类:
bash
@Library("devops5") _

//Lib
def gitTool  = new org.devops.Gitlab()
def art    = new org.devops.Artifact()
流水线运行信息
此条流水线运行在标签为"build"的节点上, 跳过默认的checkout步骤。
bash
agent { label  "build" }
options {
    skipDefaultCheckout true
}
阶段与节点

下载制品
bash
stage("PullArtifact"){
steps{
script{
//下载制品
currentBuild.description = "branch: ${env.branchName}"
//获取项目ID
// devops5/devops5-maven-service_CD
groupName = "${JOB_NAME}".split('/')[0] //devops5
projectName = "${JOB_NAME}".split('_')[0].split('/')[-1] //devops5-maven-service
projectID = gitTool.GetProjectID(projectName, groupName)
println(projectID)
//获取分支的CommitID
env.commitID = gitTool.GetBranchCommitID(projectID, "${env.branchName}")
println("${env.commitID}")
env.releaseVersion = "${env.branchName}-${env.commitID}"
println("releaseversion: ${env.releaseVersion}")
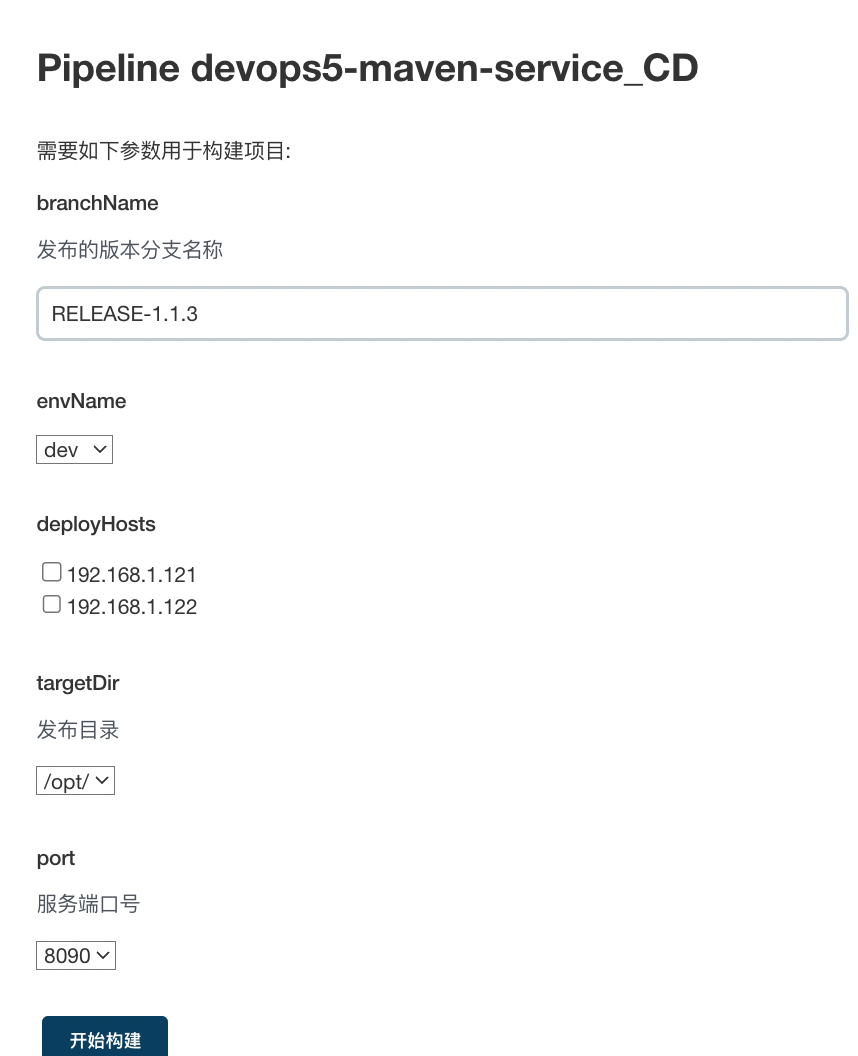
//http://192.168.1.200:8081/repository/devops5/devops5/devops5-maven-service/RELEASE-1.1.3-7688a43f/devops5-maven-service-RELEASE-1.1.3-7688a43f.jar
pkgUrl = "http://192.168.1.200:8081/repository/devops5/${groupName}/${projectName}/${env.releaseVersion}/${projectName}-${env.releaseVersion}.jar"
sh " wget ${pkgUrl}; ls -l "
env.pkgName = "${projectName}-${env.releaseVersion}.jar"
env.projectName = projectName
}
}
}发布主机
bash
stage("AnsibleDeploy"){
    steps{
        script {
            //发布
            art.AnsibleDeploy()
        }
    }
}
回滚
bash
stage("RollBack"){
    input {
        message "是否进行回滚?"
        ok "Yes"
        submitter ""
        parameters {
            choice choices: ['NO','YES'], name: 'OPS'
        }
    }
    steps {
        echo "OPS  ${OPS}, doing......."

        script{
            if ("${OPS}" == "YES"){
                art.AnsibleRollBack()
            }
        }

    }
}
3.流水线调试问题
bash
## SoanrQube的项目名称不能带有特殊字符'/'
{"errors":[{"msg":"Malformed key for Project: 'anyops/anyops-devops-service'. Allowed characters are alphanumeric, '-', '_', '.' and ':', with at least one non-digit."}]}
## 设置质量规则时,前端项目的language应该是js或者ts, 而不是npm。
{"errors":[{"msg":"Value of parameter 'language' (npm) must be one of: [java, go, js, ts]"}]}
## 在Sonarqube中找不到buildTools方法, 最后发现没有传递进去。
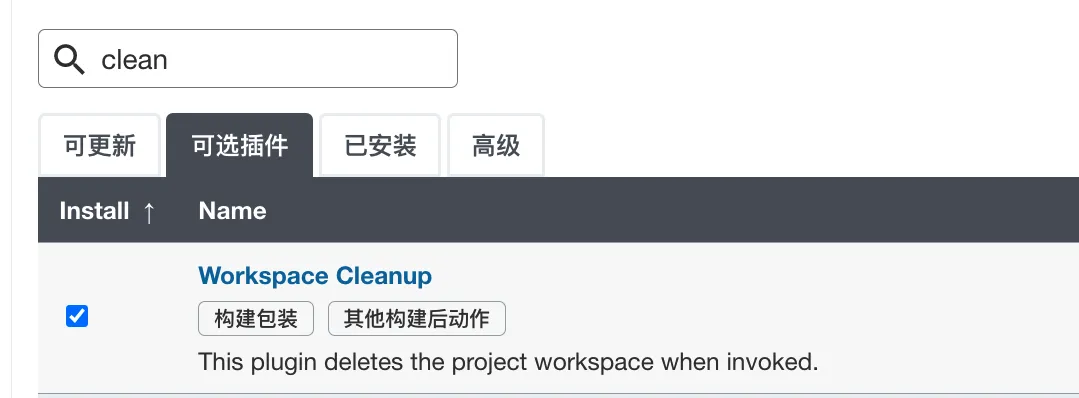
No such property: buildTools for class: org.devops.sonarqube扩展: 如何清除工作目录? 安装Workspace Cleanup插件。在Pipeline 的Post中的always添加CleanWs()
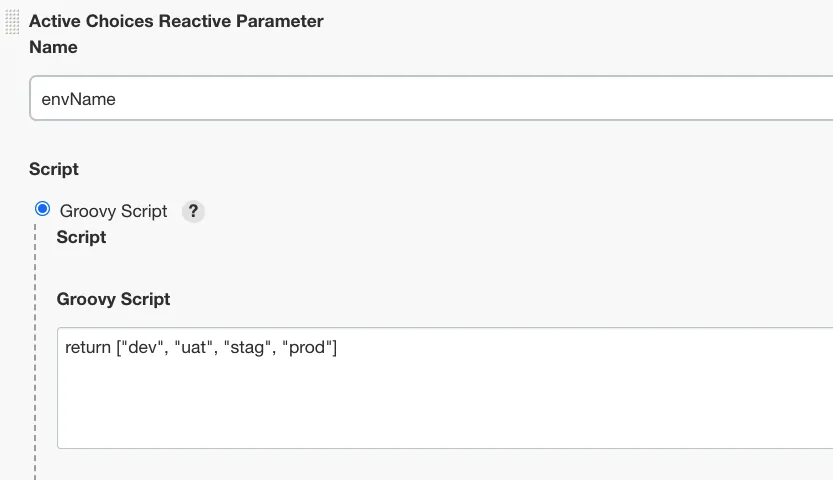
4-参数动态获取实践
需要安装active choices插件重启Jenkins服务器后再操作。
根据不同的环境带出不同的机器
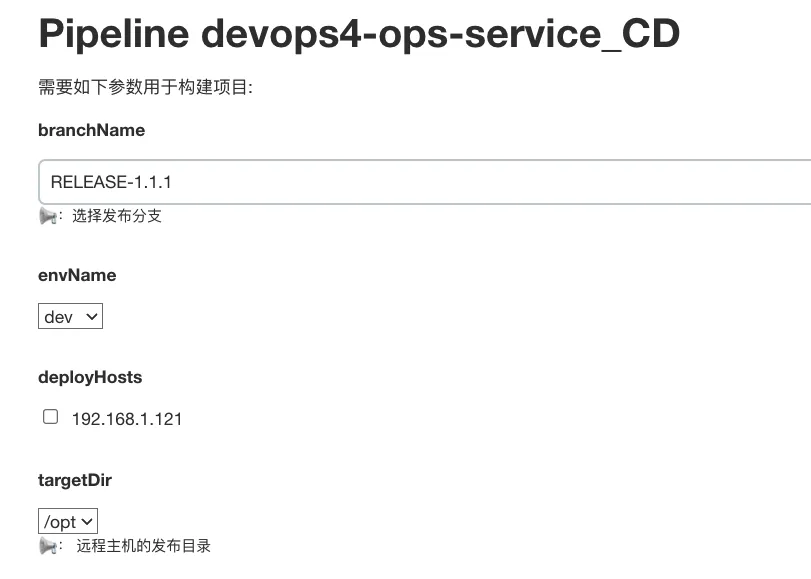
envName参数设置
deployHosts参数设置
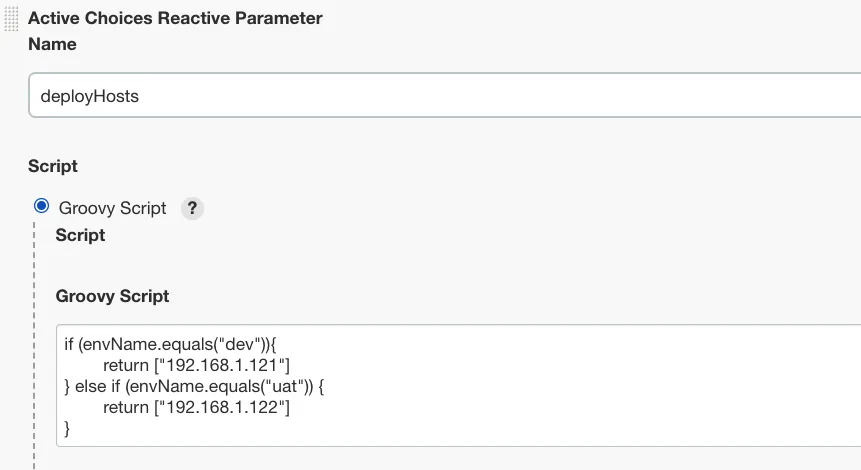
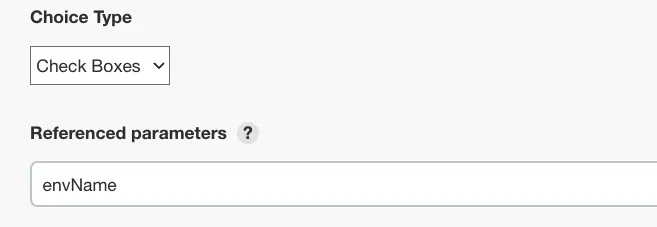
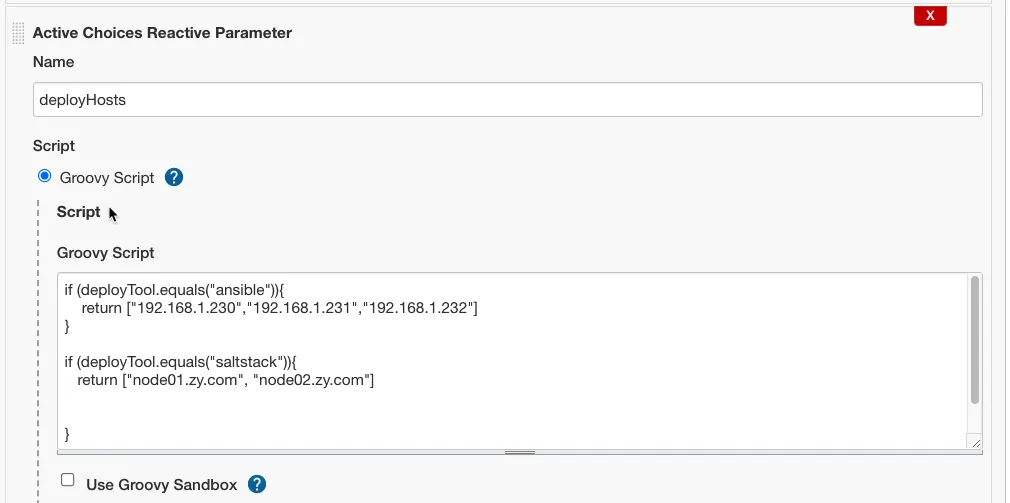
根据不同发布工具,动态展示主机参数。
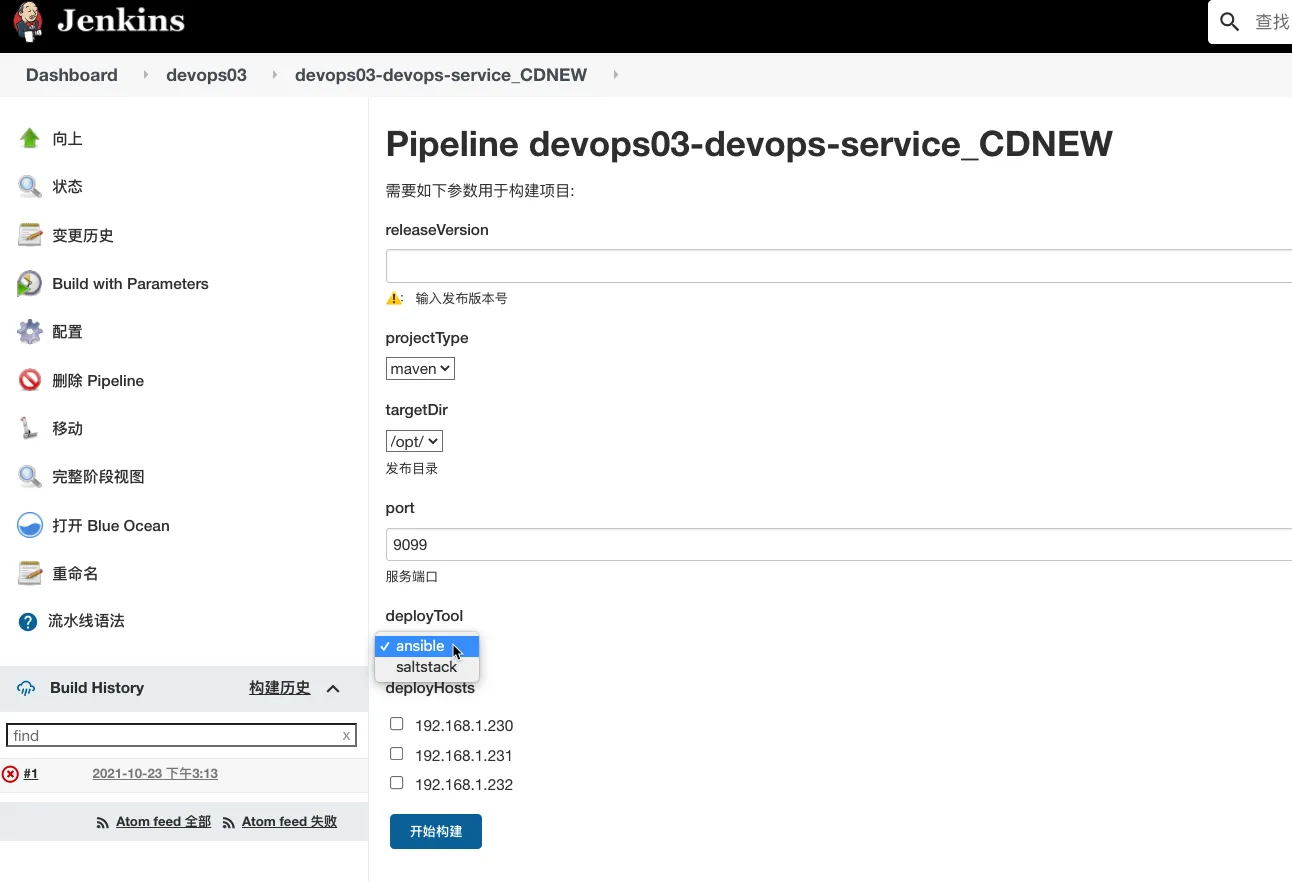
定义发布工具参数
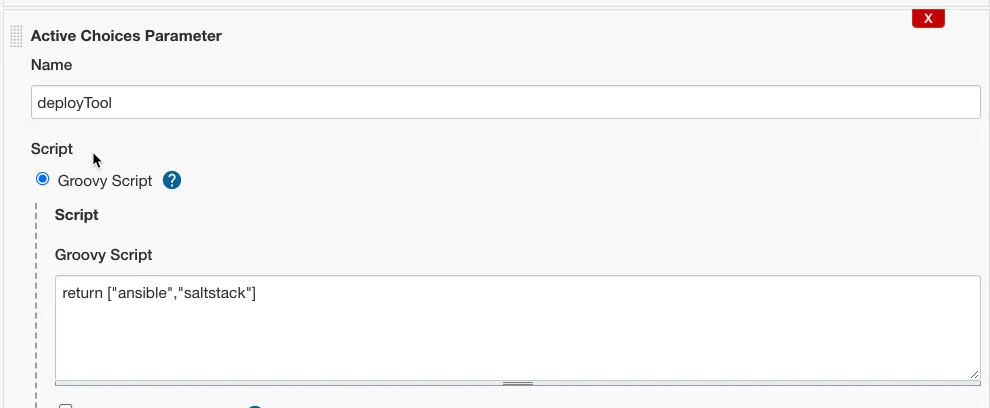
bash
return ["ansible", "saltstack"]单选类型

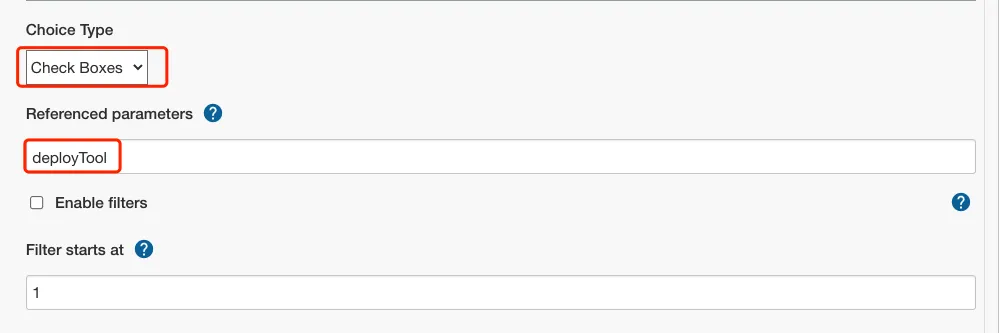
定义发布主机
选择关联的参数,多个参数用逗号分割
5-GitLab流水线(扩展)